#The green liquid is highlighter fyi
Photo
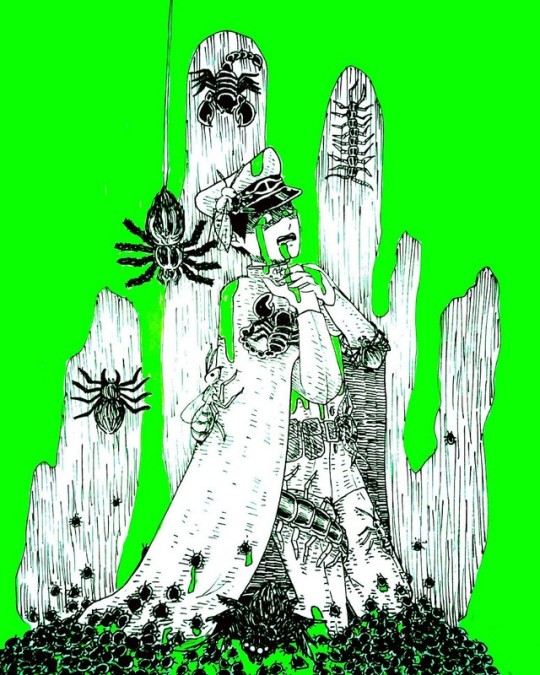
inktober day 3 “poison”
Drawing insects is very exhausting lol
#gokuto jihen#matsumoto#matsumoto (gokuto jihen)#underworld capital incident#my art#inktober#inktober2017#The green liquid is highlighter fyi
42 notes
·
View notes
Text
Everyday Makeup Recs and Tips
So before you even start you want to make sure you have a good skincare routine. I’m not an esthetician, so I’m not going to make recommendations for you as to what to use because everyone’s skin is different, but that being said here are some basics. Always wash your face twice a day even if you don’t wear makeup; once in the morning and then at night. I personally only cleanse my face once a day, at night after I take my makeup off. I remove my makeup and then use a Clairsonic with my cleanser. In the morning, I only wash my face with water as too much cleanser tends to dry out my skin. I do use Thayers witch hazel both morning and night as well as my Peter Thomas Roth Potent C Vitamin Eye Cream. I moisturizer day and night as well. I use a moisturizer with an SPF in it for day, but if you know you’re going to be in the sun for an extended period of time you may want to use a separate sunscreen as well.
Now on to makeup…haha! I go back and forth about what I do first, but we’ll start with eyes in case you have fall out. I have a ton of different products, but the eyeshadows I love are from MAC, Lorac (Which creates a ton of fall out), KKW Beauty, and Anastasia of Beverly Hills. I’m not a fan of Urban Decay, I think all their shades are the same. If you’re looking for a neutral look, I love the Lorac LUX Diamond palette, $39 for 20 shades or MAC Amber Times Nine, which is nine shades for $32 but their shades last a bit longer than Lorac. I always prep my eyelid with concealer, MAC paint pot in Painterly or Tarte 12-hour Eye Primer. This will make your eyeshadow last longer. For this example, I’ll use the Lorac colors. I always put a base color like Carat on first all over the lid, so that I have a neutral base to start. I then take a color like Grand and go into the crease, sweeping it from the outer to the inner crease, using a tapered blending brush. All my brushes are MAC but really any brushes will do. I blend that up just slightly above the crease so that there is not a stark line (Blending is key). Then I go back in with a color like Lavish in the deep crease, only blending it midway, this color I will not blend up, but more in a v down to the outer corner or lid. (FYI I always tap the excess off the brush before going to apply it to the lid). I’ll take a color like Exclusive and do the outer crease/lid in that v as well darkening that look. (Honestly I’ve never written this out, so I may look for a couple pics to add in. I’m much better at demonstration.) Once everything is very blended, I’ll take the tip of my finger and go into a color like VIP or Crystal (This color is not orange like shown online), and start on the inner corner and tap that color in, then I’ll take a clean blending brush and blend it into the middle and outer lid. Lastly, I’ll take a color like Diamonds and sweep it across the brow bone lightly. So you should get a look similar to this, minus the eyeliner:
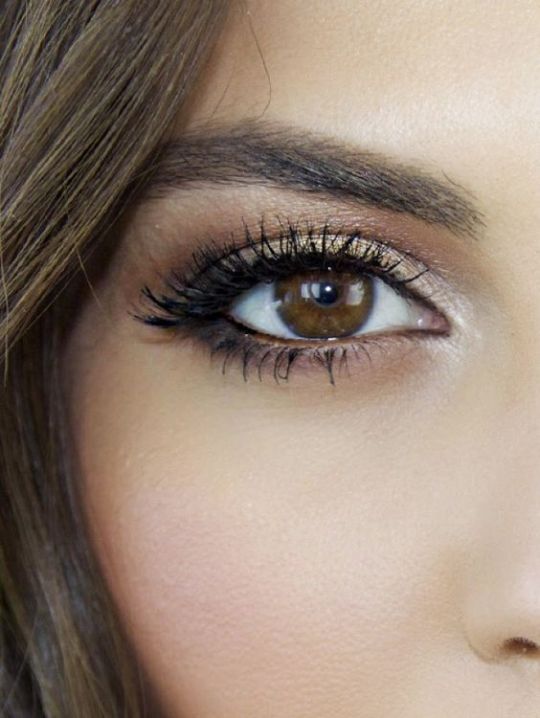
(not my photo via bydrie.com but the link is old and the pic is no longer there. I’ve had it saved)
If I want it to be dramatic, I’ll line both the eye and the waterline on the lid (like the photo is). Yes the waterline is a bitch to line. I really love Marc Jacob Highliner Gel crayon but it’s $26 dollars, so that’s a bit steep I know, but it really goes on nice and stays on. Personally, certain eyeliners tend to wear funny on me, so I use this on my bottom waterline and then smudge it in and it stays all day. I have used Maybelline EyeStudio Master Precise All Day Liquid Eyeliner as well on the upper lid and I do like this and the way it wears; I also like to use this if I do a winged eye as well (which is rare and I don’t do on an everyday look).
Let’s move on to foundation. Doing your eyes first gives a time for your moisturizer to sink into your sink, which I like; but that’s just me. If you have and blemishes, roscia or dark spots you’re looking to cover, use a color corrector. Sephora $14 (and have been on special for $7) has some great easily blendable ones. Green for red spots and peach to cover the dark. I recommend only doing these if you’re not using an airbrush foundation. Apply them before your foundation and just blend them out lightly, they help neutralize the skin. I use a beauty blender to blend both this and the foundation in. My go to foundations, Tarte Face Tape, MAC’s Studio Fix Fluid (a great dupe that I have used for MAC in a pinch is Revlon Colorstay if you’re looking for a drugstore brand)
I follow up with my undereye concealer, my absolute must have on this is Tarte Shape Tape concealer. I usually use it in a shade lighter than my foundation to brighten my eye. I blend it out with a small beauty blender (obviously this is the cheaper version at Walmart or Target because I throw this away after a month, kind of like a loofah).
If you like to contour, now’s the time. A cheap one that I like is ELF Contour Palette. If you’re a beginner, start off with a powder it’s easier to use, but feel free to try the cream. My key advice, you are not a Kardashian doing a photo shoot, so do not leave this huge line separating your contour on your face. Blend that shit out, you’ll just look fake if you don’t.
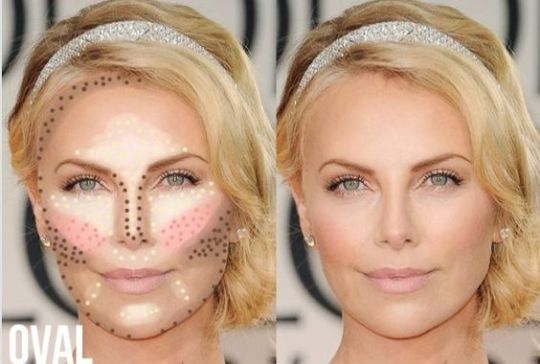
(Found this pic on google and this is a great example, minus the tip of the nose contour.)
Set the look with a setting powder, this is a translucent loose powder so it won’t make you look caked on or fake like pressed powder does. ELF makes a very inexpensive one $6, it’s their high definition powder. I just use a face brush for this. I’ll then add some blush. I love, love, love NARS orgasm, it literally goes with everything. A great dupe for this, but is hard to find is Mary Kay Shy Blush. Apply to the apples of your cheeks for that extra glow. I don’t recommend a highlighter for an everyday look. I’ll also use a setting spray like MAC fix+ or Tarte or Morphe, you can literally use anyone that you like. I think I have 4 on my counter right now…haha. I do this before my mascara because I always blink and that shit isn’t dry and then it’s everywhere.
So now mascara, I’m going to just take this from my bridal tips:
Mascara, I recommend waterproof if you’re a crier like me...lol. I’m a fan of Tarte’s Lights, Camera, Splashes. I usually prep with Lancome’s CIL Booster XL Enhancing Lash Primer, it helps keep my lashes separated, but if you don’t want to spend the money on that, take a little of that translucent powder I talked about earlier, coat an old mascara wand, or a disposable one with the powder and brush it onto your lashes before adding mascara. I’ve done this little trick numerous time and it works like a charm. You can also wear fake lashes, if you don’t have a pair that you like, Adrell has great ones that look natural and so does Eylure. I always use Duo lash glue when I wear them as well.
Another mascara I like is Maybelline Lash Sensational. I feel like it doesn’t clump and wears very well. If you don’t like your lashes and are looking to get them fuller and longer I totally recommend in getting Grande Lash MD Lash Enhancing Serum ($65). It’s a commitment, you need to put it on every night in the beginning but it does work. Also the tiny tube will last about 3 to 4 months.
Phew I think that’s it for now. If you have any questions, feel free to send them to inbox or DM me. I love sharing tips!!!
6 notes
·
View notes
Text
How To Use Every Makeup Brush Like a Pro
Seriously, how in the heck do we use all these makeup brushes? And do we really need five different brushes to apply foundation? In short, yes (we’ll explain). We love being hypnotized by watching MUAs and beauty vloggers do their thing, but we’re lost after the second makeup brush…and do we even own a stippling brush?
So rather than buying brushes in bulk only to use them incorrectly, or not at all, Beauty Banter talked to some pros so that we can finally figure out the correct way to use the endless variety of brushes. If you really want to nail #flawless makeup application, you’ll want to take notes.
Put your glasses on, consider this Makeup Brushes 101:
Synthetic vs. Natural – Generally speaking, synthetic refers to man-made materials like nylon, and natural brushes are, well, you know, natural, made out of a variety of animal hairs (i.e. pony, sable, squirrel, badger, goat). Synthetic brushes are best for liquid and cream products, like foundation, and natural brushes are meant for powders, says Min Min Ma, celebrity MUA who’s painted the girls from Girls. MUAs agree, since synthetic brushes have a tighter bristle gathering, they’re ideal for precise application and perfect for liquid products because they don’t have a cuticle, so product won’t get trapped in between the bristles. Natural hair brushes have a softer “free-flowing sweep” that’s great for blending and softening edges, says MUA Jenai Chin, who’s responsible for that Kendall Jenner snake tattoo, so they’re best for powder products. An important rule of thumb from world-renowned MUA and founder of Trish McEvoy Beauty, Trish McEvoy says: “softer, longer, and less densely packed brushes pick up less makeup and therefore give a wash of color, whereas shorter, more densely packed brushes give a more intensely pigmented application.”
Foundation brush – There are different types of brushes meant for foundation, and the one to use depends on the look you’re going for. Also, keep in mind liquid foundation versus cream and powder formulas…yep, there are brushes meant for every texture.
Flat: Looks like a good old-fashioned paint brush, this brush is the most commonly used for applying liquid foundation onto the face, usually “painted” on and then blended in with a sponge or blending brush. It’s the most versatile of brushes, says Trish, because the rounded edge can be used to blend and contour too. Try: Bobbi BrownFoundation Brush ($45).
Flat-topped: For blending and buffing liquid foundation into the skin, a flat-topped brush like YSL Touche Eclat Foundation Brush ($45) or Shiseido Foundation Brush ($30) works best. Because flat-topped brushes are densely packed, they provide medium-to-full coverage. For a seamless application, Trish McEvoy suggests “gently pressing” product into skin.
Try: IT Cosmetics Heavenly Skin Skin-Smoothing Complexion Brush ($48) and Heavenly Luxe Flat Top Buffing Foundation Brush #6 ($48), Ilia Perfecting Buff Brush ($44), and Bare Minerals Core Coverage Brush ($30).
Concealer brush: A concealer brush is small, flat, or round, depending on the the formula of concealer being used (i.e. liquid, cream, powder). It’s size and shape is meant to hit the small areas and corners of the eye area for precise spot application.
Try: Lancome Concealer Brush #8 ($28) and Le Metier de Beaute Concealer Brush ($65).
Powder brush – A.k.a. the face brush. While a powder brush is generally used for applying loose or pressed powders, it can also be used to apply liquid foundation. The latter will provide an airbrushed, soft focus finish, says MUA and Make Up For Ever Pro and Media Educator, Nicholas Lujan, who suggests dabbing the product where coverage is needed, and then quickly buffing in an outward, circular motion (this is the way we should be applying concealer too, FYI).
Try: Le Metier de Beaute Foundation Brush ($75).
Tip: Suzy Gerstein, MUA who’s worked with Christy Turlington: “I like to use a small domed eyeshadow brush to apply loose powder, rather than a traditional big brush. The tapered shape and small size helps control application and keep the areas meant to be dewy from getting over powdered.”
Round: A round, fluffy brush will have more loosely packed bristles and give a sheerer coverage, says Trish McEvoy. For applying powder and mineral foundations, opt for a big, ball brush like IT Cosmetics Heavenly Luxe Jumbo Powder Brush #3 ($58) and Heavenly Luxe Wand Ball Powder Brush #8 ($48) or Le Metier de Beaute Powder Brush ($95).
Kabuki brush: A small, usually rounded brush that’s used for applying loose powder to the face. It’s shape allows for even blending, and it can be conveniently used to apply foundation, powder, and blush.
Try: Nars Kabuki Ita Brush ($55), great for contouring due to it’s angled shape, Make Up For Ever 102 Small Foundation Kabuki ($36), best for applying liquid and cream foundation, Make Up For Ever 136 Pro Bronze Kabuki Brush ($32), doubles as a “buffing” brush, and Make Expert Veil Brush #13 ($42).
The All-Purpose: Artis brushes have the reputation of being the Rolls Royce of makeup brushes. The Artis Palm Brush ($65) looks like a scrubber, but it’s designed to apply foundation, special effect finishes, and body paint. Needless to say, it’s a pro brush. Owner and creator of Artis brushes, Matthew Waitesmith suggests: Holding the Artis Brush handle between thumb and fingers, float and glide, don’t grind or bounce. We found this brush to be best for buffing foundation when covering a larger area at a time; since it’s bigger, there’s less control if you’re targeting small areas. Matthew says, “Pick a brush size that generally matches the size of the area you want to cover.”
Blush, bronzer, and contour brushes – Again, the right tool depends on the type of formula being used. For powdered blushes and bronzers, a round, fluffy brush will make for seamless application, whereas a flat foundation brush or beauty blender (more on that later) is best for applying liquid formulas. We’ve singled out some brushes that are meant for bronzer, blush, and highlight. And remember our handy “3” trick for applying bronzer.
Try: Ilia Finishing Powder Brush ($44), Surratt Beauty Artistique Highlight Brush ($115), Cle de Peau Beaute Powder & Cream Blush Brush ($50), IT Cosmetics Heavenly Luxe Airbrush Powder & Bronzer Brush #1 ($48).
Stippling brush: A stippling brush has different sets of bristles, loose, usually white fibers at the top and densely packed bristles at the base. It’s design is meant to pick up and deposit product more efficiently, and here’s the best (and kind of annoying part), it can be used to apply foundation, blush, bronzer, powder, and highlighter! For a no-makeup-makeup look, this brush is ideal as the loose bristles at the top lightly deposit product. We find it great for blush, highlighter, and setting translucent powder all-over.
Try: Make Expert Stipple Brush #12 ($42)
Fan brush: It’s shaped like a fan, hence the name, and is meant for applying bronzer and highlighter, since it’s lightweight and makes for foolproof application.
Try: Laura Mercier Fan Powder Brush ($30).
Tapered brush: A tapered brush refers to its namesake, as it gradually gets thinner, similar to a stippling brush. These brushes are ideal for applying powder, blush, or bronzer onto the cheekbones and temples, or for contouring the face.
Try: Kevyn Aucoin The Blush Brush ($48)
Beauty Blender – The Original Beauty Blender debuted in 2003, and the rest, as they say, is history. You will not see a makeup tutorial that does not feature a beauty blender. The egg-shaped sponges work wet and dry, to perfectly blend makeup into skin, providing a more flawless finish and eliminating lines and streaks. There are dozens of varieties and sizes of blenders, meant for applying foundation, concealer, and even contour.
Try: Beauty Blender All About Face ($38), featuring three different sizes of the iconic blender, so you can nail expert blending!
Tips: Keep brushes clean with IT Brush Bath Purifying Brush Cleaner ($18) or Make Up For Ever Instant Brush Cleanser ($22). For a gentle and affordable cleanse, MUA Robert Greene, who’s dolled up Tinashe and Emily Blunt, uses Johnson’s Baby Shampoo ($4) to clean brushes, “because it keeps them soft.”
Shop the post for MUA-approved makeup brushes…
//<![CDATA[ !function(d,s,id){ var e, p = /^http:/.test(d.location) ? 'http' : 'https'; if(!d.getElementById(id)) { e = d.createElement(s); e.id = id; e.src = p + '://widgets.rewardstyle.com/js/shopthepost.js'; d.body.appendChild(e); } if(typeof window.__stp === 'object') if(d.readyState === 'complete') { window.__stp.init(); } }(document, 'script', 'shopthepost-script'); //]]>
Turn on your JavaScript to view content
–Claudia Mercado is a beauty-obsessed writer living in Long Beach, CA.
The post How To Use Every Makeup Brush Like a Pro appeared first on Beauty Banter.
How To Use Every Makeup Brush Like a Pro posted first on http://ift.tt/2u0M9RP
0 notes
Last Seen Blogs

news-mashable-yahoopartner-blog
Mashable on Yahoo

2amwakeupcall
2:00AM Wake Up Call

awphotoart
souls in pictures

wardmanlibrary
Archives &
Special Collections
Wardman Library

martinifruit
MartiniFruit