#Printer Repairing
Text
How Can The Printers Be Saved From Expensive Repairs?
High-output printers are essential to the daily production of excellent print jobs in many offices. The office may truly go into meltdown when the printer malfunctions or stops operating altogether. While many workplaces have additional printers to prevent a printout backlog, replacing a high-volume printer can be expensive and have a substantial negative impact on day-to-day operations and the…
View On WordPress
0 notes
Text
Genuine printer repair service that you deserve
To quickly cure all of your difficulties, use a printer repair provider that offers the best copier repair services. No matter where in the City you are staying, our printer repair service professionals will help you with any of your problems.
The best toner cartridges for all types of computer printers are available at Printer Repair Now, an authorised printer store, at extremely low prices. Along with printer repairs, we also offer maintenance services for well-known printer brands including Brother, Dell, Canon, HP, Samsung, Lexmark, etc. You can rely on us to provide printer toner cartridges that are not only affordable but also suitable for use with your workplace printer.
where printer maintenance, printer repair, and printer cartridges are concerned. To get all of your printer requirements met at our one-stop shop, just get in touch with Printer Repair Now. To keep its customers worry-free and joyful, Printer Repair Now guarantees the services.
0 notes
Text

#ff16#ffxvi#final fantasy#final fantasy 16#final fantasy xvi#barnabas tharmr#can someone print this out for me#my printer is beyond repair#do you like the pixels#this was gifted to me by a friend#they are anon yes how did you guess#everyone thank anon#they gave me permission to share feel free to print him out#and tape him to your desk
42 notes
·
View notes
Text

I made a replica of his card 🥹🥹❤️❤️❤️
I used a proper business card printing service and everything
I even made sure the finish was the right one! Because it reflects a bit!

#this was harder than it looked because Johnny’s thumb covers part of the text I had to repair it#also we never see his card at a perfectly straight angle so I had to do some editing#but the hardest part of all was getting the courage to go to a printing service and request this#the printer was probably like wtf business is this lady running#sing#sing 2#sing klaus#klaus kickenklober#sing movie#sing 2016
60 notes
·
View notes
Text
So I have this printer ...

Not that one specifically, that one is beautiful and in great condition, but one like it — Apple ImageWriter II. Specifically mine is the ImageWriter II/L variant, the last revision of the ImageWriter II line, but it looks like this one.
Or at least it did once upon a time.
My family acquired this printer second-hand in the late 90s along with a Mac Classic. It got used regularly for school reports and letters and business documents and tax forms for a few years until we finally were able to get a new computer with a color inkjet printer.
Long story short, like the computer that went with it, ultimately this poor printer ended up sitting in storage without air conditioning in East Texas heat and humidity for nearly twenty years. It's a sad story of slow decay.
My ImageWriter is now yellowed and scuffed and scraped and rusted and missing a piece or two; just a dim reminder of its former beauty. Given the state of it, what hope do we have of ever again hearing it sing the song of its people?
Well, I'm not going to let it go without a fight. Time to dig in and see what we can ...
... oh. Oh dear that won't do at all.
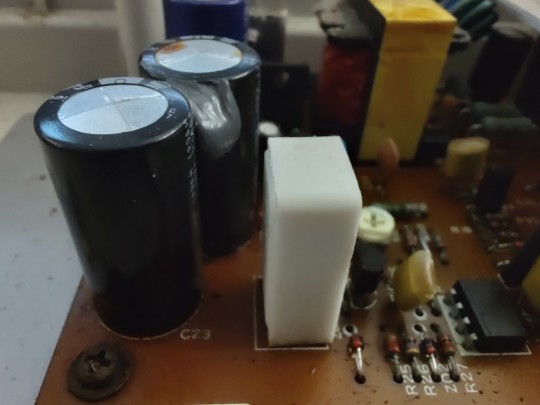
A good rule to follow when working with these 30+ year old systems, is to (carefully!) open and inspect before applying any power. In this case I'm very glad I did. Three large filter capacitors on the power supply have very obviously swollen and burst, spreading their corrosive bile all over the neighborhood.

The back side of the power supply circuit board was a wasteland of rotting solder mask, corroded traces, and displaced silkscreen. The electrolyte has eaten its way down the leads, through the solder, and left carnage in its wake all across the bottom of the board.


First order of business is getting those old capacitors removed from the board so cleanup can begin. If you've never worked with hardware of this vintage, a fair warning — make sure you're working in a well-ventilated area. Sure the solder has lead and the flux ain't great for the lungs, but the big concern here is the unholy stench of heated capacitor electrolyte hitting the nostrils like the revenge of Poseidon's refuse bin. The local fish market has nothing on these things.
The old solder, especially when mixed with the electrolyte, tends to behave in a very un-solder-like fashion. It will refuse to melt and when it does it will slump around like wet sand rather than flow like liquid metal should. While it may seem counter-intuitive, the best way to get rid of it is to add more fresh solder to it. On these single-sided boards with large components like this, a spring-action solder pump works well for getting the old parts removed, and then some solder braid will clean up the pads well.
Once the old parts are out, I like to thoroughly clean the area with isopropyl alcohol to remove the electrolyte and years of grease and dirt and pet hair that may have cemented itself to the board. In this case I also needed to use a mild abrasive to remove that damaged solder mask where it had bubbled up off the corroding copper traces. I was lucky here that none of the traces were actually broken or corroded through completely. Clear nail polish works well for protecting the now bare copper (just make sure it's not the UV-cure gel stuff).
From here I turned my attention to the case, because the power supply is the last item removed and first installed when conducting a complete tear down of this printer, and it didn't make sense to put my newly cleaned power supply into a dirty old case.


I'm not really a fan of retrobrite, and these large case pieces would be a real challenge anyway. So all I want is to clean up the dirt and rust and as many scuff marks as I can. As far as I'm concerned, the rest is just part of the history of the item. Each mark tells a story of how this item was used, not just put up on a shelf to be looked at. And if I didn't have any interest in using the machine until it completely falls to pieces, I wouldn't be bothering with going fishing replacing old capacitors.
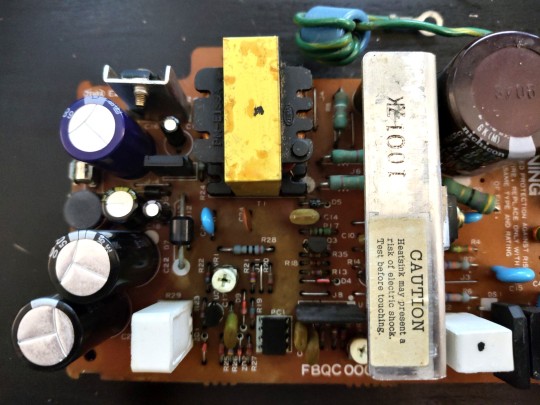
This is a good point to do some testing. There may still be more wrong with that power supply. Output voltages could have drifted out of spec from other components aging, or maybe I installed capacitors that don't quite match the originals. The ImageWriter II/L power supply has three outputs — +5VDC, -5VDC, & +26VDC. With no load on the power supply, I measured the outputs at around ±7V and 30V. That seems high, but it's not outside of what I would expect for a power supply that's not actually driving anything. This would be a good point to use an adjustable test load, but since I don't have one of those, I'll just have to move forward with my "well it seems fine'
Spoiler: it was not fine.
As part of its startup sequence, the ImageWriter exercises all of its stepper motors to get everything to a known state. This high current draw immediately after power on was more than its old power supply could give. There's clearly more than bad capacitors on the supply, but identifying what exactly is still beyond my current skill level.
So in the interest of getting the machine working (because I have plans for it), I opted to try replacing the power supply with something more modern. The catch here is the odd assortment of voltages the original supply provided. It's easy to find a ±5VDC supply, but 26V is virtually unheard-of.
Apple's documentation for the printer mentions the +26V supply is for driving the motors. I suspected that the 26V supply was less carefully regulated and probably targeting something more like 24V. Sure enough, the stepper with the highest voltage rating on its label was 24V. With a little extra current capacity available, I figured the printer would function just fine with a 24V supply.
The catch is, 24V & ±5V is not a common configuration. There are plenty of 12V & ±5V supplies, but that won't do here. I settled on a Mean Well 24V & 5V supply with a -5V inverter ... And promptly ordered the wrong part. I had a nice new 12V & 5V supply. That's ok, once I got it in hand it was a bit too large to fit in the space I had anyway.
So I got a different Mean Well 24V supply and a separate 24V-5V DC-DC converter. It's a bit of a mess all crammed into the bottom of the case, but it should give all the right voltages (or near enough).

I did have to remove the power switch from the old supply though. That particular part has long since been discontinued, and compatible replacements proved difficult to find.
Now that it's all assembled, it's time to test. This is the part that always makes me nervous, especially when dealing with mains voltages. There's so much that can go so very horribly wrong.
I started out with a smoke test — switching on power briefly to make sure there were no direct shorts that might cause an explosive failure. No smoke is a good sign, so check the voltages. With no load, the new supply rails read 23.99V, 5.00V, and -5.55V. That's about as good as I could ever ask for. So now there's only one thing left to test … does it actually print?
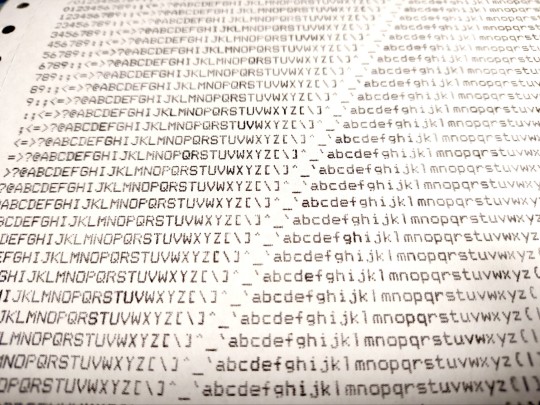
Success!
It's not perfect. Every once in a while it will stutter while printing and get stuck with the carriage on one side or the other. It really needs a complete disassembly, thorough cleaning, and relubrication. That kind of mechanical teardown is a bit beyond what I'm comfortable with at the moment, but I'll happily settle for mostly working over not working at all.
#vintage computing#macintosh#imagewriter#imagewriter ii/l#computer repair#apple#apple computers#dot matrix printer#mean well#it's always the power supply#power supply
41 notes
·
View notes
Text
anyways imagine being this weird ass old lady who has no idea where to put the sd card into the 3d printer and yanking things out because you think you know better.
like damn T-T she scared the living shit out of me while I was busy watching matpat eat his last meal with my headphones on and she like demanded to know where to put the sd card after the carnage of what she did. (the 3d printer is against a wall so the librarian put sd card extenders and this lady somehow managed to pry the extender out. like its supposed to make a click sound when you push it in and again when you take it out and when I went to put the extender back in I had to unclick and click the extender back in. like dafuq lady)
#can you imagine if she broke it? like goddamn#a 3d printer is hella expensive#do you really want to have to pay for that repair?
5 notes
·
View notes
Text
unemployment pls ? Pls?
on a completely unrelated note the only competent person here put in his resignation lol lollllll that’s 4 people quitting in the 2 years I’ve been here lollllllll this is epic and will definitely not make everything worse and it’s definitely not a sign that this place is run horribly when you have 4 people quitting in what should be a cushy office job lol hahahhh
And it’s not suspicious that the only people who have quit are all in that specific position wow that’s crazyyy
I wonder what the root cause is it’s almost like they are treated badly or something ahahah wild right
#is too poor to be unemployed#aaaaaugggwaaaughuuhgggg#I think everyone is surprised I’ve lasted here this long but#it’s not for a lack of trying to escape#just not possible to get an entry level tech job here without Knowing a guy who knows a guy who happens to be your cousin who is the manager#the other option is to be like a printer repair tech and they want you to drive around the whole state for $15 an hour
3 notes
·
View notes
Text

Need an instant and reliable printer repair shop pcmc? We can help! At the IT solutions service center in PCMC, we have highly skilled and experienced technicians who can fix all types of printer issues
#laptop repair#laptop repair center#laptop repair services in pcmc#laptop service center#authorized laptop service center in pcmc#laptop service center in pcmc#printer repair#printer
7 notes
·
View notes
Text
Born with a sense of wonder for how the world works forced to earn green pieces of paper
#just thinking about all the skills that dont bring in a lot of money (and some that do)#that id love to learn if i had more time#just passed the office copy machine and went oh what if i went into printer repair (:#but printer repair likely does not pay da bills
6 notes
·
View notes
Text
The gang has gathered together to play tabletop. Matthew is the GM and narrates the current senerio for Alfred's character.
Matt: "You are stuck in an empty, locked dungeon cell. You have no tools or supplies at your disposal, and your arms have been bound."
Alfred: "How big is the key hole?"
Matt: "About the thickness of a banana."
Alfred: "I unlock the door-"
Arthur: "How? He just said, your arms are bound."
Alfred raises his hand to signal for silence. His demeanor has become deathly serious, and everyone pauses in anticipation to hear his strategy.
Alfred: ". . .with my dick."
He rolls a NAT 20.
#hetalia#hetalia headcanons#hws england#hws canada#hws america#had to repair my 3d printer and embroidery machine today 😑 I was gearing to draw but my motivation is shot#I begin a new DND game soon pretty excited for it
9 notes
·
View notes
Text
Me: *eyes snap open from deep slumber*

Me: 3D printers
#bionicle#was asleep#then this vision hit me#I shall find a 3D printer#to repair my old broken bionic leg pieces#ok going back to sleep now
2 notes
·
View notes
Text
I worked a closing shift, then immediately got up and worked an opening shift and then they called me in right after I got home to work the closing shift...I am frazzled.
#i'm dead tired and on every piece of equipment that can break has broken#the techs keep fixing things “remotely”#meaning they haven't fixed anything at all and have even made some problems worse#the repair guy they called in for an essential piece of equipment that I LITERALLY CANNOT DO MY JOB WITHOUT doesn't work today#so it won't be fixed until tomorrow and i have to do everything manually#which means i will be working at least an hour after closing on top of the fifteen hours I'll have logged by then#i'm so done with absolutely everything right now#i have been on the phone with field support so much in the past few days that I know who's picked up my call based on the background noise#Oh hey there's a dog barking that means its Jeremy#lots of fan-type whitenoise means it's Dustin#printer going crazy in the background means it's Laquisha#Far off and echo-y means it's a guy who might be called Adam...but I'm not sure because I can never tell what the heck he's saying
8 notes
·
View notes
Text
Follow printer repairing shop near me on stayuplate.mn.co
Website is best for "indexing" . The best part is stayuplate.mn.co is most amazing platform where you can get printer repairing shop near me . Tumblr also help to execute it . Not for only promotion but also for get knowledge.
0 notes
Text
i hate company troubleshooting lines so much its unreal you'll be like "hello my computer exploded into dust" and they'll just be like "well :) have you tried unplugging it"
and u call a random repair shop with 3 google reviews and a sketchy looking website and tell them in like 5 words whats wrong they'll go "ah its your doodlebop gear you gotta replace that" and they're right
#this is a hate post to brother btw#my printer was having issues with the rollers and instead of listening to me about hey the rollers i think are broken#they walked me through how to check my ink??#and i gave up and let them hang up on me and i called a random repair shop and hes like#yea you gotta clean them and probably use a rubber repair spray
2 notes
·
View notes
Text
My family’s printers given out and has a slim possibility of being fixed.
This fucker has been around for 13 or so years. Last time I managed to make the Jack ass work again but that was a easy fix.
Anyways what’s a good replacement tool if you don’t have a the thingy I think a torx but it’s called to open the back of the print head? I have my swift army knife and now realize may not have a thing to make it move
2 notes
·
View notes
Text
VOICES OF THE VOID IS SURE SOMETHING ELSE
#балаболим#voices of the void#the fact that you can make custom paintings there. ingame stickers rugs and posters. that you can use a 3d printer there#that prints ANY model you want (as long as you can find it/make it and import it)#NOT TO MENTION THE THREATS#I THINK I GOT THE SUPER THREAT SPOILED FOR MYSELF#IT"S SO COOL THOUGH. FUCK#anyway. 0.6.0 update is SICK as FUCK#i may dislike the fact that mrdrnose made the game somewhat easier (brighter night and repair reward) but he compensated it by adding-#- a new feature to look after. i like it)
3 notes
·
View notes
Last Seen Blogs

pensamentos-soltos-sempre
Decifra-me ♡

do-you-love-me-surfer-girl
Tags content

breadwearingsuspenders
Your Local Seasoned Child Limb dealer

b-baguette
Loaf of bread

cerebralpigeon
local weird nasty guy