#MyShedPlans
Text
Crafting Backyard Bliss: A Review of ‘My Shed Plans
Embarking on the mission to transform my backyard into a sanctuary of craftsmanship, I stumbled upon “My Shed Plans,” a product boasting top affiliates making a staggering $50k per month and a conversion rate of 9%. Intrigued by its claims, I ventured into the world of shed-building with this guide.
#MyShedPlans#DIYProjects#BackyardTransformation#Craftsmanship#ShedBuilding#Blueprints#Carpentry#Woodworking#VideoTutorials#CommunitySupport#CostEffectiveness#HomeImprovement#Construction#DIYEnthusiast#BuildingCommunity#ValueForMoney#BuildingMaterials#CreativeProjects#HomeRenovation#BuildingDreams#UserFriendly#MasterCarpenter#DoItYourself#BuildingSkills#HomeDesign#OutdoorLiving#BackyardOasis
0 notes
Photo
New Post has been published on https://freecycleusa.com/woodworking-ryan-hendersons-shed-plans/
Woodworking Ryan Henderson's Shed Plans
youtube
Woodworking – Ryan Henderson's Shed Plans
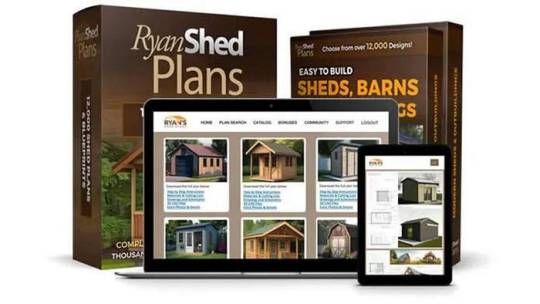
Ryan Henderson's Shed Plans:
Start building amazing sheds the easier way, with a collection of 12,000 shed plans to choose from!
Planning To Build A Shed?
Woodworking publishers ‘HATE' what I'm about to reveal.
a) Our plans include complete step-by-step details.
If you are a first time builder trying to figure out how to build a shed, you’re in the right place!
b) Our plans are designed to be easy to follow by anyone, in other words – no blueprint reading experience necessary.
c) You get a materials list for every project, so you’ll know exactly what you need – to start building.
“You'll NEVER need to Worry About Cutting the Wrong Size, or Wasting Your Time Trying To Figure Out What Goes Where… ”
Detailed instructions should be so simple that a kid could do it.
12,000 “Perfect” Shed Plans – So Clear, So Complete, So Easy To Use… The Shed Practically Builds Itself…
All 12,000 shed plans designed by Ryan Henderson
Introducing… Ryan's Perfect Shed Plans Collection
* 12,000 shed plans covering all types & styles from large to small
* A complete & exact list of materials
* LEGO style assembly instructions.
* 3D CAD designed images
These “Perfect” Shed Plans Are The Most Complete… Easy-To-Use & Clear Plans You Will Find – ANYWHERE!
If you get ‘Ryan Henderson's Shed Plans' right now, I'll throw in (4) Special Bonuses.
(1) Advanced Woodworking Tips
(2) Magic Modifications
(3) Directory of Suppliers
(4) 400 Woodworking Plans
Additional Key Words: Woodworking, Ryan Henderson, Shed Plans
Video – Published by Dunway Enterprises
For further information on Ryan Henderson's (Woodworking) Shed Plans – CLICK THE FOLLOWING LINK:
Translated titles:
Planes de cobertizo de carpintería ryan henderson
Holzarbeiten Ryan Henderson Schuppen Pläne
Plan de hangar de ryan henderson de bois
लकड़ी के कामकाज रयान हेन्डर्सन की शेड योजनाएं
木工ライアン・ヘンダーソンの起伏計画
source
#12#building a shed#building sheds#CAD Designed Drawings#carpenter#diy shed plans#Dunway Enterprises#garages#garden sheds#how to build a shed#Ken Dunn#myshedplans#outhouses#Ryan Henderson#Ryan Shed Plans#RyanShedPlans#shed blueprints#shed building#Shed Designs#shed plans#small shed plans#small storage and garden sheds#storage sheds#wood working#woodworker#Woodworking#woodworking for dummies#woodworking guide created by Ryan Henderson#Woodworking Plans
0 notes
Text
Get 12,000 Detailed Shed Plans To Build Your Next Shed!

Are you looking build a shed at home but don’t know what goes into it?
It turns that even with zero woodworking experience; you can build an amazing shed in a weekend. However, you will need to have a detailed plan for the project. Unfortunately, though, most shed plans sold by woodworking publishers today won’t help you. In this post, we’re going to tell why this is the case and how MyShedPlans is going to help you out.
VISIT MYSHEDPLANS NOW >>

So what’s MyShedPlans all about and who is it for?
Ryan Henderson, a professional craftsman and educator, gives you a variety of shed plans to help you build any kind shed at home. He has put together a collection of 12, 000 shed plans with different styles and designs. And you don’t need to have woodworking experience to use the plans; they are detailed enough and come with “hold-you-by-the-hand” step by step instructions.

As mentioned earlier, the shed plans sold by woodworking publishers can’t help you. I once wanted to build a shed. So I went online, bought the cheapest shed plan I could get and started following it. I got the tools, the 2x4’s, and even began cutting to size. I didn’t proceed much; I got stuck not knowing how to get from one point in the plan to another. If you have ever bought a plan to help you build any project, you probably know what I am talking about.
Many of the plans sold by publishers are not even written by woodworkers. They are written by ghost-writers who have never touched a chisel or a piece of lumber in their life. So, such plans often have wrong instructions, are either too dumb down or too complicated.
A good shed plan can only be written by a woodworker with experience building a lot of projects and teaching the craftsmanship to others. With Ryan's shed plan, you will never need to hire someone to build a shed for you. You will complete it yourself and within the shortest time possible.
And if you are going to invest your money, energy, and time in building a shed by yourself, then you need a detailed plan that has everything you need to know about building a perfect shed. The plan should also include factors you need to consider when building a shed, from the most basic to the most critical.
With up 12,000 detailed shed plans, MyShedPlans is arguably the only place you are going to get a complete plan that will help come up the shed you want. Note also that the plans have different designs and styles. So you will get to compare the styles and designs and build a shed that stands out.

VISIT MYSHEDPLANS NOW >>
Among other things, the plans will give you;
Views from all angles. This will help you see how everything will look before you start building.
Step-by-step instructions. The instructions are so detailed you’ll know exactly what to do in every step.
Lists of materials and cutting lists, so you know what to buy, the quantity, and how to cut the materials. The cutting lists include measurements.
3D drawings
CAD designed drawings
“Used for” labels to help you know what each material is used for and when you will need it.
Visit MyShedPlans today, get your plans and complete your shed most inexpensively and quickly.
#woodworking#home and garden#gardening#home improvement#home & lifestyle#home decor#shed plans#sheds
1 note
·
View note
Video
My Shed Plans REVIEW. ⚠️ATTENTION⚠️. My Shed Plans reviews. My Shed Plan...
My Shed Plans REVIEW.⚠️ ATTENTION⚠️. My Shed Plans reviews. My Shed Plans Ryan Henderson. ➤My Shed Plans ✔️OFFICIAL WEBSITE -
https://tinyurl.com/myshedplans-official
Hi, my name is William. I made this video to share the whole truth with you about My Shed Plans. If you clicked on this video, it's probably because you want more information about My Shed Plans and today, I'm going to reveal everything you need to know. From how My Shed Plans works, to the guarantee. So stick with this video about My Shed Plans, so you don't miss any details. ➤My Shed Plans ✔️OFFICIAL WEBSITE -
https://tinyurl.com/myshedplans-official
00:46
- Alert about My Shed Plans
01:17
- What's included in the My Shed Plans material
02:24
- My Shed Plans guarantee TAGS My Shed Plans REVIEW, My Shed Plans reviews, My Shed Plans Ryan Henderson, review my shed plans, My Shed Plans Top Aff Makes $50k/month! ~9% Conversions, how to build a shed, shed plans, my shed plans by ryan Henderson, my shed plans ryan henderson beware – ryan shed plans review – updated 2023, ryan shed plans
0 notes
Video
youtube
My Shed Plans Review. Is Ryan’s MyShedPlans Legitimate?
0 notes
Link
NOW YOU CAN BUILD ANY MODERN SHED IN A WEEKEND EVEN IF YOU'VE ZERO WOODWORKING EXPERIENCE!
#modernshed#modernshedplans#modernsheddesigns#modernstorageshed#myshedplans#modernsheddesign#modernshedplansfree
1 note
·
View note
Video
youtube
My Shed Plans - Not Just Any Ordinary Collection Of Shed Plans
0 notes
Photo
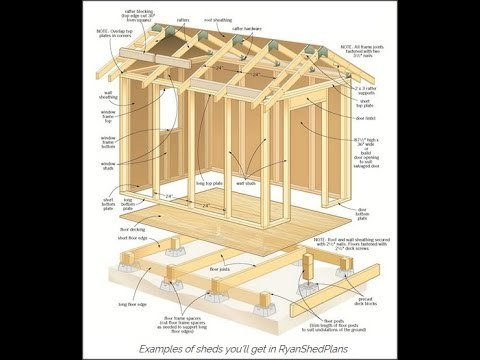
Building a shed can seem like a monumental task. However, if you have basic woodworking skills, all you’ll need are detailed plans. The good news is that the schematic blueprints included in My Shed Plans are straightforward and detailed.
0 notes
Text
Building Roof Rafter
http://bit.ly/2myZH1jWelcome to my article on roof rafter building . Here you will learn how to build roof rafters for your storage shed. In this article, you will learn the necessary steps to building roof rafters. From cutting the rafter parts out to building a jig and assembling the rafters!” A rafter is one side of the rafter assembly. The rafter assembly is made by using an O.S.B. gusset to attach two rafters together. The first rafter will be used as a template to aid in marking the remaining rafters.
This ensures that they are as close to the same size as possible. The first step in building the roof rafters is to cut one rafter board to length with the ends angled properly and then to mark and cut the birds mouth and seat on the rafter. The ridge end of the rafter, and often the eve end, will need to be cut to the angle of the roof slope. The roof on this shed is a 4 in 12 slope which makes it a 18 and one half degree angle on the board ends. A rafter or speed square will have marks for both of these angles. Measure from the eve end of the rafter board to the long point that will be the ridge of the rafter and place a mark on the board, this is the overall length of the rafter.
Use the square to make a square line on the board that goes from edge to edge of the board. Now take the square and put the pivot point, on the point where the line you made meets the edge of the board. Pivot the square until the 4 on the Common markings lines up with the edge of the board. Mark the board with this angle. You will also notice that the 18 and one half mark on the Protractor markings will be lined up with the edge of the board. Use a saw to cut along this line. Make sure to cut on the “waste” side of the line so the rafter size will be as accurate as possible.
If you have a chop saw you can set the angle of your ridge cut on the saw and make the cuts without using the angle from the framing or speed square. The second step will be to mark and cut out the birds mouth and horizontal seat. The vertical cut is called the birdsmouth and the horizontal cut is called the seat. Refer to your plans to find the dimensions for the roof angle you are cutting. Measure from the eve end of the rafter to the start of the vertical birdsmouth and place a mark. Then measure further down the board to mark the end of the horizontal seat mark. Use the square to place marks all the way across the board on the two points you just made. To mark the birdsmouth angle place the pivot point of the square where the birdsmouth mark meets the edge of the board. Pivot the square until the 4 on the Common marks lines up with the edge of the board. Mark the board with this angle.
With the square still on the birdsmouth mark, measure up the line you just made and place a mark showing the depth of the birdsmouth according to your rafter plans. To mark the seat cut you will flip the square over and place the pivot point where the seat mark meets the edge of the board. Mark a line from that point to the birdsmouth depth line. Set your circular saw to its deepest cut setting and cut along the birdsmouth and seat lines. Make sure to cut on the waste side of the lines and cut only to where the lines intersect. To fully remove the piece of wood you will need to flip the rafter over and continue the cuts to their intersection point. The piece of wood should be easily removable at this point but there will still be a bit of wood in the corner that will need to be taken out. Use a wood chisel and hammer to remove the remaining wood. The third step is to use the first rafter as a template to make two more rafters. Place the first rafter on second and third boards and trace the birds mouth, seat and ridge angles onto the second board.
Cut the second and third rafters out and prepare them as you did the first rafter. The fourth step is to build a temporary jig on the shed floor to aid in building the rafter assemblies. Using one end of the shed floor that is the same width as the rafter assemblies, make a line on the exact center of the floor. Then measure up from the edge of the shed floor and mark the overall height of the rafter assembly. This measurement can be found on the rafter plans. Test fit the rafters by setting the rafter seats on the edge of the shed floor and placing the peak of the rafter on the overall height mark on the center line. The rafter ridges should be fully touching each other along the cuts at the ridge and the seats should be flush with the edge of the shed floor along the entire cuts.
Each rafter should be overhanging the edge of the shed floor by one half of an inch. Now attach wood blocks on each side of the rafters to hold them in their locations. Screw the blocks of wood to the floor so they can be easily removed after building the rafter assemblies. Use 2 inch screws to attach the blocks to the floor.
Make sure that they are snug up against the rafter edges and that the rafter is in its exact position. The fifth step is to make a rafter gusset and use it to attach the two rafters together. Use your shed plans to find the dimensions of the gusset and then mark and cut it out from a piece of O.S.B. or plywood. Make sure that the gusset does not extend above the top edges of the rafter and then nail the gusset to the rafters using 6d nails. Place a nail every three inches along the edges of the gusset. Install the gussets on both sides of all the rafters except for the gable end rafters. Test the rafter assembly by standing it up and lining it up with the edges of the shed floor. Now build the remaining roof rafters using the original rafter template and the jig on the shed floor. Thanks for reading my article, for more great building ideas take a look here
0 notes
Text
Roof Rafter Building
Welcome to my article on roof rafter building . Here you will learn how to build roof rafters for your storage shed. In this article, you will learn the necessary steps to building roof rafters. From cutting the rafter parts out to building a jig and assembling the rafters!” A rafter is one side of the rafter assembly. The rafter assembly is made by using an O.S.B. gusset to attach two rafters together. The first rafter will be used as a template to aid in marking the remaining rafters.
This ensures that they are as close to the same size as possible. The first step in building the roof rafters is to cut one rafter board to length with the ends angled properly and then to mark and cut the birds mouth and seat on the rafter. The ridge end of the rafter, and often the eve end, will need to be cut to the angle of the roof slope. The roof on this shed is a 4 in 12 slope which makes it a 18 and one half degree angle on the board ends. A rafter or speed square will have marks for both of these angles. Measure from the eve end of the rafter board to the long point that will be the ridge of the rafter and place a mark on the board, this is the overall length of the rafter.
Use the square to make a square line on the board that goes from edge to edge of the board. Now take the square and put the pivot point, on the point where the line you made meets the edge of the board. Pivot the square until the 4 on the Common markings lines up with the edge of the board. Mark the board with this angle. You will also notice that the 18 and one half mark on the Protractor markings will be lined up with the edge of the board. Use a saw to cut along this line. Make sure to cut on the “waste” side of the line so the rafter size will be as accurate as possible.
If you have a chop saw you can set the angle of your ridge cut on the saw and make the cuts without using the angle from the framing or speed square. The second step will be to mark and cut out the birds mouth and horizontal seat. The vertical cut is called the birdsmouth and the horizontal cut is called the seat. Refer to your plans to find the dimensions for the roof angle you are cutting. Measure from the eve end of the rafter to the start of the vertical birdsmouth and place a mark. Then measure further down the board to mark the end of the horizontal seat mark. Use the square to place marks all the way across the board on the two points you just made. To mark the birdsmouth angle place the pivot point of the square where the birdsmouth mark meets the edge of the board. Pivot the square until the 4 on the Common marks lines up with the edge of the board. Mark the board with this angle.
With the square still on the birdsmouth mark, measure up the line you just made and place a mark showing the depth of the birdsmouth according to your rafter plans. To mark the seat cut you will flip the square over and place the pivot point where the seat mark meets the edge of the board. Mark a line from that point to the birdsmouth depth line. Set your circular saw to its deepest cut setting and cut along the birdsmouth and seat lines. Make sure to cut on the waste side of the lines and cut only to where the lines intersect. To fully remove the piece of wood you will need to flip the rafter over and continue the cuts to their intersection point. The piece of wood should be easily removable at this point but there will still be a bit of wood in the corner that will need to be taken out. Use a wood chisel and hammer to remove the remaining wood. The third step is to use the first rafter as a template to make two more rafters. Place the first rafter on second and third boards and trace the birds mouth, seat and ridge angles onto the second board.
Cut the second and third rafters out and prepare them as you did the first rafter. The fourth step is to build a temporary jig on the shed floor to aid in building the rafter assemblies. Using one end of the shed floor that is the same width as the rafter assemblies, make a line on the exact center of the floor. Then measure up from the edge of the shed floor and mark the overall height of the rafter assembly. This measurement can be found on the rafter plans. Test fit the rafters by setting the rafter seats on the edge of the shed floor and placing the peak of the rafter on the overall height mark on the center line. The rafter ridges should be fully touching each other along the cuts at the ridge and the seats should be flush with the edge of the shed floor along the entire cuts.
Each rafter should be overhanging the edge of the shed floor by one half of an inch. Now attach wood blocks on each side of the rafters to hold them in their locations. Screw the blocks of wood to the floor so they can be easily removed after building the rafter assemblies. Use 2 inch screws to attach the blocks to the floor.
Make sure that they are snug up against the rafter edges and that the rafter is in its exact position. The fifth step is to make a rafter gusset and use it to attach the two rafters together. Use your shed plans to find the dimensions of the gusset and then mark and cut it out from a piece of O.S.B. or plywood. Make sure that the gusset does not extend above the top edges of the rafter and then nail the gusset to the rafters using 6d nails. Place a nail every three inches along the edges of the gusset. Install the gussets on both sides of all the rafters except for the gable end rafters. Test the rafter assembly by standing it up and lining it up with the edges of the shed floor. Now build the remaining roof rafters using the original rafter template and the jig on the shed floor. Thanks for reading my article, for more great building ideas take a look here
0 notes
Video
MyShedPlans Complaints Review | Does It Really Work? Find out here: https://www.youtube.com/watch?v=114TM92FF30 #myshedplanscomplaints #myshedplans
0 notes
Text
Roof Rafter Building
Welcome to my article on roof rafter building . Here you will learn how to build roof rafters for your storage shed. In this article, you will learn the necessary steps to building roof rafters. From cutting the rafter parts out to building a jig and assembling the rafters!” A rafter is one side of the rafter assembly. The rafter assembly is made by using an O.S.B. gusset to attach two rafters together. The first rafter will be used as a template to aid in marking the remaining rafters.
This ensures that they are as close to the same size as possible. The first step in building the roof rafters is to cut one rafter board to length with the ends angled properly and then to mark and cut the birds mouth and seat on the rafter. The ridge end of the rafter, and often the eve end, will need to be cut to the angle of the roof slope. The roof on this shed is a 4 in 12 slope which makes it a 18 and one half degree angle on the board ends. A rafter or speed square will have marks for both of these angles. Measure from the eve end of the rafter board to the long point that will be the ridge of the rafter and place a mark on the board, this is the overall length of the rafter.
Use the square to make a square line on the board that goes from edge to edge of the board. Now take the square and put the pivot point, on the point where the line you made meets the edge of the board. Pivot the square until the 4 on the Common markings lines up with the edge of the board. Mark the board with this angle. You will also notice that the 18 and one half mark on the Protractor markings will be lined up with the edge of the board. Use a saw to cut along this line. Make sure to cut on the “waste” side of the line so the rafter size will be as accurate as possible.
If you have a chop saw you can set the angle of your ridge cut on the saw and make the cuts without using the angle from the framing or speed square. The second step will be to mark and cut out the birds mouth and horizontal seat. The vertical cut is called the birdsmouth and the horizontal cut is called the seat. Refer to your plans to find the dimensions for the roof angle you are cutting. Measure from the eve end of the rafter to the start of the vertical birdsmouth and place a mark. Then measure further down the board to mark the end of the horizontal seat mark. Use the square to place marks all the way across the board on the two points you just made. To mark the birdsmouth angle place the pivot point of the square where the birdsmouth mark meets the edge of the board. Pivot the square until the 4 on the Common marks lines up with the edge of the board. Mark the board with this angle.
With the square still on the birdsmouth mark, measure up the line you just made and place a mark showing the depth of the birdsmouth according to your rafter plans. To mark the seat cut you will flip the square over and place the pivot point where the seat mark meets the edge of the board. Mark a line from that point to the birdsmouth depth line. Set your circular saw to its deepest cut setting and cut along the birdsmouth and seat lines. Make sure to cut on the waste side of the lines and cut only to where the lines intersect. To fully remove the piece of wood you will need to flip the rafter over and continue the cuts to their intersection point. The piece of wood should be easily removable at this point but there will still be a bit of wood in the corner that will need to be taken out. Use a wood chisel and hammer to remove the remaining wood. The third step is to use the first rafter as a template to make two more rafters. Place the first rafter on second and third boards and trace the birds mouth, seat and ridge angles onto the second board.
Cut the second and third rafters out and prepare them as you did the first rafter. The fourth step is to build a temporary jig on the shed floor to aid in building the rafter assemblies. Using one end of the shed floor that is the same width as the rafter assemblies, make a line on the exact center of the floor. Then measure up from the edge of the shed floor and mark the overall height of the rafter assembly. This measurement can be found on the rafter plans. Test fit the rafters by setting the rafter seats on the edge of the shed floor and placing the peak of the rafter on the overall height mark on the center line. The rafter ridges should be fully touching each other along the cuts at the ridge and the seats should be flush with the edge of the shed floor along the entire cuts.
Each rafter should be overhanging the edge of the shed floor by one half of an inch. Now attach wood blocks on each side of the rafters to hold them in their locations. Screw the blocks of wood to the floor so they can be easily removed after building the rafter assemblies. Use 2 inch screws to attach the blocks to the floor.
Make sure that they are snug up against the rafter edges and that the rafter is in its exact position. The fifth step is to make a rafter gusset and use it to attach the two rafters together. Use your shed plans to find the dimensions of the gusset and then mark and cut it out from a piece of O.S.B. or plywood. Make sure that the gusset does not extend above the top edges of the rafter and then nail the gusset to the rafters using 6d nails. Place a nail every three inches along the edges of the gusset. Install the gussets on both sides of all the rafters except for the gable end rafters. Test the rafter assembly by standing it up and lining it up with the edges of the shed floor. Now build the remaining roof rafters using the original rafter template and the jig on the shed floor. Thanks for reading my article, for more great building ideas take a look here
0 notes
Last Seen Blogs


kaibait1
Ty

fukingirl
😈🔥

spongyabobteljesfilmek4k
[[MOZI-HD]!!™ SpongyaBob 2020 TELJES FILM MAGYARUL

dokidobe
yellow.dr.monv