#I just wanted to do a headshot to practice facial expressions and head structure and then this happened
Text
I may have a problem


#coroika#splatoon#splatoon 3#splatoon manga#Army coroika#corocoro#my art#I WAS SUPPOSED TO BE STUDYING TODAY BUT MY ADHD SAID#the hell you will#I just wanted to do a headshot to practice facial expressions and head structure and then this happened#I love his hair more than ever now 🧡#what kind of octopus should he be based off of anyway?#コロイカ#coroika S5#coroika S4#S4 coroika#S5 coroika#artists on tumblr#coroika army
7 notes
·
View notes
Text
Tutorial Tuesdays: Heads Up!
It’s been a long time, life is a jerk. Anyway, drawing heads! Before continuing, I recommend reviewing the last Tutorial Tuesdays post on pencil pressure and drawing with basic shapes since those are going to be put into effect. Ready to go? Alright, since this is going to be a long one, click the Read More link and away we go!
The head is likely the part of any character you’re going to find yourself drawing the most. Expressions, headshots, closeups, busts, you name it. So let’s start by drawing a basic head and start with the most common view, the 3/4 view.

This is the most basic process condensed into four steps. Lightly sketch a circle and a guideline, the former typically is the form of most of the skull and the crosslines will help with placement of the eyes, nose, and ears. Then define the shape of the face, including the cheeks and jawline, with a bit stronger pressure but still keeping pretty light. Sketch in the ear and the curvature of the back of the head, as well as the neck. The furthest line of the neck will be relatively close to where the jawline and ear connect. Then sketch in the features; very lightly sketch in circles where the eyes are--above the horizontal guideline but no further down than touching it--and sketch the eye shape and pupil/iris, alternating sides with each stroke to alleviate the frustration that comes with “drawing the other eye”. You know what I’m talking about. The nose will be close to the guideline intersection, if not actually on it at certain angles. And viola, a basic head at 3/4 view. This same process is used when facing at 3/4 the opposite way.
For a profile view, or looking at the head from the side, same basic four-step breakdown:
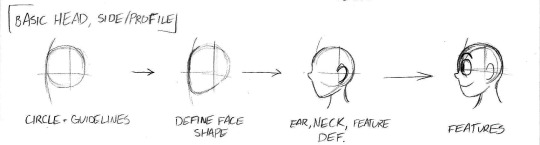
You’ll notice that the nose sticks out and you can see where the head connects to the neck at the back. Another guideline helps with ear placement. I should have put the guideline for that on the 3/4 view, but I find that the main guideline and jawline contour work better for me. Use the additional guideline for the ear if it will help with the spatial relation of that feature. More experienced artists may tweak areas to fit their signature style. For example, placement of the lips. In anime, especially more realistically styled anime, the lips appear as very small peaks with the valley between them being there the mouth is.
Now onto probably the second most common view, the front view. Also using the same four step condensed breakdown:
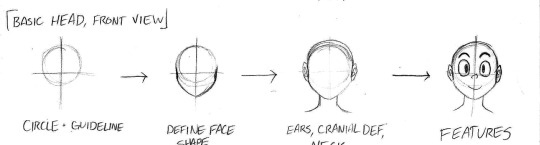
(Some of it cut off, oops) Now you can see how the face is arranged when looking at the viewer straight on. This is the easiest to practice, followed by 3/4, then profile. You can even cheat by using the Symmetry pen in digital programs (just make sure you anchor down the point of reference first with Control+Click!). While basic, this works for just about any human character, though using references is highly encouraged to get a feel for the anatomy before messing with it to fit a particular style.
“I draw anthro animals, does this still work?”
Yes. For both super cartoony stylized characters and more realistically built and furry styles. Let’s start with looking at the fastest thing alive:
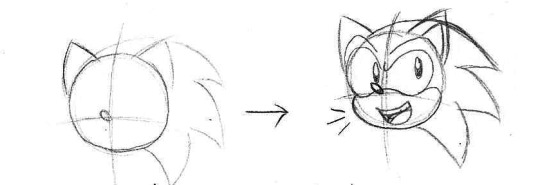
See? Circle, guideline, map out the features, and soon you got a cool boi.
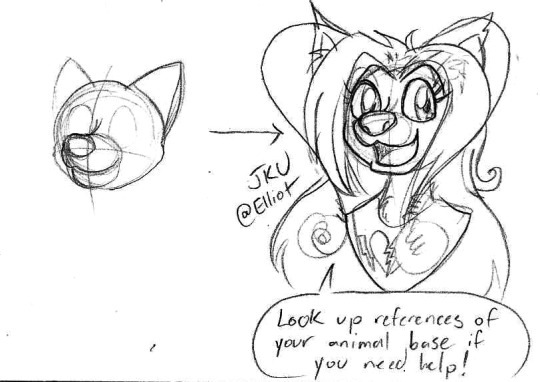
Furries or more realistically styled anthros will tend to have more shapes and forms in their facial construction to better adhere to the anatomy of the animal they’re based on. JKU, my friend Elliot’s fursona, is an alien but the anatomy is based on a dog or a wolf. Study the animal you’re drawing if you need help or even to make a basic breakdown of the shapes you would need.
“How about object heads, like Cuphead?”

Absitively-posolutely! I personally use the circle foundation when drawing the Cup Bros or even just for general mapping the direction they’re looking, but once you master it, you can take the basic shape of the object you’re using, like this candle girl, and manipulate it to get it where you need them to face without relying on the circle.
Alright, now that you understand the basics of drawing a head, let’s move onto
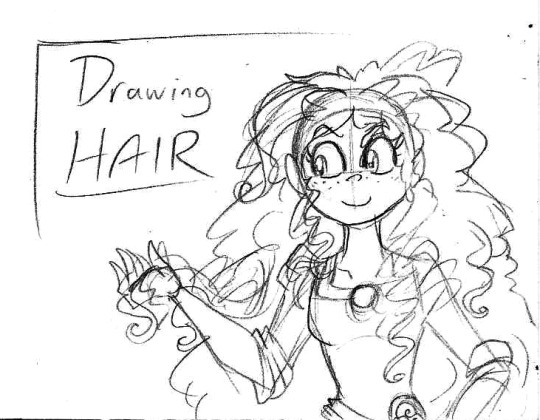
Hair is a total mess and if there’s one thing I will warn beginning artists right now, DON’T DRAW STRAND BY INDIVIDUAL STRAND. It helps to think of hair and draw it in larger chunks and forms as a whole than by each individual one. As I shall demonstrate with my boi Guzma:
Okay, now that we have removed accessories from the picture, let’s set this up.

The process goes by starting with a basic head and the respective features of the character. Now we add the hairline, a visible boundary where the hair coverage begins. You‘ll sketch it for the forehead, the sideburns, and the nape of the neck if you’re in rear views. Now, piece by piece, we sketch the hair; I started with the floof at the top, then the right side of the sketch, then the left. If you have a character with a symmetrical hairstyle/haircut, remember the technique to avoid “the other eye” (or cheat by using the symmetry pen in digital).
The hairline itself varies from character to character or style to style, sometimes more seasoned artists won’t use it since it becomes hidden anyway. It does come in three basic shapes: flat (as seen on Guzma), protruding (it comes out a little bit in the front but following a smooth contour), and a widow’s peak, as seen on Equius:
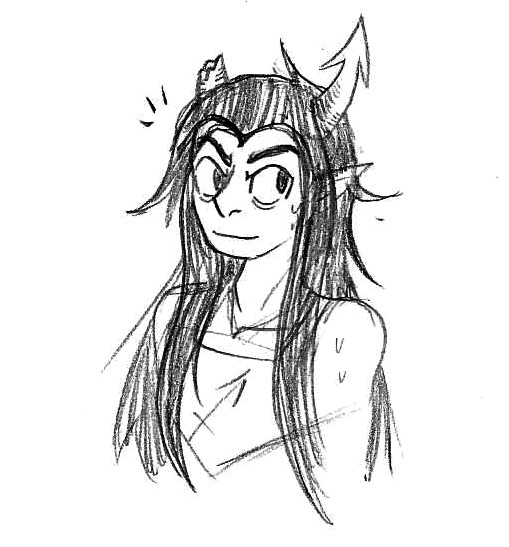
The hairline is also useful in drawing and styling a character’s bangs or even indicating how the hair parts. Know what else it’s nifty for? It’s actually one of the most noticeable indicators of age. And you knew this example was coming and you probably even saw it coming from a mile away so let’s get it over with.

In 2018, Ace of the Gangreen Gang from The Powerpuff Girls became an official member of Gorillaz, temporarily taking up the role as the bassist while Murdoc was in jail. Since the band members age in real time, the same applies to Ace. Besides the addition of a couple wrinkles, the most noticeable effect time has had on him is the receding hairline and decreased volume/body his hair has compared to when he was within spitting range of becoming a legal adult. I could even do an entirely new tutorial on hair by age, but this is just the basics.
So we talked about hairlines and drawing in large chunks. What about characters with hair accessories or their hair pulled into ponytails or pigtails? Allow Plumeria and Bubbles to demonstrate:

Take your basic head and define the hairline (though it may be impractical on any angle on the PowerPuff Girls). Draw in the part and bangs if applicable and define the volume of the hair close to the head. Lightly sketch a circle on each side where the hair gathers on the head and map out the length of the hair. Define the pigtails first and then the hair accessories. And you good!
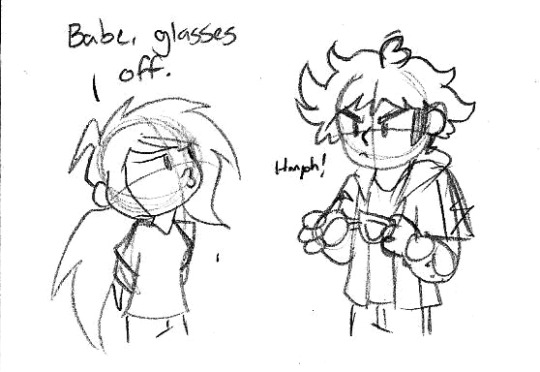
For specific textures of hair, look for references or additional tutorials. Bald characters such as Russel Hobbs or Dr. Eggman don’t really need much of a tutorial, but you do want to make sure the head is constructed very well to make it convincing. And on that topic...
TROUBLESHOOTING
These are some traps that beginning artists fall into or rookie mistakes seasoned artists shouldn’t be making on prime pieces. Let’s break them down:
Balloon Heads and Painted-on Faces
These two are beginning (more pronounced for anthro) artist pitfalls and tropes that were very common among the Sonic fandom back when Sonic X was at the peak of its popularity online in the late 2000s and early 2010s. Ohohoho... man, those were some times. Now, I do like Sonic X and even Sonic Underground, but it’s frustrating how prevalent balloon faces are in these professionally--well, mostly professionally--made shows put to television. As demonstrated here:
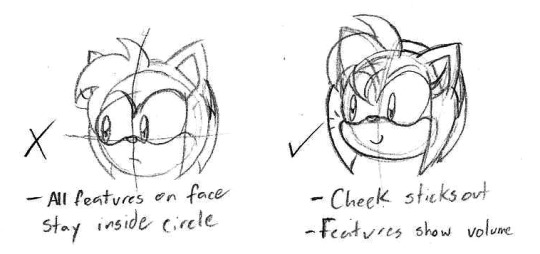
On the left, the example keeps all the features of Amy’s face within the basic circle with no indication of volume. Nothing that would indicate what parts of the face are supposed to stick out and it’s not exactly in a style that makes it simplistic enough to slide. The right, while not perfect, could reasonably be translated to 3D or CGI and the anatomy would check out and make it more convincing. At least, in 3/4 view or front view and some frames of Sonic X can be brushed off as an odd camera angle or going into a moving frame or just being too far away from the camera to properly discern some features. In profile view it’s less forgivable and more common to Sonic Underground and beginning artists.
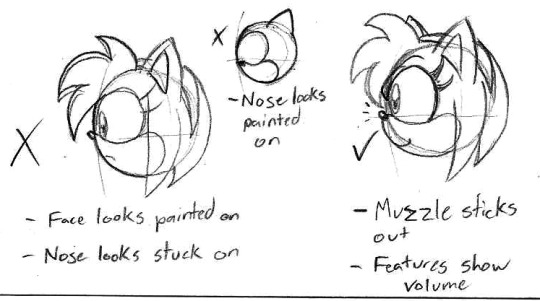
In profile view, balloon heads/painted-on faces are a very noticeable mistake derived from keeping all the features inside the circle. At the very worst you can have the inset in the middle, where the nose is inside the guide circle and looks very much like it was just painted on. This is something that most artists usually grow out of in their last years of elementary school (or for those who use the metric system, primary school). At best, the mistake is just sticking the nose on the outside of the circle without accounting for convincing shape of the face, such as the Amy sketch on the left. On the right, the muzzle and, if you can see it, “eyebrow” stick out to convey how the eyes are covered based on the Mobian skull and the muzzle sticks out to accommodate the internal structure of the face. As seriously as you can take a cartoon character’s anatomy and biology, anyway.

Really the only case I could see these mistakes being fine or harmless is on object heads like Lucius (a billiard ball) and Claire (a sugar bowl) in the rubber hose style. However, the style is deceptively easy in which it may look simple but you have to have a good grasp on the style or it falls into the uncanny valley. Balloon heads and painted on faces seem to be more common to stylized anthro characters, but I’ve made a number of fluffy anime creatures and anime-styled human characters in seventh grade that fall into the trap.
Lopping
More common to human and humanoid characters, lopping is a mistake in which you draw the face alright but the hair at the top of the head really doesn’t look right to the point that the head itself doesn’t look right.
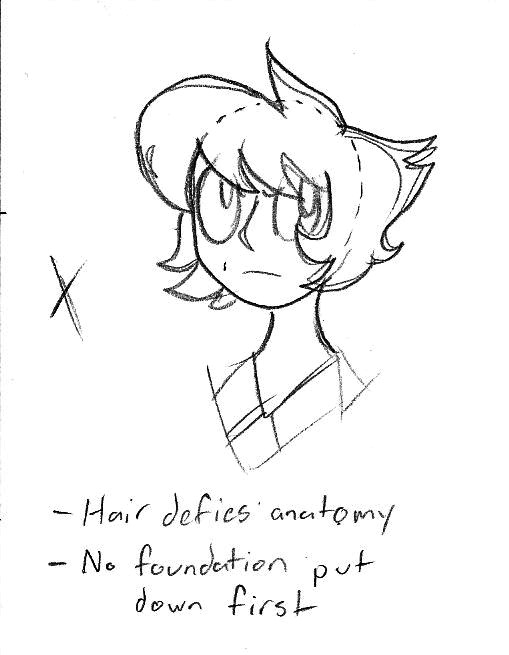
You’ll notice in this drawing of Lapis that the face shape looks okay, the eyes and nose and mouth are where they need to be, the hair is the right style, but it looks... off. Sketching a dotted line to outline the head at its most basic form shows that the hair placement defies the rules of anatomy. Such a mistake is what I call lopping, as it looks like the head was lopped off and the hair is trying to cover it. This is why I stress starting your sketch with basic shapes and then constructing details around the foundation.

Looks much better, right? And since in Steven Universe the gems don’t really have ears (at least, that’s my observation), you can lightly sketch in an oval where the ears normally are (in 3/4 and profile views) to help draw in the face shape and jawline.
As always, practice drawing these regularly and don’t shy away from references if you need something to study or a visual aid or guide. Happy drawing!
Next episode: No plans, but will take requests or suggestions in my inbox/Discord.
15 notes
·
View notes
Last Seen Blogs

superlifeworldbusiness
super life world


taylorkitschworldblog
Taylor Kitsch World

thanks-im-not-the-only-one
Thanks I´m Not The Only One

zousan7art
zou-san