#Deionized Water Heater
Text
Industrial Water Heater
Universal Heating Solutions offers a range of industrial water heaters in the UK. Explore their solutions for efficient, reliable, and cost-effective heating.For more details call us at 0845 528 0042
0 notes
Text
Role of Commercial Electric Water Heater in Hotels & Restaurants
Commercial electric water heater need to be efficient since they play a crucial role in the running of restaurants, hotels, and other commercial buildings. Manufacturers are required to conduct tests to evaluate a product's ability to vent properly and to maintain a consistent temperature. Additionally, energy-efficient equipment is now required by government rules. Because of these factors, water heaters come with Universal Heating Solutions with a wide range of functions to meet different household and business purposes. Here are a few characteristics you might want to think about for business apps.
Features of Universal Heating Solutions Electric Heater
To begin with, you could be unclear as to what commercial water heaters are. A commercial water heater is a particular kind of heater designed to heat water for commercial use. These typically indicate that a lot of water has to be heated or that the heating process needs to move quickly to avoid interrupting operations. Commercial water heaters are frequently required by establishments including hotels, restaurants, hospitals, schools, retail malls, and office buildings.
Security
Because they eliminate the risks and issues related to heating water through combustion, electric water heaters are safer than fuel-fired water heaters.
Installation that is less expensive
Compared to a fuel-fired machine, installing an electric water heater is much easier. For instance, PVC tubing must be installed up and out of the ceiling in order to properly vent a gas heater through a flue. You simply need to install a specific outlet or bare wiring when installing an electrical water heater. No need to drill through the roof!
It's easy and practical
Electric heaters are easy to use. Because an electric connection is simpler than a gas connection, the majority of electric water heaters are basic. As a result, they are the most straightforward and practical method of heating water in both residential and commercial structures.
When hotter water is needed for specific purposes, such as dishwashing, an Industrial Water Heater makes an ideal booster heater.
Requires Less Space
Your Commercial kitchen water heater can be installed in a small space like a kitchen. The majority of electric water heaters can be put on walls and will function flawlessly. You might need to make more room with a gas heater for safety reasons. As a result, you don't need to worry about placing an electric water heater close to a propane tank or natural gas line at your residence or place of business.
Do you require a brand-new commercial water heater for your establishment? Are you looking for materials for business plumbing? Universal Heating Solutions will take care of you. They are your go-to company for plumbing, washroom, and commercial water heater equipment, parts, and supplies.
Contact Us
UNIVERSAL HEATING SOLUTIONS LIMITED
262 Manchester Road
Warrington Cheshire
United Kingdom Wa1 3rb
0845 528 0042
0 notes
Text
High quality Smart Technology Digital Controller and Display supplier offers affordable, powerful, compact demineralised/deionized water heater for industrial hot DI water systems in UK. Call us at 0845 5280042 for any enquiry.
0 notes
Text
Achieving Pristine Cleanliness: The Benefits of a Spot-Free Water System
Water spots, streaks, and mineral deposits can be a source of frustration for many homeowners, particularly those who take great pride in maintaining a spotlessly clean and polished environment. These unsightly blemishes are often a result of minerals left behind after water evaporates. However, with the help of
spot-free water systems, such issues can be effectively addressed. In this article, we will explore the concept of spot-free water systems, their advantages, and how they can revolutionize everyday tasks.
What is a Spot-Free Water System?
A spot-free water system, also known as a deionized water system, is a water purification technology designed to remove impurities, minerals, and ions from water. The process typically involves passing the water through special filters or resin beds that exchange contaminating ions for hydrogen and hydroxyl ions. This results in water that is free of minerals and other impurities, making it ideal for various applications.
The Benefits of Spot-Free Water
Streak-Free Surfaces: Spot-free water ensures that surfaces, such as windows, glassware, and vehicle exteriors, dry without leaving streaks or spots. This is particularly important for maintaining a crystal-clear appearance and enhancing the aesthetic appeal of objects.]
Extended Appliance Life: The absence of mineral deposits in spot-free water helps prevent scaling and corrosion in appliances that use water, such as dishwashers, washing machines, and water heaters. This can extend the lifespan of these appliances and reduce maintenance costs.
Reduced Cleaning Effort: Cleaning with spot-free water significantly reduces the need for harsh detergents and chemicals. Surfaces cleaned with spot-free water require less effort to maintain their pristine condition.
Eco-Friendly: The reduced use of cleaning chemicals and detergents benefits the environment by minimizing the release of harmful substances into water systems. Additionally, spot-free water systems often use less water during cleaning processes.
Improved Skin and Hair: Spot-free water is gentle on the skin and hair, as it doesn't contain harsh minerals that can cause dryness or irritation. Bathing and showering with spot-free water can lead to softer skin and smoother hair.
Cost Savings: While the initial investment in a spot-free water system may seem significant, the long-term cost savings from reduced maintenance, cleaning supplies, and appliance repairs can be substantial.
Applications of Spot-Free Water Systems
Spot-free water systems have a wide range of applications, including:
1. Residential Use: Homeowners can benefit from spot-free water for a variety of tasks, including cleaning windows, washing vehicles, and improving the quality of tap water for everyday use.
2. Car Washing: Spot-free water is invaluable for professional car wash businesses and individuals who prefer to wash their vehicles at home. It ensures that cars dry without leaving water spots, enhancing their appearance.
3. Window Cleaning: Spot-free water is essential for professional window cleaning services. It ensures a streak-free and crystal-clear finish on glass surfaces.
4. Laboratory and Healthcare: In laboratory settings, spot-free water is crucial for various experiments and diagnostic tests. It's also used in healthcare facilities to ensure the cleanliness of surgical equipment.
5. Food and Beverage Industry: Spot-free water is employed in the food and beverage industry for applications such as steam production, boiler feedwater, and ingredient preparation.
Choosing the Right Spot-Free Water System
When selecting a spot-free water system, it's important to consider the specific needs and scale of your application. Some systems are designed for residential use, while others are suitable for commercial and industrial applications. Factors to consider include the flow rate, capacity, and the type of filters or resins used in the system.
For More Info :-
Di Resin Water System
0 notes
Text
How to Remove Chloride from Water (Top 3 Methods)

Chloride is a common anion that combines with minerals like sodium, calcium, and magnesium to form salts. It's most often found in groundwater supplies - so if you have a private well, your water probably contains chloride.
Chlorides are harmless in low concentrations, but large amounts may affect your water taste and damage your plumbing.
Here, we've shared the best methods of removing chloride from your water.
📌 Key Takeaways:
- Chloride is an anion that's naturally present in all water bodies, including rivers, streams, and groundwater supplies.
- While chloride isn't harmful to human health in low concentrations, it may affect water taste and increase its corrosive properties, leading to metal leaching from your pipes and plumbing.
- The best chloride removal technologies are reverse osmosis systems, water distillers, and deionization systems.
🤔 What Is Chloride?
Chloride is an anion that's commonly found in all tap water supplies, especially well water.
It combines with different minerals to form salts (for example, chloride and sodium combined form sodium chloride).
Don't confuse chloride with chlorine. While both are made from the same element, chloride can't be used to disinfect water because it isn't reactive enough.
Chloride has a wide range of commercial and industrial uses. It's used to make chlorine, de-ice roads, and treat industrial wastewater. Potassium chloride is used to make fertilizers.
In low levels, chloride isn't harmful to health. However, it has several aesthetic effects, which we've discussed in more detail later.
🚱 How Does Chloride Get Into Drinking Water?
Chloride is present naturally in most groundwater supplies. It enters water as a result of seepage - when water flows through layers of rocks and soils, picking up chloride as it travels into the aquifer.
Chloride is found in greater concentrations in well water supplies that are located near sea water and other saltwater bodies, as well as wells near salt storage facilities or wells in snowy regions where the roads are regularly treated with salts for de-icing.
⚠️Is Chloride In Water Harmful?
Chloride in water isn't harmful in naturally present concentrations.
However, elevated chloride levels are associated with elevated levels of sodium (salt), and high sodium levels are dangerous.
Potential health effects of ingesting very high concentrations of sodium chloride in water are nausea, vomiting, thirst, and convulsions.
In the long term, consuming elevated levels of sodium chloride increases your likelihood of developing hypertension (high blood pressure) and may complicate existing cardiovascular issues.
If your water has high concentrations of sodium, it'll taste salty, like seawater - so you should know about the problem.
🩺 Effects Of Chloride In Your Home
Chloride is more likely to have aesthetic effects than health effects in your water.
These include:
- Unpleasant water taste - Elevated chloride levels may give your water an unpleasant taste.
- Corrosion of pipes & plumbing - If your water supply contains sodium chloride ions, it'll have corrosive properties and may damage your appliances, pipes, fixtures, and water heater. Depending on what your plumbing and fixtures are made from, this could lead to elevated levels of lead or copper in your water.
- Stunted plant growth - If you use water that's high in chlorides to water your plants, the chloride may reduce the size of plant cells and reduce growth.
The exact effects of chloride in your home and garden depends on which minerals are present alongside the chloride and the concentrations of chloride detected.
🧪 How To Test For Chloride In Water
You can test for chloride in water with a laboratory water test.
The laboratory will send you the items you need to take samples of your tap water, including vials for collecting your samples and a shipping label for returning the samples via post.
After returning your samples to the laboratory, you'll need to wait until the results are delivered via email (typically within 7-14 days).
How much chloride is potentially dangerous? Chloride itself isn't regulated by the Environmental Protection Agency (EPA), but the EPA does recommend that chloride levels are within 250 mg/L in drinking water. So, if your water's chloride concentrations are higher than this, you should react accordingly.
⚗️ How To Remove Chloride From Drinking Water
Here are our top three recommended methods of removing chloride from drinking water.
Reverse Osmosis
This method of chloride removal consists of several filtration stages:
- A sediment pre-filter
- A carbon pre-filter
- A reverse osmosis membrane
- A carbon post-filter
It's the semi-permeable membrane in an RO system that's responsible for the removal of chloride. Membrane separation is a process in which water molecules are separated from all the dissolved solids, including minerals and salts.
Reverse osmosis is effective enough to remove up to 99.9% of all total dissolved solids. These impurities are sent down a waste pipe with a small amount of wastewater.
You can install a point-of-use reverse osmosis system underneath your kitchen sink or on a countertop. There are also whole-home RO systems available, but these aren't super popular because they're very expensive.
Continue Reading: Find Out Which Reverse Osmosis Systems Excel in Chloride Reduction
Water Distillation
Water distillers are another effective chloride removal solution.
Like a reverse osmosis system, a water distiller is capable of removing the majority of dissolved solids from a tap water supply. The treated water is pure, meaning it contains no or very few impurities.
A distiller boils water until it vaporizes. Minerals, salts, and chloride ions are unable to evaporate at water's boiling point, so they're left behind in the boiling chamber. The water vapor is funneled into a separate container, where it condenses drop by drop.
Most water distillers for household use are countertop units that can purify around 1 gallon of water at a time. The distillation process takes around 4-5 hours for a single batch of water, so the biggest setback of this method is that it doesn't provide purified water on demand.
Deionization
A deionization (DI) system collects chloride ions on an anion-exchange resin, removing them from water.
The DI process also removes other anions from water, including sulfate, and other ionized minerals and salts.
There are a couple of setbacks of deionization:
- First, this process ONLY removes charged ions, so it won't remove other dissolved contaminants with health risks.
- Secondly, high concentrations of sulfate will reduce the effectiveness of the resin, so you may need to use a pre-treatment system if your water contains a lot of sulfate.
Most deionization units are countertop systems, but there are also point-of-entry systems that treat your entire home's water supply.
Related Articles:
- RO vs DI Water: Understanding the Differences and Benefits
- Choosing Your Water Type: Distilled vs Deionized Water
⛔ Which Methods CAN'T Remove Chloride From Water?
Basic filters can't be used to remove chloride from water. These include:
- Activated carbon filters
- Ceramic filters
- KDF filters
Chloride is an anion, which means it can only be removed by a water treatment process that's capable of removing charged ions, minerals, and salts.
Boiling your water also won't remove chloride. When water is heated to boiling, some of the water molecules will evaporate, leaving the same amount of chloride in a smaller volume of water.
Finally, water softeners will not remove chloride from water. Water softeners are designed to eliminate calcium and magnesium minerals, but they won't remove chloride on its own.
🔎 Factors That Affect Chloride Removal Process
There are a few factors that may affect the chloride removal efficiency of an at-home treatment system:
- Other contaminants in your water - Certain other water contaminants may affect a filter's removal abilities or clog/foul the filter media or membrane. You may need to install a pre-filter, depending on what your water contains.
- Water flow - Some chloride removal systems, like reverse osmosis filters, need fast-flowing water to effectively remove contaminants without wasting too much water. Boosting the incoming water pressure is a simple method of improving removal efficiency and limiting water waste.
- System capacity/lifespan The capacity and lifespan of the filters/resins in chloride removal systems determine how long they can effectively reduce chloride before they become ineffective. You can replace the filters to sustain effective chloride removal in the long run.
📑 Final Word
Chloride isn't one of the most dangerous drinking water contaminants as far as human health is concerned, but it can still be problematic in drinking water.
Hopefully, you're now equipped with the knowledge you need to decide whether or not you need a water treatment system for removing chloride, and if so, which method of removal is best for you.
Read the full article
0 notes
Text
HOW TO MAINTAIN THE COOLING SYSTEM OF VOLVO GENERATOR ENGINE
HOW TO MAINTAIN THE COOLING SYSTEM OF VOLVO GENERATOR ENGINE
- Different types of coolant must not be mixed with each other.
- Risk of reduced cooling function and performance by clogging and isolation..
- Follow the mixing recommendation on the product.
- The coolant should be mixed with distilled, deionized water. For Volvo Penta specified water requirements
# NOTICE:
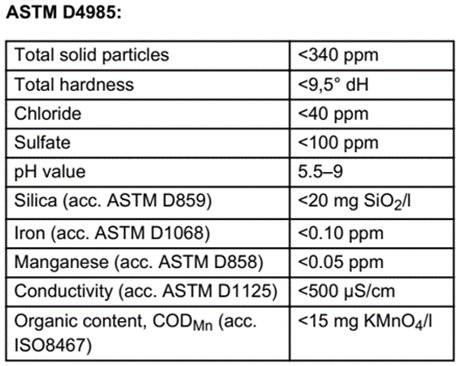
Always use “Ready Mixed” coolant if water quality cannot be determined or if it does not fulfill ASTM D4985.
Never mix more than 60% concentrated coolant with water.
1) Coolant Level, Checking and Topping up.
# NOTICE:
- Do not open the coolant filler cap when the engine is hot, except in emergencies as this could cause serious personal injury. Steam or hot fluid could spray out
- Only use coolant recommended by Volvo Penta. Fill up with the same type of coolant that is in the system. Different types of coolant must not be mixed with each other
- Filling of coolant must be performed with the engine stopped. Fill up slowly, to allow the air to flow out. Check the coolant level daily before start.
# Carry out:
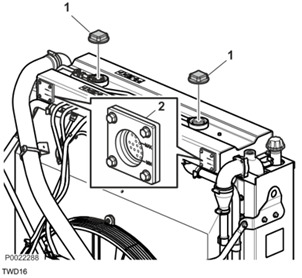
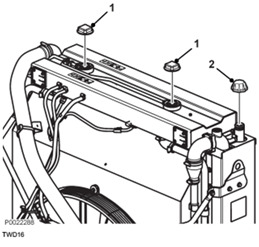
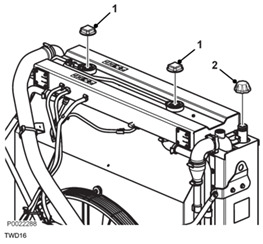
- TWD16:
1- Open the filler caps (1).
2- Check that the coolant reaches the MAX mark on the sight glass (2). Top up with coolant as required
3- Close the filler caps.
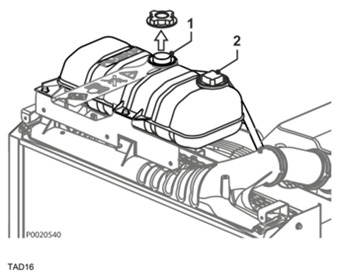
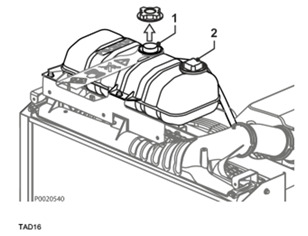
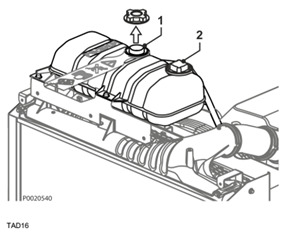
- TAD16:
1- Open only the filler cap (1). Do not open the pressure cap (2).
2- Check that the coolant level is between the MIN and MAX marks on the expansion tank (1). Top up with coolant as required
3- Close the filler cap.
2) Filling a completely empty system.
- Mix the correct amount of coolant in advance, to ensure that the cooling system is completely filled. Refer to Technical Data, page 91 for the correct coolant volume.
- Do not start the engine until the cooling system is completely filled and vented.
- If a heating unit is connected to the engine cooling system, the heating control valve should be opened and the installation vented during filling.
- Carry out topping up in the cooling system:
1- Kiểmtraxemtấtcả drain points đãđượcđónglại.
2- TWD16:
Open the caps to both the expansion tank (1) and the radiator (2). Fill the expansion tank so that the coolant reaches the MAX mark on the sight glass. Close the filler caps.
TAD16
Open only the filler cap (1). Fill the expansion tank so that the coolant level is between the MIN and MAX marks. Close the filler cap.
3- Bleed the system at the bleeding nipple (3).
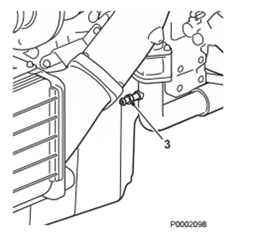
4- Start the engine when the coolant system completely filled and vented. Open any bleeding nipples a short while after starting, to allow trapped air to escape.
5- Start the engine after approx. one hour and check the coolant level. Top up with coolant as required.
3) Coolant, Draining.
- On engines which are to be put in storage, the engine cooling system should not be drained. the coolant contains corrosion inhibiting additives.
1- Stop the engine before draining.
2- TWD16
Open both the pressure caps on the expansion tank (1) and the filler cap to the radiator (2).
TAD16
Open the filler cap (1). Do not remove the pressure cap (2).
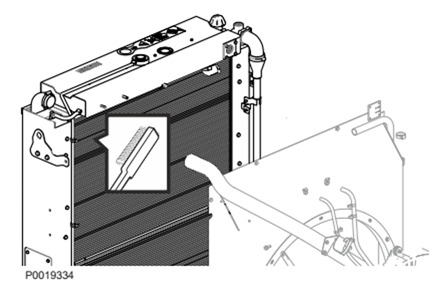
3- Open all drain points. Drain the coolant from the radiator and engine block, using the drain hose. The drain nipples are situated under the radiator on the right side of the engine block.
4 - Check that all coolant drains out. Deposits may be found inside the drain plug/tap, and need to be cleared away. There is otherwise a risk that the coolant could remain and cause frost damage. Check whether the installation has any further taps or plugs at the lowest points of the cooling water pipes.
5- Close any taps and check that the spring-loaded covers on the nipples close completely. Install the rubber plugs and the filler cap(s).
4) Charge Air Cooler, External Cleaning.
- Do not use a high pressure power washer.
- Remove guards as necessary, to access the radiator.
- Clean with water and a mild detergent. Use a soft brush.
- Be careful not to damage the radiator vanes. Reinstall removed parts.
5) Cooling System, Cleaning.
1- Empty the cooling system. Refer to Coolant, Draining, page 75.
2- Put a hose into the expansion tank filling hole and flush with clean water, as specified by Volvo Penta– refer to section Water quality in Technical Data, page 91 until the water draining out is completely clear.
3- If there should still be some contamination left after flushing for a long time, cleaning can be done with coolant. Otherwise, continue as in item 8 below.
4- Fill the cooling system with 15-20 % mixture of concentrated coolant. Use only Volvo Penta recommended concentrated coolant mixed with clean water.
5- Drain the coolant after 1-2 days of operation. Remove the filler cap and possibly the lower radiator hose to increase the speed of emptying. To prevent suspended material from settling back in the system emptying should be done rapidly, within the space of 10 minutes, when the engine has not been standing still for a long time.
6- Flush the system immediately and thoroughly with clean hot water to prevent dirt from settling in the inner areas. Flush until the water that runs out is completely clean. Make sure that any heater controls are set to full heating during emptying.
7- If contamination should still be left after a long period of flushing, cleanout using Volvo Penta radiator cleaner, followed by finishing-off with Volvo Penta neutralizer. Carefully follow the instructions on the package. Otherwise, continue as in item 8 below.
8- When the cooling system is completely free from contamination, close the drain taps and plugs
9- Fill up with Volvo Penta recommended coolant, following the instructions in the chapters entitled Maintenance, page 72 and Coolant Level, Checking and Topping Up, page 73.
6) Cooling air filter.
6.1) Installation
1- Slide one half of the filter over the fan cover (as in fig.1).
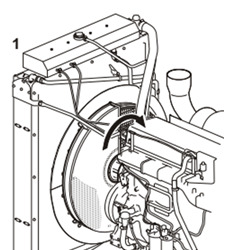
2- Turn the half filter until it is able to hang loosely on the fan cover (see fig. 2).
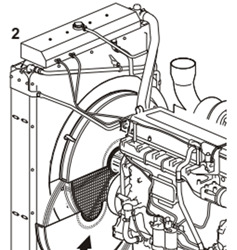
3- Slide on the other filter half and secure the two halves together with self-affixing velcro tape (as in fig. 3a).

4- Fasten the outer velcro tape around the fan cover guard (as in fig. 3b and 3c).
6.2) Removal and cleaning
1- Remove the cooling filter
2- Brush away any heavy dirt with a soft brush.
3- Rinse the filter with water
NOTICE: Do not use gasoline, steam, a high-pressure washer or other cleaning agents.
4- Re-install the filter according to instructions.
For more information, visit https://ttttglobal.com/us or email [email protected]
1 note
·
View note
Quote
Koo Energy is a health tech company located in Yio Chu Kang, Singapore. They attempt to treat physical and mental health in children and adults. They use organic cotton with sleep therapy, distilled water and infrared rays. It claims to treat anxiety, behavior, detoxification, response, sleep, speech, temperament and toileting. They believe the cause of mental and physical issues is the accumulation of heavy mets in the body, especially the head. They claim that their treatments promote cell regeneration. "The human body’s ability to replace worn out cells with shiny new ones is key to the long lifespans we’re so used to. There are a couple of things we keep all our lives, like the visual cortex, but almost everything else wears out and gets replaced, at least for part of our lives. And some things, like our hair and nails, just grow and grow and grow.We’ve gathered together scientists’ estimates of how quickly different types of cells grow. Many of these ages have been established using a technique called bomb-pulse dating, which uses the traces of atomic radiation we each carry to determine how old cells are."They offer autism and adhd seminars as well. There is very little information available about the company Koo Energy. Koo Energy's Belief About AutismThey believe that autism is an advanced and more complicated form of ADHD. They believe that toxic heavy metals are present at higher levels in the midline cerebral canal and gathered in uneven layers. They believe it all has to do with the amount of heavy metals in the canal and in what positions they are accumulated. With Autism, the additional layers of mercury interfere even more greatly with metaphysical and electrical energy communications trying to cross the canal. They say exposure to mercury and other heavy metals cause autism. They do not come out and say vaccines cause autism BUT all the details of the anti vaxxer rhetoric is there. Koo Energy believes in order to cure ADHD and Autism, they must:provide glucose to the brainflush out heavy metals and other toxinsheal brain tissuecalm the mindsupport healthy neuron signal transmissionstrengthen central nervous systemTypes of Reactions They disclose. This means "it's working":Mild:constant fartconstipatoncoughdark eye circleear dischargeeye tearingmouth ulcerrunning nosestomach acheweight gain/lossModerate:acne of face or neckbad breathbody odorbruises of the back or limbschest tightnesseczemamucus dischargemuscle painnight sweatpimples on back or chestwounds on back or limbsIntense:blood dischargediarrheafevernose bleedsred bumpsvomitingTypes of TreatmentSleep therapy with organic cottonKoo energy believes all mental and physical health issues can be healed through sleep. The extra energy with boost the self healing ability. They believe that batches of heavy metals in the head are discharged into the blood, rounds of detoxification symptoms with appear one after another in order to "purge out heavy metals from the body." They say some children take 6-12 months to fully detoxify. Some are longer. They claim once heavy metals have been cleared from the "midline canal" with koo energy sleep therapy, learning is possible. They have the slogan "Health issues? Just sleep." Sleep therapy includes the assessment, koo energy healing mat and the consultation. They don't sell the healing mat separately because the assessment gives you customer their opinion of their health and "discuss the healing journey ahead." The healing mat is made of organic cotton. They say the purpose of the intensive consultation is detoxification. This requires "your management." A team of consultants keep track of the clients progress. The consultations take several months to complete. What is Organic Cotton?Organic cotton is cotton that is grown wihtout using synthetic chemicals as pesticides or as fertilizers. This method promotes biodiversity and biological cycles. In the United States, cotton grown at plantations that meet the requirement of the National Organic Programme (NOP), US Department of Agriculture (USDA) is considered organic. Organic Cotton has no genetic difference from inorganic cotton. The only difference is chemicals being used or not being used. That is it. There is no healing benefit. It's a good fiber for textiles. THAT IS IT. Koo Energy's proof is growing beans on a regular mat opposed to their healing mat. It is unknown the growing conditions for the beans and how well controlled the environment is. This has no scientific value. Far Infrared RayThe far infrared ray is the same infrared radiation used in infrared saunas. Several studies they link on their website showing it is the same as sauna infrared. Koo energy calls it the ray of light. They claim it:oscillates water moleculesproduces gentle heatincreases skin temperatureexpands micro capillariespromotes blood circulationimproves metabolismeliminates body waste, toxins and heavy metalsassimilate nutrientsactivates cell function regenerates cells. What infrared radiation actually does:Infrared heaters emit light experienced as radiant heat. It is absorbed by the surface of the skin. These saunas heat the body primarily by conduction and convection from the heated air and by radiation of the heated surfaces in the sauna room. Because of this, the infrared sauna isn't an actual sauna by Finnish sauna societies. This is because of the application of the infrared electromagnetic field spectrum to the human body.According to the International Commission on Non-Ionizing Radiation Protection (ICNRP), the risks of Infrared therapy are:thermal injury, an injury can be present even if pain is not felthyperpigmentationscalingtelangiectasias (widened tiny blood vessels are visible on the skin)Reduced DNA repair efficiencyCan promote skin cancer initiated by other triggersThickening of the skinRetina damageEye lens damage, leading to cataractsHyperthermia (core body temperature is too high)Water HealingWater healing is the belief that drinking high energy water will promote healing. They assess the energy level with a dowsing rod. A clockwise rotation means a positive reading. A counterclockwise rotation means a negative reading. Each turn of the dowsing rod is an energy level. What is Dowsing?Dowsing is where a person walks over land while holding two L shaped rods in their hands parallel to each other and when they walk over a patch of underground water, the rods magically cross. This technique was invented over 450 years ago. It was probably thought of as witchcraft. Another name for this practice is "water witching." In modern day and after the development of the of the scientific method, it is understood that the phenomenon is caused by the ideomotor effect. This is the same effect that makes the pointer on a Ouija board move without anyone touching it. This effect is when just the act of thinking of something causes muscles to move seemingly "on their own" or "reflexively" without consciously deciding to move. Energy Water Ball:This is put in the distilled water to "increase energy." It produces infrared rays that cause resonance vibration. "The resonance is transmitted to clusters of water particles.This effect causes the gradual separation of individual molecules of H2O, thus producing de-clustered water, also known as koo energy Water.Due to the nano size, koo energy Water penetrates into each cell, providing hydration even to deep layers of skin. This facilitates detoxification of cells, thereby stimulating their regeneration and auto-regulation. This enhances skin renewal and strengthens its natural defence mechanism.Drinking koo energy Water can instantly hydrate the body, relieving symptoms of dehydration that may include tiredness, headaches, and stiff joints."The claimed benefits:penetrates into cells due to nano sized clusterfacilitates detoxification of cellsstimulates cell regeneration and auto regulationenhances skin renewal and strengthens its natural defense mechanismprovides hydration even to deep layers of skinrelieves symptoms of hydration including sore throat, tiredness, headaches and stiff jointsWhat is Distilled Water?The composition of water varies widely with local geological conditions. Groundwater and surface water is never pure water. Water contains small amounts of gases, minerals and organic matter of natural origin. Distilled water is water almost or completely free of dissolved minerals as a result from distillation, deionization, membrane filtration, electrodialysis or other technology. Distilled water is not appropriate for consumption because:demineralized water is highly aggressive and if untreated, its distribution through pipes and storage tanks would not be possible. The aggressive water attacks the water distribution piping and leaches metals and other materials from the pipes an associated plumbing materials. Distilled water does not taste goodPreliminary evidence showed that some substances in water could have beneficial effects on human health. The adverse effects of consuming distilled water are:direct effects on the intestinal mucous membranes, metabolism and mineral homeostasis or other body functionslittle or no intake of calcium and magnesium from low mineral waterlow intake of other essential elements and microelementsloss of calcium, magnesium and other essential elements in prepared food. possible increased dietary intake of toxic metals. Energy level of each type of water: The energy measurement has no scientific basis as explained above. The energy of distilled water from a water distiller is +53. The energy of distilled water from water distiller with koo energy ball (sitting in the water for 5 minutes) is +93. Energy of distilled water from water distiller with koo energy ball (sitting in the water for 1 hour) is +205. Energy of bottled distilled water is +35.Energy of bottled distilled water with koo energy ball for one hour is +108. Energy of tap water is -0.4Energy of tap water with koo energy ball for 10 minutes is +5.1.Energy of brand k ionized alkaline water is +13. Tried to make contactWhen I tried to make contact to ask them some questions, this came up:message that a consult was not available. Sources:https://ift.tt/393aZ5Zhttps://ift.tt/315nslohttps://ift.tt/3rb0bZVhttps://ift.tt/310hoKghttps://ift.tt/394K6yGhttps://ift.tt/2NI11Q9
http://www.fierceautie.com/2021/03/quackery-exposed-koo.html
1 note
·
View note
Text
Fish Tank Supplies Which are Required to Continue to Keep Your Aquarium Jogging
If you're only beginning along with your very first aquarium you might need to be aware of very well exactly what the critical fish tank provides really are. This includes such essentials as water heaters, atmosphere and water heaters, cleansing supplies, and light methods. The alternative of fish tank provides you simply just need will be contingent on the form and dimension of one's tank for your fish.
One among those initial items in your own list for bass tank provides should become described as considered a fish tank rack alone. Fish tank racks can be found in a number of substances with wooden and metal going are absolutely the absolute most widely used. When choosing a stand out strive to decide on the one which is going to merge with all the plan of the remaining part of the space.
Fish tank hoods are alike very important, and may be located on surface of one's list of bass tank provides. They truly have been required to stop the fish shape jumping from their tank also to decrease the flow of their water. Even the maximum excellent hood is people which can be produced with aluminum. They're fitted using an window to get feeding on your bass and also have a heating menu, a compartment for putting in the light system, and also are also still light .
An essential thing in the list of bass tank provides to get moderate and greater tanks needs to really become a premium excellent water pump and filter. This may guarantee a highly efficient and effective disposal of wastewater flow as well as recycling of that nutrition. By good fortune, several of the custom-made bass tanks will likely probably become installed with filters and pumps therefore that this really is something that the newcomer shouldn't be concerned about. An Easy Faucet water filter may be Utilized to deionize the water which makes it secure, also it really can be really a very Helpful Portion of the fish water provides.

It might be described as considered a smart expenditure to decide on a water screening kit whenever you're picking your tank for your fish provides. This can permit one to decide on the nitrite, PH and salt material from water. In case some issues are discovered that these may be immediately fixed.
Lighting will include different colors for one fish tank, also shape the following significant part tank for your fish provides. They can be found in several colors red, blue or green, and also certainly will put in an appealing shade into the tank for your fish. Fluorescent and metallic halide bass tank lamps appear to become far the very widely used option.
No list of bass tank provides will likely probably be whole unless a variety of corals, stones, driftwood and perhaps a few battery-powered toys have been comprised. This equipment includes things like wheels and divers. Freshwater baits, ice crystals and small fountains may also be rather common fish tank provides plus also certainly is likely to get your tank seem more amazing. When adding some other decorations on your fish tank be certain they are especially tagged and planned to use in fires.
Usually do not neglect to provide your fish tank a green signature by setting up a few plant-lives. The vinyl plants that are simple to put on your fish tank include a variety of layouts, for example as for example arrow-head, green and yellowish spike, hair-grass and also a lot additional. They ought to really produce a helpful section along with your fish tank provides.
Fixing the tank for your fish will likely probably undoubtedly be problematic than it should be in the event you don't need the essential tank for your fish provides. Algae development over the surfaces of this tank for your fish along with set of waste can pose like a hazard to this delicate eco system or maybe even taken off your tank. Additionally, your fish tank will probably look far more attractive if it isn't covered from soil. Your fish tank provides needs to hence incorporate a algae scrapper and additionally gravel cleaners, that enable one to wash out the tank and then eliminate any filth which drains into the base of the tank. Click here for more information.
1 note
·
View note
Text
Procedure for Cleaning, Operation, and Calibration of Incubator
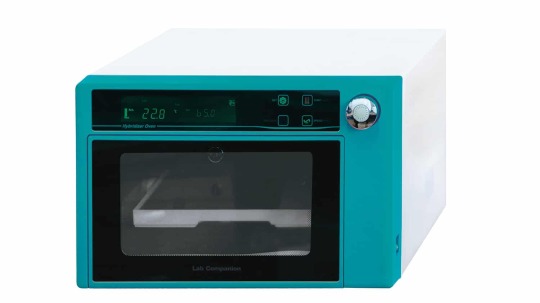
If you want to develop and provide optimum storage for your cell cultures properly, you must maintain the highest performance standards for your lab incubator. Decontamination, cleaning, proper usage, and calibration of an incubator keep it running efficiently. An efficient incubator maintains the required gaseous, humidity, and temperature levels. No matter the types of incubator, such as Biological Oxygen Demand (BOD), dual or single block, they have almost standard cleaning, operation, and calibration methods.
If your equipment is not working as it should or its calibration certificate has expired, contact us at Biotechnical Services Inc. for testing, maintenance, and incubator calibration in Los Angeles. We provide precise and accurate calibration of all types of lab incubators.
The procedure of Cleaning Your Incubator
Transfer Your Cell Culture to Another Incubator
Before cleaning your incubator, transfer your specimen to the next incubator to avoid contamination or getting your culture compromised during the process. When your incubator is empty, you can work on it with comfort and perform confident and thorough cleaning. The next step is to shut down your incubator and cut the gas supply off.
Remove The Shelves and Internal Components
For proper cleaning of your incubator, take out all the removable components. Empty your water dish and wipe it with a clean cloth to avoid shedding fibers and lint.
Clean The Internal Surfaces
Using a mild dish detergent or a botanical cleaner, clean all your incubator’s internal parts, including the shelves, ducts, shelf supports, door gaskets, and fan. Ensure that you remove all the residues, dirt, and dust. Rinse the interior surface and wipe using a dry cloth. When you have entirely wiped every component, disinfect the interior chamber with 70% alcohol to keep your incubator clean and eliminate any lingering disinfectant.
Turn The Incubator Heat On
Close the incubator door and turn the heat on. Closing the door ensures that the incubator does not attract dust and other contaminants again during the process. The heating process should take a few minutes only.
Turn On Automatic Decontamination
The decontamination cycle is meant to get rid of any fungi or bacteria. Once the process is complete, fill the sterile water into the water reservoir. Avoid using tap water because the tiny amount of chlorine can corrode the cooper or steel parts with time and introduce more minerals and bacteria. Ultra-pure or deionized water is not recommended because it is aggressive; ions may react with copper, steel, glass, and other components in your incubator.
Clean Incubator’s Exterior
Clean every exterior part of your incubator to prevent dust, dirt, and other contaminants from getting into your incubator when you open the door. When cleaning the exterior part of the incubator, use a lint-free cloth with soapy water. Wipe with a soft clean cloth and clear water before drying it with a dry cloth. Ensure that you thoroughly clean the door handles and places you mostly touch.
Operation of Lab Incubator
Before operating your incubator, ensure that it is clean and has no residue from the previous specimen. When you have ascertained that your incubator is clean, connect its plug to the power source. Press ON both on the main switch and the control panel. You should be able to see the temperature controller, incubator motor, internal displays, and the orange lamp turning on.
On the control panel, press ON on the heating switch; you will notice a green indicator lamp and dry heater. Scroll to your desired temperature on the temperature controller by pressing the decrement or the increment key. Once you have attained your required temperature, set the thermostat at about 5 degrees above the required temperature. The thermostat will cut the power off if the temperature exceeds the allowed 5 degrees before sounding an alarm. When your temperature is set, you will see a green digital on it and a red digital display of the actual temperature.
On your PC or printer, set the time interval for data communication. If necessary, switch on the fluorescent light and enter the temperature monitoring record before recording the incubator log details of your cell culture samples. Ensure that your incubator is kept away from a heating device.
Keep a record of temperature two times a day, i.e., early in the morning and later in the evening.
At Biotechnical Services Inc., you can trust us for your equipment supply, installation, testing, and incubator calibration in Los Angeles.
Lab Incubator Calibration
Switch off your incubator and transfer your specimen to another incubator. Insert the thermal probes before removing the incubator cork from the validation porthole. After setting the temperature probes, switch on your incubator. Once your desired temperature is reached, start the data logger. Record the display temperatures and the data logger temperatures after about 10 or 15 minutes. You can monitor the sets of each temperature for about 2 to 3 hours. If you notice a temperature variation, adjust your incubator accordingly.
Conclusion
Proper cleaning, operation, and calibration of a lab incubator ensure that it runs smoothly and lasts longer. Always ensure that you frequently clean your incubator thoroughly for optimum growth of your cell cultures. Follow the standard operating procedures to ensure that your incubator is appropriately maintained. When your incubator has an error in temperature reading, contact us at Biotechnical Services Inc. for your incubator calibration in Los Angeles.
Original article posted here - https://www.biotechserv.com/procedure-for-cleaning-operation-and-calibration-of-incubator/
0 notes
Text
Benefits of Installing a Water Heater at Your Home
The budget is the most crucial consideration when choosing any equipment, and water heaters are no exception. You need your tankless water heater to function well for you. By effectiveness, you mean that the heater provides the necessary amount of water while using the fewest amount of gas or electricity.
0 notes
Text
Marine tankless water Heater| Universal Heating Solution
The tankless water heater is built to provide continuous hot water whenever you need it! When a hot water tap is turned on, water from the cold water pipe enters the water heater and passes through the heat exchanger. With an electric tankless product, the water passes over the heating elements quickly, heating the water to your desired temperature.
Visit Here : https://universalheatingsolutions.co.uk/
1 note
·
View note
Text
Spot-Free Water Systems: Say Goodbye to Water Stains and Spots
Water is a precious resource that plays a vital role in our daily lives, from drinking to cooking, cleaning, and more. However, one persistent problem that plagues many households and businesses is the issue of water stains and spots. These unsightly blemishes can tarnish the appearance of glass, dishes, and even cars, leaving a less-than-impressive impression. Fortunately, there's a solution: spot-free water systems. In this article, we'll explore what spot-free water systems are, how they work, and the numerous benefits they offer.
Water stains and spots, often referred to as hard water stains, are the result of minerals like calcium and magnesium present in the water. When this water dries on surfaces, it leaves behind deposits that can be challenging to remove. These deposits manifest as cloudy spots on glassware, soap scum in bathrooms, and unsightly stains on cars, among other issues.
The Impact of Hard Water
Hard water not only affects the aesthetics of surfaces but can also damage appliances, plumbing, and fixtures over time. The buildup of mineral deposits can clog pipes, reduce the efficiency of water heaters, and even lead to costly repairs. Furthermore, the constant need for cleaning and scrubbing to remove stains and spots can be a time-consuming and frustrating endeavor.
Spot-Free Water Systems: The Solution
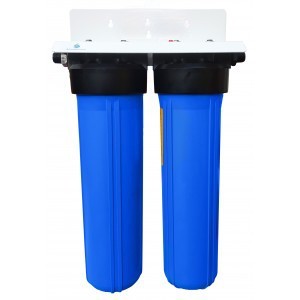
Spot Free Water System offer a practical solution to the hard water problem. These systems use a process known as water softening or deionization to remove the minerals responsible for water stains and spots.
Here's how they work:
Filtration: Spot-free water systems typically include a series of filters that remove impurities and minerals from the water supply. These filters may use resins or specialized media designed to attract and capture calcium, magnesium, and other mineral ions.
Deionization: In addition to filtration, many systems incorporate deionization technology. This process involves passing the water through ion-exchange resin beds, which exchange the mineral ions for hydrogen and hydroxide ions, effectively removing the hard water minerals.
Dispensing: The treated water is then dispensed for use in a variety of applications, from washing dishes to cleaning glass surfaces or even filling up a car's water tank.
Benefits of Spot-Free Water Systems
Spotless Surfaces: The most obvious benefit of spot-free water systems is the elimination of water stains and spots. Glassware, dishes, and windows will sparkle without the need for constant cleaning and scrubbing.
Extended Appliance Lifespan: By preventing mineral buildup in appliances and plumbing, spot-free water systems can extend the lifespan of water heaters, dishwashers, and other water-dependent appliances.
Reduced Cleaning Time and Effort: With spot-free water, cleaning becomes a breeze. Say goodbye to the need for harsh cleaning chemicals and hours spent scrubbing surfaces.
Cost Savings: Spot-free water systems can lead to significant cost savings in terms of reduced energy consumption and fewer repairs and maintenance for appliances and plumbing.
Eco-Friendly: Using spot-free water reduces the need for chemical cleaners, which can be harmful to the environment. It also conserves water, as less water is needed for rinsing.
Spot-free water systems offer a practical solution to the pervasive problem of water stains and spots caused by hard water. By removing the minerals responsible for these issues, these systems not only improve the aesthetics of glassware and surfaces but also contribute to cost savings, environmental benefits, and extended appliance lifespans. Say goodbye to the frustration of water stains and spots and embrace the convenience and efficiency of spot-free water systems. With spot-free water, you can enjoy the beauty and functionality of water without the unsightly consequences.
For More Info:-
Deionized Water For Car Washing
0 notes
Text
DIESEL ENGINE MAINTENANCE INSTRUCTION FOR GENERATOR
HOW TO MAINTAIN THE LUBRICATION SYSTEM OF VOLVO PENTA ENGINE
1) Oil level, checking and topping up- Engine oil, change.
- Dipstick is marked signs "Stop" and "Operating", so we can check the oil level both operating and stopping engine.
- The oil level is compulsory inside marked area in dipstick. Don't top up oil more than marked area.
- Just top up oil when the engine stops.
- Just use oil in "Oil Recommendation" on page 90 in Volvo's operator's manual.
- Change engine oil after 600 operating hours or twelve months.
- Connect the drain hose to the oil drain pump and pump old oil outside and then remove the drain hose and fill up with engine oil.
2) Oil Filter-Pass Filter, Change.
1- Clean the oil filter bracket (2).
2- Remove all oil filters with a suitable oil filter extractor (1).
3- Clean the mating surface of the oil filter bracket. Make sure that no pieces of old oil seal are left behind. Carefully clean round the inside of the protective rim (2) on the oil filter bracket.
4- Put a thin layer of engine oil on the seal rings of the new fuel filters.
5- Install the new oil filters. Tighten the filters ¾–1 turn after they touch.
6- Top up with engine oil, start the engine and let it run for 20-30 seconds.
7- Turn off the engine, check the oil level and top up as required.
8- Check sealing round the oil filters.
For more information, visit https://ttttglobal.com/us or email [email protected]
HOW TO MAINTAIN THE FUEL SYSTEM OF VOLVO ENGINE
1) Draining condensate, fuel system.
1- Open the drain nipple (1) in the base of the fuel prefilter.
2- Tighten the drain tap (1) when fuel without water starts to run out.
2) Engine Fuel Filter Replacement.
1- Clean round the fuel filter.
2- Remove the filter with a suitable filter remover. Collect any spilled fuel in a collection vessel.
3- Clean the filter mating surface on the filter bracket.
4- Lubricate the seal with diesel fuel and install the new fuel filter. Tighten the fuel filter in accordance with the instructions on the fuel filter.
5- If necessary, vent the fuel system, please refer to
3) Fuel Pre-filter, change.
1- Undo the cable from the water trap sensor.
2- Remove the water trap filter from the filter housing. Collect any spilled fuel in a container.
3- Remove the lower part of the water trap from the filter.
4- Clean the lower part of the water trap with a soft rag. Check that the drain hole in the lower part is not blocked.
5- Install a new seal on the lower part and lubricate the seal with diesel fuel. Re-install the lower part of the filter.
6- Lubricate the seal with diesel fuel. Screw the filter onto the filter bracket by hand until the rubber seal just touches the mating surface. Then tighten amfurther half turn, no more.
7- Connect the cable to the water trap sensor.
8- If necessary, vent the fuel system, please refer to Bleeding the Fuel System.
4) Fuel System, bleeding
1- Check that there is sufficient fuel in the tank, and that any fuel taps are open.
2- Release the hand pump on the fuel bracket by pushing down and twisting the plastic handle.
3- Vent the fuel system by pumping with the hand pump. Air is vented to the tank via the fuel return pipe. No venting nipples need be opened.
4- Start the engine and allow it to idle fast for about 10 minutes.
5- Perform a leakage and function check.
For more information, visit https://ttttglobal.com/us or email [email protected]
HOW TO MAINTAIN THE COOLING SYSTEM OF VOLVO GENERATOR ENGINE
- Different types of coolant must not be mixed with each other.
- Risk of reduced cooling function and performance by clogging and isolation..
- Follow the mixing recommendation on the product.
- The coolant should be mixed with distilled, deionized water. For Volvo Penta specified water requirements
# NOTICE:
Always use “Ready Mixed” coolant if water quality cannot be determined or if it does not fulfill ASTM D4985.
Never mix more than 60% concentrated coolant with water.
1) Coolant Level, Checking and Topping up.
# NOTICE:
- Do not open the coolant filler cap when the engine is hot, except in emergencies as this could cause serious personal injury. Steam or hot fluid could spray out
- Only use coolant recommended by Volvo Penta. Fill up with the same type of coolant that is in the system. Different types of coolant must not be mixed with each other
- Filling of coolant must be performed with the engine stopped. Fill up slowly, to allow the air to flow out. Check the coolant level daily before start.
# Carry out:
- TWD16:
1- Open the filler caps (1).
2- Check that the coolant reaches the MAX mark on the sight glass (2). Top up with coolant as required
3- Close the filler caps.
- TAD16:
1- Open only the filler cap (1). Do not open the pressure cap (2).
2- Check that the coolant level is between the MIN and MAX marks on the expansion tank (1). Top up with coolant as required
3- Close the filler cap.
2) Filling a completely empty system.
- Mix the correct amount of coolant in advance, to ensure that the cooling system is completely filled. Refer to Technical Data, page 91 for the correct coolant volume.
- Do not start the engine until the cooling system is completely filled and vented.
- If a heating unit is connected to the engine cooling system, the heating control valve should be opened and the installation vented during filling.
- Carry out topping up in the cooling system:
1- Kiểmtraxemtấtcả drain points đãđượcđónglại.
2- TWD16:
Open the caps to both the expansion tank (1) and the radiator (2). Fill the expansion tank so that the coolant reaches the MAX mark on the sight glass. Close the filler caps.
TAD16
Open only the filler cap (1). Fill the expansion tank so that the coolant level is between the MIN and MAX marks. Close the filler cap.
3- Bleed the system at the bleeding nipple (3).
4- Start the engine when the coolant system completely filled and vented. Open any bleeding nipples a short while after starting, to allow trapped air to escape.
5- Start the engine after approx. one hour and check the coolant level. Top up with coolant as required.
3) Coolant, Draining.
- On engines which are to be put in storage, the engine cooling system should not be drained. the coolant contains corrosion inhibiting additives.
1- Stop the engine before draining.
2- TWD16
Open both the pressure caps on the expansion tank (1) and the filler cap to the radiator (2).
TAD16
Open the filler cap (1). Do not remove the pressure cap (2).
3- Open all drain points. Drain the coolant from the radiator and engine block, using the drain hose. The drain nipples are situated under the radiator on the right side of the engine block.
4 - Check that all coolant drains out. Deposits may be found inside the drain plug/tap, and need to be cleared away. There is otherwise a risk that the coolant could remain and cause frost damage. Check whether the installation has any further taps or plugs at the lowest points of the cooling water pipes.
5- Close any taps and check that the spring-loaded covers on the nipples close completely. Install the rubber plugs and the filler cap(s).
4) Charge Air Cooler, External Cleaning.
- Do not use a high pressure power washer.
- Remove guards as necessary, to access the radiator.
- Clean with water and a mild detergent. Use a soft brush.
- Be careful not to damage the radiator vanes. Reinstall removed parts.
5) Cooling System, Cleaning.
1- Empty the cooling system. Refer to Coolant, Draining, page 75.
2- Put a hose into the expansion tank filling hole and flush with clean water, as specified by Volvo Penta– refer to section Water quality in Technical Data, page 91 until the water draining out is completely clear.
3- If there should still be some contamination left after flushing for a long time, cleaning can be done with coolant. Otherwise, continue as in item 8 below.
4- Fill the cooling system with 15-20 % mixture of concentrated coolant. Use only Volvo Penta recommended concentrated coolant mixed with clean water.
5- Drain the coolant after 1-2 days of operation. Remove the filler cap and possibly the lower radiator hose to increase the speed of emptying. To prevent suspended material from settling back in the system emptying should be done rapidly, within the space of 10 minutes, when the engine has not been standing still for a long time.
6- Flush the system immediately and thoroughly with clean hot water to prevent dirt from settling in the inner areas. Flush until the water that runs out is completely clean. Make sure that any heater controls are set to full heating during emptying.
7- If contamination should still be left after a long period of flushing, cleanout using Volvo Penta radiator cleaner, followed by finishing-off with Volvo Penta neutralizer. Carefully follow the instructions on the package. Otherwise, continue as in item 8 below.
8- When the cooling system is completely free from contamination, close the drain taps and plugs
9- Fill up with Volvo Penta recommended coolant, following the instructions in the chapters entitled Maintenance, page 72 and Coolant Level, Checking and Topping Up, page 73.
6) Cooling air filter.
6.1) Installation
1- Slide one half of the filter over the fan cover (as in fig.1).
2- Turn the half filter until it is able to hang loosely on the fan cover (see fig. 2).
3- Slide on the other filter half and secure the two halves together with self-affixing velcro tape (as in fig. 3a).
4- Fasten the outer velcro tape around the fan cover guard (as in fig. 3b and 3c).
6.2) Removal and cleaning
1- Remove the cooling filter
2- Brush away any heavy dirt with a soft brush.
3- Rinse the filter with water
NOTICE: Do not use gasoline, steam, a high-pressure washer or other cleaning agents.
4- Re-install the filter according to instructions.
For more information, visit https://ttttglobal.com/us or email [email protected]
0 notes
Link
0 notes
Last Seen Blogs

uppercase-disgrace
to define is to limit

thefoodgriot
Tonya Hopkins: The Food Griot

xonortheasternkingxo
Northeasternking

wolfshadow16
Wolfshadow16

chrisinacio
Chris Inácio