#AntiqueChairRestorationProject
Text
The antique chair restoration project—part 7
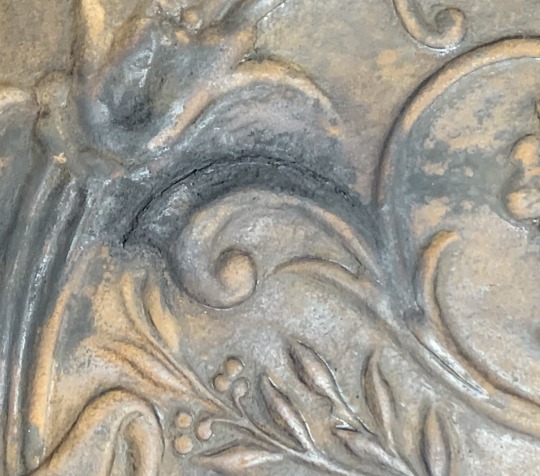
The finished paint job is looking good! I may do some more shading after I’ve assembled everything, but I think it will look quite close to the chair back with a coat of wax polish on it (the only real difference now is the level of sheen, because the leather paint has a satin finish).
#Antiques#AntiqueChair#AntiqueFurniture#restoration#AntiqueRestoration#LeatherChair#EmbossedLeather#AntiqueChairRestorationProject#LeatherRepair#LeatherDye#LeatherPaint#AntiqueFinish
2 notes
·
View notes
Text
The antique chair restoration project—part 3
As I mentioned in my last post, the impression I had when removing the seat was that the leather was extensively affected by rot and too far gone to save. Not so!
Actually, the areas of rot are fairly limited to the parts of the seat which were in direct contact with rusty metal (the blackened areas), and since it seems to have been caused by a local chemical reaction with the tacks and nails, it isn’t really “red rot” as such, at all. That’s a good thing!
Now, the leather is still old and weak and stiff and needs lots of attention, but I think now that I can save the vast majority of it.
The first thing I did was to apply Cellugel (this is a conservation grade leather consolidation treatment that was developed for antique leather book bindings) on both sides to consolidate any rot and stop any further disintegrating and shedding as I am working on it. Anyone who has experienced this type of leather rot knows how messy and horrible the stuff can be! It sheds a fine dust on everything it touches, as well as dispersing the stuff into the air. Not nice! Hence the Cellugel. :-)

I let that dry overnight, and then used a very fine Scotchbrite pad to remove all of the old crusty adhesive from the old patch (the old patch came off fairly easily, thank goodness), and as much of the rotten surface as possible from the areas that were in contact with metal. I suppose that, ideally, it would be a good idea to neutralise whatever it is that’s causing the reaction, but I’m not sure of the chemistry involved, or what would be safe to use, so I just opted for mechanically removing as much as I could. I’ll almost definitely cut away more of the black parts when it comes time to patch the missing areas, but I’m leaving it as-is for the moment.
Then I gave the whole underside a wipe with 99% isopropyl alcohol to clean off the powdery residues.
I next applied a couple of coats of leather binder to the back of the piece to bond the fibres back together and strengthen the whole thing as much as possible.
Next, I’ll apply some mink oil on the top surface, to try to restore a bit of flexibility, and then probably apply the binder to the top surface as well.
This is what it looks like now, from the underside. There are some areas from around the nails and tacks that have completely rotted away, as well as the large cracks in the middle of the seat, and the torn area at the back. My plan is to fully line the whole piece with new leather for strength (including creating a backing for patching the missing areas at the edges), and then use patches and fillers to repair the missing and damaged parts.

#Antiques#AntiqueChair#AntiqueFurniture#restoration#AntiqueRestoration#LeatherChair#EmbossedLeather#AntiqueChairRestorationProject#Cellugel
2 notes
·
View notes
Text
The antique chair restoration project—part 8
So, this is it! I think it’s finally done at last.
I’ve been working on it, but not posting about it, so let me bring this series up to date!
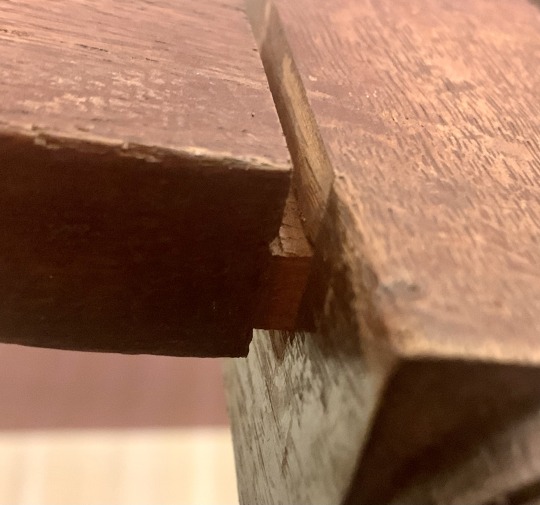
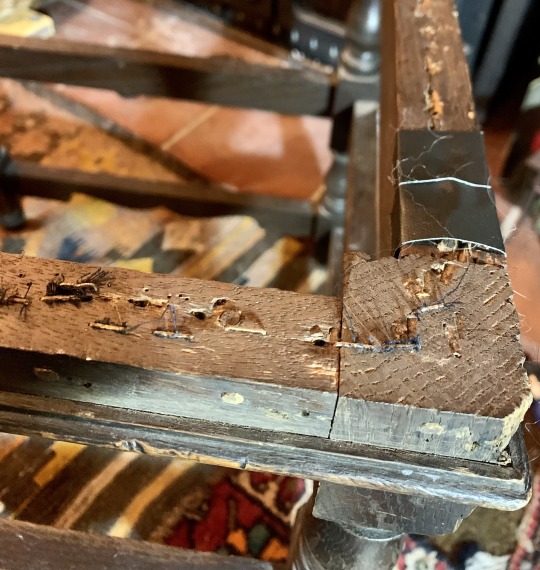
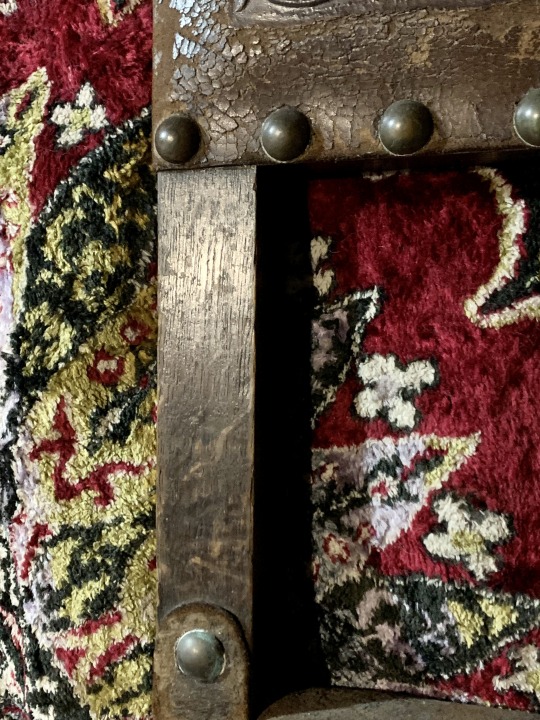
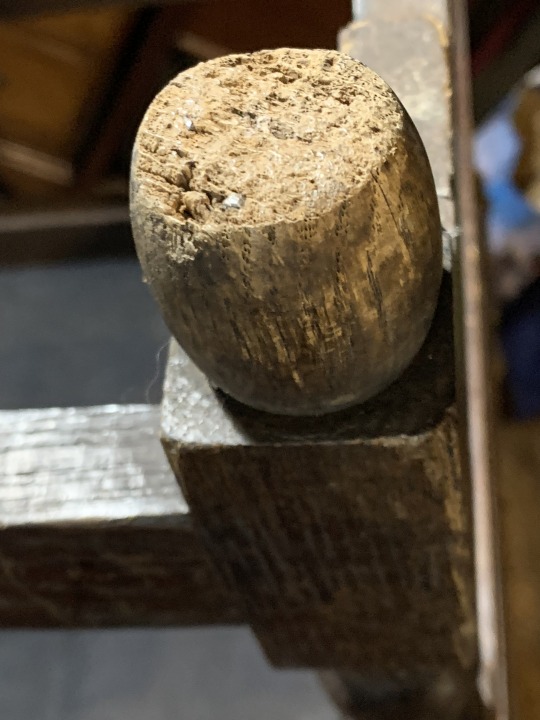
There were a couple of ever so slightly loose joints in the frame, so I whacked them apart with a mallet just enough to get a little bit of hide glue into them. Probably needn’t have bothered, but IME a loose joint just gets looser, and then loosens other things, so may as well nip it in the bud, right? Yeah. Isn’t this a gorgeous bit of joinery? I doubt these tight-fitting joints even needed glue to begin with, but after 150 years (at least…I’m not sure of age, but I’m going with Victorian for my best guess), wood can be expected to shrink a little.

I gave it a few coats of shellac, followed by some paste wax polish, because the original finish was badly worn to nonexistent in places and I wanted to protect the wood. Obviously I left the lovely patina alone though! I did have to glue a few splintery bits back down, and fill a few woodworm and knot holes, but not much work was needed on the frame (apart from the tacking rail, that is).
The upholstery was straightforward. I would have liked to use tacks throughout to stay in keeping with the era in which the chair was made, but the tacking rail was in pretty bad shape, and is less than an inch thick (much of that being riddled with holes from previous tacks). I filled all the damage, but decided to do the webbing with tacks and the rest with staples to be kinder and gentler to the frame (much smaller holes and fewer and less violent impacts).
Webbing. (I used copper tacks to attach it, just because removing the incredibly rusty steel ones was such a royal pain in the arse, and I wouldn’t knowingly inflict that on any future person!) Obviously the quality control department had to be involved for this.

This is overkill, I know, but I do not want this seat to sag and cause the leather to split again! That would really piss me off. So, overkill it is! It’s not going anywhere.
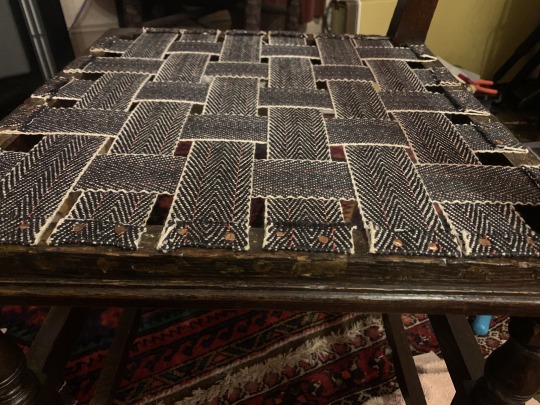
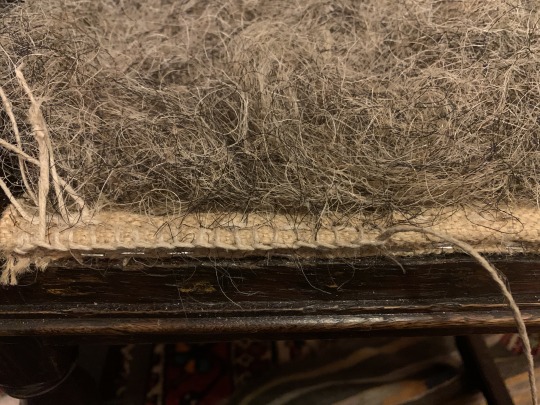
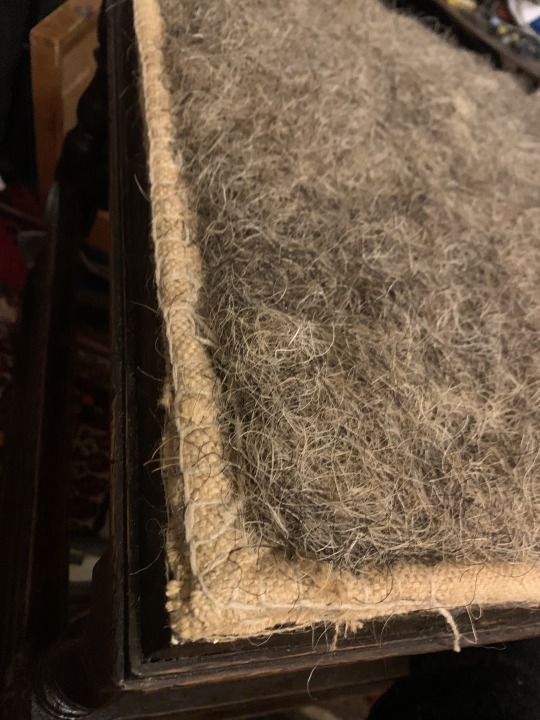
Here’s the hessian foundation. This seat is really shallow, and I’m constrained to the original proportions by the leather cover, so I’m just going to do one layer of hessian with an integral edge roll (stuffed with horsehair), and then stitch around that to create a very firm and defined square edge profile.

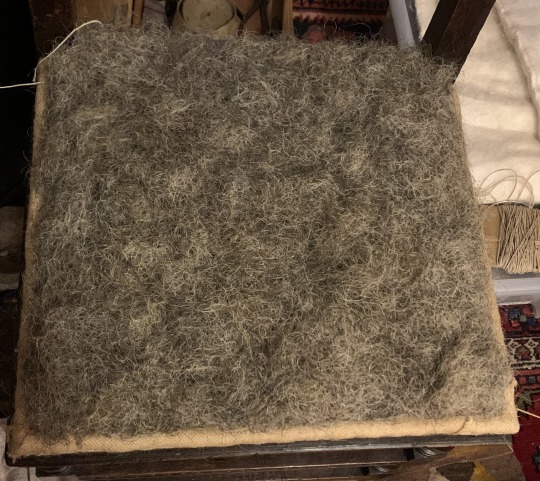
I forgot to take a photo when I was sewing in the bridle loops to hold the hair, but I did take one after putting in the horsehair:
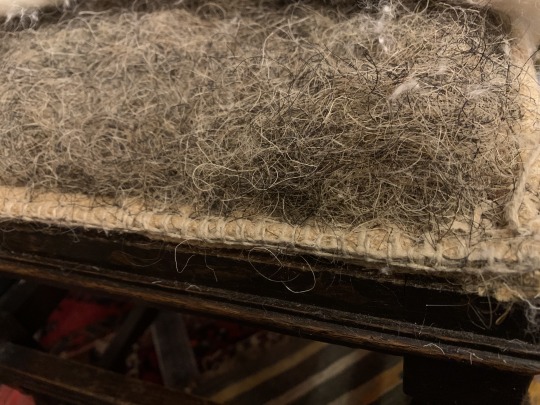
Edge stitching:
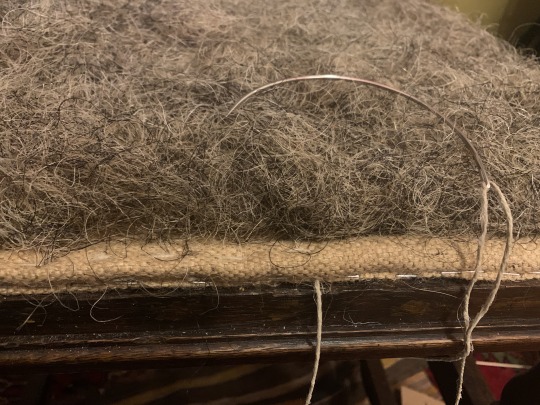
I think I ended up stitching around it three times.
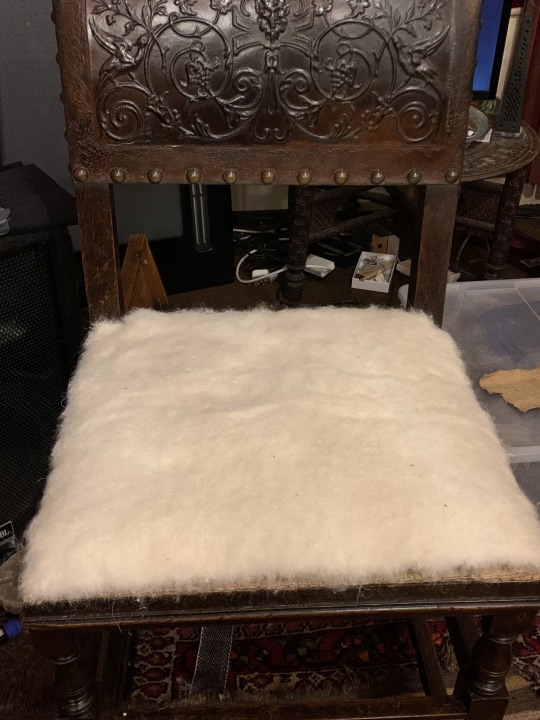
Then some cotton and wool wadding:
Then calico stretched over tightly:
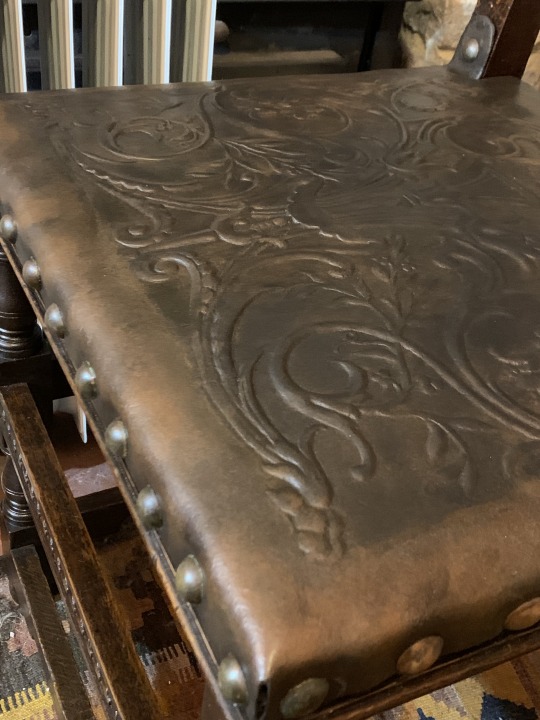
And finally the leather cover:

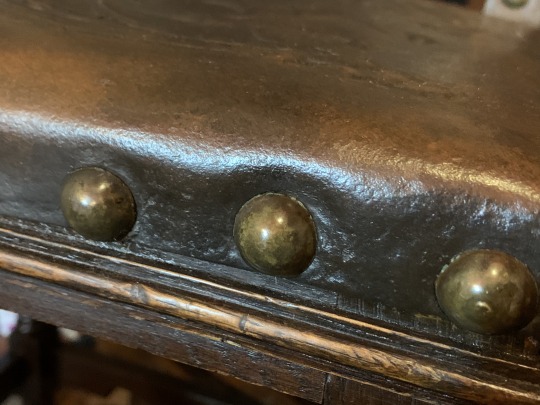
I fastened it down first with a few tacks, and then started to put in the brass nails. Unfortunately more of them broke in the process (only the heads are brass, and the steel parts were badly rusted and quite fragile). So I found some in my stash that were close to the same size (there were actually two different kinds on it, so who knows what is original anyway), and set about faux-patinating them with vinegar and salt so they didn’t look silly next to the old ones. They’re not as dark as I’d like, but I’m in a hurry to finish this up and don’t want to have to order any specialist patina solution for brass (the ones I have are for silver, and are not very effective on brass). It’ll be fine. They’ll continue to darken with time.

I did a bit more faux painting to perfect the look of the seat:
I couldn’t resist trying it out at this point. The seat is very comfortable and very firm! No sagging is remotely likely for the foreseeable future.
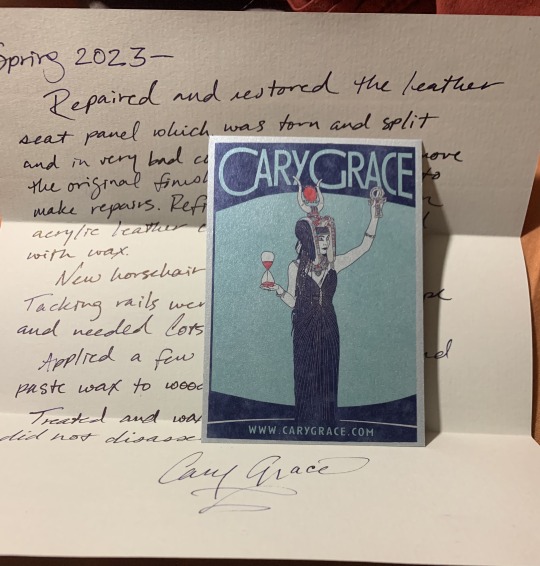
I wrote up an account of what I did, and tucked it into the webbing underneath with one of my cards, in case a future person takes the seat apart again someday.
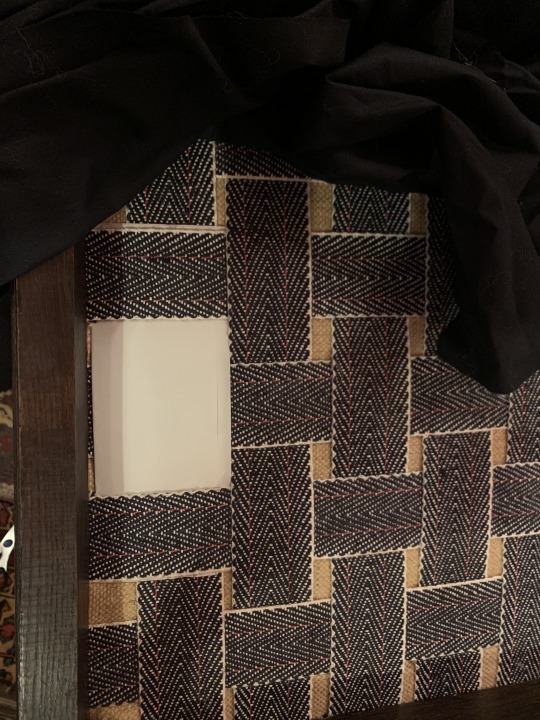
Finally the bottoming cloth went on.
I did a bit more painting on the seat once it was in place, to emphasise areas of “wear” and “fading” and make it look more authentic.
Next I gave the leather a few coats of Renaissance Wax to polish it and protect it.
A few of the cracks have become visible again now that the leather seat cover has been under tension for a couple days, but it is light surface cracking only, and I’m confident my repairs are structurally sound, strong, and will be fine. I will let it all settle for a few months and then re-fill the surface cracks with some flexible filler to make them invisible again, but there’s no point in doing that until the newly stretched leather has settled in for a while and been used (sat on).
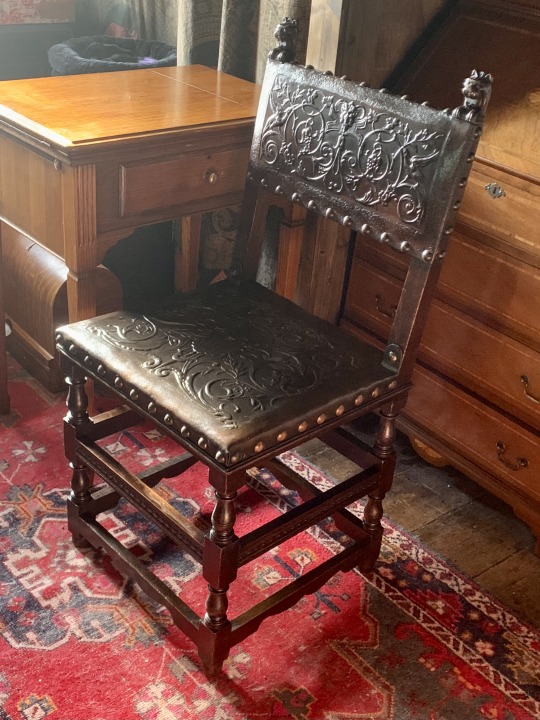

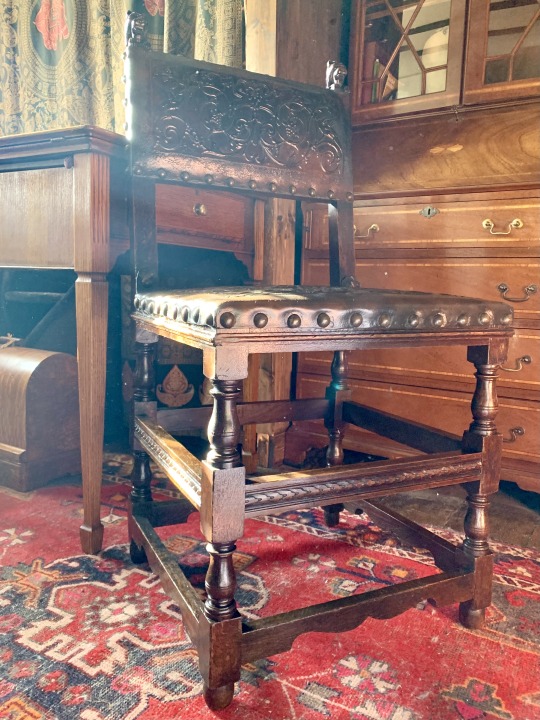
All in all, I’m very pleased with the result!
#Antiques#AntiqueChair#AntiqueFurniture#restoration#AntiqueRestoration#LeatherChair#EmbossedLeather#AntiqueChairRestorationProject#LeatherRepair#LeatherDye#LeatherPaint#AntiqueFinish#LeatherAndOakChair#upholstery#TraditionalUpholstery#horsehair
1 note
·
View note
Text
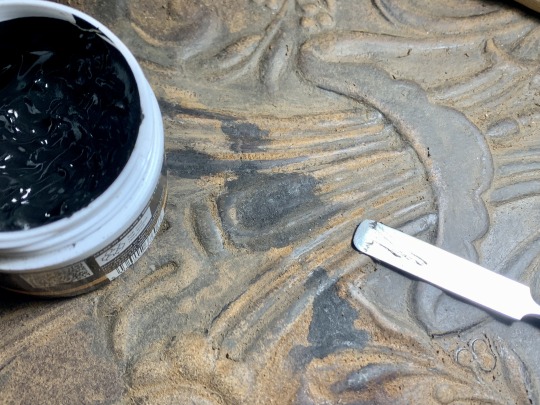
The antique chair restoration project—part 6

Getting there…the filler has to be built up in thin layers. It’s kind of like sculpting with whipped cream! Needs a very light touch, and lots of fine dexterity!

Now to let it set overnight, and carefully sand it into shape…

It’s not perfect, but hopefully it will be convincing enough once I’ve applied the finish. If not, I guess I can always mess with it some more!
OK, finish time at last! I’m using a modern pigment/paint type finish out of necessity (a penetrating dye would never work with all these repairs and patches, and since the leather is essentially missing its skin surface for the most part, it really needs a surface coating for protection). Actually, it had a pigmented varnish coating originally, so this is in keeping with how it was originally done, albeit with a very different formulation of finish.
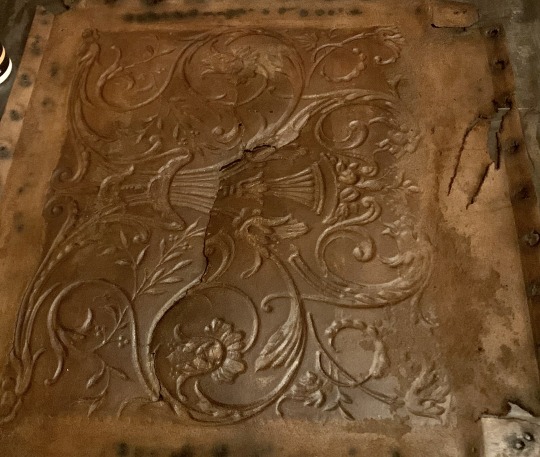
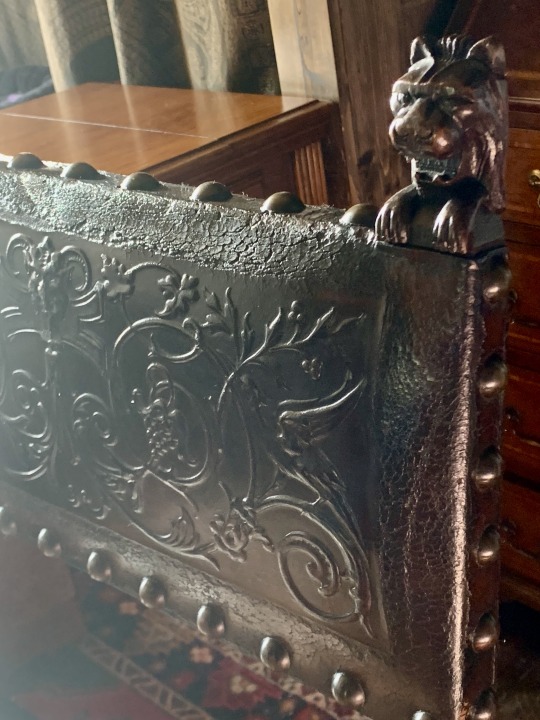
I don’t want the end result to look like it has been newly applied, though. It needs to be sympathetic with the age and patina of the rest of the chair, including the leather panel on the back (which is in much better condition than the seat was, and which I’ve decided to try to preserve just as it is, including the original varnish).

The plan for finishing the seat panel is to use three different colours, and various mixtures of them, to apply many very thin blended coats with a damp sponge to achieve something resembling the patina of the old finish. Here’s what it looks like after one coat (looking much better already):
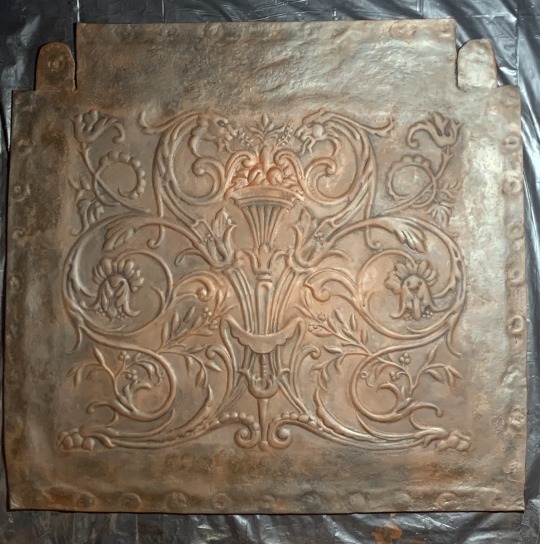
And after a few more layers:

Meanwhile, in between coats, I’m going to start tackling the seat rails of the chair frame, where there are somewhere around ten million more staples and tacks that need removing (I’ve already started, but can only take so much of that in one sitting), and some splits that need repairing before it can withstand a new upholstering job.
#Antiques#AntiqueChair#AntiqueFurniture#restoration#AntiqueRestoration#LeatherChair#EmbossedLeather#AntiqueChairRestorationProject#LeatherRepair#LeatherDye#LeatherPaint#AntiqueFinish
1 note
·
View note
Text
The antique chair restoration project—part 5
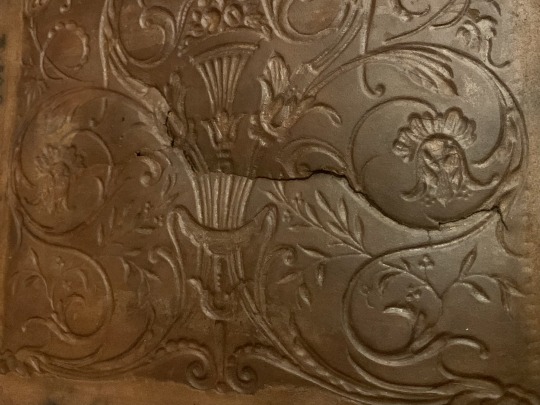
I forgot to include this in my last post, so this is slightly out of sequence, but after I attached the lining, it became apparent pretty fast that my leather backing wasn’t working entirely to stabilise the cracks. The new leather is really supple, and the embossed leather is really firm. The difference in properties was great enough that it was insistent on creasing along the cracks, and no amount of glue and filler was going to withstand that, especially when sat upon!


My solution was to dilute some contractor grade PVA glue about 50/50 with water to aid penetration, and brush it over the back of the lining in the whole embossed area, to hopefully make the lining stiff enough to resist creasing. I let it sink in, and then weighted the whole thing down to hold it flat overnight.
Result! It worked brilliantly.
That problem solved, I proceeded with removing the old finish, which takes us back to the end of the last post.
Next is a whole lot of fiddly sanding, repairs and filling gaps and holes, more sanding and scraping, more filling, etc., which is taking a while due to drying time. My heat gun decided this was a perfect time to burn out it’s fan motor, so there’s no way to speed it up.
This particular filler only comes in black or white, but I’m planning to use a pigmented paint type finish on it anyway, so it won’t matter.
For some of the small raised details I needed to repair/rebuild, I didn’t think the flexible leather filler compound was going to hold up, so I got the PVA out again and used that.

The larger holes and missing bits got leather patches, and then I blended in the edges with filler.
Almost finished now:

Just have to finish reconstructing this element that had a crack running along its top edge, and it will be ready for finish:
#Antiques#AntiqueChair#AntiqueFurniture#restoration#AntiqueRestoration#LeatherChair#EmbossedLeather#AntiqueChairRestorationProject#LeatherRepair
1 note
·
View note
Text
The antique chair restoration project—part 4
The next step in restoring the leather seat covering panel to a usable condition was to rub small amounts of mink oil into it gradually over several days, until it was no longer so stiff it was likely to crack further. I also had to pull everything into position and weight it down almost continuously for a few days, since the torn areas had become distorted through being left like that for a long time, and didn’t want to go back together properly.
Then I lined the whole thing with a new piece of leather, to hold the torn and cracked areas back together to make a strong repair, and also to add enough strength to the piece generally for it to hopefully be safe to sit on without worrying about further damage.
I went ahead and patched the missing area at the back of the seat with new leather to stop it getting any worse. The edges will get blended in by filling and sanding.

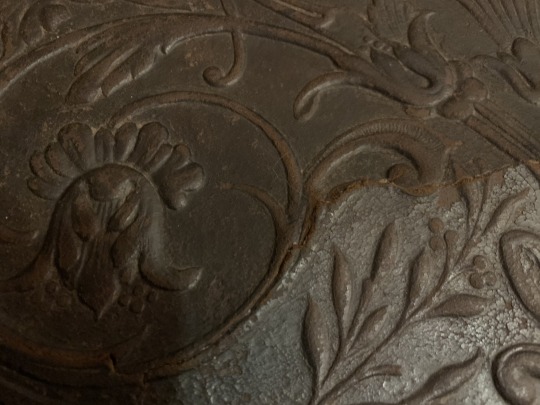
That complete, I determined that the thick top finish (probably multiple coats of a linseed oil based varnish mixed with pigments, based on what I could find out from Google) was beyond salvage. It had come off the plain border area almost entirely already, and even though the finish on the embossed part looked fairly intact, it was also very hardened and deteriorated, and wasn’t actually adhered very well to the leather. I tried filling around my little patch on top of it, but the filler didn’t really want to bond to the finish very well (even after cleaning it with solvent), and a fingernail could easily remove the whole lot from the leather. So, that wasn’t going to work. Damn. Finish would have to go.
I carefully and gradually scraped it all off over the next few days with little clay sculpting tools.
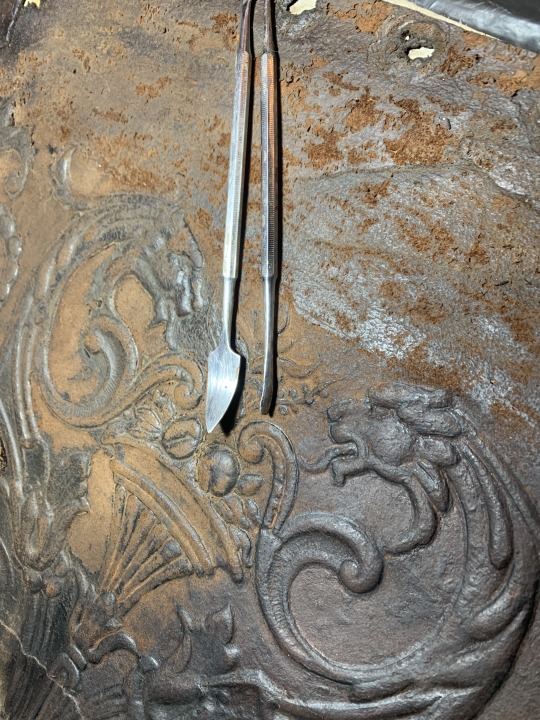
The surface underneath actually feels quite sound, especially after applying a couple coats of the fibre binder to the now bare leather and sanding smooth with 600 grit.
Next I’ll be repairing the many holes and splits and missing bits that had rotted away beyond salvaging, and applying a new top finish.
#Antiques#AntiqueChair#AntiqueFurniture#restoration#AntiqueRestoration#LeatherChair#EmbossedLeather#AntiqueChairRestorationProject
1 note
·
View note
Text
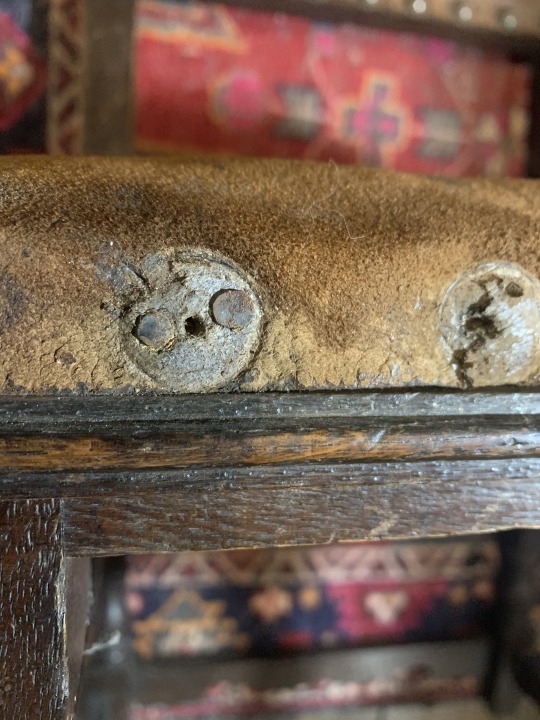
The antique chair restoration project—part 2
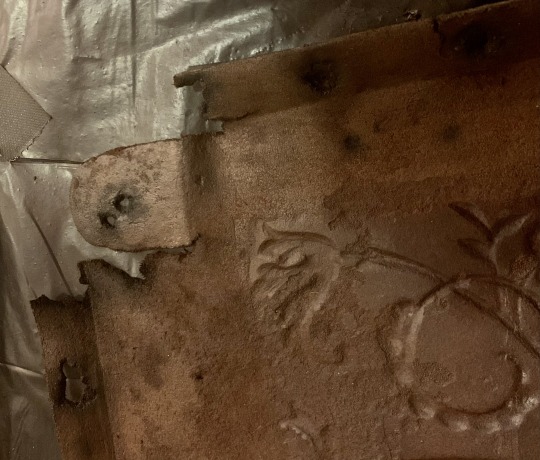
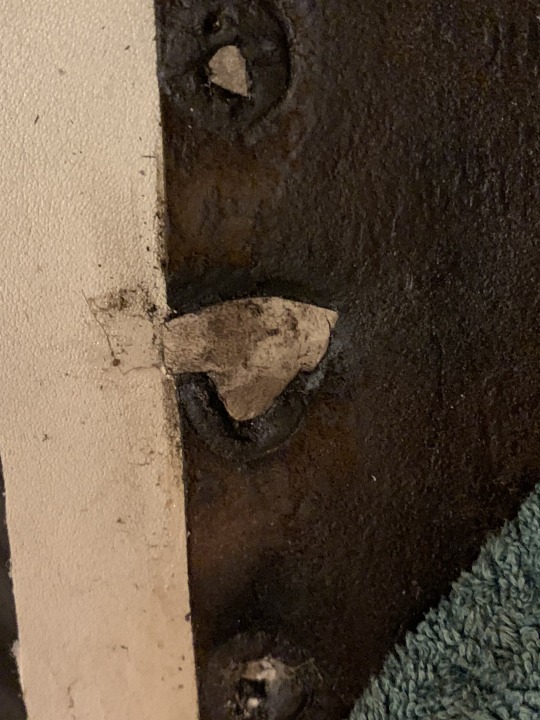
The first step in addressing the seat was to take it apart, which proved to be more challenging than expected due to the extensive corrosion of the decorative brass nails (they were solidly embedded in the frame, especially in the back, where I think they must not have been removed at all in the recent attempt at repair, which I’ll show later).
Usually these sorts of brass nails come out pretty easily, but in this case each one needed carefully and tediously working free. Speaking of nails, this is one thing that makes me think Victorian: they aren’t solid brass cast nails. Rather they have a steel nail pressed into the brass head. Again, I’m no expert, but I don’t think they were made like this before the industrial revolution…(?) Does anyone know? I can’t seem to find any information about, or pictures of, historic upholstery nails online.
there were a couple missing, and despite my best efforts the rusty pins popped out of two of them, so I’ll need to find a few replacements.

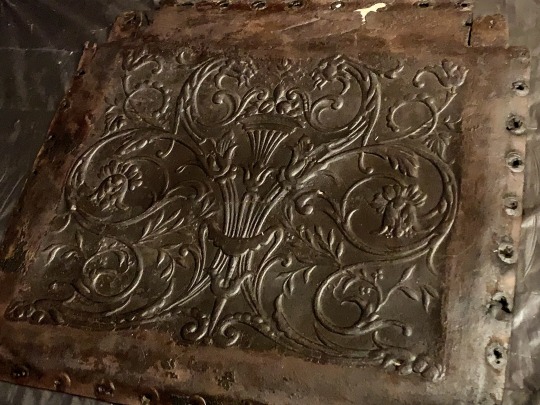
It was soon apparent that the leather was more thoroughly deteriorated than I initially thought. I knew it had a bit of red rot, but it’s actually quite bad. It’s entirely crumbling to powder in some places. Just carefully working a tool under some of the nail heads caused the leather I touched to break down, and much of it was already broken down under the nails (I guess the metal corrosion and rust must have accelerated the progression of the rot).
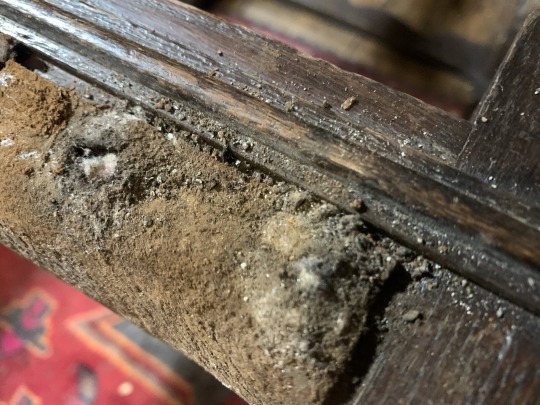
My original plan was to consolidate the whole piece, condition it, and then line it fully with new leather for strength, before repairing the tears and surface damage with fillers.
I’ve now decided the best way to go is to make a whole new seat piece from new leather, using the original seat to make a template/pattern, carefully cut out the embossed section (the only part that’s really worth preserving), and then bevel the edges and splice it in to the new seat leather, and I have a preliminary plan for how to do this. Wish me luck!
Also, I fear I’m really going to have to take the back apart as well to do this job right, even though it appears reasonably sound, because I want to treat that piece of leather as well (from both sides) to consolidate it, and hopefully slow the deterioration, before I restore the surface. But, probably best not to even think about that until I’ve done the seat.
When I finally got all the nails out and lifted the leather, I found this:
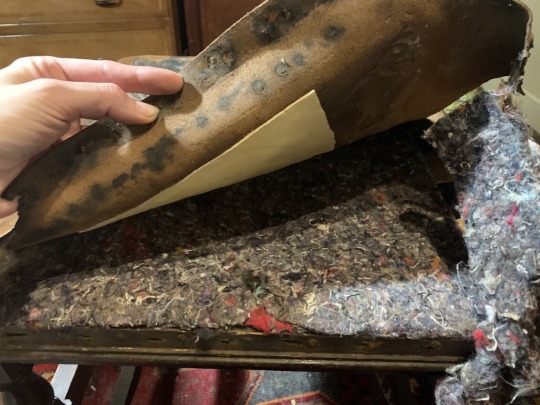
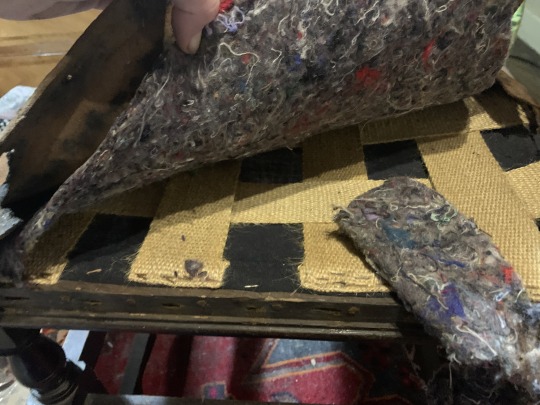
Somebody has tried to repair the leather cover before, and also has sort of re-upholstered it using modern materials and staples…I say “sort of” because there’s hardly anything in there! There’s the bottom fabric, some very slack webbing, then a layer of wadding/felt just laid on top that has been pieced together from scraps, and then the leather. No stuffing at all. No linings. So that will all be ripped out and done properly in due course!
Stay tuned…
#Antiques#AntiqueChair#AntiqueFurniture#restoration#AntiqueRestoration#LeatherChair#EmbossedLeather#AntiqueChairRestorationProject
1 note
·
View note
Text
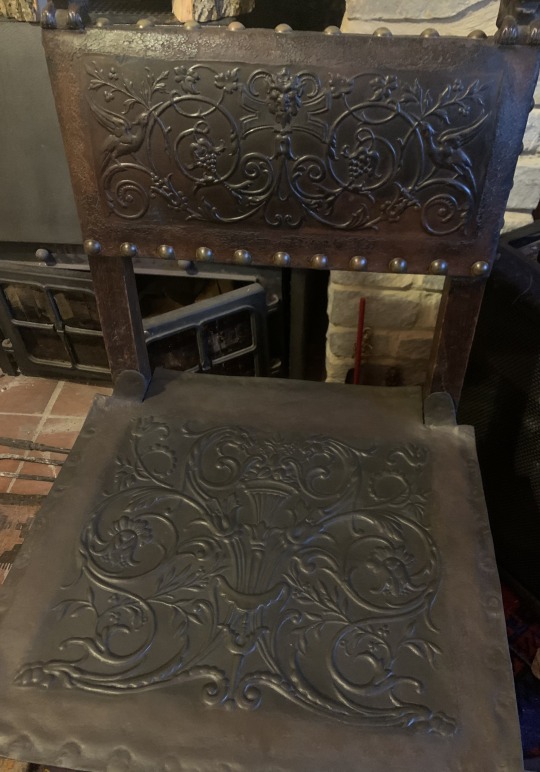
The antique chair restoration project—part 1

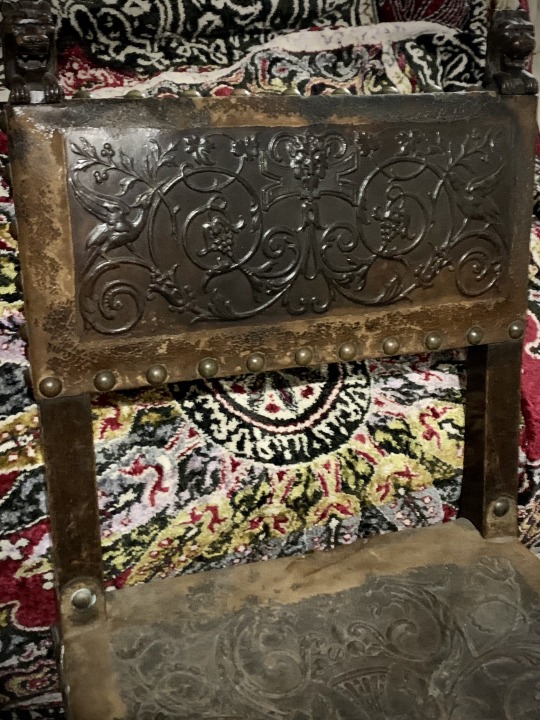
I bought this amazing chair (I won’t even tell you how little I paid for it, because you’ll hate me—but let’s just say I couldn’t pass it up, even though I need another project like I need a hole in the head) recently from a man who said he found it in the cellar of his parents’ old pub, and had had it for years, intending to restore it, but never actually getting around to it.
It clearly has some age on it, but I’m no expert on dating furniture. If I had to guess, I’d guess Victorian, but have also had suggestions from a an antique dealer who is a friend of a friend that it could actually be considerably older (just based on my photos, but would need an in-person inspection to be sure). If anyone reading this has any expertise in this area, please get in touch!
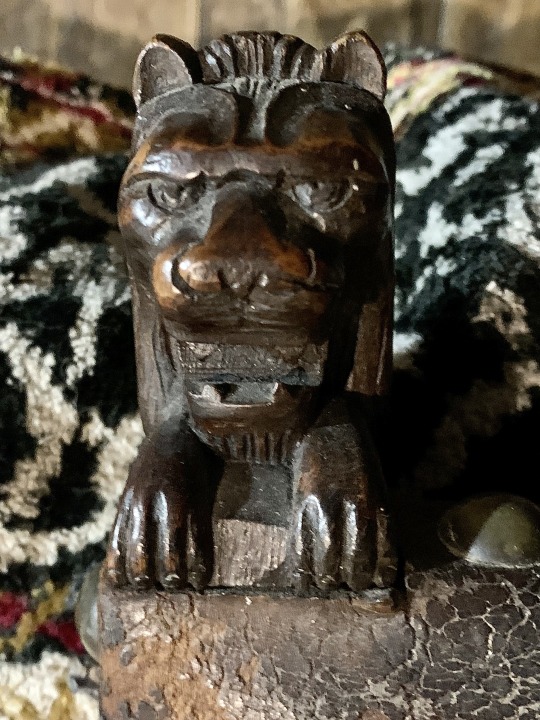
Anyway, regardless of age, I absolutely adore it! The frame is very solid. The little carved lion finials have actual little fangs! The upholstery though (seat especially), is going to need some pretty extensive attention. Will attempt to document my progress and post about it as I work.


#Antiques#AntiqueChair#AntiqueFurniture#restoration#AntiqueRestoration#LeatherChair#EmbossedLeather#AntiqueChairRestorationProject
1 note
·
View note
Last Seen Blogs

twentyonepilotsficlibrary
Joshler Fic Library

tereselw
Multicultural America

aestheticaristocracy
Aesthetic Aristocracy

mitchellgoodman60
The Life of Sivertsen 626

alengirlirengiz
Mumdaki Kelebek