#AND ALSO I WENT THROUGH AN ENTIRE BOTTLE OF TACKY GLUE
Text
Simplified Bookbinding: Buy Good Glue
In the first post in the Simplified Bookbinding series (How to Make a Cheap First Book), I explained the four steps to binding your own book. Because it was a crappy first-effort practice book and I didn’t want to ask you to buy anything special, I used Elmer’s school glue. You can see what’s already happening to the book. The end papers are pulling off the cover; the cover is coming off the boards; even the binding has split and pages are going to start falling out.
The most important bookbinding supply to upgrade immediately is the GLUE. In this post, I’ll go through the four standard steps of bookbinding and talk about what kind of glue you need for each step. Here are the steps:
Step 1. Format the text and print it. (No glue required.)
Step 2. Create the text block. (The glue is incredibly important for this step and I will tell you exactly what to buy.)
Step 3. Create the case. (You need a decent craft-strength glue. I’ll explain some options, but there’s a lot of leeway in this glue choice.)
Step 4. Attach the case to the text block. (I’ll give you a couple of pointers, and then you can choose your own glue as you develop the technique.)
If any other bookbinders @renegadepublishing want to reblog and add glue comments, please go ahead. There are so many glue tips and tricks, and what you can get varies with what part of the world you’re in, so the more perspectives, the more helpful it is.
Long post with pictures and astonishing amounts of glue geekery under the cut.
Step Two: Create the text block.
To put the pages together, whether you’re perfect binding or sewing signatures, you must use PVA bookbinding glue. The description should also say things like “archival quality” and “acid-free” and “PH neutral” and “non-toxic.” There are several brand names of PVA bookbinding glue. I bought Lineco brand from Amazon.
Step Three: Create the case.
The glue to create the case is basically any glue that permanently sticks paper and cloth and cardboard together. I watched Sea Lemon’s glue video and went to a craft store with my list of glue brands she recommended and couldn’t find any of them. So I picked up a bottle of Aleene’s Tacky Glue and an Elmer’s Craft-Strength Glue Stick mostly because that was all the store had. They’ve worked out great and I’ve never tried anything else.
Check the glue descriptions for those important words like ‘archival quality’ and ‘non-toxic.’ I figure any glue that claims it’s safe for photos is safe for bookbinding.
A case for a book is made out of cover boards (stiff, strong and thin cardboard) which are covered in either bookcloth or cardstock (See Simplified Bookbinding: Cardstock Covers). Those things will all warp if they get wet. Glue is wet. Creating a case means using enough glue to stick it together without using so much glue that your cover warps.
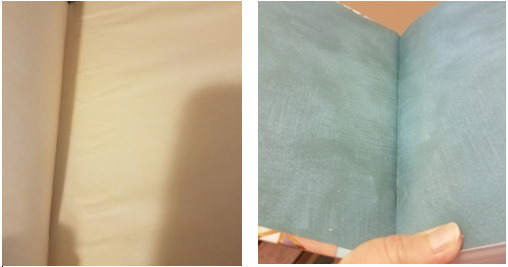
This is one of my first books, in which I spread liquid glue over the entire cover board. I think I was still using chipboard for the cover boards at this point. You can see how badly it warped:

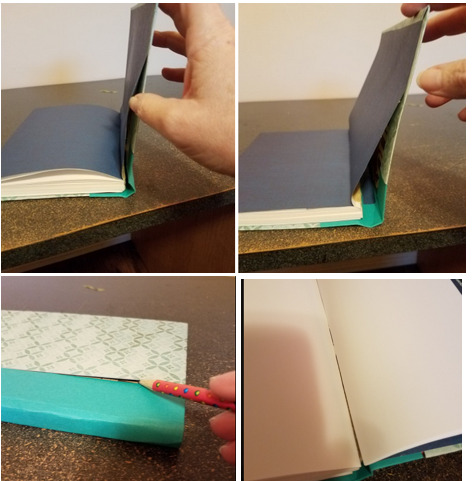
Then I figured out you should only put glue on the edges of the board, and my covers warp a tiny bit or not at all:

I do not use the PVA bookbinding glue on the covers because the PVA bookbinding glue is very runny/wet. The Tacky Glue is thicker. The glue stick is thickest of all. I know some people are leery of using a glue stick, but I’ve had great results. The craft strength glue stick says it was formulated to use on photos, so I figure it won’t turn yellow and rot ordinary paper either.
Step 4: Attach the case to the text block.
There are two places you use glue in Step Four. One is to glue the end paper to the text block. For that, I use the PVA bookbinding glue, applied with one of these methods.
Method 1:
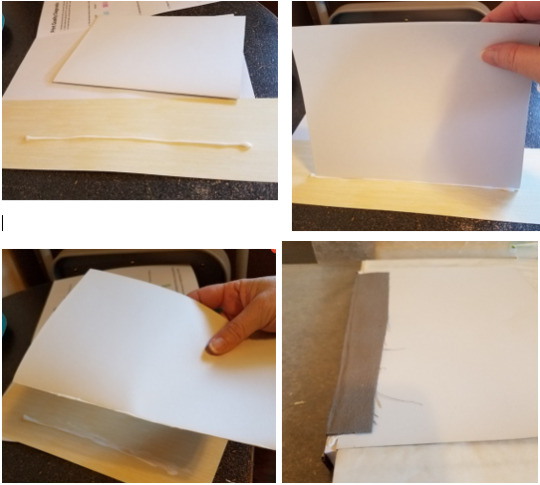
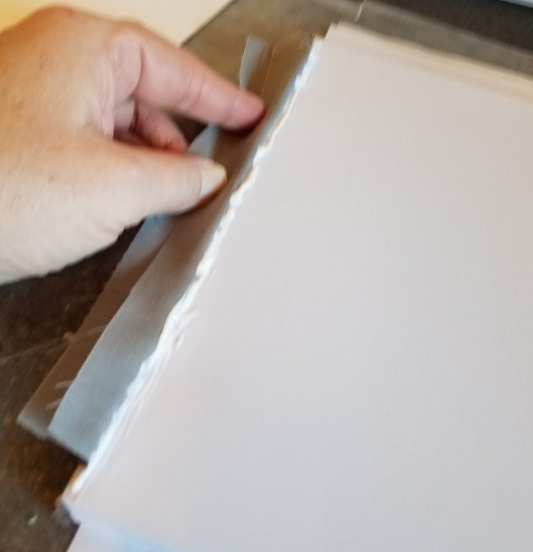
Dipping the end paper in a line of glue gives you a nice thin and consistent line of glue on the crease.
You can also apply the glue directly to the text block, but that risks getting a glue blob somewhere, and then that spreads out and glues a bigger area than you wanted to glue.
Method 2:
Put some trash paper and wax paper between the end papers, and between the end paper and the first page of the text block (so you don’t glue pages together). Set wax paper on top of the text block, put some heavy books on it, and let it dry.
Is it dry? Moving on.
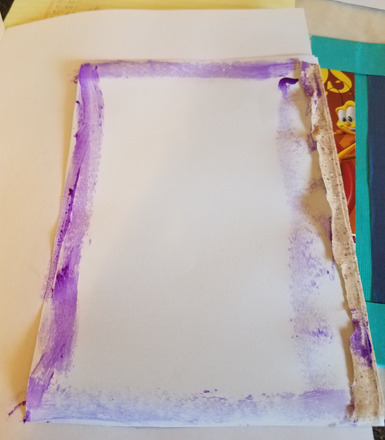
The second place you use glue in Step 4 is to attach the end paper to the case. In the pic on the right, I used liquid glue spread only at the edges. Maybe you can’t see it very well, but the paper is wrinkled like any paper gets if it gets wet and then dries. If you put a piece of paper in between the end papers while it dries, it absorbs some of the moisture, but I still get wet wrinkles sometimes. The one on the left was glued with a glue stick, and you can see how smooth it is.
I apply the glue stick only to the edges. (Notice I cut off as much of the spine cloth as I could.) Any glue on the end papers, whether glue stick or liquid glue, should only be applied around the edges:
Glue sticks dry really fast, so two sides are already drying out while I took this picture. One drawback to using a glue stick is you have to work fast. It might be easier to practice with liquid glue so you’ve got an extra few seconds to get the text block set straight in the case. Otherwise, you may have nice smooth end papers, but your entire text block is crooked. If the end papers are bad enough, you can always cut them off and start over with Step 4.
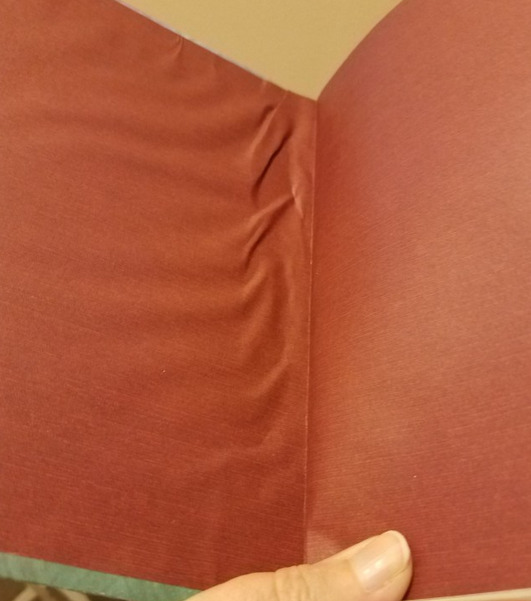
And just to keep glue in perspective, if the end papers get really screwed up, it probably isn’t the glue’s fault. This one is me not smoothing out the end paper very well before putting it under a heavy stack of books to dry:
Summary: Find good craft-quality glue and experiment to learn how to apply enough glue to stick your case together without applying so much that it wrinkles. That’s just a matter of practice, which is why I suggest making a few blank practice books before trying to bind something that really matters to you.
Good luck and have fun with it!
#simplified bookbinding#bookbinding#renegade bookbinders#renegade bookbinding#glue#lindstrom2020#op#renegade publishing
207 notes
·
View notes
Text
Building the Machine: Part 3, The Head
Part 1, Collecting References
Part 2, Breaking Down the Parts, Picking Materials


Welcome to part three of the Machine build. Today we’re going to talk about the head, or specifically, how to make a round ball without breaking your budget.
We wanted to find something made out of plastic for durability. It turns out acrylic hemispheres and spheres over 10″ diameter get really expensive really fast. So we went to plan B:
Paper mache.
What you need:
A playground ball, beach ball, or balloon in the size you need.
Duct tape
A container or something you can tape to the object as a stand
Newspaper
PVA glue
Plastic wrap or petroleum jelly
Latex or nitrile gloves
Thin CA glue (optional)
Rotary tool, small handsaw, or really sharp Xacto or utility knife.

We found a 15″ playground ball at the store. A beach ball or large balloon will also work as long as the diameter is right. Take your container and tape it to the ball. If you want to save the ball, tape the container over the release valve. Cover the ball in plastic wrap or petroleum jelly. This works as a mold release. Try to keep it smooth and avoid bumps. Your first layer will show imperfections, but you can smooth things out in subsequent layers.
The glue mixture
I used Aleene’s Original Tacky Glue, but whatever PVA-based glue you have on hand will work. Pour it into a container and add enough water so its runny, but not completely watery. You don’t want to water it down too much, but you also want to water it down enough so it tries and isn’t tacky.
Tear your newspaper into strips. Take a strip and drag it through the glue mixture, squeezing out the excess. Then lay the paper on the ball, keeping it as smooth as possible. I alternated between vertical and horizontal layers so I could keep track of what I already covered, but you can do whatever. You might also drip glue-water, so put down some paper or plastic to catch it, or wipe it up later. Putting on some entertainment is also advised since it took 20-30 minutes per layer.

I did one layer at a time and let it dry, but you could do two layers at a time. Just make sure you let it dry between runs. Putting it in front of a fan and rotating the ball every few minutes can help.

The final ball has ten layers on it. Try to keep each layer as smooth as possible and avoid building up hard edges (unless that’s what you need).

(This is what ten layers of paper mache looks like. It’s about 4 mm.)
At this point, you have a perfectly serviceable hollow ball. However, we decided to harden the paper with CA glue for durability. If you decide to do this, you have to have a respirator that has a filter for organic vapors, eye protection, gloves, and be able to work outside. DO NOT DO THIS INSIDE.
Along with the above safety gear, you’ll need thin CA glue, 8 oz or more. This specifically needs to be thin CA glue as you want to build up layers and thin CA glue spreads nicely. Having CA glue accelerator helps with the dry time, but isn’t necessary.
If you decide not to, you can remove the ball inside. Once you’re done, free the container. Whether you’re popping the ball or using the release valve, do it slowly. Make sure you aren’t pulling or crumpling anything as the ball deflates.
If you’re going to harden the paper with CA glue, leave the ball inside and remove it after you apply a few layers of CA glue on the outside. If you have disposable brushes, you can use them. You can also take cardstock and tear it with a rough edge and use that as a brush.
Dribble some CA glue on the top and let it run down, using a brush to spread it out. If you can smell the glue or your eyes begin to water, stop working immediately and go inside. Wait 15-20 minutes before starting again. Repeat until the first layer is complete. Repeat this process until you have two or three layers.
For the inside, the process is similar except instead of brushing out the layers, pour CA glue into the ball, then roll the ball around to move the CA glue around (essentially slush casting). Keep the opening aimed away from you, go inside if you begin smelling CA glue or your eyes water. Build up as many layers as you want, we ended up using the entire 8 oz bottle of CA glue. You can also spray the inside with CA accelerator to speed up the dry time, but this is optional. At this point, the entire head should be a fairly solid, rigid piece.

See how reflective it is? That’s all CA glue.
Let the inside dry for a few days. If you can still smell CA glue, let it keep drying.
Cutting the head hole
For an easy way to figure out how big the head hole needs to be, take a big sheet of paper (or in our case, an EVA floor mater) and draw and cut out a circle about the circumference of your head. Now keep widening the circle until you can fit your head through it. Overlay the hole on the ball and trace it out.
A rotary tool is the best option for cutting out the head hole. You could do it with a handsaw or with a knife, but a rotary tool is the quickest option, especially if you hardened the paper with CA glue. After you cut out the head hole, seal the edge with CA glue or lots more PVA glue. Ditto for any other holes or exposed edges.
Sanding?
If you harden the surface with CA glue, you can do light sanding with 100 grit and up. To get a better idea of what the surface looks like, spray it with primer so it’s uniform. That’ll expose any edges or rough spots. You can also use Bondo to fill and smooth, but it depends on the surface you need.
How are you going to see?
Ummm we’re still working on that. With the way we’re building the Machine eyes, it’ll be impossible to see out of them. We’re looking at a few different options. For most costumes, cutting out holes and replacing them with screen or a fine mesh should work.
Next part: The shoulders and upper torso! See you then!
[BECOME AS GODS]
#nier automata#cosplay tutorial#machine lifeform#nier#paper mache#ohi cosplay#ohi cosplay tutorials#ohi machine
164 notes
·
View notes
Text
androssizahard replied to your post:Tag! Post ten things about yourself and then pass this on to your ten favorite followers :)
teach me how to bind books!!
ok!! its just houRSSSS of work lol, I made two as birthday gifts and honestly it probably took like...at least 10 or 12 hours @_@
#androssizahard#i mean i didnt do it all in one go lol#i worked on them for like 3 or 4 hours at a time#AND ALSO I WENT THROUGH AN ENTIRE BOTTLE OF TACKY GLUE
0 notes
Last Seen Blogs