Last Seen Blogs

amitcsakakarsz
Elveszve.
seitosokusha
Abstract Reality

floridaroofingprosus
Florida Roofing Pros

katelllllynn
28. F. 🖤

27roccotano
Senza titolo
Text
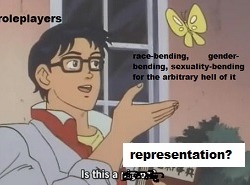
PSA: responsible representation within roleplay.
I could easily be one of the LEAST qualified people to write this post, but lately I’ve noticed a phenomenon within roleplaying communities. writers will change their muses’ race, sexuality, ethnicity, and gender ( or attempt to tackle a muse of another race, sexuality, ethnicity, and gender ) without writing any supporting headcanons or making any attempts to incorporate those identities into their muses’ story. Sometimes these “efforts” at representation go no further than a simple faceclaim change ( and, in the worst cases, an alt faceclaim ). This can feel like a token gesture to minority groups, and to be honest, it is. It is GREAT roleplayers are beginning to understanding the need representation within roleplay communities !! Representation is needed. But RESPONSIBLE representation is needed. Writing a character of a marginalized identity should be proceeded by education and dedication.
1. EDUCATE YOURSELF:
🗸 learning about systemic racism, intersectionality, sexual & racial & gender discrimination, cultural & ethnic norms, external & internalized oppression, whitewashing & erasure, misgendering &passing, tokenism vs. diversity, nuance & stereotypes ( and much more ) will contribute to your ability at writing good representation. If any of these topics may sound completely foreign to you– so DO YOUR RESEARCH!
HELPFUL LINKS FOR STARTERS:
writing people of color
writing poc when you are white
writing characters of other sexual orientations
comprehensive list of lgbtq+ terms
stereotypes and tropes navigation
preventing tokenism
gender-inclusive guidelines
introducing race & skin color naturally
2. DEDICATE YOURSELF: reach out to qualified friends and acquaintances with a genuine curiosity and willingness to learn what life is like in their shoes. be open to accepting hard truths, facing hidden biases, and correcting personal misconceptions. puruse articles and blogs that address the identity you’re looking to write. When re-working your muse, DO incorporate what you’ve learned into their history, psyche, mentality, logic, and ultimate story.
things to avoid straight out the gate:
X stereotyping - falling back on tropes & generalizations
X cultural appropriation - writing about a culture that is not yours, while perpetuating stereotypes or egregiously misrepresenting it
X whitewashing - portraying your muse as lighter than they are
X fetishism - fetishizing a person or culture belonging to a race or ethnic group, as well as a person belonging to a certain sexual or gender identity group
X tokenism - including a minority character for the simple sake of having a minority character
X homogenizing - “every gay is the same”, “every latinx person is the same”. to avoid this, write your muse with their own unique dreams, goals, thoughts, stories, and passions.
important things to remember:
🗸 just because you fall into a specific minority group does NOT mean you understand life through the eyes of another minority group.
X “Oh heck, I could easily write a black muse without research, after all I’m gay.”
🗸 “As a gay man, I acknowledge that people of color have their own unique perspectives and experiences that I have never lived.”
“But that’s a lot of work!” BINGO. People can’t peel their identities off like a pair of clothes, so arbitrarily changing or writing a muses of a certain race / sexuality / ethnicity / gender without appropriately explaining how such changes alter the fabric of their identity, sends out the message that these identities are totally inconsequential.
“But I might screw up.” It’s quite possible you won’t get everything right, but that’s where you stay open to critique, criticism, and pointers, and reach out to people where you can’t find answers. The answer isn’t to totally throw in the towel.
“It would just be easier to write my own identity.” Again, representation is needed within writing. refusing to do so because it’s “work” is a major cop-out.
In summary, offering up the bare minimum representation isn’t good enough anymore. Representation must be rooted in learning and understanding. So educate yourself, dedicate yourself, and REPRESENT the people groups who need it the most. Be safe, and be responsible with your muses’ identities. 💖
883 notes
·
View notes
Text
Resources For Describing Emotion
Emotions
Without Making Your Character Feel Too Self Aware
Showing Emotion Without Telling About It
Emotions Associated With Body Language
Telling Readers What The Character Doesn’t Want To Show
Hiding Emotions
Expressing Cardinal Emotions: Masculine vs. Feminine
Writing Extreme Emotion Without Melodrama
Specific Emotions
Conveying Shock
Conveying Embarrassment
Conveying Disappointment
Conveying Love/Attraction
Conveying Annoyance
Conveying Relief
Conveying Uncertainty
Conveying Impatience
Conveying Shame
Conveying Resentment
Conveying Panic
Conveying Guilt
Conveying Desperation
Conveying Sarcasm & Verbal Disrespect
Conveying Confusion
Conveying Stubbornness
Conveying Frustration
Conveying Indifference
Conveying Indignation
Conveying Confidence & Pride
Conveying Smugness
Conveying Enthusiasm
Conveying Curiosity
Conveying Hopefulness
Conveying Unease
Conveying Reluctance
Conveying Worry
Conveying Humility & Meekness
Conveying Happiness & Joy
Conveying Amusement
Conveying Disgust
Conveying Resignation
Conveying Jealousy
Conveying Anticipation
Conveying Contentment
Conveying Defeat
Conveying Excitement
Conveying Fear
Conveying Hatred
Conveying Hurt
Conveying Being Overwhelmed
Conveying Sadness & Grief
Conveying Satisfaction
Conveying Somberness
Conveying Sympathy & Empathy
Conveying Wariness
Conveying Defensiveness
Conveying Desire
Conveying Doubt
Conveying Energy
Conveying Exhaustion
Conveying Hunger
Conveying Loneliness
Conveying Physical Pain
Emotional Wounds
A Role Model Who Disappoints
A Sibling’s Betrayal
A Speech Impediment
Becoming a Caregiver at an Early Age
Being Bullied
Being Fired or Laid Off
Being Held Captive
Being Mugged
Being Publicly Humiliated
Being Raised by Neglectful Parents
Being Raised by Overprotective Parents
Being So Beautiful It’s All People See
Being the Victim of a Vicious Rumor
Being Stalked
Being Trapped in a Collapsed Building
Being Unfairly Blamed For The Death of Another
Childhood Sexual Abuse (by a family member or known person)
Discovering One’s Parent is a Monster
Discovering One’s Sibling was Abused
Experiencing a Miscarriage or Stillbirth
Failing At School
Failing To Do The Right Thing
Financial Ruin Due To A Spouse’s Irresponsibility
Finding Out One’s Child Was Abused
Finding Out One Was Adopted
Getting Lost In a Natural Environment
Growing Up In A Cult
Growing Up in a Dangerous Neighborhood
Growing Up In Foster Care
Growing Up In The Public Eye
Growing Up In The Shadow of a Successful Sibling
Growing Up with a Sibling Who Has a Chronic Disability or Illness
Having Parents Who Favored One Child Over Another
Having To Kill Another Person To Survive
Infertility
Infidelity (emotional or physical)
Losing a Limb
Losing a Loved One To A Random Act of Violence
Making a Very Public Mistake
Overly Critical or Strict Parents
Physical Disfigurement
Rejection By One’s Peers
Telling The Truth But Not Being Believed
The Death of a Child On One’s Watch
Victimization via Identity Theft
Watching A Loved One Die
Wrongful Imprisonment
Spending Time In Jail
Suffering From a Learning Disability
Motivation
Achieving Spiritual Enlightenment
Avoiding Certain Death
Avoiding Financial Ruin
Beating a Diagnosis or Condition
Being Acknowledged and Appreciated by Family
Being a Leader of Others
Being the Best At Something
Caring for an Aging Parent
Carrying on a Legacy
Catching The Bad Guy or Girl
Coming To Grips With Mental Illness
Discovering One’s True Self
Escaping a Dangerous Life one Doesn’t Want
Escaping a Killer
Escaping a Widespread Disaster
Escaping Confinement
Escaping Homelessness
Escaping Invaders
Finding Friendship or Companionship
Finding a Lifelong Partner
Having a Child
Helping a Loved One See They Are Hurting Themselves and Others
Obtaining Shelter From The Elements
Overcoming Abuse and Learning To Trust
Overcoming Addiction
Protecting One’s Home or Property
Pursuing Justice For Oneself or Others
Realizing a Dream
Reconciling with an Estranged Family Member
Rescuing a Loved One From a Captor
Restoring A Name or Reputation
Righting a Deep Wrong
Seeking Out One’s Biological Roots
Stopping an Event From Happening
Trying Again When One Has Previously Failed
Support Wordsnstuff!
Request A Writing Help Post/Themed Playlist/Writing Tips!
Send Me Poetry To Feature On Our Instagram!
Receive Updates & Participate In Polls On Our Twitter!
Like us and share on Facebook!
Read More On Our Masterlist & See our Frequently Asked Questions!
Tag What You Want Me To See With #wordsnstuff!
Participate in monthly writing challenges!
107K notes
·
View notes
Text
how to mass edit / save icons without an action script.
sweaterquccn:
Alright everyone ! ! So over the years here on tumblr, I’ve gained a rather LARGE collection of icons which I’ve, painstakingly made, hand by hand and one by one. I’m sure others can agree that they’re sick and tired of sitting in photoshop for HOURS with the same motions of cut + paste + save for each new icon (and when you make thousands of icons like I do, you go a little crazy) Personally, I’ve looked into how to mass edit these icons, I’ve tried everything from PHOTOSCAPE (which doesn’t let you slap psd’s on top) and action scripts (which if you don’t understand it like me, it fails all the time.) BUT FEAR NOT ! ! Somehow I’ve discovered how to mass edit and save icons WITHOUT AN ACTION SCRIPT. All you’ll need is one thing;
● Photoshop CS6 / portable (a link to download can be found here)
but if you’re able to figure out how to do this in the photoshop
version you’re comfortable with, please don’t feel forced to change.
Before I get into this tutorial I’m SORRY that I’m NOT placing it under a read more, the reasons are simply that if this blog is to ever be deleted or moved or changed URLS - no one would be able to read it under the read more, so please keep that in mind !
For those who want to save RAW icons; feel free to skip down to step six as it should explain what to do !
Instructions.
(step one.) so, first thing that you’re going to want to do, is load all of your icons into a STACK, this means that each icon you load will be a separate layer but in the one canvas. To do this, you’ll want to do the following. FILE » SCRIPTS » LOAD FILES INTO STACK

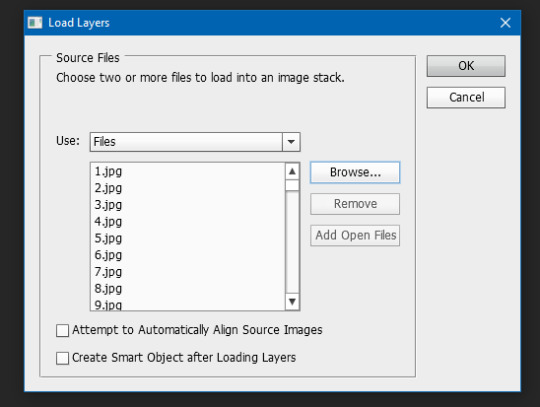
After clicking on this, a new popup will come onto the screen, what you want to do is click on BROWSE and it’s through this you’ll navigate to the icons you want to edit (for me I’ve chosen my mirai icons which are numbered into the 1500′s) you don’t need to worry about any of the other boxes, when the files are loaded into the grey box, hit OK. Note that pending on how many icons you have to edit, this process might take a while to run on photoshop (for me it took a good 15 mins or so to load up 1,500 icons) but you should end up with something like this; notice how all my icons are now in one canvas, but in multiple layers, that’s what you want.
also please be aware you’re computer MAY OVER HEAT - if you’re on an older computer or laptop I recommend that you just let this process be and to not touch anything else in the mean time.

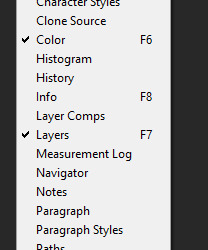
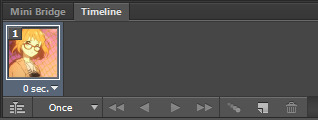
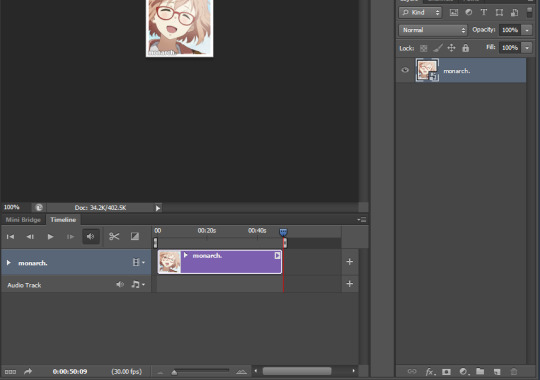
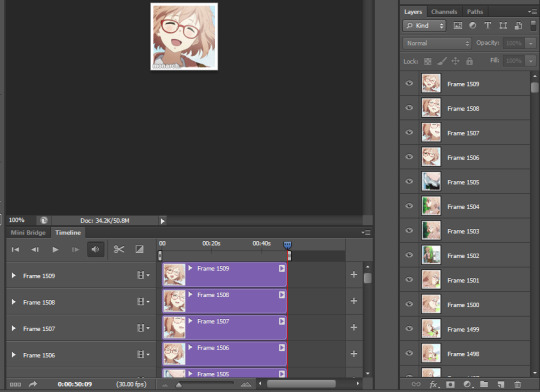
(step two.) Now, for the next step, you’ll want to open up your timeline, if you don’t already have it up, just go to WINDOW » TIMELINE as shown in the below image, this should then bring up what is given in the second image ( bigger resolution HERE )
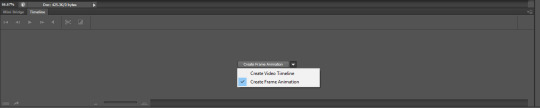
click on the CREATE FRAME ANIMATION and you should get the following in your time line bar; also SOME users may already have this automatically come up and this is OKAY, it’ll work the same even if you don’t go through the above step.
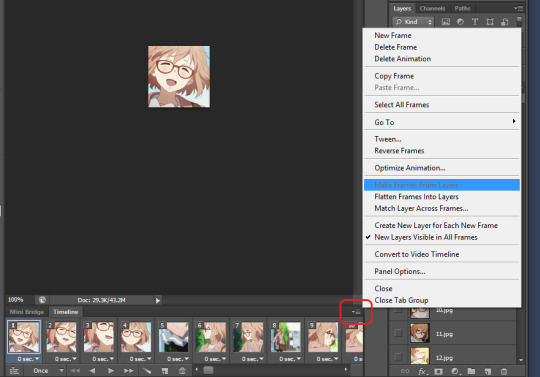
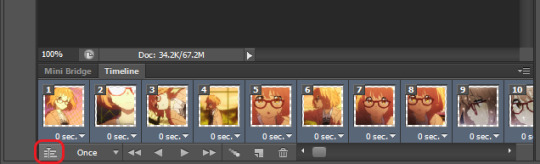
Now, what you’re going to do is go to the top, right hand corner of this timeline window, click on the little box and hit MAKE FRAMES FROM LAYERS. You should end up with the result below (which is also highlighting where the box that you need to do this is - it’s only greyed out because I already clicked the button.) also, for the sake of order, if you like your icons in chronological order - hit the REVERSE FRAMES button.
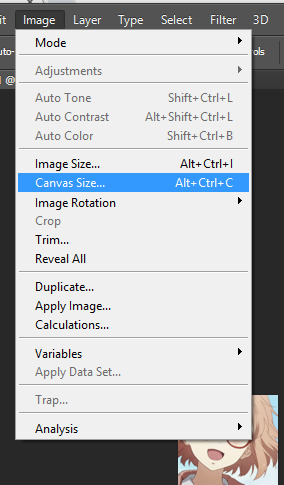
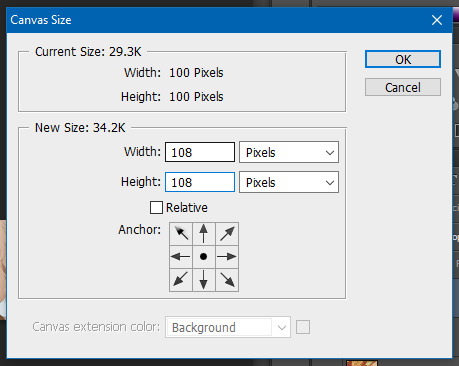
now, I almost forgot to do this and this is a step you can do before making the timeline animation / frames - if your icons need a bigger canvas size - due to borders, psds or whatever - MAKE SURE YOU CHANGE THE CANVAS SIZE, you can do this by IMAGE » CANVAS SIZE. which will pop up with what is given in the second image, use this to change the canvas size to whatever your edits take up, for me I need a canvas size of 108 x 108 pixels - please also note this will take some time to process in photoshop, so please be patient.
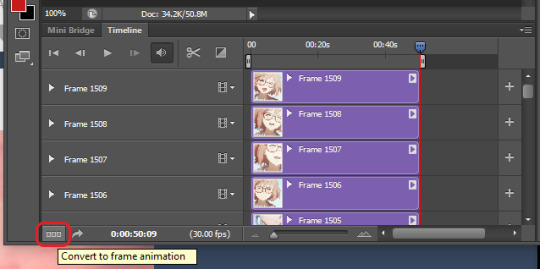
(step three.) so now, comes onto the more difficult part, but when you have this memorized it should be easy to continue for other icons which you make. First thing that you’re going to do; in the bottom LEFT hand corner of the timeline window, there’s a small button and you’re going to click that - it’s highlighted in the following image;
clicking this will cause your timeline to change into something that looks like this ; and i’m sure you’ve seen this with other tutorials but DON’T STRESS it doesn’t get complicated - once again however this is a lengthy process to convert.
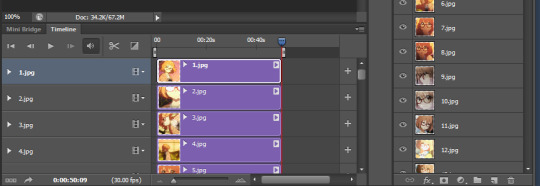
When this is finished, you’re going to SELECT ALL OF YOUR LAYERS. After this, you’ll be going to FILTER » CONVERT FOR SMART FILTERS. Once you finish this, you should get what is in the second image;
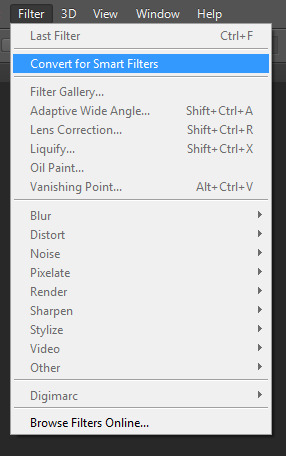
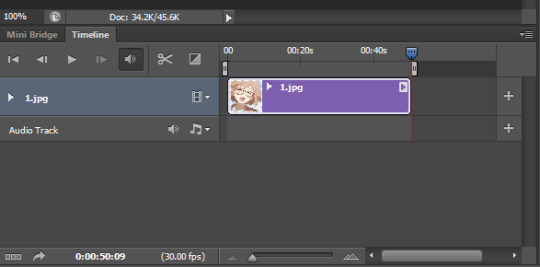
DO NOT STRESS ABOUT THIS AND THE FACT THAT ONLY ONE LAYER NOW SHOWS - THIS IS WHAT YOU WANT AND YOU HAVE NOT DELETED ANYTHING. If you simply move the slider around on the time line, you can see that all the layers are still there, think of the smart filter as fancy folder.
(step four.) Now comes to the FUN part of editing ; so, what you’ll need to do is open up the PSD file that you use for your icons, for me I have a few filters that I change depending on if I use manga, live action or anime - make sure to also drag this canvas out into a smaller one to make the next steps easier.
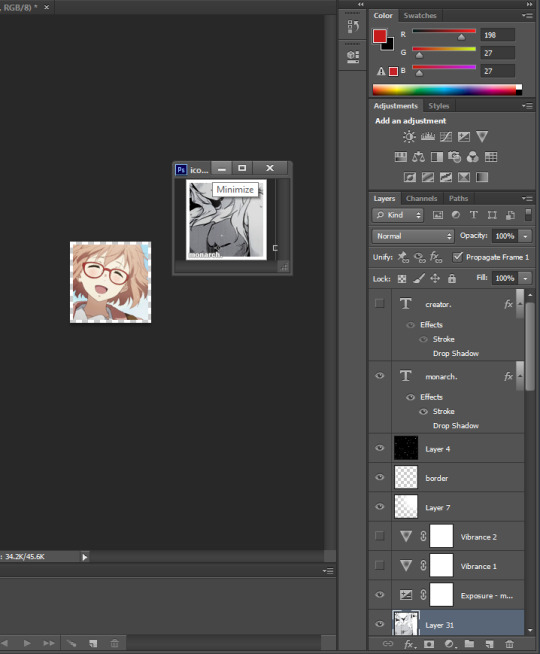
as you can see from the above, I have my icon psd selected and yet the icons I’d like to edit are still able to be seen, now, you’re going to drag the layers of your psd - what you usually place ontop of your icons, and DRAG THEM onto the icons you want to edit like the following;
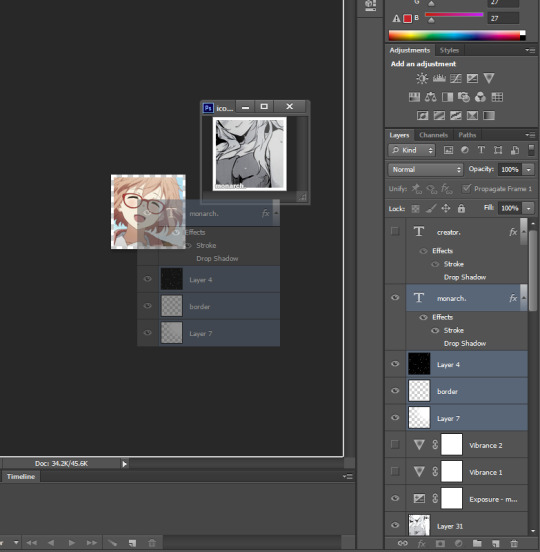
This should drop onto your icons all nice and neat and in frame, if not, simply move them around as you normally would until everything lines up all nice and neat, but HOLD ON A SECOND. there’s something VERY IMPORTANT that you need to take care of;

In the above image, there are these purple little sections now added in the timeline, what you want is for these to be lined up like the image below, they need to start where the longer purple section starts and, they need to END where they end (DO NOT EXTEND OR SHORTEN THE PURPLE SECTION WHERE YOUR ICONS ARE.)

So now, you should end up with the bottom image, everything is now neat and the same length. If you’ve done this, the hard part is now over and you can relax a little now, there are only a few more steps and you’re done !

Now, you’re going to repeat a step that you’ve already done, like before, you’re going to SELECT ALL LAYERS and convert them for a smart filter, so you’ll end up with just a single layer and a single, purple section like the following;
(step five.) Now we’re going to get onto how to save all of these icons, first what you’re going to want to do is click on the upper right box, like you did earlier and as show below. You’ll be going to CONVERT FRAMES » FLATTEN FRAMES INTO CLIPS.
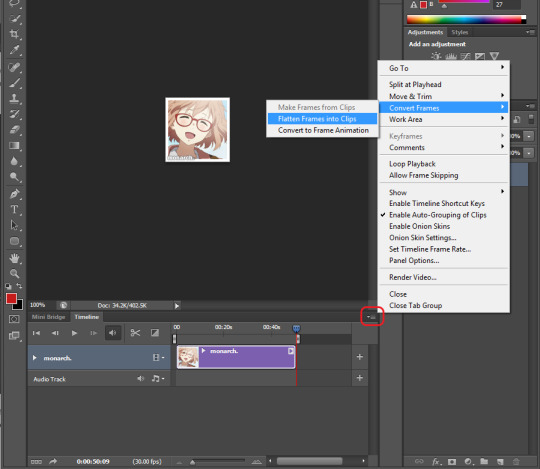
Now, your work space should look like the following; there’s frames for each icon and a layer for each icon, but you’ll notice that each icon is edited with your PSD, it’s a miracle ! and this means you’re on the right track. Keep going, you can do it.
Now in the bottom left corner there should be three squares to click on, these will return you to the timeline you were familiar with before, it’s a more simplified version;
Now, you should get the following image after clicking that little button, but before you move onto the next step, there are two IMPORTANT THINGS you need to know before moving on.
In the first frame, the number HAS TO BE CHANGED TO ‘NO DELAY’ this is done by clicking the area highlighted in the picture - DO NOT SKIP THIS STEP by skipping this step, when you save your icon, you’ll end up with the same one repeated, so this needs to be changed.
You also need to scroll to he bottom of your layers and DELETE the one layer that isn’t visible, once again it’s highlighted in the image.

(step six.) [ this can be applied to raw icons if you make them in the same layer or canvas ]
Now, to save all of your icons you’re going to want to go to FILE » EXPORT » RENDER VIDEO. I know it seems strange, but this will save you all the time in the world, and best of all you don’t have to download any scripts !
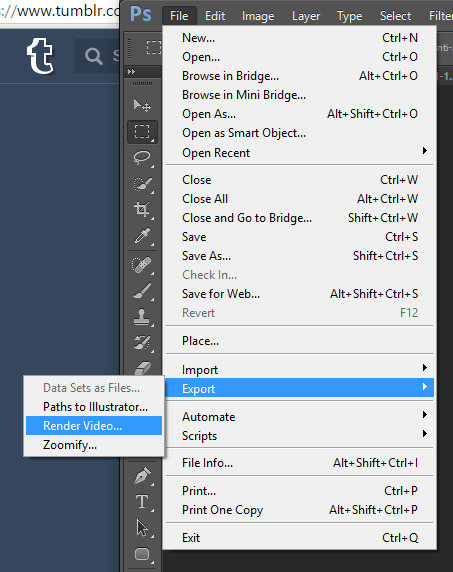
after clicking on this, the following will pop up and it’s with this, I’ll explain what details you need to change.

name: personaly, I like to number my icons numerically ; so I placed a ‘0′ these will save your icons in the sequence of ‘ 0001, 0002, 0003 … 0345, 0346, 0347 ‘ etc etc.
select folder: these will be where your icons save.
create new subfolder: i never use this, but this would save the icons in a new folder in the folder you’ve selected.
adobe media encoder box: ALWAYS CHANGE THIS TO ‘PHOTOSHOP IMAGE SEQUENCE’
format: whatever you save your icons as, change this, for icons with a transparent background, they should be saved to a PNG format.
starting: This is the number where the icons will save as; if you chose 0 for example, your first icon will save as ‘0′
digits: this is how many digits you want in the name, I always set this to 1
size: this should stay the same with your canvas size and you shouldn’t have to touch this.
Making sure ALL FRAMES are selected, simply hit the RENDER button and watch as your icons save in one place and you’re DONE.
I really hope that this tutorial makes sense, it’s the best I could do / how to explain things and I hope that it helps a lot of people who struggle making icons.
please feel free to reblog this if it has helped.
2K notes
·
View notes
Photo
Please like/comment if download.
Don’t claim as your own,if you use it credit me.
Don’t manipulate my work .
[DOWNLOAD]
88 notes
·
View notes
Photo
SUDDENLY : PSD ® wiiintermoon
➤ Like / Reblog if you download the PSD
➤ Download : HERE
➤ Don’t copy
126 notes
·
View notes
Photo


“Your Aesthetic Enforces White Beauty Standards and You Should Really Think About Why You Consider Porcelain Skin The Epitome Of Beauty Instead Of Ignoring Your Own Blatant Colorism” by Panic! at The Disco haithehelpful
I tried my hand at a pastel psd that doesn’t whitewash since I haven’t seen many out there. In no way is this perfect since I’ve never made a real pastel psd before but I tried! download here & long live melanin.
710 notes
·
View notes
Photo


PETRICHOR
a pastel psd for darker skin tones.
desaturates blues & greens while darkening browns & tans!
will NOT whitewash. you can use it on lighter skintones too, but it will darken them & occasionally give off that quintessential bad spray-tan look, so you would need to do some adjustments.
download! (google drive)
184 notes
·
View notes
Photo
COLOR PSD #01;
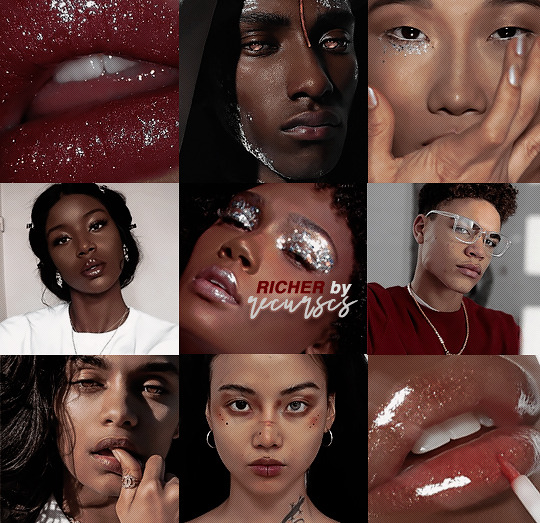
↳ RICHER by recurscs –– ( descarga // download )
RICHER; un psd creado para poc (personas de color) que mantiene y realza los colores: rojo/marrón/negro y suaviza los tonos azules/cyan/verdes. basicamente, un psd que mantiene el aesthetics™ sin caer en el blanqueamiento de piel. disfrutenlo y porfis like/reblog si les sirvio. como siempre, no reclamen como propio.
✧
RICHER; a psd created specifically for poc that maintains/enhances colors: red/brown/black and turns blue/cyan/green tones down. basically a psd to keep the aesthetics™ poppin’ without having to whitewash in your edits. enjoy and please like/reblog if you found this helpful. as always, don’t claim as your own.
2K notes
·
View notes
Photo

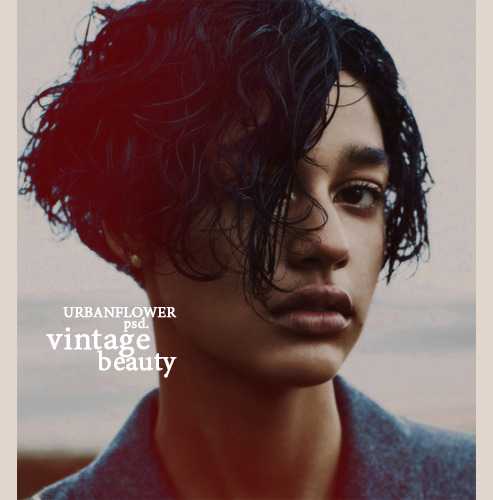
description ☾˚
low contrast vintage-inspired coloring
brings out reds and yellows, desaturates most other colors
poc friendly
comes with an optional black and white adjustment layer
terms of use ☾˚
like or reblog if using or saving, or if liked or appreciated
provide credit if using; i would love to see what you do with this, so please consider tagging me in the first five tags, sending me your work with this psd, or giving me an @!
ask permission before using in commercial or commission work
download ☾˚
download on deviantart here
downloading implies consent to the terms above
a huge thank you to @concinnitytm for their skintone swatches used in the above preview graphic!
227 notes
·
View notes
Note
I'm the same anon that asked about the size of the sidebar in Caffeine Fiction, what's the size for the rest of images? If it's not too much trouble, can you make a post with all image sizes to have a reference of how big they should be?
Navigation: 110x150
Sidebar Portrait: 130x170
Full Sidebar: 150x610
Connections: 50x50
6 notes
·
View notes
Photo
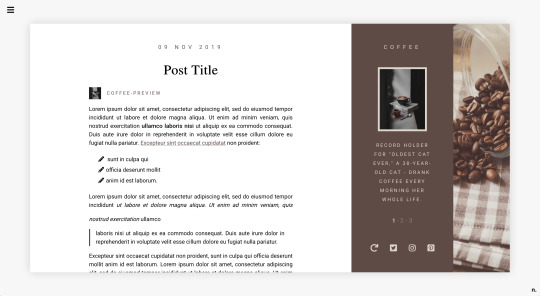
THEME #06 COFFEE [Preview]
Container theme. A minimalistic container theme, based on my character theme CAFFEINE FICTION.
↳ [GITHUB] | [THEME GARDEN] (soon)
Features:
Contained
Full sidebar image & portrait
3 social links + home button
Slide navigation
Accent & highlight colors
Custom list icon
Post width selection: 300, 400, 500, 540 & 700px
Semi-responsive
Credits:
Font Awesome Icons
Unsplash Stock Images
Edit and customise to your liking. Don’t repost/redistribute and/or claim as your own. Do not use as a base code. Leave the credit, thank you.
As always, explanations are in the code. I’ll be updating them from time to time. If you are having issues, take a look at this themes FAQ, or my general FAQ. Not finding anything? Shoot me a message. Please report any bugs to me.
668 notes
·
View notes
Photo

Theme - Starship; [preview] [code] [magnusthemes]
Psycho-pass theme. Features lots of barcodes.
Features:
Theme is responsive!
Like/reblog buttons
Custom post size from 400px to 540px
Option to hide captions and tags on index page
Optional infinite scroll and manual load
Optional sidebar image, max. 120px width
Notes:
To insert links, simply create a page and check “show a link to this page”.
This theme has no background image option. Please do not ask me to add it.
If you don’t upload a sidebar image, the theme will use your dashboard avatar
Please turn off the default mobile theme in Advanced Options if you want to use the mobile version!
Sidebars can go either at the top or at the bottom
Please like and/or reblog this post if you use or plan or using this theme, or just if you like it (: Thank you for your support!
1K notes
·
View notes
Photo
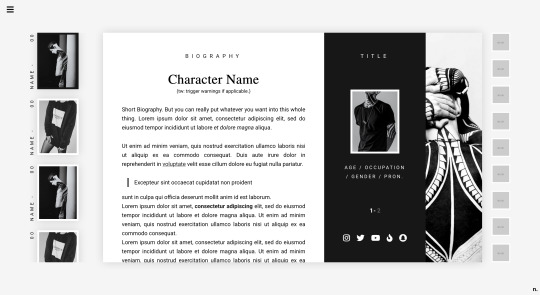

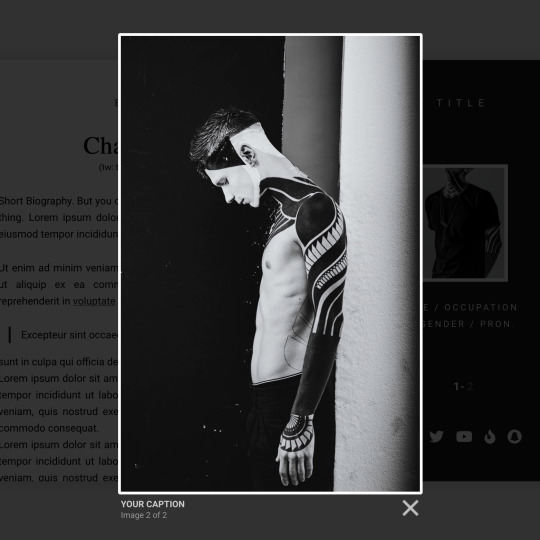
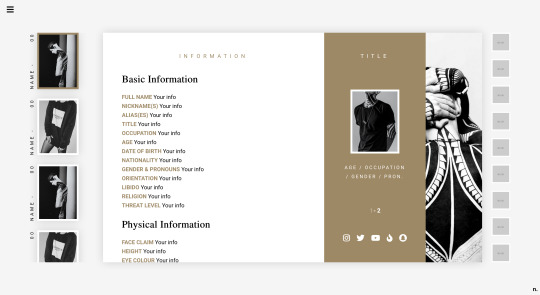
PAGE THEME #03 v. 3.0 CAFFEINE FICTION [Preview]
SODA POP FICTION revamp. A minimalistic character page theme. It features tabs for each character with two pages for additional info, connection popups and lightbox image galleries.
↳ [GITHUB]
Features:
Image side navigation
Two pages per character
Connection pop up
Lightbox social media images
Sidebar image
Filtering
Semi-responsive
Requires at least basic html knowledge.
Credits:
Font Awesome Icons
Lightbox Plugin
Unsplash Stock Images
Edit and customise to your liking. Don’t repost/redistribute and/or claim as your own. Do not use as a base code. Leave the credit, thank you.
As always, explanations are in the code. I’ll be updating them from time to time. If you are having issues, take a look at this themes FAQ, or my general FAQ. Not finding anything? Shoot me a message. Please report any bugs to me.
2K notes
·
View notes
Photo

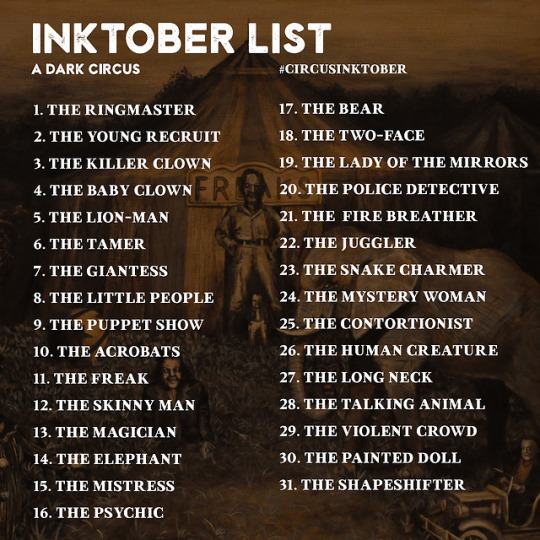
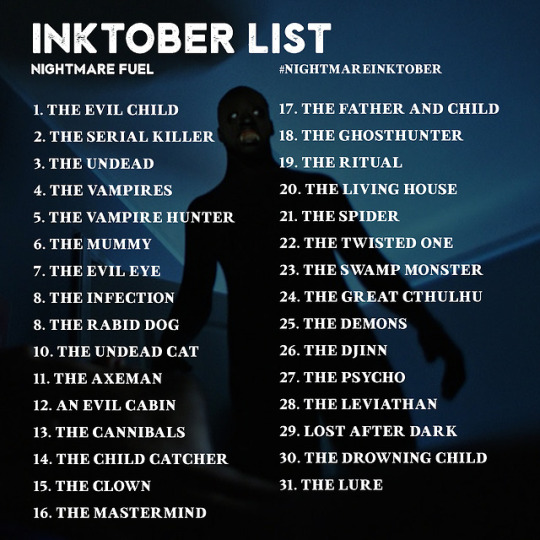
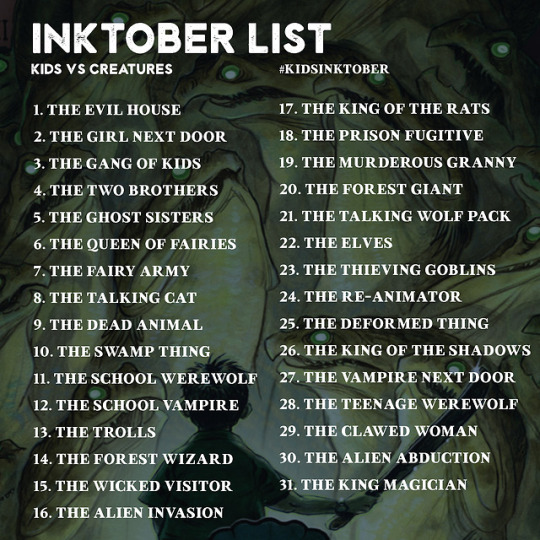
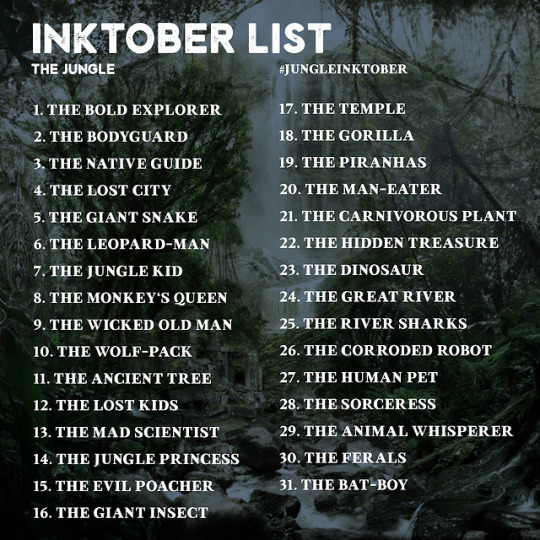

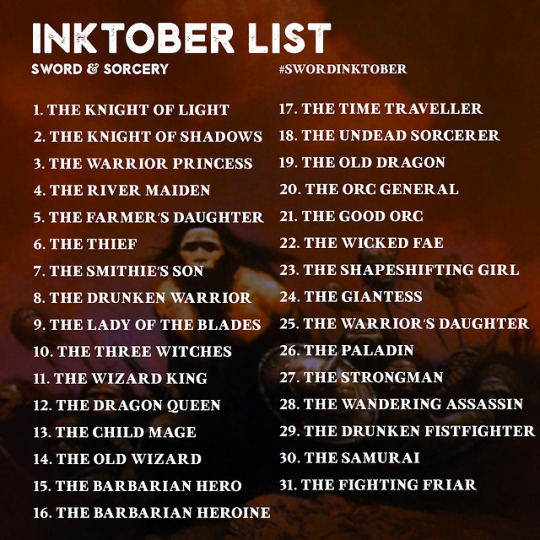
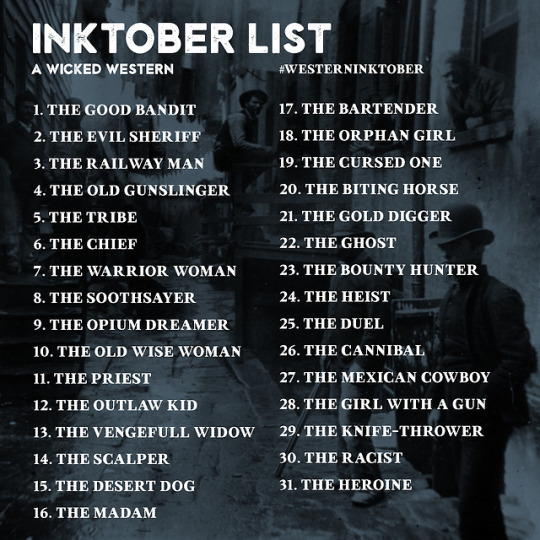


Wow, what a response to last year’s Inktober lists, with 77,337 notes just here on tumblr!
Here are my new lists this year. I hope they inspire you, use the hashtags so we can see what you come up with, tag me, share!! Or use one of the 8 lists from last year. Do whatever you want!
Make sure you:
- do one inked drawing a day.
- tag your work with #inktober and the relevant list tag
- have fun!
Instagram
tumblr
(Note, older versions of this post had ringmaster twice in the dark circus list, now fixed.)
5K notes
·
View notes
Photo
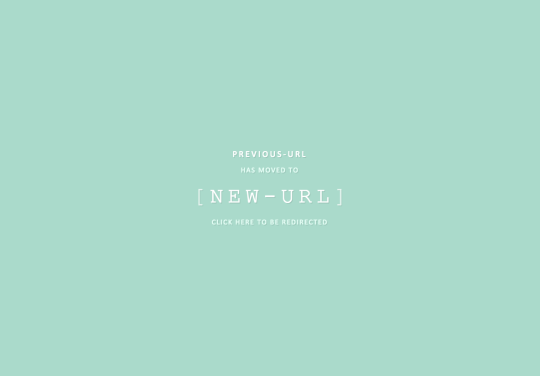
redirect page
preview & download
option to redirect automatically or when clicked
preserves path (links to posts, pages, tags, etc.)
customizable colors
2K notes
·
View notes