
soulshines
* 𝑺𝑼𝑵𝑺𝑯𝑰𝑵𝑬 .
allie . she/her . latina . gifmaker .
235 posts
Don't wanna be here? Send us removal request.
Last Seen Blogs
kishihuman
Welcome to the end of the world
ambelle
Reclaiming My Time

ymanation
YMA WEALTH MANAGMENT GROUP
softpetall3238
kawaii kochanie
jmb102001
Here For The Fandom, Fun & Fuckery
Text
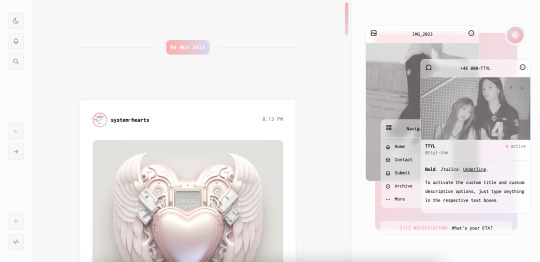

[ Theme #11: TTYL ]
Preview + Install (Theme Garden)
Live Preview + Static Preview + Code (GitHub)
A responsive, all-in-one theme that includes the option to hide the about, navigation, muses, following, and recently liked sections!
Features:
Day and night toggle button that will stay in the selected mode until it is turned off. A dark mode option is available for those who prefer a dark color scheme on their blogs instead of the default light colors. The day and night mode button will also change according to the scheme you are using.
6 sections are included in the theme (blog posts, an about me, navigation links, muses, following, and recently liked posts).
Left or right sidebar. Both layouts are responsive on multiple screens including mobile.
You can also choose icons that you like for various elements of the theme (i.e. the menu links in the sidebar) from Tabler Icons. Please refer to the theme guide linked below for more information.
Like and reblog buttons, a search bar, an updates tab, and a custom "Not Found" page.
A drop-down menu with 3 custom links.
Supports NPF posts and page links.
Options:
Instead of giving you a selection of post sizes to choose from, you can enter your desired post size (i.e. 500px or 40vw). The same applies to the sidebar.
A custom title and/or description. To activate the custom title and description options, just type anything in the text boxes "Custom Title" and "Custom Description."
You have the option to choose whether your accent colors will be a gradient or one color.
There is a selection of border styles and header styles to choose from.
Different sidebar images are optional. However, the first sidebar image that uses your header image as the default will always be visible on your blog. There is no option to hide it like the other sidebar image.
Show or hide tags on the index page.
Notes:
The search bar will be hidden automatically if you have the option to hide your blog from search results enabled.
The following and recently liked sections will only work if you're using the theme on a primary blog. It will not work with side blogs. Please also make sure you have enabled the options to share your following and liked posts in your blog settings.
For an in-depth explanation and tutorial on how to customize the theme to your liking, please refer to the theme guide! Everything you need to know will be addressed there.
Credit:
NPF Audio Player by @glenthemes
Tabler Icons by Paweł Kuna
See full list of credits here.
Please make sure to read the theme guide before sending in any questions about customization, thank you!
1K notes
·
View notes
Text

💌 𝐃𝐄𝐋𝐈𝐕𝐄𝐑𝐘 𝐈𝐍𝐂𝐎𝐌𝐈𝐍𝐆 * template #32: dash icon.
by visiting the source link, you will find a download (deviantart) for a template psd ! this file comes with clearly labeled layers + a “helpful tips” layer you can toggle on/off to make editing super easy. an anon requested a tutorial for my dash icon but i thought it would be a little easier to share like this!
p.s. to ensure all of your layer effects come out true to color, i would recommend adding any psds or actions to your picture before dragging it into this file ! there’s a stroke effect that goes around the inside of the image frame so psds would alter the color of that.
you can find my usage guidelines here.
please like or reblog this post if you found it helpful.
198 notes
·
View notes
Text

*✶ wife
a template by cozysip.
by clicking in the source link ( deviantart ) you’ll find 02 psd template made by me from scratch. credit is not needed , but do not claim as your own ! if you enjoy this or you use it, please reblog or like this post . thank you !
90 notes
·
View notes
Text


GO GO.ATN *
╰ * clicking on the source link you will find the “ go go! ” action . it can look too sharp so you might need to edit the opacity . this action was made by me from scratch , you can edit this as you like but only for personal use , so don’t claim as your own or redistribute . if you found this helpful consider giving this a like / reblog and follow me for more of my resources .
137 notes
·
View notes
Text

— HALSTON SAGE IN DAUGHTER OF THE BRIDE.
All in GALLERY. Like or Reblog if it was useful, every interaction shows us that we should keep making screencaps for y'all ♡
28 notes
·
View notes
Text
too late. psd !
hi hello 🐻 here’s a simple lil psd. this coloring brings out browns, pinks, and beiges mostly. has been tested on multiple skin tones ( examples 1 & 2 ) so if you stumble across one it doesn’t work on please let me know and i’ll adjust accordingly ♡ as always like or reblog if you plan on using. thanks !
93 notes
·
View notes
Text

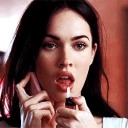
mishti rahman via instagram .
22 notes
·
View notes
Text

✦ Okay, I give in. Let's upload our gifs on the beta editor to prepare for a gif pack page. Resources are available at the bottom, so lets get started !!
So first things first, you can only upload 30 gifs at a time. Now for me, I will always upload as I gif, around every 20 gifs, then upload to the page (this also ensures I don't skip any or have doubles) and keep gifing. That used to mean that I don't have to wait for tumblr to load 300 gifs and die from impatience. For the rest of y'all that means you're going to have to batch upload. I know, I'm sorry.
Note: With the help of @nataliealynlind we discovered that the daily limit is 250 gifs! So if you have more than that, prepare to upload your gifs over the course of a couple days or use a second blog. (imo this is another great reason to upload as you gif! that way you don't have to get stuck at 250!)
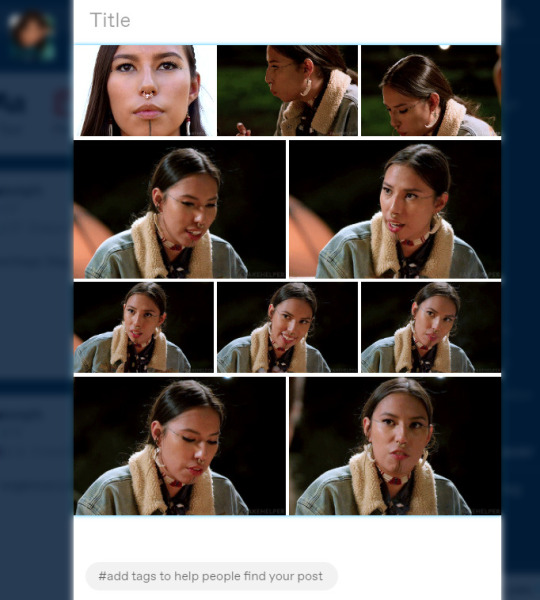
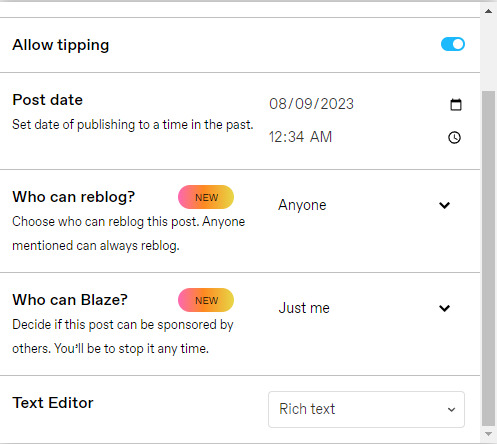
So after you upload your gifs (in this case I only did 10)*, you're going to go to the gear at the top of your post and click it. Then scroll all the way to the bottom where it says Text Editor. This looks familiar, right?

*Note: If you don't save it as a draft first, your gifs will be in .gif format, not .gifv. This means you can skip removing this tag later on, but I'm not sure if gifs that are uploaded but never saved/drafted will later disappear at some point. To be safe, I would save it as a draft. I just forgot at this part tbh
Well the good news is, you only have to change this once! The bad news is, we don't do Markdown then HTML anymore bc Markdown doesn't strip any of the code anymore 🙃 So just change it to HTML
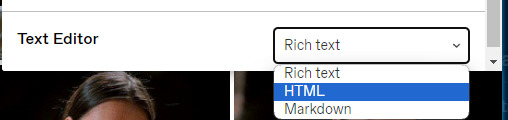
Now it should look like this! Fun!
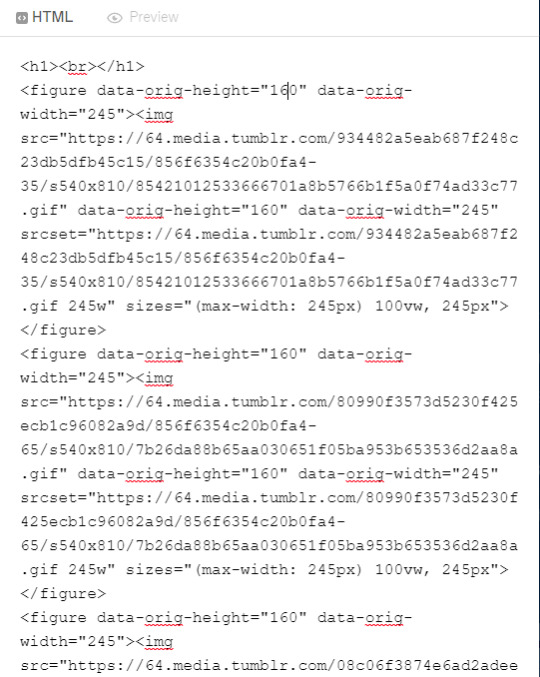
Okay, now we're going to copy that text and take it on over to our new best friend, the HTML Cleaner! So you're going to want to paste it on the right side of the screen. Your gifs should appear on the left side. If both sides have text, that's how you know you pasted it on the left.
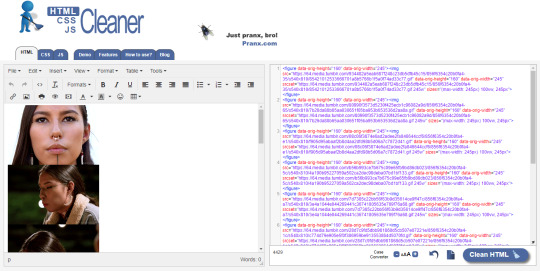
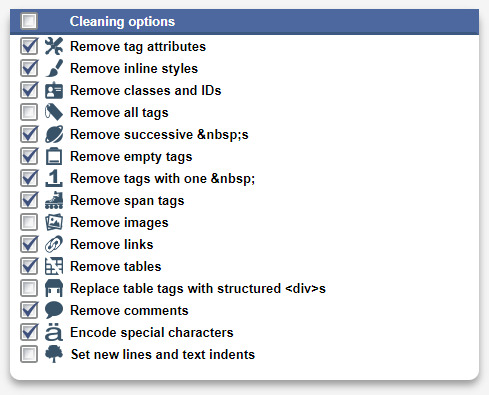
So in order to get ride of all this extra code, it's going to take a couple extra steps. First, you're going to check these boxes on the left hand side.
Now, on the right hand side, you're going to enter these under Find and Replace (copy/paste section below!!). I know you're like, uh what? Where the hell did you get those numbers? Well, I got them from our gif post code!
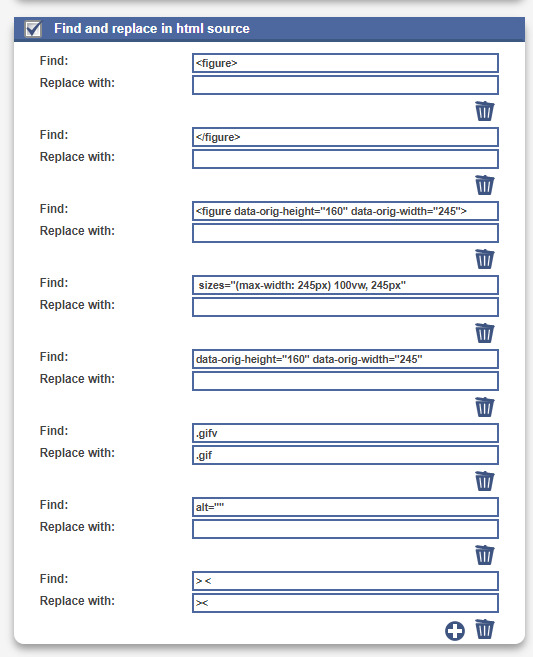


For easy copy pasting:
Find: <figure>
Replace: (leave blank)
Find: </figure>
Replace: (leave blank)
So after you add the specific widths for your gifs, you're also going to want to add the following:
Find: .gifv
Replace: .gif
Find: alt=""
Replace: (leave blank)
Find: /> <
Replace: /><
NOTE: If your gifs are usually the same size, I would recommend saving these snippits above on your computer's sticky notes or a draft to copy/paste for future uploads! While I do appreciate the viewer traffic, I'm sure coming to this tutorial every time is gonna get old real fast.
After all that, click Clean HTML

And now, your code should look like this! If there's still a space between your image links, just click Clean HTML again and it should get rid of it!

Now your code is nice and clean to put into your gif pages! Not quite sure how to do that? Read the Setting Up Your Sidepage section in this older tutorial!!
Resources
HTML Cleaner
My Gif Pack Page Codes
Recommended Gif Pack Page Codes (tag)
Previous Tutorial (How to upload to a Standard Sidepage)
Barebones Code (for previous tutorial)
160 notes
·
View notes
Text


#001: PINK CRUSH
The above link will direct you to a mediafire download for my pink crush psd. The psd is made to restore color balance and skin tone on images with extreme pink/magenta color casts.
PLEASE NOTE this psd will most likely not work on other footage as it is incredibly scene specific but you are welcome to test it out yourself. Credit isn't necessary but a like /reblog is appreciated. Below the cut I go into more detail on my process for those interested in color balancing.
My first step was to do a color divide to begin chipping away at the pink colors in the image. First you add a new fill layer > solid color.

When the color picker pops up, I use the eyedropper tool to click on the color of the image I want to remove from my gif. Your entire screen will be filled with the color we DON'T want. That's ok because we are going to adjust that.
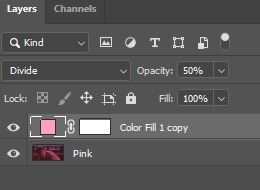
2. Change your layer from normal to divide. Then adjust the opacity to your choosing.
I start out with a small percentage at first and adjust as I play around with it. I ended on 50% opacity. Sometimes the first color you want to use may not be optimal, so experiment with choosing different hues in the image. I started off with a darker pink but learned the lighter pinks in the highlights worked better.

3. Next, I did the typical color balance.
It's my go to for images with slight color casting. It's your best friend but be weary of overdoing the image and making your shadows too blue or green. The color balance does not have to be perfect and most likely won't be at this point and that's fine. Sometimes less is more and you can always go back and adjust as necessary. The general rule of thumb is to scale to the complementary color you are trying to remove. In this case, it was green and yellow.
4. Then I added a subtle touch of color with a hue/saturation layer. I also added a levels layer to add contrast by toggling the white and blacks on the scale.
5. Curves. One of the greatest tools when you get the hang of it.
Apart from adjusting the brightness and shadows, you can auto correct the black, white, and gray points. On the left hand side of the graph there are three eyedropper tools. When you hover over the eyedropper tool it will tell you what point it is for. The first one is for the black point.
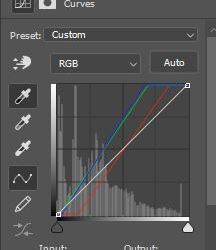
Click on the black point eye drop tool > select the blackest point of your image. Repeat this step for the next points. (Choosing grayest area for gray points and whitest area for your white point). The image may come out overly bright or have an odd color cast. You can play with the RGB setting on the curves to adjust the colors or you can choose different black/gray/white points that bring better balance to your image. I find that I often lessen the opacity of this layer so it's not so punchy.

This is what my image looks like at this point. That green is ugly! But, the skin tones are the most balanced they have been at this point. So I decided to work on removing those greens.
6. Selective color. I went into the green and worked on removing it from the shadows. I played around with the colors until it eventually came out looking decent. Your image may have other color casts so adjust them accordingly.

At this point, the image below is what I came out with. Of course, I did not color in this exact order and went back and forth to make adjustments here and there.
Hope this helps!
39 notes
·
View notes
Text
some fucking resources for all ur writing fuckin needs
* body language masterlist
* a translator that doesn’t eat ass like google translate does
* a reverse dictionary for when ur brain freezes
* 550 words to say instead of fuckin said
* 638 character traits for when ur brain freezes again
* some more body language help
(hope this helps some ppl)
186K notes
·
View notes
Text


click the source link below to find #100 gifs of mitch marner in various interviews and youtube videos . feel free to edit any way you want as long as it is for personal use ONLY and you don’t steal / claim as your own or redistribute . do not use them to play mitch himself . please give this post a like or reblog if using !
28 notes
·
View notes
Text

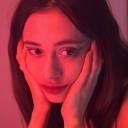
mishti rahman via instagram .
13 notes
·
View notes
Note
Hiii there :) I was wondering if I could make a gif hunt suggestion with gifs of Mk Xyz from the series First Kill and Intentions? Thanks :)<3
hi angel ! i do accept suggestions but i mostly gif youtube videos cuz i’m not good with films / shows and i’m also scared of torrenting lmao . so i’m gonna have to politely decline but thanks for considering me 🤍
0 notes
Note
Hey Ellie, could you please share your gif sharpening settings? Thank you!
hi luv ! i use this sharpening action for all of my gifs
1 note
·
View note
Text

SUBURBIA.PSD *
╰ * clicking on the source link you will find the “ SUBURBIA ” psd . you might need to edit basic layers like brightness and levels . this psd was made by me from scratch , you can edit this as you like but only for personal use , so don’t claim as your own or redistribute . if you found this helpful consider giving this a like / reblog and follow me for more of my resources .
152 notes
·
View notes
Photo
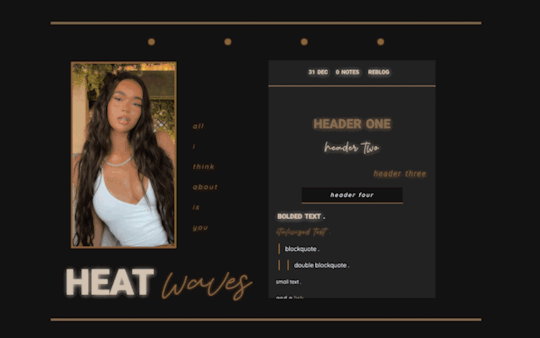
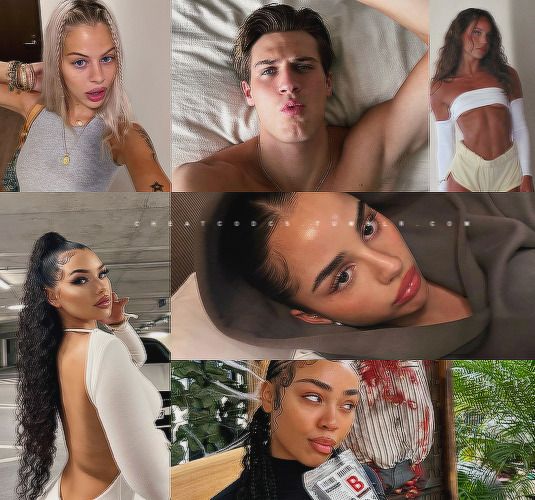
* › 005, HEATWAVES — BY LOVEGAMES .
ringing in the new year with a whole new aesthetic for coding . i’ve recently gained a ton of inspo and have so many goodies to give out .. stay tuned . i’ve changed up my post style so let me know what you think or what you’d like to see in future codes . if you have any questions , my inbox is here for u all . one of the main questions i get after my themes is how to get the title to look like the one in the preview and you have to use <b> and <i> formatting ! support me by liking or reblogging . or don’t . x drew .
* › RULES .
full rules are in the code .
don’t take parts and plug them into other creators codes .
don’t claim as your own .
don’t use as a base code .
don’t remove credit .
* › FEATURES .
2 sidebar images sized at 200x360 . second sidebar img appears on hover
4 different header options .
aesthetic text options .
two blockquote stylings .
navigation tab with 4 links .
navigation info blurb for guidelines .
animations throughout .
visible source link .
optional post bg + bg image .
* › CREDITS .
full credits are in the code .
tabs script / filter / base code by : gordonramsei .
icons by : cappuccicons by suiomi .
imessage chat style by : animalities .
animations : animista .
* › SOURCE LINK FOR CODE .
398 notes
·
View notes
Photo

* › ANGEL BABY 👼🏽 — BY BARELYPOISON .
hi angels , here’s my third theme and it’s named after troye sivan’s song ‘ angel baby ’ ! its a minimalistic theme with a basic look aka do what you please . if u find any bugs or errors please send me a quick message and i’ll get it fixed for u . i hope u all enjoy , if u do a like or reblog is appreciated !
* › RULES .
full rules are in the code .
don’t take parts and plug them into other creators codes .
don’t claim as your own .
don’t use as a base code .
don’t remove credit .
* › FEATURES .
sidebar image sized at 230x200 / included in the code .
navigation tab with 6 links .
animations throughout .
visible source link .
optional post bg + bg image .
* › CREDITS .
full credits are in the code .
tabs script / filter / base code by : the talented gordonramsei .
icons by : cappuccicons by suiomi .
imessage chat style by : animalities .
animations : animista .
preview background : toptal .
* › SOURCE LINK FOR CODE .
355 notes
·
View notes