
redquadrantdesigns
Red Quadrant
Art, books, jewelry, and other things
566 posts
Don't wanna be here? Send us removal request.
Last Seen Blogs

sapphicwedding
love is a demand


caffeineandnetflix
Island Giraffe

improve-responsibility
Untitled

wandering-art-attic
Wandering with a messy art attic
Text
reblogging from my main because this belongs here too
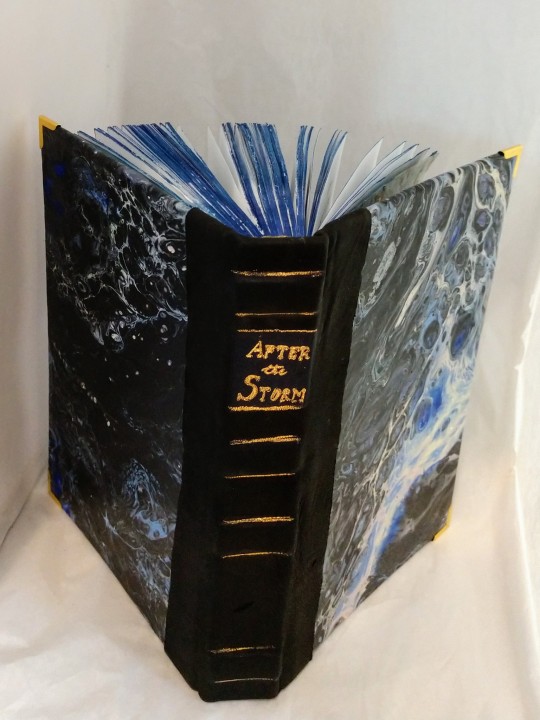


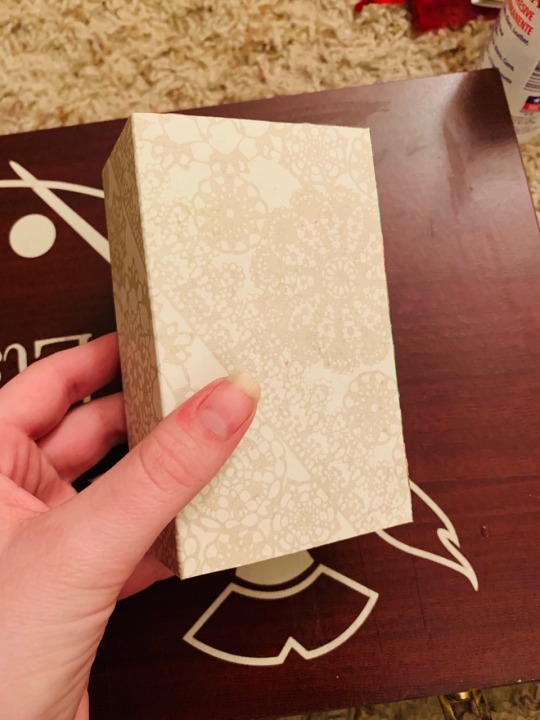
It’s been a long time since I did a book binding project, and I’m pretty happy with the way it came out!
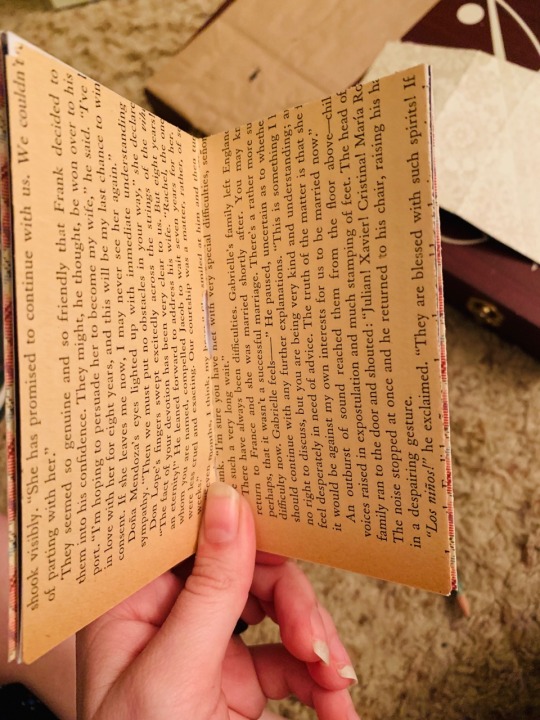
After the storm is a great read, and it’s quickly become one of my comfort books. It features a gentle sweetheart built like a brick shithouse slowly healing from trauma and learning to trust against a rich sci fi landscape. Also, a lot of (well written!) sex. Check it out here and go visit @boatboys for very cool illustrations!
204 notes
·
View notes
Text


Packing up a new order! I always enjoy this part.
#there's something inherently soothing about playing with fire and wax#redquadrantdesigns#sealing wax
2 notes
·
View notes
Photo
this is beautiful!

I got these two wooden cupboard panels a while ago from a junk market stall for literal pennies… I’ve just finished Coptic stitching them into a book. Really chuffed with it…all the paper is from supermarket veg section that they use to line the boxes and packing…especially bananas and the card between stacked bottles…so it’s cost me pretty much nothing to make. I’m a bit rusty at the stitching but I love that kind of finish. Working on a new story and this book once aged a bit might be taking its role in it. X
167 notes
·
View notes
Text
well i'm not the op but i've done something similar, what i'd do is press the leaves you're going to use (you don't need a fancy press for this, just spread them out between two pieces of printer paper and put them on a flat surface with a heavy book on top for a week or so)
when they're dry you can just glue them to the base you're using for your cover, whether it's cardstock or chipboard or whatever else you have on hand. to make them a little more durable you can also put a coat of glue on top, i like to use mod podge for this but tacky glue or even plain old elmers glue all will do in a pinch
you can also use flower petals and things like maple helicopters the same way!
Hey Goblins, uh
Did you know, that you can make an AWESOME journal for your adventures ALL ON YOUR OWN from a cereal box and paper/scraps that you likely have at home/can get from friends or family/you may find around your environment?
They’re called Junk Journals and they’re my entire life.
Im gonna do my best to walk you through how to make one! First, get you a mini cereal box! I use boxes from those cool multipacks of cereal that you can find at Walmart!
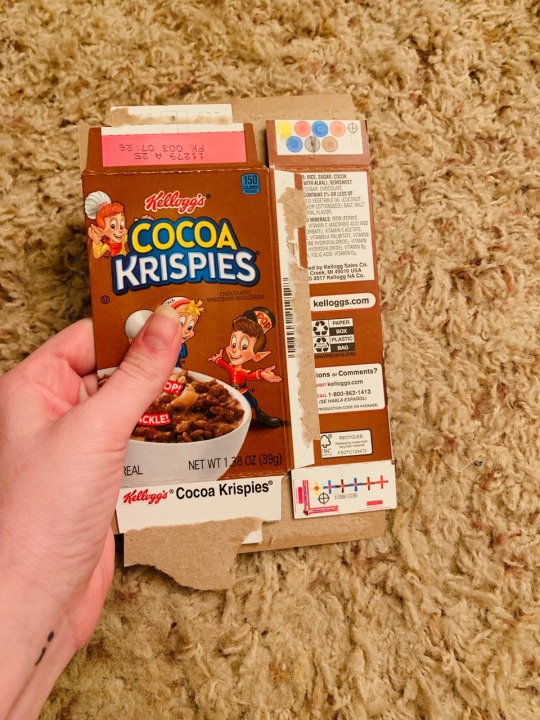
And then cut it out so it looks like this! (I already had one cut, so I’m gonna use that)

That “nutrition facts” side is gone become your spine!
Next, find some paper to use to decorate your cover! I was lucky enough to be gifted a bunch of scrapbooking paper, so I’m gonna use that, but you can also use newspaper, paper from books/magazines, junk mail, napkins, paper towels (excellent texture), etc!
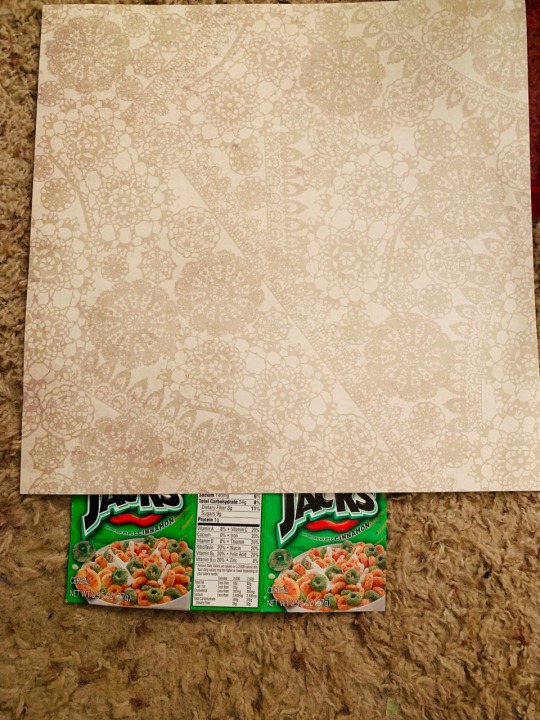
Go ahead and glue that paper to your box (to cover the cereal logo) and cut it out! It’ll look like this;
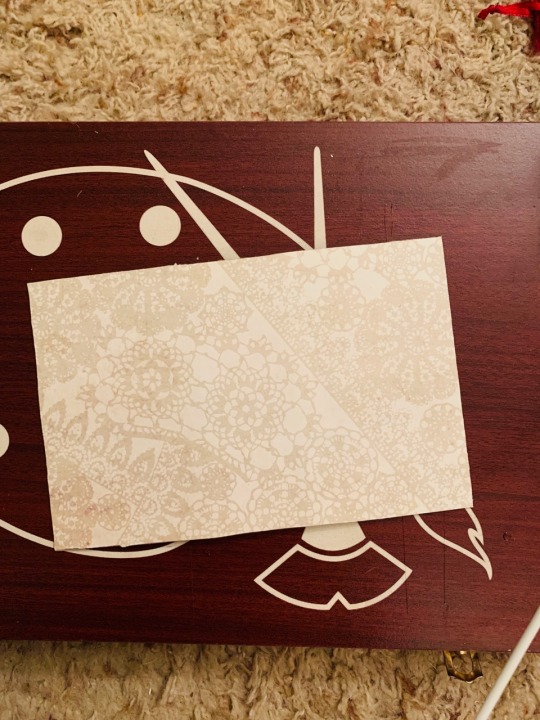
Next you need to find your pages! Again these can be anything! Junk mail, envelopes, receipts, food wrappers, magazine/book pages, scrapbook paper, computer paper, construction paper, ANYTHING. Just grab a whole bunch!
You’re gonna want to fold them in half and cut them to the size of one of the covers of your box, and layer other pages inside of it to make your signatures, like this!

Each signature should be about 7-10 pages. You don’t want them too thick, otherwise the inner pages start sticking out when folded in half. You’re gonna have a LOT of these signatures, as you wanna fill the area in the spine as best as possible. For this one I’m using 7 page signatures. Here’s a pic to show just how much paper you’ll need
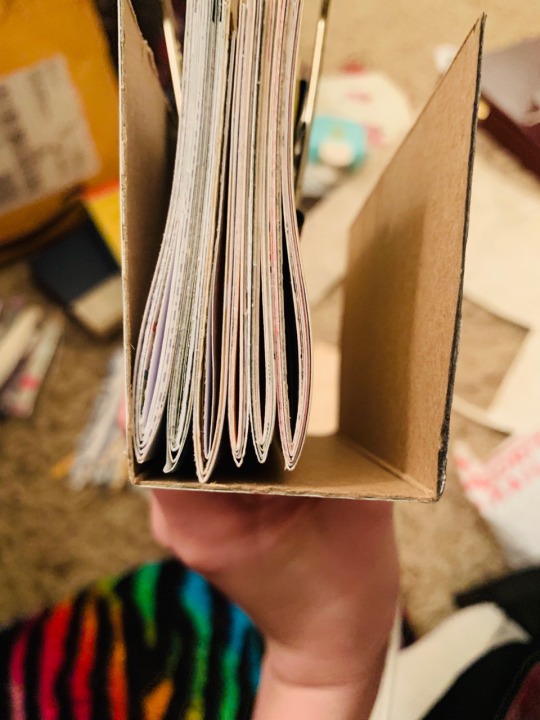
Each of these signatures are 7 pages, 6 signatures have only filled about half of the spine, so I’ll need probably 6 more.
Next you gotta figure out how you want them in your journal. Personally, I like to sew them into the spine, but you can also keep them in the spine with rubber bands, so you can have removable pages! (Be weary that rubber bands may break over time! So you may want to always keep extra bands near it to replace in case one snaps. This is why I prefer sewing them in) I find it best to look up on YouTube how to sew in signatures, just because having someone walk you through it where you can see what they’re doing is easiest. If you can’t access YouTube, there’s plenty of text tutorials on how to sew in signatures online, or you can message me! I’m not gonna go too into detail, but here’s the jist;

Okay so I’m a forgetful gob and I hecken forgot to take pictures as I was going along kahshshshsh
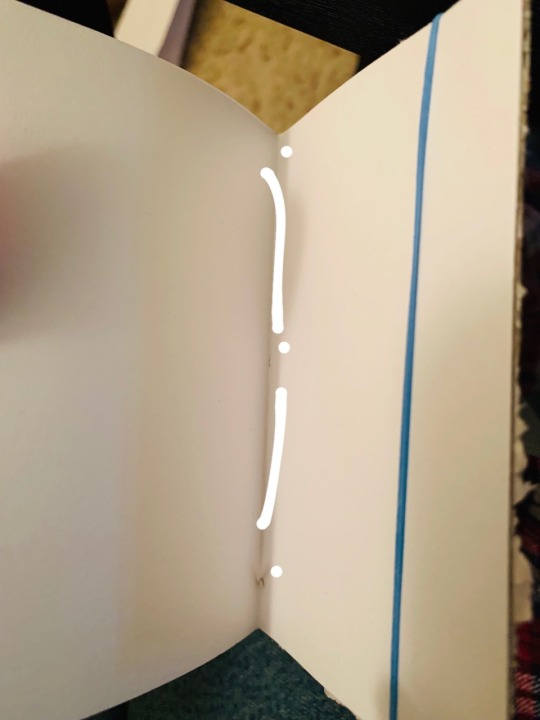
But essentially, I sewed in the pattern similar to the one I drew. The dots are where the needle goes all the way through to the back. I also like to use rubber band as an extra mode of support but you can do one or the other. I also like both cuz I can tuck stuff in em between the pages. Since I didn’t take more pictures; I’d really recommend looking up a how-to on YouTube or w/e if my badly drawn diagram isn’t clear enough (heh sorry about that)
Next, I glue fabric to the spine. It spruces it up quite a lot and holds the rubber bands in place, plus it give more support to the spine since there’s gonna be a lot of strain on it.
Only 10 photos per post, so I gotta post this and reblog it with the rest.
66K notes
·
View notes
Text
sure what's up?
Hey Goblins, uh
Did you know, that you can make an AWESOME journal for your adventures ALL ON YOUR OWN from a cereal box and paper/scraps that you likely have at home/can get from friends or family/you may find around your environment?
They’re called Junk Journals and they’re my entire life.
Im gonna do my best to walk you through how to make one! First, get you a mini cereal box! I use boxes from those cool multipacks of cereal that you can find at Walmart!
And then cut it out so it looks like this! (I already had one cut, so I’m gonna use that)
That “nutrition facts” side is gone become your spine!
Next, find some paper to use to decorate your cover! I was lucky enough to be gifted a bunch of scrapbooking paper, so I’m gonna use that, but you can also use newspaper, paper from books/magazines, junk mail, napkins, paper towels (excellent texture), etc!
Go ahead and glue that paper to your box (to cover the cereal logo) and cut it out! It’ll look like this;
Next you need to find your pages! Again these can be anything! Junk mail, envelopes, receipts, food wrappers, magazine/book pages, scrapbook paper, computer paper, construction paper, ANYTHING. Just grab a whole bunch!
You’re gonna want to fold them in half and cut them to the size of one of the covers of your box, and layer other pages inside of it to make your signatures, like this!
Each signature should be about 7-10 pages. You don’t want them too thick, otherwise the inner pages start sticking out when folded in half. You’re gonna have a LOT of these signatures, as you wanna fill the area in the spine as best as possible. For this one I’m using 7 page signatures. Here’s a pic to show just how much paper you’ll need
Each of these signatures are 7 pages, 6 signatures have only filled about half of the spine, so I’ll need probably 6 more.
Next you gotta figure out how you want them in your journal. Personally, I like to sew them into the spine, but you can also keep them in the spine with rubber bands, so you can have removable pages! (Be weary that rubber bands may break over time! So you may want to always keep extra bands near it to replace in case one snaps. This is why I prefer sewing them in) I find it best to look up on YouTube how to sew in signatures, just because having someone walk you through it where you can see what they’re doing is easiest. If you can’t access YouTube, there’s plenty of text tutorials on how to sew in signatures online, or you can message me! I’m not gonna go too into detail, but here’s the jist;
Okay so I’m a forgetful gob and I hecken forgot to take pictures as I was going along kahshshshsh
But essentially, I sewed in the pattern similar to the one I drew. The dots are where the needle goes all the way through to the back. I also like to use rubber band as an extra mode of support but you can do one or the other. I also like both cuz I can tuck stuff in em between the pages. Since I didn’t take more pictures; I’d really recommend looking up a how-to on YouTube or w/e if my badly drawn diagram isn’t clear enough (heh sorry about that)
Next, I glue fabric to the spine. It spruces it up quite a lot and holds the rubber bands in place, plus it give more support to the spine since there’s gonna be a lot of strain on it.
Only 10 photos per post, so I gotta post this and reblog it with the rest.
66K notes
·
View notes
Text
hell yeah live your best goblin life!
Hey Goblins, uh
Did you know, that you can make an AWESOME journal for your adventures ALL ON YOUR OWN from a cereal box and paper/scraps that you likely have at home/can get from friends or family/you may find around your environment?
They’re called Junk Journals and they’re my entire life.
Im gonna do my best to walk you through how to make one! First, get you a mini cereal box! I use boxes from those cool multipacks of cereal that you can find at Walmart!
And then cut it out so it looks like this! (I already had one cut, so I’m gonna use that)
That “nutrition facts” side is gone become your spine!
Next, find some paper to use to decorate your cover! I was lucky enough to be gifted a bunch of scrapbooking paper, so I’m gonna use that, but you can also use newspaper, paper from books/magazines, junk mail, napkins, paper towels (excellent texture), etc!
Go ahead and glue that paper to your box (to cover the cereal logo) and cut it out! It’ll look like this;
Next you need to find your pages! Again these can be anything! Junk mail, envelopes, receipts, food wrappers, magazine/book pages, scrapbook paper, computer paper, construction paper, ANYTHING. Just grab a whole bunch!
You’re gonna want to fold them in half and cut them to the size of one of the covers of your box, and layer other pages inside of it to make your signatures, like this!
Each signature should be about 7-10 pages. You don’t want them too thick, otherwise the inner pages start sticking out when folded in half. You’re gonna have a LOT of these signatures, as you wanna fill the area in the spine as best as possible. For this one I’m using 7 page signatures. Here’s a pic to show just how much paper you’ll need
Each of these signatures are 7 pages, 6 signatures have only filled about half of the spine, so I’ll need probably 6 more.
Next you gotta figure out how you want them in your journal. Personally, I like to sew them into the spine, but you can also keep them in the spine with rubber bands, so you can have removable pages! (Be weary that rubber bands may break over time! So you may want to always keep extra bands near it to replace in case one snaps. This is why I prefer sewing them in) I find it best to look up on YouTube how to sew in signatures, just because having someone walk you through it where you can see what they’re doing is easiest. If you can’t access YouTube, there’s plenty of text tutorials on how to sew in signatures online, or you can message me! I’m not gonna go too into detail, but here’s the jist;
Okay so I’m a forgetful gob and I hecken forgot to take pictures as I was going along kahshshshsh
But essentially, I sewed in the pattern similar to the one I drew. The dots are where the needle goes all the way through to the back. I also like to use rubber band as an extra mode of support but you can do one or the other. I also like both cuz I can tuck stuff in em between the pages. Since I didn’t take more pictures; I’d really recommend looking up a how-to on YouTube or w/e if my badly drawn diagram isn’t clear enough (heh sorry about that)
Next, I glue fabric to the spine. It spruces it up quite a lot and holds the rubber bands in place, plus it give more support to the spine since there’s gonna be a lot of strain on it.
Only 10 photos per post, so I gotta post this and reblog it with the rest.
66K notes
·
View notes
Text

i'm makin shoooooeees!
my wife walked in while i was making a mold of my feet with duct tape and a paper bag, then just immediately walked back out again


1 note
·
View note
Photo


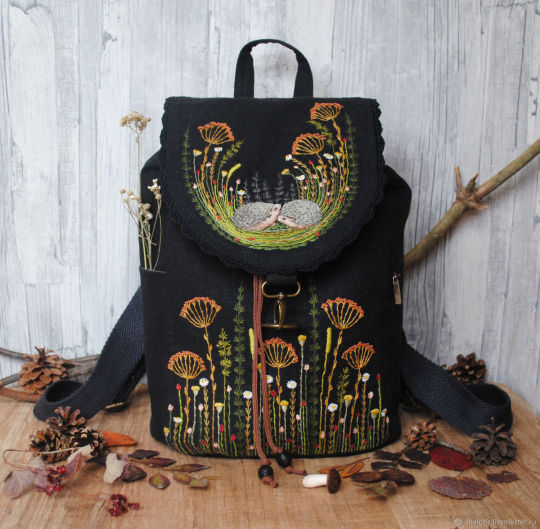
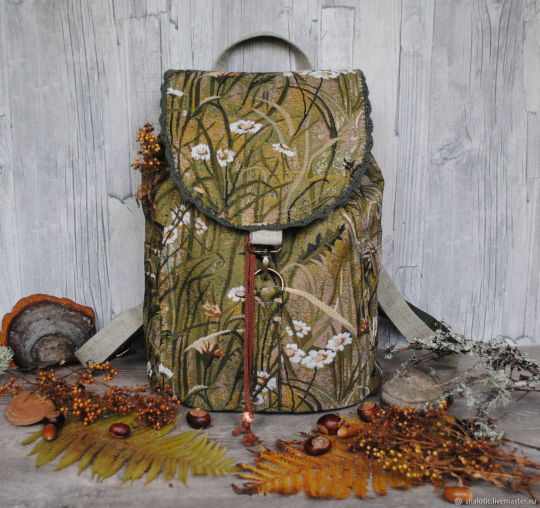

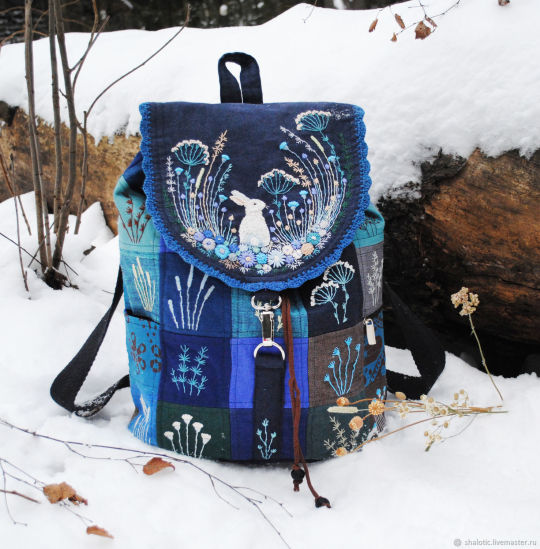

Embroidered Backpacks from Julia Linen tale
x / x / x / x / x
x / x / x / x / x
32K notes
·
View notes
Text
you can also use those sturdy paper shopping bags from clothing stores for the cover, and have a book with handles!
Hey Goblins, uh
Did you know, that you can make an AWESOME journal for your adventures ALL ON YOUR OWN from a cereal box and paper/scraps that you likely have at home/can get from friends or family/you may find around your environment?
They’re called Junk Journals and they’re my entire life.
Im gonna do my best to walk you through how to make one! First, get you a mini cereal box! I use boxes from those cool multipacks of cereal that you can find at Walmart!
And then cut it out so it looks like this! (I already had one cut, so I’m gonna use that)
That “nutrition facts” side is gone become your spine!
Next, find some paper to use to decorate your cover! I was lucky enough to be gifted a bunch of scrapbooking paper, so I’m gonna use that, but you can also use newspaper, paper from books/magazines, junk mail, napkins, paper towels (excellent texture), etc!
Go ahead and glue that paper to your box (to cover the cereal logo) and cut it out! It’ll look like this;
Next you need to find your pages! Again these can be anything! Junk mail, envelopes, receipts, food wrappers, magazine/book pages, scrapbook paper, computer paper, construction paper, ANYTHING. Just grab a whole bunch!
You’re gonna want to fold them in half and cut them to the size of one of the covers of your box, and layer other pages inside of it to make your signatures, like this!
Each signature should be about 7-10 pages. You don’t want them too thick, otherwise the inner pages start sticking out when folded in half. You’re gonna have a LOT of these signatures, as you wanna fill the area in the spine as best as possible. For this one I’m using 7 page signatures. Here’s a pic to show just how much paper you’ll need
Each of these signatures are 7 pages, 6 signatures have only filled about half of the spine, so I’ll need probably 6 more.
Next you gotta figure out how you want them in your journal. Personally, I like to sew them into the spine, but you can also keep them in the spine with rubber bands, so you can have removable pages! (Be weary that rubber bands may break over time! So you may want to always keep extra bands near it to replace in case one snaps. This is why I prefer sewing them in) I find it best to look up on YouTube how to sew in signatures, just because having someone walk you through it where you can see what they’re doing is easiest. If you can’t access YouTube, there’s plenty of text tutorials on how to sew in signatures online, or you can message me! I’m not gonna go too into detail, but here’s the jist;
Okay so I’m a forgetful gob and I hecken forgot to take pictures as I was going along kahshshshsh
But essentially, I sewed in the pattern similar to the one I drew. The dots are where the needle goes all the way through to the back. I also like to use rubber band as an extra mode of support but you can do one or the other. I also like both cuz I can tuck stuff in em between the pages. Since I didn’t take more pictures; I’d really recommend looking up a how-to on YouTube or w/e if my badly drawn diagram isn’t clear enough (heh sorry about that)
Next, I glue fabric to the spine. It spruces it up quite a lot and holds the rubber bands in place, plus it give more support to the spine since there’s gonna be a lot of strain on it.
Only 10 photos per post, so I gotta post this and reblog it with the rest.
66K notes
·
View notes
Text
Letterlocking: the long-lost art of using paper-folding to foil snoops

“Letterlocking” is a term coined by MIT Libraries conservator Jana Dambrogio after she discovered a trove of letters while spelunking in the conservation lab of the Vatican Secret Archives; the letters had been ingeniously folded and sealed so that they couldn’t be opened and re-closed without revealing that they had been read. Some even contained “booby traps” to catch the unwary.
Dambroglio and her colleagues have since been painstaking reconstructing these long-lost letterlocking techniques (which they hypothesize led to the development of the modern envelope), and documenting their findings in an online Letterlocking dictionary that documents the techniques, tools, and jargon of their discipline.
Letterlocking got a huge boost in 2012 when Yale’s Rebekah Ahrendt discovered 600 unopened 17th century letters in at the Hague post-office; the letters were in a larger collection of undeliverable post, held against a date that someone came forward to claim them. Prior to the trove’s discovery, letterlocking had been primarily studied through reconstruction, using fold-marks, dirt, and traces of seals on multiple documents to try to recover the lost techniques.
Dambroglio and a colleague named Daniel Starza Smith are self-described letterlocking “evangelists,” having distributed 10,000+ replica letterlocked-letters in the hopes of reviving the practice.
https://boingboing.net/2019/03/15/security-thru-topology.html
4K notes
·
View notes
Text
there's something so satisfying about playing with clay honestly

0 notes
Text

This bracelet is for sale on my Etsy! Come take a glance!
⬇️⬇️⬇️
496 notes
·
View notes
Photo
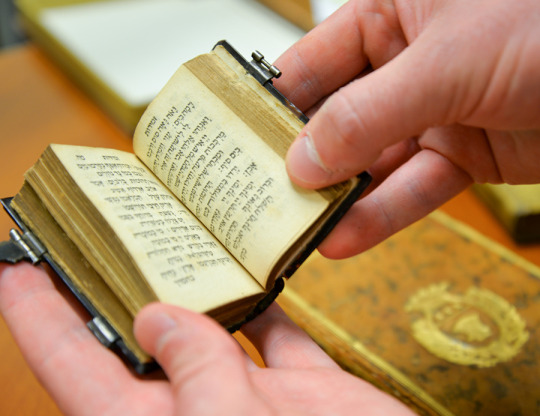


18th-century Seder Tefilah–the order of prayer for divine service.
Measuring just 8 cm (3 inches) this tiny prayer book is bound in tortoise shell, and was a gift to Cabell Library from Ballad Cabell, son of James Branch Cabell.
Special Collections and Archives (BM 675.D3S3 1709z), James Branch Cabell Library
To see more beautiful and interesting early modern books, visit our Flickr site.
673 notes
·
View notes
Text
Lightly bone along the side
Things you hear in book art
13 notes
·
View notes
Photo

roniy-stitch.com
19K notes
·
View notes
Photo
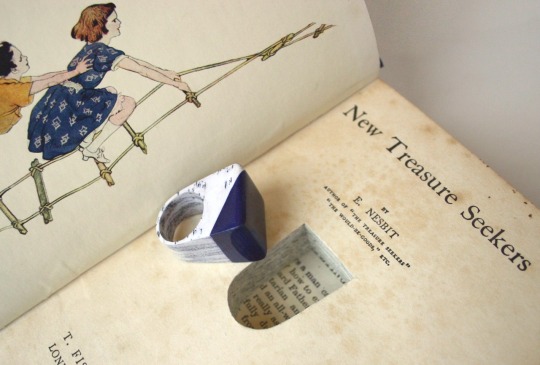


Jeremy May, Literary Jewels
I think this is one of the coolest ideas. May takes books, cuts our pages, laminates them together and creates jewelry. The bracelet is made out of Sherlock Holmes and is still for sale, which makes me drool just a bit. Go check it out!
1K notes
·
View notes