Last Seen Blogs

randygrim
half baked jello

n-s-23-23
Fan of 웬디 (Wendy), KwangMong

kaylynn33
Kayla

ambrose-society
Untitled

duangan
杜飞飞
Text
Indefinite hiatus.
I’ve enjoyed making this blog, and I’ve found it useful too. However, I’ve recently gone back to college and found I don’t have enough time to maintain this blog.
(also, the stated purpose of this blog is to give me a side project that lets me just sit down and write and not get mired in the creative side of things, and I get more than enough of that from assignment deadlines forcing me to produce)
I aim to maintain this again after I graduate. I know that no one is reading this, but I’m not writing this for any readers. I’m writing this update as a way to make a promise to myself that I’ll be back... even if it’s to say I’ve found a different side project and I’m formally shutting this down :P
0 notes
Text
Dark Cloud - Sun & Moon Temple

Table of contents:
Overview
Objective(s)
The Pyramid Itself
Treasure, Traps, & Things to Find
Enemies
Tips & Tricks
Music
My Relationship to this Game

Overview
400 years ago, the Genie of Darkness appeared in the East, and with its evil power, the world was burnt away. The people managed to seal it in an urn, but Colonel Flag of the Lagoon Empire Army has reawakened the genie to use as a weapon of conquest. That night half the world was annihilated.
As they wreaked havoc, the Fairy King was one step ahead of them, encasing the buildings and people in magic spheres called Alta that, instead of being destroyed by the genie’s magic, were scattered around. The Fairy King also saved a boy from one of the villages the genie attacked, a boy with a strong will that could withstand the genie’s evil power. And also a clear, kind heart. To fight against the darkness the genie generates, he blesses the boy with a magic stone that can release the people and buildings preserved in the Alta.
As this boy, we’re tasked to restore the world to its original form. We may even be able to create an even better world than before.
Objective(s)
The Sun and Moon Temple is the 4th (of 6) dungeon in the game. Over the first 3 levels, we learned about the moon people that originally sealed the genie away, and collected 2 orbs that will let us power a spaceship. However, the ship isn’t responding to our summons. For protection, it’s docked deep within the Sun and Moon temple. We’ve gotta get to it, and along the way rescue the people and buildings scattered within to rebuild the nearby desert town of Muska Lacka.
The Pyramid Itself
Dungeons in Dark Cloud are procedurally generated, and this one is 18 floors, with the 9th being just an arena for fighting the minibosses, and the 18th just for the boss. To get to each next floor, keep an eye out for a Stone Key. And in every dungeon there's a special item that leads deeper into the dungeon’s "back floor." They are optional areas where the monsters are tougher, and the treasures sweeter. In The Sun & Moon Temple, the item to look out for is simply called Secret Path Key.
Additionally, as with other dungeons, we may occasionally come across a floor with a strange effect. These can range from our character becoming thirsty faster, to weapons losing experience points each time we attack with them. While these floors and their effects are largely random, in the Sun & Moon Temple there are 2 we’ll encounter every time, both limiting us to a single party member:
Floor 5: Goro only
Floor 13: Ungaga only
And as Ungaga joins the party beginning with this dungeon, it may be wise to get some practice in with him before floor 13.
Additionally, we won’t be able to go further than Floor 8 unless we can rebuild the 3 Sister’s House. So stay on top of collecting Alta for the town.
Treasure, Traps, & Things to Find
Because the levels are procedurally generated, treasure in Dark Cloud is more or less random, with a higher chance of finding expensive items like gems or Power-up Powder. Even Alta found in dungeons are randomly scattered between the floors.
Shockingly, despite being a Roguelite there are almost no procedurally generated traps (perhaps because this isn't a grid based game). There is occasionally a pit to jump across, but that’s just forcing us to swap to another character to clear it. However, we must concern ourselves with trapped chests.
There are three different traps kept inside chests: explosion, poison, or curse. When opening a trapped chest, we’ll get a chance to guess which trap is inside, and if we guess correctly we disarm the trap. If we guess incorrectly, the trap goes off but the chest can still be opened afterwards… unless the trap is an explosion, which destroys the chest.
Note that any locked chest can be forced open as well. A key will open it safely, but by forcing it open we’ll need to deal with any trap inside.
Though there may not be any trap tiles per se, there is 1 to watch out for. Mystery Circles are spinning runes randomly found on dungeon floors. Stepping bravely onto one will have a random effect, from altering our weapon’s stats and parameters, to changing how much we have in our wallet, or buffing the party and every monster left on the floor.
Enemies
Enemies are listed in alphabetical order with the mini-boss (or, in this case, mini-bosses) and boss listed at the end.
If either the Bandit Slingshot or the Bandit's Ring is equipped, every attack has a chance to steal an item from an enemy.
Also, for whatever reason Tumblr is acting like it no longer supports PNG or JPG files, so I’m gonna skip them for now and hopefully figure it out later (but I’ll probably forget).
Blue Dragon
HP: 600
ABS: 12
Type: Dragon
Weakness: Fire
Drops: –
Steal: Blizzard Gem
They look a little different from the Dragons in the Divine Beast Cave, and attack a little faster, but are still so slow they can be handled the same way. It’s safest to either zig-zag in until close enough to circle strafe and chip them to death, or strafe back and forth at range while peppering them from a distance.
Despite being the first on this list, they don’t appear until later into the dungeon, normally around 14th Floor.
Bomber Head
HP: 180
ABS: 4
Type: Mage
Weakness: Fire
Drops: –
Steal: Bomb
This is a new kind of enemy not encountered before this dungeon, and starting with the 2nd floor wow is it full of them. Bomber Heads can be encountered on nearly every floor of the pyramid, so it’s best to get used to how it behaves. It only has 1 attack, a punch, but make sure to dodge it, because it can’t be blocked. Its head explodes when it dies, but this is only a problem if attacking with Toan. Despite also being melee characters, Goro and Ungaga both have just enough reach that they’re usually out of range.
Funnily enough though, it’s head looks exactly like the bomb we can steal from it.
Crabby Hermit
HP: 280
ABS: 4
Type: Marine
Weakness: Fire, believe it or not
Drops: –
Steal: Throbbing Cherry
Like with the crabs from the previous dungeon, be careful not to combo these enemies as they’re prone to hiding in their shells. Not only does attacking when they’re defending really wears down our weapons, but their spiked shells can also damage us.
Unlike those crabs however, their projectile attack is much more dangerous. Where the crabs had small, slow moving bubbles, Crabby Hermits shoot a gas cloud much faster and far more frequently.
If attacking from close quarters, they’re best dealt with by either dodging their attacks and punishing the whiff, or attacking once before quickly backing up or strafing to stay away from their face.
Usually begins appearing around the 7th floor.
Dune
HP: 525
ABS: 10
Type: Stone
Weakness: –
Drops: Stone
Steal: Stone
These guys are really easy to deal with because they only have one attack: causing a jet of sand to shoot up where we’re standing. Just keep moving and they’ll usually miss. The only wrinkle is that being attacked doesn’t interrupt or stun them, so if we stand still and attack for too long then we’re gonna get hit back.
Many enemies in this dungeon can safely be taken out from a distance, but Dune’s are a little different. If we’re far away, they often close in while defending almost constantly. It’s generally more expensive to heal our weapons HP than it is our own, so get in close to take them out.
Begins appearing around the 10th floor.
Golem
HP: 375
ABS: 4
Type: Stone
Weakness: –
Drops: –
Steal: Repair Powder
Careful, like with Dunes, attacking doesn’t interrupt them. We won’t need to though. They’re slow enough we’ll be able to run circles around them and are nearly helpless against ranged characters.
We can begin encountering Golems around the 4th Floor, until they’re replaced by Steel Giants later.
Mimic
HP: 70
ABS: 6
Type: Mimic
Weakness: Mimic Breaker
Drops: Dran’s Feather
Steal: Repair Powder
They don’t have any ranged attacks, so they’ll constantly move in towards us. Simply make a circle around the room while backing up and wear them down. If a mimic is encountered before the room is cleared of enemies, this strategy should also minimize danger from the other enemies until the mimic is taken care of, though we might not be able to retreat directly along the walls if a large slow enemy is along them.
If there’s no choice but to engage them in melee (say, if it’s the 5th or 13th floor and we’re limited to a melee character), watch out for their random lunge attack.
By this point in the game they should start going down pretty quickly, which is good because they usually start appearing around Floor 3.
Mimic, King
HP: 70
ABS: 6
Type: Mimic
Weakness: Mimic Breaker
Drops: Chest Key
Steal: Repair Powder
King Mimics are so similar to their smaller counterparts, that they basically could have just called them both mimics. There isn’t anything particularly “Kingly” about it either.
Don’t let them get close, kick their butts, and nab that chest key.
Mr Blare
HP: 225
ABS: 5
Type: Mage
Weakness: Ice
Drops: —
Steal: Inferno Gem
This mage is completely immune to fire, but cripplingly weak to ice. They’re also very vulnerable when trying to throw a fireball due to the length of the attack animation, so use that as the main opportunity to strike. Ranged characters may need to come in closer than they’re used to to bait this move, as even though it is a ranged attack Mr Blare doesn’t use it if we’re too far away.
Usually begins appearing around the 6th floor.
Mummy
HP: 150
ABS: 4
Type: Undead
Weakness: Holy
Drops: —
Steal: —
This is a basic enemy with a basic attack and little else going for them. They seem to be exactly the kind of simple enemy found in the beginning of the game to acclimate new players, but with a twist. Any time they die there’s a chance they’ll get right back up with about 1/3rd of their HP. I’ve had one get back up 3 times in a row, so don’t relax until it’s certain they’re done.
There are lots of Mummies on the first few floors.
Phantom
HP: 150
ABS: 4
Type: Sky
Weakness: —
Drops: —
Steal: Antidote
For their main attack they rise briefly before diving. They stop tracking the player while they rise, so during that melee characters can circle around behind them and be ready to wallop them when they come back down. Ranged characters can simply attack from a distance and keep retreating so they never dive.
Lots of them on the first few floors.
Steel Giant
HP: 750
ABS: 12
Type: Metal
Drops: —
Weakness: Thunder
Steal: Repair Powder
Functionally identical to the Golem, but with higher stats.
Encountered regularly beginning around the 15th Floor.
Sil & Gol
Stats: I’m fairly certain, but can’t confirm, that they have the same stats as Golems, only Sil is weak to Cold and Gol is weak to Fire. Also, I don’t think anything can be stolen from them.
Despite being visually distinct, having unique names, and being introduced in a cutscene where they have dialogue… they’re just two Golems. At this point in the game we might even be able to, if we get them bunched together, take them both out with a single combo.
King’s Curse
HP: 1,000
ABS: –
Type: I don’t know, but I’m not sure it has one.
Weakness: I don’t know, but I’m not sure it has one.
Drops : –
Steal: –
Dark Cloud has some weird and tricky bosses in it, but King’s Curse is by far the easiest. There was a roadblock earlier in the dungeon that showed us how to use Ungaga’s spinning attack to clear away smoke. That was to prepare the player for this boss fight. King’s Curse is surrounded by this black smoke, and we have to clear it away with Ungaga’s spinning attack to make the boss vulnerable. The boss has no attacks and simply moves towards us, dealing damage on contact. And we can strike the boss once for every time we dispel the smoke. There really isn’t more to this fight than that. Just bring some extra Repair Powders, because this spin move can really drain his weapon’s HP.
Tips & Tricks
Dark Cloud’s procedural generation isn’t perfect. On rare occasions we may find an area with no paths leading to it. There is no way to fix this short of re-entering the temple to generate a different floor layout.
This is less a “tip” and more of a “heads up.” As we explore, we’ll have to manage our water and the durability of our weapons, but note that pools of water are tougher to spot in this pyramid. They are set lower into the floor than in previous dungeons, so with the game’s relatively flat camera angle, and the pyramid’s murky lighting, it can be easy to look out across a large room and look right over the pool. They still display clearly on the minimap, so just pay closer attention to it than in previous stages or we may end up in a tight spot.
Revival Powders are always important to have on hand, but bring a few extra for this dungeon.
As mentioned above, Floors 5 and 13 limit us to only playing as Goro and Ungaga respectively. The extra powder helps ensure that even if there are some accidents on these floors and things go South, we don't get punked out, booted out, and lose half our money.
There is a special fish called Mardan Garayan that, if we catch one and keep it in our inventory, will tell us how a chest is trapped. It’s first available as a rare catch in the waterfall in the 2nd town, Matataki Village. However, it’s significantly more common in Muska Lacka, the village outside this dungeon.
Upon exiting the Back Floor, the area doesn’t disappear or lock behind us. Until we leave the floor, we’re free to re-enter the unlocked Back Floor. Doing so respawns all monsters inside, which is a good way to grind ABS.
Music
The soundtrack was made by Tomohito Nishiura, who has almost exclusively worked on music for the Professor Layton series.
Check out the dungeon music~
And the boss music~

My Relationship to this Game
I first played this with friends in college. My fiance really likes games, and this was one of the first ones I remember her introducing me to (even though I think she’d only played the 2nd). I’ve played it twice and never beaten it, but still regard it dearly. Dark Cloud is that special, cozy kind of game where a reward for helping someone might be a cool item, or simply having a conversation about their backstory, but either way it feels satisfying.
0 notes
Text
Gauntlet: Dark Legacy - Mystic Pyramid
Table of contents:
Overview
Objective(s)
The Pyramid Itself
Treasure, Traps, & Things to Find
Enemies
Tips & Tricks
Music
My Relationship to this Game

Overview
Gauntlet: Dark Legacy is the 7th game in Midway's classic arcade series. In it, we battle through dungeons, avoiding traps and trying to take out various enemy generators, all while making our way through each stage.
The bulk of the story is in its opening narration:
"In an ancient time the evil mage Garm, using the power of the runestones, released a great evil upon the land. This evil, Skorne, broke free of Garm's control, crushing him and imprisoning his soul in the underworld. Skorne then released his minions upon the lands, and scattered the runestones across the Eight Realms so that they might never be assembled and used against him. No one has dared try... until now."
Objective(s)
The Mystic Pyramid is in The Desert Lands, one of the final realms in the game. An evil genie rules the desert from a tomb at the bottom of the Mystic Pyramid. His servants are the former people of the desert, who have been turned into zombies.
The goal is simply to fight to the end of the stage.
The Pyramid Itself
The pyramid appears to have been warped by the genre's magic. Other realms, like the Mountain Kingdom or Castle Stronghold, look more or less like real places. However this pyramid has impossible stone walkways floating off into the air, unnatural passages that wind in and out of the pyramid, and the basement floor is a cartoonish pit of lava.
The path forward is often blocked by an impassable gap or wall, forcing the player to explore for various red buttons and switches that open the way forward.
Treasure, Traps, & Things to Find
There are many items in this level, with apples and crystals lying right out in the middle of the room, with barrels stuffed full of random items filling the corners and along the walls, and all of these lovely pickups potentially distract from some hidden items.
But the big hidden item here are the Toxic Bellows. In this game, each Realm has a hidden legendary weapon that cripples the boss of another Realm. And the legendary weapon hidden in The Desert Lands is right here in The Mystic Pyramid.
The Toxic Bellows are hidden in a sarcophagus in the beginning of the level. To reach it we need to hit a series of switches sprinkled through the beginning. If we reach a wooden scaffolding that leads around the outside of the pyramid we’ve gone too far.
This legendary weapon is effective against the previous Realm's Spider Queen Boss, as it temporarily shrinks and weakens her.
Keys are precious in this game, and there aren't many to pick up in this level. Here's a peek inside each chest in this level to help ration keys.
1st chest - bomb.
2nd - Lightning Shield.
3rd - an apple.
4th - random
5th - bomb
6th - bomb
7th - meat
Note: THERE IS NO RUNE STONE IN THIS LEVEL.
Don’t go crazy looking for one.
Enemies
This game has 8 main enemies that get reskinned for each Realm, and typically appear in every level in one form or another. They are:
Anklebiter
Grunt
Sniper
Lobber
Bomber
Advanced Grunt
General
Golem
It is tempting to refer to these as "categories" of enemies, but there is nothing to differentiate one Sniper or Grunt from another beyond visual flair.
Also in The Mystic Pyramid, we will also encounter 2 less common foes: a Gargoyle, and Death
A few of these enemies (noted below) continuously spill into the level from monster generators, with each having their own dedicated generator. Only when each generator is attacked until reduced to rubble will they stop creating enemies.
Below I will expand upon these in the order I've presented them above.


Anklebiter
These are small enemies (so small we stomp on them instead of using our regular melee attack) that die in 1 - 2 hits. They exist mainly to annoy the player and chip away at their HP. Don't be tricked into using resources to wipe them away, they're almost never worth it. Instead, hang back and attack them from a distance. They pour out of their generators quickly, so getting into melee range quickly get overwhelming. Plus, they have so little HP that even characters with slow or weak ranged attacks can still safely manage them from a distance.
Some realms have two ankle biters, with one just being a stronger version of the other. The Desert Realms is one such area, with black cobras as the weaker version, and red cobras for the stronger counterpart.


Grunt
In The Desert Lands they look like zombified versions of the desert's former denizen. Unlike the Ankle Biters, there is always a stronger and a weaker version of this enemy.
These enemies make up the bread and butter of every level. They’re designed to be blown through.

Sniper
It looks like a Grunt with a bow, but they are as strong as a level 2 grunt.
Snipers don't come from a generator, but are placed at specific points in the level to harry us. And unlike most other monsters that just rush straight at us, Snipers will back away slowly to try and stay a set distance away.
They're often in spots where it's easy for them to attack us, but difficult for us to retaliate. If they’re not perched somewhere we can’t reach easily, they often attack us while we’re in a tight space making it hard to dodge their fast arrows. But the reflect shield is a perfect counter to this enemy. Alternatively, they're easily dispensed with a thrown potion or our Turbo Attack.

Lobber
They are a Grunt with a bag of bombs.
Like the Sniper, they don't come from a generator, and they attack from range, backing up if approached. However, they're able to toss rocks and bombs over walls, limiting our ability to retaliate. Their bombs will knock us down, and while they can be dodged, their explosion can still catch us if we’re not fast enough.

Bomber
They are grunts with an exploding barrel strapped to their back. When they see the player, they will roar and charge, running much faster than the player can normally move.
This enemy will explode if they reach a player.
They'll explode when hit.
And their bomb has a fuse on it, so they'll also just explode on their own a little while after they roar.
(Note their explosions damage their allies too.)
Their aggro range is notably larger than the radius of our field of vision, so while they always see us first, their roar will let us know they're coming. After roaring, they only charge in a straight line. So speedy (or lucky) players can get Bombers stuck on level geography.
Additionally, there are two different barrels that Bombers can carry: a red or a green barrel. They behave exactly like the exploding red and green barrels around the level, with red ones dealing immediate damage and knocking down everyone hit, and with green ones leaving a poisonous cloud.

Advanced Grunt
They operate just like grunts, only they give/take more damage. They're resilient enough that trying to whittle down a horde will often have them respawning faster than we can drop them, so it's often wise to go for their generator first and then mop up whatever is left. Advance Grunts have a ranged attack however, so if there is too large of a swarm of them it may be impossible to dodge all incoming damage.
When we break their generator, instead of being destroyed, it'll downgrade into a Grunt generator.
General
They don't spawn from a generator, instead their thundering steps let us know when they're coming. They only know how to do two things: charge and melee, but they do them well, moving faster than the player normally can until late game, and their attacks are far stronger than ours and can knock us down.
Additionally, Generals can block strong attacks, like the last hits in a combo, strong items, and even our Turbo Attack. However, after blocking it takes them a moment before they can block again. If we can bait a block with a strong ranged attack, as soon as they drop their guard they're open to punishment.
All This aside, we can make short work of them. When we hear a general coming, look around for geography to trap them on. Like Bombers they only head for us in a straight line, so their lack of a melee leaves them very vulnerable.
Our best bet is to never square up and take them on in a battle of attrition, but if worst comes to worst: use the Thunder Hammer. Barring that, the 3 way or 5 way shot + an elemental amulet can help even the playing field.
Generals leave behind a random item when defeated.


Golem
Some enemies let us know they're coming, but Golems try to disguise themself as part of the scenery before popping out to attack, though, as the image above shows, they’re not too good at it.
They are quite similar to Generals, but much slower. They can also block, only now most of their attacks will knock us down. And when they're also far hardier than a General, battles of attrition can be quite costly. It's important to keep our distance, retreating down already cleared sections of the level to keep away. However, because they're so slow moving they're very easy to lure onto traps, especially spike or fire traps.
While cunning or patient players can lure golems down side halls and circumvent them entirely, especially if they get stuck on geography, Golems also leave behind a random item when defeated.

Gargoyle
They are the strongest non-boss enemies in the game and come in 3 varieties: acid with a serpent head, electric with a falcon head, and fire with a lion head, each dropping a different golden item needed to unlock different parts of the Summoner's castle. In The Mystic Pyramid, there is a lion gargoyle in the 2nd half of the level. We’ll suddenly come across it rounding a corner, and we fight it in a narrow area with no cover.
Their melee attack is no joke, that’s not the way to engage them. But it’s easy to stay out of melee range when they almost don’t move. However, they’re not moving because they’re busy attacking. If we’re not close enough to strike, they’ll use one of their two ranged attacks: a cone, or an orb. Fortunately, this is their great weakness. The orb doesn’t home in on the player, and moves just slowly enough that it can be dodged. And Gargoyles will still attempt to hit the player with their cone breath attack even if we stand just out of range.
Gargoyles do not block, but can take such punishment they're impossible to simply blitz down. Stay patient, don’t panic, and they’re not even worth using items on.

Death
Yes, Death himself lurks in the Mystic Pyramid, waiting behind a gate and guarding a switch we need to proceed. While there is only one Death here, another may also randomly be in the 4th treasure chest, so it’d be best to mention both kinds of Death, just in case.
The Death we’re guaranteed to find is wearing a red cloak, and will sap up to 100 health. The other kind of Death is wearing a black cloak, and will drain experience points. Very nasty, but like everything else in this game, no problem once you know how to manage it.
While Death will soak 100 attacks before going down, he can also be dispelled with a single potion. Additionally, the Anti-Death Halo will instead let us drain health or EXP from him, even letting us temporarily go over our max HP.
And if death is hiding in the 4th chest, using a potion on it before opening it will turn Death into a piece of fruit.
Tips & Tricks
About half of the chests in this level have bombs in them. Sure, we can always save the key and skip them, or lure enemies near before opening them. This late into the game the explosion will be much smaller than most characters' potions can reach, but the exploding chests are always a fun use of spare keys.
There is an easy way to glitch Shrink Enemies or Freeze Time and make them last for a whole level. Have 10-20 seconds left of the preferred buff and go into a boss fight. Activate it before the boss kills us, and upon death select “Continue.” The item will now be active until it’s used again, the game is quit, or restarted. This is a great way to collect treasure, or safely hunt for The Toxic Bellows. Each item comes with its own pros and cons, for while Shrink Enemies will simply shrink all enemies, reducing their stats by half, Freeze Time will prevent any enemies from spawning at all, making for a quicker level at the expense of enemy gold and EXP.
Music
This game has an impressive ost. Each stage, and bonus stage has its own music, making for 63 total tracks! They average about 4 minutes a track, but with a few stages in the 7-9 minute range for some of the longer levels.
Check it out~

My Relationship to this Game
As a kid I went to Wisconsin Dells a few times. It was always tons of fun, even though their inner tubes are how I learned I have a latex allergy. Arcades weren't too common where I grew up. The closest we had was stuff like Chuck e Cheese, which didn't really have cabinets so much as stuff like Skii Ball and other games made to reward tickets. But Wisconsin Dells was the first proper Arcade I remember going to. Most of the games looked super hard, and I didn't have too many tokens to burn trying them out, but I was entranced by Gauntlet Legends. I only recently graduated from the NES to N64, so Gauntlet Legends was blowing my little mind. I couldn't even beat the first realm, I died a few levels in on a majestic hillside swarmed by orcs after being turned into Pojo the Magic Fire Breathing Chicken. But I had so much fun that as soon as I got home I hopped onto the family computer to pick up a home port.
It’s hard to go back to Gauntlet Legends now because of the jerky camera and low framerate (how did I suffer these as a kid), but the sequel, Gauntlet: Dark Legacy, has actually aged pretty well, and is arguably the pinnacle of good old Gauntlet fun. I have fond memories of crowding around my tiny TV in the corner of my bedroom with my brother and some friends as we tried to unlock the Unicorn. That Cloud9 minigame was so hard! We made a line across the cloud to try and catch all the coins, and it still took us 4-5 tries because of the way the cloud bobs around! And with each failure we’d have to play the whole level again! I also loved it when we could bring a big pile of Thunder Hammers into a boss fight and watch them wither against our i-frames and global damage.
0 notes
Text
Persona 5 - Pyramid of Wrath
Table of contents:
Overview
Objective(s)
The Pyramid Itself
Treasure, Traps, & Things to Find
Enemies
Tips & Tricks
Music
My Relationship to this Game
The Ultimate Persona

Overview
In Persona 5, we travel between the real world and a dimension known as the Metaverse, which is shaped by our mental energy. Here, the mental energy from strong willed individuals manifests as a physical "palace" representative of their psyche. Some are literal palaces, others are anything from a casino to a space station.
Futaba is a child prodigy living with her uncle. She is the founder (and only member of) a hacker "group" named after the Egyptian deity Medjed. And Futaba's Palace is a pyramid.
It is the 4th level (of 8) and starts off deep in the desert with the pyramid only visible as a light in the far distance, peeking between the dunes. There's a small town built near the pyramid. After a little kerfuffle where a boulder trap boots us out of the pyramid, and a brief trip back to town to retrieve a map of the pyramid from some looters, we enter the dungeon for real… only to fall into a pit trap and into the basement.
Objective(s)
In this dimension, the mental energy of exceptionally strong willed individuals creates a physical palace representative of their psyche. The protagonists realize this means one's corrupt desires will physically manifest here too. And if they can be removed from the palace, they would be removed from the person, triggering a change of heart.
In Persona 5, we mainly travel into the palaces of corrupt authority figures and muck about with their heads against their will, but Futaba asks the protagonists to do this to her. In fact, she blackmails them into it. She wants them to remove her self-destructive behavior and guilt over her mother's death, because she fears without help she will shut herself away from others until her home becomes her "tomb."
So the goal is, essentially, to get in, steal the physical representation of these behaviors, and get out.
The Pyramid Itself
The first time in this pyramid, we traverse straight up a wide set of stairs with many landings. At the top we’re chased out by a big boulder trap, and a large set of doors closes off each landing. When we return, we’re dropped into a pit trap. The first half-ish of this level is moving through the pyramid’s basement and back up to the pyramid proper.
The first underground room is quite novel and merits special mention.
When dropped into the basement
It dumps us into this big pit-like room, which has a bunch of short scaffold-like paths built in ring-like tiers, with designated points allowing us to climb up / drop down to a lower level, making a simple 1 room maze. The way out of this is pretty clear, but the area is expansive to hide a fair number of chests and items among the nooks and dead ends. Even though it's hard to get lost here, it can still be easy to get turned around or lose track of where we've been if trying to explore the whole room. And not only is this open design pretty unique in P5, but it's also uniquely engaging. The verticality changes how we stalk enemies and get the jump on them since we aren't just using shadows to creep in. And the careless are more likely to stumble right into the way of an enemy when changing levels than in the relative safety of the games many hallways. Enemies rarely get the jump on the player in this game (unless the game spawns them in on top of us), and I really appreciate how this little twist makes exploration more cautious.
Shortly, we return to the wide set of stairs from our initial visit. Each landing is still sealed by massive doors. To open them, we need to travel into a side chamber next to each door and complete a series of puzzles, mainly switch puzzles and moving gems between pedestals with each area ending in a scrambled mural puzzle. Each mural shows a scene from Futaba's past, and this exposition is not only the main way we learn more about her, but also confronting her with things she's repressed.
There are 3 sealed landings in total, with a save point on each accessible after its doors are unlocked. The steady ascent up this staircase makes up the bulk of the dungeon and builds anticipation for the boss fight. This design is interesting in how it lets the player explore side rooms and discover secrets in the pyramids maze, all in service of opening a straight pass through the heart of the pyramid so it's easy to return to exactly where we left off.
With a clear way forward and the dungeon split into many smaller zones, this pyramid isn't really one to get lost in. While the dungeon is quite linear, there are puzzles seemingly designed to subvert it feeling too linear. Some of the small zones are mainly a large room or two made of an intricate series of paths, none of which lead to the next room. There are switches that manipulate the geography, so to progress we'll need to find detours and backtrack as the puzzle closes off one path to open another.
Treasure, Traps, & Things to Find
This pyramid has almost no traps. There are plenty of things that LOOK like traps, from floors with hidden spikes, to rolling boulder hallways. However these aren't there to surprise or punish incautious players, but to impede our progress until we can deactivate them. Outside of the trapdoor the party falls into in a cutscene, really the only traps are sarcophagi that look ornamental but are hiding an enemy. They're mainly in the latter half of the dungeon, but as long as we stay on our toes they'll mainly serve to put us into combat without a preemptive round.
As for treasures and things to find… being an RPG this place is littered with loot. Though the dungeon is linear, and all chests display on the map, so I’ll simply be listing items in the order they’ll be found:
Black Rock - Itemize Persona into accessories
Seishiki Sword - Sword for Yusuke
Gale Cape - Evade Wind (med) accessory
Mind Choker - +20 SP accessory
Black Robe - Itemize Persona into equipment
Spirit Belt - Reduce physical damage (low) accessory
Blitz Ring - reduce electric damage (med) accessory
Snuff Soul - restores 50 SP to one ally.
Turquoise - sells for ¥2,500
Magic Ointment - Ally gains a magic reflecting barrier. Works on the next non-almighty spell.
Stamina Sash - +20 HP accessory
Dogwatch Kimono - Sleep resisting armor. Equippable by females.
Black Rock - Itemize Persona into accessories
Turquoise - sells for ¥2,500
Dust Crusted Gear - wash it to see what it is.
Retention Vest - Forget resisting armor. Equippable by males.
Turquoise - sells for ¥2,500
Ruby - sells for ¥3,500
Ignis Ring - Reduce fire damage (med) accessory
Timeworn Armor - wash it to see what it is.
Enemies
There are a few versions of Persona 5, each changing the enemies up slightly as well as what monsters are where. But for this blog I'll comment on the original P5's enemies, which will be arranged by level.
Note: enemies in Persona are inspired by religious, mythological, and mystical figures from all over the world, Persona (and Megami Tensei, the franchise Persona spun off of) has largely been using the same set of enemies for decades, and each enemy generally has a specific level range associated with them. Because of this, instead of finding characters from Egyptian myth in the pyramid level, it had what may seem to be an arbitrary assortment of figures.
Also, I would like to apologize for the image quality. Persona 5 doesn’t let players take screenshots of their Persona (even before beating Kamoshida’s Palace, after which it doesn't allow streaming the game). And at the time of writing the images available online are… inconsistent, with many websites settling for pictures of these enemies from other games entirely. Thus I opted to just use my phone and take photos of the TV screen.
Stone of Scone
Treasure Demon
Fortune - level 20
Weak to: Curse
Unlike every other Treasure Demon, this one nullifies physical moves. Unfortunately, they can’t just be taken Down with a crit. They’re able to know any of the 8 elemental single target medium damage spells. They’re weak to curse skills, which can be a little tricky to come by. It may be easiest to summon up Arsene just to have on hand for this enemy. We can have 10 Persona with us at this point and we really only need 2 for this dungeon (I’d recommend Lean Sidhe and Flauros or Setanta. More on that in Tips & Tricks).
Naga (Cavern Snakeman)
Gloomy
Hermit - level 24
Weak to: Wind
Naga has some bite. They've got nasty electric moves curbed by not the levels/stats to really back them up. Just give them some respect early on, especially on harder difficulties. Play cautiously and by the end of the dungeon we'll cleanly out-level them and can take them easily. . . when encountered randomly. A few enemies in this dungeon can summon allies to fight with them, and they generally summon Naga. With this enemy being fairly ubiquitous it'd be wise to keep Morgana around.
Naga makes a dangerous enemy, but an even better ally. Not only can ours get leveled up and grow into their skills, but its best electric moves are yet to come. Also, Naga is needed for an advanced fusion to summon Vasuki. So even if they don't look interesting they're still worth picking up. And thanks to their ubiquitous presence, we never need to go out of our way or grind encounters to find one.
There are 76 ways to fuse this persona. The simplest involves a Treasure Demon: Regent + Ippon-datara. Alternatively, Matador + Eligor if you never got Regent.
SANDMAN (Envoy of Slumber)
Irritable
Magician - level 24
Weak to: Electricity
Sandman is (unsurprisingly) all about sleep. As an enemy, his only attack is to try and put someone to sleep. That doesn’t sound too bad, since characters wake up on their own eventually, or right away if attacked, but if Sandman puts a healer to sleep we may find ourself in a sticky spot. Have healing items on hand so in a pinch anyone can heal.
There are 69 (nice) ways to fuse this persona. The simplest involves a Treasure Demon: Regent + Nekomata. Alternatively, Suzaku + Nakami if you never got Regent.
ANZU (Thief of Tablets)
Irritable
Hierophant - level 25
Weak to: Gun & Nuke
Anzu is one of the few "nothing special" enemies in this dungeon. Not only are they weak to gun, but outside of a heavy damaging physical skill they're just a few wind skills on an HP bar. Simply choose to not have anyone weak to wind along and this enemy is no problem.
One step in levelling the Strength Confidant involves showing them a Neko Shogun with Dekaja. Anzu makes that easy. Anzu learns Dekaja at level 28, and can then give it to Neko Shogun via advanced fusion. Alternatively, putting Anzu in the electric chair with a Blank Card turns it into a Dekaja skill card.
There are 58 ways to fuse this persona. The simplest involves a Treasure Demon: Regent + Phoenix. Alternatively, Setanta + Sudama if you never got Regent.
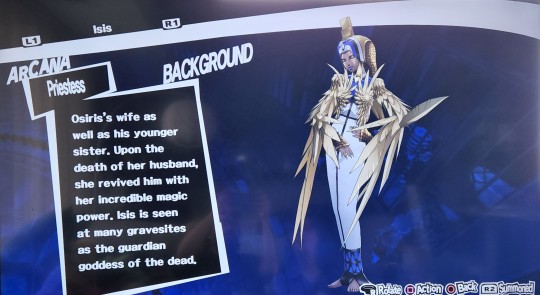
ISIS (She of Life and Death)
Timid
Priestess - level 26
Weak to: Psychic
She has a Fire, Electric, and Wind attack. So someone in the party is probably scared of her. Bring a Persona with a Psychic move to deal with her quickly before she gets extra turns.
Isis is used in an advanced fusion with Thoth, Anubis and Horus to produce Seth.
There are 199 ways to fuse this persona. The simplest being Jack Frost + Kodama.

LAMIA (Slithering Snakewoman)
Gloomy
Empress - level 26
Weak to: Ice
As an enemy, she’s pretty well rounded. All 5 of her moves are something worth knowing about.
She can deal heavy physical damage to 1 person.
She has a medium damage fire attack.
She can make someone more vulnerable to ailments, which doesn’t just combo with Sandman, but also with her ability to inflict the dreaded Despair ailment.
And if that weren’t enough she can summon more Lamia. Fortunately, she usually seems to summon allies when she’s alone.
As a Persona, she’s not a bad unit to bring into the boss fight. She starts with a single target heavy damage physical skill, which is really useful since the boss takes 5x damage from physical attacks.
There are 55 ways to fuse this Persona, and none of them are particularly simple at this part of of game, but the simplest is Clotho + Makami.

THOTH (Chanting Baboon)
Gloomy
Emperor - level 36
Weak to: Psychic
Thoth is used in an advanced fusion with Isis, Anubis and Horus to produce Seth.
They are possibly the most dangerous enemy in this level.
They've got an Almighty attack that hits the entire party, and another that inflicts rage on a target.
There are 75 ways to fuse this persona. The simplest involves a Treasure Demon: Regent + Eligor.
Alternatively, Principality + Choronzon if you never got Regent.

ANUBIS (Bearer of the Scales)
Gloomy
Judgment- level 37
Weak to: Nothing
Beware, Anuibus slings around instant death spells. If possible, try and bring some equipment or a persona that nullifies such moves.
Anubis is the first persona of the Judgment arcana. If looking to recruit this enemy, the best bet is to try and crit it. But watch out, they have both light and dark instant death attacks and don't hesitate to use them.
Fortunately, the social link with the Judgment confidant only ranks up through MSQ, so we're not pressured to grab them for the sake of social links.
However, it may be good to nab Anubis anyway as they're used in an advanced fusion with Isis, Thoth, and Horus to produce Seth.
There are 128 ways to fuse this Persona. The simplest way being Angel + Pixie.
RAGING BIRD GOD
Mini-boss
Weak to: Gun
Encountered in the village outside the pyramid, this is one of the first battles in this level. And it's a pushover, as it's basically just a big Anzu. They've got a few wind attacks, and some status ailments skills, but won't really get a chance to use them because they're weak to gun. Exploit that weakness and move on.
COFFIN-BORNE GOD
Mini-boss
Weak to: Wind
This mini-boss starts the battle by turning someone into a rat. This isn't really a big deal but on its own, but it does mean that it may be wise to bring 2 healers (especially if running low on items) just in case one of them is turned into the rat. This battle doesn't put out too much damage, but don’t relax because the coffin-borne god has a party wide medium damage almighty attack.
The mini-boss can also summon some zombie adds. They're weak to ice, so they can be taken out quickly.

Cognitive Wakaba
Boss
Weak to: Physical (x5)
The boss is a sphynx, which is pretty neat. We don't get to see those as enemies often in video games. Wakaba is fought in 2 phases. During the 1st she'll fight from the skies where she can't be hit by melee attacks. There's little we can do to her during this phase. Gun and Magic skills can hit her, but she has so much HP that at this point it'll amount to little more than poking her. It's best to play conservatively and spend most of our turns defending, which helps resist ailments. Not only does she have a physical skill that can inflict dizzy, but also a skill that can inflict despair, which should be avoided at all costs.
The gun shop sells Hope Shirts for ¥23,200, which give despair resistance and can be equipped by everyone but Morgana. Additionally, it may be wise to stock up on Relax Gel from the clinic, especially since they're just ¥900 each.
Wakaba ends the first phase with a dive bomb attack. This hits hard even when defending. Fortunately the game is very clear about when she'll come crashing down, giving us a countdown for when we need to be healthy, buffed, and defending by.
Phase 2 starts with Futaba creating a ballista nearby. We can send a party member off to operate, letting us shoot Wakaba down and making her vulnerable for 3 turns. Use a different character to load and fire the ballista each time. If the same character is picked twice it'll take them 1 turn longer to shoot her down.
Like with the divebomb, there's a clear signal when the ballista will shoot her down. Wakaba takes 5X damage from physical skills, so take full advantage of those 3 turns and buff party members beforehand.
Ryuji's physical prowess is very valuable here. But as he's weak to Wakaba's many wind skills, he's quite the liability until she's shot down even if he's chosen to operate the ballista.
Yosuke, another physical powerhouse, may be the safer option, though it's definitely possible to take both, especially if Ryuji has Tarukaja. Additionally, Yosuke is able to counter Wakaba's divebomb. It isn't very common, but it's hilarious when it happens.
Morgana does a great job healing here, and can quickly top the party off before a dive bomb. Their Lucky Punch is also very effective when the boss becomes vulnerable, and Me Patra is another way to cure Despair.
Makoto is also a solid member to bring along. She hits about as hard as Ryuji or Yosuke, and her Energy Shower ability can cure the party of Despair.
Tips & Tricks
In the last palace, many Persona still used skills that dealt “light damage.” Here, most attacks deal “medium damage,” with a few heavy damage moves trickling in through Anzu and Lamia’s physical skills. This may make the first half of the pyramid painful, but as we push on the damage plateaus. Especially since the enemies here are of a much smaller level range than in many of the other palaces.
7 of the 12 enemies in this dungeon share 3 weaknesses:
Anzu and one miniboss are weak to Guns.
Thoth and Isis are both weak to Psychic.
Naga and the other two minibosses are weak to Wind.
The other 5 enemies have no overlapping weaknesses.
In short: bring Morgana. Not only do they bring wind attacks, but Morgana’s Lucky Punch is valuable to help ensure we can down any odd enemy we don’t have coverage for, especially since no one here resists physical damage (except for the Stone of Scone which nullifies it).
Lean Sidhe is a very useful Persona to bring into this dungeon. She innately has a single target medium damage psychic skill, and if created by fusing Sui-ki and Agathion she can also pick up a light damage electric skill from Agathion and some nice ice attacks from Sui-ki. Not only does this gives her effective type coverage for this dungeon, but her naturally high Magic growth means she'll deal some decent damage too. Between her and Morgana the only enemy we don’t have a way to down is Anubis, who just doesn’t have a weakness. A word of warning however: she is weak to fire and both Isis and Anzu have fire skills. But since Isis is weak to Psychic, and Anzu is weak to Guns, so as long as we're faster and down them first everything should be fine.
Lamia is useful against the boss. They take 5x regular damage from physical & gun attacks, and Lamia happens to have a heavy damage physical attack. But if you want to go the extra mile, check out Flauros.
Flauros is an advanced fusion made only by combining Eligor, Andras, and Berith. They start at level 25, and learn their heavy damage physical attack at 29. They resist the bosses Wind attacks, have a passive to help dodge her physical attacks, and a passive that buffs their crit rate. Additionally, they can inherit an attack buff from Eligor.
Eternal Lockpick crafting materials first appear in this dungeon, though the drops are a bit of a pain to get. If the party is healthy and down to grind I highly recommend getting this infinitely reusable lockpick sooner rather than later. If not, don’t worry, the materials will be more easily available in the next dungeon.
To make the lockpick we need:
20 Aluminum Sheets (rare drop from Anzu)
10 Liquid Mercury (rare drop from Anubis)
Reminder: The enemies must be defeated to get their drops. We can't get them through negotiation.
Persona 5's dungeons, for better or worse, are each notably longer than the last. And, perhaps because of the exposition heavy back half, this dungeon is something of a tipping point for a lot of people where the dungeons really start to feel their length. Going forward, consider not pushing to complete a dungeon in one sitting.
Music
Persona 5 doesn't often reuse music between different areas. Because of that, every song played in this level is unique to it (with the exception of music for general things like battles, safe rooms, menus, etc.). Along with songs for various cutscenes and the village in the desert, this level also has 3 unique songs for Futaba's Palace:
When Mother Was There (Another Version)
Which plays outside the pyramid.
When Mother Was There
Which plays inside.
And
The Collapse of Wrath
Plays during a cutscene as her palace collapses.
My Relationship to this Game
When I was living in Japan, my fiancé (who was a few towns away) played this when it came out, loved it, and eagerly lent it to me. When I first played this game… I hated it. I was so busy at the time that for every real world day I wasn't able to play more than 1 in-game day. It was a slog. I came into the game identifying with all the slumped and exhausted businessmen in the subway. I didn't have the emotional energy to deal with the protag’s hopeless situation, or all the inescapable negative gossip/chatter popping up across the screen. And as Kamoshida's power trip at "Prisoner Academy" drug on it all really wore me down. I couldn't bring myself to finish even the first level. I tried returning it to my fiancé , but after she realized I was playing it at a snail’s pace she said, “Are you kidding? Of course you aren’t enjoying it if you play like that. Wait until you have a day off or something, don’t drag yourself through it.” So I did, and I kept at it. Then part way through Madarame’s palace it finally clicked with me, and I got into it hard. I was still in a bad place, but Persona 5 was now helping me through it instead of adding to it. I fixated on it and got real deep into it. Deep enough I ended up homebrewing what I consider the ultimate persona, which I would like to share with you.
The Ultimate Persona
I realized a few key things
We can grind infinite money off of Abbadon.
Persona have the same stat pools by level.
We can see how a Persona’s stats will go up when you fuse them.
We can fuse any skill onto anyone.
Result:
What I mean by all this:
1. Grinding infinite money off of Abbadon
If we raise the Sun confidant past Rank 3, we unlock the Fundraising bonus, which allows us to ask for large amounts of money during negotiations. Careful though, if we raise this confidant to level 8 we unlock a bonus that, counter intuitively, lets us skip negotiations all together.
Abbadon is weak to Psy and Nuke damage, but absorbs physical damage. Use a weak Psy or Nuke skill to down it, then just harass them for money until they get upset and break off negotiations, resuming the battle. Then, simply down them again to grill them for more money. Rinse and repeat, basic attacking every now and again to keep their health up, and we’ve got a money fountain that lasts as long as our MP does. And in the final area Abbadon isn’t too uncommon to find, so we’re able to rest and re-engage a new one pretty easily.
2. Persona have the same stat pools by level
Take Jack Frost for example. They are encountered at level 11. If we add together all of their stats (8 Strength, 9 Magic, 7 Endurance, 9 Agility, & 7 Luck) we get a total of 40.
But… if we added together the stats of any other persona at level 11, they will also have 40 total stat points.
Asparas is also encountered at level 11, and has 7 Strength, 11 Magic, 6 Endurance, 10 Agility, & 6 Luck, which also totals to 40.
And all Persona have the same stat growths. All Persona gain 3 stat points when they level up.
Mokoi is encountered at level 9. It has 9 Strength, 5 Magic, 6 Endurance, 10 Agility, & 4 Luck, which totals to 34. If they gain 2 levels (bringing them to 11) they would gain 6 more stat points, which would bring their 34 stats up to 40.
What this means is: no Persona has better or worse stats than another. A level 89 Pixie will have the same stat totals as a level 89 Metatron or Kohryu. The points may be allocated differently, but stats don't set Persona apart.
3. We can see how a Persona’s stats will go up when fused
All Persona gain 3 stat points when they level up. Normally these points are semi-randomly allocated. For example, more magically inclined persona will be more likely to have those points increase their Magic, and less likely for them to increase Strength or endurance. But, when we level up a Persona through a Sacrificial Fusion (turning one Persona into EXP for another), we can see how these 3 stat points will be applied before we confirm the sacrifice. And if we push B once to back out of the screen, and A to re-enter it, it re-randomizes how the 3 stat points will be applied. We can keep backing out of this menu until we get the stat growths we want from that level up, and we can do this for every level up.
4. We can fuse any skill onto anyone.
In previous games, there were more restrictions when fusing Persona, especially where inheriting attack skills and passive skills is concerned. Often, each Persona only had a small list of skills they could inherit, and they learned most of their skills by leveling up. In some games we don't even choose which moves a newly fused Persona would inherit, the game just selects a couple to carry over.
But in Persona 5, any Persona can inherit any skill, and when fusing we can manually select as many skills as the Persona has room for. Additionally, we aren't restricted to fusing Persona together only to make a new one. We can use "Sacrificial Fusions" to turn one Persona into EXP for another. And this form of fusing allows the sacrificed persona to transfer skills to the other. What's more, Sacrificial Fusion can be done with any two Persona.
So in short: Persona 5's fusion system lets us put any skill onto any Persona. At this point, the main thing that functionally differentiates Persona is what they’re innately weak / resistant to. In all other regards they may as well be blank slates.
Result
With infinite money, we can level any Persona to cap while controlling their stat growth along the way. We can transfer any skill to any Persona through Fusion, so we can make our ideal movepool while we do it. And since no Persona has "bad stats," we can turn literally anyone into the powerhouse of our dreams.
We can take a Persona who already reflects 2 elements and make them reflect the other 8 (and probably max an offensive stat while we’re at it). Some options include: Odin (reflects Curse and Bless), Yoshitsune (reflects Electricity and Bless), Black Frost (reflects Fire and Curse), or Trumpeter (reflects Electric and Bless).
We can meme it up and build Jack Frost into a steamroller that uses Hassou Tobi to unload more damage than the game can handle (Hassou Tobi, Charge, Arms Master, Auto-Mataru, Auto-Maraku, Auto-Masuku, Reflect Fire, Victory Cry). And with their base level being 11, we have 88 levels worth of stat growth (264 points) to spread out any way we want. That's almost enough to max their Strength thrice over.
Pick a Persona you like, max their Magic stat, and load them up with the strongest of each elemental spell. Along with our own basic attack & gun we’re able to hit any weakness and just obliterate our opponent.
The game is a playground. Enjoy.
There are many fun choices, but none of them really felt worth the investment to me (though don’t get me wrong, these builds are wild, wonderful, and will not disappoint).Reflecting every element is hilarious, but with all 8 skill slots devoted to reflects our only offense will be basic attacks. It can take quite a while to whittle an enemy down with basic attacks, we’re in trouble if the enemy resists or reflects physical damage, and enemies and bosses start dealing typeless almighty damage before the halfway point in the game and it only gets more common.
Spamming Hassou Tobi runs into the same issue with physically resistant/reflective enemies, plus using our HP to deal damage always opens us up to getting punked out when we think we’re safe, especially by stray criticals or in boss fights.
Building a Persona that can hit any weakness only works for enemies with weaknesses.
And using up all our skill slots on 8 elemental attacks doesn’t leave room for any of Persona 5’s bonkers passives.
Not to mention that all of these builds are vulnerable to status ailments.
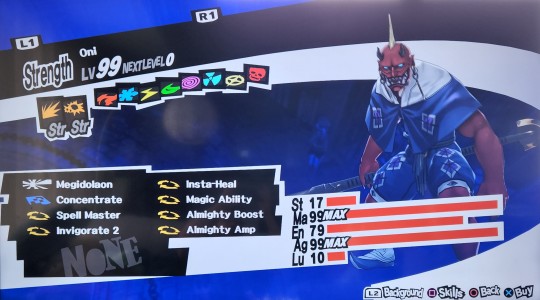
So… for my ultimate Persona, I chose to juice up Oni (who, if I remember right, took somewhere between 4 and 7 million yen to bring to level 99). Their base level is 19, making them the lowest level Persona without any weaknesses. Being super low level, they have a lot of stat growth we can control. 80 levels means 240 stat points to allocate. This is enough to max Magic and Agility while also bringing Endurance near max (which, combined with their innate resistance to physical and gun damage makes them real tanky… when enemies can even hit someone with that much Agility). With this obnoxiously min-maxed pile of stats the plan is simple: go first and do a buttload of almighty damage.Megidolaon deals "severe almighty damage to all enemies," and is backed up by 3 passive damage buffs (+25%, +25%, and +50%), Concentrate, two passive skills that help manage our SP, and Insta-Heal so we passively shake off status ailments in 1 turn.
I considered building this on Anubis (who innately blocks Bless and Curse skills) so we'd be immune to instant death attacks. But those can be negated with equipment, and enemies with those skills aren’t actually all that common to begin with, so I chose to go with the lower level Persona to better optimize their stat growth.
I started making a super cleric too to ensure no battle becomes unsalvageable, and got ready to put each elements big attack on Mothman, but honestly there’s no need. This Oni build completely trivializes even the secret boss on merciless difficulty.
0 notes
Text
Castlevania: Portrait of Ruin - Sandy Grave
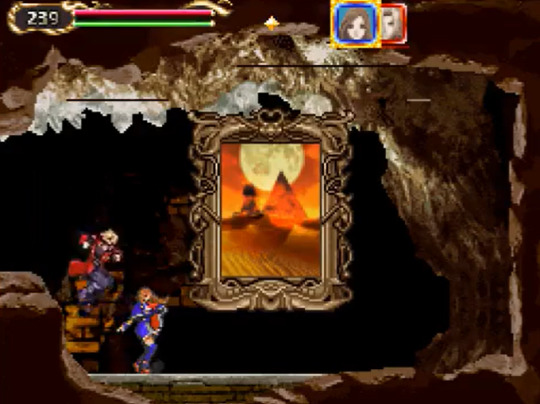
Table of contents:
Overview
Objective(s)
The Pyramid Itself
Treasure, Traps, & Things to Find
Enemies
Tips & Tricks
Music
My Relationship to this Game

Overview
It is 1944, one year before the end of WW2. Dracula’s Castle has suddenly reappeared, but strangely, Dracula is absent.
You control the tag team Jonathan & Charlotte, who have come to investigate the mysterious reappearance of Dracula’s Castle. Whichever character you’re not playing as is controlled by an AI, so the two of them are always fighting together. Jonathan is a more familiar Castlevania protagonist with a whip and sub weapons. Charlotte is a witch that attacks with enchanted books and by charging up magic spells.
In Portrait of Ruin, instead of Dracula’s Castle being a single immense map split up into many different areas (dungeon, laboratory, clock tower, etc), you travel into magic paintings around the castle to access many different, smaller, areas. This puts the player in locals less common to the franchise, like a Victorian Era town run by demons, a haunted school, and a pyramid.
The Sandy Grave is one of the first levels of the game, and it’s where you first encounter a strange new vampire named Brauner, who has used the souls of those killed in the war to “resurrect” Dracula’s Castle. But he says he’s not planning on reviving Dracula, who has failed at controlling humanity too many times. Dracula may be dead, but his castle is still an extension of him and is thus a source of great magic, one that Brauner has taken control of by using his magic paintings to (among other things) seal Dracula’s body away, separating him from his own castle.
Note: In Portrait of Ruin, most of the paintings have a counterpart in the 2nd half of the game.
Sandy Grave's counterpart is called Forgotten City. Though they share many assets, it isn't a pyramid (though the map is shaped like one). so I won't be covering it in this blog.
Objective(s)
Brauner is using these magic paintings to seal off and control different parts of the castle. You must enter the paintings and destroy the evil within in order to both weaken Brauner, and release sealed portions of the castle to steadily make your way to him.
The Pyramid Itself
This level has monsters everywhere. It’s a good thing Jonathan and Charlotte attack in tandem (and not that you swap between them like Castlevania 3) because levels in Portrait of Ruin are much denser with enemies than an average Castlevania level. The Sandy Grave will be your wakeup call if you haven’t gotten that memo yet.
One of the real cool things about this level is that the map is actually pyramid shaped. Which is not only pretty neat, but the game actually uses this design to its advantage. Normally, if a dungeon has a clearly conveyed shape / design, that often removes some of the mystery of its layout. For example, in Link's Awakening once the player explores enough to see HOW Key Cavern resembles two large keys, they can deduce "hmm, there should be a hidden room over here" based on something missing from the image the map makes. Or they can say "Oh, that way will probably be a dead end so I'll check it out quickly first."
But Portrait of Ruin uses their map to different effect. The map is full of enough dead space that you still ultimately explore this pyramid either unsure of where each passage will lead or filled with a false confidence. And this is compounded by the fact that you don't know where you're supposed to be going. You're here to fight a boss, but they might be along the back of the pyramid, at the tip, or somewhere deep underground.
The dungeon is made up of a lot of looping paths, with only two outright dead ends, which is a bit of an unusual design for a maze, but having the player always moving forward definitely works for the more action oriented style of this game.
The sloping walls of the pyramid are made up of many large rooms in a row, giving this place a unique feeling. Not just compared to other levels in this game, but for the franchise as a whole.
These rooms are also a treat because when you're standing near the outer walls you can see beyond them, the desert outside stretching off into the dusk with a swollen moon rising behind another pyramid on the horizon.
Treasure, Traps, & Things to Find
The "traps" in this level manifest as obvious obstacles, with none of them actually being hidden. For example, there’s a hallway with infinite boulders rolling down it at regular intervals. Or the room full of stones (covered in spikes) churning up and down like pistons. Or weak platforms that fall when you stand on them. Though there is one trap to watch out for. It first appears somewhat early into the pyramid. There is a long hallway with bundles of spikes near the ceiling that will fall when you get close. They’re roughly the same color as the ceiling and can surprise you the first time you encounter them.
Similarly, all of the pyramid's treasure lies out in the open. Shockingly, this level has none of the secret passages or breakable walls so common in Castlevania games (especially the Metroidvania Igarashi Koji games). And… uh… there’s quite a lot of treasure. Here is everything you can get on your initial visit:
– Stat upgrades –
HP Max Up - sink into the quicksand beneath the first Sand Worm you encounter.
HP Max Up - Upper right in the room beneath the rolling boulder hallway (guarded by White Dragons).
– Weapons –
Bahg Nahk - The furthest right spot on the map.
Steel Whip - Eastern side of the first room with Red Skeletons.
– Money –
$2000 - Found on falling platform in the basement
$2000 - Guarded by a White Dragon just before where you jump to reach the 1,000 Blades.
$2000 - Next to the Clear Skies spell.
– Equipment –
Charm Necklace - You’ll spot it as you trave down the right slope of the pyramid.
Crystal Necklet - Upper left in the very tall room in the middle of the pyramid.
Diamond Brooch - Found on falling platform in the basement
Glamorous Pumps - On the right side of the lowest room on the right slope of the pyramid.
Royal Sandals - In the 1x2 room above the very tall room in the middle of the pyramid.
– Consumables –
High Potion - Guarded by a Mimic
High Potion - In the upper left corner in the 2x3 room below the lower 2x2 room along the pyramid’s left slope.
High Tonic - Lower left corner of the lower 2x2 room along the right slope of the pyramid.
Pumpkin Pie - Right of the very tall room in the middle of the pyramid.
– Special –
(Dual crush) 1,000 Blades - Use your partner for a boost, then double jump to the top of the yellow path. The statue next to it has a lot of gold.
(Relic) Strength Glove - Found just past the boss room.
(Spell) Clear Skies - In the upper right corner of the 2X2 room on the ground floor of the pyramid.
(Spell) Sanctuary - In the bottom left corner of the rolling boulder room. You need the Toad Morph spell to reach it. This spell can keep regenerating enemies dead. It can also, amazingly, cure vampirism, which is useful when the shopkeeper Vincent is turned into a vampire, and needed to unlock the 2nd half of the game and get the good ending.
(Sub weapon) Bwaka Knife - In the upper right of the room right of where you meet Brauner. You’ll have to jump off your partner’s shoulders to reach it.
(Sub weapon) Steel Ball - Behind a Bone Pillar in the 2x3 room below the lower 2x2 room along the pyramid’s left slope.
You can explore about 98% of the map during your initial visit here. After you can transform into an owl, return to get to two previously out of reach spots.
One spot is in the rolling boulder hallway. With the Owl Morph you can reach the upper right corner and get the Lorica, which is the best armor for Jonathan that you can find lying around the castle. The few better armors are monster drops, so this is definitely worth coming back for.
The other spot is in the pyramid’s first room. If you fly to the upper left corner of the room you can find the Kaiser Knuckles, which is easily the strongest fist weapon in the game.
Enemies
The enemies are arranged in alphabetical order, but with the boss listed at the end.
-----------------------------------------------------------------------------------------------------------
Amphisbaena
Bestiary description: A double-headed snake. Its name means “able to move in both directions.”
To be honest, this enemy looks wild and may give you pause, but just attack it. It’ll go down before ever having a chance to counter attack. It’s one of the biggest pushovers in the game.
HP: 266
Strong: Strike
Weak: Whip, Slash, Fire
Exp: 94
Skill Points: 3
Drops: The equipment: Pearl Tiara (5.64%), and Ruby Corset (5.64%). The Corset is actually a pretty solid piece of equipment as it boosts both strength and defense, so if you missed the free one in the Entrance, consider trying to get this drop.
This enemy is unique to the Sandy Grave.
-----------------------------------------------------------------------------------------------------------

Armor Knight
Bestiary description: An armored zombie warrior who carries a spear.
They look like a weak enemy, and Castlevania often tries to frame them as one, but watch out. The Armor Knight has some quick attacks that can catch you off guard if you’re expecting them to go down in a hit or two.
They’re also able to strike a pretty surprising distance directly above or below them by extending their spears. Even if you’re on another floor you’re not safe.
HP: 60
Strong: Ice
Weak: Strike, Whip, Electric
Exp: 48
Skill Points: 3
Drops: The weapon Long Spear (9.87%), and the sub weapon Javelin (8.46%) which you’ll need for a quest later.
This enemy appears in the Sandy Grave, the Nation of Fools, and the Burnt Paradise.
-----------------------------------------------------------------------------------------------------------
Bone Pillar
Bestiary description: The skulls of dinosaurs, animated by a demonic force.
They can breathe fire and shoot fireballs, which you'll be able to simply jump over after knocking a few heads off the pillar and making it shorter. Their eyes always flash before they attack, and they only “activate” when you’re close. In this level they’re often blocking a path in an area where ghosts are spawning in around you. Fortunately, Charlotte’s Ice Fang spell is great for here. Not only does it hit the whole pillar multiple times, but it also takes out the Bone Pillar's fireballs too, giving you a chance to charge up another one if needed, though you are still a sitting duck for any ghosts you didn’t take care of.
HP: 100
Strong: Dark
Weak: Strike, Whip, Fire, Holy
Exp: 23
Skill Points: 1
Drops: None
This enemy is unique to the Sandy Grave.
-----------------------------------------------------------------------------------------------------------

Corpseweed
Bestiary description: A grown Une that bears the face of the human it fed on.
Punch it in the head.
HP: 148
Strong: Electric
Weak: Slash, Fire, Stone
Exp: 53
Skill Points: 2
Drops: Orchid Corsage (5.64%)
This enemy appears in the Sandy Grave, and the Forest of Doom.
-----------------------------------------------------------------------------------------------------------
Crossbow Armor
Bestiary description: An armored warrior equipped with a crossbow and exploding bolts.
This enemy is usually found standing behind other enemies and attacking from the back ranks. They think they’re safe back there, but if you strike their crossbow bolt it’s sent flying back at them for usually lethal damage, and their eyes flash red before they fire. They do a lot of damage to you too though, so be careful. Alternatively you can jump the bolts pretty easily, and after they fire it takes them a while to reload.
HP: 111
Strong: Ice
Weak: Strike, Whip, Electric
Exp: 95
Skill Points: 3
Drops: Silver Plate (4.23%), and the sub weapon Crossbow (2.82%)
This enemy appears in the Sandy Grave, the Great Stairway, and the Tower of Death.
-----------------------------------------------------------------------------------------------------------

Devil Wheel
Bestiary description: A demonically-possessed wheel that is obsessed with speed.
Once it notices you it’ll charge. It moves fast, and it’ll (generally) notice you before it’s even on screen, but is never unfairly placed to just get in cheap damage on you. You’ll meet one a few “rooms” into the desert outside the pyramid, so you’ll get a chance to size them up pretty early.
HP: 55
Strong: Dark
Weak: Strike, Whip, Fire, Holy
Exp: 56
Skill Points: 2
Drops: Coffee (7.5%)
This enemy appears in the Sandy Grave, the Nation of Fools, and the Forgotten City.
-----------------------------------------------------------------------------------------------------------
Dragon Zombie
Bestiary description: A zombie dragon. It lost its magic, but has become mindlessly violent.
It has a large variety of attacks, from a lunging bite, to whipping with its tail, to a large poisonous breath weapon, to a great laser beam. They can be pretty tricky to dodge, especially since it’s in a room with mummies constantly rising from the floor, so it’s best to hang back at a safe distance and bring it down with ranged attacks.
HP: 350
Strong: Dark
Weak: Slash, Fire, Holy
Exp: 150
Skill Points: 5
Drops: The weapons Gladius (7.5%) and Zweihander (5.64%)
There are only 2 Dragon Zombies in the entire game (along with a surprise appearance in Boss Rush Mode). There's one in the Buried Chamber and the one in the Sandy Grave. And only the one in the Sandy Grave respawns.
-----------------------------------------------------------------------------------------------------------

Ectoplasm
Bestiary description: A substance created by souls who cannot find rest.
It moves about the room in wide, slow loops as it flies towards you. It curses you on contact, which will rapidly deplete your MP. Be careful when fighting them, when you strike them they temporarily speed up. If you’re having trouble with their curse, or just wanna be careful, here are a few things that can help.
First, there are two helpful accessories you have access to at this point in the game.
Charm Necklace - Found shortly before the boss room, this item gives curse resistance.
Blessed Ring - A quest reward from Wind which gives curse immunity.
Second, you can pause the game before you're hit and switch which character you’re controlling, as the AI controlled character is largely immune to status conditions and debuffs.
Note: if you’re playing as Stella and Loretta you are unaffected by curses.
And if you’re playing in Old Axe Armor mode and can neither equip accessories, or swap to a partner character, you’ll just have to git gud.
HP: 10
Strong: Strike, Whip, Slash, Dark
Weak: Holy
Exp: 36
Skill Points: 2
Drops: Uncurse Potion (7.5%), and the Cure Curse spell (5.46%)
This enemy only appears in the Sandy Grave, and its counterpart level the Forgotten City.
-----------------------------------------------------------------------------------------------------------
Elgiza
Bestiary description: A guardian of treasure.
You’re not able to get the jump on this guy. Instead, when you walk close they burst forth from the floor, so be on your toes when entering large, empty areas.
You can defeat this monster by damaging its head, but it can be tricky to get close with it’s arms in the way. Fortunately you can destroy each one. Be warned however that they reform after a short time, so destroying them only briefly makes them more approachable. Also, when you get in close (whether they have their arms or not) they have a tendency to belly flop on you.
HP: 168
Strong: None
Weak: None
Exp: 133
Skill Points: 5
Drops: the armor Kalasirius (5.64%), and the accessory Uraeus (4.23%) which gives Luck +5 and may be worth grabbing.
This enemy only appears in the Sandy Grave, and its counterpart level the Forgotten City.
-----------------------------------------------------------------------------------------------------------
Fleaman
Bestiary description: A sinister little man who leaps about as if he were a flea.
They hop about erratically and can be pretty tricky, though they’re far less aggressive than their progenitors from earlier games as after they leap there’s generally a pause where they just hop about a little before leaping again. Because they should be a familiar sight by this point in the game, it tries to throw you for a loop and have you encounter them in narrow, vertical shafts.
HP: 15
Strong: None
Weak: Whip, Slash, Curse, Stone
Exp: 19
Skill Points: 1
Drops: The equipment Fedora (2.82%), and the consumable Pancake (1.41%)
This enemy appears in the Sandy Grave, the Nation of Fools, the Dark Academy, and the Forgotten City.
-----------------------------------------------------------------------------------------------------------

Flying Skull
Bestiary description: A skull that flies through the air.
This enemy is pretty similar to the Ectoplasm, except it doesn’t curse you. Also, it seems to go out of its way to come at you diagonally.
HP: 10
Strong: Dark
Weak: Strike, Whip, Fire, Holy
Exp: 15
Skill Points: 1
Drops: the accessory Glasses (5.64%)
This enemy appears in the Entrance, and the Sandy Grave.
-----------------------------------------------------------------------------------------------------------

Ghost
Bestiary description: A small spirit doomed to wander the castle grounds for all eternity.
Ghosts are a little unique in that they don’t sit in the level, but will spawn in when you move into specific areas. They spawn pretty quickly (another about every 3 seconds) and float towards you, so if you’re not quick you can find yourself surrounded. They don’t have much HP, but they’re resistant to a lot of what Jonathan can do. Charlotte however, can take them out pretty easily. And her weapons have pretty big hitboxes, so she’s pretty good at keeping the area around her clear, even if her short range struggles to keep them at bay.
HP: 8
Strong: Strike, Whip, Slash, Dark
Weak: Holy
Exp: 9
Skill Points: 1
Drops: The Summon Ghost spell (2.82%)
This enemy only appears in the Sandy Grave, and its counterpart level the Forgotten City.
-----------------------------------------------------------------------------------------------------------

Great Ghost
Bestiary description: An enormous phantom.
This special monster only appears after defeating many Ghosts while in the bottom room along the right slope of the pyramid. It behaves almost identically to a regular Ghost in that it doesn’t have any attacks per se, it just floats towards you in the hopes of colliding and damaging you. You need to defeat this monster for one of Wind’s quests.
HP: 66
Strong: Strike, Whip, Slash, Dark
Weak: Holy
Exp: 240
Skill Points: 9
Drops: None
This enemy is unique to the Sandy Grave.
-----------------------------------------------------------------------------------------------------------
Mimic
Bestiary description: A creature that disguises itself as treasure, then awaits its prey.
Unlike some other castlevania games, there are no treasure chests in Portrait of Ruin. All treasure chests you see are mimics that haven’t gotten this memo and just stick out like sore thumbs. They can leap pretty fast and far on their frog legs, so it’s important to take advantage of their poor camouflage and get the jump on them for a change.
The brooch they drop is the 2nd strongest brooch Charlotte can equip. If you’re interested in getting it, the Mimic can also be farmed on The Great Stairway.
HP: 99
Strong: None
Weak: Whip, Slash, Fire, Curse, Stone
Exp: 38
Skill Points: 2
Drops: Abalone Brooch (5.64%)
This enemy appears in the Great Stairway, and the Sandy Grave.
-----------------------------------------------------------------------------------------------------------
Mummy
Bestiary description: A mummified warrior, buried in a tomb to protect his king.
Mummies rise from the floor in droves and attempt to swarm the player. They each take a few hits, and move slowly, so you may be compelled to jump over them and move on. But if you do, watch your back, because they also have a projectile bandage attack.
HP: 64
Strong: Dark
Weak: Slash, Fire, Holy, Stone
Exp: 24
Skill Points: 1
Drops: Stone Mask (2.82%)
This enemy only appears in the Sandy Grave, and its counterpart level the Forgotten City.
-----------------------------------------------------------------------------------------------------------
Persephones
Bestiary description: The count's demonic maid. She seems to have bought a new vacuum cleaner.
And here we have the game’s best enemy, truly 10/10 design: a kung fu maid trying to tidy up all the sand with a vacuum. She didn’t have an appliance in previous games, and I think it’s cute how the bestiary description acknowledges this update.
She’ll greet you with an audible “welcome” and a curtsey before coming at you. She’ll first try to suck up the hem of Jonathan’s coat or Charlotte’s skirt with her vacuum to stun you before she drops the machine and breaks out a barrage of kicks and chops. She becomes much faster then, so try and take her down before she has a chance to ditch the vacuum.
HP: 60
Strong: Dark
Weak: Whip, Slash, Holy, Poison, Stone
Exp: 35
Skill Points: 2
Drops: Frilly Camisole (5.64%), and Pudding Bucket (2.82%)
This enemy appears in the Sandy Grave, and the Great Stairway.
-----------------------------------------------------------------------------------------------------------

Red Skeleton
Bestiary description: A skeleton warrior that has absorbed blood. It can regenerate.
These guys shamble back and forth across whatever platform they’re on. They don’t really even seem to notice you, just go on their merry way back and forth. With just 1 HP anything can take them out, but they get back up after a few seconds.
Sometimes you’ll find them wandering in large, open spaces and you can just jump past them, but just as often you’ll find some on smaller platforms you’re not just gonna fly by, or in passages with low ceilings.
Usually, there’s no way to rid yourself of them, but Portrait of Ruin is one of the rare exceptions. If you have the whip Undead Killer, or the spell Sanctuary, you can take them out (and reap their rather juicy pile of exp).
HP: 1
Strong: Dark
Weak: Strike, Whip, Fire, Holy
Exp: 127
Skill Points: 5
Drops: None
This enemy only appears in the Sandy Grave, and its counterpart level the Forgotten City.
-----------------------------------------------------------------------------------------------------------
Sand Worm
Bestiary description: An enormous worm that lurks in the ground to snare its prey.
This huge worm erupts from a dune just outside the pyramid. The worm doesn’t really attack you, so much as wiggle around and hope to clip you. The tricky part is that the ground around it steadily pulls the player down and into the worm. It’s helpful to have a quick weapon with good range so you can stay aggressive while jumping to both keep free of the sand and keep away from the Sand Worm.
HP: 250
Strong: Strike
Weak: Whip, Slash, Fire
Exp: 100
Skill Points: 5
Drops: None
This enemy is unique to the Sandy Grave.
-----------------------------------------------------------------------------------------------------------
Skeleton
Bestiary description: A skeletal corpse controlled by magic.
A classic bone throwing skeleton. They only throw weak little bones at you which can be destroyed mid air. At first they may not seem like a problem, but they’re often placed where they can hit you, but you can’t easily strike back. The Sandy Grave is the 3rd and final zone they appear in, so you should be comfortable fighting them by now. Just take your time when approaching them.
If one is trying trying pester you while you fight a stronger enemy, note that their bones deal so little damage that sometimes you’re better off getting hit by them than the stronger enemies and using your invincible recovery frames to either strike back at the tougher foes or reposition. Just be careful they don’t knock you into another room.
HP: 10
Strong: Dark
Weak: Strike, Whip, Fire, Holy
Exp: 3
Skill Points: 1
Drops: The Summon Skeleton spell (4.23%)
This enemy appears in the Entrance, the City of Haze, and the Sandy Grave.
-----------------------------------------------------------------------------------------------------------
Skull Archer
Bestiary description: An archer made of bone.
Their arrows move pretty fast, but generally you won’t have a tough time with them. For whatever reason they’re normally encountered in stepped areas that don’t give them a clear shot at you. Be patient when approaching so you don’t jump into the path of an arrow and you’ll be fine.
HP: 40
Strong: Dark
Weak: Strike, Whip, Fire, Holy
Exp: 16
Skill Points: 1
Drops: None
This enemy appears in the Sandy Grave, the Great Chamber, and the Entryway.
-----------------------------------------------------------------------------------------------------------

Spittle Bone
Bestiary description: A four-legged skeleton that crawls on walls.
Last (and first) seen in Symphony of the Night about a decade earlier, since then the Spittle Bone has gotten a bit of an upgrade. Before it would drip (or spit) poison as it climbed around the room, but now it’s been outfitted with fire breath. Calling them Spittle Bone feels a little inaccurate now, but in Japanese their name is even more confusing. They’re directly named after the Artibatirae, an Ethiopian tribe of humans that walked on all fours and roared like animals. Historical accounts describe them as everything from merely strange to monstrous, but none mention fire breath.
This monster doesn’t follow the player, but moves in one direction around whatever surface it’s on, whether that means it’s crawling around a small platform or circling the room itself. This not only makes it pretty easy to avoid most of them, but also actually kind of makes it a pain if you’re trying to beat any for their moderate exp.
HP: 10
Strong: Dark
Weak: Strike, Whip, Fire, Holy
Exp: 33
Skill Points: 1
Drops: None
This enemy appears in the Sandy Grave, the Entrance, and the Nation of Fools.
-----------------------------------------------------------------------------------------------------------
White Dragon
Bestiary description: The bones of a long-necked dinosaur, animated by a demonic force.
Based on (and sometimes directly named after) the Mesoamerican deity Quetzalcoatl, this dragon is attached to a wall and will lunge forward at the player. It’s hitbox is it’s head, which bobs around, making it difficult to hit without an arcing weapon or magic spells with large hitboxes.
The level design usually pulls some kind of trick to prevent the player from simply sitting beyond its maximum range and attacking when it lunges and falls short. Traditionally you’d simply fight them in places too small for you to stand that far back. But in Portrait of Ruin the main places you’ll find them also have a lot of respawning Ghosts harrying you, and if you stand too far back they’ll often forget about you and leave you alone. For better or worse your best plan of attack is to get used to how it moves so you can safely get in it’s face and take it down quickly.
HP: 80
Strong: Dark
Weak: Strike, Whip, Fire, Holy
Exp: 110
Skill Points: 4
Drops: None
This enemy appears in the Sandy Grave, and the Nation of Fools.
-----------------------------------------------------------------------------------------------------------

Astarte (boss)
Bestiary description: A woman of irresistible beauty. No man can defy her will.
Astarte is based on the mesopotamian goddess of sex and war by the same name, and she is weak to all physical damage, and resistant to all magic.
She's got 4 attacks, but only occasionally attacks. Most of the time she'll just slowly stroll back and forth around the room. However, it's important you keep some distance.
– She has a quick lunging attack which can be difficult to avoid if you're in close.
– She can fire a tornado from her rod large enough that you'll have to double jump over it (or over her).
– She'll jump back and attack around the space where she was, which can catch people playing too aggressively or attacking while too close.
– But you also want to keep some distance to ensure you can dodge her magic arrows. The boss is designed around this attack, and if you can avoid it you’ll have little problem with her.
The arrows appear quickly spread vertically behind her and fly across the screen in an X-cross pattern so they make the shape of a bow-tie. It is best dodged by staying at midrange so you can jump over the thin midpoint point where the arrows cross.
If Jonathan gets hit by it, he'll be charmed and fight alongside the boss. You can avoid that by playing as Charlotte, as she's immune to the charm effect. However the bosses magic resistance means playing solely as Charlotte makes the fight much more difficult, especially when most of the bosses' attacks are designed to catch people that come in close, and Charlotte’s weapons all have pretty short range.
You can fight as Jonathan while simply pausing and swapping to Charlotte to avoid being charmed, just like how you can swap to avoid being cursed by the Ectoplasm enemy above. Though if you plan on doing so, I'd recommend playing as Charlotte for a bit first so you can safely see how fast the attack comes out. If it catches you by surprise you're in for a much rougher fight.
Jonathan can be defeated, but if you take him out he doesn't return to your side. He'll slump down on the ground and you're left to finish the boss alone. If worst comes to worst and he is charmed, defeat him first. They don’t fight in conjunction, but each attack you independently. Their uncoordinated attacks are not just difficult to read and respond to, but sometimes overlap in ways that you can’t avoid. This makes it even more dangerous for Charlotte to get in close and attack Astarte. And the boss takes so little damage from Charlotte’s magic that unless you've been wailing on her for a while and are already deep into the fight, you'll probably inadvertently take out Jonathan first while focusing on Astarte anyway. But also, Astarte still wanders around the room only attacking sporadically, whereas Jonathan is pretty aggressive. Since Charlotte's attacks either have short range or a cast bar, you defeat Jonathan if only to get some breathing room.
Though, you may also want to let Jonathan get charmed, for pausing the game at various points and using the Talk option gives some cute extra dialogue between Jonathan and Charlotte.
If you are struggling, the 1,000 Blades Dual Crush hidden in this level makes short work of Astarte. It’s the only Dual Crush that is canceled by enemy damage, but because the boss wastes time moseying around you'll have plenty of chances to use it to its full extent. Despite having over twice the HP as the previous boss she can only take a full 1,000 Blades a couple of times, and it can hit her while she’s off screen.
HP: 1,500
Strong: Fire, Ice, Electric, Holy, Dark
Weak: Strike, Whip, Slash
Exp: 3,000
Skill Points: 50
Tips & Tricks
Persephones gives easy money and health items. As mentioned above, she drops Frilly Camisole (5.64% drop rate), which sells for a surprising $2,450. If you farm her on your initial visit to the Sandy Grave you might not get time efficient returns, but after your luck stat rises you can expect about one Frilly Camisole every minute. This can really help if you're looking to buy the Golden Axe.
As an added benefit, she also drops Pudding Bucket (2.82% drop rate), which restores 200HP (the same as a High Potion).
If you don't want to venture all the way into the Sandy Grave to farm her, there are also many Persephone in the castle near the portrait for the Sandy Grave.
Charlotte is really good in this level. Not only are a surprising amount of enemies Weak to fire and holy magic, but her spells are great for keeping on top of the swarms of the Sandy Grave's swarms of monsters, especially once she gets the Clear Skies spell. If you've been mainly using Jonathan, I recommend giving Charlotte some time to shine here, in part because you'll want to have the hang of her for the boss fight in case things go south.
Being able to quickly tag between Jonathan and Charlotte is a valuable skill in this level, from avoiding the Ectoplasm's curse effect, to avoiding Astarte'a charm effect, to just cheesing some traps, etc. If you want to practice tagging between them, I recommend going into a room with Ghosts (like the lowest room along the right slope of the pyramid).
– They infinitely respawn so you can practice as long as you'd like.
– They deal negligible damage so messing up won't get you messed up.
– And because they move somewhat slowly they're great for players just picking up the timing of a good swap. Plus you can also let the ghosts swarm you if you're more advanced and looking to polish your twitch reflex.
Music
The Sandy Grave’s theme is Hail from the Past, a unique piece not reused elsewhere in the game. The sound effects in this game can be pretty loud, and are pretty constant. I appreciate how the song for this stage isn’t driven by a strong melody that the SFX and shouting will just eclipse, but instead the song is a moody groove that never feels interrupted by the action.
A remix of Hail from the Past is used in Castlevania: Harmony of Despair in the stage Beauty, Desire, Situation Dire, which is a colossal pyramid based off of The Sandy Grave.
Another remix was made for Super Smash Brothers Ultimate.
Check out Hail from the Past~

My Relationship to this Game
I’ve been entranced by Castlevania ever since my late grandmother got me a copy of Harmony of Dissonance for Christmas. I was especially entranced by Kojima Ayami’s art. Yet, somewhat surprisingly, I’ve never owned Portrait of Ruin. As shallow as it sounds, I got pretty turned off by the change in art style when the series moved to the 3DS. I also got Dawn of Sorrow for Christmas and it blew my mind, but at the store whenever I’d see a new one on the shelf the box art was always just enough to stop me from buying them… but it wasn’t enough to stop me from playing them, and I’d always pester my friend Jon to borrow his copy of Portrait of Ruin.
Also, Old Axe Armor mode rocks.
If you have a recommendation for a cool pyramid I could write about, or other suggestions, hit me up with the Ask Me Anything button.
0 notes
Text
Super Mario 64 - Shifting Sand Land

Table of contents:
Overview
Objective(s)
The Pyramid Itself
Treasure, Traps, & Things to Find
Enemies
Tips & Tricks
Music
My Relationship to this Game

Overview
After defeating Bowser in the first of 3 encounters, you get a key to the basement of Peach’s Castle. Down there among a maze of corridors, and disguised as a regular looking dead end, is the entrance to Course 8: Shifting Sand Land.
The pyramid dominates the map, sitting just off center. It’s surrounded by lethal quicksand and unclimbable sand dunes, shaping the level into a counterclockwise spiral that leads you in towards it.
Objective(s)
Princess Peach is missing, and Bowser has taken over her castle and placed barriers inside to keep Mario out. In order to fight Bowser, Mario has to gather enough Power Stars to take out the barriers placed before each room Bowser is hiding in. Each time he is defeated, Bowser drops a key that grants Mario access to different parts of the castle, starting with the basement and proceeding through the castle's upper floors.
The secrets of this desert are almost entirely contained in or on the pyramid. There are only two stars in the surrounding desert (the star the buzzard is holding, and a star from collecting the 8 red coins). The other 4, 2/3rds of the stars for this course, are connected to the pyramid, with 3 stars inside and 1 on top.
– You can collect one star by traveling up a narrow edge spiraling up the outside of the pyramid.
– One by platforming your way up the pyramide from the inside.
– Another is guarded by a boss deep in the belly of the Labyrinth (one of the games 8 non-Bowser boss fights),
– And the final one appears after collecting 6 special coins scattered around the chute by the roof that’s depositing sand into the pyramid.
The Pyramid Itself
Once you enter the pyramid, you're unable to just run back out. To leave you've either gotta finish the level or get a star. Not to say that you’ll necessarily feel trapped. There are two spinning hearts to infinitely restore your health, one midway up and one nearer to the top.
Inside, the pyramid is huge, basically 1/4th the size of the level outside. It’s not a traditional tangle of hallways and maze-like corridors, but instead it’s basically a big open room (which is definitely for the best because the camera in Super Mario 64 becomes really rigid when you try and move it through level geometry). The center of the room has collapsed, exposing slightly less lethal quicksand than the stuff outside, and you explore some of the surviving passages still clinging to the walls. There are many ways you can make it up, but the paths generally form a spiral going up along the walls (in the opposite direction the desert outside spirals in towards the pyramid). This room is 5 floors high, so there is a lot of verticality to this level. It really comes to a head when you're carefully climbing down a sand chute dangling over the middle of the room.
Treasure, Traps, and Things to Find
Along with the many power stars hidden around the area, there are also five 1UP’s hidden inside (and one just outside) the pyramid. They are:
In a yellow "!" Box near the entrance to the Pyramid.
Above the Grindel along the left path.
At the end of the left path.
Along the back wall.
In the back right corner. It appears after the player steps on all five platforms on the quicksand.
Above the metal hanging grille near the Amp.
As for traps, oddly enough there really aren’t any. Sure, there are some funky moving stairs, enemies that can squish Mario as they move about, and benign obstacles like that, but there isn’t anything to trip / trigger, none of the geography damages you, there aren't any surprises to catch you off guard (outside of perhaps technically the AMP enemy, because it doesn't spawn in until you’re close, but referring to that as a “trap” feels rather misleading).
Enemies

Goombas
(note, photo does not depict them inside the pyramid)
Goombas were given new behavior in Super Mario 64. Instead of just ambling back and forth, they patrol around in a small area, and will charge Mario on sight. While there are more Goomba’s in this area than any other single enemy, they are both the only enemy that isn’t invincible, and is the only enemy that didn’t debut in Super Mario 64.

AMP
They are an invincible ball of electricity that typically travels quickly in a tight circle, but inside the pyramid they will instead bounce back and forth between their home point and Mario.
They are initially encountered in the first Bowser level. While they become a somewhat common sight in the latter half of this game, this is the first stage players will encounter this monster, and as such will be a fairly new and unnerving obstacle, especially with the spooky crackling sound they make.

Grindel
This enemy looks somewhat like a large mummified Thwomp, and only appears inside this pyramid. They move much like Thwomps as well, some rise and slam to the ground vertically, and others do so at an angle in order to move about. Like this game’s Thwomps, you are able to stand on top of them, can even use them as shortcuts to make it higher up the pyramid more easily.
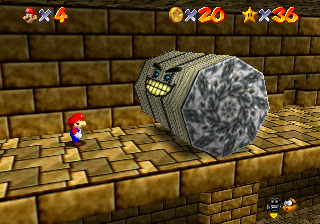
Spindel
It's a cylindrical version of the Grindel. There is a single Spindel and it continuously rolls back and forth along one of the pyramid’s upper paths. It’s expression never changes, even when rolling over it’s own face. The Spindel is wide enough that it takes up the entire walkway and Mario must either duck inside a small recess in the wall, or try and jump over it. It's top is safe to touch, so no need to fret about trying to get over it in a single bound.

Kuromame / Kenronpa Ball
This enemy looks like a little floating black ball. Not only did this enemy debut in Super Mario 64, it is unique to this game and it’s remakes. They do not appear in the first 1/3rd of the game, so Shifting Sand Land will be one of the first places the player encounters it.
This little ball doesn’t move, but spits out a homing flame at Mario. If it touches him, it deals damage and lights Mario’s butt on fire, causing him to run around for a short period of time and making it difficult to remain on narrow walkways. Of course, they’re placed around the narrow edge spiraling up the outside of the pyramid.
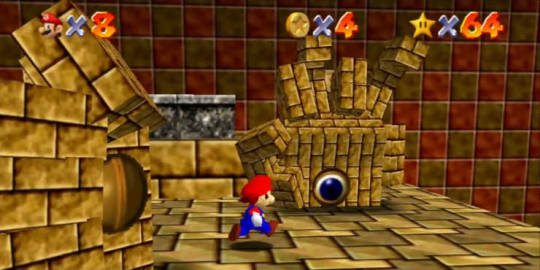
Eyerok
This is one of the 7 non-Bowser bosses in the game.
In order to reach this boss, you have to blow the tip off of the pyramid and drop into the exposed shaft that allows you to reach the deepest part of the pyramid.
Eyerok is a pair of giant stone hands guarding a tomb near the far wall There are pits on the other three sides of the platform you share. The boss tries to push you off and pummel you with his big hands. To beat him you have to attack the eyes on his hands 3 times each by punching/kicking, or diving into them.
Super Mario 64 is one of the first 3D platformers, and it's designed around simple platforming and spatial challenges in the new 3D space, so the hands telegraph pretty clearly, move slowly, and have some pretty obvious safe zones, yet Eyerok is still easily the most elaborate non-Bowser boss fight and it definitely gives this place some spice.
Tips & Tricks
When you enter, there is a short cut to your right. There is an exposed corner of the floor above hanging just low enough for Mario to reach with a side somersault. If you make it up, this'll also put you right next to a pole you can climb to reach the 3rd floor.
When collecting the special coins for this levels 6th star, you have to drop down a series of very small ledges. They're coincidentally spaced just far enough apart that you can backflip down to each one. The camera may not always rotate enough to show you where the next one is, but you can use the first person camera to orient yourself. Also, when jumping down it can be a little difficult to land on them. But they're coincidentally spaced just far enough apart that, oddly enough, you can backflip down to each one.
If you've already blown the top off the pyramid, coming in through the top puts you in a little lift that moves you right past where you need to be to start collecting the special coins
Watch out, the sand chute looks shallow, but Mario can still sink into the sands and die. Keep jumping so you don't go under.
There is also a little known warp hidden in this level. On the 2nd floor, if you stand to the right of the hole with the pole it will warp you to the top of the metal hanging grill. It is a 2 way warp, but to return you might need to stand ever so slightly up the grill than where you teleport in.
If you die inside the pyramid, when you reenter the level you will respawn inside the pyramid (unless you game over). With five 1UPs inside the pyramid this can be a great way to stock up on extra lives.
Music
While Shifting Sand Land shares music with Lethal Lava Land, the pyramid uses the song Cave Dungeon, which is also used in Hazy Maze Cave, Wet-Dry World, Metal Cap Switch Course, Wiggler's cave in Tiny-Huge Island, and in the igloo in Snowman's Land. Cave Dungeon is an arrangement of the underground theme from the original Super Mario Bros.
Check it out~

My Relationship to this Game
Man, I love this game. As a kid it was one of my favorites and fed right into my love of exploration, and this level is a perfect example of that.
I always found this stage very mysterious because it didn't have a painting. I get the concept behind jumping into the world depicted in an enchanted painting, but a stone wall?
A couple years ago someone gave me a Japanese N64 with a few games. One was Super Mario 64 and I popped it in to see if I could get all 120 power stars from memory (cuz I can’t read Japanese). Ironically, this was one of the levels I remembered the least, and it was a joy to rediscover.
If you have a recommendation for a cool pyramid I could write about, or other suggestions, hit me up with the Ask Me Anything button.
3 notes
·
View notes
Text
About this blog
I have a hard time writing consistently, as I get very easily stuck in planning and plotting. So I'm trying to make a side project that lets me just sit down and write. I tried writing a journal, but I don’t like writing about myself. So my next plan is to write a blog about something extremely narrow (so the side project doesn't balloon out of control), and about something informative with a hard structure I repeat across posts (so I can't get too mired in the creative side of things). That's how I settled on a blog about appreciating and dissecting pyramid levels in video games. It also helps that I don’t expect anyone will ever actually find this, let alone care enough to read it, which lowers my mental barriers of engagement even further.
Because of that, this blog won't focus on colorfully describing these pyramids with passages like:
The sunlight leaking through the cracked stone is too weak to reach the dirty floors. Moving about, the dust you kick up looks like a writhing silhouette, obscuring the floor.
But will instead be more akin to a 90's strategy guide: a little cozy and casual, while focusing on presenting information as clearly as possible.
When I first sat down to gather material for this, I came up with a dozen different candidates off the top of my head from Super Mario 64’s Shifting Sand Land, to Skies of Arcadia’s Temple of Pyrynn. But when I tried to look beyond my initial list I quickly realized how rarely games actually have you exploring a pyramid instead of just some desert ruins. Heck, Mega Man 4's Pharaoh Man lurks in nondescript underground tunnels. There's not even a monument on the surface! You literally enter by jumping into a hole in the ground!
I briefly considered broadening the scope of this blog, but I’m making it explicitly to write about something incredibly specific, so pyramids it is. And because I'm using this blog to supplement my writing, it probably won't update more than once every 3 months.
If you have a recommendation for a cool pyramid I could write about, or other suggestions, hit me up with the Ask Me Anything button.
1 note
·
View note