
Last Seen Blogs


Link
#passion fruit syrup#home brew recipes#passionfruit syrup#cheese making kit#lemon squeezer#coconut syrup#kegerator fridge#beer glasses australia
0 notes
Text
How to pick the best cocktail kit

All of us long for the best cocktail kit to get the upcoming party, isn’t it? There are a wide range of methods for choosing a cocktail kit especially if you have to use it for a special occasion. Many individuals favor making cocktail units in different ways with the goal that when they gift and use them, the entire party turns out to be more memorable. However, you can choose the ones that goes well your budget and the occasion. Need some tips to customize the cocktail kit? Presenting you a few tips to pick the best cocktail kit:
Blending vessels:
To collect a mixed drink pack, you can begin with blending vessels. Since there are two vital and regular blending work, both the vessels must be considered. Most importantly, we should consider shaking the beverages and additionally mixing it. There are various mixed drink shakers accessible, for example, Boston shakers, which are metal vessels, and cobblers of various types. The most imperative thing that bothers is the material of the vessel. The material utilized as a part of the making of vessels ought to be solid and durable. Also, you can’t afford to ignore the keeping in mind the design and style. It must be elegant and should go well with the occasion.
Blending Glass:
The second critical factor for creating the best cocktail kit is the blending glass. It should be of suitable shape and style — it ought to be tall and limited. Likewise, the mixing pitcher ought to be wide and sufficiently substantial to give space to ice and a spoon.
Spoon:
The third most vital device is the spoon. A ban spoon ought to be produced using a stainless steel material which is solid and long-lasting, with the goal that it can hold up the heavy work of splitting the ice. The spoon picked ought to be sufficiently long to fit in the tall glasses and vessels.
Strainers:
The strainers are of two types - one is a julep strainer and the other one comes with a spring. If you are looking for a exotic and economical strainer, you can opt for julep strainer. A few people are inclined towards adding a meddler to a cocktail unit. The motivation behind adding a meddler is to pulverize herbs and citrus in the blending vessel. It is normally made of wood or plastic, and is ordinarily modest and comes in basic designs.
Measuring Tools:
It is additionally imperative to include a couple of more measuring tools to the unit so that the exact amount of liquid would be mixed to get that perfect drink. Most of the times people end up getting too high or don’t get the kick at all. This could be due to the wrong proportions of the cocktail mix. Why spoil the moment when you have the best measuring tools?
The measuring gadgets included ought to be exact, simple to utilize, modest and sturdy. The glassware that you have picked must also be elegant and simple. There are numerous factors with regards to choosing the glasses. From highballs to the outdated low ball, people may pick the glasses depending upon their requirements and budget. Highballs use tall and thin glasses though low balls come in twofold size glasses. However a sensitive bit of glass requires excessive care when cleaning. Likewise, shape and sizes ought to be considered while picking the quantity of glasses to be amassed in a particular mixed drink pack. Subsequently, it is critical to pick the tools wisely while considering choices for the cocktail unit, particularly when it will be used exclusively for special occasions.
Want more updates on cocktail kits? Need experts to assist you? Looking for an online store where the best bar accessories are available?
Visit One stop Bar Shop to get some of the best cocktail supplies. You can also opt for
Visit the link( https://www.onestopbarshop.com.au/contact-us) and fill the contact form to get in touch with the experts immediately.
0 notes
Text
Ways to clean Whiskey Stones:
Whiskey stones require little push to clean after being used.If you want your whiskey stone to last long, you need to prevent the residue from building and kill the bacteria. Here are a few ways that can be followed to clean the
whisky stones:
1 Maintaining Stones:
Clean whiskey stones once used:
Doing this will shield microscopic organisms from developing on your stones and prevent residue from forming up. Flavors consumed by your stones in the cooler will be hard to expel with a general cleaning.
To evacuate a retained flavor, by and large you'll either need to bake or soak the stones. Here’s the process:
Wash the stones with dish cleanser and warm water. Roll the stones forward and backward in your spotless hands underneath warm water from a fixture. Expel the stones from underneath the water and include a couple of drops of dish cleanser to them. Foam up the stones, at that point wash the cleanser from the stones.
Dry the stones: Damp a paper towel on the stones to remove the moisture from the stones. Wipe the stones completely and allow it to dry for an hour or so.
Restore the stones to the cooler:
Embed your stones into their bag.If your stones are dirty irrespective of storing them in the bag, probably, it’s time for you to replace them. Keep your stones in a sealable cooler baggie or water/air proof holder for enhanced protection.
2. Soaking Stones:
Soak stones in a mixture of water and vodka:
Take a glass loaded with warm water and fill another quarter of it with cheap vodka. Add the stones to the glass. Make sure that the stones are totally submerged. Leave it for a few hours and stir the glass content after every hour.
Dry the stones and return them to the cooler: Expel the stones from the water-vodka blend and wipe them with a paper towel or a spotless drying towel. Spread the stones on a dry paper towel to air dry for around an hour or until dry. Embed the stones into their pack, place them in the cooler, and appreciate the cleaned stones.
Re-apply the water-vodka blend as important:
You may need to drench your stones more than once before a flavor is totally expelled. On the off chance that your stones ingest an undesirable flavor from your cooler once more, reapply the water-vodka blend as described above.
3. Expelling Absorbed Flavors in an Oven
Dry the perfect whiskey stones totally:
Take out the stones from the cooler, if essential. Place the stones in a dry, bright area for a one or two days to allow the stones to completely dry.
Clean your stones with your Oven’s self-cleaning cycle:
You can keep the stones inside the oven and let the self-cleaning cycle be on. The heat of the oven will sterilize the stones and evacuate any assimilated smells. At the point when the cycle is finished and the oven has cooled, take the whiskey stones out.
Most whiskey stones are made of soapstone, which can oppose the high warmth of your oven. If your bourbon stones are made of another sort of stone, confirm they can withstand high heat before cleaning them along these lines.
Review the state of the stones:
Investigate each stone turn by turn. Check all sides for splits and breaks. Any stones that have been harmed by the warmth ought to be disposed of.
Follow these simple steps and you can surely protect your whiskey stones and increase their longevity. However, make sure that you purchase the high- quality whiskey stones as poor quality stones tend to crack easily.
Visit Onestopbarshop to know more about their products and services!
0 notes
Text
Different Types of Bottle Openers
About Bottle Openers
Similarly, as a corkscrew is a gadget for expelling plugs or plastic plugs from wine bottles, a container opener is a gadget for evacuating bottle tops made of metal from different sorts of jugs. Most metal jug tops, for example, those found on brew bottles, are smooth to finish everything except creased or creased around the edge.
Picking Bottle Openers
There are a large group of various jug openers to look over, going from antique to current and from plain to lavish. Bottle openers can be picked depending upon the beverages that you are going to choose. For instance, buyers looking for openers appropriate for brew should ensure they search for things particularly adapted to open ale bottles. Similarly, those individuals who drink beer, wine, juice, and strong should search for openers intended for the particular motivation behind expelling the highest points of those jugs. For those customers hoping to consider every contingency, there are additionally multi-top openers accessible.
Types of Bottle Openers
Most container openers are made of stainless steel, as they must be sufficiently durable to apply adequate power while levering off jug tops.
You can also choose wall mounted bottle opener if you frequently need it.
Churchkey
The development of the crown stopper bottle top in 1892 gave a helpful seal to brew bottles; be that as it may, it likewise caused a considerable measure of trouble among sharp lager consumers, who gathered scars and scratches from endeavoring to evacuate it. After two years the creation of the Churchkey bottle opener tackled the issue and was successful to the point that in the mid-twentieth century delicate carbonated beverages fixed with a crown stopper, became popular.
Standardized Bottle Openers
In the mid 1960s in Germany, a logical way to deal with altering crown corks brought about institutionalizing the length and number of creases or ribs at 21, and amid the decades that took after outlines for bottle openers went up against a wide range of odd and magnificent shapes, while basically proceeding to use a similar activity for opening and evacuating bottle tops.
Container Openers for Home Use
Bottle openers for regular use in the house are basic gadgets. There are powerful assortments joining bottle openers and corkscrews, and sets that are perfect for the home bar, including openers, corkscrews, and wine pourers. A portion of the more uncommon things incorporates thumb ring openers, key-formed openers, and those intended to look like spanners or other laborers' instruments. Openers that have the office to enhance grasp are especially helpful for elderly individuals or the individuals who may have issues with joint pain in their grasp, as they are customizable and can oblige diverse sizes of jug and jug tops. Regular materials for bottle openers for home utilize incorporate stainless steel, chrome, plastic, and metal.
Oddity Bottle Openers
Some oddity bottle openers can be used as refrigerator magnets, copying the activity of the first divider mounted container openers. Convenient forms are additionally made as key rings, frequently likewise conveying pictures of pop stars, TV characters, or donning symbols.
Collectable Bottle Openers
They are frequently gathered as marked sets or as a component of a determination of bar-related instruments that may incorporate container openers, key rings, identifications, corkscrews, cooler magnets, and tops and caps.
Visit Onestopbarshop today!
0 notes
Text
Home brewing mistakes to avoid
People have been brewing beer at home from ages, yet, they commit mistakes. As an amateur home brewer, you have an abundance of data available to you to enable you to abstain from falling into the basic traps. To enable you to keep away from them, here are 5 of the most widely recognised novice home blending botches:
Careless cleaning and sanitation:
Most homebrewers have heard that cleaning and sanitation are among the most imperative parts of homebrewing, yet it's difficult to know precisely what to do when you've never blended. Wipe down each surface with a clammy material. Scour with a non-rough brush if necessary. Check all the niches and crevices (particularly packaging nozzles!). Purify utilizing Star San or Iodophor following the maker's details. After the bubble, circulate air through, pitch yeast, and don't allow anything to contact the brew that isn’t sanitized.
Including 5 oz. of priming sugar:
Most homebrew formula packs accompany five ounces of priming sugar and they teach the brewer to blend everything on packaging day. You will find from a couple of containers that something isn't right. Get an advanced scale and read how to maintain a strategic distance from over-carbonating your homebrew.
Blending without temperature control:
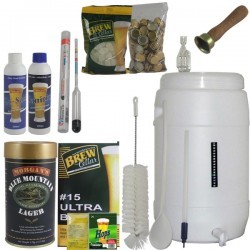
Try not to undercut yourself and attempt to blend an ale as a beer. Notwithstanding when you are blending lagers, focus on fermenting temperature and attempt to keep it inside the prescribed range for the yeast strain you're utilizing. Your lager will be colossally better for it. Read Controlling Homebrew Fermentation Temperatures for extra advice. You can also purchase a home brewery kit.
Underpitching yeast:
Many individuals will disclose to you that fluid yeast is the approach since it offers more choices and better flavor. This might be valid now and again, however, you will never need to pitch only one pack of fluid yeast into your homebrew. This is on the grounds that lager requires a specific number of yeast cells for a sound aging, and a fluid yeast culture cannot help much. On the off chance that you want to use fluid yeast, set up a yeast starter the previous day. On the other hand, an 11.5-gram pack of dry yeast contains enough cells to mature a standard five-gallon group.
If you are home brewing, do consider the above-mentioned tips and avoid the mistakes. However, it is better to purchase Home brewery kit as it is more reliable and result-oriented!
Visit us at Onestopbarshop today to avail the best offers.
0 notes
Text
5 tips to brew beer at home:
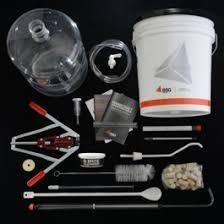
Planning to set a home brewery? Here are a few things to be considered:
Utilize High Quality, Fresh Ingredients – Fresh ingredients improve home brew. On the off chance that you began with dry yeast, move to fluid yeast. If you want to be a concentrate brewer, look out for fresh concentrate as opposed to the old ones. Let your fluid yeast be stored in the icebox, hops in the cooler, and your grains in a dry place.
Keep It Sterile –
Once the beer begins cooling, anything that would touch your beer must be sterilized. There are high chances of contaminations and the yeast might be affected. This, in turn, is sure to affect the quality of the beer.
Cool your Wort a little quick-
If you cool your craft beer rapidly it will expand the aftermath of tannins and proteins which aren’t good for your brew. Thus cooling will likewise diminish the possibility of contamination. A submersion wort chiller is cost-effective that will enhance the lucidity and nature of your brew. Cooling is especially critical for full cluster bubbles.
Bubble for 1-1.5 hours - Boiling your wort plays out a few critical role. It cleans your wort, vaporizes numerous bothersome mixes, discharges bittering oils from the jumps and coagulates proteins and tannins from the grains so they can drop out amid cooling. To accomplish these respectable objectives you have to bubble for no less than an hour, and for lighter styles of lagers a more drawn out bubble of an hour and a half is alluring.
Control Fermentation Temperature –
Many of the brewers have devoted aging fridges, still, there are basic techniques that you can use to maintain the temperature of the beer. All you can do is pick a cool and dry space at your place and wrap the fermentor in wet towels. Now place a fan right in front of the wet towel.
You can also approach the professionals to help you out with the right equipment and process to set a perfect home brewery. Visit one stop bar shop for more details.
0 notes