
micamaconceptart
Concept Art MA
Mica Rowson's Masters Blog!
20 posts
Don't wanna be here? Send us removal request.
Last Seen Blogs
riotkayla
Understaments
astrolavas
brainrot center

cuckboy2003
Cuckboy

dokidobe
yellow.dr.monv

19610402
題名未設定
Text
Concept Art:
Development Project 2: Light and Shadow
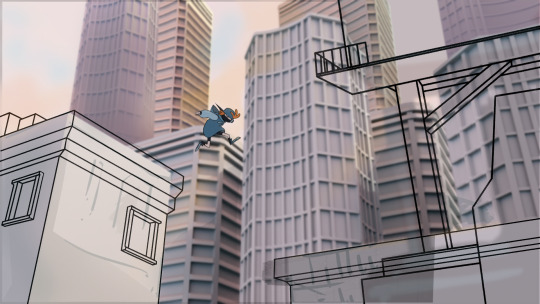
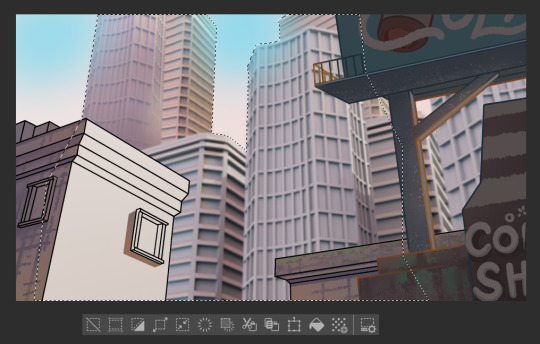
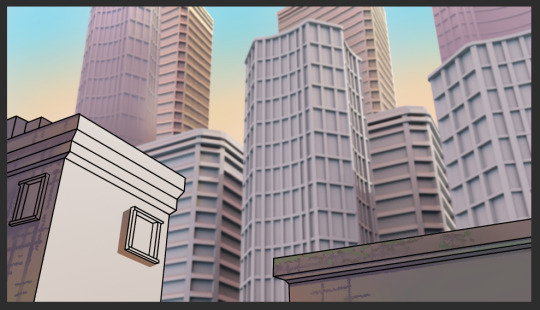
Regarding feedback on my 3D environment design, my tutor helped me revision the presentation of my environment, by providing methods of how to further push clarity of the focal point in my scene. One way is to further play around with values and add further depth and elements to compliment my foregrounds.
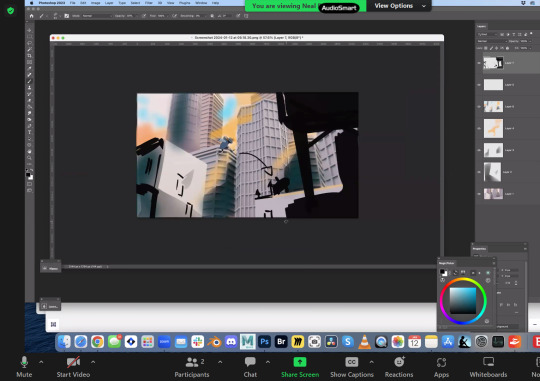
This technique is called positive and negative space, where it can engage viewers in guiding their eyes to certain elements of the environment, allowing them to clearly find out what is the main focus of the drawing. My tutor also suggested to further bring out the lighting of my 3D environment, by adding more saturation to the atmospheric lighting of the scene, as well as make a glowing 'blur' around certain subjects. Bret Knoll of BaM Animation gave viewers advice on this method revealed as light blooming, where artists paint glows of any chosen colours around and object within a lightening layer mode.
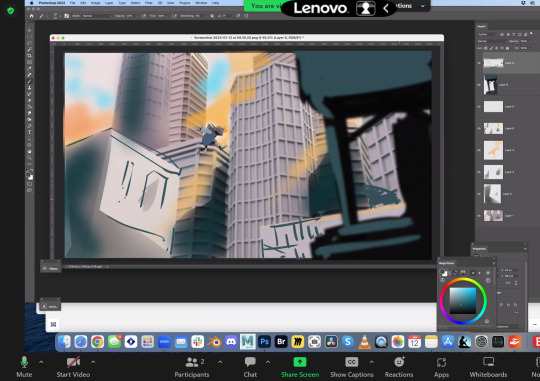
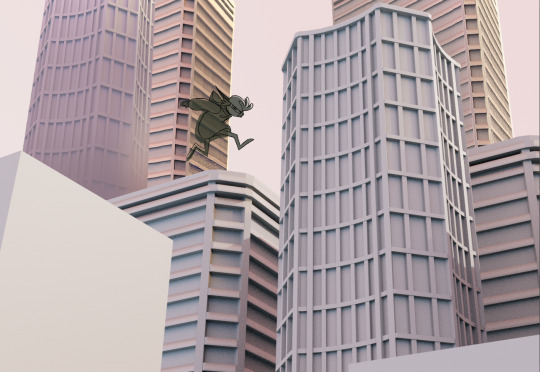
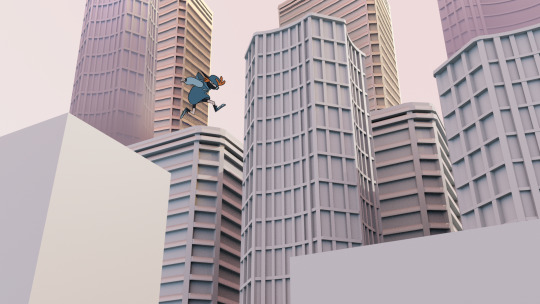
Following the feedback I received from my tutor, I went ahead and took his quick composition to recreate it in my work. I referenced a guide of a 3D blockout method that was also provided by a tutor of mine; Jordan Grimmer created a quick 3D blockout render from blender and pasted it ontop of a 2D sketched composition to help better the greyscaling of his environment, as well as find out how the lighting in his scene works like.
youtube
With Grimmer's video and my tutor's advice, I was able to produce a successful piece in terms of improving my composition and rendering abilities. Below are the stages from 3D blocking to finish.
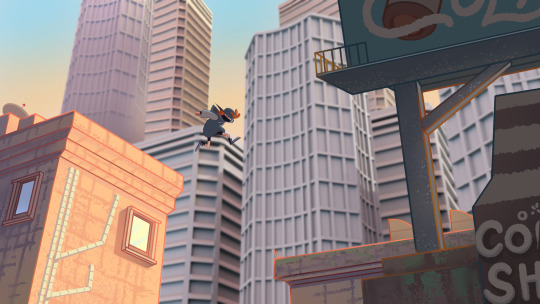
Overall, I was very happy with the results. Had I not been pushed to improve on this piece of work, I would have missed out greatly from the opportunity to better my rendering skills as an artist, as well as failed to bring my work to fruition in combining 2D and 3D together through this concept.
Sources:
BaM Animation (2023) Painting Backgrounds for TV Animation! Photoshop. 14 June 2023. Available at: https://www.youtube.com/watch?v=MKtcsF5IUF0 (Accessed: 17 January 2024).
Jordan Grimmer (2019) Using a 3D Blockout for Concept Art: Process. 21 November 2019. Available at: https://www.youtube.com/watch?v=lpzHFORgDiQ (Accessed: 17 January 2024).
0 notes
Text
Concept Art:
Development Project 2: Light and Shadow
At this point in time, I am now at the stage where I focus on the environment design of Light and Shadow, as well as how to integrate both my character and the 3D city world together.
youtube
Yone Santana posted a video exploring the different ways of lighting up an environment to create an 'exterior' lighting through Maya's Arnold feature, which allows users a whole variety of different controls of lighting their stage up; I could manipulate the exposure of my light, the intensity as well as the choice of, and amount of, colours I want in my lights. This feature was available to me through adding a sky dome or physical skylight.

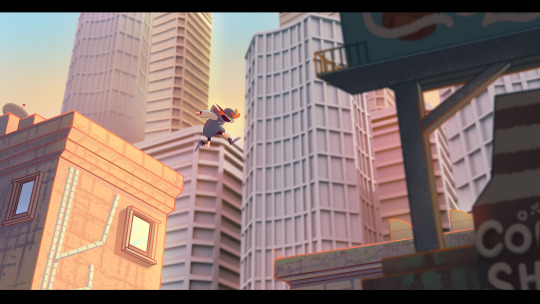
In regards to the main purpose of the project's 'light and shadow' theme, I also added in a strong directional light to mimick a 'daylight' hour in my setting, then rotated it to make it appear as the foreground is exposed to the intense lighting compared to the background buildings, which are instead hit by the 'sunlight' from behind.

This distinction of shading between the foreground and background was me applying what I learnt from BaM animation's video of significance in values of environment, which visual development artists Allison Perry discussed how certain shades of value can set up a stage for the main focal point of the environment - in this case being the two basic cubes in front of the camera.

Yone Santana also showed how users can create further advanced sky dome light through its gradient feature, were one can choose and control what colours can represent the shade in an environment as well as the light. I had a colour palette in mind to compliment the relationship of the city foregrounds and backgrounds, as well as what I envisioned my cityscape character to resemble; the chosen colours were orange and blue.

Maximus Pauson of BaM Animation explains how colours can indicate the mood of a scene; certain colours signify warnings to viewers, such as red and orange evoking a sense of danger. Darker colours like blue can appear mysterious, but depending on the saturation, the shade can be unwelcoming, thus making an environment appear "harsh and unforgiving". Generally, most environments use a palette of specific colours that would 'harmonise' with each other, such as triadic, analogous and complementary colours - orange and blue are such examples of complementary colours.


Granted, it is a subtle palette of oranges and blues within this Arnold lighting, though I would have decided to saturate these colours in a 2D software during its editing anyways. Prior to the past blogpost, I also implemented dynamic silhouette over my 3D piece to plan out how Kenz would be travelling on the foregrounds of this composition.
To compliment and symbolise the environment's colours of orange and blue hues, I also applied them to Kenz's colour scheme, which seems to suit him a lot and make him feel more belonging in this place, despite the obvious difference of 2D and 3D fields.
The lighter, orange tones could create a fast-paced, dangerous environment for my cityscape, whereas the blues of greyish tones can further indicate how urban life can seem uninhabitable. However, my character is able to adapt in the city, as I imagine him as a quick and wary individual. This is why I have decided to choose these two colours for both my environment and character design.
In my next and final blogpost, I will find a way to properly mix these two fields together and present a strong piece that overall offers a unique approach of style in visual development.
Sources:
BaM Animation (2023) Painting Backgrounds for TV Animation! Photoshop. 14 June 2023. Available at: https://www.youtube.com/watch?v=MKtcsF5IUF0 (Accessed: 17 January 2024).
yone santana (2016) Maya 2017 - Exterior Lighting in Arnold. 30 November 2016. Available at: https://www.youtube.com/watch?v=K3QNbkyEe4I (Accessed: 17 January 2024).
0 notes
Text
Concept Art:
Development Project 2: Light and Shadow

For my next chosen practice of development, I went forward with my 'Light and Shadow' concept, as it was the most developed project out of all the ones I had tried out. The visual development potential that already consisted of character and environment designs was too good to pass up.
During my personal tutorials, my tutor played a significant part in helping me shape my project to become a stronger concept. He suggested that I should evaluate my character design in terms of how he would 'carry' himself - to further bring the active, agile traits out of him. This could be done by improving the line of action and eye flow of his movements and gestures.
youtube
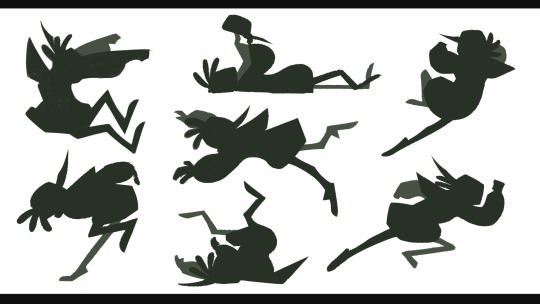
As part of his suggestion, I looked at a short parkour video of men running from one underground stop to another. What I initially thought was simply running was completely different to what I expected; platform jumping, climbing, long landings, and even shortcutting by sliding down an underground pole in means to get to the end. The amount of effort that goes into parkour makes the hobby extremely difficult, and so intense as a result - this was what I was meant to communicate through Kenz's design; a risk-taking kid in a hurry and constantly pushed to the limit by the city around him.

With this, I took a couple shots from the video and directly studied them on a separate canvas. I drew short sketches of these poses, lasting no longer than two minutes each. I blocked in prominent shapes in each of these poses, making them simple and easy for me to digest.

Later on, I applied these parkour gestures to Kenz's design, implementing the same hastiness and big energy as found in the study sketches. This seems to work, as I was able to draw Kenz in more dynamic poses. The simplicity of the silhouette also helped in improving his shape language further, with triangular and circular shapes capturing his youthful and chaotic energy.
With my character design sorted out, I'm able to move onto the environment aspect of this chosen project and focus on rendering it to prepare for my composition!
Source:
STORROR (2018) Race the Tube - London Parkour POV. 8 October 2018. Available at: https://www.youtube.com/watch?v=tXMPRK2LQAE (Accessed: 17 January 2024).
0 notes
Text
Concept Art:
Development Project 1: Creating Concepts
In this blogpost, I will showcase the smaller task of this project, which I think is the more successful one of the two. I will be briefly exploring my thought process behind my choice in prop design, as well as a conclusive thought on what I ended up achieving with this.

Using the environment perspective as template for my props, the designs would have to appear as they would exist within this ruins environment; lots of green, moss and plants would be involved. I took the full opportunity of going wild with my plant brushes in Clip Studio Paint (CSP) and decorated my props with them.

The colours I chose are a subtle variety of greens to complement the overall environment of the ruins hall; the cool and neutral tones indicate that the place is resting and a safe haven for travellers who pass by. After making one set of the ruins' props, I moved onto a more character-based prop design of this environment, which are the knight statues shown from my storyboard panels:

The cultural and historical aspects surrounding the designs of the knight statues are kept as a superficial amalgamation of sorts - for the purpose of keeping this concept as a fantasy piece rather than a realistic one. Therefore, some historical items of knights here involving helmet and armour design are used more so for the shaping of their silhouettes.
One critique made by my tutor suggests a more professional approach in presenting my ideas of design, which is to label and show reference of images to viewers in helping them understand the context behind my work.
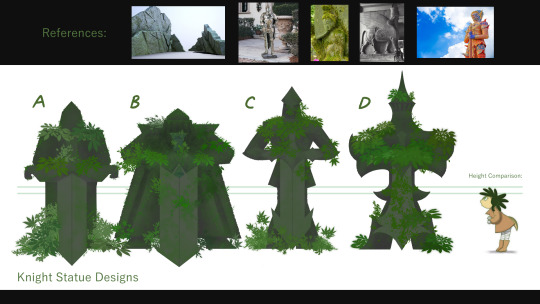
Subjects that inspired my concept of knight statues and their mossy depiction stems from sources such the Mesopotamian being Lamassu, mossy statues found in the Zen gardens of Japan, and even my previously explored source of the Yak giants of Thailand.
0 notes
Text
Concept Art:
Development Project 1: Creating Concepts
As we reach at the last stage of assignments in semester A, I had to pick two of any past practices I started on.
I pondered a lot on what strengths I've shown through my works so far, as well as what weak points I feel like I should work on. For me, my problem lies in my lack of balance between time management and ambition; I think of a massive project, only to realise to little to late that I do not have the time to execute it.
However, I still wish to see my ideas come to fruition - some ideas should be scrapped, but there could be a few concepts undeserving of such treatment, as they still have potential.
With my tutor, I have been able to plan ahead on what I should prioritise in a work as big as my initial concept idea: I am treating this project as a half prop, half environment design, which I can showcase two different 'perspectives' of the same idea instead of solely relying on a single image.
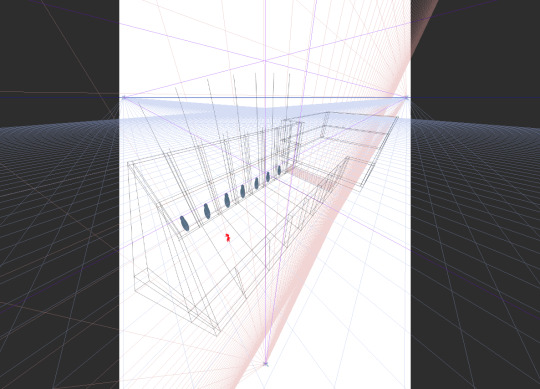
The first development of this concept is to pick off where I left it; I previously created a perspective grid of my lined environment, which I stated prior that I would continue with it if I had picked this concept for one of my developed assignments. Originally, I compared the environment's arrangement to that of a isometric environment design, but I had been misinformed, as my tutor points out that this layout resembles more of a fish lens perspective than a usual two-lined perspective isometric design.

I decided to take advantage of this and fully utilise my brushes and transform tool to create a layout design with different textures - for the walls, ground and even the invasive moss that I planned to make as a prominent feature in this ruins.

Due to the tight schedule of juggling between different concepts within this last assignment, I thought it would be best to leave out the development of the 'next' room, and instead make it so it is a transparent feature connected to the room of focus. Besides, it is an outdated idea, as I had already explored what was within this ruins concept through my storyboarding project.
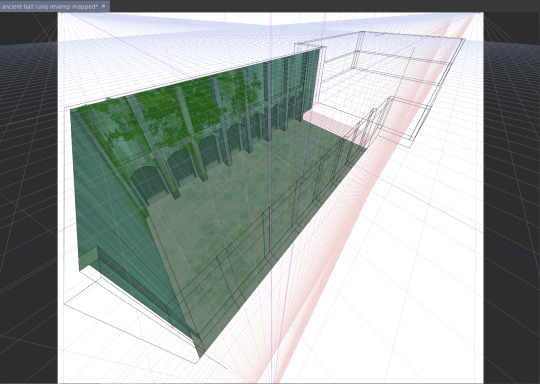
The software I used for this stage throughout its lining and colouring is Clip Studio Paint (CSP), which helped tremendously with the providing me the perspective of this layout through its perspective ruler feature; each art stroke I make snaps and aligns along the perspective lines marked by CSP, though I myself can manipulate and arrange the perspective grid and points if I need to!

To finish the rest of the colouring off for this room, I disabled some layers involving moss. However, they are still very much there and if I have time, I may further add more moss and plant detail to the environment.
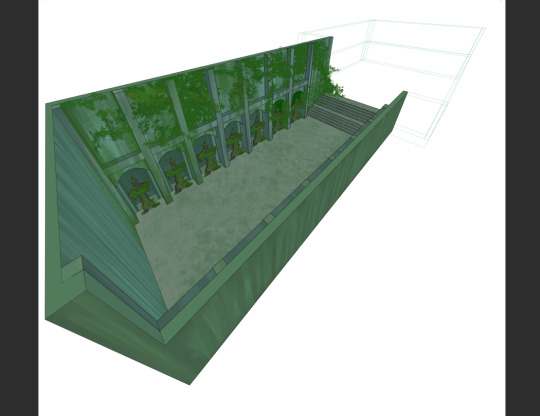
Now that I have managed an attempt at the first phase of my ruins project, I will look into it prop designs, which can offer more insight to the aesthetic of this ruins, as well as generally help me get my concept ideas across further to viewers who look at my work.
0 notes
Text
Creating Concepts:
Practice 6: Concept and Storyboards
When I was about to begin my storyboarding, my tutor gave me advice to try out Miro, a free presentation app where people can share their ideas and brainstorming to multiple parties; storyboarding is one of the aspects that can be drawn and discussed among others in a team or industry. I ended up giving Miro a try and found out how versatile of an app it is; storyboards could range from simple, plain sketches to detailed thumbnails of art.
With this, I went ahead and tried to visualise how my written story could be shown. While keeping storyboard panels simple is an effective and usual tendency, I did want to utilise as many tools as I could that was provided to me by Miro. In addition, the main focus in my narrative concerned the environment and the journey of my character within said environment, so I did end up going overboard with the details of what I envisioned the ruins concept to appear like.
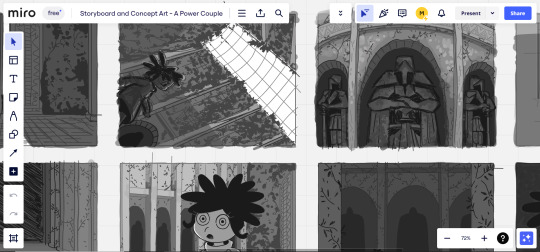
As result, the amount of panels I managed to complete only covered a fraction of the story I wrote within the previous post. While the speed of my drawing could be improved, I did not necessarily think it was a bad idea to at least develop the setting through storyboarding, as it offered a lot of clarity in what could be portrayed, whether through storyboarding or a full-fledged piece of art.
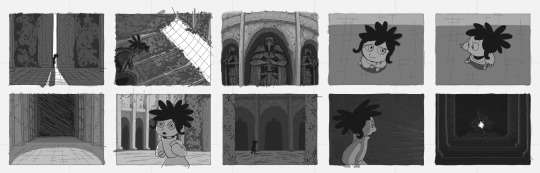
Nonetheless, I failed to treat this practice as a proper storyboarding experience and instead managed to turn it into a thumbnailing of compositions, of which does somewhat correspond to storyboards, though the skills required in both differ from each other - one of such differences involves time efficiency. Overall, this was more of a failed practice compared to my other concepts, but it is apparent that I am gradually improving on my skills of greyscaling.
0 notes
Text
Creating Concepts:
Practice 6: Concepts and Storyboards
For my next project, I was heavily focused on exploring the narrative aspects of visual development, though did not want to be bold as to create an entirely new ambitious idea. Instead, I decided to take the opportunity to go back and delve into my first initial concepts of the semester. Time again, the ancient ruins had been a subject in my mind to further develop. While we are not in the development assignment phase yet, I wanted to try adding some world-building to my ruins concept by producing a storyboard for it. I used the Google Docs app, where I could freely write my story:

Firstly, I wanted to screen write my narrative for the ruins in question. This was a technique taught to me during my undergraduate years of animation; we produced a screen written text before figuring out how to visualise it.
While I was still a bit rusty with my story writing, the narrative details and beat board was not the most important factor in this phase, but rather the introduction of characterisation featuring both my protagonist and her environment was a significant step forward in illustrating the narrative's setting.
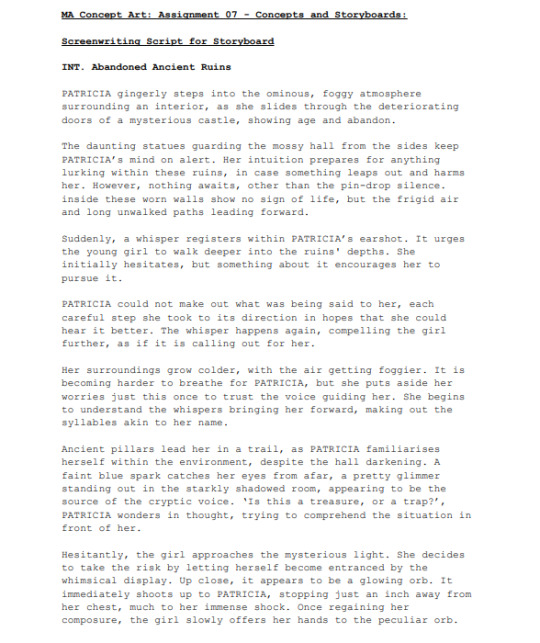

Perhaps I could have removed some of the miniscule details featured within the papers to present a cleaner, concise pair of screen writing sheets. I will be showing my visualisation of this narrative work within the next blogpost!
0 notes
Text
Creating Concepts:
Practice 5: A Little Bit of 3D
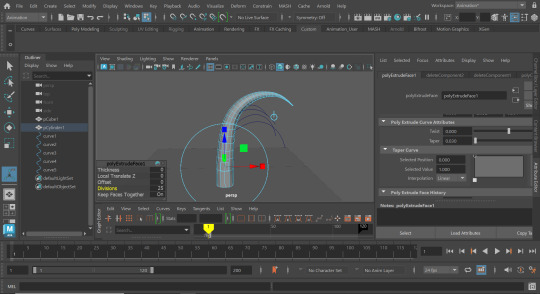
After completing what I felt like was more than enough branches needed, I made an attempt to practise UV unwrapping with my newly modelled tree.
There is a lot that I could say bout the design of the tree, mostly negative; the trunk is too stiff for a tree and the branches look unnatural, lacking any resemblance to a longan tree. However, I have to remind myself that I was still relatively new to the aspect of UV unwrapping and mapping - with the first complicated 3D object to sort out.

Once again, I used TrimitKala's video guide to help me with my 3D project - this time, with unwrapping a model object. The artist covers the technical functions of tabs such as UV editor, as well as crucial tools used in obtaining the best results for a clean UV model.
youtube
I opened up UV editor and selected the tree object to prepare a planar mapping. I then went ahead to the UV tab to select the '3D cut and sew UV tool'; this what TrimitKala used to separate the 'skins' of the branches off of the stem skin, forming smaller UVs to unwrap and map for later purposes. Afterwards, I created an open border throughout the tree trunk from top to bottom to create a seam in its UV, then I tried to unfold the tree trunk's UV along with the seam. This technique is applied to the rest of the UVs of the branches and sub branches of the tree.

Using the 3D cut tool, I had made multiple attempts to even out the stretchmarks of the checker boxes throughout the UVs of the tree, as well as creating more open edges in difficult UV parts but to no avail - this is something I will have to get used to fixing, if I decide to further integrate myself into a 3D workspace.
Despite my failure in UV unwrapping, I still learnt more about aspects in 3D that I would have never found out had I not properly tried to 3D model. I have heard that UVs are some of the most challenging elements within a 3D process, which I could understand the difficulty of perfecting it or even simplifying it. Nonetheless, my knowledge has grown more from this experience and I'm appreciative of it.
Source:
TrimitKala (2020) 3. Unwrapping the Scene in Maya | Tutorial 3 | Making 3D Scene Step by Step. 17 May 2020. Available at: https://www.youtube.com/watch?v=tXYR2oqeYmI (Accessed: 17 January 2024).
0 notes
Text
Creating Concepts:
Practice 5: A little bit of 3D
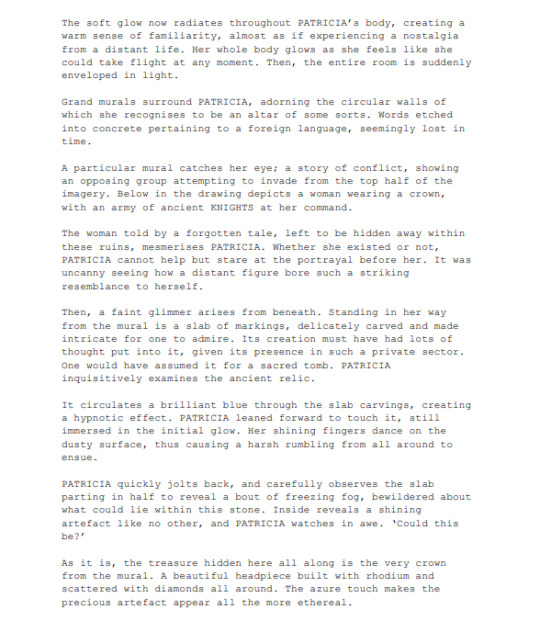
In this continued post of my 3D project, I further experimented with the branches of my tree model. The most interesting part I learnt from this process of modelmaking was the ability to create width of the tree branches, which I produced from selecting the top faces of the cylinder and EP curve together and extruded them all. Then, I smoothened out the width of the extrusion by increasing the subdivisions to the max.
To narrow the ends of my 'branches', I went ahead to the input node of the extrude features and decreased the 'taper' of its properties to 0.03 to 0.1, depending on the overall size of the EP curve.

Since the EP curves weren't connect together automatically, I manually did so by adding extra edge loops around the area to prepare the connection between the stem and branch. I then selected four faces for where the curve branch could connect to and then circularised it through the edit mesh tab. The same thing involving the stem is repeated for the rest of the main branches, where I selected the same four faces and branch curve to extrude once more. This process continues on with the smaller branches as well.
To make the tree branches appear more natural, I began to start smoothing the connection of the branches and stem by adding even more edge loops, allowing me to adjust the poly shape connecting the branch either by the move tool or edge slider tool.
As I learnt to adapt to the tools provided to me, the more confident I grew in altering the positions and shape of my tree. I will post further progress in my next blog submission regarding the outcome of my 3D modelling, and how I manage to get on with UV unwrapping.
0 notes
Text
Creating Concepts
Project 5: A Little Bit of 3D
For this next project, I wanted to make it a bit easier for me to adjust to 3D workspace. Given that I had already started on a rather big project involving 3D work, I decided to start anew and create a prop idea for something that is both simple yet challenging for me; I 3D modelled a tree that I remember fondly from Thailand.

I based this idea off a memory I had back with my sister and cousins. My cousins would always grab some longan fruit (ลําใย) in the forest for their parents, which at one point my sister and I joined them in fruit-picking. Longan fruit is a common fruit that grows in my village, but is treated as a delicacy. Provided by lush trees and generous branches of these, longan fruits make an overall satisfying snack.
youtube
To help me 3D model my tree, I used a video guide provided by TrimitKala. Using the EP curve tool from the 'create' tab of Maya, I directed and manipulated the look of the tree's branches' in both front and perspective views - with the move tool provided in the side bar. After creating the main 'bark' of the tree, I added smaller tree branches along the way.

In the next post, I will further explore how I ended up making the full 'skeleton' of my 3D tree with the extension of EP curves, as well as how I fleshed them all out to create a convincing tree model!
Source:
TrimitKala (2020) 2. Tree | Modeling a Tree & Stones in Maya | Tutorial 2 | Making 3D Scene Step by Step. 12 May 2020. Available at: https://www.youtube.com/watch?v=2pmKU_fl2uQ (Accessed: 17 January 2024).
0 notes
Text
Creating Concepts:
Practice 4: Light and Shadow
Regarding my plans to implement 3D within this project, I wanted to prioritise the foreground elements, such as my character, to remain 2D - leaving the background of my city environment to be 3D modelled. This is directly influenced from my motivation to become a digital artist in the first place. I grew up with mixed-media products like Cartoon Network City and Gorillaz, which offered a unique perspective to animation as well as art in general; the two fields don't necessarily mix together, but rather co-exist and so bring out the best in each other.

The level of experimentation within this style of animation also seemed very fun to draw in, which is another reason why I wish to explore hybrid 2D / 3D art!

While Gorillaz is not inherently 2D / 3D, the mesh of cartoon and reality was a truly otherworldly experience for my generation during their time on MTV, thus playing an integral part in my aspiration to become an artist.
In relation to 3D modelling, I have had some experience with Autodesk Maya, though I had never modelled an urban building before. So, I referenced from a time-lapse video of YouTube channel DSZarts creating an urban building in Maya. He added details such as columns and railings all around his model to add depth to his building, which is what I wanted to add to my own buildings.
youtube
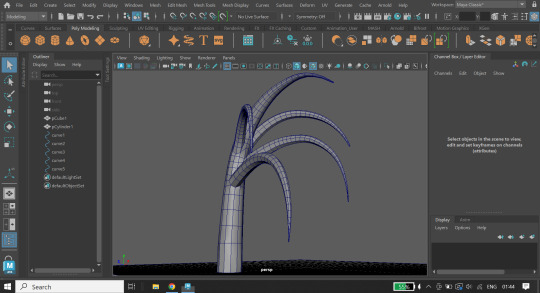
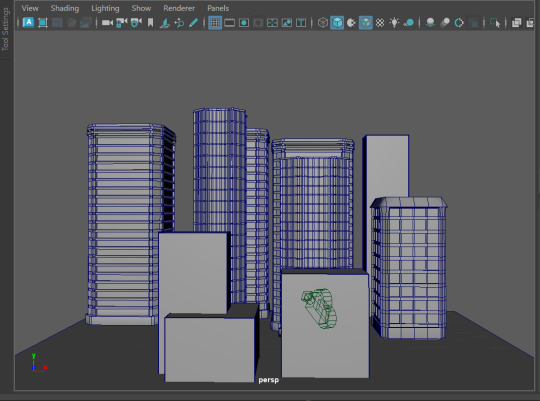
Then I went ahead to produce some of my own. I started off with testing out DSZarts' technique on a 3D cube in Maya, then scaled it to create a tower. I then went ahead to bevel and extrude the faces of the cube to add the 'column' depth that urban buildings typically have in real life, as demonstrated in the YouTuber's video.

The challenging aspect of this 3D model was to create the illusion of the windows for the building, which I have to make multiple pillar shapes to vertically align across a side of the cube, then to duplicate a group of it onto the rest of the sides. The 'railings' I included all down the building was from the edge-cutting multiplier tool. This was to further illustrate the height of the modelled cube in making it seem elevated with multiple floors.
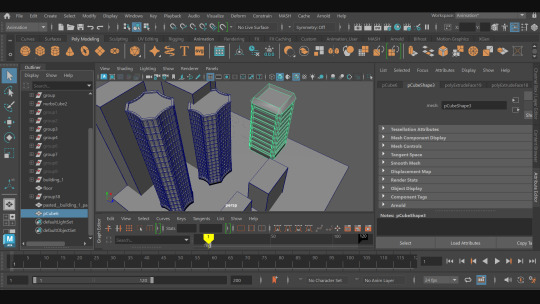
Once I finished creating my first building model, I went ahead to duplicate it a few times and planted them onto placeholder cubes I quickly prepared for my camera shot. I also went ahead and added more 'variety' to my city environment, by making new building models and trying out new methods of designing them, such as the screenshot above showing a building that I bevelled the roof of.

To see if my 3D composition arrangement would be successful, I created a camera view in Maya and angled it upwards towards the two 'foreground' 3D cubes - as platforms for my character to run and jump on. I made a attempt of following the rule of thirds, as well as avoiding a flat image by creating a dynamic shot in 3D.
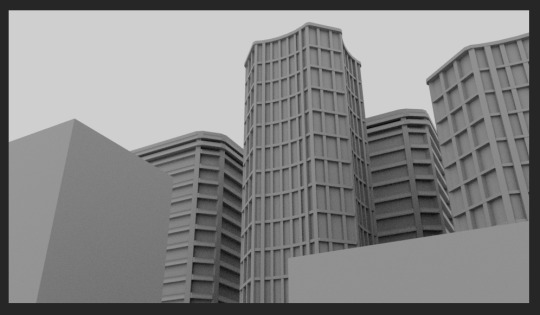
This was from the renderview tab of my camera view in Maya, which I feel had turned out successful. If I carry on with this project within my development assignment, I will perhaps go on to create a fully rendered hybrid art of 2D and 3D with this composition, or at least produce an example of my vision of both fields in an art piece.
Sources:
Cartoon Network City (2004) Cartoon Network, 14 June.
DSZarts (2019) 3D Building Modeling - Maya 2019 & Mash. 6 September 2019. Available at: https://www.youtube.com/watch?v=AEPjRN9eS-c (Accessed: 17 January 2024).
Gorillaz (2024) Gorillaz. Available at: https://www.gorillaz.com/ (Accessed: 17 January 2024).
0 notes
Text
Creating Concepts:
Project 4: Light and Shadow
After briefly exploring the character design I wanted to include in this project, I swapped to focusing on the environment design for this concept. This task was challenging for me, as I was stumped as to where I should start planning my 3D background. So, I looked into a few artist channels on YouTube and came across some useful tips in creating an effective and strong background for art.
Nach Rubel posted a tutorial about composition, explaining how he creates complex pieces by deconstructing his work into priorities followed through in a simple order; he advises to start the design with big shapes, while focusing on values - the mid ground tone comes first. Rubel explains he uses references and key themes (desert, ruins, etc.) to produce unique designs for his compositions.
youtube
Rubel states that for a composition to come together, the relationship between the main shapes in the environment needs to firstly be established. Methods like rule of thirds can be used to create an easy flow for the viewer's eyes towards a focal point in a composition.
Additionally, BAM animation, a channel dedicated to teaching viewers about the industry standards of animation, also explains the significance of values determining information within environment design. Visual development artist and guest of BAM animation video Allison Perry advised to prioritise values over hue for the purpose of clarity within a composition; greyscaling can fix any wrong choice of colour, as well as help establish a focal point onto an important object within an environment.
youtube
Brent Noll of BAM animation also explains the method of 'atmospheric perspective', which is an artistic illusion from our perception of objects appearing 'faded' from far away, due to natural dust and moisture 'obscuring' its image. Noll explains that its useful for separating objects within a background to focus a viewer's attention to whatever is important. In typical compositions, these atmospheric objects lack detail and saturation to help connect the environment as a 'framing device'; this corresponds to Rubel's method in leaving out focus of objects that are further away from the view of his environment.
Overall, this is the main safe advice that all artists use regarding environment. Any details from far away or aside from a focal point is left out, to ensure the viewer reads information of the composition better and know exactly what the focal point is within the piece.
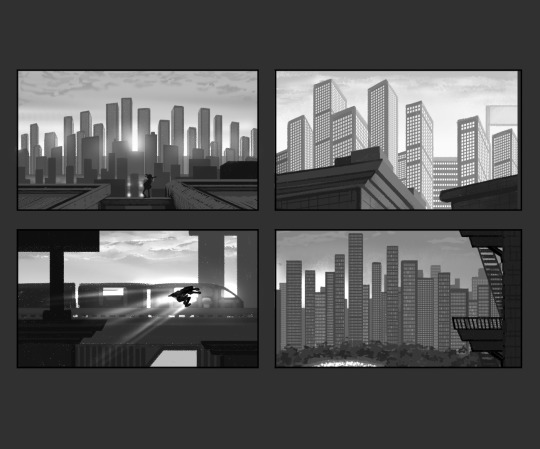
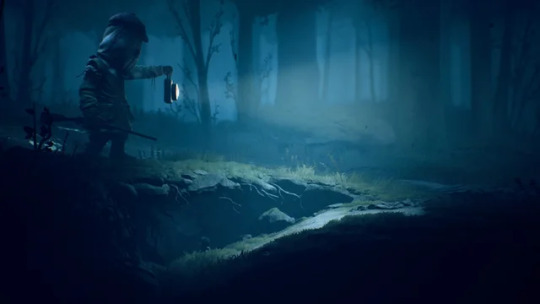
With these artists' methods and the mood boards I provided for myself beforehand, I went ahead and produced some thumbnail work to experiment with my environment piece, including spacing and values. I took reference from the Spider-Man (2018-2023) films in adding specks of light within the building blocks, as well as the gradient values between the sky and city. I applied the spacing of buildings I studied from the environment of Mirror's Edge (2008), and decided to add a few details showing the aging of my city as seen from Stray (2022). This practice was to help me improve my skills in shading, as I mostly struggled with my values in previous works.
Since I only had a week to explore this, I ended up picking the most simple but readable composition among the four; granted it was not so refined, but I was able to alter that when I refined the angle through modelling in Maya.
Sources:
BaM Animation (2023) Painting Backgrounds for TV Animation! Photoshop. 14 June 2023. Available at: https://www.youtube.com/watch?v=MKtcsF5IUF0 (Accessed: 17 January 2024).
BlueTwelve Studio (2022) Stray [Video game]. Publisher OR Available at: https://store.steampowered.com/app/1332010/Stray/ (Accessed: 17 January 2024).
DICE (2008) Mirror's Edge [Video game]. Available at: https://store.steampowered.com/app/17410/Mirrors_Edge/ (Accessed: 17 January 2024).
Nach Rubel (2020) Easy way to create a thumbnail for concept art. 28 December 2020. Available at: https://www.youtube.com/watch?v=REyYFLSxqTE (Accessed: 17 January 2024).
Spider-Man: Across the Spider-Verse (2023) Directed by J. Dos Santos [Feature film]. Culver City, LA: Sony Pictures Releasing.
Spider-Man: Into the Spider-Verse (2018) Directed by J. Dos Santos [Feature film]. Culver City, LA: Sony Pictures Releasing.
1 note
·
View note
Text
Creating Concepts:
Project 4: Light and Shadow
After experimenting with characterisation of concepts from my last assignment, I was tasked to focus on a more environment-based project. I thought about various settings that could best bring lighting and shading out - space, underwater, woodlands, and so on. Eventually, the one setting I have ended up going with is cityscapes.
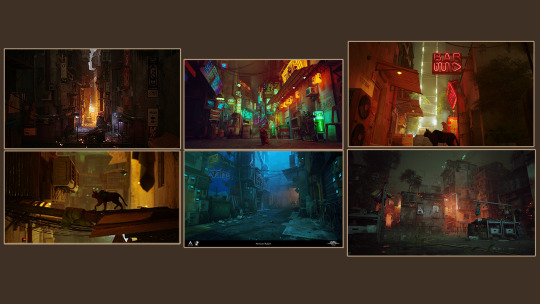
Other than its characters, Stray (2022) displayed beautiful depictions of its undercity, adorned with rich neon light all throughout the gameplay. I thought that for this specific topic, portraying a city to contrast light and shadow would really bring out values in my works - and even colour! The opportunities to cast light through various skyscrapers and other city features sound like an overall fun idea to explore rendering with.
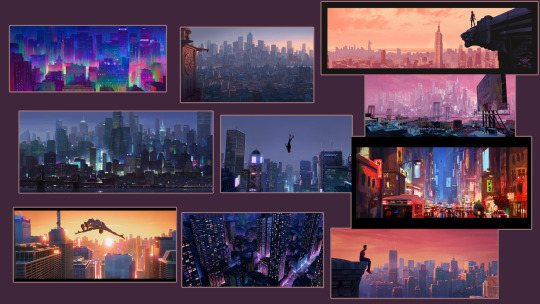
To make the most of this idea, I planned to create a city template of 3D modelled buildings in Autodesk Maya software, so I can produce a dynamic camera shot as my composition for this concept. Aside from Stray, I have also looked at the films Spider-Man: Into the Spider-Verse (2018) and Spider-Man: Across the Spider-Verse (2023); both films illustrate beautiful compositions of New York City, with its unique asymmetry and play in positive and negative spacing.
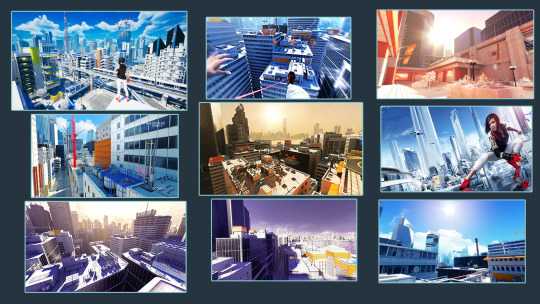
Part of Spider-Man unlocked a memory for me regarding a particular game that concerned parkour; it was relatively city-based, but the overall environment of Mirror's Edge (2008) was futuristic and dystopian. Its settings were cluttered with various parkour elements, featuring many buildings with various heights and proximity. This got me thinking: maybe I can also implement a parkour feel to my modelled cityscape. With this, I was able to bring an old character design of mine from years back into this project.

(*Future note: This is a refined version of arrangement - the initial sketch here has been retained. The original file has been redlined by my tutor in the later posts.)
I feel like my character 'Kenz' would be able to push this concept further in providing more of a dynamic in my works. So, I will be treating this project as a composition study which involves elements of both character and environment, as well as 2D and 3D! More to come in my next post, featuring a process of my 3D modelmaking.
Sources:
BlueTwelve Studio (2022) Stray [Video game]. Publisher OR Available at: https://store.steampowered.com/app/1332010/Stray/ (Accessed: 17 January 2024).
DICE (2008) Mirror's Edge [Video game]. Available at: https://store.steampowered.com/app/17410/Mirrors_Edge/ (Accessed: 17 January 2024).
Spider-Man: Across the Spider-Verse (2023) Directed by J. Dos Santos [Feature film]. Culver City, LA: Sony Pictures Releasing.
Spider-Man: Into the Spider-Verse (2018) Directed by J. Dos Santos [Feature film]. Culver City, LA: Sony Pictures Releasing.
0 notes
Text
Creating Concepts:
Project 3: Nostalgia and Memory
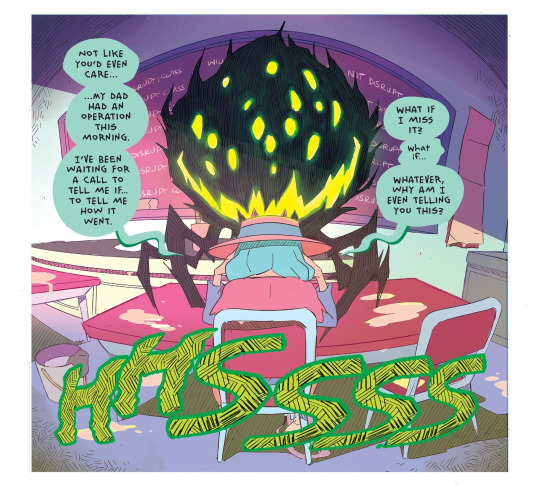
While I was designing my evil little geckos, I was wondering how else I could make them more terrifying. I suddenly had the recollection of playing Zelda: Breath of the Wild (2017), which I quickly grew fond of and tried my best to finish it.
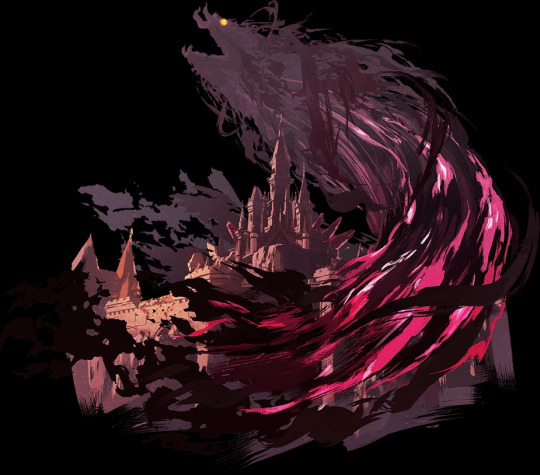
Breath of the Wild (BOTW) was an excellent game - from start to finish. The gameplay environment was beautiful and all the characters were likeable...Excluding Calamity Ganon.
Calamity Ganon had a design that sold for its purpose; it's revolting. The sheer mass of this antagonist completely dwarfs the grandest of architectures within BOTW, especially Hyrule castle. It oozes with dark, evil aura - a bleeding red. This was the perfect inspiration for my design.
The more I drew these tokay geckos, the more disturbing ideas I was able to come up with in accentuating their features further. Their ugly dots of red hue were what I started to imagine as eyes, as if the geckos were eager to watch your every move from the dark, peering and eager to get indoors at night.

This idea partly stems from the earlier inspiration, The Girl and the Glim (2022), as its glums have the ability to manifest into a massive feat, conjoined with all the smaller ones.

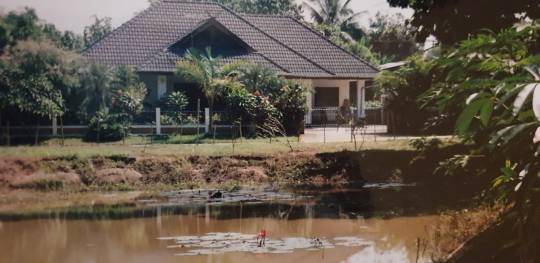
As stated prior, I also wanted to try out photo-bashing for a concept I had in mind. I wanted to take this giant, monstrous tokay gecko and illustrate it lurking from the exterior of my childhood house.
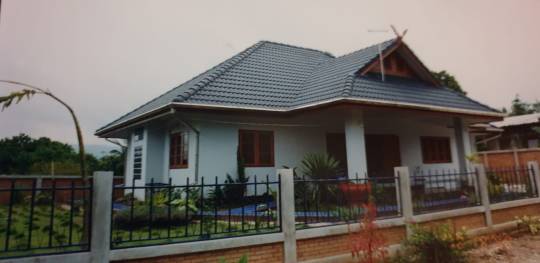
A picture here was taken while the house was still under construction. This was an idea I wanted to quickly explore, so while the 'drawing' of the building will not be from scratch, I still wanted to add more details and compositing to create a spooky illustration.
With this, I sought out more media to take note of. I came across a horror-action type of game: Little Nightmares II (2021), which features very beautiful compositions and focus on background colours. The long, stretched out environments of gameplay allows players to immerse in its scenes. Overall, the art of this game compliments the horror of its antagonists, thus perpetuating the scary elements of its gameplay throughout.
I did not wish to create an overly detailed art piece for this concept, so I decided to keep the adding of details simple. I only wanted to see how a composition in my vision would work out, and if it would be a coherent idea at all.
After altering the colours and tones of the original house photo, I was able to depict a night scenario. I also carefully measured the windows in the photo, so I could colour them in and make them more defined. Lastly, I added in the huge tokay gecko, leering on top of the roof!

This was where I decided to make a few adjustments, by adding in some extra details with colour dodge layers. In relation to colour theory, I also wanted to communicate more 'contrast' within the colour coding of this piece, so I made the overall environment blue to further clash with the tokay gecko's red.
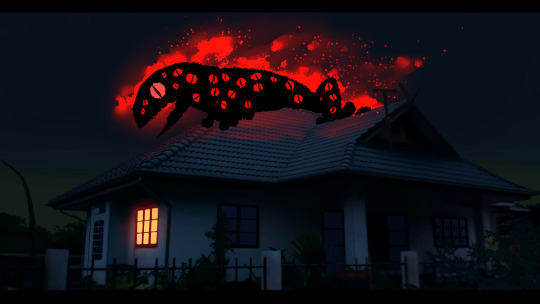
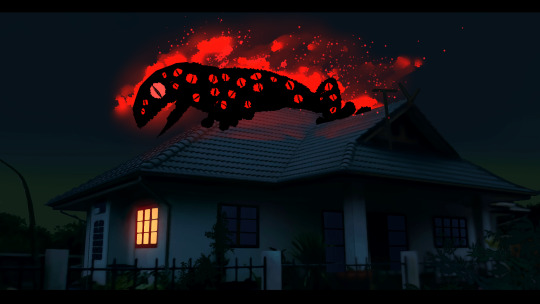
However, there was a slight mistake in adjusting the hue of the work. In order to fix the 'flatness' of the photo bashing and drawn in mess, I made an attempt to balance the main and highlighted colours to be more 'green'. This is so that the house will not drown in the colours of the sky's gradient, yet will also give an illusion of the tokay gecko's mass up on the roof.

This is a comparison between the 'blue' and 'green' hues of the house. I ended up merging the layers of the two, which resulted in this:
In conclusion to this project, I did not expect I would have fun drawing the subject that used to bring me so much stress. Exploring the ideas of geckos, while intentionally setting out to be negative, allowed me to embrace the strange traits found in these reptiles, as well as come to terms with the fact that I don't have to like them - all animals that roam this earth are different, coming from their own journeys of evolution.
Thus, this exercise has been a cathartic one, in which I'm now able to understand myself better and further grow from my experiences, both as a person and an artist.
Sources:
Nintendo (2017) The Legend of Zelda: Breath of the Wild [Video game]. Nintendo.
Swift, India. (2022) Instagram. Available at: https://www.instagram.com/doigswift/reel/Cey4FSCADOi/ (Accessed: 23 October 2023).
Tarsier Studios (2021) Little Nightmares II [Video game]. Available at: https://en.bandainamcoent.eu/little-nightmares/little-nightmares-ii (Accessed: 17 January 2024).
0 notes
Text

Creating Concepts:
Project 3: Nostalgia and Memory
For this stage in my project, I gathered up a few references of antagonists from recent media I consumed - the products below share common traits that I often associated with geckos; little creatures with monstrous forms.
I often viewed geckos as aliens, and basically parasites in our house - despite the fact they were more help than hindrance, eating up all the less wanted pests within. One type of antagonist that stood out to me was the zurks from Stray (2022), which are organisms evolved from man-made bacteria. They scavenge for and feast on both meat and metal, thus causing a lot of danger to the environment of gameplay in Stray. While its obvious that geckos are not like that, one similarity that they do share with zurks is that they tend to avoid light.
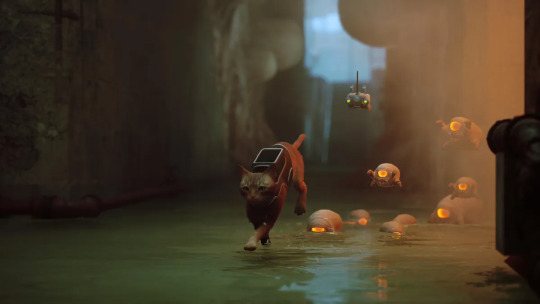
Hence, my earlier comment of associating geckos with the dark in the previous post. Additionally, zurks also share similar quantities and mass with tokay geckos, further compelling me to use these glowy-eyed critters as reference for my visualisation of geckos:
I wanted to communicate the discomfort I feel when seeing tokay geckos, as well as how little me would have envision them while they lurked in the dark. I even accentuated the little razor-sharp teeth that they have. I kept the colours simple and binary: black and red. So, a bit of colour theory was implemented; I used red to signal danger, as well as black for mystery and correspondence to the dark.
The reason for my choice of colour scheme was heavily inspired by a graphic novel I read, called The Girl and the Glim (2022). Filled with vivid illustrations, the story is narrated through an array of symbolic colours - the antagonists, referred to as 'glums', are coded with a black and green palette. India Swift, the author of this novel, explained in her Twitch livestreams about representing her characters using colour theory, and that the green and black colours associated with the glums are meant to communicate fear and disgust to her readers.


Like zurks, the glums share similar size and feature. However, Swift explains that glums are transcendent beings, meaning that they take on a variety of size, mass, and even appearance, which are all based on the host they attach to. They are parasitic aliens that are fuelled by the negativity and fears of Earth's beings.

While I was happy with exploring the nightmare-fueled illustrations I created from tokay geckos, I still wanted to push their designs further and make them bigger and 'badder'. I also wanted to take an opportunity to produce a photo-bashed piece, which I have the pictures needed to create that.
My next post will involve further experimentation on my character design of geckos, including more inspirations I took and the photo-bash work I came up with.
Sources:
BlueTwelve Studio (2022) Stray [Video game]. Publisher OR Available at: https://store.steampowered.com/app/1332010/Stray/ (Accessed: 17 January 2024).
Swift, I. (2022) The Girl and the Glim. Available at: https://www.girlandtheglim.com/ (Accessed: 17 January 2024).
0 notes
Text
Creating Concepts
Project 3: Nostalgia and Memory
For this assignment, I had thought about touching on my childhood memories from Thailand.
When I thought about the idea of nostalgia and memory, I made an attempt to think about the good times of my hometown back in Northern Thailand. It was made of a tight-nit community, where my relatives were often involved with my life, so we bonded through many years.
However, one concern I had in mind was that while I experienced good memories of my mother's rural village, it also had an connection to what I had been scared of for a long while, and that is my phobia of geckos.

Geckos are a prime occurrence in Thailand, scattered throughout Southeast Asia. They are particularly common sightings in rural areas, and often drop in a visit within many households. They are typically seen as free pest control and, for many people, are considered very appealing reptiles that are welcomed in their homes. Most of geckos are nocturnal, and are active at night in search for food and mates.
I never liked the ones back home. Ever. As a child, the idea of geckos disgust me, and it didn't help that I knew of their presence deep within the night.
Perhaps the common fear of the dark led to my association with these reptiles. Stories I've heard of them randomly dropping onto humans scared me even more. The fact that you couldn't see where they are and have to rely on their sound to avoid their touch was my worst nightmare.
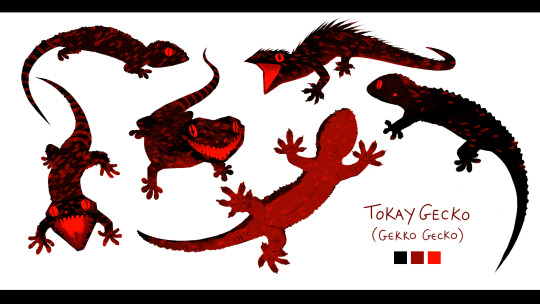
Furthermore, a particular species of gecko had cemented this dislike of mine into fear: the tokay gecko.

The tokay gecko (Gekko gecko) is a nocturnal arboreal gecko. It is the third-largest gecko, behind the giant leaf-tail gecko and the Caledonian giant gecko. It is a wild reptile native to Thailand and its neighbouring countries.
Known for its nasty temperament, the tokay gecko has a notorious reputation for being a problematic pet within the gecko domestication community, often being referred to as the 'pitbull' of geckos. This particular name is akin to their biting nature and the ability to hold on with their jaw strength for long periods of time. Their intense colour palettes and skin texture marks the clear distinction from other types of geckos in the world.

These geckos were never welcomed in village homes. Horror stories of their temper injuring people within my town had been the main way I discovered them, though incidents of seeing them came rare. My first recollection was finding a massive gecko on the kitchen window from outside with my sister, and we were shocked by its sheer size and mass, for a gecko species.

After having a while to think, I decided to use this childhood fear of mine to good use; I want to use this opportunity to recreate the vision of geckos I've had to endure years ago, so I can allow a viewer to hop in my shoes and embrace the feelings I had regarding my 'nostalgia'.
The next post will show how I further develop my idea of herpetophobia - including an exploration in character design, with playing around in colour scheme and mass. I will use my moodboard of tokay geckos as reference for the gecko species I will illustrate.
Sources:
SeaWorld Parks & Entertainment (2024) Tokay Gecko. Available at: https://seaworld.org/animals/facts/reptiles/tokay-gecko/ (Accessed: 17 January 2024).
'Tokay gecko' (2024) Wikipedia. Available at: https://en.wikipedia.org/wiki/Tokay_gecko (Accessed: 17 January 2024).
0 notes
Text
Concept Art:
Practice 2: Human vs Inhuman
With the ideas I explained from my previous post, I went ahead in developing a character design of Thai-culture. I envisioned this character to resemble aspects of the nationality, such as having the occupation of a Muay Thai champion. This meant that the body shape of his design would have to be extremely fit, in order to appear similar to that of a strong and enduring fighter. Also, the traits that I would like him to have in his design would relate to the previously explored Yak giant features, thus making him to be a 'taller-than-average' humanoid. With this, I want this design to communicate both human and inhuman characteristics, through both his outer appearance and personality.
To make it possible in adapting the Yak features into this character, I further studied the mythological species to understand their gestures and shape language better - through silhouette practice. In the national epic, Yak giants are seen to be holding specialised weapons used to injure trespassers, resembling a form of baton. Furthermore, Yak giants have particular motions to their movements when they engage in conflict; akin to the expression displayed in traditional Khon performances.

Due to their size, yak giants are speculated to be sloppy fighters, yet are heavily armed with massive weaponry and strength. The powerful impact of their strikes makes up for the slowly delivered anticipation of their movements. The shape language I learnt from previous post is still retained through my studies, as it helped me figure out the main triangular features yak giants possess, thus being another aspect I can implement within my character design.
Once I felt more comfortable with illustrating my chosen 'inhuman' species, I went ahead to water it down through my first sketches of the character design. As discussed prior revolving around the concept of modern conceptualisations of mythical beings, I envisioned my inhuman character to be acquainted with popular human activities, as well as dressed in casual clothing. However, I do want to communicate his design bearing the traits derived from the ancient Thai epic, to signify a relation to his yak giant ancestry.
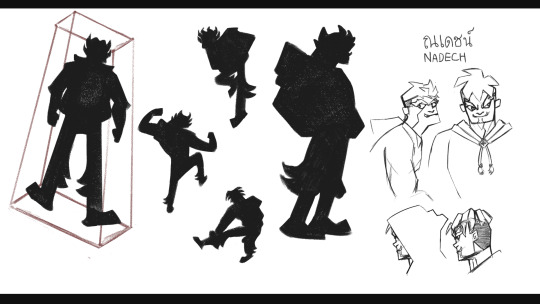
I decided to name him Nadech (ณเดชน์), since it is one of the more common names given to boys in Thailand. I was also inspired by popular fictional characters like Wolverine from Marvel, who show very clear silhouette every time they appear in a medium. However, I wanted to avoid the similarity to such characters and instead produce a unique silhouette for Nadech in general. I did this by prioritising the significance of his head silhouette.
Regarding this project, my tutor's feedback was for me to improve the shape language of Nadech's head and hoodie, as implied from his initial sketch. Something revolving around his hair had to be significant enough to take notice of, though I wanted to further push the cultural accuracy of his character. Furthermore, I went to do more research into hairstyles for Thai men.

Recent Thai romance / drama flicks like ฮักหลายมายเลดี้ (2023), ลมพัดผ่านดาว (2023), and แม่ปูเปรี้ยว (2023) have male protagonists with appealing appearances; their attractive looks and hairstyle trend in Thailand. Even retellings of popular Thai horror legends like 'Mae Nak Phra Khanong' (แม่นากพระโขนง) have produced series of more defined characters that were involved in the story - with historically accurate hairdos to match.
I took one of the men's hairstyles from the movie พี่มาก..พระโขนง (2013) and adapted the bun's style to my hard-lined design, while playing around with its shape outline. Some of the designs are from me trying to relate it to the triangular features of the yak giants' helmets, whereas some where meant to bear more of a resemblance to elements, such as fire - the Ramakien often portrayed yak giants as 'demons' more than typical giants, of which are known for their chaotic nature. Thus, I wanted to incorporate a bit of that trait into Nadech as well.

The sketches labelled as A to F were my first round of bun shapes, before I picked A and B to mix them up further. This led to my final two designs for Nadech's head, labelled as AB1 and AB2. I also briefly explored his hoodie's shape and how they would sit on his head while up. The sharp, angular headband for the character's bun hints at the materials I observed while studying yak giants, which include valuable goods of golden accessories.
In the end of this practice, I was able to further experiment with shape language, as well as learn more about my cultural roots. Exploring the development of this character design had been fun, though in the future projects I also wish to branch out into more environmental aspects. Had I had more time with this project, I would have included one more development sheet, focusing on combining his body shapes to his newly fleshed out head shape.
0 notes