
medieval-life
Medieval Life devlog
Medieval Life is a first person, open world, procedural generated, simulation game with medieval theme for PC. The game is in development. Follow me to learn more about.
4 posts
Don't wanna be here? Send us removal request.
Last Seen Blogs


openload-after2subdeutsch
▶ [Ganzer'Film] After 2 Stream - After Truth Sub-Deutsch

chofisaquino
Chofis💕ok

catws-anniversary
10 years of TWS
Text
Devlog: Adding terrain transitions to the terrain using procedurally generated textures. What do you think? Follow me to stay up to date with the development of Medieval Life
#procedural#pixelart#gamedev#gaming#devlog#devlopment#game design#unity#madewithunity#sims#stardew valley#stardew farmer#retro#retrogaming
0 notes
Photo


Added first furniture 3D models in Medieval Life!
#gamedev#3d#lowpoly#pixelart#procedural#art#indie#indiegame#indiedev#sims#minecraft#medieval#stardew valley
0 notes
Text
Using mipmaps and texture atlas together
As you probably know, Medieval Life is a 3D game with pixel art textures. Instead of using 500 different textures (which would cause a lot of draw calls in the GPU), I use a texture atlas. This texture atlas is created at runtime when the game starts. The generated atlas looks like this:
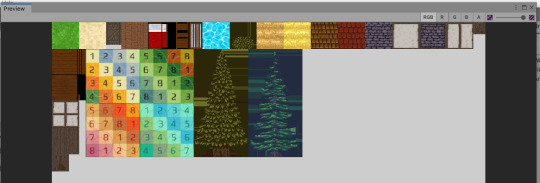
As you can see, each texture is contained inside the atlas. You can see all the house wall textures, the floors, grass, sand, trees, water and even a big texture with numbers that I use to test UV coordinates when I’m generating a procedural mesh.
The problem arrives when I want to use mipmaps. In each mipmap, the texture size is halved. For example, if the texture atlas has 1024x1024 px then the 7th mipmap will look like this:
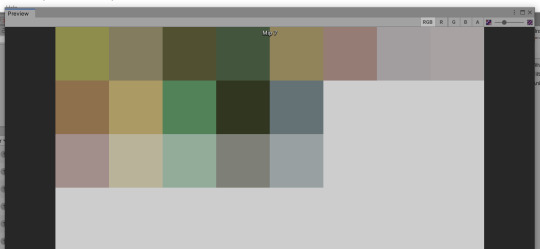
This is known as texture bleeding and it is caused when a texture from the atlas
interferes with another texture in the lower mipmap resolutions.
Here you can clearly see the texture bleeding in the water. The water has a greenish tone that is mixing with the textures of the trees that are below in the texture atlas.

So, what is the solution?
Each mipmap halves the texture size. So, if a texture of the wall or grass has 64x64 pixels, then it means we can generate up to 6 mipmap levels without any texture bleeding (Because 2 << 6 == 64). My solution is to arrange my atlas so each texture is aligned to an imaginary grid of 64x64 pixels. If a texture fills the entire grid, perfect. If not, then I fill the remaining pixels with the nearest color.
My new atlas looks like this:

It almost looks the same, but if you look closer, each texture is aligned to a 64x64 grid. So, when we generate the mipmaps we can generate up to 6 mipmaps without any texture bleeding:
Mipmap #3:

Mipmap #6 (As you can see, each texture is at least 1x1 pixel. The biggest texture is my UV testing texture that was 256x256px and is 4x4 pixels now)

Great!
The problem, cames in the 7th mipmap. If we halve the texture size again, then each texture needs to be a half pixel, and that’s impossible! So, each color is blended with the neighbour colours causing texture bleeding.
Of course this is less noticeable than before (because it only happens from the 7th mipmap), but it is still something we want to avoid. Here you can see the 7th mipmap and the brown tone in the grass that is mixing into the grass texture from the texture bleeding from the wood table texture that is below in the atlas.

Hopefuly, starting from (I think, I’m not sure) Unity 2019.3 there is a new undocumented constructor for Texture2D that takes as one of the parameters the maximum number of mipmaps that we want to use.

We can pass 6 (or the number we want as our maximum mipmap count depending of our “cell” size in our texture atlas) and that’s all!
In this way Unity will use only 6 mipmaps.
Warning: If the atlas is not generated by code, or if you are generating it with an external program, you wouldn’t be able to configure this parameter (there is no setter, you can only change it in the constructor). So I recommend that you simply use the first technique of aligning your textures to a grid size that is a power of 2, and live with the fact that you will have bleeding in the lower mipmaps. Hopefully it wouldn’t be as noticeable.
Another alternative is to use the Unity Texture Streaming system and setting the Texture2D.minimumMipmapLevel property. But I haven’t tested it (because you can use the streaming system with runtime generated textures), so I don’t know if it works.
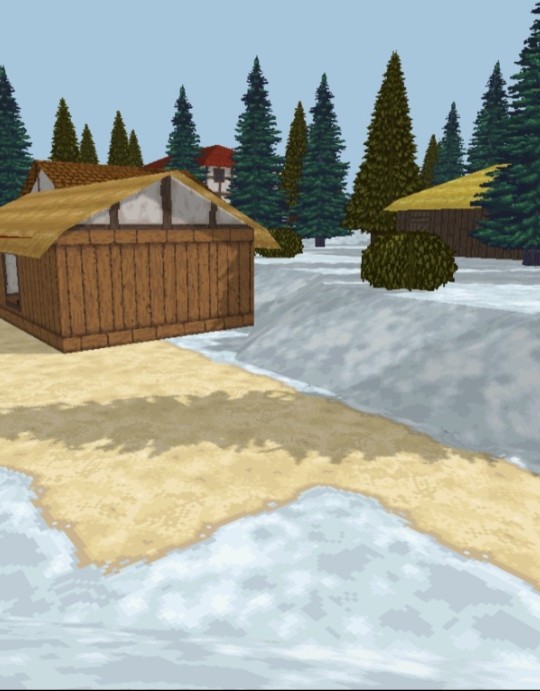
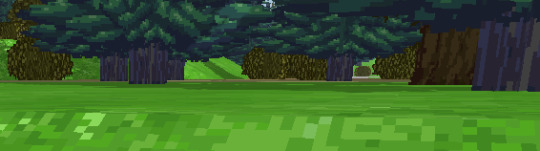
Lastly, here is a comparative of two Medieval Life screenshots, one with mipmaps and another without mipmaps. (Look at the water in the distance)
With mipmaps:

Without mipmaps:

0 notes
Text
The “Container” pattern in Unity for procedural games
Hi. Today I want to talk about a software design pattern that I’m using in the game that I’m developing (Medieval Life) and the advantages and disadvantages of this pattern.
The problem
In Medieval Life, a 90% of the resources are generated procedurally or are modified somehow at runtime. Eg: textures are stored individually but merged in a big atlas when the game starts. Using code a lot of meshes are created or modified dynamically (houses, terrain, and other procedural things).
This leads me to a problem that is how to manage in a ordered fashion the tens of meshes, data structures and textures without ending with a spaghetti code with a lot of references. At first, I started using Unity’s ScriptableObjects, and they work perfect for a handful of objects that are all the same in structure, but the main problem comes when you have objects that depend on another object and so on... leading to a big mess of dependencies between ScriptableObjects.
Also, refactoring ScriptableObjects turns imposible because if you change any property, you lose all references in your project’s ScriptableObjects and you have to drag all references again, and with a few objects is not a problem, but when you have a lot of objects this can take a lot of time.
I would prefer having the object’s configuration and the link with between entity, texture and mesh all in my code, and not having to switch between ScriptableObjects inside the Unity Editor.
The solution
So, what is the solution? Basically, I ended up implementing a pattern called ServiceContainer (or Container). But I didn’t use it to resolve services, I used it to register and resolve procedurally generated assets.
The Container Pattern
Basically, I have a class that is my container. The container is responsible for registering and resolving all the game assets. Each asset has a unique string ID. For example, “tex:wall.bricks” would be the ID for the bricks wall texture. The Container is nothing more than a wrapper arround a C# Dictionary.
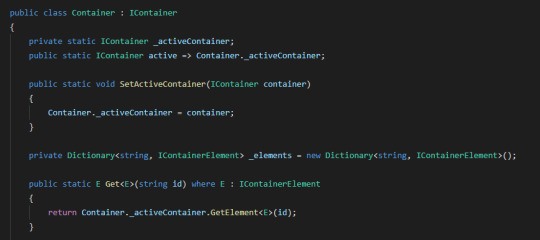
I can create a new Container, assign it as the active container and then use Container.Get(”tex:wall.bricks”) to obtain the reference to the texture that I registered in the container before.
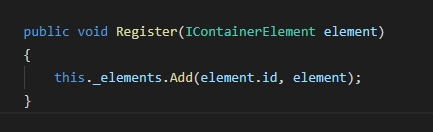
With Container.Register you can register new elements in the Container. They only need to have a string ID.
What is the advantage? You can have for example, a procedural mesh generation system that registers the meshes that it is generating in the container. For example Container.Register<Mesh>("mesh:house.backery").
And then, every entity that wants to use that resource can ask it to the Container by the ID with Container.Get<Mesh>("mesh:house.backery")
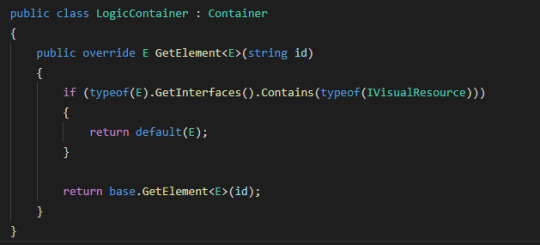
This has a lot of other advantages. For example, I can create my own classes that implements the IContainer Interface and change the logic used to resolve assets. I have made a LogicContainer class that overrides the Get method of the container and ignores (returns null) all resources that are visual (texture, mesh, audio) and not logic (class, procedural data, configuration).
This is useful when you want to test your code, or when you want your game to be able to run inside the Unity Editor with only the logic and simulation and without the visuals, or inside an online server. It does not make sense to load textures and meshes that will never be shown on screen (because there is nothing to show in a server)
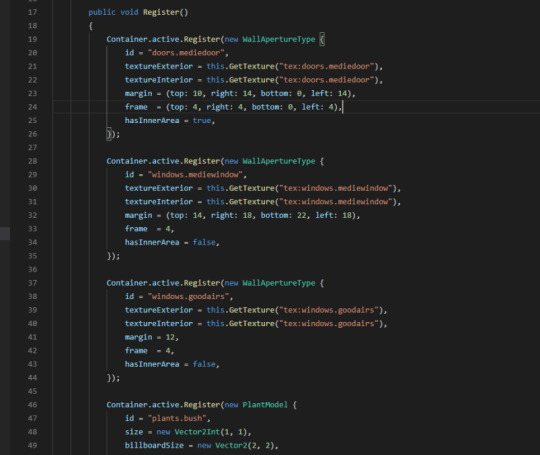
Below is an example of how I use the Container. Here I am registering in the container the model classes that have the logic and configuration of how different entities are defined in the game. For example, a house window, a door, a bush, or a tree. Those models link the logic related data with the visual related data so other subsystems can use this information to generate the game world.
Conclusion
I don’t recommend to anyone to use this pattern in unity unless you have a very specific scenario like my I have. Normally this “pattern” is considered an anti-pattern: The Service locator antipattern. Why? Because if you don’t have enough care, you can easily end up hiding the dependencies between different classes. For example, if some game component depends of an specific texture, you will not know until you run the game and it crashes because the resource is not correctly registered in the container. And that is super dangerous.
In the 99% of the scenarios, I recommend to use the Unity default serialization system. Why? Because that system is very similar to the dependency injection pattern that is the solution to Service Locator anti pattern.
The problem is that for my particular case, I could not use it because 90% of the assets are generated or modified at runtime. And that led me to passing references from one class to another and a huge spagetti code with a lot of duplicated and nested references.
Bonus: Case study, Minecraft
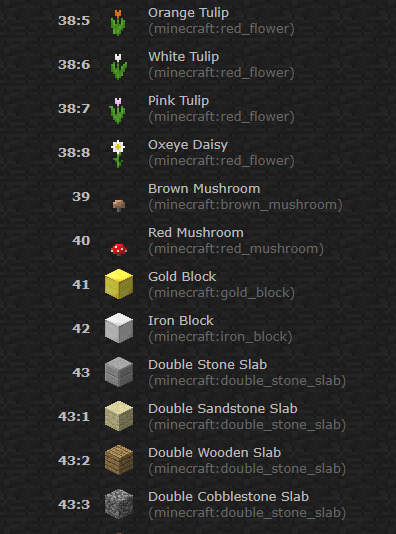
I was investigating and it seems that Minecraft, uses internally a similar system in which each block, entity and game resource (texture, audio, text) have an ID. In this way is super easy to mod the game because each resource can be referenced by it’s global ID in the external configuration files.
I don’t know if other games use a similar technique but I don’t think it is something weird, especially across procedural games.
1 note
·
View note