
Last Seen Blogs
m-t-g-ifs
#MTGIFS

planet-torei
The BDSM Planet Torei

theastromind
hello there ~ ☆

latestnewstips
Read for life
howlingowl-festivals-wra
The Howling Owl Festivals
Text
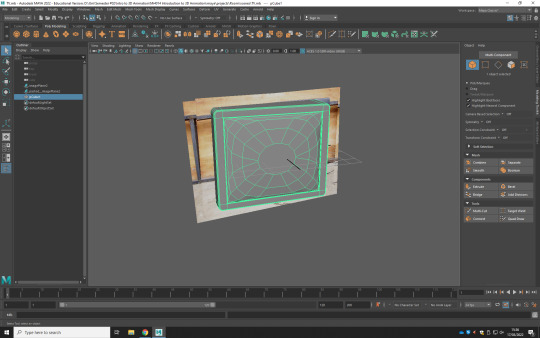
Texturing & Terrain
Start with a plane
Add subdivisions (50 x 50 in this case. In this case, many is a good thing.)

To create the terrain, click Deform, Texture.

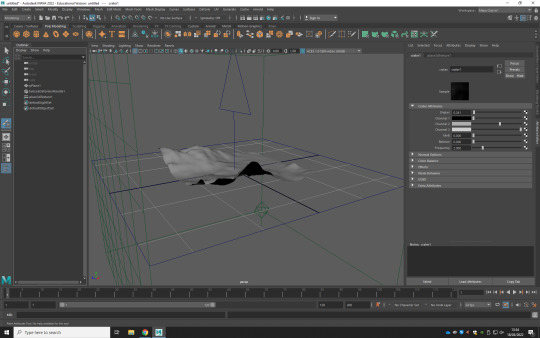
https://polyhaven.com/
0 notes

Text
Week #07
Lectern
Camera
Create Camera
Create, Cameras, Camera
Create CV or EP Curve
Create a ‘track’ using the curve tool
Create a Locator
Motion locator
Camera and Aim
Shift Camera Aim +
Animation, Constrain, Motion Paths, Attach to a Motion Path
Parent + Child
Drag object (preferred child) using the middle mouse button click,
Graph Editor
Panels, Perspective/Graph Editor
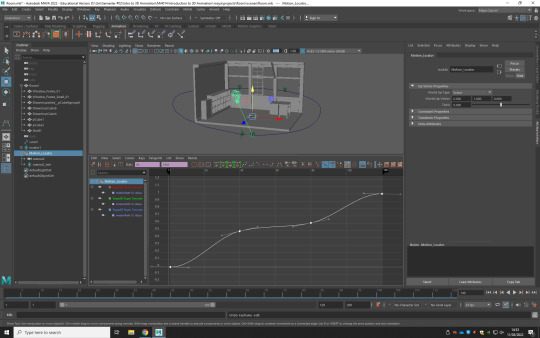
Camera Rig
New Scene.
File, Import, File:Name.
Change to 24 fps on the Timline if needed.
Delete Pers 2 Camera
0 notes
Text
Week #06
UV Mapping - Recap

-
-

Isolate Object: CTRL + 1
0 notes
Photo


Artists
I’m a very modern person. I grew up on illustrative children's’ books, cartoons/anime and comics/manga. So all of my utmost favourite artists are illustrators and/or animators of some kind, and have inspired me to become an illustrator and/or animator, in turn. I also love vibrant colours and horror, so anything that leads in either/both directions, appeals to me.
One thing going into this, is that I’m sure I’m supposed to choose classical or fineartists, who I’m admittedly not very interested in. Not that I think such a vast breadth of work is terrible, I just have a more active interest in artists I can be influenced in, more directly.
Although, because I’m very boring, I am fond of Alphonse Mucca’s work. I love incorporating warm colour palettes, thick and thin line variations, flowing hair, etc.
Hans Zatzka, has the whimsy and vibrancy I adore (not to mention that his painting Fairy Dance, reminds me of one of my favourite songs, Away with the Faeries by Inkubus Succubus.)
But, that wouldn’t be true to my own personal delights. So I’ll be picking the other artists from my world.
Tite Kubo
In another brief, we were told to not explore anything that incorporates abuse, the objectification of women, weapons and explosions, so I’ll assume that would be the same for all the briefs, Which, is a bit of a shame, because one of my biggest inspirations since I was 12, is Masayuki Taguchi (Battle Royale manga adaptation, one of the hundreds of Black Jack manga). His compositional skills and ability to illustrate highly detailed 19-paged comic chapters within a fortnight, overshadow his inability to draw kids, non-fine fabrics and unwillingness to draw multiple body types. Whilst I cannot use him, I also can
Instead, I’ll go with my art inspiration at age 14, Tite Kubo (AKA, the Bleach guy.) I’ve always been blown away by his ability to make all of his characters look attractive (even the ones who are supposed to be ‘ugly’,) interesting ways he incorporates languages, poetry, architecture, cultures, subcultures, different religion, fashion, pop culture, music, etc into his artwork, even when excluding story. Kubo’s modern art reminds me of a simplified version of Taguchi’s work, so he’s a fitting replacement. I know it’s a manga art style, but a large part of my artistic journey and personal delight would be missing, and my project would always have a void.
Designers
With designers, I wanted to pick one of each. As I tend to value trends/movements more than the individual designer, this will be pretty hard for me.
Chanel (Company)
Whilst on the surface, I should be more of a Vivienne Westwood type, I’ve been more fascinated and influenced by fashion moguls such as Coco Chanel. Or, more accurately, the company she founded and the efforts of her employees.
I grew up watching The Simpsons, so Marge wearing the iconic Pink Chanel Suit and being seen as the pinnacle of glamour, struck a cord in me, as an 8 year old. Even general pink suits make me think of high society types.
Digging deeper into the fashion gallery that Chanel’s company have kept a consistent uniform in their clothing line, which makes many of them recognisable as a Chanel, even at first glance.
They keep a steady profit, despite their lack of social media usage. Although, their marketing campaigns do have some appealing artists and graphic designers, such as Kerrie Hess (who I like,) creating art for them.
Another reason, is that I love the irony in how Chanel’s fortune has been distributed and the sense of self-deprecation I have in liking what the company has created. It’s not a secret that Coco Chanel used Nazi connections for her own benefit and was an agent of sorts herself. I tend to separate the art from the artist (and the vast majority of her employees are to be credited for the company’s iconography) so learning this fact hadn’t made me dislike the catalogue of clothes, but the fact that her wealth has been distributed to the [Jewish] people she so despised, makes me giggle.
Also, I love the perfume. It makes me feel pretty.
Mathiole
Partricia Urquiola
The duality of sterility and creativity in Partricia Urquiola’s works, compliments how I am very calculated and meticulous in how I create my personal art (to the degree of utter sterility at this stage,) but how my imagination runs wild.
Writers
Koushun Takami
My favourite novel is Battle Royale by Koushun Takami, and has been since I was 13. It’s meant a lot to me and got me through my coming-of-age phase. The novel posed a lot of critique about Japanese society, how far the individual will go for self-preservation and/or to protect a loved one, how regimes use the national social culture against the masses and/or isolate them from the ‘radical’, the multitude of different ways that fear and stress can have an effect on the individual (from the heroic to the downright disgusting,) and that you can never truly know someone (even your best friend.) It also helps that, whilst the cast are very trope-y and the main cast are a bunch of Gary/Mary-Sues, they’re all still very fun and unique and relatable. Takami’s writing style can be poetic and he’s great with creating individuals with their own unique voices in their POV chapters and roughly 36 of the cast of 42 have their moments to shine.
I also do not think he’s a perfect writer, by any stretch. The main characters are too perfect at everything they do and everyone loves them for existing, the female antagonist’s backstory is so laughably over-the-top and shoehorned into her final POV chapter (in some means to redeem her?) that I cannot take her seriously, Takami has clear favourites who’s propped up by their opposition being utter strawmen, those favourites also have more in-depth backstory and physical descriptors than even the main trio (which is terrible when one of the favourites existed for one chapter, half of which was a description of how utterly amazing she supposedly is, a quarter of it is fetishising her, then immediately dies), the ending is boringly predictable (even with the double-misdirect,) and some of the more interesting characters either die too early or were neglected to some capacity.
Battle Royale is absolutely a one-hit-wonder. Takami keeps stating that he wants to ignore Battle Royale and move on to complete his second novel but hasn’t released anything about it since it was announced like 20 years ago. Wrote a spin-off manga to explore some neglected characters (which I loved and was great, but retcons his pet favourite, in relation to one of the spin-off’s protagonists) and is currently releasing a sequel to Battle Royale (which seems bizarrely based on the rip-offs of this series, such as Dangan Ronpa and Squid Game) that even the long-term Japanese fans aren’t interested in, at all.
But it means a lot to me.
Smells
Peony
When I was in Primary school, we had these specialist soaps in our dank, run-down bathrooms. They were shaped like a teddy bear and may have been left-overs from Christmas stock. I always loved the smell of them and nothing and no one smelled quite like them. My family had very set smell preferences and my friends and their families weren’t very flowery. I was only 4-6 when the school had these soaps, so I couldn’t identify or articulate what this smell was.
Later on, I was introduced to Lily of the Valley and mistook the smell for that. I got many Lily of the Valley products, which gradually helped me realise that I hadn’t found exactly what I was looking for.
Now, I had been introduced to Peony flowers and smelled them, but I didn’t identify the smell directly from the flower. So I disregarded the flower quite quickly.
Eventually, I browsed through TKMaxxx to find some new candles and books, where I eventually found the Peony candle that smelled exactly like the soap I loved when I was young.
Ever since, I’ve been repeatedly buying that candle and keep the jars for decoration.
Clean Cotton
In my Japanese classes at Comprehensive school, my teacher always had the Clean Cotton Yankee Candle smell in the classroom. Even though I was one of two people who came to the class, I always enjoyed it.
Smoked Pumpkin
I found a cool-looking, giant Smoked Pumpkin candle from TKMaxx, that I bought for my new flat in Edinburgh. Due to complications, I had to immediately move back home. There, I wasn’t able to light the candle, since it made my stepdad feel unwell.
I’d still open the candle and smell it, when I was alone and the window was wide open.
I’ve kept the candle as a keepsake, since it represents a trend in my life.
Views
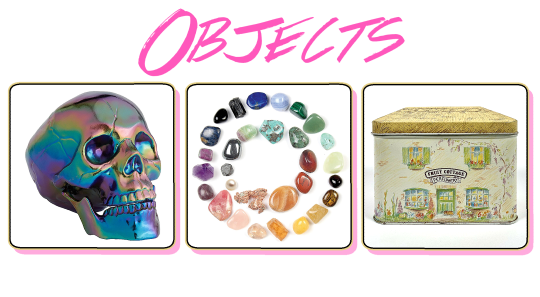
Objects
0 notes
Text
Maya LT
After several weeks of using Maya, I’ve only jut found out from Hugo that I’ve downloaded the wrong version of the program. Instead, I’d downloaded Maya Lite, which isn’t very compatible with Maya.
I’ve asked Paul about how I could go about exporting my current projects from Maya LT into Maya. I could go about this by exporting my objects as .OBJ and importing them into a new scene, or exporting as .FBX.
Once I returned home, I downloaded Maya 2022 (which had taken around 3 hours.)
0 notes
Text
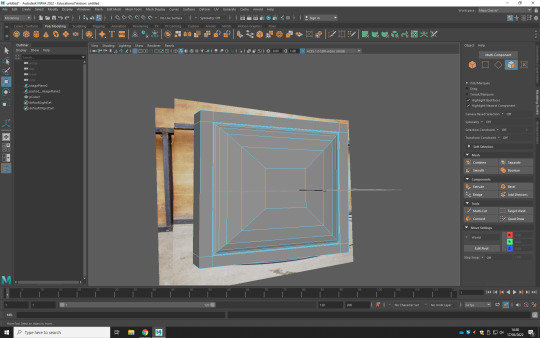
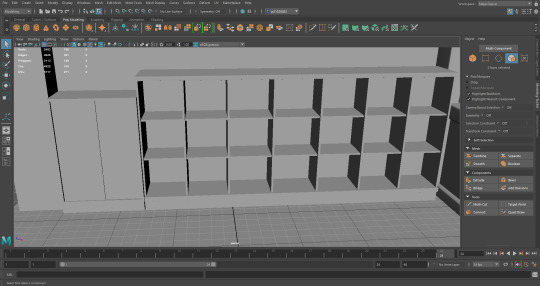
Window Frame
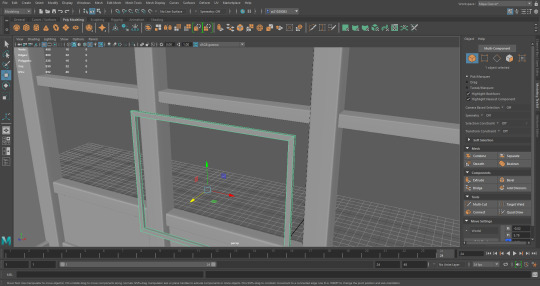
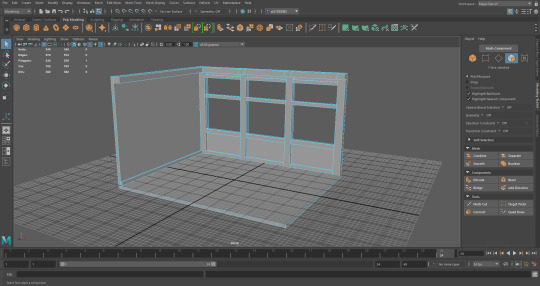
Continuing on with the mini brief, I next need to build the frames of the window.
To do this, I created a cube, resized it to fit within the border of the window. I cut out the front and the back of the cube. I manually selected each edge of the hollowed cube, Extrude with the Local Translate Z by 0.2, then selected Bridge, which filled in the inside of the frame.
At first, I used the Thickness option for the Extrude, but the hollow cube wouldn’t Bridge afterwards. If I Extruded outwards, it would clip through the window, but if I Extruded inwards, the cube would invert.
This was fixed when I toggled the Local Translate Z option, which I had no issue with and it Bridged perfectly.
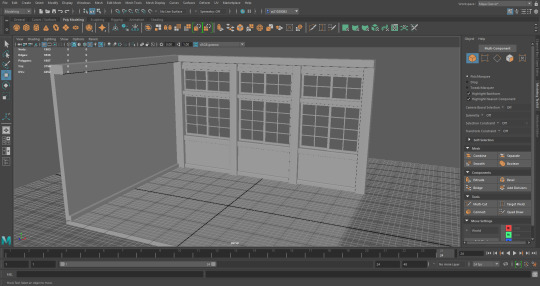
The inner frame in both the top and bottom areas, were showing a black striped face. I tried Googling how to fix this and also numerous different ways to change it (such as deleting the face and re-bridging) but nothing worked. Then when I treat these faces as blackened faces and just reversed the mesh, they both became fully grey.
With these newly fixed faces, I used the original tutorial once again, but hit a bump when I realised that I don’t know how to (successfully) add new segments to a mesh. I found a new Youtube video that explained different methods of adding Edge Loops and/or segments. I’d decided to go with the fifth method, which is to use the Connect Tool
It did take some trial and error to learn how to use this tool correctly. Because I have a tendency to use the camera hotkeys (which require the ALT key + mouse buttons) and since the mouse keys are integral to using the Connect Tool, I kept trying to use the camera hotkeys to move the segments and/or pinch the segments.
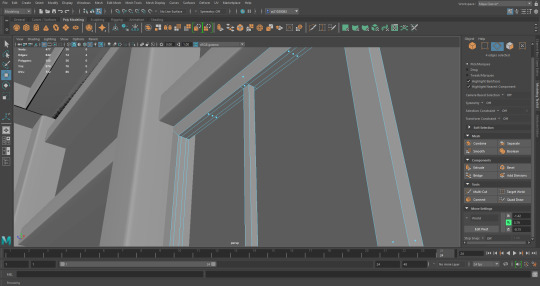


Happy with my framework, I decided to bevel the edges. Unfortunately, no matter which face or edge, I received the same error message,
“//Warning: Encountered a non-manifold vertex. Cannot Bevel.”
I could Bevel the outer frame, but the corners refuse to align.
-
-

-Resources
youtube
https://knowledge.autodesk.com/support/maya/learn-explore/caas/CloudHelp/cloudhelp/2019/ENU/Maya-Modeling/files/GUID-A7C41EA4-3249-4A24-A0AA-788D1F7D3DBF-htm.html
0 notes
Text
Week #04 - Part II
Lighting
Assign new material, Arnold, AiStandardSurface. Focus on the colour and shininess.
Arnold, Render. There’s no light, so it’s all black. We need to add light. Create Skydome Light.


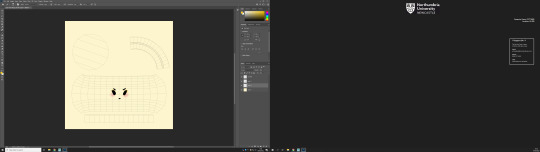
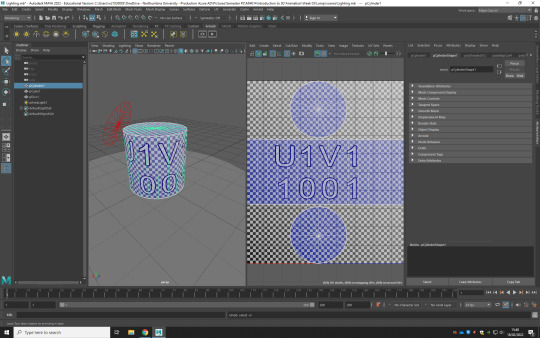
UV Editor
UV Editor, select the edges of the face to be edited, cut the shape, right click and click UV Shell.
Unfold. Modify, Unfold.

I did the same with the tube of the cylinder and it changed the UV Mapping.
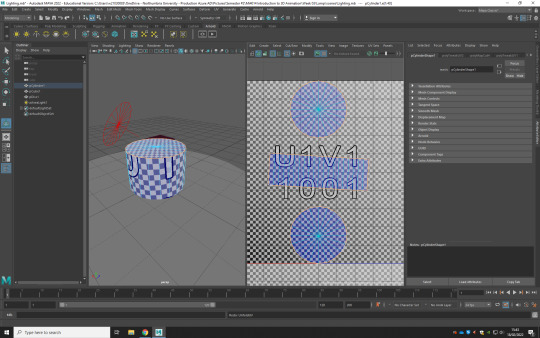
In the UV Editor, I can use the shelf buttons to alter the elements, as well. So i rotated the tube and expanded the area. I rotated the tube a little bit more, so the texture would align when it met back up
Texturing
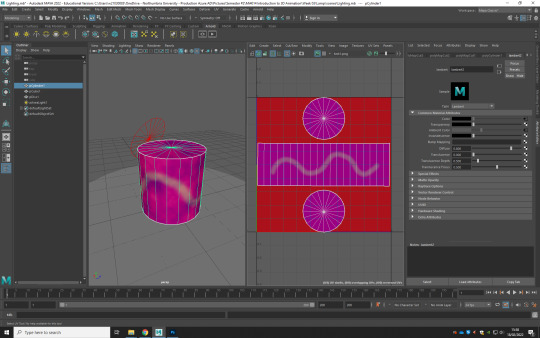

I can select multiple objects, by holding down the Tab button and selecting whatever I need.
0 notes
Text
Week #04 - Part I
RESEARCH
Task
We’re to research 9 different visual references. 3 Artists, 3 designers/architects, 3 and 3 poets or philosophers, each a work of theirs that inspires me the most.
Resources
I went up to the library to find compilation books of different works, but most of the books I found were of either individual artists or literature.
0 notes
Photo

Learning Outcomes
Demonstrate an awareness of key historical critical and contemporary issues within the 3D animation industry.
Acquire a knowledge of 3D animation production processes that underpin 3D animation practice.
Effectively develop digital animation skills.
Effectively conduct research.
Evaluate critically reflect and respond to feedback on personal practice.
Engage with the studio community in a professional manner.
What do I mean by a ‘Creative process’?
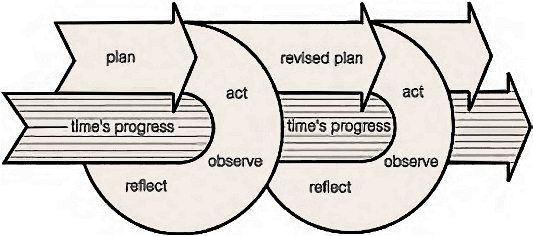
In the creative process, we’re bound by a repetitive cycle of:
Planning, acting/creating, observing, reflecting/revising, then back to planning with the revisions in mind.
Context - Culture
There’s context to everything we create, as was everything that came before. Creativity itself is not a production of reproducing or repeating what’s came before; but one of gathering, sorting, reflecting and applying components of culture in order to create new pieces of culture.
It’s not just about technical skill, but the components and resources we choose.
Why is this process so important to making animation?

As animators, we have to practice a multitude of disciplines and crafts. It’s not enough to know how to draw, but to also understand movement, pleasing aesthetics, acting, physics, understand how to tell a story, etc.
The Reflexive Practitioner.
This is someone who can reflect on and interrogate the production process, who can learn from what worked and what did not, and can chart the development of ideas – the choices and decisions made which affected the outcome.
The Theoretical Practitioner.
The practitioner who directs our attention to the product, the symbolic artefact that has been worked up out of the production process. This has involved a transformation of pre-existing (cultural) materials into a definite article using specific codes and conventions of the medium in the first instance, and then genre(s).
The Critical Practitioner.
This is, I believe, the most difficult kind of practitioner to produce. The critical practitioner is able to interrogate the politics of representation. This requires a movement from the text (the domain of the theoretical practitioner) to context.
Why is ‘Originality’ important?
youtube
A creative process for you to begin with
Resources
Research
Three Artists
Three Designers and/or Architects
Three Writers, Poets, Philosophers
Some other great resources to get you started
School of Life
William Kentridge - Peripheral Thinking
William Kentridge - How We Make Sense of the World
Ways of Seeing
Everything is a Remix
0 notes
Video
youtube
Task
When you have watched it would you be able to make a post on your tumblr blogs, noting a thought, a question or an idea that comes from watching it. Then we can talk about these tomorrow.
Thoughts
For paintings, there is only one original that can be seen. Digital art, specifically 3D models and vectors that are generated through code and numbers, are genuine and are generated through a file.
Camera angles and composition are just as integral to storytelling, as the subject itself.
Sound design changes the mood of the image/scene in a drastic way.
In class for Week 04, me and Cherry talked with Hugo about the video. He seemed impressed with our insights and we talked about technology, NFTs and artists intent.
Afterward, he gave me a good list of philosophers:
Michel Foucault & Heterotopia
William James
Walter Benjamin
It would be an idea to research these three, ready for Delights.
1 note
·
View note
Text
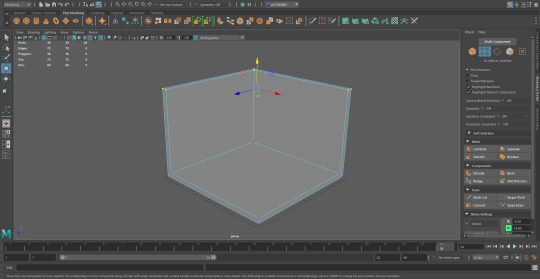
Starting
I started with a cube, scaled it up so it fit the size of the grid. I deleted the top and two front sides. I Extruded backwards (although, without any weird warping, somehow.) Thinking of what room I’ll be building, I lowered the height of the room by 25% by clicking on the the Vertex Selection, selecting the top sections of the room and lowering the ceiling by using the Move tool.

I know what type of window I need, but I’m not sure how I can build the framework. I found a tutorial on Youtube, to follow.
So, when trying to cut holes in the base, the Multicut would only affect the inner faces of the cube.
I recreated the cube, using the base + extrude method. It took 2 minutes but hopefully I can cut the windows out now.

Using the Multi-cut tool, I mapped out where the windows, skirting board and framing system of the room. I extruded to the lengths I saw fit.
Afterwards, I wanted to get rid of all the new edges, so I painstakingly deleted each edge, one-by-one.
However, I quickly realised that, whilst each edge may be gone, the selection tools were selecting areas that should already be deleted. I looked this up online and it turns out that deleting an edge, does not delete the vertex.
I went back to before any edges were deleted, then began deleting edges via CTRL + DEL, which takes away the vertex as well as the edge. This method required some trial and error in regards to which parts I can and can’t delete. Some edges or vertex being deleted just caused the model to warp and spread out its faces everywhere.
During this, I found out that one of the frames had gone missing. I tried deleting the edges and vertex, and tried bridging the edges (which caused an error to appear.) I figured out that this could have happened when I was extruding the multicuts, so I extruded the wall back to where it should be. Unfortunately, I can’t get the edges to merge back, without the object warping.
At some point, a strange green grid appeared on parts of the object. I tried to figure out when this occurred and try to get rid of it. I undid a lot of the actions, but the grid wasn’t removed. I’ve decided to leave the green grid alone and just continue on until I find out what it is.
I moved onto curving the frames. I selected the edges needed, selected the Bevel option in Modelling Toolkit, then curved each edge to the number of fractions, segments and the extent of depth that I wanted.

Resources
youtube
0 notes
Photo


Task
What to Consider
For this Room mini brief, there’s a lot I’m trying to consider, before I choose which room to build.
If we only have two walls and the floor, should I allow objects/furniture be positioned where the walls would have been?
How compact should this room be?
Should it be a solid cube or can I change its shape?
Which walls of the room should I remove? If we’re peeing in as if it’s a diorama, then which angle would be best portrayed?
If it’s based on a larger room, should I squish everything together or model the room as it is?
Idea Generation
I love the interior design projects that FZD School of Design students post online, so my mind races when trying to figure out how to build rooms.
I’m also a big fan of Seiji Yoshida (to the point I bought two of his books from Amazon.jp) who is infamous for his ‘Houses with a Story’ series. Looking through his Houses with a Story book, there are too many ideas to just settle for one. I’d like to use the personalisation of his houses/rooms for inspiration, but not use any of his rooms.
So, I’m torn between two rooms. Last summer, I was designing some concept art based on some descriptions from a book. I wound up stopping when Uni kicked in, so I’d like to model what I had from two of the rooms.
Now, I’m a very very boring person, so one of the rooms is just a Japanese classroom (customised at least) whilst the other was an open plan kitchen/living space within a lighthouse.
I decided to go with the classroom.
Research
I researched different Japanese classrooms, where I found that there is in fact a default architectural guideline for how these are built and setup. For example, the hallways tend to be on the side of the building, for air flow and keeping the temperature cool.
So what we see in anime/manga/JDramas/video games, is pretty accurate and a general rule.
I created a moodboard of stock images, screenshots and images from articles, of different schools that show how the standard can be personalised.
As I’ve seen a lot of classrooms from the modern era, I’d like to build a room using the standard from the Showa era. This would include mostly wooden furniture and pre-mid-80′s technology.
Using Japanese shopping sites, I found the standard classroom furniture in different angles but also their dimensions.
Whilst not placed in my moodboard, in Seiji Yoshida’s book, ‘Yoshida Seiji Art Works & Perspective Technique’, Yoshida illustrates the dimensions of the classroom proper. Being typically 3-metres high, secondary windows starting at 2-metres high, main windows at 90cm high, traditional Japanese doors being 180cm high but modern at 2-metres, etc. I’d like to use this as a basis. If the room must be a cube and is 3-metres high, then the X & Z dimensions must also be 3-metres.
Using the dimensions of the furniture in the moodboard, I illustrated a mock-up of how the room could look. Although there’s also a lot of wiggle room for change and extra customisation.
Whilst I much prefer to plan ahead, I feel as though it might be too much of a time killer to dive into some more microscopic details. So I’ll be adding the personal touches (such as textbooks, storage fillers, posters, pencil cases and bags, etc) as I go.
After this room, I should become an expert at modifying the standard cube!
1 note
·
View note
Text
Week #03 - Part II
Task
We followed along with Gary, who showed us how to build a specific lamp.
Importing the image file. View, Image Plane, Import Image. The reference image will paste.
Break the reference down to the basic shapes
I spent the whole time not knowing how to move the camera, but I finally figured it out. Because I had to figure out the camera shortcuts (ALT + Scroll/ centre mouse button), I missed the first section of the lamp tutorial.
I was caught up during the one-to-one, however. I also learned about the multselect, which uses the TAB button to quick select multiple planes.
To build the lamp, we first created a cylinder. From there, we selected all of the faces of the base/bottom surface, extruded (CTRL + E) then dragged the face down and created a new segment. To alter the scale or slant of this new surface, we use the (R) shortcut and use the grey centre cube to increase/decrease the scale.
Once I added enough, we needed to create the lip of the lamp.
With the lip made, we needed to hollow the inside of the lamp. For this, we just repeated the CTRL+E and R routine, but inverted. To see inside of the lamp, we selected the XRay tool.
For the neck of the lamp, we created a new cylinder shape, decreased the side to match up with the reference image, then repeated the CTRL+E routine.
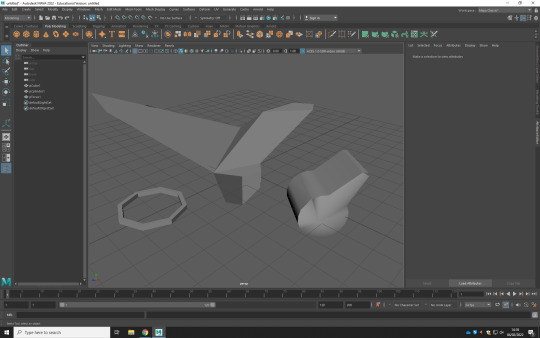
However, along the way, I ran into an issue with the shape of the base morphing to a great degree.

I tried the CTRL+E process from the start, just to see what the issue was and if it was due to rotating the extrusions. With the use of only pulling and tilting the extrusions, I wound up with this:
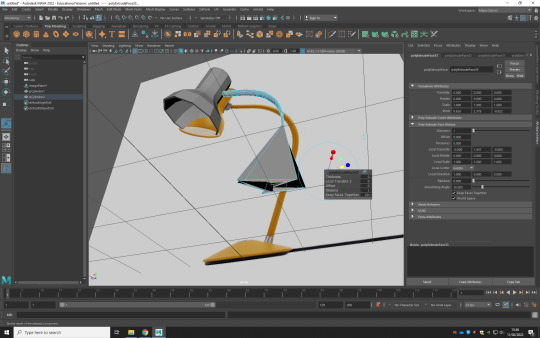
Now my lamp has a weird skirt. I’ll have to start again.
I found out that my issue was due to the way Maya morphs objects during Extrusion.
So I was advised to create larger and fewer extrusions and keep it simple. Afterwards, I should click the Multi-Cut tool, hold CTRL+Shift to select the tube of the cylinder and add in Multi-Cuts wherever needed. After, I should go to Edit Mesh, Edit Edge Flow. Holding G, Maya will fill in the gaps and correct the curves of the mesh.
0 notes
Video
Week #03 - Part I
What I Am Able To Do:
Open Maya 🗸
Navigate the software 🗸
Tumble the view 🗸
4 windows or one window 🗸
Finding the outliner 🗸
Understanding the channel box 🗸
Create a shape 🗸
Change its colour
Set keyframes
Playblast
Render
Find the render (add sound)
Change Object Colour
To change the object colour, we select the shape, right-click (drop menu) and scroll down to the Assign New Material option, Lambert (although I do not have Lambert on my personal laptop.) And within the Attribute Editor menu, I can change the colour.
In my practice project, I created a sphere and changed the colour to bright magenta (although it looks like a burnt burgundy on the sphere.)
Set Keyframes
We’ll need to set up our animation preferences. To do this, we click onto Preferences, Time Slider, change Update View to “all”, change any attributes to whatever I want (I just needed 24FPS, but that can be altered in the Timeline window) and select Save.
The Timeline window shows the timeline and how long the sequence will last for.
To set a keyframe, click on the Key drop down menu and Set Key. Otherwise just use the hotkey (S).
We can then alter the objects and/or the scene as a whole and set another keyframe. Maya will fill in the inbetweens from each keyframe.
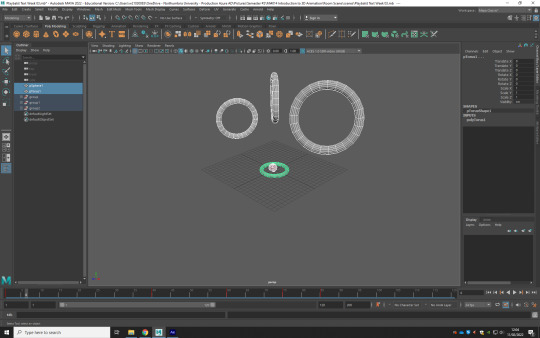
For my practice, I created a loop for my sphere, where it lifts up (and scales up), curves around the edge of the grid and leaps up to the middle of the scene. I used five keyframes in total and used Fade In;Fade Out as a basis for the pacing.
Once I was happy with the sphere, I added in hoops that outline the path of the sphere. I gave them varied sizes and painstakingly positioned them in a way where the sphere couldn’t clip through them. This was quite hard for me, because I couldn’t figure out how to move the camera, so I had to eyeball everything based on the default view + the X/Y/Z axis windows.
I decided not to bother colouring them.
Once I saw the scaling of the hoops, I decided that I wasn’t happy with how the furthest hoop and sphere scale looked and I maybe should have made them both smaller.
Playblast
For the Playblast: Windows, Playblast. Or Right-click on the timeline and scroll down to Playblast.
We were told to Format as QT (for Quicktime) if we want to export as a direct video, or export as PNG if frames, Save to File (whatever folder and name accordingly. Keep it in a separate folder from everything else.)

Project Window
Put Renders in Renders, Frames in Images, Scenes in Scenes, After effects Video in Renders
File, Set Project, click on the pre-made folder, save it
After Effects
Open After Effects, import the frames, select all frames,

What I Am Now Able To Do:
Open Maya 🗸
Navigate the software 🗸
Tumble the view 🗸
4 windows or one window 🗸
Finding the outliner 🗸
Understanding the channel box 🗸
Create a shape 🗸
Change its colour 🗸
Set keyframes 🗸
Playblast 🗸
Render
Find the render (add sound)
0 notes
Text
Week #02 - Starting the Room
Building the Base
Both Gary and Paul gave us different examples of how we can build this base.
I decided to try out both methods, so I could learn more first-hand about how to craft in Maya.
Paul’s Method
We began by using a basic primitive cube. We deleted the top and two connected sides.
We select the remaining three sides, select Extrude (or CTRL + E) and drag the extrusion backwards, so the original sides can become the interior of the shape.
The extrusion will cause the walls to become misshapen, which we’ll need to straighten.
Gary’s Method
Just like with Paul, Gary began the process with a basic primitive cube.
Using the scaling tool, the cube needs to be flattened into a thin base. It’ll be easier to level the base so the bottom is laying on top of the grid.
We then use the Multicut Tool. When holding down CTRL, the Multicut will wrap around the shape (creating an Edge Loop). Using this tool, we’ll select two sides of the base, that will interlock at a right-angle.
Right-click, Face; select the perpendicular sides (plus the overlapped corner,) Extrude (CTRL + E) up the Y axis, until I’m satisfied with the cube shape.

My two different cubes
What Next?
I’m a bit indecisive about which room I’d like to build, but I know I’m stuck on two. I’ll give it a little bit of a think, but I do have visual references for both.
Resources
Pogo Motion: Modelling Task Part I
0 notes
Text
Week #02 - Part II
TASK
We’ll be continuing to learn the basics of Maya (or in my case, beginning the basics of Maya)
By the end of the day, we should be able to:
Open Maya
Navigate the software
Tumble the view
4 windows or one window
Finding the outliner
Understanding the channel box
Create a shape
Change its colour
Set keyframes
Playblast
Render
Find the render (add sound)
Open Maya
Click on Maya and it opens.
Navigate the Software
Tumble the View
Four Windows/One Window
In the Tool Box at the side, in the Panel Layout, there are icons to let us view the Perspective Window (moveable camera), Four Windows (which also includes the X, Y and Z views.) We also have a Two Window option, but we don’t need that just yet.
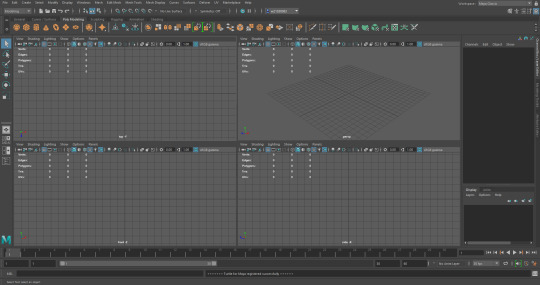
Hotkey: Space Bar
Also within the Tool Box, we can use:
Select Tool
A tool that selects objects.
Hotkey: Q
Lasso Tool
Select objects using a free form shape around them.
Paint Selection Tool
Paint a scene and it selects objects.
Move Tool
Moves the objects by X, Y and Z axis, also freeform.
Hotkey: W
Rotate Tool
Rotates the object by the X, Y and Z axis.
Hotkey: E
Scale Tool
Scales the object by the X, Y and Z axis
Hotkey: R
These attributes can also be altered in the Channel Box.
Finding the Outliner
The Outline is every component or object within a scene.
It’s in the Tool Box, under the Panel Layout.
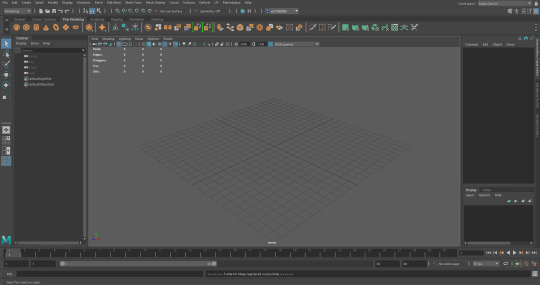
Understanding the Channel Box
Create a Shape
Playing with the different shapes

Creating a mug
End of the Day
What I Am Now Able To Do:
Open Maya 🗸
Navigate the software 🗸
Tumble the view 🗸
4 windows or one window 🗸
Finding the outliner 🗸
Understanding the channel box 🗸
Create a shape 🗸
Change its colour
Set keyframes
Playblast
Render
Find the render (add sound)
0 notes