
lizard-juice-vape-shop
Ive Had This Url Saved For Multiple Years
And I’ve decided to use it as a furby side blogHarley | he/him | ask me about furby commissions!!
70 posts
Don't wanna be here? Send us removal request.
Last Seen Blogs

elizabethdarko
@aldorain

tantalizingtroye
no longer in use.

ourhasretgultekin
Çeyrek Asırlık Çınar
Hasret Gültekin

hedgecock2
Love Femdom, not Findom. I won't be wiring money.

kgonciarz-blog
Krzysztof Gonciarz
Photo
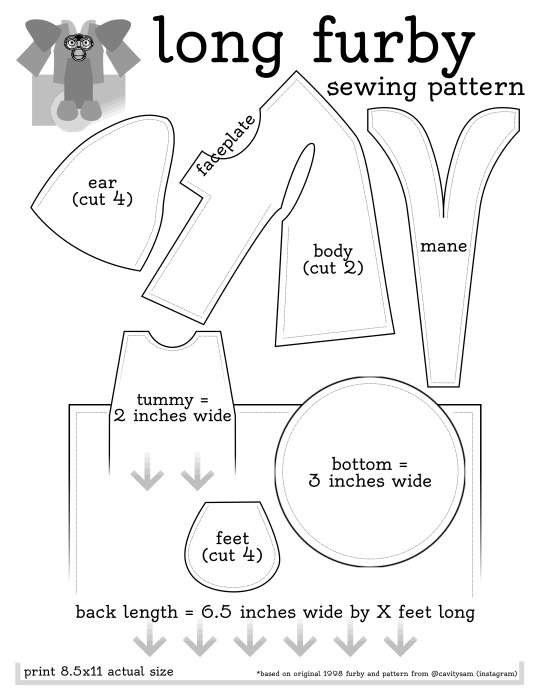
long furby sewing pattern, digitized winter 2020: download the PDF here
136 notes
·
View notes
Photo
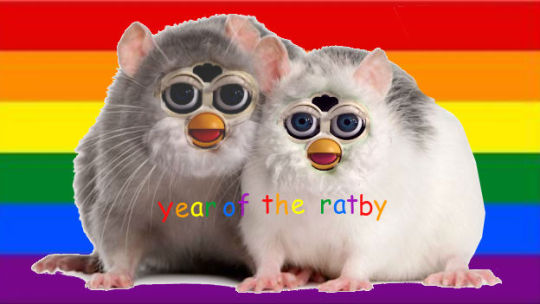
I’m a little late but happy year of the rat!
4K notes
·
View notes
Text
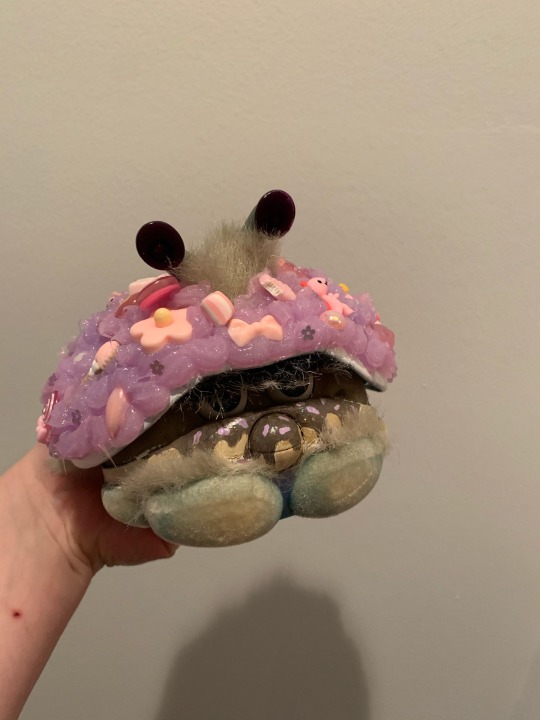
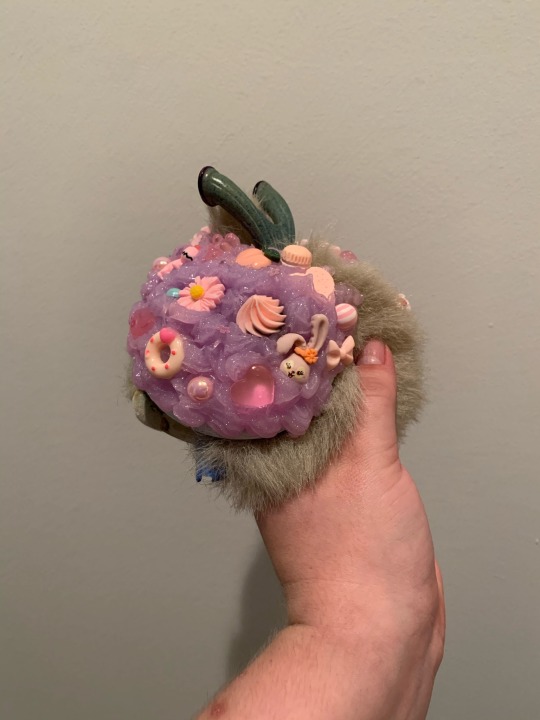
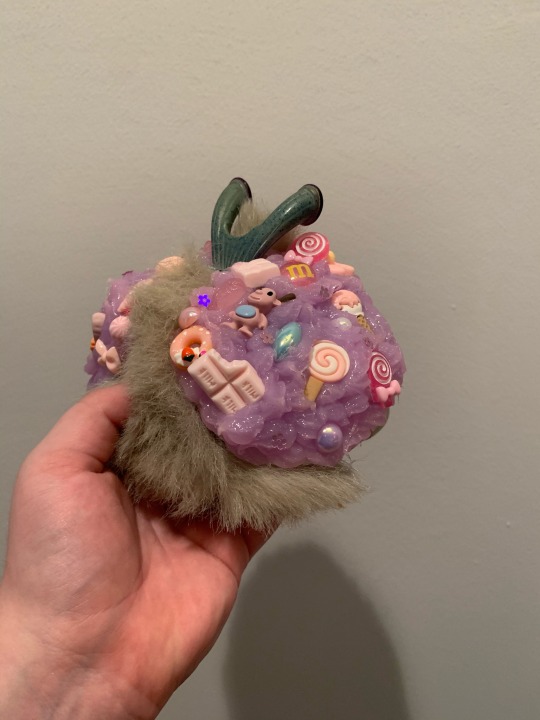
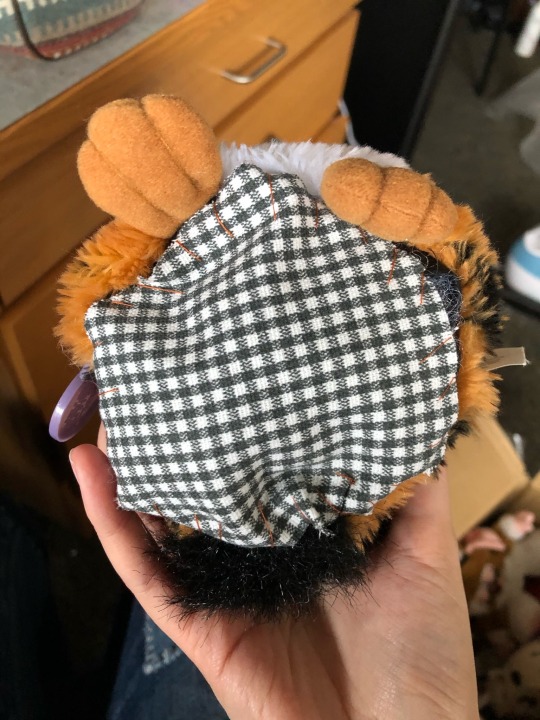
So I decodened a shelby
#decoden#kawaii#custom shelby#shelby custom#shelby furby#furby shelby#furby#custom furby#furby custom#safefurby#safe furby#allfurby#all furby
132 notes
·
View notes
Text
I MADE A TOY COLLECTOR DISCORD SERVER uwu✨
Please dm me if you’re interested!!!
Please rb this to spread the word!!
We have channels and categories for dolls, plushies, robots, and more!! Come share your joy for toys!!
#toy collector#toy collection#discord#discord server#toycore#toy core#furby#all furby#safe furby#allfurby#safefurby#botblr#toys#toy#kidcore#kid core
49 notes
·
View notes
Text
I ended up making it, dm me if you want to join!!!!
Okay I'm up way too late but concepts for a toy collector discord:
-channel to post checklists/cheats for surprise toys
-section for dolls, section for action figures, plush section, robot section, STIM SECTION
-each section would have both brand name channels and general channels
-cursed toy emotes
-fan art channel
-toy customization channel
-toy news channel
-toy DISCOURSE channel
26 notes
·
View notes
Text
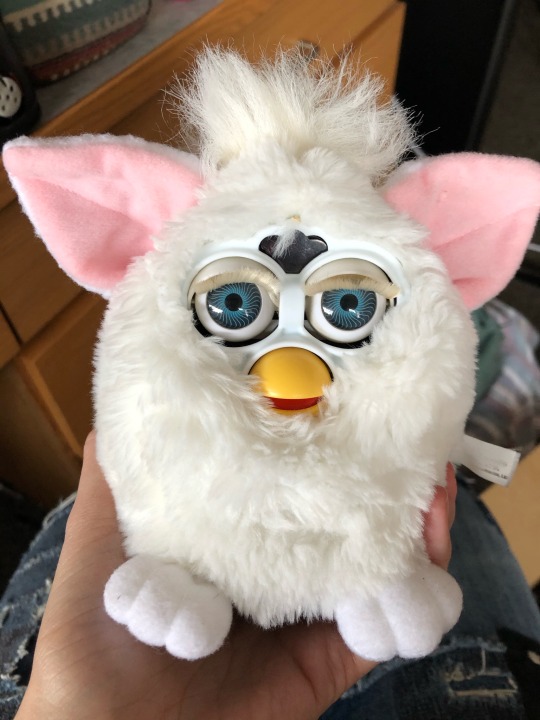

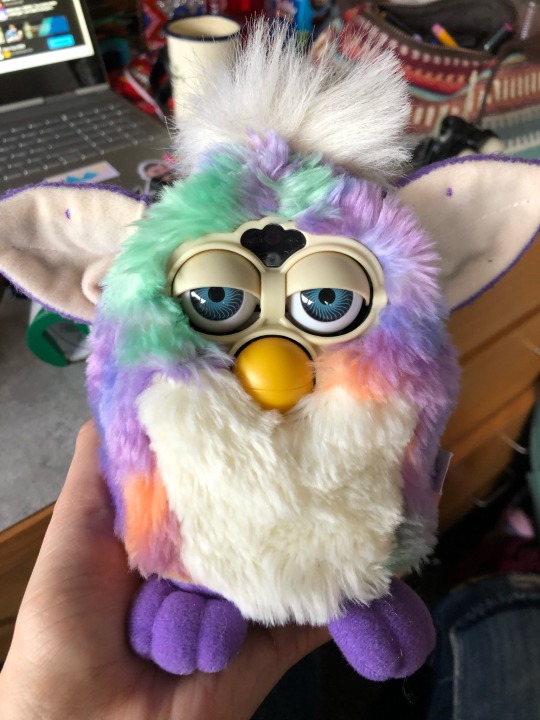
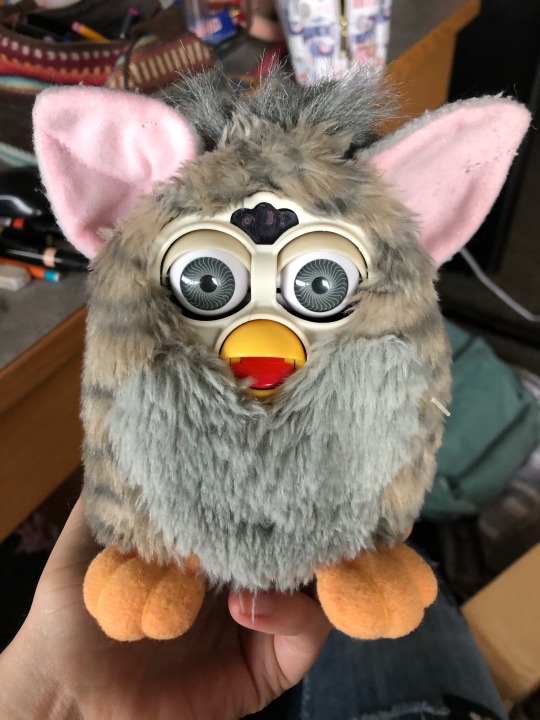


ALL HAVE BEEN SOLD.
Snowball (nonworking)- $15
Dalmatian (nonworking)- $15(SOLD)
Tie Dye (nonworking) - $20
Wolf (nonworking)- $15
Owl (working but mute)- $20(SOLD)
Tiger (plushified)- $20
Gizmo* (non working)- $25
Statue of Liberty (nonworking)- $25
Raccoon (neon eyes, nonworking)- $30
I am only selling/shipping in the US for this round. Shipping is $8 USPS priority!
Want a furby plushified? +$5
READ BEFORE BUYING:
I’m currently a college student with a bit on my plate, so there may be a delay with some orders. It’ll be a first buy-first ship basis. Feel free to message me with any concerns! Payment will be through PayPal. All furbies have been skinned/cleaned except the Gizmo.
*- the Gizmo may be beyond repair, as one of the battery springs is missing. Message me for pictures.
39 notes
·
View notes
Text
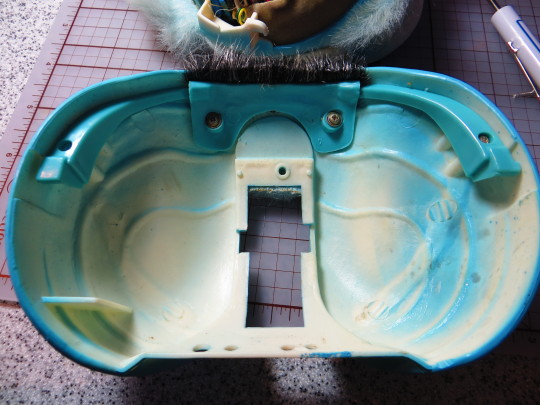
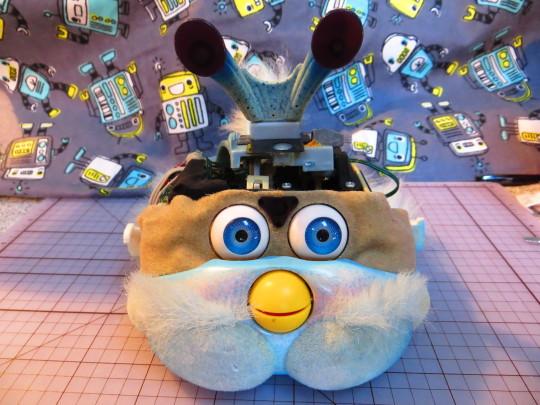
How to Skin (or Shuck) a Shelby (+ Push Start)
I’m not going to lie to you: It was super hard to figure out how to open my Shelby. It took me maybe an hour of solid Google-ing to find any information, and it culminated in precisely one defunct website from 2002 that, upon later Google-ing, I could not find again. I owe that website my life, and if anyone can find it again, I’ll be very grateful. UPDATE: The website has been found! You can visit it right here! Click “Shelby problems” and then “Problem 1”.
1) Peel back the fur
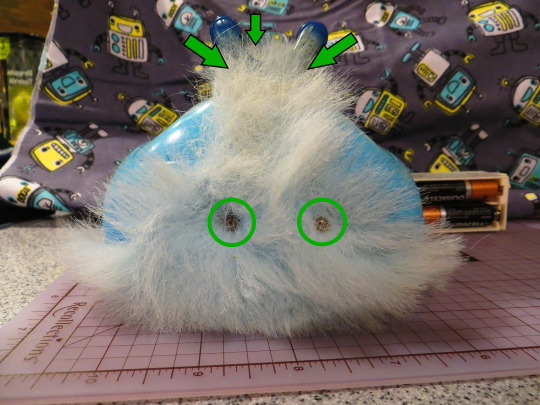
You may have noticed all the screws on the bottom of your shelb. I don’t know what they hold in, but the good news is that you don’t need to either! Instead, you’ll want to comb through your Shelby’s fur until you find 5 screws: 2 lower on the back, 2 on the top behind Shelby’s ‘tennies, and 1 off-center in front of the ‘tennies. All these screws are slightly different sizes, so keep track of where they all go.
(This Shelby’s screws are very rusty, by the way. Yours probably won’t look quite so awful. They’ll also be very hard to find on shelbies with darker fluff)
You should be able to pull the fur and it’s plastic backing away from Shelby’s body now. It’s glued on at the bottom, but the fur doesn’t need to come off all the way, so you can leave that alone.
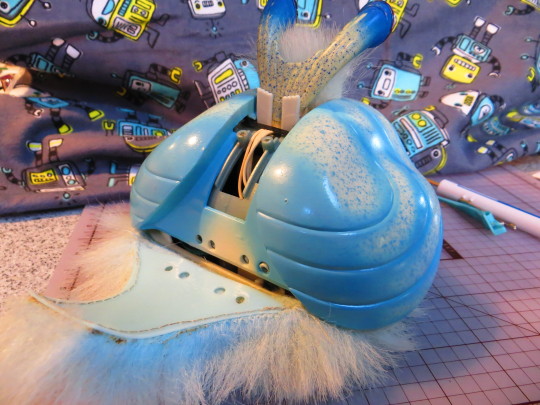
2) Free the shell

This one’s a little weird: When Shelby is facing you, you will find a screw on the left side of the body, screwed into the shell. Remove this screw and the piece it holds in. Do not repeat this step on the other side.
Here’s what it looks like inside the shell. The tapered side ends just inside the piece that holds Shelby’s eyelashes/unibrow in, and is only attached by the one screw. Again, completely ignore the matching piece on the right side of the shell. Though it’s the same part, it doesn’t do anything.
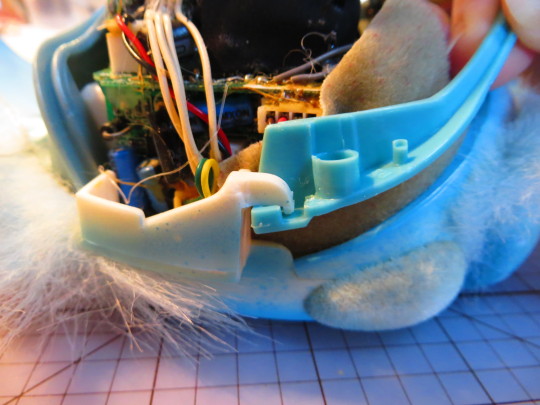
This piece is important to remove because it forms one half of the hinge that keeps Shelby’s shell from opening too far.
3) Remove the shell
You should be able to now wiggle the shell around pretty freely. To get it off, you need to rotate it 90 degrees and lift it over the ‘tennies. Rotating it is pretty tricky, because the fit around the base of the ‘tennies is pretty tight, but there’s a certain sweet spot that lets the shell rotate pretty smoothly. Just keep wiggling and twisting gently and you should be able to get it in the right spot, which looks like this:

Then it’s just a simple matter of maneuvering the ‘tennies through the slot!
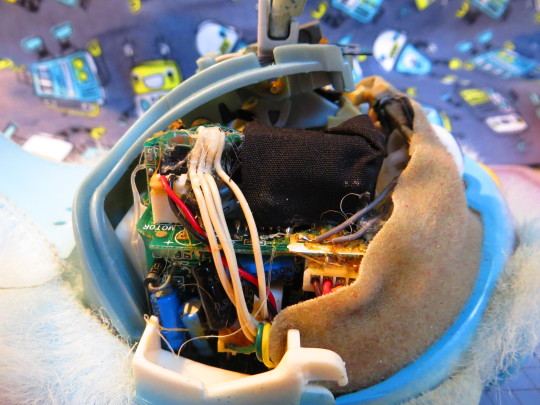
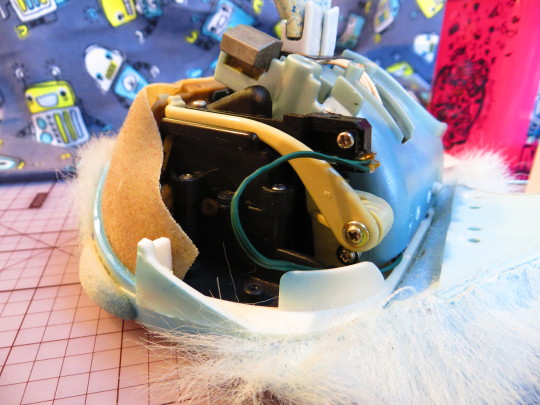
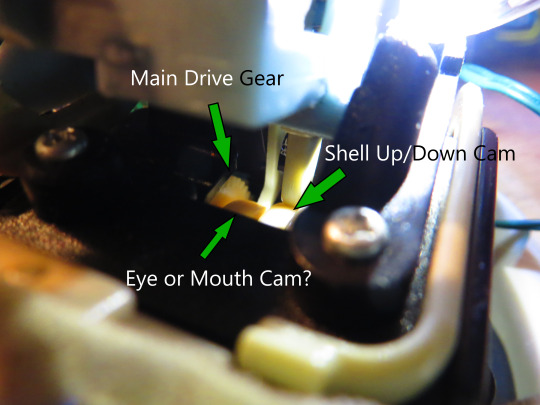
Congratulations, you’ve done it! You may notice that Shelby looks a lot different from a Furby. Specifically, the speaker, motor, and cam gears are absolutely buried under each other! While it’s nowhere nearly as easy, you can still push-start a Shelby.
+) Push-starting

If you look in through the top of Shelby’s head, just about above the right eye, you should be able to see the cam. If you’re lucky, one of the 3-ish gears you’ll be able to see has a nub (very similar to the ones I talk about in my sync screw guide) that you can reach with a long, sturdy tool like a flathead screwdriver. With batteries in the shelb, gently push on the gear. Be ready to pull your tool out as quickly as you can, because just the lightest pressure can bring a Shelby out of a coma!
It is absolutely vital that you are gentle with these gears! If you apply too much pressure, you run the risk of warping the gear, and even the slightest scratch or bent tooth can permanently ruin these little bots. Use caution and never try to brute force plastic pieces!
Thanks for taking the time to read my guide! If you’re feeling generous, you can donate to my Ko-fi! I really appreciate it, and donations will help me provide more guides and fun tech stuff in the future!
You’re also completely welcome to use the images or writing in this guide on other websites, or in your own guides! If you do so, please leave a link back to this post near the images.
552 notes
·
View notes
Text
:0 if u sell this on stuff please tell me I’ll buy it

I’ve always wanted to make a line of apparel or journal covers with themes like this. I call it Stim House #1
92 notes
·
View notes
Text
Hey!! I sell customs on Etsy!!!
CUSTOM FURBY MAKERS!
If anyone is open to making a custom furby (I’m Very in the market for a prototype custom) for commission, PLEASE contact me!! I’m willing to pay, of course, and understand how much they may cost !! I’m desperate :”0
17 notes
·
View notes
Text
I bought a slow rising squishy to try this with!!!!
FOAM FURBY TUTORIAL
Okay I've seen people make squishy furbies before but I had no friggin idea so I decided to make one out of cushion foam and it actually worked out.
FUN FURBY TIMES HERE WE GO
INGREDIENCE:

Foam. I tried to find the cheapest foam with the longest expansion time. I found it at Wal-Mart it was like 10 dollars.
Cloth. I used fleece. About 5-7 dollars for 4 feet.
Scizors
Stuffing
Needle and thread
Glue gun
Glue sticks (seriously nothing's worse than forgetting you didn't buy glue sticks when you have everythin layed out.)
Sharpie
A small screwdriver
God given patience.
HOW IT DO:
Skin your furby. Put the skin aside.
Take your to robogut furby and draw the outline of its butt onto the foam with your marker.
Cut out several squares each with the butt outline and stack them.
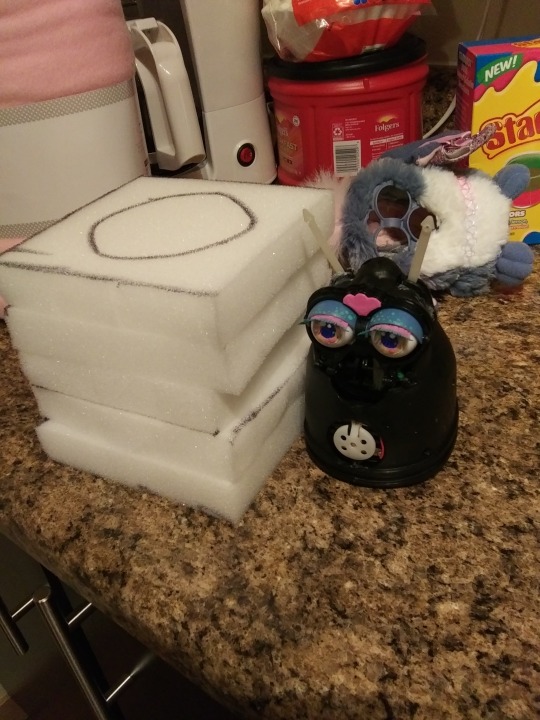
4.) After the stack is only alightly taller than your furby shell, cut out the outline to the best of your ability and hot glue them together to make a tower as monument to all your failures.
5.) Remove the furby's shell and face plate.
6.) Now at this point usually a tutorial will tell you to hot glue your furby's mouth into a position that you like. That's where I say NAY. Im sure you can do this with those little styrofoam sheet sticker things and cut them out but what I did was lay hot glue "bumpers" where the tongue and beak connect. If you do it right you won't end up losing your beak under the face plate later. Let the bumpers dry and try it out.


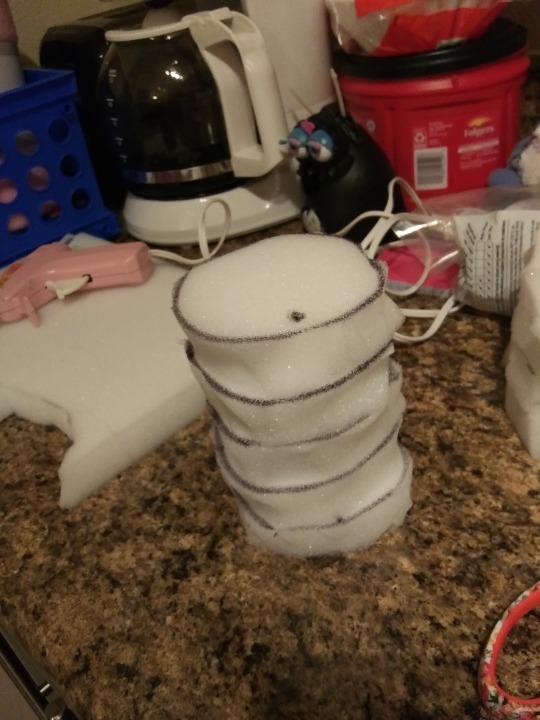
7.) Using the scizors (or an exacto knife, I dunno I didnt try it I dont work with foam much) do your best to carve outa vaugly furby shell shape out of your foam tower. It should be roughly the same size and shape as the original shell. Think of it as a new skeleton only but this time its made of matress.
8.) Using the face plate, trace the shape onto the foam.

9.) G O U G E. Using myfingers and carefully ripping out bits of foam until I cod fit your face plate seemed to work well enough.
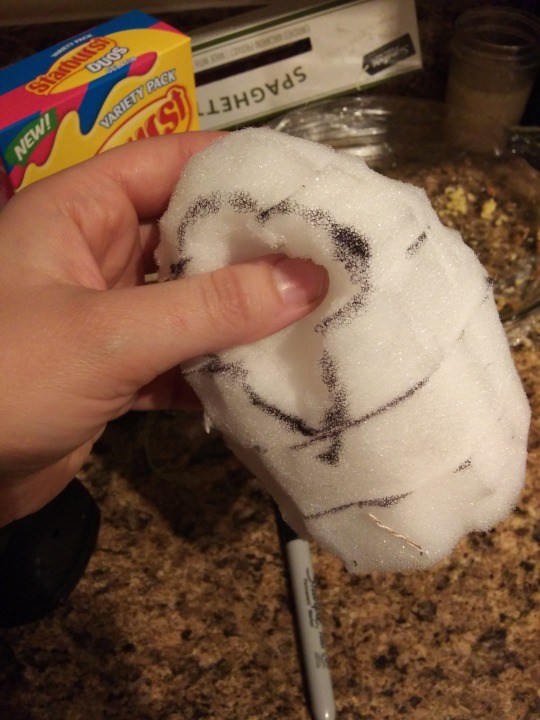
10.) Glue a piece of fabric onto the back of the face plate. Give the moving parts of the face a bit of space to move freely.
11.) Make sure the face pieces can move freely in the cavity you dug out. If theres a struggle, dig some more.
12.) Hot glue the face plate to the foam.

13.) Laugh for 10 minutes straight because you've created an absolute atrocity lmao what am i even doing with my life?

1K notes
·
View notes
Text
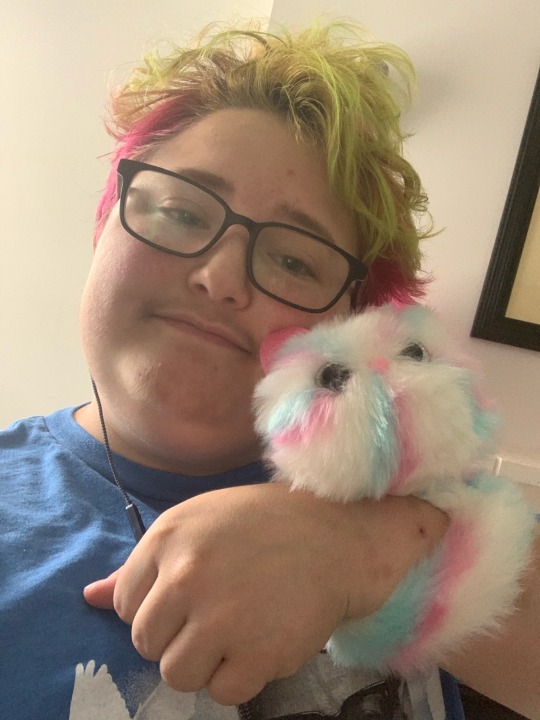
This is the trans rights pomsie of good luck
I bought her on clearance at target today and just got a phone call to reschedule my top surgery that had previously been delayed due to COVID
Reblog for good luck
16 notes
·
View notes
Text
Okay I'm up way too late but concepts for a toy collector discord:
-channel to post checklists/cheats for surprise toys
-section for dolls, section for action figures, plush section, robot section, STIM SECTION
-each section would have both brand name channels and general channels
-cursed toy emotes
-fan art channel
-toy customization channel
-toy news channel
-toy DISCOURSE channel
26 notes
·
View notes
Text
I kind of wish there was a general bot server, I’ve started collecting random bots and I love to talk about them but I’m relegated to the “other” channels of furby and aibo discord’s
5 notes
·
View notes
Text
I’m live on twitch for the first time!!! Drawing thirst traps of the spec ops guy lol
https://twitch.tv/pasteljackalope
6 notes
·
View notes
Text
I wanna try this with slow rising foam... like I could probably repurpose old squishies as furby stuffing.... hmmmmm
FOAM FURBY TUTORIAL
Okay I've seen people make squishy furbies before but I had no friggin idea so I decided to make one out of cushion foam and it actually worked out.
FUN FURBY TIMES HERE WE GO
INGREDIENCE:
Foam. I tried to find the cheapest foam with the longest expansion time. I found it at Wal-Mart it was like 10 dollars.
Cloth. I used fleece. About 5-7 dollars for 4 feet.
Scizors
Stuffing
Needle and thread
Glue gun
Glue sticks (seriously nothing's worse than forgetting you didn't buy glue sticks when you have everythin layed out.)
Sharpie
A small screwdriver
God given patience.
HOW IT DO:
Skin your furby. Put the skin aside.
Take your to robogut furby and draw the outline of its butt onto the foam with your marker.
Cut out several squares each with the butt outline and stack them.
4.) After the stack is only alightly taller than your furby shell, cut out the outline to the best of your ability and hot glue them together to make a tower as monument to all your failures.
5.) Remove the furby's shell and face plate.
6.) Now at this point usually a tutorial will tell you to hot glue your furby's mouth into a position that you like. That's where I say NAY. Im sure you can do this with those little styrofoam sheet sticker things and cut them out but what I did was lay hot glue "bumpers" where the tongue and beak connect. If you do it right you won't end up losing your beak under the face plate later. Let the bumpers dry and try it out.
7.) Using the scizors (or an exacto knife, I dunno I didnt try it I dont work with foam much) do your best to carve outa vaugly furby shell shape out of your foam tower. It should be roughly the same size and shape as the original shell. Think of it as a new skeleton only but this time its made of matress.
8.) Using the face plate, trace the shape onto the foam.
9.) G O U G E. Using myfingers and carefully ripping out bits of foam until I cod fit your face plate seemed to work well enough.
10.) Glue a piece of fabric onto the back of the face plate. Give the moving parts of the face a bit of space to move freely.
11.) Make sure the face pieces can move freely in the cavity you dug out. If theres a struggle, dig some more.
12.) Hot glue the face plate to the foam.
13.) Laugh for 10 minutes straight because you've created an absolute atrocity lmao what am i even doing with my life?
1K notes
·
View notes
Text


you now stand before
THE TRIBUNAL
how will they judge your sins?
480 notes
·
View notes
