
Last Seen Blogs

chicamistica95
Chica Mística

boykingbottoms
all hail our boyking;
Sam Winchester

o-n0rmal-is-b0ring-o
Tired

sir-yaps-alot
pigeon :)

trixiethunderfun
Bing Bang Bong
Text
Autel IM608 Pro + XP400 Pro Add New Key+ All Keys Lost for Mercedes Benz
We all know that Mercedes keys are much more complicated to program than other car keys. So today we will show how to add a new key and do all keys lost for Mercedes-Benz using Autel IM608 Pro plus XP400 Pro.
Programming keys to a Mercedes poses a tough problem for techs, for most models you need to use the MaxiFlash JVCI and the XP400 Pro. When all keys are lost, you should use the Autel G box.
Part 1: Add a key for Mercedes- Benz
Device and equipment used:
Autel IM608 Pro & XP400 Pro& JVCI
One working key
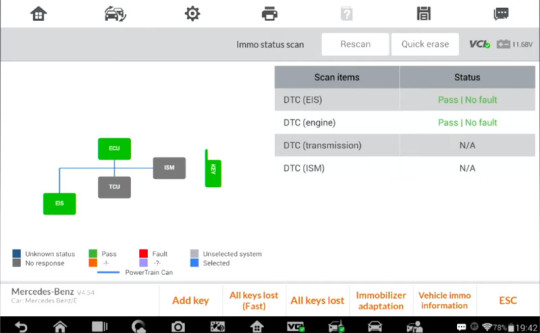
Perform a pre-scan on the vehicle firstly.
After getting the car’s info automatically detecting the VIN, go to choose “Immo status scan”
The scan is completed, then move on to the next step which is to add the key.
Connect to the car via JVCI to the OBD and with the XP400 Pro
Select “On vehicle”
The main steps to add a new key:
1.Read EIS data
2.Read ignition key information
3.Read blank key information
4.Obtain key password
5.Generate key file
6.Write BE key file
7.Test if the new key works normally
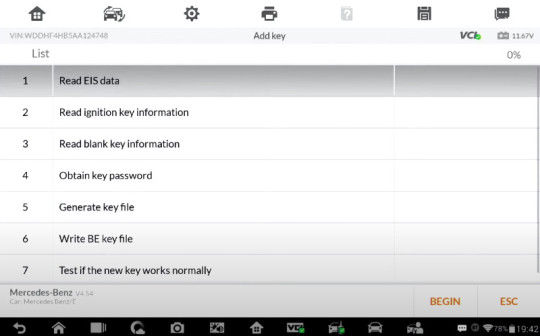
Click “BEGIN”
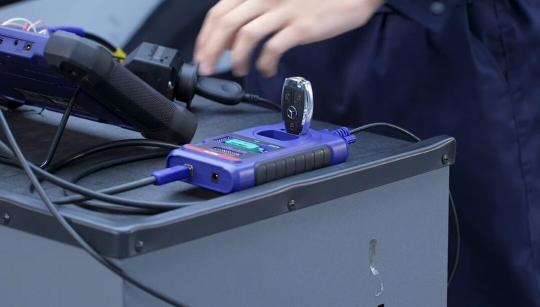
Follow the instructions on screen to place the working key in the XP400 Pro programmer
First press any button of the key and hold it close to the programmer
Next insert the working key into the programmer and press OK
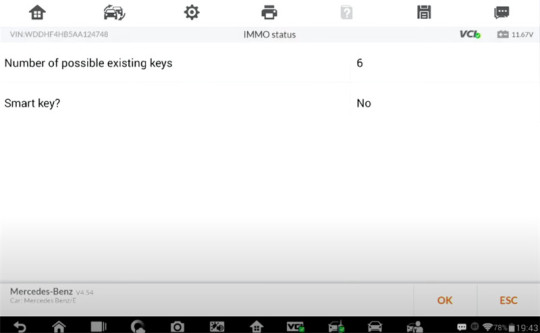
Ensure the key is not a smart key
Confirm the ignition key info
Take the blank key and put it close to the programmer and press any button on it, then replace the working key with the blank key in the programmer.
There is not a key password, so need to take the working key and get the password.
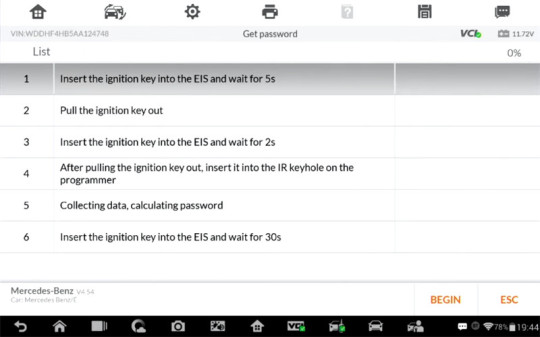
Enter password calculation process
Insert the ignition key into the EIS and wait for 5s
Pull the ignition key out
Insert the ignition key into the EIS and wait for 2s
After pulling the ignition key out, insert it into the IR keyhole on the programmer
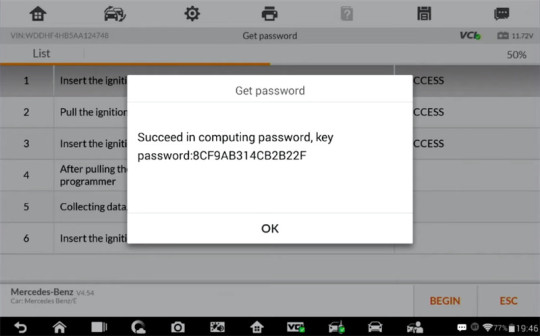
Collecting data, calculating password
Insert the ignition key into the EIS and wait for 30s
After the key password has been obtained successfully, it will generate the key file automatically.
Then go to next step- write BE key file
Insert the blank key into the IR keyhole on the programmer
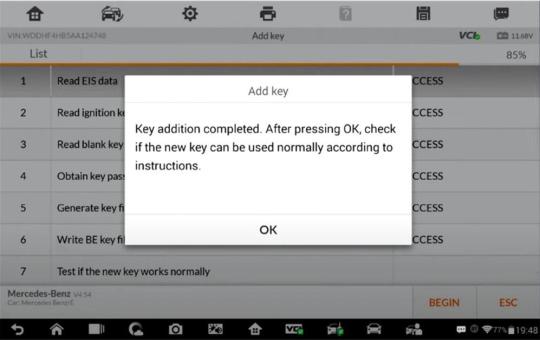
When the key addition is completed, check if the new key can be used normally according to the instructions.
Make sure your new key is working by turning on the engine and locking/unlocking the doors.
Insert the new key into the EIS. If the red indicator lamp on the key lights up and goes off, the key learning is successful. If the red indicator stays lit, try to insert and remove the key for several times. If still not working, the key addition failed.
Turn ignition on and check if the vehicle can be started normally. If the vehicle not started normally, the key addition failed.
Check if remote lock and unlock functions can work normally. If not, please check if the key battery can work normally. If the key battery works normally and the remote function is still invalid, the key addition failed.
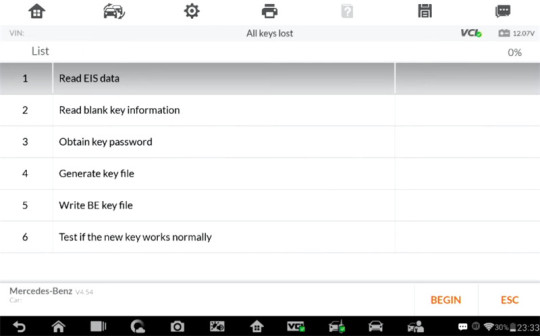
Part 2: All keys lost programming for Mercedes- Benz
Device and equipment used:
Autel IM608 Pro with XP400 Pro
Autel G box
With the Autel G- box, the process can be cut down by over 80%.
There are two scenarios in which you can use the G box.
One is by connecting with the OBD2 port in the vehicle. But for some Benz models, they don’t work with the OBD, therefore, we need to disassemble the EIS component and work with that separately from the vehicle. So in addition to the G- Box, the XP400 Pro key programmer, the cable that will connect the XP400 Pro with the EIS, and the JVCI and JVCI cable are required.
Finally, make sure you’re connected to the internet, then follow the instructions for key learning with all keys lost.
Procedure:
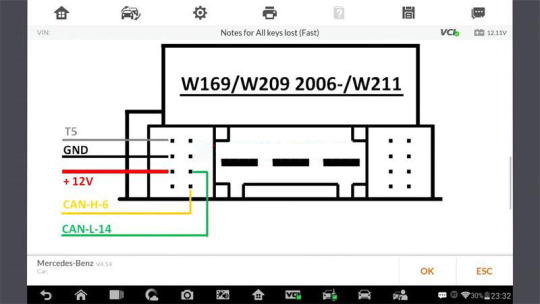
Select Mercedes- Benz>> Smart selection>> All keys lost (Fast)>> On bench (G- Box Fast)>> Select the corresponding EIS type (e.g. W209/2006- )
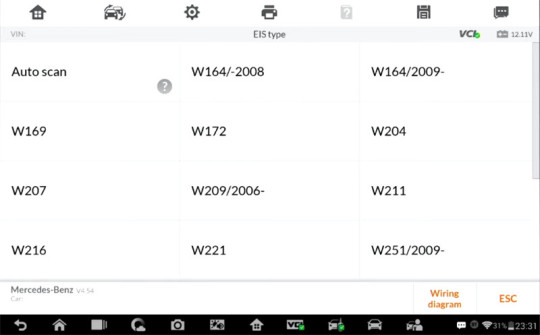
Note: We can check the EIS number on the EIS itself.
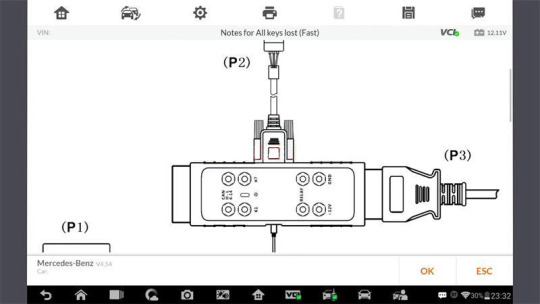
Connect the power adapter to the G- box
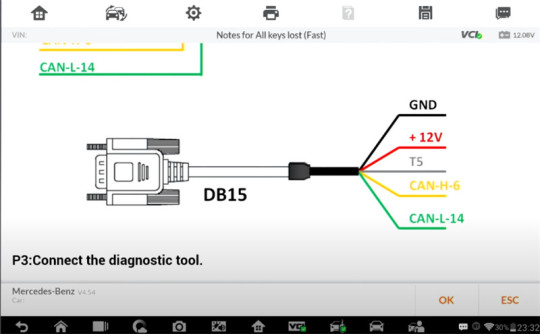
Then connect wires to EIS component according to the diagram
It is color-coded and marked with labels to help you connect easily.
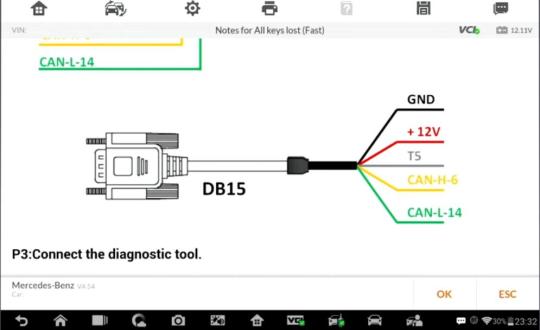
Finally, connect the JVCI and the JVCI cable with the G- box
The main steps to do all keys lost programming:
1.Read EIS data
2.Read blank key information
3.Obtain key password
4.Generate the key file
5.Write BE key file
6.Test if the new key works normally
Follow the instructions on the screen to operate
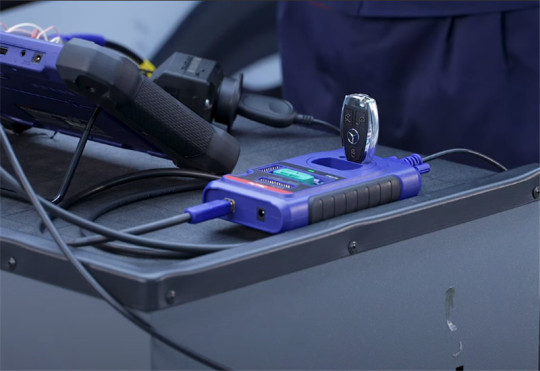
Put a blank key into the XP400 Pro
There is not key password, so enter key calculation process to get key password
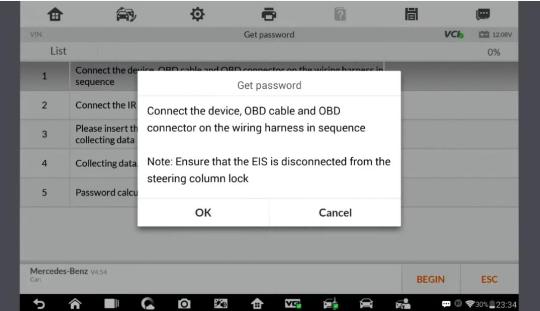
Connect the device, OBD cable and OBD connector on the wiring harness in sequence
Note: Ensure the EIS is disconnected from the steering column lock.
Connect the IR key simulator (APB102/APB125) to the programmer
Insert the IR key simulator (APB102/APB125) into the EIS, start collecting data
Collecting data, calculating password
Password calculation completed
Once the key password is calculated, the key learning process will only take a few more seconds.
It will generate the key file automatically, then go to write BE key file.
Insert the blank key into the IR keyhole on the programmer to write key file.
When all keys lost are completed, assemble the EIS back into the vehicle and check if the new key can be used normally according to the instructions.
Done!
0 notes
Text
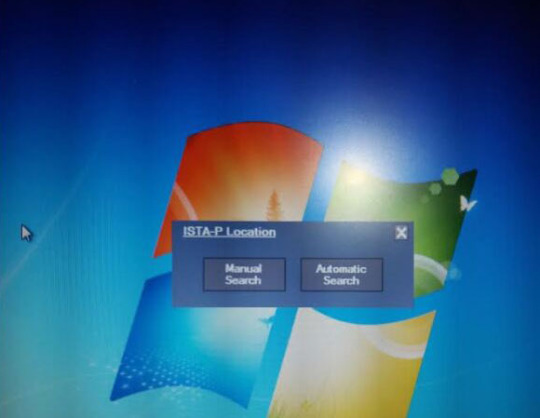
VXDIAG BMW Cannot select ISTA-P Auto Problem
Recent some users reported that they had problem using vxdiag full or vxdiag vcx se BMW ista-p software.
Run ISTA-P software, it prompts to “Automatic search” or “Manual search” , but no matter select what option, it stuck and not move on. How to solve it?

Possible reason:
ISTA Version is too old. There is no ISTA-P Fix file on desktop.
Solution:
Get the VXDIAG BMW ISTA software updated.
Both vxdiag full and vcx se BMW software come in HDD format. You can either send back old HDD or buy a new HDD to update.
0 notes
Text
JCB Electronic Service Tool Reviews
JCB Electronic Service Tool diagnostic interface is used for fast and effective fault finding, check maintenance standards, see if the machine has been abused, view and change machine set up data, flash ECUs with the correct data files. You can reset EMS hours, edit speed limiters and use other functions what require special unlock.
JCB Service Master is a gateway application allowing a large number of Vehicle Support Applications to be linked using one familiar interface. The interface acts as a graphical tool for selecting the target vehicle from a groups of Vehicle Families and triggering the particular Service Tool Application desired. This removes the need for a user to ‘remember’ every individual service tool available and select which one if intended for a particular machine.
The JCB Service Master also provides several key features that will accompany all JCB projects, a Multi Language editing tool that provides a means of individual text string translation for all JCB Applications and a means to select a localised language translation for the each JCB Application.
1. Lastest Software Version: V1.73.3 (We also have V8.1.0 and v1.45.3 software , if you need it , we can offer to you )
2. Language: English, French, German, Italian, Portuguese, Spanish
3. Update By Email
In summary, with the latest version of ServiceMaster loaded on your laptop, you can:
– Fault detection
– For a quick and effective search of failures.
– Verify maintenance standards.
– View and change the configuration data of the machine.
– This can only be done with ServiceMaster.
– Flash ECU with the correct data files.
– Resolution of the problem
– Verify service standards.
– View and edit the generated data.
Calibration program JCB ServiceMaster 4 allows the user to diagnose construction, agricultural and engine JCB.
Service Master is a gateway application allowing a large number of Vehicle Support Applications to be linked using one familiar interface. The interface acts as a graphical tool for selecting the target vehicle from a groups of Vehicle Families and triggering the particular Service Tool Application desired. This removes the need for a user to ‘remember’ every individual service tool available and select which one if intended for a particular machine.
The Service Master also provides several key features that will accompany all JCB projects, a Multi Language editing tool that provides a means of individual text string translation for all JCB Applications and a means to select a localised language translation for the each JCB Application.
0 notes
Text
Tacho Programmer Digital Tachograph Programmer CD400 TRUCK TACHO Speedometer
1.What is a tachograph?
What is a tachograph? Basically, a tachograph is a device that measures and records the speed and distance driven by a vehicle. The data are recorded in the form of graphics on a paper disk. The new digital tachographs record those data on its embedded memory and also on the smartcard of the driver.
2.Description
2.1 Technical specifications
Graphic FSTF LCD Display: (100 x 32 pix. / 4 lines x 20 char)
White LED backlight
Size: 150 x 100 x 45 mm
Supply voltage: 9 to 30 VDC
Supply current: 12mA
Case: green-blue ABS (IP40).
Operating temp: -20…+70°C
Weight: 155g
2.2. Keyboard – Alternate function keys ‘F1′, ‘F2′ & ‘F3′ are active when a function in inverted video appears on the bottom line of the display.
F1= MODIFY, F3=OK
– Alernate function key ‘↑’ & ‘↓’ are used for example to navigate the menus.
– Alernate function key ‘←’ & ‘→’ are used to select the digit in some parameters.
– ‘Ent’ (=Enter) is used to select a function or enter a value.
– ‘Esc’ key is used to go back in the menu, leave a function, to erase the last digit entered and to switch the programmer ON & OFF when powered by the battery.
2.3. Connections
– Left connector: Serial port for software upgrade (upgrade cable).
– Center connector: Connection for crocodile clip cable (K13xx/K1318).
– Right connector: Connection for tachograph cable.
3.Operation
3.1.Power supply and tachograph type detection For all tachograph types, except for the K13xx/1318 and the FTCO1319, the Key Programmer is powered by the tachograph itself. An automatic tachograph type detection is executed on power ON, so don’t switch the programmer ON, simply connect it to the tachograph with the appropriate cable. The programmer will switch ON and detect the tachograph type. In the case of the K13xx/1318 and the FTCO1319, switch the programmer ON pressing the ‘I/O’ key. If the FTCO1319 is connected, the programmer will detect it. To switch the programmer OFF, press and hold the ‘I/O’ key. If no tachograph is detected, the K13xx/1318 will be selected by default. OOn power ON, the programmer will display the product information (Software version, Serial number, etc…), then the menu for the tachograph type detected.
0 notes
Text
How to Solve XTOOL PAD2 can not do BMW Key programming
Recently have customer got his new XTOOL X100 PAD 2 but he found that the item not work. Used the pad2 to do BMW KEY programming but fail to do that.
How to solve the problem? Let us find out.
Customer: I tried a Q7 2006 to diagnostic the pneumatic shock absorbers the aircraft supports only 5 marked so Jaquar land rover, benz and another brand. And my BMW 3 seris E91 for DPF system because I have the light FAP lit nothing it does not work.
Today I tried to program a key on a Golf 2000 gasoline and I can not, I try to make a BMW e46 it does not work either. I would like to have the procedure to follow.
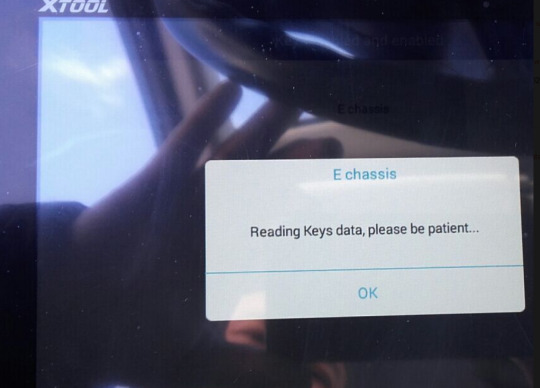
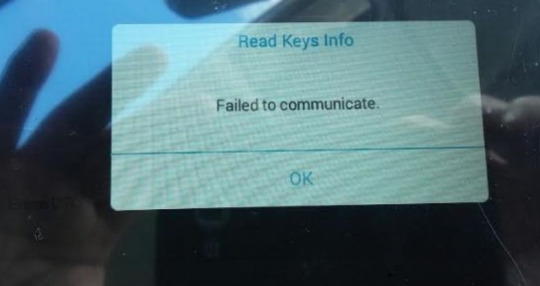
Engineer suggest customer change the menu from “F chassis and E chassis” to “CAS 1-3”
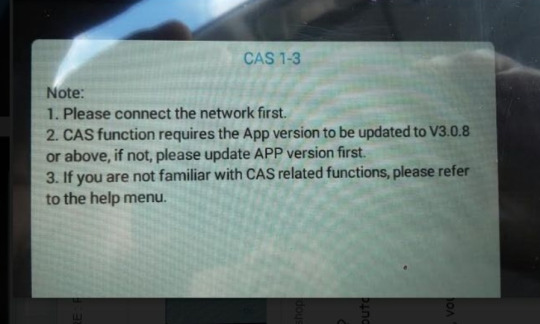
While customer still can’t do BMW key program after using the ‘CAS 1-3”. And it appears a “Fail to communicate” and a CAS 1-3 using note:
Here are some tips to use Xtool x100 pad 2:
Choose the right menu or change the menu when you meet problem programming
Update the device to the latest version software.
If the x100 pad 2 still can’t work after update, you should tap the help on the device to test the device so that the engineer could give you more detail solutions.
0 notes
Text
Jungheinrich EJD 220 Travel Acceleration Parameter Setting by CanCode
This example shows the parameter setting for the acceleration of travel program 1 (parameter 0256).Without CanDis only CanCode internal parameters can be changed.Traction controller parameters can only be changed with CanDis,without CanDis the settings must be performed by the manufacturer’s service department.

CAUTION!
Altering settings for the travel, steering and hydraulic functions can result in accidents
Increasing or decreasing the settings for travel, steering and hydraulic functions can result in accidents.
Carry out a test run in a secure environment.
This requires greater attention on the part of the operator.
Procedure
* Enter four-digit parameter number “0256” and confirm with the SET key (76).
* Enter sub-index (enter “2”) and confirm with the SET key (76). Z The parameter and sub index are displayed alternately with the current reading(0256-2<->0000-3).
* Enter the parameter according to the parameter list and confirm with the Set key(76). Z The LED (77) of the O key (78) switches briefly to steady light and start flashingagain after approx. 2 seconds. Z If the entry is incorrect, the LED (77) of the O key (78) turns red. Enter the parameter number again to repeat the setting. Z The parameter and sub index are displayed alternately with the entry (0256-2<->0000-5).
The travel parameter is now set.
Repeat the procedure to enter further parameters as soon as the LED (77) of the O key (78) flashes.
Z Travel is disabled while the parameters are being entered.
Checking the settings in programming mode
Procedure
Select the travel program to be worked on after changing the parameter value, and confirm with the Set key (76).
The truck is now in travel mode and can be checked.
Z To continue setting, confirm with the Set key (76) again.
Saving travel parameters
Requirements
– Enter all parameters.
Procedure
* Run “SaveParameters” by pressing 1-2-3-Set.
* Confirm with the O key (78).
If you want more instruction for Jungheinrich forklift,please refer to: Jungheinrich Truck Repair.
0 notes
Text
VXDIAG Benz C6 Export & Program HU05 Control Module Data
How to export HU05 control module data and program by Vxdiag Benz C6 with DTS Monaco software? Check the step-by-step guide in this post.
Connect Star C6 with the vehicle
Run DTS Monaco software
HU5 Ethernet option cannot be found in the [Diagnostic Services] option
So exit the software to export the data
Click on [Administrate and manage DTS projects]
In the [System Configurator] menu, click on [System settings]-> Interfaces]
Check whether the options are correct in [ISO_DOIP_SMR (MVCI_DAIMLER_DOIP_Collection)], [Physical links], [VCI_SMR (MODULE_TYPE_ID_MTS6532)] and [Physical links]
Then go to Xentry Diagnosis application location
Path: Benz (C:)-> Program Files (x86)-> Mercedes-Benz-> Xentry-> Kontexte-> ODXProjekte-> PKW_COMMON-> dbr
Copy all the related HU5 control module data and paste to [205 DTS DOIP] file
Open [Temporary workspace]
Select all HU5 module data
Then click on [Open]
Select [MBCar_MBVan_SMR_DiagnosticCVAN_V_02_02]
And then click on [Finish]
Click on the switch icon
If the Execute broadcast notice pops up with the words “Broadcast might not be supported by the currently activated interfaces” as below, just click on “OK”
Select [HU5 (UDS_Ethernet)] option to view the software number
Then select [HU5 (UDS_Ethernet). HU5_HU5_Bootloader]-> [Flash Programming]-> [Temporarily add flash data]
Select the related flash files and open as below
Tick all the sessions and click on [DiagnosticService]
Click on [Read ID] to confirm the software number again
Switch to [Flash Programming] menu
Click [Stop] to program and refresh ECU
Operate it until the programming process is completed
Done!
0 notes
Text
XTOOL AutoProPAD programmer reflash/initialize immobilizer system for Toyota/Lexus
In this instruction Obd2tool.com show you guide on how to use XTOOL AutoProPAD programmer to reflash/initialize immobilizer system for Toyota/Lexus.More topics about Toyota immobilizer,please check here:Toyota Key Programming
What You Need?
XTOOL AutoProPAD Programmer
XTOOL EEPROM Adapter Set
Toyota/Lexus Immbilizer Box
Procedures:
Plug the EEPROM PCB to EEPROM adapter,and rainbow cable on the EEPROM PCB
Connect clip to the rainbow cable
Build connection between XTOOL AutoProPAD and EEPROM adapter
And provide 12v power for EEPROM adapter
Enter menu to select “Other Service”
Select “EEPROM Adapter”
Select “Data initialization”
Make sure the adapter is connected and powered on,the status light is turned on
Press “OK” to contine
Select “Toyota”
Now locate the IC900 on the Toyota immobilizer system box
Use 8 pin clip to clamp the chip
Press “Toyota 16 bit (93C56)”
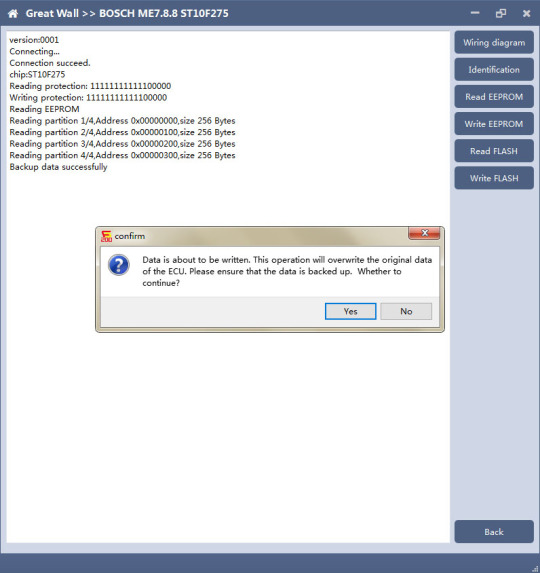
Then input the file name to make a backup on the XTOOL AutoProPAD,in case immobilizer data damaged during reflashing.
Press “No” to continue
And the file is saved successfully
Whether to continue
Press “Yes” to continue
Repair the data…
Data initialized successfully!
Now install the immobilizer box back on Toyoa/Lexus,then just do regular key programming proceudres.
0 notes
Text
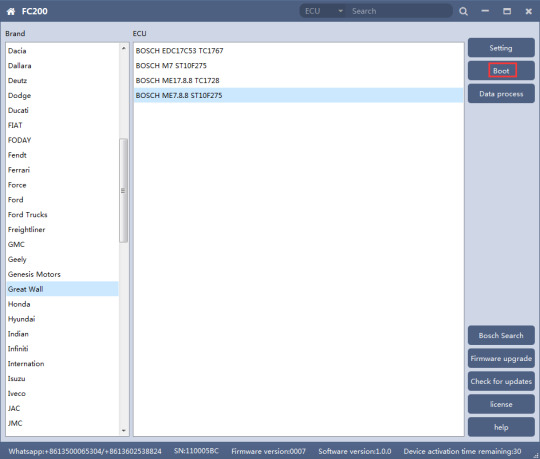
Guide to use CG FC 200 ECU Programmer
CG FC-200 is arriving after 3-5 working days delivery on schedule, it will be used for ECU /EGS ECU clone, it is claimed to cover 4200 kinds of ECU and 80% of the models on the market. And it is claimed to be capable of data processing, module cloning, disassembly matching, DTC shielding, Immobilizer closed, ISN acquisition, Vin modification etc. If it is as good as promised? Read the following parts.
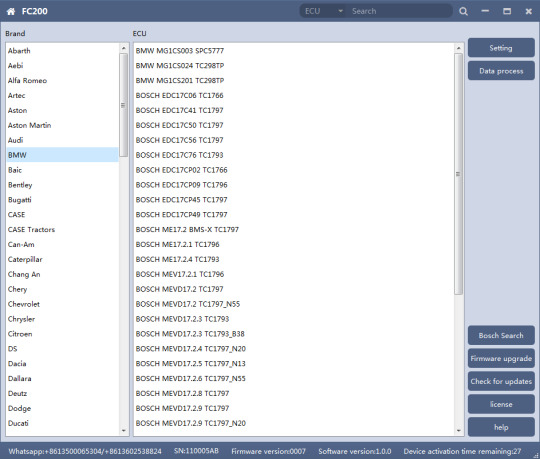
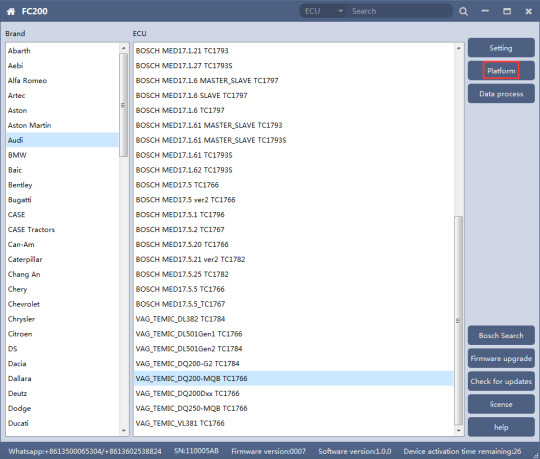
1. Software Use
Below the main interface is the software version and device information.
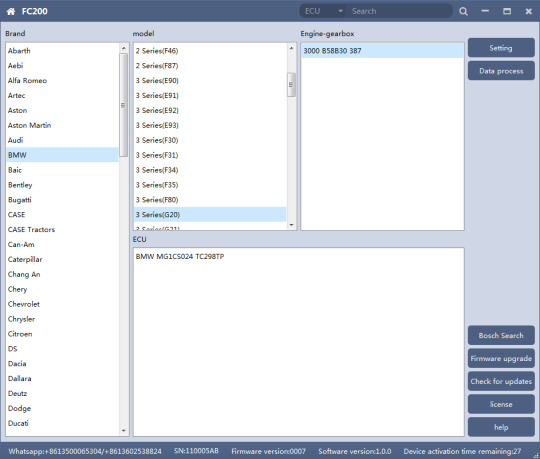
The functions on right side are are:
◎Setting Set the language, font size and display type.
◎Firmware update Firmware version update
◎Authorization info FC200 software requires authorization before use
◎Use help Open use document
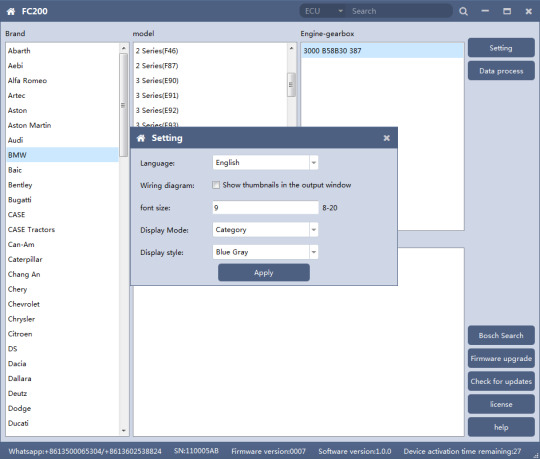
1. Setting
◎Language: Switch languages, currently supports Simplified Chinese, Traditional Chinese, English, French ,Polish and Spanish
◎Font size: You can enter the font size yourself (the larger the number, the larger the font) Range: 8-20
◎Display Method: Select category display and merge display
◎Display style: Blue gray and dark blue
1.1 Display Method
◎Select category display
◎Select category display
2. Device Authorization
◎FC200 software requires authorization before use
◎Click Authorization Information button on the main interface to view the authorization list
◎Click the Update Authorization button
http://forobd2tool.com/blog/2021/08/23/guide-to-use-cg-fc-200-ecu-programmer/
0 notes
Text
Guide to use CG FC 200 ECU Programmer
CG FC-200 is arriving after 3-5 working days delivery on schedule, it will be used for ECU /EGS ECU clone, it is claimed to cover 4200 kinds of ECU and 80% of the models on the market. And it is claimed to be capable of data processing, module cloning, disassembly matching, DTC shielding, Immobilizer closed, ISN acquisition, Vin modification etc. If it is as good as promised? Read the following parts.
1. Software Use
Below the main interface is the software version and device information.

The functions on right side are are:
◎Setting Set the language, font size and display type.
◎Firmware update Firmware version update
◎Authorization info FC200 software requires authorization before use
◎Use help Open use document
1. Setting
◎Language: Switch languages, currently supports Simplified Chinese, Traditional Chinese, English, French ,Polish and Spanish
◎Font size: You can enter the font size yourself (the larger the number, the larger the font) Range: 8-20
◎Display Method: Select category display and merge display
◎Display style: Blue gray and dark blue

1.1 Display Method
◎Select category display
◎Select category display

2. Device Authorization
◎FC200 software requires authorization before use
◎Click Authorization Information button on the main interface to view the authorization list
◎Click the Update Authorization button
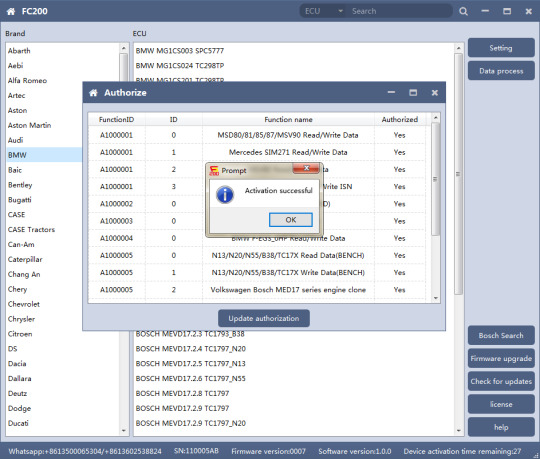
◎If “No” is still displayed after updating authorization, please contact the manufacturer
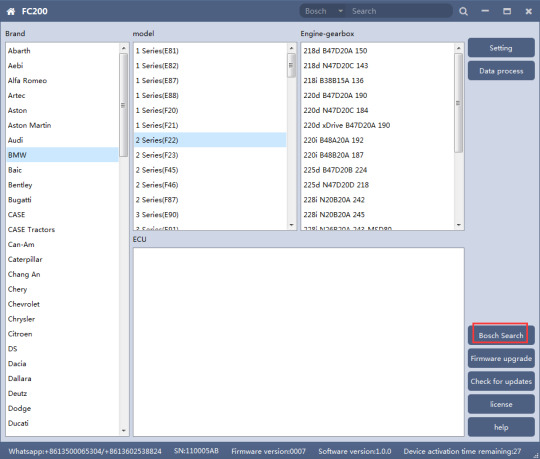
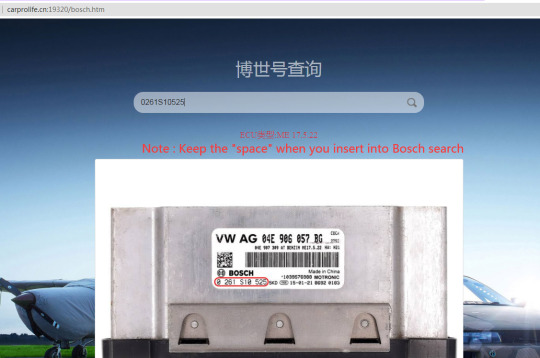
3. Device search function (frequently-used)
◎ECU search
◎Bosch number search

◎Bosch number query (click “Bosch search”)
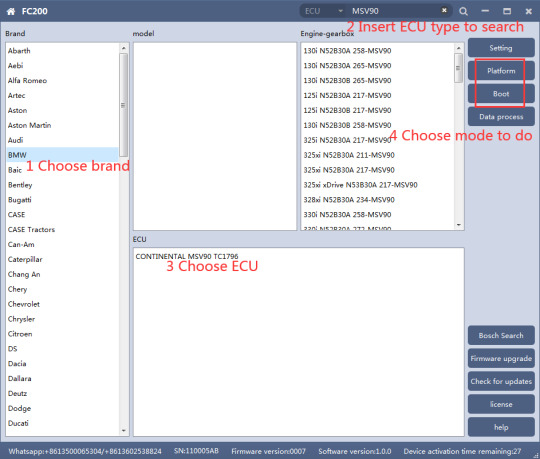
2. MSV90/80/MSD87/85/ 81/80/SIM271
FC200 currently supports the cloning and ISN reading of BMW models MSV90/80/MSD87/85/81/80 (E series, F series) and Mercedes-Benz SIM271 ECU.
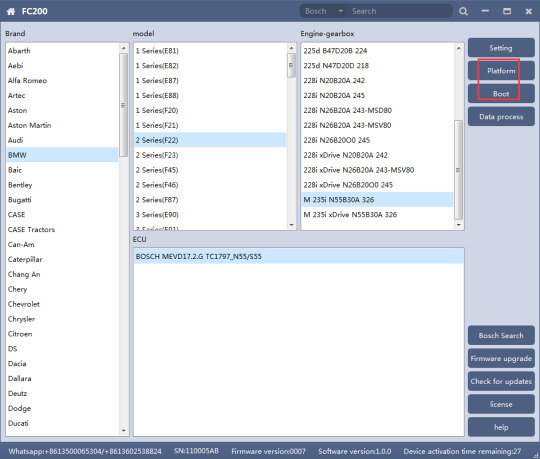
1. Determine the type of ECU according to the vehicle model, and select the correct model, otherwise the normal operation will not be possible.The MSV90 is used for description below.

After selecting the correct ECU model, the “Platform” button will appear on the right. As shown in the figure above, click the “Platform” button to enter the ECU operation interface.
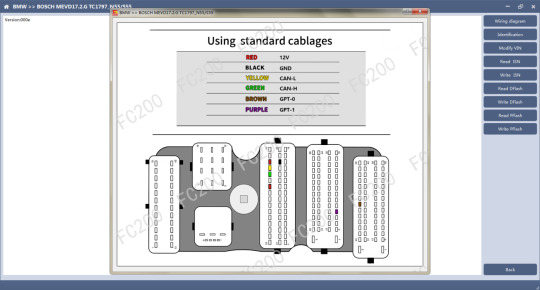
2. View wiring diagram
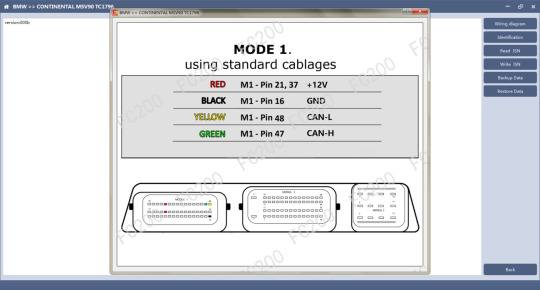
Click the “Wiring Diagram” button to view the ECU wiring diagram, connect the wiring harness correctly according to the wiring diagram, and connect with the device, plug in the device DC12V interface with 12V power supply.
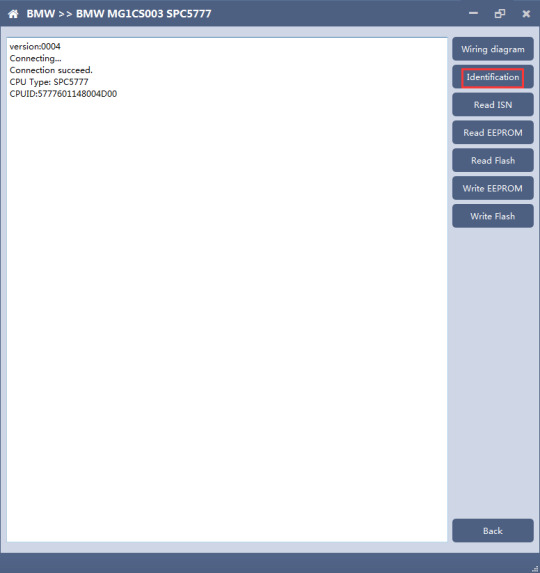
3. Identifying the ECU
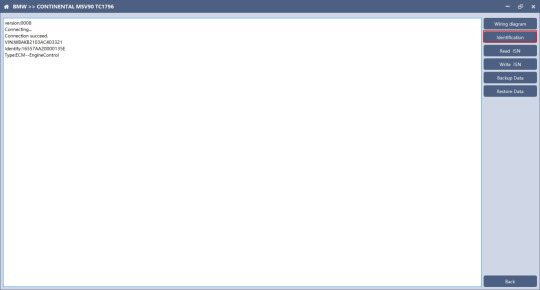
Click the “Identify” button to read the ECU related information, as shown in the figure above.
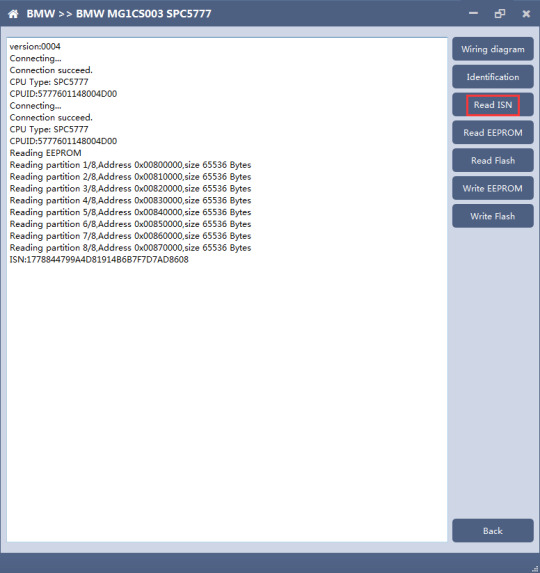
4. Reading ISN
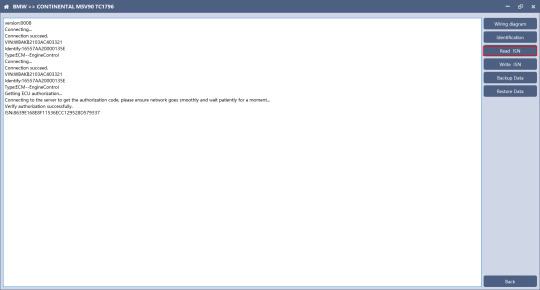
Click the “Read ISN” button to read the ISN.
Note: This operation needs to be connected to the network. Please ensure that the network is normal during using.
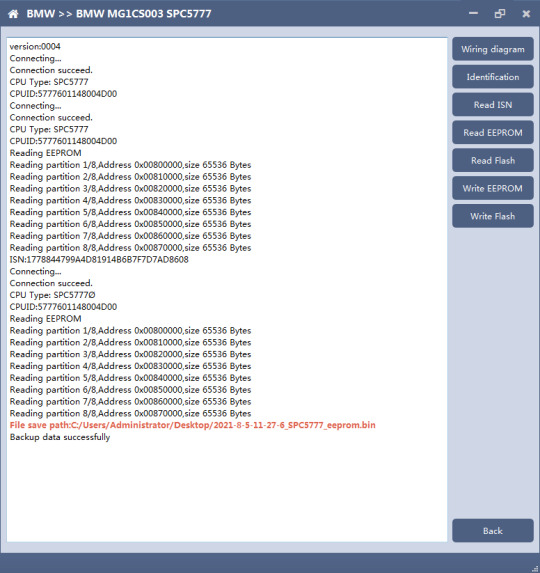
5. Backup Data
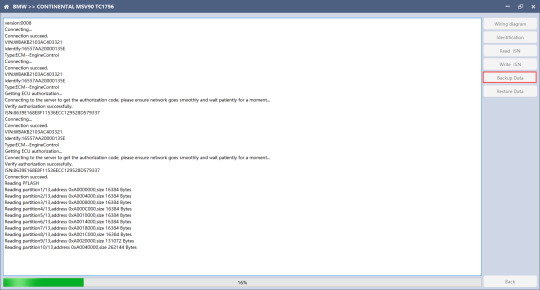
Click “Backup Data” to back up the ECU data. After reading, please save the data for subsequent use.
Note: This operation needs to be connected to the network. Please ensure that the network is normal during use.
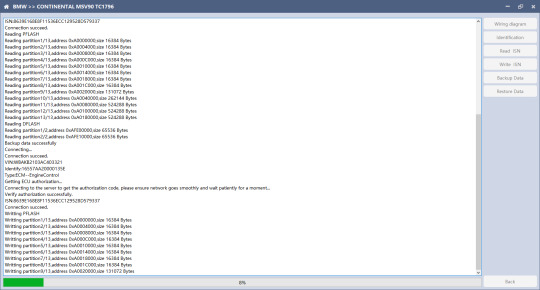
6. Data Restore
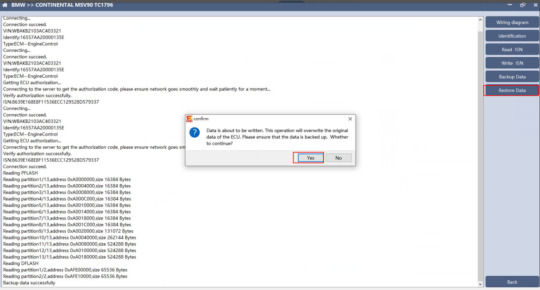
Click “Restore Data” to write the ECU data. Before writing, please make sure the data is backed up. The restored data will overwrite the current ECU data. The data can be the data of the current ECU or other ECU of the same type.
Note: During the process of data recovery, it is strictly forbidden to disconnect the device power or disconnect the device, otherwise it may cause damage to the ECU; if the software is unexpectedly shut down or the computer is shut down or crashed unexpectedly during the process of data recovery, please do not disconnect the device power or device Connect for 15 minutes, and the device can complete data recovery independently.
3. N13/N20/N55/B38/TC17X
The FC200 currently supports ISN read / write, VIN modification, and data read / write functions for the N13 / N20 / N55 / B38 / TC17X F series chassis of BMW models.
1. Determine the type of ECU according to the vehicle model, and select the correct model, otherwise it will not operate normally.The following is described with N55.
After selecting the correct ECU model, the “Platform” button will appear on the right. As shown in the figure above, click the “Platform” button to enter the ECU operation interface.
2. View wiring diagram
Click the “Wiring Diagram” button to view the ECU wiring diagram, connect the wiring harness correctly according to the wiring diagram, and connect with the device, plug in the device DC12V interface with 12V power supply.
3. Identifying the ECU
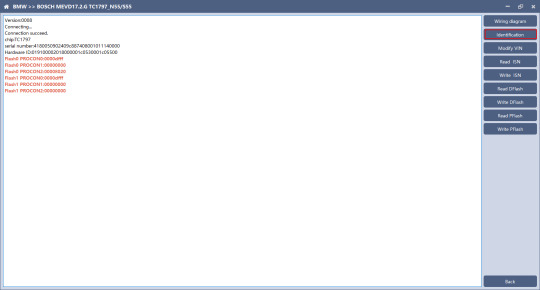
Click the “Identification” button to read the ECU related information, as shown in the figure above.
4. Reading ISN
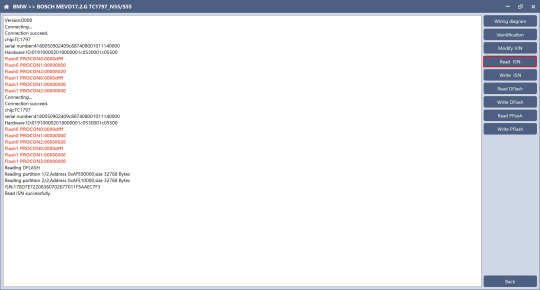
Click the “Read ISN” button to start reading the ISN. Wait for a while to complete the reading of the ISN.
5. Writing ISN

Enter the new ISN in the edit box, and click the “OK” button to start writing the ISN.

Writing successfully。
6. Modifying VIN
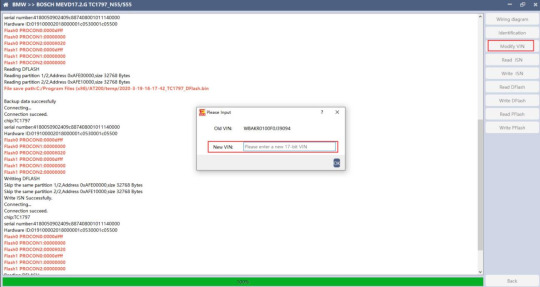
Enter the new VIN in the edit box, click the “OK” button to start writing VIN
7. Reading DFlash. PFlash
Take reading DFlash as an example:
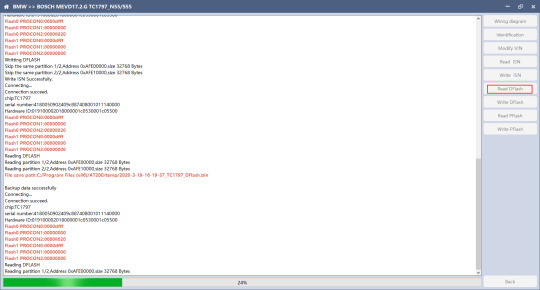
Click “Backup Data” to back up the ECU data. After reading, please save the data for subsequent use.
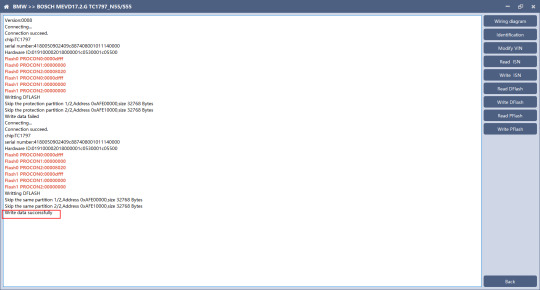
8. Writing DFlash. PFlash
Take writing DFlash as an example
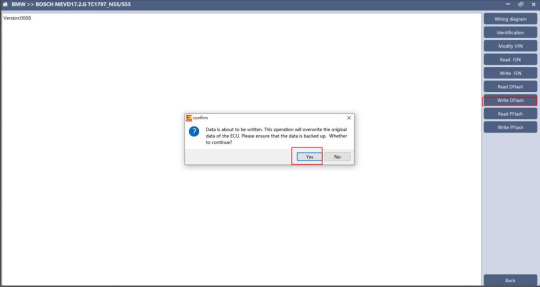
Click “write DFlash” to write the ECU data. Please make sure the data is backed up before writing. The restored data will overwrite the current ECU data. The data can be the data of the current ECU or other ECU of the same type.
Note: During the data recovery process, it is strictly forbidden to disconnect the power supply or disconnect the device, otherwise it may cause ECU damage; if the software is shut down unexpectedly or the computer is shut down or crashed unexpectedly during the data recovery process, please do not disconnect the power supply or device Connect for 15 minutes, and the device can complete data recovery independently.
4. B48/B58
Car ECU Programmer FC200 currently supports the OBD reading ISN of BMW F020 and G series S15 models B48 and B58, and the platform SPC5777 chip and TC298 chip reading ISN and reading and writing EEPROM and FLASH.
1 OBD read ISN
1.1 Determine the type of ECU according to the model, and select the correct model, otherwise it will not operate normally.The following is described with B48.

1.2 Identifying ECU
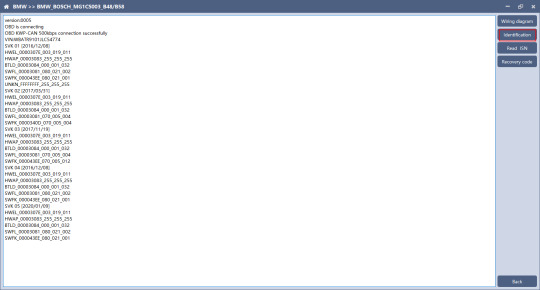
1.3 Reading ISN
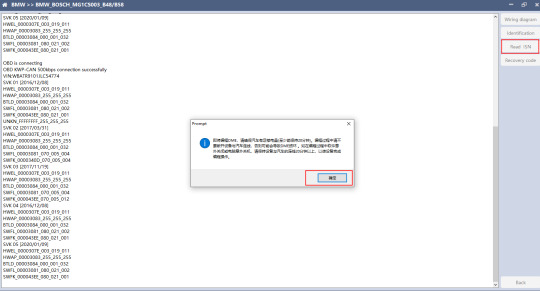
Click the “Read ISN” button to start reading the ISN. If it is the first reading, you need to program the ECU before reading. The programming time will take about 25 minutes, please be patient.
Note: During the programming process, it is strictly forbidden to disconnect the power supply of the device or disconnect the device wiring, otherwise it may cause damage to the ECU; if the software is closed unexpectedly or the computer is shut down or crashed unexpectedly during data restore, please do not disconnect the device power or device connection On-line, hold for more than 25 minutes, the device can complete programming independently.
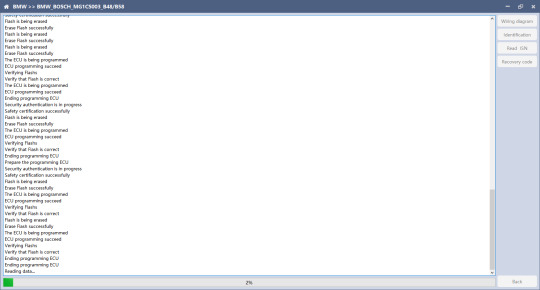
After the programming is completed, if there is a coding file before the ECU programming, the coding recovery will be performed automatically. After programming, the software starts to read data, as shown in the figure above.

Finish reading the ISN.
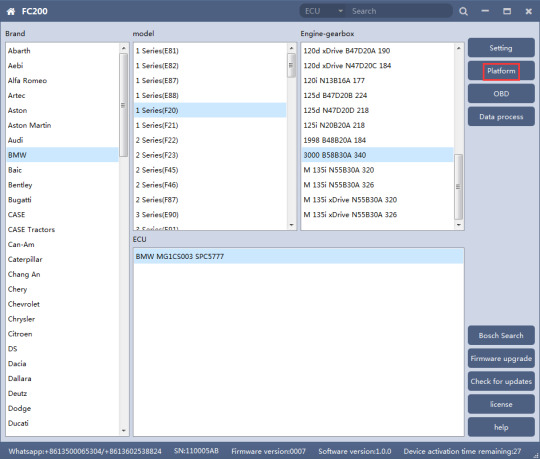
2. Read ISN on bench
2.1 Determine the type of ECU according to the model, and select the correct model, otherwise it will not operate normally.The wrong choice of the two types of chips will have no effect.
After selecting the correct ECU model, the “Platform” button will appear on the right. As shown in the figure above, click the “Platform” button to enter the ECU operation interface.
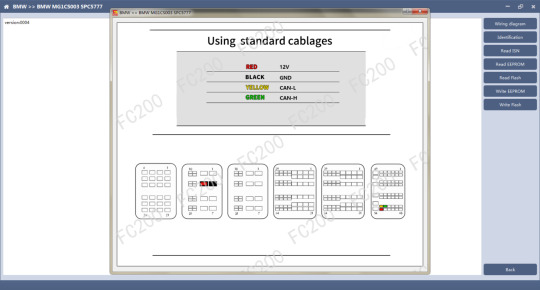
2.2 View wiring diagram
Click the “Wiring Diagram” button to view the ECU wiring diagram, connect the wiring harness correctly according to the wiring diagram, and connect with the device, plug in the device DC12V interface with 12V power supply.
2.3 Identifying the ECU
How-to-use-CG-FC-200-ECU-Programmer-34
2.4 Reading ISN
2.5 Reading EEPROM/Flash
Take reading EEPROM as an example
2.6 Writing EEPROM/Flash
Take reading EEPROM as an example.Make sure to save a copy of the original data before writing data
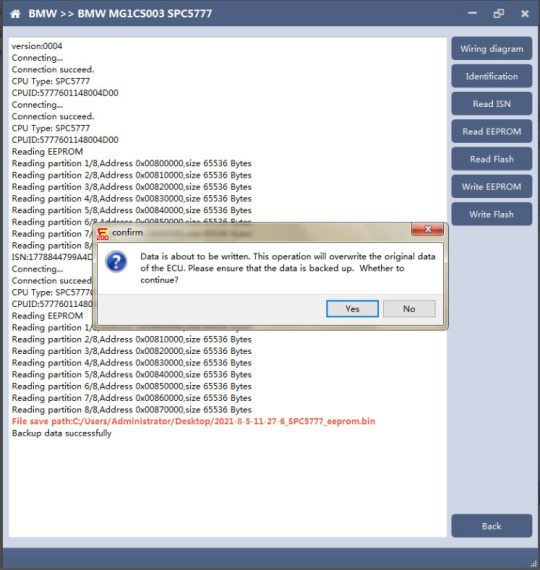
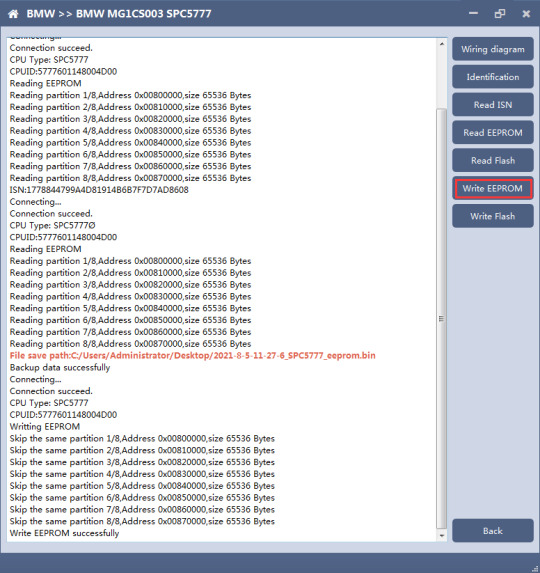
Note: During the data recovery process, it is strictly forbidden to disconnect the power supply or disconnect the device, otherwise it may cause ECU damage; if the software is shut down unexpectedly or the computer is shut down or crashed unexpectedly during the data recovery process, please do not disconnect the power supply or device Connect for 15 minutes, and the device can complete data recovery independently.
5. 6HP
The FC200 currently supports the cloning of 6HP ECUs in BMW F-series (F01, F02, F03).
1. Determine the ECU type according to the vehicle model, and select the correct model, otherwise it will not operate normally.
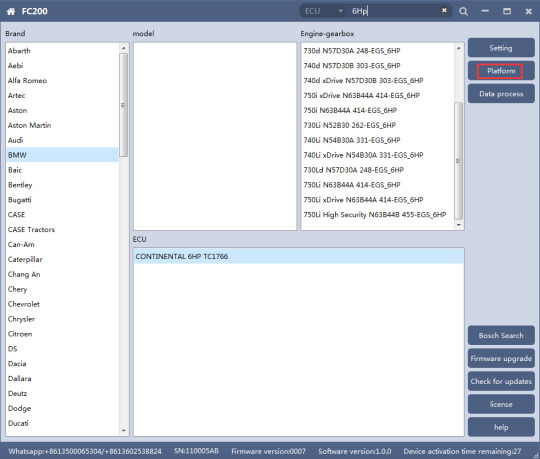
After selecting the correct ECU model, the “Platform” button will appear on the right. As shown in the figure above, click the “Platform” button to enter the ECU operation interface.
2. View wiring diagram
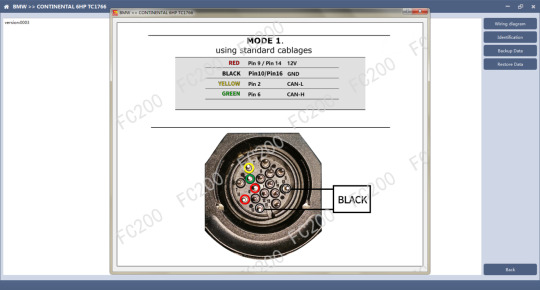
Click the “Wiring Diagram” button to view the ECU wiring diagram, connect the wiring harness correctly according to the wiring diagram, and connect with the device, plug in the device DC12V interface with 12V power supply.
3. Identifying ECU
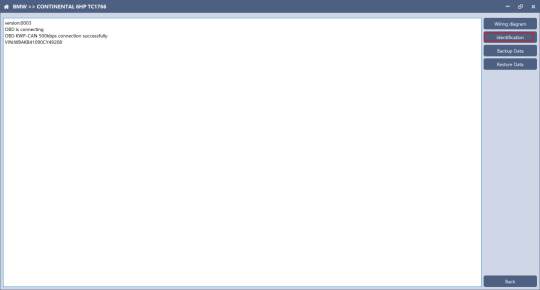
Click the “Identification” button to read the ECU related information, as shown above
4. Backup Data
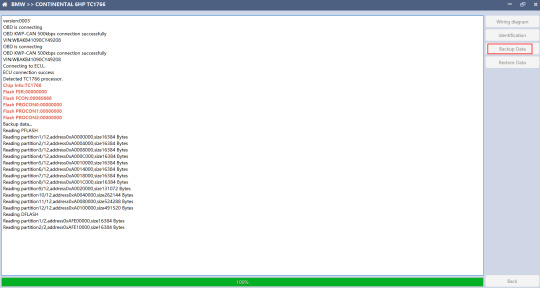
Click “Backup Data” to back up the ECU data. After reading, please save the data for subsequent use.
5. Data Restore

Click “Restore Data” to write the ECU data. Please make sure the data is backed up before writing. The restored data will overwrite the current ECU data. The data can be the data of the current ECU or other ECUs of the same type.

Note: During the data restore process, it is strictly forbidden to disconnect the device from the power or disconnect the device; if the software is unexpectedly shut down or the computer is shut down or crashed unexpectedly during the data recovery process, please do not disconnect the device power or the device connection for 15 minutes , The device can complete the data restore independently.
6. BOSCH BOOT(Boot)read and write data
1. The ECU type should be determined according to car type,and the model should be selected correctly, otherwise it can not operate normally.
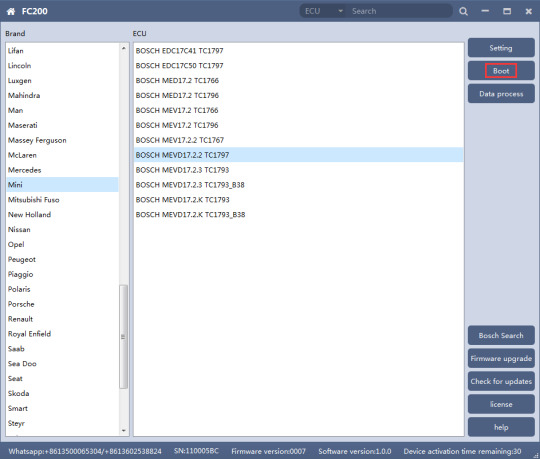
After choosing correct ecu type, there will show a“Boot”button as shown picture above.
2. Check the diagram in software

3. Identify ECU

4. Read password
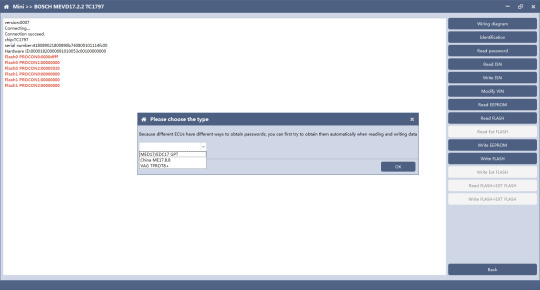
Pop up option box when reading password and select correct type.
5. Read/write Pflash
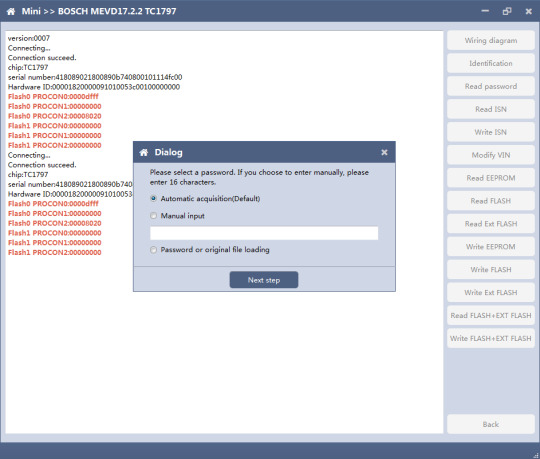
When reading and writing flash, please select automatic acquisition first. If it is not successful, please try other input methods.
Please note:In the process of writing data, it is strictly forbidden to disconnect the power supply or the connection of the device; if the software is shut down or the computer is shut down or crashes unexpectedly in the process of writing data, please do not disconnect the power supply or the connection of the device, and keep it for 15 minutes, the device can complete the data recovery independently.
7. Volkswagen EGS read and write Flash on bench
AT-200 currently supports data reading and writing functions of DQ200 and VL381 transmissions of Audi and Volkswagen. DQ200 is taken as an example following.
1. The ECU type should be determined according to car type,and the model should be selected correctly, otherwise it can not operate normally.
2. Check diagram
Connect cables well according software diagram

3. Identify ECU
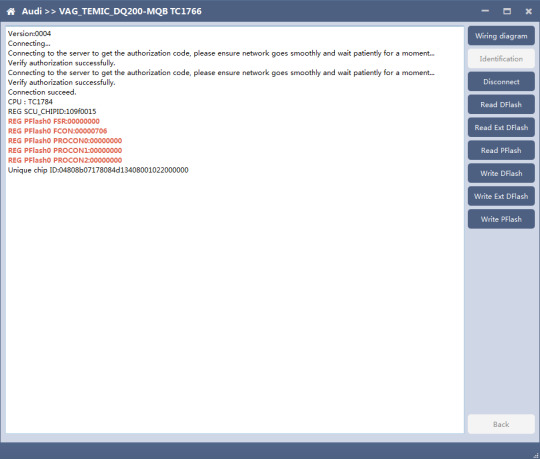
After connecting to DQ200, the “identify” button will be grayed out. You can proceed to the next step. When you click “disconnect”, you can identify again.
4. Read DFlash. EXT DFlash and PFlash
Take reading Dflash as an example:

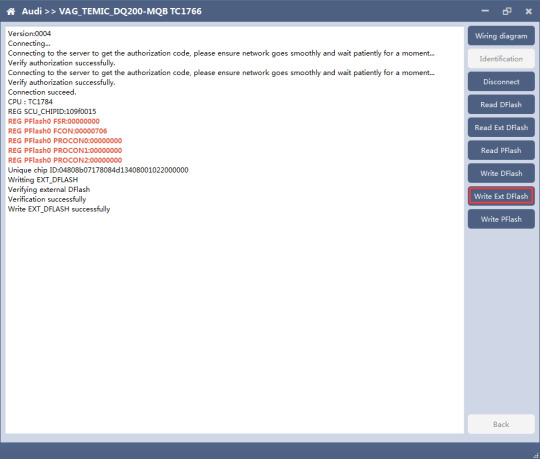
5. Write DFlash. EXT DFlash and PFlash
Take writing EXT-DFlash as an example:
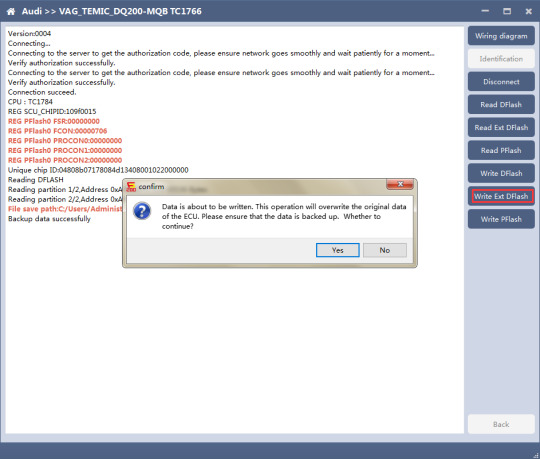
Back up original data before writing flash.
Please note:In the process of writing data, it is strictly forbidden to disconnect the power supply or the connection of the device; if the software is shut down or the computer is shut down or crashes unexpectedly in the process of writing data, please do not disconnect the power supply or the connection of the device, and keep it for 15 minutes, the device can complete the data recovery independently.
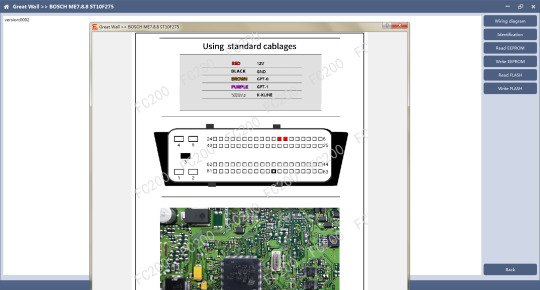
8. BOSCH ST10 series(Boot) read and write data
AT-200 currently support ME7.8.8 ECU data reading and writing function.
1. The ECU type should be determined according to car type,and the model should be selected correctly, otherwise it can not operate normally.
2. Check diagram
Connect the cables according to software diagram.
Note:Password reading is the password reading connection, and bootloader reading is the boot mode connection.
3 Identification
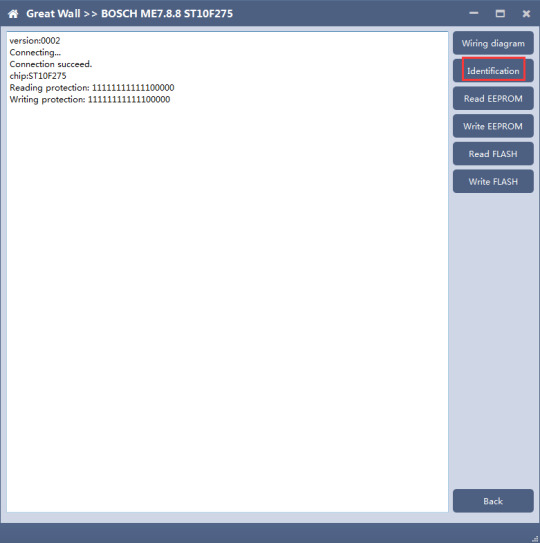
4. Read EEPROM and FLASH

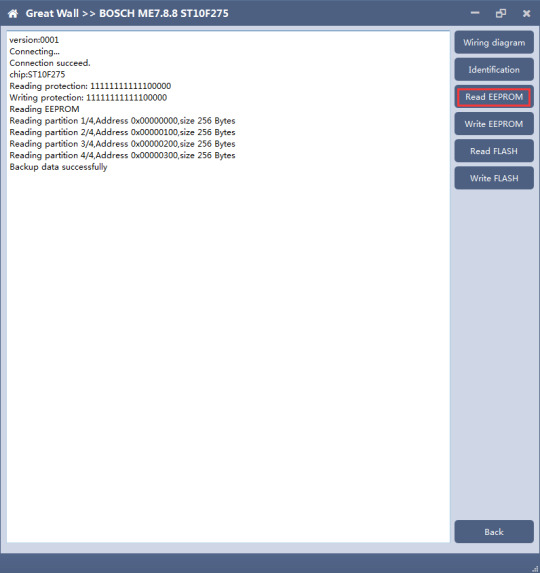
5. Write EEPROM and FLASH
Please read the backup data before writing
Note: in the process of writing data, it is strictly forbidden to disconnect the power supply or the connection of the device; if the software is shut down or the computer is shut down or crashes unexpectedly in the process of writing data, please do not disconnect the power supply or the connection of the device, and keep it for 15 minutes. The device can recover the data independently.
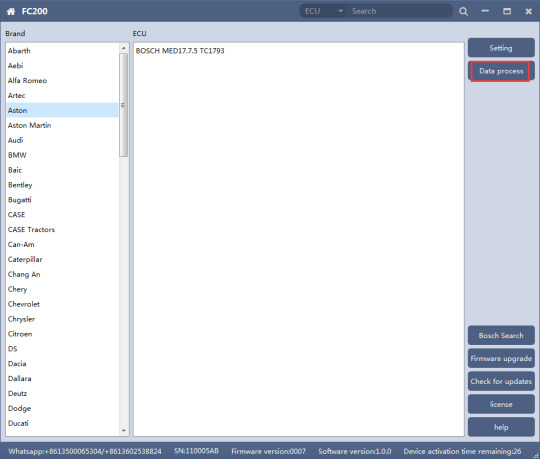
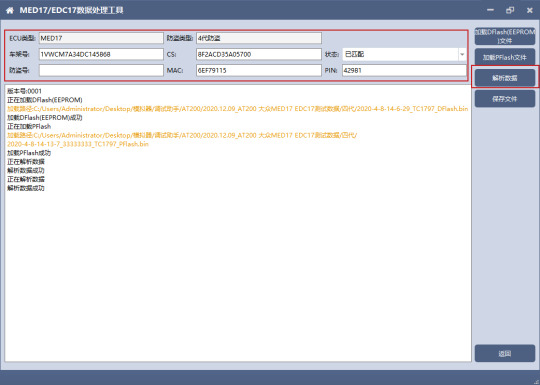
9. MED17/EDC17 data process tool
FC200 currently support(Generation 4 and 5 anti theft of AUDI/SEAT/SKODA/VOLKSWAGEN)ECU data parsing and modification.
Support Bosch MED/EDC17series immo off.
Support the closing TPROT function of Bosch VAG MEDC17 series, BMW / mini MEVD17 / EDC17 series, Hyundai / Kia EDC17 & MED (G) 17 series.
1. Choose AUDI/SEAT/SKODA/VOLKSWAGEN car type then enter data process function
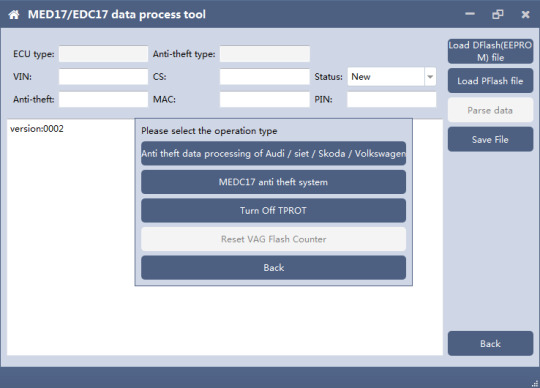
2. Select operation type
Choose function need to be operated
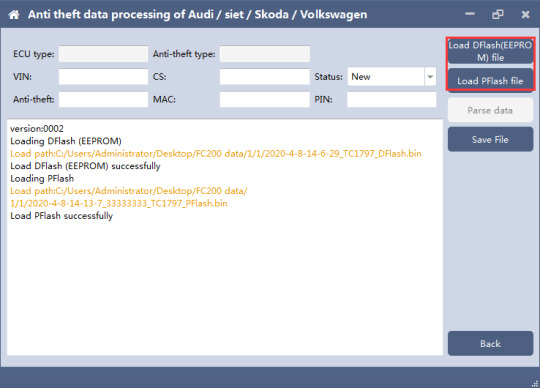
3. AUDI/SEAT/SKODA/VOLKSWAGEN anti-thief data process function
3.1 Load DFlash(EEPROM) and PFlash files
Load DFlash (EEPROM) and PFlash files respectively
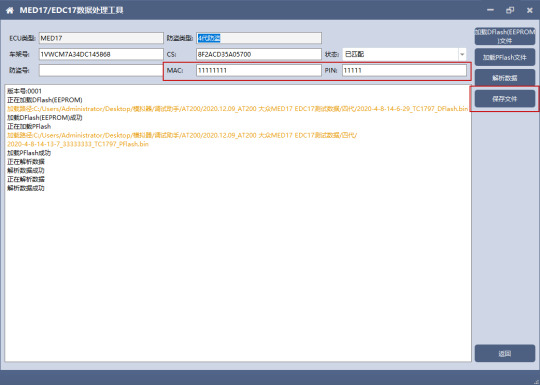
3.2 Parsing data
3.3 Modify the data and save the file
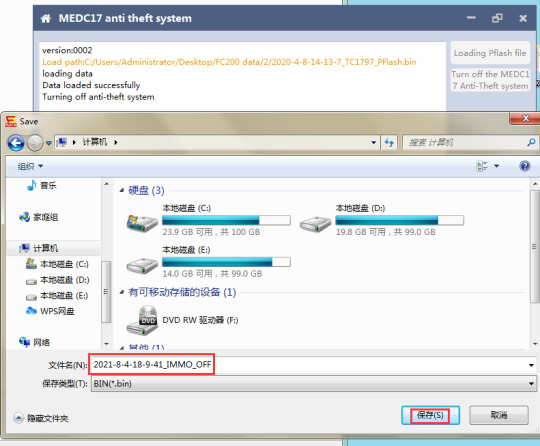
4. MEDC17 anti-theft system function
4.1 Load PFLASH data
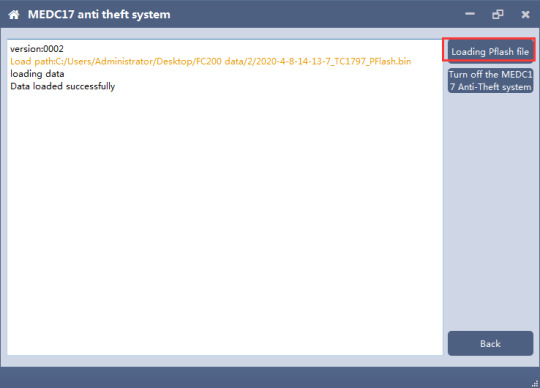
4.2 Turn off the MEDC17 anti-theft system and save file
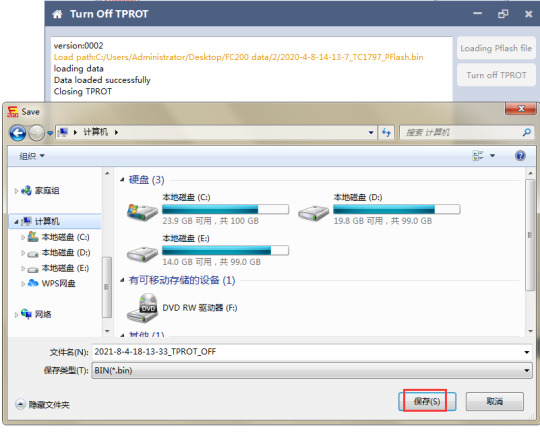
5. Close TPROT
5.1 Select ECU type
Choose correct ECU type, currently support the Bosch VAG MEDC17 series, BMW / mini MEVD17 / EDC17 series, Hyundai / Kia EDC17 & MED (G) 17 series .

5.2 Load PFLASH data
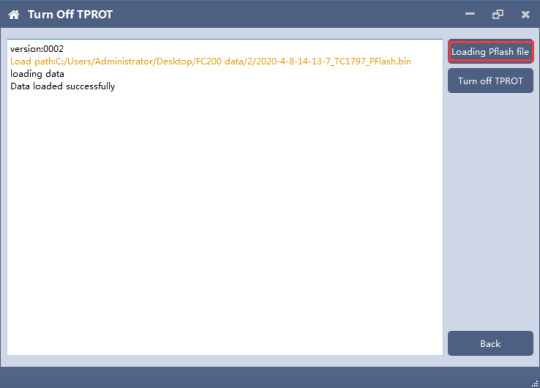
5.3 Close TPROT and save the file.
0 notes
Text
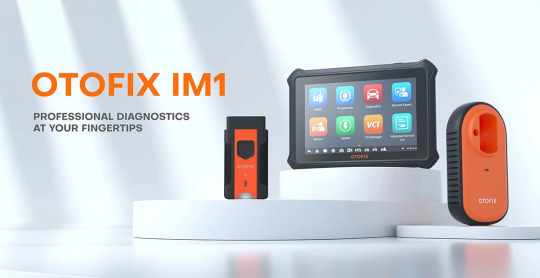
AUTEL OTOFIX IM1 AUTOMOTIVE KEY PROGRAMMING & DIAGNOSTIC TOOL WITH ADVANCED IMMO KEY PROGRAMMER
Autel OTOFIX IM1 is a professional and easy-to-use immobilizer & key programming tool that combines superior performance with a streamlined design. It supports read PIN code, key programming, IMMO parts replacement, IMMO type identification, transponder read/write, etc. Equipped with the XP1 key programmer, OTOFIX IM1 is capable of providing extraordinary service functions for the immobilizer system. OTOFIX IM1 key programmer is the best choice in automotive key programming for locksmiths.
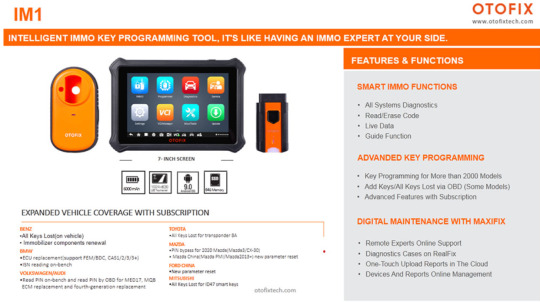
Highlights:1. Global Version without IP Blocking Problem2. Wide Key Programming Coverage, Supports key programming for more than 2000 models of more than 60 car series.3. Powerful OE Level Diagnostics for more than 80 US, Asian and European makes and models4. One-Stop Cloud Service, Remote Expert, RealFix, Device/Report Management5. Multi-Languages: English, German, Spanish, French, Traditional Chinese, Japanese, Polish, Portuguese, Russian, Italian, Korean, Dutch, Swedish, Turkish, Persian, Thai, Vietnamese and Simplified Chinese.6. One Year Free Update Online & One Year Warranty7. Advanced Features, Able to unlock more with subscription

Vehicle Coverage:Autel OTOFIX IM1 also is a professional automotive diagnostic scanner that provides full system diagnostics and 26 special services for more than 80 US, Asian and European vehicles by additional purchase advanced features.–Key programming coverage more than 95% of common vehicle models–Supports key programming for more than 2000 models of more than 60 car series.
Autel OTOFIX IM1 Functions:1. OE-Level Diagnostics* Powerful and fast diagnosis for all vehicle systems* Supports ECU information, read/erase codes and live data* Guide Function provides more DTC tips (Supports Volkswagen/ Audi)* Supports advanced features of Volkswagen and Audi including online coding, online IMMO, and hidden function renewal
2. Smart IMMO FunctionsOTOFIX IM1 key programming tool support for expansive list of makes and models, including BMW, Volkswagen, Audi, GM, Ford, Mazda, and Nissa. Equipped with OTOFIX XP1 key programmer to support key read/write and EEPEROM/MCU read/write.
Supports OBD key programming for 80% of vehicle modelsSupports All Keys Lost programming via OBD for Volkswagen IV, V and MQB IMMO systemSupports Add Key and All Keys Lost programming via OBD from CAS1 to CAS4 and FEM&BDC IMMO systemSupports key programming bypassing PIN code for all 2005-2020 Ford modelsSupports key programming bypassing PIN code for 2019-2020 Promaster, DT-RAM, Jeep Commander, etc.Supports read password for Hyundai Kia key ID46, 47, 4A, 8A, etc.
3. AutoVIN TechnologyOTOFIX IM1 professional car key programmer scan tool can automatically identify vehicle make, model, and year with AutoVIN/ ScanVIN
4. Advanced Features by SubscriptionYou Need to Buy Extra XP1 Pro, G-BOX2, APB112, and AKL Cable for Following Expended VehiclesAutel OTOFIX IM1 also is a professional automotive diagnostic scanner that provides full system diagnostics and 26 special services for more than 80 US, Asian and European vehicles by additional purchase advanced features.
Mercedes: All key lost (on vehicle, fast), renew immobilizer components. (Need XP1 Pro)BMW: ECU replacement(FEM/BDC,CAS1/23/3+),read ISN by Bench. (Need G-Box2)Volkswagen: Read PIN by Bench (Need G-Box2), and read PIN by OBD for MED17, MQB ECM replacement and forth-generation replacementToyota: All keys lost for transponder 8A. (Need APB112, G-BOX2 and 8A AKL Cable)Ford/Mazda: PIN bypass for 2020 Mazda(Mazda3/Cx-30),Ford China and Mazda China(Mazda PMI/Mazda2013+) new parameter resetMitsubishi: All keys lost for ID47 smart keyDiagnostics: Full systems diagnostics and services functions
One-Stop Cloud Service1. Remote Expert Support OnlineIM1 car diagnostic tool is able to connect seamlessly with OTOFIX cloud service to obtain professional remote expert support online, share diagnostic reports and assist you with any diagnostics problem. (Coming Soon)
2. Highly Detailed Diagnostics CasesIM1 key programming tool can provide highly detailed diagnostics cases are available for you to consult anytime. (Coming Soon)
3. Maintenance Reports ManagementWith the OTOFIX IM1 key programming & diagnostic scan tool, all maintenance reports are stored in the cloud, allowing you to view device and test records anytime, anywhere. (coming soon)
OTOFIX IM1 SpecificationsOperating System: Android 9.0Processor: 4x ARM Cortex-A35 (1.5GHz)Screen Display: 7″ LCD capacitive touchscreen with 1280*800 resolutionStorage: 64 GBDDR: 2 GBCamera: Rear 8MBattery: 5800 mAhConnectivity: USB OTG Type C /USB HOST Type C/ BluetoothWorking Temperature: 0 to 45°C (32 to 113°F)Storage Temperature: -10 to 60°C (14 to 140°F)VCI (Vehicle Communication Interface): V1Wi-Fi: Wi-Fi 5
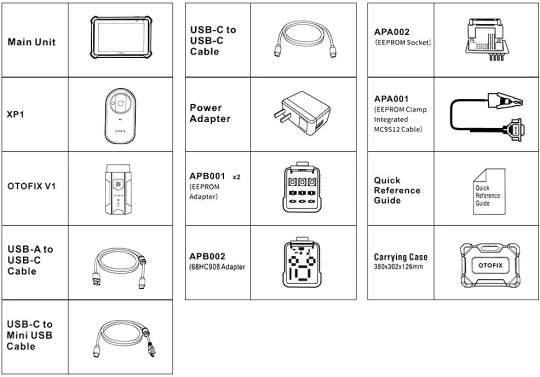
Package List:1pc x Main Unit1pc x USB-C to USB-C Cable1pc x APA0021pc x XP11pc x Power Adapter1pc x APA0011pc x OTOFIX V12pcs x APB0011pc x USB-A to USB-C Cable1pc x APB0021pc x USB-C to Mini USB Cable1pc x Carrying Case1pc x Quick Reference Guide
https://www.youtube.com/watch?v=t917jSEzZ5M
0 notes
Text
MDI Manager and Data Bus Diagnostic Tool Software Updates
New diagnostic software updates are now available or being rolled out to GM dealerships across the country.
MDI Manager
The new MDI Manager software includes updates for the future CAN FD protocol that is necessary for the next generation of GM vehicle architecture.
CAN FD (CAN with Flexible Data-Rate) is an extension to the original CAN bus protocol. It’s designed to make the Controller Area Network (CAN) faster, extending the useful data length from eight to 64 bytes for significantly higher data transmission rates.
The new software is being released through a staggered rollout to GM dealerships. The initial rollout included all GM dealerships in Michigan and Ohio. Additional dealers will be added every Monday, with completion of the rollout in October.
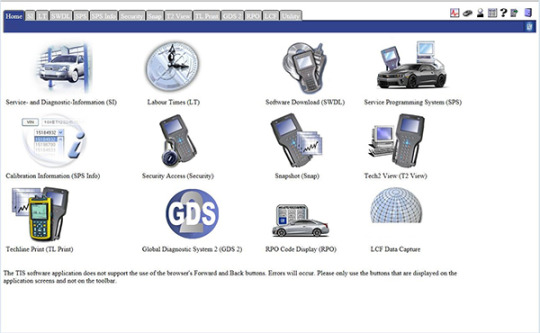
A user will be prompted to install the MDI/MDI2 Manager software when clicking the SPS or GDS2 icon in TIS2Web. (Fig. 6) It is recommended to update all MDIs and Service computers at the same time to avoid incompatibility issues.
Data Bus Diagnostic Tool
Obd2tool.com also recently began distributing Data Bus Diagnostic Tool software update version 1.30.923 through TIS2Web. The update allows the tool to simultaneously monitor up to three dual-wire CAN busses as well as corrects some Device IDs. To download the software, click the GDS 2 icon on the TIS2Web home page.
https://gmscantool.blogspot.com/2021/08/mdi-manager-and-data-bus-diagnostic.html
0 notes
Text
Program Nissan Sylphy B18 2020 Proximity Bypass PIN Code by OBDSTAR X300 DP Plus
OBDSTAR X300 DP Plus free updated 2019 up Nissan Sentra Sylphy B18 proximity add key, all keys lost and program HFM function in Aug. 2021. This function requires a dedicated Nissan 16+32 bypass cable.

Procedure:

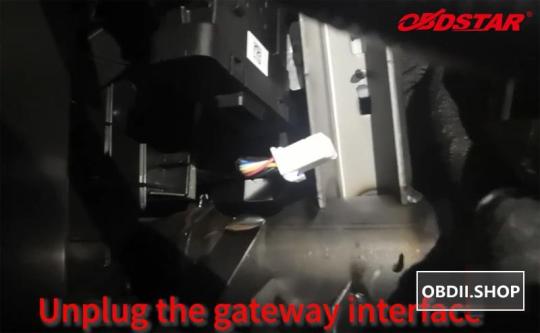
Unplug gateway interface
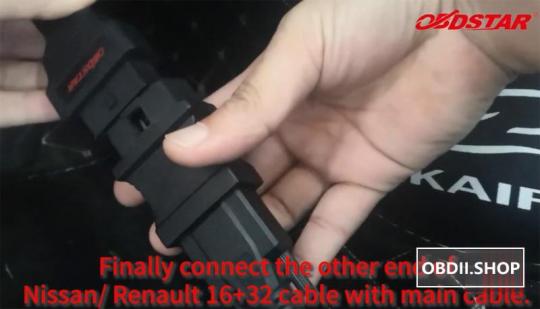
Connect the Nissan bypass cable with the unplugged gateway adapter
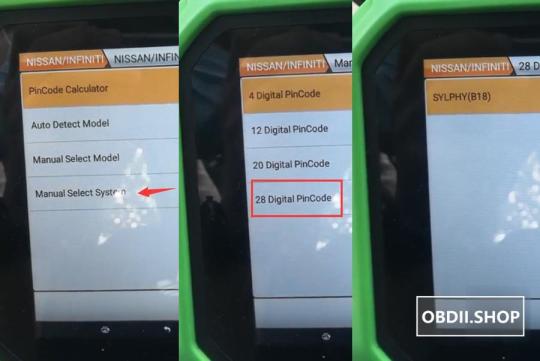
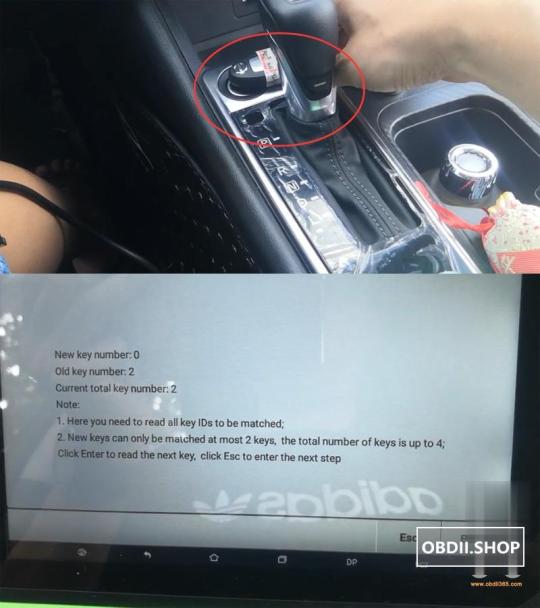
Go to IMMO, select Nissan Infiniti v32.19 -manual select system – 28 digits pinched – Sylphy (B18) – Proximity – 2019 up – add key (No pin)
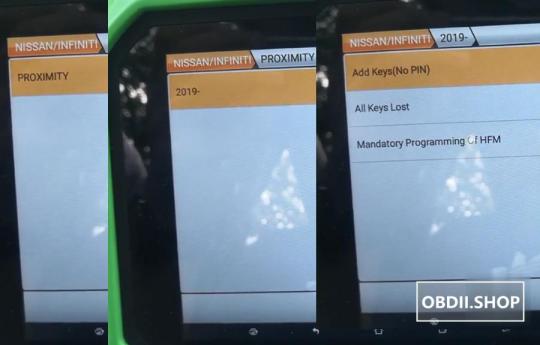
This function requires network connection.
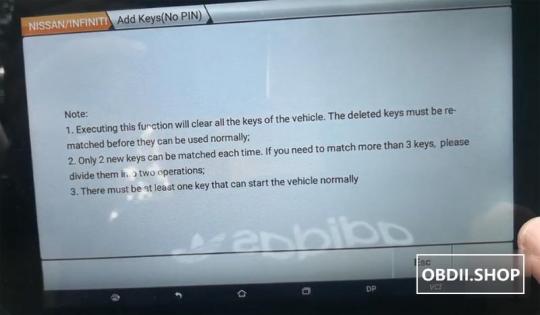
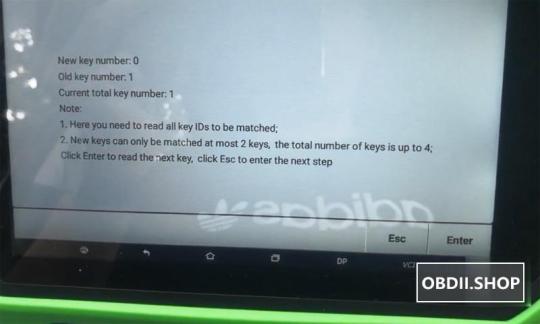
Executing this function will delete all keys. Only 2 new keys can be programmed each time.
Require at least one key that can start the vehicle normally
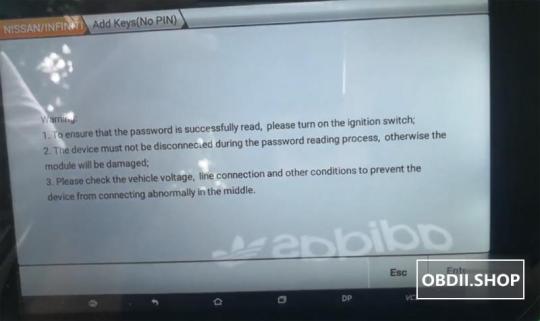
Press start button, turn on the ignition switch
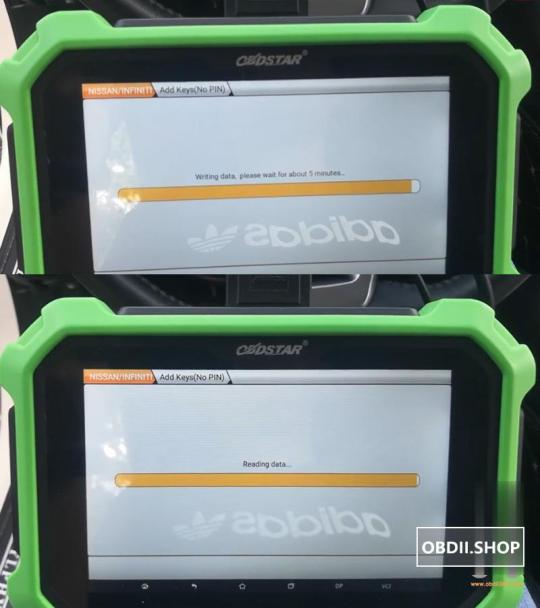
Writing data
Reading data
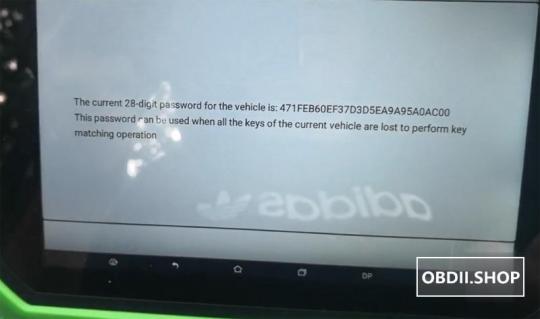
Read 28 digit pin code success
Turn on the emergency indicator, turn off the ignition switch

Turn on the ignition switch
Long press the start button to turn off the ignition switch
Turn on the hazard warning lights
The gear position is in P gear or neutral gear
The steering column lock is in the unlocked state
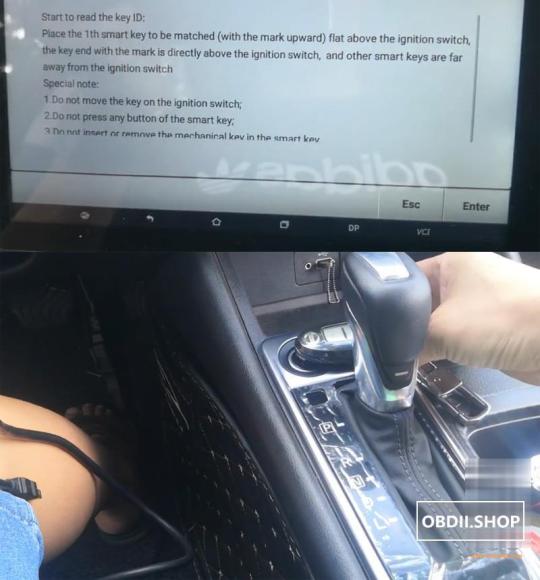
Start to read the key id
Place 1st smart key to be programming horizontally above the ignition switch and put other smart keys are far away from the ignition switch
Don’t move the key on the ignition switch
Don’t press any button of the smart key
Read current key information
Place 2nd key to be programming above the ignition switch
read key information
Place 1st key above ignition switch again
Progam success
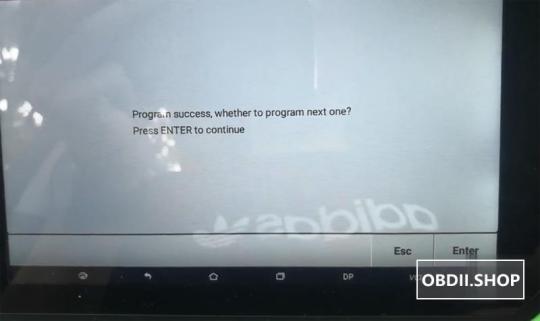
Place 2nd key above ignition switch
Program 2nd key success
2 keys has been programmed successfully
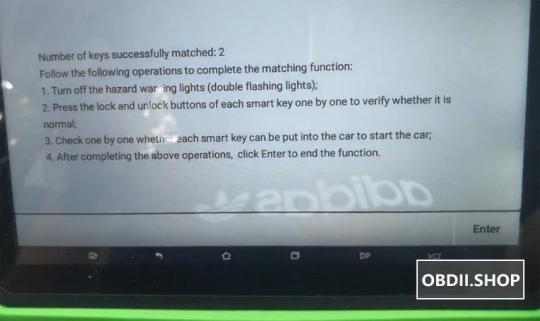
Follow procedures below to complete programming:
Turn off emergency warning lights
Press Lock and unlock buttons of each smart key one by one to verify
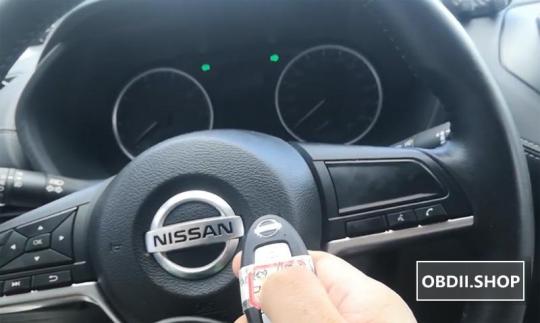
Check one by one whether each smart key can be put into the car to start the car
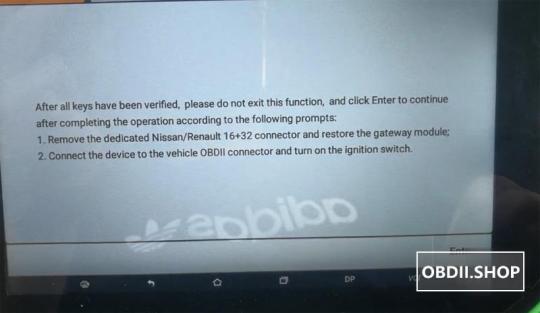
After all keys have been verified do not exit this function, remove the dedicated Nissan bypass cable and restore the gateway module.
Connect the x300 dp plus to the vehicle and turn on the ignition switch to clear the fault code.
0 notes
Text
FAQ SD C4 PLUS WIFI
How to solve Chinese cloned SD Connect C4 DoIP : there is NO WiFi card inside, therefore wireless connection is not possible no ! There is NO 6 batteries holder/compartment no . Batteries are necessary for firmware upgrade if needed
In fact:
1. SD Connect C4 DOIP supports WIFI setting.ste
Take obdexpress.co.uk for example, the engineer made a operation guide on how to set SD Connect C4 DOIP WIFI on WIN10 & WIN7.
2.Mercedes Star Diagnostic SD connect C4 Plus firmware update does not require battery installation as the older sd c4.
Take this user’s feedback for example: I take a risk from here, only the battery pack is missing but work ok. I have it over an year and have no problems.
How to upgrade SD C4 Plus Xentry without battery?
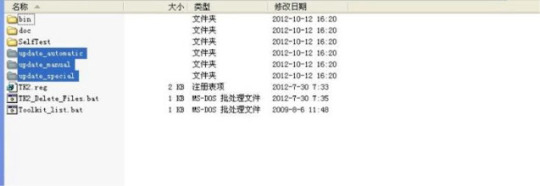
1. Open DAS software, enter the folder “C:\programm files\SDconnect
Toolkit”, check if there are the following three folders: Update_automatic, Update_manual
; Update_Special.. As shown in the figure below. If the name is wrong, please correct it.
2. Reboot the computer.
3. Start to upgrade the SD C4 Plus firmware, please follow the procedure below:
1) Closing Xentry Diagnostics/Xentry DAS diagnostics application
When accessing a vehicle in Xentry Diagnostics or Xentry DAS, the following message appears:
Please exit the diagnostic application Xentry Diagnostics or Xentry DAS correctly and follow the next steps.
2) Connecting the SDconnect to the Star Diagnosis system
Connect the SDconnect to the Star Diagnosis system with the green LAN cable.
The SDconnect will be automatically selected and appear in the deskband on the Star Diagnosis system:

3)SDnetControl
A) Start SDnetControl by clicking the deskband
Go to the “Connections” tab.
B) Check whether automatic selection via the cable connection is active:

Go to the “Configuration” tab, and confirm the warning with “Yes”:

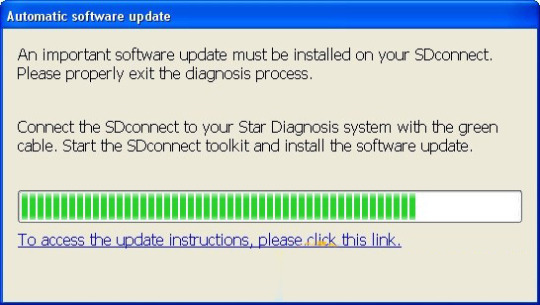
4). Software update
Go to the “MUX” tab in SDnetControl.
Click on the “Software update” button.
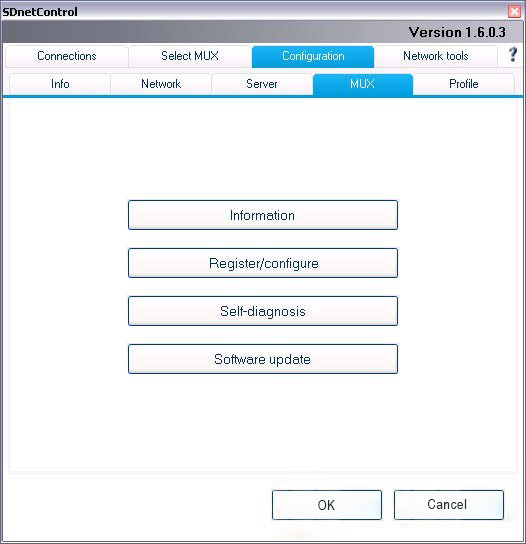
The “SDconnect Toolkit Administration” program will start.
Go to the “Software update” tab in the SDconnect Toolkit.
Your SDconnect is already selected on the left-hand side.
Select the “Software update” packet under “Files for software update”.
Click “Start” to start the process.
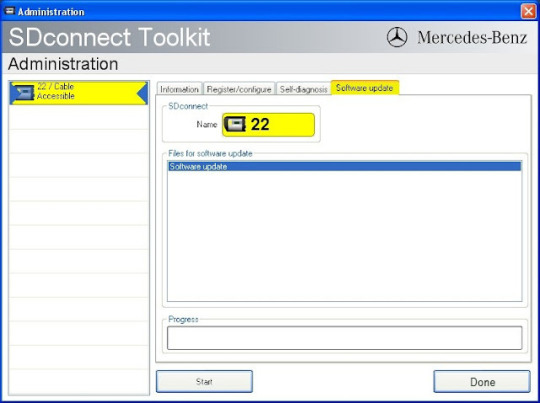
The update process will start. This takes approx. 4 minutes.
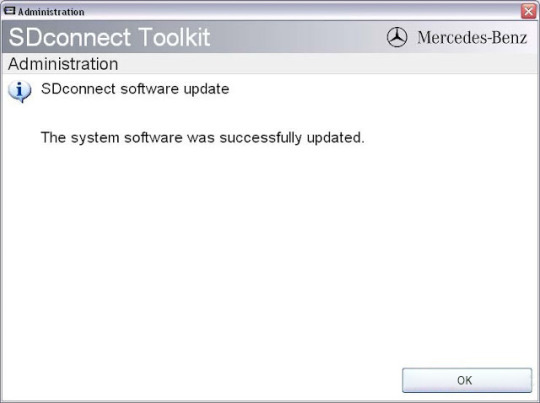
5) Complete the installation
Confirm the successful completion of the update.
After a successful update, a message indicating the successful update completion appears.
Confirm the message by clicking “OK”.
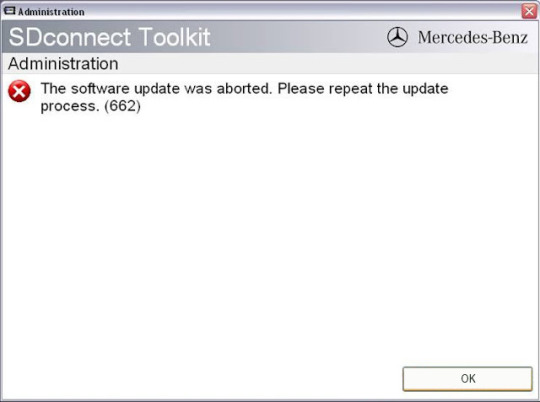
Update not successful
If the update was not successful, the message “The software update was aborted. Please repeat the update process” will appear.
Confirm this message by clicking “OK”. Check the SDconnect batteries if necessary and repeat the update process.
6) Check the installed software
Go to the “Information” tab in SDconnect Toolkit
Select your SDconnect on the left-hand side.
• Check the information under “Software versions” at the right:
The versions of the Linux OS and the CommandServer must be at least 2:0:xxxxxx.

0 notes
Text
New Holland Electronic Service Tools CNH EST Software Free Download
What is New Holland Electronic Service Tool?
Electronic Service Tool (EST) Engineering Level* (software only) – used by New Holland dealer technicians to connect with vehicles that have a Controller Area Network (CAN) BUS.
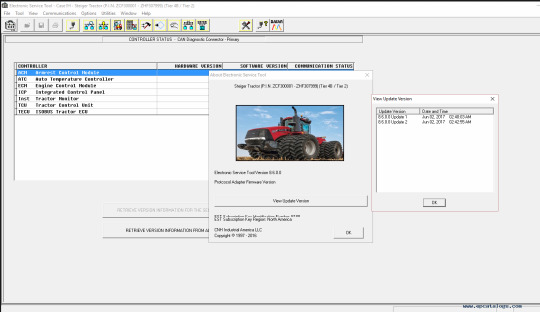
New Holland Electronic Service Tool Function List:
Check the status of parameters;
• Retrieve faults;
• Run diagnostic tests;
• Make ECU and parameter programming;
• Monitor active and logged diagnostics;
• View and change ECU configuration;
• View diagnostic procedures and schematics.
• Troubleshoot problems;
• Use assist database;
• Run scope diagnostics;
New Holland Electronic Service Tool Support OS:
Windows 7 32 bit, Windows 7 64 bit, Windows 8/8.1 32 bit, Windows 8/8.1 64 bit, Windows 10 32 bit, Windows 10 64 bit
New Holland Electronic Service Tool Support Languages:
English, Spanish, Italian, Mexican, German, Norwegian, Russian, French
New Holland Electronic Service Tool Supported Brands:
New Holland (Agriculture and Construction);
New Holland FK (Fi at-Kobelco);
New Holland O&K (Orenstein & Koppel);
CASE (Agriculture and Construction);
STEYR;
KOBE-LCO;
Iveco (Astra) (articulated dump trucks only);
Flexi-Coil;
Sumitomo (S.H.I.)
New Holland Electronic Service Tool 9.1 Download:
https://mega.nz/#F!WVghzKwY!anc22uzd2t41QLiGgAt88Q
New Holland Electronic Service Tools 9.2(CNH EST 9.2) software
https://mega.nz/#F!2UpnhLSL!b7ptTfnUtQzjRdcef2_z3Q
New Holland Electronic Service Tool 9.2 Update:
Case IH AG:
-New Engine Datasets for the following Machines with FPT engines
oEDC17C49 Engine Controller Datasets
•5802804074 -FARMALL 55A (Tier 4A)
•5802804075 -FARMALL 65A (Tier 4A)
•5802804076 -FARMALL 75A (Tier 4A)
Heavy Duty Truck diagnostic Scanner New Holland Electronic Service Tool 9.4 Update
https://www.obd2tool.com/goods-10452-New-Holland-Electronic-Service-Tools-CNH-EST-Diagnostic-Software.html
New Holland AG:
-New Engine Datasets for the following Machines with FPT engines
oEDC17C49 Engine Controller Datasets
•5802804074 -T4S.55 / WORKMASTER55 / T3.60F (Tier 4A)
•5802804075 -T4S.65 / WORKMASTER 65 / T3.70F (Tier 4A)
•5802804076 -T4S.75 / WORKMASTER 75 / T3.80F(Tier 4A)
Case CE Heavy:
-Wheel Loaders (Models 521G, 621G, 721G, 821G, 921G, 1021G, 1121G) (Tier 4B / Tier 2)
oColor Display-Vehicle Support (GDSP) software version 1.11.0.0; part number 51447685
New Holland CE Heavy:
-Wheel Loaders (Models W110D, W130D, W170D, W190D, W230D, W270D, W300D) (Stage V)
oColor Display-Vehicle Support (GDSP) software version 1.11.0.0; part number 51447685
New Holland CE Light:
-Wheel Loaders (Models W110D, W130D, W170D, W190D, W230D, W270D, W300D) (Stage V)
oColor Display-Vehicle Support (GDSP) software version 1.11.0.0; part number 51447685
0 notes
Text
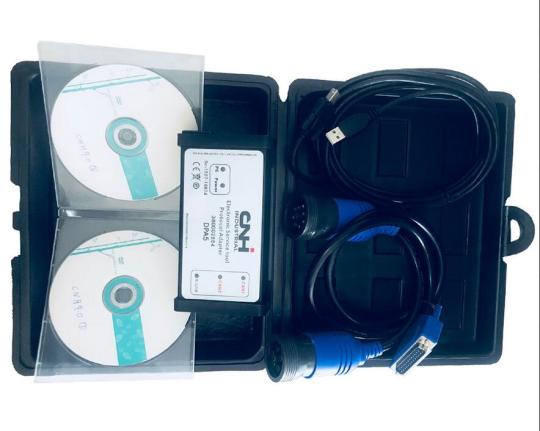
New Holland Electronic Service Tools (CNH EST 9.4) CNH DPA5 kit diagnostic tool
New Holland Electronic Service Tools – full diagnostic and repair manual for New Holland, Kobelco, CASE, Steyr, Flexicoil, FK, O&K. New Holland Construction and New Holland Agriculture equipments. Case Construction and Case Agriculture equipments.
New Holland CNH EST Diagnostic Kit Heavy Duty Truck Diagnostic Scanner CNH Electronic Service Tool

CNH EST DIAGNOSTIC KIT Electronic Service Tool (EST)
CNH EST DIAGNOSTIC KIT
Electronic Service Tool (EST) CNH Est Diagnostic Kit Heavy Duty Truck Diagnostic Scanner
Electronic Service Tool (EST) – used by dealership technicians to connect with machines that have a Controller Area Network (CAN) BUS as part of the electronic system architecture.
Supported brands:
New Holland (Agriculture and Construction);
New Holland FK (Fiat-Kobelco);
New Holland O&K (Orenstein & Koppel);
CASE (Agriculture and Construction);
STEYR;
KOBELCO;
Iveco (Astra) (articulated dump trucks only);
Flexi-Coil; Sumitomo (S.H.I.);
Link-Belt.
Supported languages: English, Italian, Russian, Polish, Spanish, French, Portuguese, German, Dutch, Danish.
With this service tool you can:
• Check status of parameters;
• Retrieve faults;
• Run diagnostic tests;
• Make ECU and parameter programming;
• Monitor active and logged diagnostics;
• View and change ECU configuration;
• View diagnostic procedures and schematics.
• Troubleshoot problems;
• Use asist database;
• Run scope diagnostics;
E.A.S.y – additional engine diagnostic and download tool for connection directly to ECU to perform diagnostic, programming and ECU reload by K-Line protocol. CNH Engine Download Tool operates from within the EST program to perform the following engine download operations:
• Provide Engine Control Unit (ECU) programing update capability;
• Provide blank ECU initialization and programming capability;
• Provide ECU programming reassignment for blank and other ECUs;
• Provide ECU download crash recovery.
0 notes
Text
Autel IM608 Pro Program Mercedes W209(2006-) All Keys Lost
What happen if you lost all Mercedes keys? Luckily Autel has a solution for that, having the Autel G-BOX2 Tool working together with Autel MaxiIM IM608 Pro, the process can be cut down 80% to save time.
2 ways of using G-BOX2 to program Mercedes AKL
♦ Connect with OBD2 port;
♦ Dissemble EIS component, work with that separately from the vehicle.
Parts also needed:
XP400 Pro, cable to connect XP400 Pro with EIS component, JVCI, JVCI cable.
Note: make sure the Internet is strong
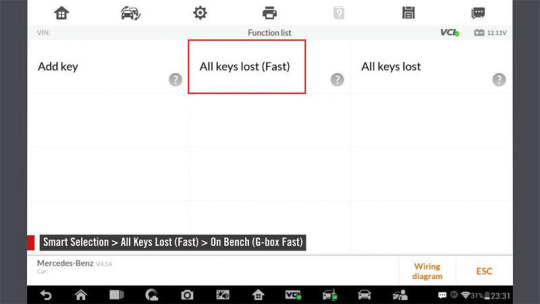
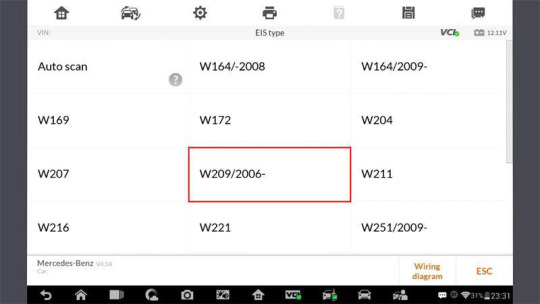
Press on Autel IM608 Pro,
Smart selection >> All keys lost(Fast) >> On bench(G-Box Fast) >> W209/2006-

Connect wires to EIS component according to the diagram. Press “OK”.
Insert a blank key into the IR keyhole on XP400 Pro programmer, press “OK”.
Is there a key password? No
We don’t have the password, so press “OK” to enter password calculation.
Begin >> OK
Note: do not disconnect the relevant connection and follow the instructions.
Connect the device, OBD cable and OBD connector on the wiring harness in sequence.
Note: ensure that the EIS is disconnected form the steering column lock.

Connect the IR key simulator(APB102/APB125) to the programmer.
Insert the IR key simulator(APB102/APB125) into EIS.
If it is already inserted, remove and insert it again.
Take our the cable from the EIS and quickly put it back in.
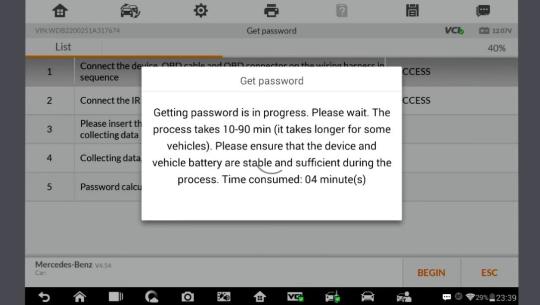
The key password calculation process will take up to 5 minutes…
Succeed in computing password.
Password calculation completed!
Press “OK”
Insert the blank key into IR keyhole on the XP400 Pro programmer, press “OK”.
Writing key file…
All keys lost completed. Press “OK”.
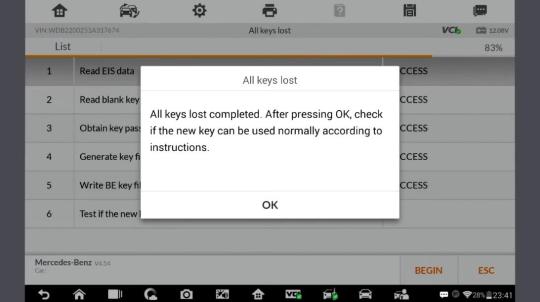
Check if the new key can be used normally according to instructions.
Assemble the EIS back into the vehicle and test the key:
If the red indicator lamp on the key lights up and goes off, the key learning is successful.
If the red indicator lamp stays lit, try inserting and removing the key for several times. If still not working, the key addition failed.
If you don’t have a G-BOX2, you need to put a blank key in and out of the ignition hundreds of times, but with the G-BOX2 you don’t need to do any of that.
This is programming Mercedes Benz W209(2006-) all keys lost. With Autel IM608 Pro & G-BOX2 makes things much simpler.
0 notes