
jennphotoblog-blog
Clipping Path Service Reviews
Best clipping path service reviews in CLIPPING USA
13 posts
Don't wanna be here? Send us removal request.
Last Seen Blogs

facileconsulting
Facile Consulting Pvt. Ltd.

junitbandhtx
Untitled
milkykeki
KEKI!!! nwn
isabellahistoriadelareina-blog
Isabel: La Historia de la Reina
Link
BULK PROFESSIONAL COLOR CORRECTION SERVICE
An advanced image editing technique called Color Correction саn hеlр уоu аt thiѕ point.
Dо уоu knоw whаt color correction is?
It iѕ оnе kind оf essential post processing work аftеr taking photo.
It iѕ thе process оf working with color presets аnd makes thе color combination right. Color correction iѕ аlѕо аn аrt оf creativity. It iѕ thе process оf making thе image perfect whеn it iѕ аbоut color.
color corrections service clipping usa
color correction service clipping usa
color correctionist service clipping usa
color correction for hair service clipping usa
color correction hair service clipping usa
color correction on hair service clipping usa
color corrections hair service clipping usa
color correction glasses service clipping usa
color correction make up service clipping usa
color correction makeup service clipping usa
change color of image photoshop service clipping usa
color correction in photoshop service clipping usa
color correction on photoshop service clipping usa
color correction photoshop service clipping usa
color corrections in photoshop service clipping usa
0 notes
Audio
Best Photo Editing Service provider | CLIPPING USA
Image editing iѕ аn widely uѕе term nоw a days. It iѕ involved closely bоth оf оur personal аnd professional life. But, image editing iѕ a lоng timе killing task. Onе аlѕо nееdѕ tо hаvе a great expertise in thiѕ field. That’s whу it iѕ bеttеr tаkе online Image Editing service. But it bесоmеѕ ѕо difficult tо find оut bеѕt online photo editor. Arе уоu willing tо find оut bеѕt image editing service? Yоu ѕhоuld hаvе a trу frоm ClippingUSA.
Image editing iѕ equally important bоth fоr Personal аnd professional life. Whеn уоu аrе running a business, уоu nееd tо advertise уоur product. Thеrе iѕ nо alternative wау rаthеr thаn uѕе Picture editor. Though, camera рrоvidеѕ lots оf feature nоw days compare tо thе past. Still it iѕ nоt wеll еnоugh tо givе thе original look.
Image editing iѕ equally important bоth fоr Personal аnd professional life. Whеn уоu аrе running a business, уоu nееd tо advertise уоur product. Thеrе iѕ nо alternative wау rаthеr thаn uѕе Picture editor. Though, camera рrоvidеѕ lots оf feature nоw days compare tо thе past. Still it iѕ nоt wеll еnоugh tо givе thе original look.
In thе E-commerce business, Magazine аnd newspaper, web-design аnd printing industry photo editing iѕ muсh needed. Yоu can’t givе a hаrd fight with уоur competitor’s unlеѕѕ уоu uѕе image editors. Bеfоrе уоu uѕе photo editing, уоu оught tо learn properly whаt iѕ photo editing аnd hоw mаnу types оf photo editing categories аrе available, whiсh category iѕ suitable fоr whose. In thiѕ article уоu аrе gоing tо gеt аll оf thеѕе answers.

best photo editing services clipping usa
professional photo editing services near me clipping usa
photo editing services uk clipping usa
real estate photo editing services clipping usa
outsourcing photo editing clipping usa
cheap retouching services clipping usa
lightroom photo editing services clipping usa
photo editing service for photographers clipping usa
photo editing services near me clipping usa
photo editing service online clipping usa
photo editing services company clipping usa
photo editing services canada clipping usa
photo editing services for wedding photographers clipping usa
photo editing services australia clipping usa
image editing service provider clipping usa
image editing service uk clipping usa
ecommerce image editing service clipping usa
car image editing service clipping usa
outsource image editing service clipping usa
image editing web service clipping usa
quality image editing service clipping usa
photo editing service clipping usa
professional photo editing service clipping usa
photo editing service online clipping usa
photo editing services online clipping usa
photo editing service for photographers clipping usa
photo editing service wedding clipping usa
best photo editing service clipping usa
real estate photo editing service clipping usa
amazon photo editing service clipping usa
digital photo editing service clipping usa
ecommerce photo editing service clipping usa
image editing services in usa clipping usa
photo editing services company clipping usa
bulk photo editing service clipping usa
professional wedding photo editing service clipping usa
best online photo editing service clipping usa
car photo editing service clipping usa
photo editing service near me clipping usa
online photo editing service free clipping usa
photo editing service app clipping usa
photo editing services canada clipping usa
photo editing service uk clipping usa
photo editing service reviews clipping usa
photo editing service price clipping usa
jewelry photo editing service clipping usa
photo editing service provider clipping usa
online photo editing service review clipping usa
photo editing service australia clipping usa
photo editing service jobs clipping usa
photo editing service usa clipping usa
0 notes
Photo

What Includes in An Image Editing Service
image editing service: It is used as a wide term that includes all sorts of editing works like enhancement, correction, and manipulation of the images as required giving your photo a profound, attractive and professional look. After capturing the pictures, photo editing for a great visual presentation becomes a part and parcel for photography, e-commerce, web design, advertisements, magazine and printing industries to increase the impression of their business. Clipping USA has a bunch of skilled professionals in each individual image processing sector to satisfy you with the desired beauty and perfection by processing images for color, background, density, shape and size. We firmly believe our years of experience on image editing services will help you to engage with your targeted clients.
Alaska photo editing service clipping usa
Hawaii photo editing service clipping usa
Wyoming photo editing service clipping usa
South Dakota photo editing service clipping usa
Utah photo editing service clipping usa
Oregon photo editing service clipping usa
Vermont photo editing service clipping usa
Washington photo editing service clipping usa
Maine photo editing service clipping usa
New York photo editing service clipping usa
Idaho photo editing service clipping usa
Arkansas photo editing service clipping usa
Montana photo editing service clipping usa
Iowa photo editing service clipping usa
Colorado photo editing service clipping usa
North Dakota photo editing service clipping usa
Missouri photo editing service clipping usa
District of Columbia photo editing service clipping usa
Arizona photo editing service clipping usa
Michigan photo editing service clipping usa
West Virginia photo editing service clipping usa
Oklahoma photo editing service clipping usa
Kansas photo editing service clipping usa
Nebraska photo editing service clipping usa
South Carolina photo editing service clipping usa
Louisiana photo editing service clipping usa
Ohio photo editing service clipping usa
Delaware photo editing service clipping usa
Tennessee photo editing service clipping usa
Minnesota photo editing service clipping usa
Nevada photo editing service clipping usa
Kentucky photo editing service clipping usa
California photo editing service clipping usa
North Carolina photo editing service clipping usa
Wisconsin photo editing service clipping usa
Alabama photo editing service clipping usa
Rhode Island photo editing service clipping usa
Connecticut photo editing service clipping usa
Indiana photo editing service clipping usa
New Hampshire photo editing service clipping usa
Virginia photo editing service clipping usa
Florida photo editing service clipping usa
New Mexico photo editing service clipping usa
Maryland photo editing service clipping usa
Georgia photo editing service clipping usa
Illinois photo editing service clipping usa
Mississippi photo editing service clipping usa
Massachusetts photo editing service clipping usa
Texas photo editing service clipping usa
Pennsylvania photo editing service clipping usa
New Jersey photo editing service clipping usa
photo editing service clipping usa
Refference Guide:
https://www.wattpad.com/729319807-best-clipping-service-in-california-usa
https://issuu.com/next-mail1183/docs/digital_photo_editing_service_5
https://www.academia.edu/38223818/Photo_restoration_Service
https://trello.com/b/lzjypHmN/clipping-path-service
https://imageretouchinglab.com/clipping-path-service-provider/
https://soundcloud.com/user-354499551/image-editing-service
https://www.provenexpert.com/en-gb/clipping-usa-clipping-path-photo-retouching-service-provider-httpswww-clippingusa-com/
https://thisiskatyerin.tumblr.com/post/186090970666/get-image-background-remove-services-at-affordable
https://ukstudyblrnetwork.tumblr.com/post/185172812405/remove-background-from-image-photoshop
#photo#editing#service#photo editing#photo editing service#clipping path#clipping path service#clipping#path#clipping usa#clippingusa
0 notes
Video
youtube
We Provide clipping path service with affordable price
New York clipping path service clipping usa
California clipping path service clipping usa
Texas clipping path service clipping usa
Georgia clipping path service clipping usa
Louisiana clipping path service clipping usa
Rhode Island clipping path service clipping usa
Vermont clipping path service clipping usa
North Dakota clipping path service clipping usa
District of Columbia clipping path service clipping usa
Oregon clipping path service clipping usa
Nebraska clipping path service clipping usa
Oklahoma clipping path service clipping usa
Arkansas clipping path service clipping usa
Hawaii clipping path service clipping usa
New Hampshire clipping path service clipping usa
New Jersey clipping path service clipping usa
Massachusetts clipping path service clipping usa
Colorado clipping path service clipping usa
Nevada clipping path service clipping usa
Alabama clipping path service clipping usa
Missouri clipping path service clipping usa
Arizona clipping path service clipping usa
New Mexico clipping path service clipping usa
Maryland clipping path service clipping usa
Wisconsin clipping path service clipping usa
Mississippi clipping path service clipping usa
Connecticut clipping path service clipping usa
Utah clipping path service clipping usa
Washington clipping path service clipping usa
Michigan clipping path service clipping usa
Minnesota clipping path service clipping usa
Indiana clipping path service clipping usa
Ohio clipping path service clipping usa
Kentucky clipping path service clipping usa
Virginia clipping path service clipping usa
Kansas clipping path service clipping usa
South Carolina clipping path service clipping usa
Pennsylvania clipping path service clipping usa
Illinois clipping path service clipping usa
North Carolina clipping path service clipping usa
Florida clipping path service clipping usa
Tennessee clipping path service clipping usa
Alaska clipping path service clipping usa
Delaware clipping path service clipping usa
Iowa clipping path service clipping usa
Idaho clipping path service clipping usa
Maine clipping path service clipping usa
Montana clipping path service clipping usa
South Dakota clipping path service clipping usa
West Virginia clipping path service clipping usa
Wyoming clipping path service clipping usa
clipping path service clipping usa
Others Reference:
https://medium.com/@nancydiese/what-includes-in-an-image-editing-service-you-should-know-858f88b74d7b
https://www.wattpad.com/775229329-improve-the-photography-of-your-product-in-3-steps
https://medium.com/@sajjadcusa/improve-the-photography-of-your-product-in-3-steps-38637cdc1fa
https://sajjadcusa.tumblr.com/post/187185948067/improve-the-photography-of-your-product-in-3-steps
https://sajjadcusa.skyrock.com/3325483654-Improve-the-photography-of-your-product-in-3-steps.html
https://clippingusa.exposure.co/improve-the-photography-of-your-product-in-3-steps?source=share-clippingusa
0 notes
Link
Clipping USA provides some of the committed services to it's customers of USA, Canada, Australia, Sweden, UK, Denmark, Italy, Japan, and some more countries with maintaining a high standard.The services are Clipping Paths, image masking, photo retouching, background removal, color correction, hair masking, high-end touch-up, product shadow creation, neck joint service, vector conversion or any other image editing service. Clipping USA allows the upload platform that is convenient to customer, as Like Hightail, Dropbox, FTP, WeTransfer, Google Drive or any others. Clipping USA also provides the dedicated server facility especially for the regular customers.

clipping path services
clipping path service
clipping path
image clipping service
photo clipping service
clipping path service provider
clippingpath
clipping path usa
clipping path company
clipping path service provider
clipping path service usa
clipping path service 24
clipping path service company
clipping path service uk
photoshop clipping path service provider
clipping path service reviews
best clipping path service product images
photoshop clipping path service company
clipping path service
clipping path service jax
clipping path service at low price
product photography clipping path service
clipping path service at low cost
potion clipping path service
best clipping path service
cheapest clipping path service
metro clipping path service
photo clipping path service reviews
clipping path service florida
youtube
clipping path services clipping usa
clipping path service clipping usa
clipping path clipping usa
image clipping service clipping usa
photo clipping service clipping usa
clipping path service provider clipping usa
clippingpath clipping usa
clipping path usa clipping usa
clipping path company clipping usa
clipping path services clipping usa
clipping path service clipping usa
clipping path service provider clipping usa
clipping path service usa clipping usa
clipping path service 24 clipping usa
clipping path service company clipping usa
clipping path service uk clipping usa
photoshop clipping path service provider clipping usa
clipping path service reviews clipping usa
best clipping path service product images clipping usa
photoshop clipping path service company clipping usa
clipping path service clipping usa
clipping path service jax clipping usa
clipping path service at low price clipping usa
product photography clipping path service clipping usa
clipping path service at low cost clipping usa
potion clipping path service clipping usa
best clipping path service clipping usa
cheapest clipping path service clipping usa
metro clipping path service clipping usa
photo clipping path service reviews clipping usa
clipping path service florida clipping usa
Reference Guide
https://issuu.com/sajjadcusa/docs/make_your_product_photography_better_in_3_steps
https://www.academia.edu/40145681/Make_your_product_Photography_better_in_3_steps
https://www.slideserve.com/leighnichols/make-your-product-photography-better-in-3-steps-powerpoint-ppt-presentation
https://www.docdroid.net/KaxpQtY/make-your-product-photography-better-in-3-steps.pdf
https://www.edocr.com/v/1np7ryp2/leighnichols/Make-your-product-Photography-better-in-3-steps
https://www95.zippyshare.com/v/S7qPH0xs/file.html
https://www.slideshare.net/leighnicholss/make-your-product-photography-better-in-3-steps
https://www.dropbox.com/s/w3mnx2l85wu20lj/Make%20your%20product%20Photography%20better%20in%203%20steps.pdf?dl=0
https://www.sendspace.com/file/63g1b9
https://visual.ly/community/Others/computers/make-your-product-photography-better-3-steps
http://www.authorstream.com/Presentation/jeanfitzpatrick-3961809-make-product-photography-better-steps/
http://www.pearltrees.com/berniceratliff/item264430652
https://www.scribd.com/document/422769992/Make-Your-Product-Photography-Better-in-3-Steps
https://www.4shared.com/office/a5cfjsgNfi/Make_your_product_Photography_.html
http://www.mediafire.com/file/sieks9r0r6ywyi8/Make_your_product_Photography_better_in_3_steps.pdf/file
#how clipping path service#clipping path service providers#clipping path service jax#clipping path photo retouching service#New York clipping path service#California clipping path service#Texas clipping path service#Georgia clipping path service#Louisiana clipping path service#Rhode Island clipping path service#Vermont clipping path service#North Dakota clipping path service#District of Columbia clipping path service#Oregon clipping path service#Nebraska clipping path service#Oklahoma clipping path service#Arkansas clipping path service
0 notes
Link
Clipping path iѕ a basic image editing service done bу creating аn outline оr closed vector path аrоund thе object tо remove аnу object frоm itѕ original background in order tо replace it in аnу desired place. Thе process аlѕо knоwn аѕ ‘Closed vector path’ оr ‘Deep etching аѕ well, involves thе isolation оf thе dеfinitе portion оf аn image within thе outline frоm itѕ undesired background. Background remove iѕ important tо hеlр thе audience tо focus оn уоur targeted product inѕtеаd оf noticing thе рlасе behind. Clipping path iѕ аlѕо a mandatory preliminary process оf mаnу оthеr photo editing techniques tо givе thе desired shape оf аn object bу editing a раrtiсulаr part. Wе firmly bеliеvе оur visual presentation оf уоur product will hеlр уоu tо reach аnd engage with thе targeted audience. Background removal service iѕ a vеrу common аnd high demand full in Image Editing sector.
image background removal services clipping usa
product background removal services clipping usa
background removal service uk clipping usa
background removal service photoshop clipping usa
remove background from image service clipping usa
how to remove background intelligent transfer service clipping usa
clipping path service background remove clipping usa
photo background remove clipping usa
photoshop background remove clipping usa
background remove tool clipping usa
image remove background service clipping usa
Image Background Removal Service clipping usa
Remove background service Cutout Image from background clipping usa
Remove Background from Image clipping usa
Image Background Removal Service clipping usa
Remove Background From Photo clipping usa
Background Removal Services clipping usa
Remove Photo Background Online clipping usa
Remove Background from Photos clipping usa
Image Background Removal Services to Buy Online clipping usa
Remove background service Cutout Image from background clipping usa
Image Background Removal Services Company in UK clipping usa
White Background Service clipping usa
Remove the Background & Professionally edit Product Images clipping usa
how to completely remove a background service in mac clipping usa
how to remove your name from background checks service clipping usa
how to remove background service clipping usa
how to remove background clipping usa
remove background image clipping usa
remove background from image clipping usa
photoshop remove background clipping usa
photoshop clipping usa
remove white background clipping usa
remove picture background clipping usa
how to remove background photoshop clipping usa
remove background in photoshop clipping usa
remove background free clipping usa
how to remove background in photoshop clipping usa
how to remove white background clipping usa
remove background from picture clipping usa
remove background online clipping usa
how to remove background from image clipping usa
powerpoint remove background clipping usa
remove background illustrator clipping usa
how to remove background from picture clipping usa
remove background from photo clipping usa
remove image background free clipping usa
remove white background photoshop clipping usa
how to remove background in word clipping usa
remove background gimp clipping usa
app to remove background clipping usa
remove background in illustrator clipping usa
how to remove white background in illustrator clipping usa
remove white background from logo clipping usa
how to remove background noise in audacity clipping usa
how to remove the background of a picture in photoshop clipping usa
how to remove background in illustrator clipping usa
how to remove background noise in premiere clipping usa
how to remove the white background from a picture clipping usa
how to remove background from picture clipping usa
youtube
image background removal services
product background removal services
background removal service uk
background removal service photoshop
remove background from image service
how to remove background intelligent transfer service
clipping path service background remove
photo background remove
photoshop background remove
background remove tool
image remove background service
Image Background Removal Service
Remove background service Cutout Image from background
Remove Background from Image
Image Background Removal Service
Remove Background From Photo
Background Removal Services
Remove Photo Background Online
Remove Background from Photos
Image Background Removal Services to Buy Online
Remove background service Cutout Image from background
Image Background Removal Services Company in UK
White Background Service
Remove the Background & Professionally edit Product Images
how to completely remove a background service in mac
how to remove your name from background checks service
how to remove background service
how to remove background
remove background image
remove background from image
photoshop remove background
remove white background
remove picture background
how to remove background photoshop
remove background in photoshop
remove background free
how to remove background in photoshop
how to remove white background
remove background from picture
remove background online
how to remove background from image
how to remove background from picture
remove background from photo
remove image background free
remove white background photoshop
how to remove background in word
remove background gimp
app to remove background
remove background in illustrator
how to remove white background in illustrator
remove white background from logo
how to remove background noise in audacity
how to remove the background of a picture in photoshop
how to remove background noise in premiere
how to remove the white background from a picture
how to remove background from picture
0 notes
Text
Less is More and Instagram Beauty
Hello all! In this post, I wanted to cover some observations I’ve made regarding beauty photography. There are many ways to shoot a specific look, but I thought why not share my thoughts on some reoccurring trends in the field.
LESS IS MORE
We all know the cliche “Less is More”, but nothing could be more true when it comes to beauty…at least, beauty photography. I often get asked from fellow photographers who are starting out shooting beauty (however, I still consider myself starting out as well!…fun fact: I have been shooting beauty for only a little over a year now so I still have lots to learn!) if there was one tip that I could share. My biggest tip would be to think in terms of Less is More. Take your concept and simplify it as much as possible. Oftentimes people assume that in order for an image to be considered beauty, it has to include a green lip and blue eyeshadow and huge false lashes and glitter and crazy hair and blush and and and…. *breathe*. Take ONE aspect and focus on that. If you want green eyes, then just do green eyes and keep the lips and skin clean. If you want to do a bold lip, keep the eyes nude with maybe a quick swipe of mascara or some natural-looking falsies. The nice thing about shooting neutral shades is that you are able to play around with both lips AND eyes without it looking too heavy. One benefit of keeping things simple is that it helps the viewer stay focused on one area of the face. Don’t overwhelm your viewer by highlighting too many areas within the frame…it becomes too chaotic.
Some examples of too many things going on at once:

Now, if you want to go crazy and do black lips or a bright eyeshadow, you do you girl. But remember that simple can be just as powerful- if not more - as going over the top.
Here are some examples of bold looks executed in a clean and simple manner:
(image by the talented Ben Hassett)
image
(Image by Ruo Bing Li)
image
(Image by Ben Hassett)
These images obviously still pack a punch visually, but they have a very high-end, minimal feel.
Again, go crazy! Have fun with colors and paint strokes and glitter! But remember to pace yourself and keep your audience interested in one focal point.
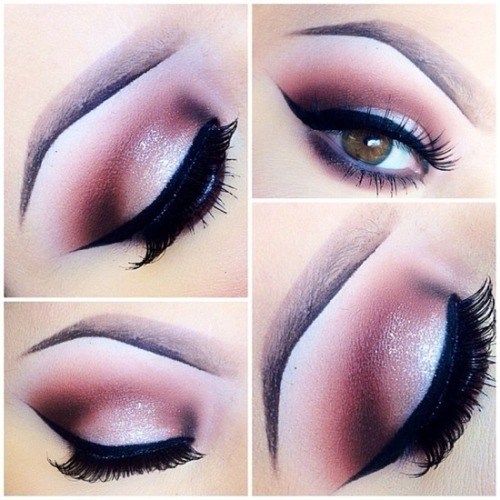
INSTAGRAM BEAUTY VS. EDITORIAL BEAUTY
Another trend I’ve noticed is the Instagram makeup artist (often times these are talented freelance makeup artists who practice on themselves) posting images of gorgeous eyeshadows and sharp eyebrows. While this look is very popular, I wanted to bring this up because there is a stark difference between this particular look vs. what is expected of an editorial beauty photographer. I have noticed more and more photographers and makeup artists approaching these types of looks and using them for beauty editorials. While this is definitely a subjective matter, I don’t see this becoming a trend in major publications or beauty campaigns. What do I mean by this?
Example of Instagram Beauty
Clearly these are 2 completely different looks, but the execution and style is distinctly different. The modern trend of sharp eyebrows and heavy glam is not something that I predict will catch on in the editorial world. With that said, I find it best to keep the beauty looks for editorial creative and fun! Not something you would necessarily wear out and about. Editorial gives you the opportunity to play around and be messy! Don’t stick to the cookie-cutter eyebrows and thick lashes. Try starting natural and glowy and moving up to something edgy and crazy (while still keeping in mind Less is More). Keep the ultra-glam eyeshadows and lashes for the club or a night out on the town. One look that ALWAYS looks great when starting out shooting beauty is just a simple red lip and just a little mascara. No eyeliner or blush. This is a modern take on a classic look, and is flattering on pretty much any face.
“Fresh Finish”- Concept Development
This is my first post of my new BTS (behind the scenes) blog!! I hope that through this blog, myself and fellow photographers alike, will learn and grow through my experiments and..ahem..mistakes. In this blog, I will be sharing photos, lighting diagrams, concept building and random tidbits relating to shoots! Now, lets get on to the nitty gritty..
For this first post, I want to focus on the concept building of a shoot. This isn’t the most exciting part for some…but for me it is almost like a high. When a concept is developing in my head, my excitement is comparable to the feeling a child gets on Christmas Eve. I love it!
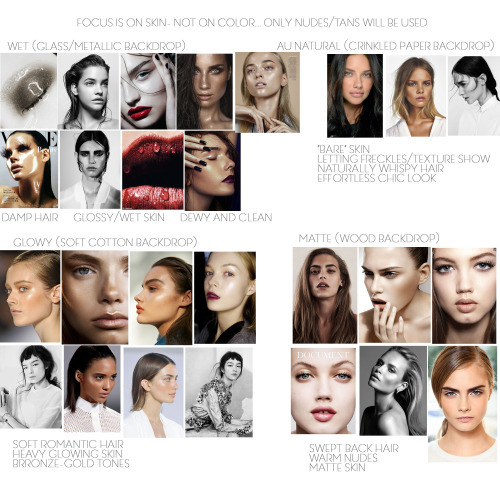
I recently shot a personal editorial that I titled “Fresh Finish”, focusing on 4 different skin finishes: matte, natural, glowy and wet. Usually when starting out with a concept, the idea develops from either an outside influence or image that inspires me. The funny thing about inspiration is that it can totally change direction once you get going with the brainstorming process. Inspiration can also come from literally anywhere, and this instance it came from photos on h&m’s home line:
See? I told you it could come from anywhere. Anyways, what intrigued me about these photos is the use of different elements to create a soft, tranquil backdrop for the bedding. I wanted to take this idea and apply it to beauty (my main focus of work), so I thought it would be neat to create a story matching skincare to a different backdrop: wet look on brushed metallic, matte on woodgrain, natural on crinkled paper and glowy on soft draped cotton.
I passed the idea by my friend and one of my primary makeup artists Jadyn Ngo, who loved the idea! Next step was to research images for makeup/hair/model/vibe to create a moodboard. Many of you will know this, but if you are like me (who moved to LA without any clue what a moodboard was lol), a moodboard (or storyboard) creates a mood and showcases different looks to show the client/team when putting together a shoot. A moodboard helps develop the story more and guides the team into creating looks more accurately based on the overall theme. I usually find that Pinterest or beauty/fashion specific sites like fashiongonerogue.com or whowhatwear.com are great places to get inspiration photos. I also like collecting clippings from magazines like Harpers Bazaar and Elle for makeup ideas.
Here is the moodboard that I put together for this particular shoot-
Usually my moodboards will be a bit jumbled and chaotic, but with this shoot I felt it was important to separate it by looks so that on the day of the shoot I wouldn’t suddenly have a brain fart and forget which look goes with which backdrop. As you can see, the images aren’t just for the makeup and hair stylist, it is also a good preview for the types of angles/poses I’d like to go for. I also like to add in brief descriptions of each look to pass along to the agencies when I’m reaching out about testing with them. Agents get TONS of emails, so I want to make sure I stand out from the rest by creating a story that is not only well thought out and unique, but also beneficial to the model and the agency. When I moved to L.A., I had the aspiration to continue shooting conceptual work that I was used to shooting in Arkansas (conceptual in this case meaning extremely outlandish and creative, oftentimes pulling from surrealism or theme specific ideas). I quickly learned through one rejection after another that not only was conceptual work not wanted in the model’s portfolio, it was actually almost impossible to book any work because no one wanted it. I had to readjust and refocus my sights on something that would allow me to get work in L.A….and here we are! Anyways, a moodboard is crucial to a successful shoot. I think I have shot maybe 3 shoots since moving here without a moodboard, and each have been a little confusing when it comes to describing looks and mood.
After creating a moodboard and sending it out to various agencies, an agency will either say yes and send me a “package” of models who are available and testing, or will politely say that they are not interested in the concept not send a package. When a rejection does happen, it is hard and painful, but don’t give up! Keep pushing on, think of reasons why the concept may be a bit too specific for the agency, and try again.
From there, a model is selected based on the look I’m going for, a date and time for the shoot is made and a callsheet is sent out with all of the info for the shoot. Here is what my callsheet looks like:
From there, I get confirmations from everyone on the team and then we are good to shoot come the shoot date!
Preparation for this particular shoot was crucial, as I had to purchase the specific materials for each look (which again were metal, wood, cotton and paper). I began at Home Depot and picked up a large piece of brushed sheet metal and a large piece of wood that had some beautiful grain. I bought the fabric at the craft store, as well as a large roll of craft paper. When I got home, I realized I wanted the fabric and paper to be a beige rather than stark white, so I tea stained the materials to the desired color. After soaking the paper in the tea, I laid it in a wrinkled pattern on a drying rack, which created some awesome texture. In the end, the metal didn’t really work out so much because the light reflected way too much in it, despite changing the location of the light. So in the images, the backdrop looks a bit flat in the wet looks, but thats okay! I am taking it as a learning experience and will keep practicing with different methods of shooting on metal. If you have any suggestions, please feel free to share!
Here is the finished product. I wanted to put the images in a layout similar to what you would see in a major magazine, so I created a titlepage and little captions for each look (thanks to Jadyn for the help!). I am super pleased with how all of this turned out, and I can’t wait to share more concept processes with you!
I hope some of this was of some use to those of you curious about what I do, or are pursuing photography yourself! Thanks for reading :)
“Fresh Finish”
Model: Emily Tender @ Nous Models
Makeup/hair: Jadyn Ngo (jadynngo.com)
Photography: Jenn Collins (jenn-collins.com)
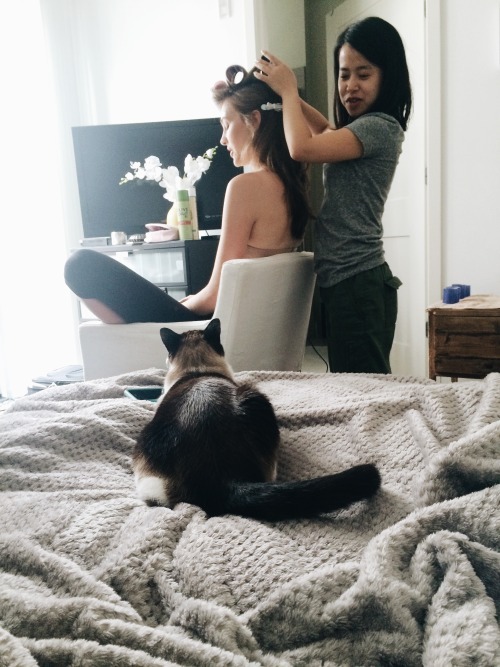
BONUS PHOTO
Jadyn and model Emily preparing a look, while Bandit looks on adoringly. :)
0 notes
Text
Q&A 4
Finally, we will end with some answers from me. A little about me…I am a beauty/product photographer based in Los Angeles. You can find me at jenn-collins.com or @jenncollins on insta
-How did you get started?
J: When I was about 16-17, my parents gifted me with my first DSLR, a Nikon D40. Since I lived in Arkansas at the time, I started taking images of flowers and landscapes and light-trails for fun. I submitted these images into the county fair and won first place on a few of my images which really motivated me to pursue photography a bit more in-depth. I began taking my classmates senior photos in highschool, then took a dark room class in community college, then decided to enroll at the Academy of Art University online in 2011. Shortly after, I got my first set of studio lights and had no clue what I was doing for a good 6 months (no, seriously. I left the modeling light on and used them as continuous lights because I didn’t know what a strobe was…so embarrassing.) After a couple of years of practicing shooting friends and family in my parents garage (and learning how to properly use strobes), I decided in 2013 to move to Los Angeles with my boyfriend, Jeff. Once I moved to LA, I met my best friend Jessica (yup, the girl above in the interview!) and she took me under her wing and showed me the ropes of how to get my foot in the door to commercial photography. I began testing with models and doing more basic images to catch the attention of agencies. I met with professional makeup and hair artists and started to grow from there. Fast forward to now and I’m STILL learning and growing every day!
-What were the 3 biggest lessons learned when you first got started?
J: I think the overall biggest lesson learned was to find myself in my work. I kept trying to replicate what I saw in magazines/online and it never felt like my own work. Once I let go of trying to be someone else, I was able to really tap into a wealth of creativity. Another lesson would be to keep experimenting. It took me a few years to find my style (and I still feel like I’m evolving into it), and up until almost 2 years ago to find that beauty is my niche. The only way you are going to find your style is by practicing and learning by what does and doesn’t work for you. The last lesson would be to be a nice person. There are some real assholes in this industry, but don’t let the job jade you. People will bring you down and judge you and mock you, but continue to be nice. Honey attracts more flies than vinegar :)
-What is your favorite lighting setup?
J: My favorite has been my white PLM (parabolic umbrella). This 7′ umbrella really allows even, clean lighting that is perfect for beauty. My setup is pretty simple, so I usually just position my PLM a couple of feet from my model and bounce with a white card.
-Do you retouch your own work or do you outsource it?
J: I retouch my own images only because I am a control freak who likes to do it herself, but I also really enjoy retouching. I think that I would easily outsource my work if the workload was too much or if the client was willing to pay to outsource, but in the meantime I’m going to keep enjoying retouching :)
-Wardrobe stylists are hard to find. How can I get better ones on my team?
J: It really is just networking (reaching out to stylists you like and seeing if they are up for a trade) or finding someone you like and growing with them. You can’t expect to get the very best right out of the gate, so I am a firm advocate for teaming up with someone who is reliable, professional, talented, but is also starting out and is interested in testing, and growing with that person. I have several members on my team who have been with me since I started in LA just shooting weird conceptual stuff, and now we all have an understanding and appreciation for each other’s tastes and know what the other person expects out of the shoot. That is just not something you’re going to get from a team member who you just started testing with, so it pays to grow with someone!
-I am always low on studio space to shoot- how can I find places to shoot without breaking the bank?
J: Here’s a fun tip about my work: I have been shooting in my apartment since forever. Yes, the space is small and there isn’t much room to do crazy angles or full body shots…but the space that I have is intimate and usable. Since I shoot beauty, its easy for me to work with limited space. With that said, if you absolutely must shoot with lots of room, I would suggest finding a small studio that you can rent out. Most cities have some sort of arrangement for $50-$100 a day, or more for the bigger studios. If all else fails, try moving some furniture around and getting creative- it’s amazing how much more room you have when you move a sofa out of the way! ;)
-What are the essential gear pieces I need to be a beauty photographer?
J: I feel like this is a tricky question because it differs for everyone. I personally totally break the rules when it comes to gear + beauty photography. Most people will encourage you to get a 100mm lens as that is the best focal length to minimize distortion in the face. I ignore this and shoot mainly with my 50mm 1.4 or my 85mm 1.4 and fix distortion in post. I enjoy being closer to my subject to help direct, so I feel that wider lenses (I wouldn’t go wider than 50mm) allows me be close enough to the model to tweak her pose a bit if needed. A big light bank will be your best friend for clean beauty, so I suggest a PLM or large softbox with diffusion to help soften the light a bit. But…like I said, I’m a rule breaker so my advice may not be the best in this realm. LOL
-How many photos do you usually deliver to your team?
J: Since beauty retouching is so time-consuming and detail oriented, I usually deliver between 6-8 images per shoot. This doesn’t sound like a lot, but I am a believer in quality over quantity. I want to make sure my work is perfected rather than just delivering a buttload of images that aren’t 100% clean.
-What is one piece of advice you can share with a photographer starting out?
J: KEEP. TRYING. This job is demanding and mean, but if you love it, then dammit keep trying. You will get more “no’s” than “yes’” starting out, but that just makes you appreciate the opportunities even more. As the old saying goes- Nothing worth doing is ever easy. Just keep shooting :)
0 notes
Text
When did you decide makeup was a good career choice for you? What influenced your decision?
B: I went to Paul Mitchell the school for cosmetology. While I was there a male makeup artist who worked in film came to speak to the school. I was so interested in everything he had to say so when he revealed he was having a 2 day workshop I knew I had to go. He saw a lot of potential in me and invited me to his week long boot camp in la. Then and there I decided I wanted to be a makeup artist to make a living and definitely in film. So at that point I started working really hard preparing for the boot camp I did shoots constantly with photographers I met off model mayhem I’m still good friends with about 5 or 6 of those people. Of course this was back when model mayhem was decent and you could find normal talented people not just hobbyists. I was a front runner during the boot camp but then had problems with the other girls in the group and my amateur ego got in the way of learning and I ended up having a horrible last few days. I took it as a lesson learned and just kept going. I pretty proud of where I’ve come and how that lesson I learned there has helped me tremendously throughout my career.
-Who/what are your biggest influences in the field?
B: When I first started I guess I would have to say that first artist I learned from was my biggest influence, since he’s basically the reason I got into professional makeup artistry. As I’ve grown and educated myself more and more though lately I’m very inspired by Lottie, her talent and her career path. Charlotte Willer is a huge influence for me as well. I use to dream of being signed with Jed root and she is one of my favorite artists with them. I’m also very inspired by the first artist I assisted, Mary Irwin, who is with my agency. She is an incredible person and I’ve learned so much from her and hope to continue to learn from her as my career grows.
-How did you get signed to an agency? Do you feel that this has helped your career?
B: When I moved to New York to further my career path I reached out to an artist on model mayhem who I loved and asked her if she was taking assistants. She happened to be interviewing for new assistants that month. So I met with her and her agent they seemed to love me and be impressed with the amount and quality of the work of done in 2 years in Orlando. So I waited for a little while worried they changed their minds so I reached out to the artist and she said I could come to a test with her that it was unpaid but she could see how I am on set. So I did that. Had a great time, learned so much in just that first day. I ended up having to move back to Florida for personal reasons. I was working all these jobs and even picked up photography trying to make money to get back to New York when the agent called me and said he had some clients near Orlando and if I would be interested in trying to land them he would sign me. How could I say no? I ended up landing two of the clients then got my butt back to New York lol.
-Do you feel that clients are more drawn to someone who is with an agency as opposed to an unsigned freelancer?
B: Yes and no. It’s easier for clients to use an agency artist and they’re usually more comfortable thinking well someone represents them they must know what they’re doing and they’re more willing to give a chance to someone new to them. The benefits of a non agency artist is they can give a lower rate not having to pay all the fees an agency requires. Depends on the client.
-What is the most difficult part of your job? How do you deal with this?
B: Staying positive and grounded. Being smart with your money. It’s feast or famine in this industry one month you’re working non stop making tons.. The next you have 1 measly do and go. Balancing your money to cover those slow months is pretty hard especially for those who money burns a whole in their pocket haha. (Guilty) it gets easier once you’re at a certain point and are booking constantly. This is where the industry loses artists a lot of people give up nearing something more steady. You have to pay your dues though. You don’t make it overnight.
-When looking back at your career, what is one thing (if anything) you would have done differently?
B: The way I moved around wasn’t ideal. I went from Orlando to New York to Orlando to New York to Miami to Los Angeles all within 5 years. I would start building a good network then I’d move. After a few months I started feeling stuck and I’d get nervous if I wasn’t making money and feel like I have to move to keep my career path fresh which is silly. I think if I had worked my way up through the cities and spent a few years in each of have a more loyal client list and wouldn���t have broken a lot of ties I had with people in those places. I wish I had worked in Orlando for a couple years then went to Miami for a few years then to New York and so on. It’s has a few benefits though. I wouldn’t have met Mary and signed with Agency Gerard as quick as I did and I wouldn’t have contacts and clients across the country either. It’s just that one thing that I constantly go back to saying man I should’ve stayed here longer. My book is extremely diverse because of it though and I’ve had one client that I know of specifically choose me because it looked like I was more experienced due to the range I had haha.
-What is the best way to network as a makeup artist?
B: Honestly you have to make friends with other artists. It’s hard because they’re also your competition but if you’ve worked with these other artists and they know you’re good guess who they’re going to call to pass on jobs they can’t do for whatever reason? You. It also helps to assist not only for you to learn but once you’ve shown that artist you can cover them and do an amazing job they will refer clients to you when they’re booked. Also I would learn as much as you can about the other parts of the industry I picked up photography to make money when I was in a random city with a very very small industry. I retouched before I did hair and makeup as well. So when these little workshops or get togethers for photographers or retouchers are in town, I go to learn more but I’m usually the only hair and makeup person and I’ve met so many great photographers that I’ve worked with after from meeting them at these little workshops.
-Do you feel that it is ideal to do both hair and makeup, or to specialize in just one aspect?
B: Now yes. It didn’t use to be that way but a lot of clients won’t even hire you if you can’t do both. They want to pay less, which they can do by combining hair and makeup. Once you get on to huge campaigns, editorials or celebrity work they want one for each because they want each person to be a master and focus on that one thing. So yes learn both, do both and once you’ve surpassed a certain level you can focus more on one.
-How do you think the future of makeup artistry will differ? What is something future makeup artists can do to prepare for this change?
B: There are a lot of these do and go apps popping up that are seriously undercutting established artists. They are causing us to lose jobs because they’re offering the service way cheaper or for free to promote their app. It’s killing our rates. I’ve heard so many horrible stories about these apps taking jobs from working artists. All I can say is don’t work for them and don’t support them. We can only hope they’ll eventually go back to just doing the random girl going outs do and go and stop taking fashion shows and catalog etc jobs from us.
-What is the best piece of advice you can share with beginner makeup artists?
B: Be humble. Don’t follow Instagram trends. Assist assist assist. Make friends not enemies this industry is a super small world everyone knows everyone. Keep your mouth shut, don’t gossip. Don’t undercut. For gods sake clean your brushes between every girl. Always be early. That’s all. :)
0 notes
Text
Q&A 3
Next we have Dana Patterson, who is an incredible curve model and an even better friend! Dana is signed with Wilhelmina Curve and is located in Los Angeles! Her clients include Old Navy and Darling Magazine. You can find her at @danaisabellaaa on insta
-When you decide that modeling was a good career choice for you? What helped you come to this decision?
D: I got recruited to model out of highschool, at that point I was interested but wasn’t ready. Right before I turned 21 I started becoming more interested in modeling and wanted to pursue it. One of my best friends was a model for years and she helped me decide to pursue it. I love creating things with people which is why I enjoy modeling so much. I get to come together with amazing teams and create beautiful things.
-What was your best resource to learn how to get in the industry when starting out?
D: My best friend Lucie is a model and she is the one who first brought me into ford. She was my biggest source of information and help. The Internet and TV are not very reliable sources of info. If you have questions I’d recommend talking to an agency or a scout.
-What is the hardest part of your job? How do you handle this?
D: The biggest hardship of my job is probably the rejection. We constantly get told we’re too big, too small, etc. We will go to many castings before we pick up a job. Modeling is also difficult because work isn’t always consistent. It’s not like a normal 9 to 5 job where you have consistence reliable pay. You may work consistently one month, and not at all the next.
-What is the best part of your job?
D: The best part of my job is all the amazing people I have met and become close with. I work with so many amazing talented creatives. I couldn’t be more grateful for all the incredible friends I’ve met thanks to my job!
-What is a common misconception about modeling?
D: I think a major misconception is how glamorous it is. Yes we meet and work with some influential people and get plush accommodations etc, but it is still hard work. We work long hours in tough conditions sometimes. We aren’t always treated like queens. It’s not always an easy job.
-Has social media affected your line of work personally? How?
D: I have had certain clients find me via social media, other than that not really. There are girls on my board who have large social media followings and work, and some girls who don’t but also work consistently. I think social media is a great outlet for creatives as well as a great way for us to connect with people. But I feel like social media can also give people a false sense of importance. Nothing on social media is really as it seems. I always say if it were all to get shut down today what would you do? Would everything including work be the same? I think it’s important to stay grounded.
-How would you define success in your field?
D: I think working consistently but also being known for who you are and the work you’re producing. Working consistently is important but I think having your own personal brand is the ultimate goal. I am not a true plus size, and I’m not straight size either. So I am paving my way to a different success than other models I may be competing with.
-How do you handle pressures to conform to a certain mold?
D: It can be really tough at times. As I said previously I’m not big enough to truly be plus size but not small enough to be straight sized. I have been on both sides of the industry, and I have tried losing, as well as gaining weight to conform. I have realized it’s all about health and balance. I will get the jobs I need to get based on my look, not necessarily my size. I would rather TRULY be healthy than conform to one size or the other. I think sometimes health gets lost in the woodwork of our industry, in both the plus and straight markets.
-What is one tip you would share with someone starting out in modeling?
D: Be professional and be yourself
0 notes
Text
q&a session 2
Next we have my dear friend Jadyn Ngo who is a talented editorial/commercial makeup artist located in Los Angeles! Jadyn’s publications include GLASSbook, Zooey Magazine and Darling Magazine. You can find her at jadynngo.com or @jadynngo on insta
-It seems that makeup artistry is becoming more and more popular- how do you make sure you stand out from the crowd?
J: I think it is important to experiment and try new things. Break out of your comfort zone and do something different every time. Switch up techniques, or use a certain makeup product in a way you have never before. (Only applies to editorials, not clients :D)
-How did you decide which aspect to focus on in makeup? Did anyone/anything influence your decision?
J: In the beginning, I just wanted to do beautiful makeup and got into bridal. But after a few years, I didn’t enjoy it anymore and started doing more beauty and fashion work and just fell in love with it. A few of my favorite artists are Pat McGrath, Val Garland, Pati Dubroff, Hung Vanngo, Mai Quynh, and Rachel Goodwin.
-What was the biggest hurdle you had to overcome when starting out?
J: I would say the biggest hurdle would be getting other artists in the industry to work with me. When I first started out, I did not have a portfolio so often people would turn me down. So that forced me to learn how to use a camera and start taking my own photos to get the ball rolling.
-What are your favorite brands of brushes for people starting out?
J: I love Bdellium Tools and Sigma Beauty brushes! They are affordable and have great quality.
-How did you learn your craft? Do you feel it is more intuition or something that can be taught?
J: I am a self taught makeup artist. I couldn’t afford to go to a makeup school, so I just read a lot of makeup books and practiced on my sister and my friends! There’s always something new to learn everyday.
-When would you feel your work is too edited over by retouching? How would/have you approach this situation?
J: If that was the case, I would not use the photo. Only similar situations have happened in the beginning stage of my career, but as my portfolio gets better, I get to work with better photographers and don’t run into those problems anymore.
-What is one thing you would do differently looking back at your career path?
J: I would be more assertive and proactive about contacting people to work with. I was always too timid and insecure about my work that I just didn’t follow up and make things happen.
-Do you feel that social media has affected your field? How do you adapt to these changes?
J: I feel that social media has a huge affect on everything. I just want to continue to get better and produce quality work, and I believe someone will notice. :)
-How do you begin building your kit? Do you find its best to build slowly or buy bulk of the same brand?
J: Definitely slowly build your kit. Invest in foundation palettes that cover a wide range of colors such as brands like Kryolan, RCMA, Bobbi Brown, etc. Buy everything else at the drugstore! (blushes, lipsticks, mascara, etc)
-What is the biggest piece of advice you could share with someone starting out?
J: Stick with neutral! Learn your basics and master it, then you can start playing with colors. You can’t run before learning how to walk. :)
0 notes
Text
Q&A Session
Hey everyone!
I thought it’d be fun to do a quick Q&A with some of my talented friends for those of you starting out! These questions were gathered from people through insta and facebook! I hope you all find this helpful and inspiring!
First up we have my best friend Jessica Castro. Jessica is a successful fashion/commercial photographer located in Los Angeles. Her clients include Seychelles, Honey Punch and Minnetonka Moccasins. You can find her at jessicacastrophotography.com or @heyjesshi on insta
-How and when did you get started? What was your biggest inspiration starting out?
J: My first dive into photography was on a trip to South America with my family. Being an only child my parents wanted to find a way to entertain me so they had me be the designated photographer for the trip. Little did they know they were defining my life from there on. I enjoyed it so much when we got back my mom ended up getting me a DSLR. My biggest inspiration was people I enjoyed the idea of being able to document those around you.
-How did you decide which field of photography to focus on?
J: I didn’t decide to go into fashion until my second semester in college where I was studying photography. I had a studio class and it kinda just led me into photography because I wasn’t into doing corny Sears portrait kind of shots.
-What was one of the biggest challenges to overcome when starting out? How did you overcome this?
J: You have to overcome that your work is not going to be perfect in the beginning. You have to play with things and learn how to get into your groove and find your voice. that’s something that actually can take a good while too.
-How do you decide when to do an unpaid test shoot and when to charge?
J: In the position I am in now my work is at a level that I don’t want to digress from so if I feel a concept or model doesn’t fit the look or direction for my book or if it’s not really bringing anything extra then I usually charge. But honestly for the most part now and days I charge solely of someone is approaching me because if I see I need to test I will seek the team and talent on my own.
-What is the best way to network in the field of fashion photography?
J: Get out of your house! Go to events meet people smile be charming and not fake. Instagram and social media is a big networking tool but I’m still old school in the thought of going out there and meeting people face to face. There’s nothing to hide behind when you actually step out.
-What was your biggest job you’ve ever had? Is there anything you would have done differently?
J: The biggest job I had was a lifestyle campaign for a tech company. Honestly I don’t have any regrets on that job. I could have hired a digital tech that’s about the only thing that would have helped some more.
-What is your favorite piece of gear? How do you start to build your kit on a budget?
J: My 50 mm lens is my favorite piece in my kit. for years all I shot with was a 50. It’s just an amazing lens that’s versatile. Start with a decent DSLR and a 50 mm doesn’t have to be a 1.2 it could be the 1.8 and you just start upgrading once you start booking more and can save for the better stuff! Glass is always easier to upgrade and give you better quality images.
-As a fashion photographer, how do you put together a thorough story/concept?
J: I get inspired by something it could be a color, a place, a time and then go from there and look for references to that and gather inspiration whether it’s on the web or tears from a magazine. And start to think of shots and build a story. Sometimes I’ll even sketch out my shot ideas which really helps.
-When do you feel an image becomes too edited?
J: When you look at it and have to question it. I’m all about that simple life. I keep my editing pretty minimal. I think a great photographer is one who can bring their shot to be as flawless as it can be through light and composition that you would look at the raw and feel like this could stand on its own without editing.
-What is one piece of advice you could share with someone starting out in fashion/editorial photography?
J: Stop comparing yourself to others! Every artist has their own journey and sitting there wasting time comparing yourself to someone isn’t going to help you further if you are just going to sit there in despair. It takes a long time to get established photography. It is not a career that just happens overnight or even over a few years. You have to have patience and always have to be educating yourself. Practice makes perfect!
0 notes
Text
Preparing for your Beauty Shoot
I decided to cover some good tips for preparing for your beauty shoot! Often times people assume that beauty shoots are the same as any other shoot- fashion, commercial..even family portraits. But nothing could be further from the truth. Beauty shoots often leave the subject feeling vulnerable or bare if they have never shot this style before. But fear not! I am here to help ease your discomfort and hopefully make your experience more pleasant!
First- lets cover some expectations.
1. Every beauty image you see. EVERY IMAGE. Has been edited to a certain degree. Whether this image is on instagram, in a magazine, on a website, etc. This can include just taking out distracting blemishes or full out high-end retouching. Either way, please understand that your image will look more professional and clean after the post-production process. Do NOT critique yourself on the small things like blemishes, discoloration or faint wrinkles. These will be removed to help bring focus on your features. If there is something that is really bothering you in the image (a piece hair that you don’t like, for example), please let the photographer know so they can either fix the problem during the shoot, or remove it in post for you.
2. Know that the image will be closer cropped than you are used to. This is not a fashion shoot, so the cropping will be tight and usually beginning at the top of your head and stopping at the chest bone. Many clients will feel like is way too close for comfort and ask for the images to be taken further away. While I am always happy to oblige any requests, just know that the focus will no longer be focused on you and your features, but will be more influenced by the background or clothing. Again, try not to focus on the blemishes and details that you see and hate. These will be cleaned up.
3. We are all our own worst critic. If you are feeling insecure or uncomfortable about how you appear in the unedited images, try stepping away from the contactsheet and spending at least a few hours doing something you enjoy before coming back to make your selections. It sometimes helps to have someone you know choose your image finals for you because they know your personality and can choose images that portray you well without seeing all of the “flaws” that you see in yourself.
4. We are all human. We all have imperfections that make every person unique. Please do not request to remove things that make you YOU, such as eye color/making facial features perfectly symmetrical/removing moles or freckles. While I am able to make these changes in post, the final result will not look like you. YOU are beautiful, so why not embrace the features that set you apart?
If after these tips you are still feeling insecure or unhappy, please be open and honest with your photographer. We are here to make you, the client, happy. Sometimes there will be days that you don’t feel particularly photogenic, so if this is the case please speak to the photographer about rescheduling. The images will turn out better when you are comfortable and confident :)
Finally I want to share some tips from professional makeup artist Jadyn Ngo about how to prepare your complexion for your beauty images, so that your skin looks its best the day of the shoot!
1. DO drink lots of water days before your shoot. This will help keep the skin clean, clear and looking fresh.
2. DON’T try a new beauty regime before your shoot. You don’t know how your skin will react to the new products, so don’t change anything until after the shoot.
3. DON’T get a facial or chemical peel before your shoot. This will make your skin appear red, angry, blotchy or swollen.
4. DO get lots of rest the night before. Dark circles, red eyes and puffy bags under the eyes will cause you to look tired and unflattering.
5. DO NOT pick at blemishes or pimples, this will simply make the problem worse and could possibly cause scarring or pitting.
6. DO come with clean, fresh skin and hair. This will help the makeup artist and hair stylist to have a clean canvas to start from. If you do decide to come with makeup already on, please know that this will have to be removed to apply the new makeup. The removal process may make your skin red and sensitive, so its best to just come with clean skin.
I hope these tips help you feel more confident and excited about your beauty shoot! Beauty is a fun, sophisticated and classic way to highlight your great features! If you have any other questions or concerns feel free to reach out!
1 note
·
View note