
imnotaaroncraig279
Aaron Craig's Video Production Blog
9 posts
Don't wanna be here? Send us removal request.
Last Seen Blogs
dumbass-brunette
I’m Just a Lil Stupid
mawnstern
Mawnstern
cheryblossoms
cherry

coastal-fleur
today is awful

190729
main
Text
Video Editing Weeks 10 - 15
In this section I will be showing my editing process from start to finish.
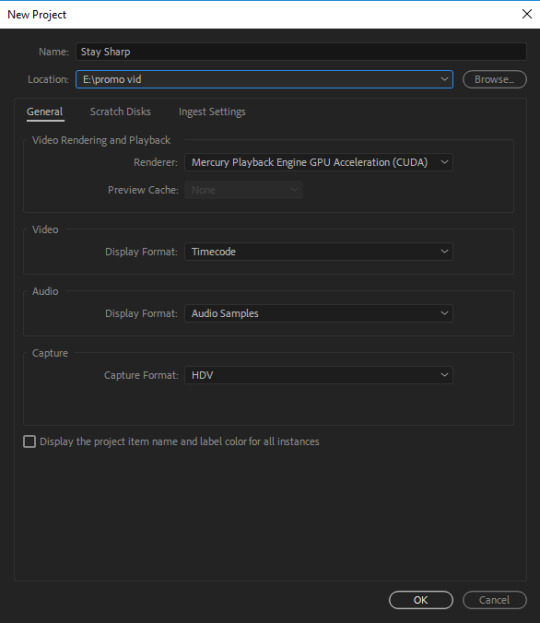
Fig. 1 SS 1
To begin my editing process I needed to start my premier pro document, I did this by starting premier pro and and selecting new. I chose these settings and a location with my videos in the same folder as it would make it easier to put them into my sequence later.

Fig. 2 SS 2
Here I created my sequence, I did this by going to file new and sequence. This gave me this screen, I chose HDV 1080p 25

Fig. 3 SS 3
Here I added my video clips, I did this by going to file import and selecting the videos I wanted. Next I trimmed them and put them into my sequence, I found a song that Ben liked on YouTube it was non-copyrighted and was a perfect fit for what I was doing. I synced the video clips up-to the beat of the song, I did this because it added a nice effect to the video and made it more attractive than if it was off beat. Being off beat would have made my video look bad and random.
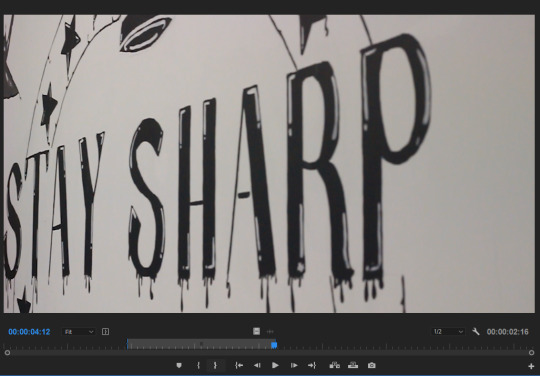
Fig. 4 SS 4
This is how I trimmed my videos, I double clicked on the video in the bottom left of my screen and found where I wanted it to start and pressed the open bracket button. I then closed the brackets when I found where I wanted it to end, I did this for all my video clips to get them to size.

Fig. 5 SS 5
Here is a closeup on how I found where exactly the beat was, the video track above is a nested sequence of videos. The change in the sound waves is how I pin pointed the beat, this made the editing process easier than just guessing by sound.
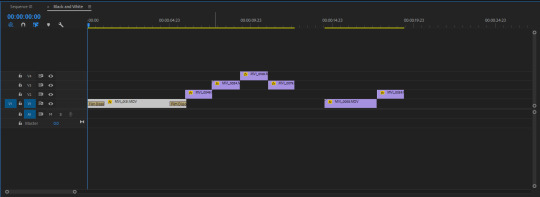
Fig. 6 SS 6
This is the nested sequence I mentioned before, It consists of a collection of video clips that appear before the song fully starts. I placed them in a nest because I wanted to edit this section and add an overlay. Placing them in a nest meant that I could add the effect on all of the clips at once, and they would all be 100% the same.

Fig. 7 SS 7
Here a screenshot of the preset I used, I would then later remove this as it made my video look drastically different and I did not like that.
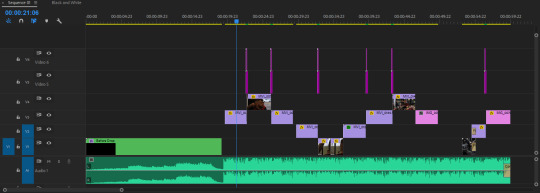
Fig. 8 SS 8
Here I added some transitions for my video clips, I was googling during my research stage for transitions and found this really cool video that had a few different transitions. I saw them and knew they fit perfectly with my video, the video then explains how to add the transitions. I followed the video step by step and added them into place, I felt there were too many and wanted a different transition. In my google search I found another video which also had transition I liked.

Fig. 9 SS 9
To add the transition needed to download a file and import it into my effect presets. After I had done this I needed to cut five frames off the end of my first clip then another five off the start of my second clip. I did this with the razor tool and the arrow keys.

Fig. 10 SS 10
I then merged those two clips and found the preset I wanted to add, I then applied it to the ten frame clip. This gave me some contrast between transitions, I then repeated this process for the other placed I wanted this to appear.
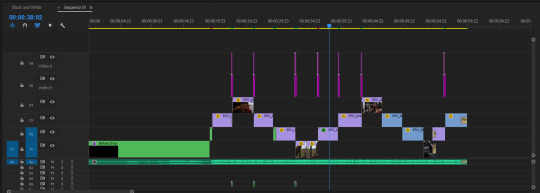
Fig. 11 SS 11
Here you can see the short green clips are the second transition and the purple is the first transition. I added more of the second transition in later.
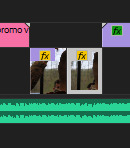
Fig. 12 SS 12
Here I added a clip and duplicated it, this was so I could make a boomerang effect. I did this by right clicking of the second clip, selecting speed and duration, and inverting the playback. This meant that it would play the clip in reverse, this with the first clip gave me the boomerang effect I wanted.
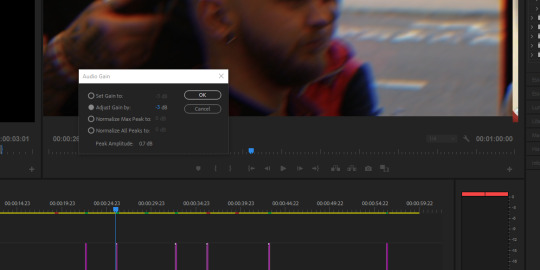
Fig. 13 SS 13
Here I added an audio gain, I did this because my audio was coming up and hitting the red on the meter to the right. This meant that my audio was too loud and needed brought down. I did this by adjusting the gain to -3 dB this meant that the volume would not exceed the -3 dB mark.

Fig. 14 SS 14
Here I tried another effect, I wasn't a fan of it but it was fun to experiment with different things. I went for like a pop art comic book style, It was cool but just didn't fit with my video unfortunately.
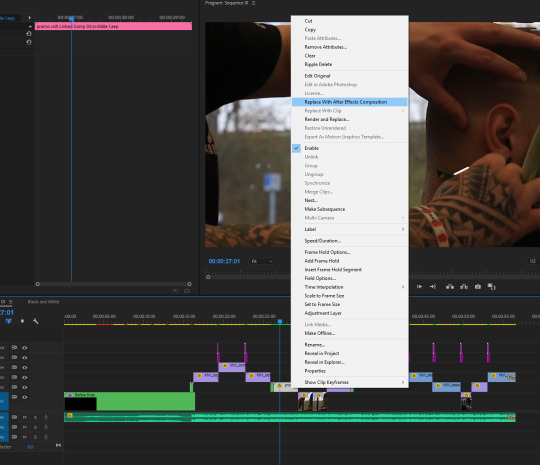
Fig. 15 SS 15
Here I felt that the video was a bit bland and I wanted to add some extra effects so I found this cool scribble effect, I felt that I could really incorporate it into my video. To do this I had to right click on my clip and select replace with After Effects Composition. Next I followed the videos instructions to create my scribble effect, I made a white line go along Ben's arms. It took a couple of different attempts to finally find the best looking version. I did this frame by frame but this was worth the time it took as once I had settled on one it looked awesome. I then repeated this process again later for another clip.

Fig. 16 SS 16
Here I added some more transitions and another visual effect, the effect you can see the in the main display. My first set of videos felt dull, so I added this tint to the last two and first two of two clips I then merged them and added the effect like how I added the transitions before. I added this effect for extra contrast, next I placed transitions over the merged clips this gave me a great looking transition.

Fig. 17 SS 17
I sent Ben a quick rendered video to see what he thought, He loved it so I exported it properly.
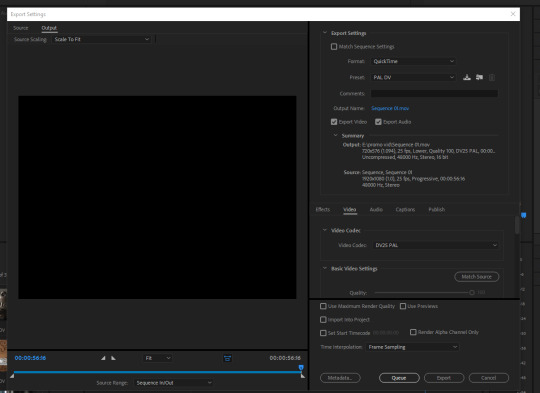
Fig. 18 SS 18
I went to file then export and chose media, I then changed the first option to QuickTime then made sure to name the file and place it in the correct location. This would give me a mov file once it was complete the next step was to press queue. This came out all wrong so I switched the format to H.264, this gave me the best looking export possible.
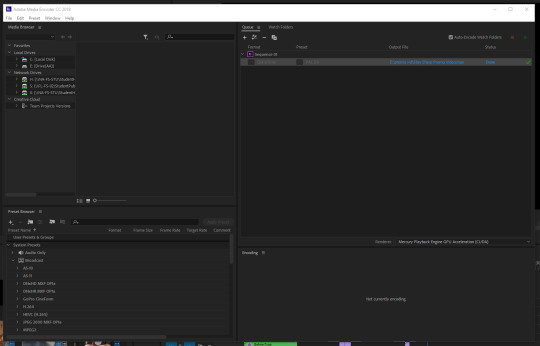
Fig. 19 SS 19
In this image I just pressed the play button and that rendered out my video for me. This was my process complete all I had to do now was upload it to YouTube.
youtube
Fig. 20 Stay Sharp Barbers Promotional Video
This is my final video once I uploaded it to YouTube, I am very happy with the warm laid back and happy atmosphere it conveys. I enjoyed this project more than I thought I would and I feel that it worked out really well for me and my client. I may have had a few errors and times when I thought it wasn’t great but It really came together in the end.
Bible
https://www.youtube.com/watch?v=M_Y8EHBdGe8&t=237s
https://www.youtube.com/watch?v=0KV6mrQ239E&t=54s
Figures list
Fig. 1
Aaron Craig, (2018), SS 1 [Accessed 26 November 2018]
Fig. 2
Aaron Craig, (2018), SS 2 [Accessed 26 November 2018]
Fig. 3
Aaron Craig, (2018), SS 3 [Accessed 26 November 2018]
Fig. 4
Aaron Craig, (2018), SS 4 [Accessed 26 November 2018]
Fig. 5
Aaron Craig, (2018), SS 5 [Accessed 10 December 2018]
Fig. 6
Aaron Craig, (2018), SS 6 [Accessed 10 December 2018]
Fig. 7
Aaron Craig, (2018), SS 7 [Accessed 10 December 2018]
Fig. 8
Aaron Craig, (2018), SS 8 [Accessed 10 December 2018]
Fig. 9
Aaron Craig, (2018), SS 9 [Accessed 10 December 2018]
Fig. 10
Aaron Craig, (2018), SS 10 [Accessed 10 December 2018]
Fig. 11
Aaron Craig, (2018), SS 11 [Accessed 10 December 2018]
Fig. 12
Aaron Craig, (2018), SS 12 [Accessed 17 December 2018]
Fig. 13
Aaron Craig, (2018), SS 13 [Accessed 17 December 2018]
Fig. 14
Aaron Craig, (2018), SS 14 [Accessed 17 December 2018]
Fig. 15
Aaron Craig, (2018), SS 15 [Accessed 17 December 2018]
Fig. 16
Aaron Craig, (2018), SS 16 [Accessed 17 December 2018]
Fig. 17
Aaron Craig, (2018), SS 17 [Accessed 17 December 2018]
Fig. 18
Aaron Craig, (2019), SS 18 [Accessed 7 January 2019]
Fig. 19
Aaron Craig, (2019), SS 19 [Accessed 7 January 2019]
Fig. 20
Aaron Craig, (2019), Stay Sharp Barbers Promotional Video, [ONLINE]. Available at: https://www.youtube.com/watch?v=maQLmH62mwQ [ 7 January 2019]
0 notes
Text
Blog Work Week Nine
This week I caught up on some blog work that I was behind on, I also began to go through the videos that I had taken and chose the best possible shots I had taken. Once I chose them I placed them in a folder named keep.
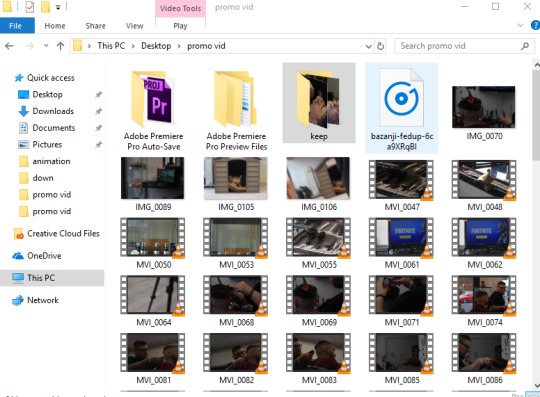
Fig. 1 Folder SS
It was a lengthy process as I had shot over 100 videos, I shot most of my planed shots a few times to get the best possible results. I also couldn't get some of the shots I had planned because the layout of the shop had changed, this was because he had recently opened the shop. So I had to improvise and get some new shots, I thought it would be better to have an abundance of unused clips rather than not enough. This is why I have over 100 shots, I found that I needed to do some re shoots as some of the videos weren’t up to scratch. I also needed to get a few other clips that I didn't get because I ran out of time on the days I was there.
In this section I will explain how I took most of my shots and why I chose to take them. I set the camera to an aperture of F/7.1 and an ISO of 400, I chose these settings as the aperture gave the background a slight blur and the ISO kept the lighting perfect. I’m not going to go through all 100 videos or so as my blog would become a book. I will cover a few different ones that I think are the most important. (Tumblr broke and I lost this whole section so I had to recreate it).
youtube
Fig. 2 Start shot 1 MVI 0095
Firstly I have my intro shot I took this shot using a tripod like all of my shots, I positioned it to start at the bottom of the wall logo and pan upwards. After looking at this I decided against the first shot, this was because it didn’t have the same look I thought it would. So I re-shot it but panning right to left, this was a far better look and I decided that this would be a far better start as you could see the full name and had time to read it.
youtube
Fig. 3 Pan of tools
Another shot was this panning tools shot, I used the same setting and liked the look of it but it felt too boring. Whereas the second shoot of the red clippers felt more intense and worked better with my song, this is why I chose to use it.
Figures List
Fig. 1
Aaron Craig, (2018), Folder SS [Accessed 19 November 2018].
Fig. 2
Aaron Craig, (2019), Start shot 1 MVI 0095 [ONLINE]. Available at: https://www.youtube.com/watch?v=UgixYt83nlg [Accessed 10 January 2019].
Fig. 3
Aaron Craig, (2019), Pan of tools [ONLINE]. Available at: https://www.youtube.com/playlist?list=PL_vw_a2edi0yVr7XSGvGq6QdXpwQEAzYd [Accessed 10 January 2019].
0 notes
Text
Kinetic Typography Week Eight
This week we were to finish our pre-production stage and move on to learning kinetic typography. For ease of reading I chose to place the audio section of my pre-production in my research post.
After I did the audio research I researched how to create kinetic typography, I found this video that explained step by step how to do this.
youtube
Fig. 1 Kinetic Typography Tutorial
Once I found this I needed to find a quote that I wanted to recreate, I chose a quote from one of my favorite films Pulp Fiction. I then began following the tutorial step by step until I had a finished product.
youtube
Fig. 2
This was my finished product, its a quote from Samuel L Jackson. I really love the idea and effect kinetic typography has but I don’t think that it would fit within my promo video. For that reason I will not be using it in my video.
Bibliography
Jesse Rosten. (2011). Kinetic Typography Tutorial. Available: https://youtu.be/fOi5P1qxrM4. Last accessed 12 November 2018.
Figures list
Fig. 1
Jesse Rosten, (2011), Kinetic Typography Tutorial [ONLINE]. Available at: https://youtu.be/fOi5P1qxrM4.[Accessed 11 November 2018].
Fig. 2
Aaron Craig, (2019), K Type English Mother F***er [ONLINE]. Available at: https://youtu.be/KmSer9mlQUg [Accessed 14 January 2019].
0 notes
Text
Promo Video Storyboard Week Seven
Over the Halloween holidays I lent one of the cameras from the tech and took some pictures of my client for my storyboard. These are my storyboards that I created from my recce shots.

Fig. 1 Storyboard one
My video will follow as story, We will start looking at the logo moving to his tools and him cleaning and preparing like he would at the start of the day. Next it moves to him turning on his clippers and giving someone a cut from multiple angles.

Fig. 2 Storyboard two
Here it continues from the last board showing the chair and changing angles of Ben working, It shows off his brand repeatedly to help emphasis his brand. It then shows a ps4 controller for people to see you can play whilst you get your hair cut.
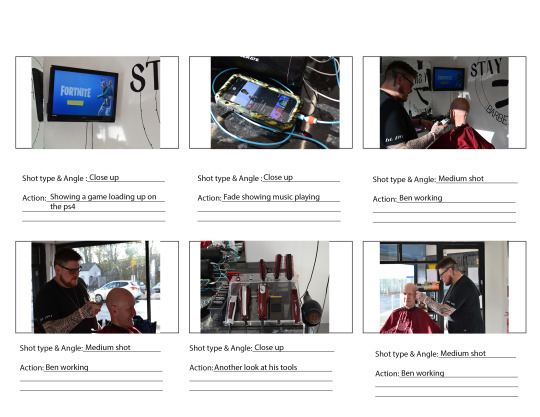
Fig. 3 Storyboard three
Here it shows a game loading up, it also shows how he has music in the background. After that it then shows more of Ben working.
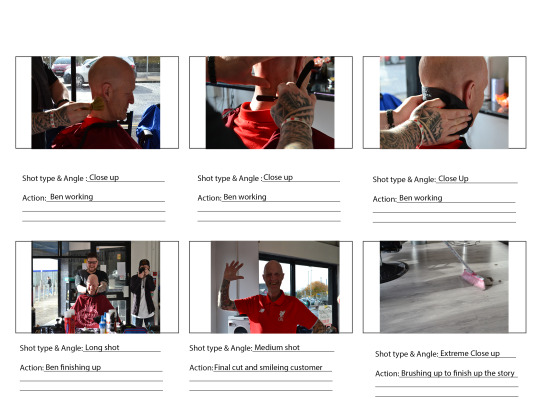
Fig. 4 Storyboard four
It will then show Ben in the final stages of his work showing the final product and ending with him brushing up. This is so the video has a story of some kind.

Fig. 5 Stay sharp shot list
This is my shortlist it contains every shot I wanted to get on my shoot days, It contains shot types and and angles. This would later make my filming process easier and quicker.
Figures List
Fig. 1
Aaron Craig, (2018), Storyboard one [Accessed 5 November 2018].
Fig. 2
Aaron Craig, (2018), Storyboard two[Accessed 5 November 2018].
Fig. 3
Aaron Craig, (2018), Storyboard three [Accessed 5 November 2018].
Fig. 4
Aaron Craig, (2018), Storyboard four [Accessed 5 November 2018].
Fig. 5
Aaron Craig, (2018), Stay sharp shot list [Accessed 5 November 2018].
0 notes
Text
Week Six
This week we continued researching and coming up with ideas for our videos, I have placed this information in week four so that its all together. Later in that day we were given a task to create a short video, we were told we could take shots from other movies and use them in our videos.
Fig. 1 8 movie shots
This is a compilation of all the shots we wanted to use from other movies, they are from Split, Halloween, It follows, Curse of the Nun, Don’t Breathe and Hereditary.
Once we did that we needed to brainstorm what we would shoot, we came up with a video of two people being followed unknowingly.
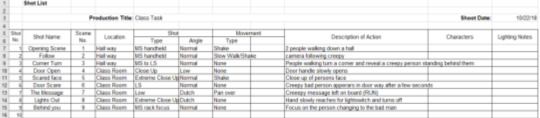
Fig. 2 Shot list
We then compiled a shot list, this consisted of what the shots were, their number, the location, the shot type/angle, and any movement. We then moved on to shooting our footage, we got a camera and started with the first shot, this went well and we got it first time. We got the second shot first time also, but the third had to be re-shot a few times because someone laughed and random people started walking past. The rest of the shots worked out fine and we could then move onto the editing process.
youtube
Fig. 3 Scary shot video
This is the final video, we added a backing track that we thought sounded good for the style of video. We also thought it would look good in black and white so we added a preset to the whole video, we also added some cross dissolves to transition switching between clips.
Figures List
Fig. 1
Aaron Craig, (2018), 8 movie shots [Accessed 28 October 2018].
Fig. 2
Aaron Craig, (2018), Shot list [Accessed 28 October 2018].
Fig. 3
Aaron Craig, (2019), Scary shot video [ONLINE]. Available at: https://www.youtube.com/watch?v=Qtpwqwc8MFk&feature=youtu.be&fbclid=IwAR2LpZMKcfBbITMM3_pERkXeTQyOKgMIvMrfxkXxLoKMiYWM-wZqzqzUyag [Accessed 7 January 2019].
0 notes
Text
Week Four Barber Promo Video Research
I had to find a business for my video to be based on, I already had this done. My video was going to be for a Barber shop named Stay Sharp Barbers, its my friends business. I wanted to do this video for him because I might as well help him instead of someone I don’t know. Most if not all communication between us was verbal so unfortunately I cannot really show anything in the way of that.
Before I can begin to plan my own promo video I need an Idea on what I want to archive. Obviously I want a clean smooth video that promotes for my client whilst keeping the viewers attention long enough to leave an impression.
I began to look at Promotional videos for barbers to get a better idea on how I could achieve my goals, the first video I found was for Frant Barbershop. I chose to use this as an example because it shows people with big smiles enjoying themselves and has some good camera angles like in the 46th second. The way it pulls away from the nicely laid out equipment. It also shows people on a ps4 whilst they wait and my client has a ps4 for the same reason, I’d like to show that in my video. They have a close up on some hair clippers that they turn on, they have a close up on someone brushing away hair I think that would be a cool place to end the video and maybe add in a transition.
youtube
Fig. 1 Frant barbershop promo video
This next video shows how comfortable the environment is, they achieve this by using warm colours, showing the welcoming fist-bumps /handshake and showing smiling faces. They also show coffee being given to the customer this helps emphasize the the friendly feeling, they focus on the one haircut and show the customer giving an approving nod this tells the viewer that the barber has done a good job. In my video I feel like I should focus on one haircut as too many could look weird and Id want to show the end product to show my clients skills. I could also start the video with my client cleaning his equipment that way people know instantly what the video is about, it would also give a story line and show how clean and professional he is.
youtube
Fig. 2 The Original Barber Shop - Promotional Video
Next I looked for transitions that I could use, most videos now transition on a beat for more depth I wanted to do this too. I also wanted to have a cool glitch or movement transition to accompany that and so I began researching different transitions. I found one that was easy to use and looked really good, I wanted to use this because it was different to all the wipes and fades.
youtube
Fig. 3
This is the first transition, it is a tutorial as well which made it really easy to learn how to apply. This transition wasn't enough though, whilst I wanted my video to look constant I also wanted some contrast in transitions.
youtube
Fig. 4 6 FREE Glitch transition templates
This lead me to this transition, as the other this video is a tutorial making my future editing process slightly easier for me. I felt that this transition could be my big one and that I would use it less to give a hierarchy.
I also looked into what kind of sounds I wanted in the video, I realized that I could add some scissors and buzzing for clippers to make it feel more like a barber shop. Firstly tho I wanted to find a music track and decide if I wanted to add anything after that, the music track needed to be rap as that the kind of music that my client uses in his shop. I chose to use rap as it would reflect and be consistent with the atmosphere that would be within the shop. So I began researching music that was copyright free, I found a few different songs some of which were to bland and didn't have the best beat. I finally stumbled upon this song, I chose to use it because it was a good song with a strong beat and I felt that it was exactly the type of song that my client would play.
https://www.youtube.com/watch?v=_rSd1Dzw8BI
(Glitch, Wont Display Video)
Fig. 5
I thought adding other sound effects would be very out of place and would cheapen the video as a whole, so I decided not to use any sound effects. Another reason was that with the beat being so clear and strong I didn't need to add anything to help the transitions.
Bibliography
Chase Me Films. (2014). What is B-roll Footage?. Available: https://www.youtube.com/watch?v=NkELnJ0avgQ. Last accessed 8 October 2018.
Full Time Euphoria. (2018).
How to Make A Barbershop Promo Video.
Available: https://www.youtube.com/watch?v=ooc0IjNzw9s. Last accessed 8 October 2018.
Figures List
Fig. 1
Zombox Studio, (2015), Frant barbershop promo video [ONLINE]. Available at: https://www.youtube.com/watch?v=nB1lmuh_Q-4 [Accessed 8 October 2018].
Fig. 2
PAULUS RIZAL, (2016), The Original Barber Shop - Promotional Video [ONLINE]. Available at: https://www.youtube.com/watch?v=ka_6uth6XOU [Accessed 8 October 2018].
Fig. 3
BjK Productions, (2018), NSANE ADVANCED SHAKE TRANSITIONS PACK (Adobe Premiere Pro CC 2018) [ONLINE]. Available at: https://www.youtube.com/watch?v=M_Y8EHBdGe8&t=237s [Accessed 8 October 2018].
Fig. 4
Orange83, (2018), 6 FREE Glitch transition templates (preset pack for Premiere PRO) [ONLINE]. Available at: https://www.youtube.com/watch?v=0KV6mrQ239E&t=54s [Accessed 8 October 2018].
Fig. 5
FlyingTunes - Premium Music, (2017), Bazanji - Fed Up (Copyright Free Rap Music) [Gaming Music] [ONLINE]. Available at: https://www.youtube.com/watch?v=_rSd1Dzw8BI [Accessed 12 November 2018].
0 notes
Text
Practical Task Week Three
This week we were put into teams and given the task to create a trailer with the same shots from a supplied storyboard. My team consisted of Harrison, James and myself, we all started by playing with the camera (It had a 50mm lens) and getting used to the focus aperture and ISO.
Once we all understood how to use the camera better we started shooting all the footage, we began with a close up shot. We thought it would be nice to have the subject (Me) walking into the shot and becoming more in focus. We had multiple takes to get a better video this will show you the best videos.
youtube
Fig. 1 Scene One
This was the second scene we shot its a medium shallow shot, this was Harrison walking towards a seat and siting down. We only shot this one once as it looked good enough first time.
youtube
Fig. 2 Scene Two
This scene was a replacement for the long shot deep focus, we used this instead because everywhere we went was occupied or didn't have enough room. The shot we used instead was a close up.
youtube
Fig. 3 Scene Three
The third scene was a close up just like the last one.
youtube
Fig. 4 Scene Four
Here is our fourth scene, Its a extreme close up.
https://youtu.be/I5Lt5MoIezc
Fig. 5 Shot Five
.Here we have Scene Five, its an over the shoulder
https://youtu.be/I-egwufxp4E
Fig. 6 Shot Six
This is the sixth scene, its a long shot
youtube
Fig. 7
This was the final product once I had exported it and added it to YouTube.
Figures List
Fig. 1
Aaron Craig, (2018), Shot One [ONLINE]. Available at: https://youtu.be/uKMddFTzVTs [Accessed 8 October 2018].
Fig. 2
Aaron Craig, (2018), Shot Two [ONLINE]. Available at: https://youtu.be/AN0bq8oUAVg [Accessed 8 October 2018].
Fig. 3
Aaron Craig, (2018), Shot Three [ONLINE]. Available at: https://youtu.be/lVgHyKVyUqI [Accessed 8 October 2018].
Fig. 4
Aaron Craig, (2018), Shot Four [ONLINE]. Available at: https://youtu.be/CHLA_ot3-F0 [Accessed 8 October 2018].
Fig. 5
Aaron Craig, (2018), Shot Five [ONLINE]. Available at: https://youtu.be/I5Lt5MoIezc [Accessed 8 October 2018].
Fig. 6
Aaron Craig, (2018), Shot Six [ONLINE]. Available at: https://youtu.be/I-egwufxp4E[Accessed 8 October 2018].
Fig. 7
Aaron Craig, (2018), Scene one [ONLINE]. Available at: https://youtu.be/6Lgnc93L7UU [Accessed 8 October 2018].
0 notes
Text
Research Task How Aperture Can Be Used Properly. Week Two
The best way to understand Aperture is through an aperture chart. As you can see the smaller the number the less elements that are in focus, as you scale up in number you scale up in focus.
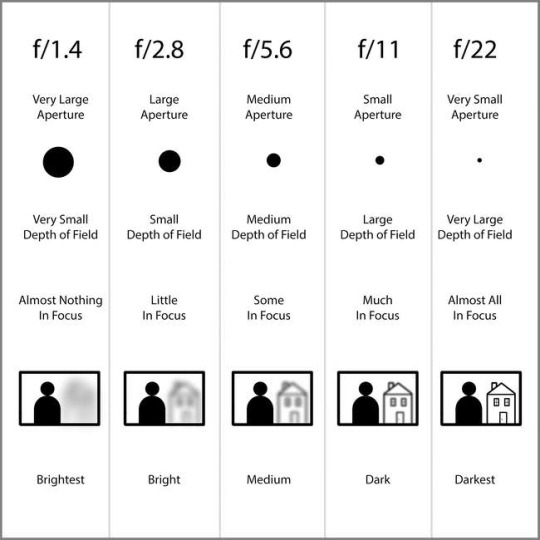
Fig.1 Aperture Chart
Aperture controls two important features, they are Depth of Field and Amount of Light. Depth of Field helps the user determine the closest and farthest away elements in a picture, these can both be in focus. Amount of Light controls the brightness of an image which is rated in stops.
In a video I watched Dave Morrow explains how to set the scene and get the Hyperfocal point. He does this by measuring the distance between his camera and the the closest point to his camera. He then doubles that to give himself the the Hyperfocal point, this is a good basis for his picture and could come into play for my project.
Task Two
High and Low Key Lighting are two forms of lighting that are used to convey mood.
Originally, high key lighting was used to help improve high contrast ratios. It is important to note, however, that the concept key lighting started in the film industry. Cameramen used the term key light whenever they referred to the main light used for a particular scene. Along with the key light, the cameramen would also use backlight and fill light to complete the lighting effect that they envisioned for the scene. Of course, nowadays, more sophisticated lighting technology is used in movie-making, so the three-light technique, while still in use today, has paved the way to more complex lighting setups. - Michael Gabriel
High key lighting are scenes that have a lot of white/light tones, these images have minimal blacks and mid-tones. Using High key lighting makes the mid-tones white and the whites even whiter. High key dose not mean that there is no blacks but that there are less than usual. High key is used to promote a optimistic, happy and youthful feel.
Low key Lighting is the opposite of high key, low key uses darker shadows and blacks. Theses photos have very small amounts of whites and mid-tones this gives the image a mysterious and dramatic feel. It can enlist a variety of deep and negative emotions, this depends on on the theme and subject in frame.

Fig. 2 high-key-vs-low-key
A good example if high key in movies is this scene from the black panther, you can see how the the mid-tones on the rocks in the background are made more white

Fig. 3 Unknown
Task Three
Next we took turns in using a camera to find different depths of field, our aim was to have 4 different images. These images would consist of a focused image on each Lego man with the rest blurred out using aperture and one with all of the Lego men in focus together.

Fig. 4 Lego 1
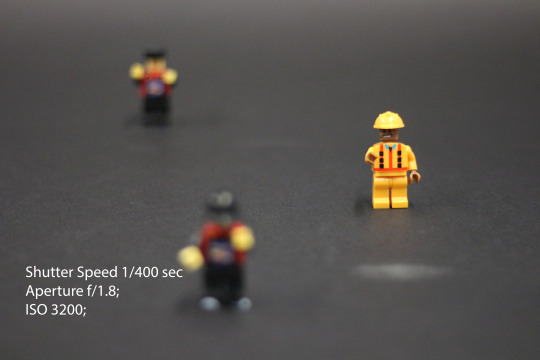
Fig. 5 Lego 2
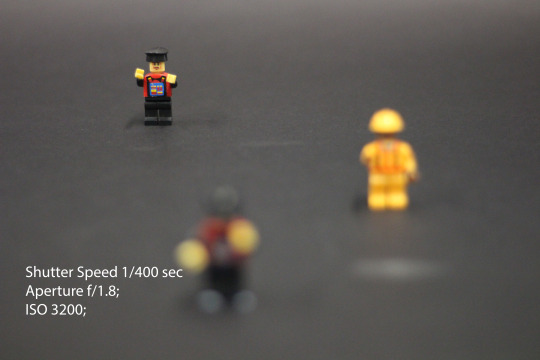
Fig. 6 Lego 3

Fig. 7 Lego 4
As you can see the first three were the same, all I had to do for these was to adjust the focus until I had the right lego man in focus. Where as the last one I had to up the aperture to f/20, this was how I got all the lego men in focus.
FIGURES LIST
Fig. 1
SPENCER COX, (2016), Aperture Chart [ONLINE]. Available at: https://photographylife.com/lens-aperture-chart [Accessed 24 September 2018].
Fig. 2
Pacific Graphic Design, (2016), high-key-vs-low-key [ONLINE]. Available at: https://pacificgraphicdesign.wordpress.com/courses/computer-graphics-print-media/assignments-arts-091/three-portraits/high-key-vs-low-key/ [Accessed 24 September 2018].
Fig. 3
BRENT LANG and RICARDO LOPEZ, (2018), Unknown [ONLINE]. Available at: https://variety.com/2018/film/news/black-panther-grassroots-marvel-theaters-1202687225/ [Accessed 24 September 2018].
Fig. 4
Aaron Craig, (2018), Lego 1 [Accessed 24 September 2018].
Fig. 5
Aaron Craig, (2018), Lego 2 [Accessed 24 September 2018].
Fig. 6
Aaron Craig, (2018), Lego 3 [Accessed 24 September 2018].
Fig. 7
Aaron Craig, (2018), Lego 4 [Accessed 24 September 2018].
REFERENCE LIST
Michael Gabriel. (2017). Understanding The Basics of High Key vs. Low Key Lighting. Available: https://contrastly.com/understanding-the-basics-of-high-key-vs-low-key-lighting/. Last accessed 24/09/18.
BIBLIOGRAPHY
Dave Morrow. (2018). Aperture & Depth of Field Photography Guide [2018]. Available: https://www.davemorrowphotography.com/depth-of-field-photography. Last accessed 24/09/18.
Michael Gabriel. (2017). Understanding The Basics of High Key vs. Low Key Lighting. Available: https://contrastly.com/understanding-the-basics-of-high-key-vs-low-key-lighting/. Last accessed 24/09/18.
0 notes
Text
Researching Emmanuel Lubezki and his style of camera framing - Week One.
TASK ONE
BIO
Emmanuel Lubezki is a Mexican T.V and Film cinematographer born in 1964, he released his first independent film (Twenty Bucks) in 1993. Which was a story of a twenty dollar bills journey in the world. He is known as one of if not the worlds best cinematographer, this is due to his use of framing, lighting, locations and angles.
Examples of his camera work:
These few images are from his movie The Revenant, this first image is of the burning ashes of a fire in the wind. This scene is shot in a low angle which helps set the mood and location. He has done this because its a more visual way to set the scene, other movies may have a screen of text or a narration explaining this whereas Emmanuel Lubezki lets the viewer establish this for themselves.
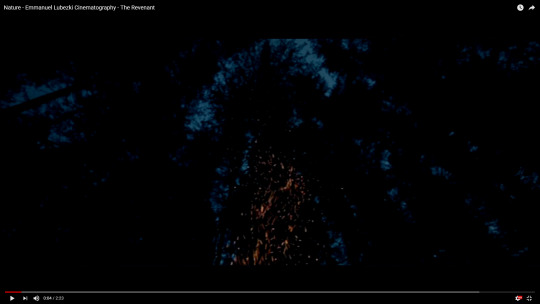
Fig. 1 Screenshot of burning ashes
This next scene is known as a Extreme Long shot this is commonly used by Emmanuel Lubezki to show the location of a scene, in this case its used to show the magnitude in distance the subject is from the comet.
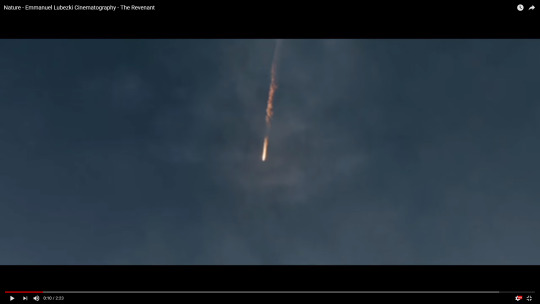
Fig. 2 Comet
This scene is shot in a extreme close up shot, this is used to show some subtle details that the viewer would struggle see in any other shot. This kind of shot helps highlight certain details without someone having to explain it to the viewer
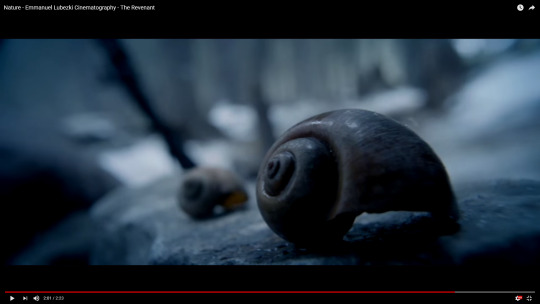
Fig. 3 Shell
It would be hard for me to find a better way to show how Emmanuel Lubezki uses cinematography better than this video, in short the creator explains how Emmanuel Lubezki will change his style depending on the director/movie. He states that you could divide his style into two half's, the long lens glamour style and the wide angle natural lighting styles. He shows that Emmanuel Lubezki also has two prominent lighting styles when it comes to characters. The first is short lit which is when the shadow is facing the camera and the second is side lighting which is when the light is split down the middle. It also shows how he likes to use landscapes, sunsets and sunrises. The video maker also says that due to his choice in backgrounds this gives him all the natural lighting he needs, and how he rarely needs artificial lighting to help him. He then says and shows that he likes a moving camera and will use open frames and long takes. He also prefers a clean image without grain which digital shooting can give him. He used to use a T stop of 2.8 to 4 he then changed to T 5.6 or higher (T stop is a more accurate F/stop used in cinema). This change to T 5.6 and higher give his frames a lot more depth and information. Wolfcrow explains he can focus the camera on mundane subjects and can somehow celebrate them, he also states that you can argue that his sense of hyper reality and dedication to the story resonates with movie goers from all around the world. This was a brief recap of what this video shows and explains to you, I would 100% recommend that you watch it and see for yourself.
youtube
Fig. 4 Understanding the Cinematography of Emmanuel Lubezki
TASK TWO
In this task I will show you examples of shots from movies and how/why they are used. Firstly I will cover Extreme close up, close up, over the shoulder, medium and and an extreme wide shot. in this 2.30 min scene from The Good, The Bad, and The Ugly. The scene opens with an over the shoulder shot that shows the viewers what the secondary focus is, and where the current focus is in proximity to the secondary. This is used to show the weight of the situation these three men are in and that its an all for one moment, whilst subtly showing the graves of other people hinting at the worst outcome for the men. It then moves to an extreme close up at 14 seconds, this was used to show that the men are armed and ready to fight for survival and that death is a very real possibility. After cycling through the three men it then moves to a close up shot of their faces at 25 seconds. This can do many thing such as humanize the focus and help portray the emotion of the scene, another thing it dose is show how the men look at each other each not wanting to die and tying to figure out who will shot who first and how they will survive. It then follows up with an extreme close up of their faces, this helps show the intensity of the the situation by showing the fine details such as the sweat, breathing and eye movements of these men. Mixed between these shots are shots of the men reaching towards their guns, which was purposely shown to show that the scene was nearing a climax. It then cycles through all of these previous shots again to tease the audience and build a false sense of security. It does this continuously at a faster rate until the scene has built enough tension for a fulfilling climax. At 2.19 the video shows a medium shot which is from the knees up to the head of Clint Eastwood, this shows the audience that he successfully got his shot off and looks to be unharmed. It then moves to an extreme wide shot, this was used to show who was killed and confirm that the main protagonist survived as the shot before hinted at, this also shows the extent of the graveyard and how it was a fitting place to die. These were only a few shots from a movie which I enjoyed.
youtube
Fig. 5 1-Close Ups (The Good, The Bad, and The Ugly)
The next shots I would like to look at are high and low angle shots, I will be using the example of scrubs a comic TV show about a hospital. The scene starts with an eye level shot, this implies that they are both equal. The seen then changes to a high angle of the man showing his authority decreasing in size as the camera gives the impression that it/she is looking down on him. It then changes to a low angle showing the nurse increase in size and authority as the camera is looking up to her. Using these techniques it can really help show power/authority in a scene, and show the audience the kind of person the focus is and helps them formulate an opinion of that subject.
youtube
Fig. 6 Use of high and low angle shots in "Scrubs"
Lastly I would like to show you POV (Point of View) hand held and Wide shots, the movie I am using for this example is called Hardcore Henry, its a movie that was shot in 100% POV and some people say its the first action POV movie ever. In the video it starts and stays in a POV shot for the entire movie, you can see that it has other shots inside this POV for example at 7 seconds the shot is a Mid POV, it then moves to a Close up POV. Around the 46 second mark you can see that it changes to a Wide Hand Held POV shot, the Wide shot is to show the danger of the situation by showing the men in full from head to toe, this is to increase the intimidation factor. The hand held part is to help convince the viewer what they are watching is real and helps them get more engaged with the story.
youtube
Fig. 7 Hardcore Henry | Official Trailer | Own It Now on Digital HD, Blu-ray & DVD
FIGURES LIST
Fig. 1
Emmanuel Lubezki, (2016), Screenshot of burning ashes [ONLINE]. Available at: https://www.youtube.com/watch?v=lw68J8Mw5kg [Accessed 17 September 2018].
88stanleyambrose, (2016), Screenshot of burning ashes [ONLINE]. Available at: https://www.youtube.com/watch?v=lw68J8Mw5kg [Accessed 17 September 2018].
Fig. 2
Emmanuel Lubezki, (2016), Comet [ONLINE]. Available at: https://www.youtube.com/watch?v=lw68J8Mw5kg [Accessed 17 September 2018].
88stanleyambrose, (2016), Comet [ONLINE]. Available at: https://www.youtube.com/watch?v=lw68J8Mw5kg [Accessed 17 September 2018].
Fig. 3
Emmanuel Lubezki, (2016), Shell [ONLINE]. Available at: https://www.youtube.com/watch?v=lw68J8Mw5kg [Accessed 17 September 2018].
88stanleyambrose, (2016), Shell [ONLINE]. Available at: https://www.youtube.com/watch?v=lw68J8Mw5kg [Accessed 17 September 2018].
Fig. 4
wolfcrow, (2016), Understanding the Cinematography of Emmanuel Lubezki [ONLINE]. Available at: https://youtu.be/3H8nTrToBvU [Accessed 17 September 2018].
Fig. 5
Nathan Velasquez, (2012), 1-Close Ups (The Good, The Bad, and The Ugly) [ONLINE]. Available at: https://www.youtube.com/watch?v=osVn_YJ0TKQ&feature=youtu.be [Accessed 17 September 2018].
Fig. 6
tomkail, (2008), Use of high and low angle shots in "Scrubs" [ONLINE]. Available at: https://www.youtube.com/watch?v=8V1uE1-wTPs [Accessed 17 September 2018].
Fig. 7
STX Entertainment, (2016), Hardcore Henry | Official Trailer | Own It Now on Digital HD, Blu-ray & DVD [ONLINE]. Available at: https://www.youtube.com/watch?v=96EChBYVFhU [Accessed 17 September 2018].
BIBLIOGRAPHY
IMDb. (2018). Emmanuel Lubezki Biography.. Available: https://www.imdb.com/name/nm0523881/bio. Last accessed 17/09/18.
0 notes