
Last Seen Blogs

gauridesai
Gauri Desai

vrogue1
VRogue1

artleliroza
ArtLeliRoZa

infamousmonkey-cat
closer than a wife, closer than an eye

superfallingstars
his guilt complex compels me
Text
Suburban Lawn And Garden

Then you’ve come to the right place. With a rich history spanning several decades, this family-owned business has evolved into one of the premier destinations for all things green in our community.
Whether you’re a seasoned gardener looking for top-quality plants and supplies or a landscaping aficionado in need of expert advice, Suburban Lawn and Garden is here to cater to all your needs.
For more: Suburban Lawn And Garden
So let’s dive deep into their story and discover why they have become synonymous with excellence in the industry. Get ready to uncover their secrets behind creating stunning landscapes that will leave everyone breathless!
History and Evolution of the Company
Suburban Lawn and Garden has a rich and fascinating history that spans over several decades. It all started back in the late 1940s when John Doe, a passionate horticulturist, had a vision to create a one-stop-shop for all things gardening and landscaping. With his dedication and entrepreneurial spirit, he opened the doors of Suburban Lawn and Garden in 1952.
From humble beginnings as a small nursery, the company quickly gained popularity among local homeowners who were eager to transform their yards into beautiful outdoor spaces. As word spread about the quality of products and expert advice available at Suburban Lawn and Garden, the business grew rapidly.
Over time, Suburban Lawn and Garden expanded its offerings to include not only plants but also an extensive range of gardening tools, fertilizers, mulch, pottery, outdoor furniture – you name it! The company’s commitment to providing customers with everything they need for their landscaping projects has remained steadfast throughout its evolution.
In addition to serving individual homeowners, Suburban Lawn and Garden also caters to commercial clients such as landscapers, property managers, schools, and municipalities. This expansion into the B2B market further solidified their position as Kansas City’s premier destination for all things garden-related.
Through innovative marketing strategies like hosting educational workshops on various gardening topics and participating in community events year-round – including plant sales benefiting charitable organizations – Suburban Lawn and Garden continues to maintain its status as an industry leader.
As trends have shifted towards more sustainable practices in recent years (think organic gardening), Suburban Lawn and Garden has adapted accordingly by offering eco-friendly products like natural fertilizers made from recycled materials. Their commitment to sustainable practices extends beyond product offerings; they actively promote water conservation techniques through proper irrigation systems installation.
With each passing year since its inception nearly seven decades ago if customer satisfaction is any indication of success then Suburban Lawn Garden is definitely doing something right. The company is proud of its track record of happy customers who have achieved their
Products and Services Offered
At Suburban Lawn and Garden, we take pride in offering a wide range of products and services to meet all of your landscaping and gardening needs. Whether you’re looking to spruce up your backyard or create an inviting outdoor space for entertaining, we’ve got you covered.
Our nursery is stocked with a variety of high-quality plants, from vibrant flowers to lush shrubs and trees. With the help of our knowledgeable staff, you can find the perfect additions to enhance your garden’s beauty. We also carry top-notch gardening supplies such as soils, fertilizers, tools, and more to ensure that your plants thrive.
In addition to our diverse selection of plants and supplies, we offer professional landscaping services. Our skilled team can design stunning landscapes tailored specifically to your preferences and budget. From concept creation to installation, we handle every step with precision and care.
If you’re short on time or need assistance maintaining your outdoor space throughout the year, our maintenance services are just what you need! We provide regular lawn care services including mowing, trimming hedges, weed control treatments – everything necessary for a beautiful yard without the hassle.
For those looking for unique decor items or gifts related to gardening or nature-inspired living spaces that will impress guests at any occasion – look no further! Our gift shop offers an array of charming home accents like birdhouses feeders statuary pots containers accessories books plus other seasonal novelties where even non-gardeners delight in browsing through these offerings!
No matter what project or vision you have in mind for your outdoor space – large or small – Suburban Lawn & Garden has the products expertise knowledge experience dedication commitment passion creativity innovation customer-oriented approach.
Support resources inspiration solutions partnerships collaborations community involvement environmental sustainability practices future goals plans etc.
Making us one stop destination fulfilling all landscaping gardening needs desires dreams aspirations requirements challenges problems ideas hopes.
Wishes expectations standards benchmarks guidelines objectives targets missions visions directions opportunities possibilities potentialities ambitions goals objectives
The Importance of Landscaping and Gardening
Landscaping and gardening play a crucial role in enhancing the beauty and functionality of our outdoor spaces. Whether it’s a small backyard or a sprawling garden, investing time and effort in landscaping can make a significant difference.
One of the key benefits of landscaping is its ability to improve curb appeal. A well-maintained and aesthetically pleasing landscape can instantly enhance the value of your property. It creates an inviting ambiance that makes people feel welcome.
Moreover, landscaping also contributes to environmental sustainability. Trees, shrubs, and other plants help purify the air by absorbing carbon dioxide and releasing oxygen. They also provide shade, reducing energy consumption by keeping homes cooler during hot summer months.
In addition to the aesthetic benefits, gardening can have numerous positive effects on our mental health as well. Research has shown that spending time outdoors among nature reduces stress levels and improves overall wellbeing. Gardening allows us to connect with nature on a deeper level while enjoying activities like planting flowers or growing fresh produce.
Furthermore, creating an outdoor space for relaxation or entertainment purposes through landscaping provides an opportunity for families to spend quality time together outdoors. It encourages physical activity and fosters connections with loved ones away from screens.
Community Involvement and Sustainability Efforts
At Suburban Lawn and Garden, we believe in giving back to the community and preserving the environment for future generations. We are committed to being good stewards of the earth by implementing sustainable practices in our operations.
0 notes
Text
How To Remove Sink Stopper

Sink stopper is an essential component of every bathroom or kitchen sink. But it can sometimes become a nuisance. Whether you’re dealing with a clogged drain, trying to upgrade your sink fixture, or simply wanting to give your stopper a thorough cleaning, we’ve got you covered!
For more: How To Remove Sink Stopper
In this comprehensive guide, we will walk you through the process of removing various types of sink stoppers. But before we dive into the step-by-step instructions, let’s first discuss some factors that are important to consider. Understanding these key points will help ensure that you approach the task confidently and avoid any unexpected surprises along the way.
Factors to Consider Before Removing a Sink Stopper
When it comes to tackling any household task, preparation is key. The same goes for removing a sink stopper. Before you dive into this project, there are a few factors to consider that will make the process smoother and more efficient.
It’s important to identify the type of sink stopper you have. There are various types available, including pop-up stoppers, plunger-style stoppers, and twist-and-lock stoppers. Each type requires different removal methods, so knowing what you’re dealing with upfront will save you time and frustration.
Another factor to consider is the materials used in your plumbing system. If your pipes are old or fragile, removing the sink stopper could potentially cause damage or leaks. It’s wise to assess the condition of your pipes beforehand and take appropriate precautions if needed.
Additionally, having the right tools on hand can greatly simplify the process. Depending on the type of sink stopper you have, you may need items such as pliers, an adjustable wrench, or even a screwdriver. Ensuring that these tools are readily available before starting will prevent unnecessary delays.
Lastly but certainly not least: safety should always be a top priority when working on any plumbing project. Make sure to turn off water supply valves before attempting any work on your sink stopper to avoid potential accidents or flooding.
By taking these factors into consideration before removing your sink stopper, you’ll be well-prepared for success in tackling this DIY task!
Different Types of Sink Stoppers
When it comes to sink stoppers, there are a variety of options available for you to choose from. Each type has its own unique features and benefits, so it’s important to understand the different types before deciding which one is right for your sink.
One common type of sink stopper is the traditional rubber stopper. This type simply sits on top of the drain opening and can be easily removed by lifting it up. Rubber stoppers are affordable and easy to replace if needed.
Another popular option is the pop-up sink stopper. These are attached to a lever or knob that allows you to easily open or close the drain with a simple push or pull. Pop-up stoppers are convenient because they eliminate the need to manually remove and replace the stopper each time you want to use your sink.
If you’re looking for something more modern and sleek, consider a magnetic sink stopper. These utilize magnets in order to create a secure seal over your drain opening. Magnetic stoppers not only prevent water from leaking but also add an aesthetic touch to your sink area.
For those who prefer a minimalist design, a grid strainer may be ideal. This type of sink stopper consists of small holes that allow water to flow through while catching any debris that could clog your pipes.
Choosing the right type of sink stopper depends on your personal preferences and needs. Consider factors such as ease of use, maintenance requirements, and overall aesthetics when making your decision.
Step-by-Step Guide on How to Remove a Sink Stopper
Step 1: Locate the stopper
The first step in removing a sink stopper is to locate it. This can typically be found at the bottom of your sink, near the drain. Look for a small knob or lever that controls the movement of the stopper.
Step 2: Prepare your tools
Before you start removing the sink stopper, it’s important to gather all necessary tools. You may need a pair of pliers, an adjustable wrench, and possibly some lubricant if the stopper is stuck.
Step 3: Disconnect any connecting rods
In order to remove the sink stopper, you will likely need to disconnect any connecting rods that are holding it in place. These rods are usually located underneath your sink and connect directly to the back of the drain pipe.
Step 4: Remove screws or clips
Once you have disconnected any connecting rods, you can proceed to remove any screws or clips that are securing the sink stopper in place. Use your pliers or adjustable wrench to carefully loosen these fasteners and set them aside for safekeeping.
Step 5: Lift out the stopper
Now that all fasteners have been removed, you should be able to lift out the sink stopper from its position in the drain. Gently pull up on it until it comes free from its housing.
Remember- each type of sink stoppers has its own unique removal process. Be sure to consult specific instructions provided by manufacturers if available.
Common Problems and Solutions
Sink stoppers can occasionally present some common issues that may require troubleshooting. One common problem is a sink stopper that won’t stay in place, constantly popping up when water runs or the sink drains. This can be caused by a loose linkage or worn-out o-rings. To fix this, you will need to tighten the linkage nut or replace the o-rings.
Another issue you might encounter is a slow-draining sink. This can be due to a clogged drainpipe caused by hair, soap scum, or debris buildup. To solve this problem, try using a plunger or a drain snake to remove any obstructions blocking the flow of water.
A leaky sink stopper is yet another frustrating problem homeowners face. Leaks can occur at various points in the system including around the pivot rod seal, ball joint connection, tailpiece gasket, or even damaged pipes under the sink. Identifying where exactly the leak is coming from will help determine which component needs repair or replacement.
Sometimes you may find your sink stopper not working correctly after reassembling it following maintenance work. If this happens, check if all components are properly aligned and connected as per manufacturer’s instructions.
By understanding these common problems and their solutions, you’ll have better success maintaining your sink stopper and keeping it running smoothly for years to come!
Tips for Maintaining Your Sink Stopper
Proper maintenance of your sink stopper is essential to ensure its longevity and functionality. Here are some helpful tips to keep your sink stopper in good condition.
0 notes
Text
Black Bathroom Vanity
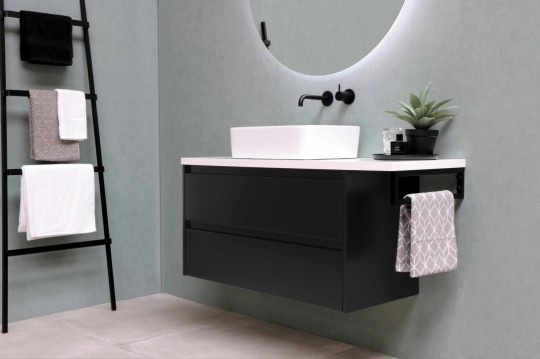
Gone are the days when white or neutral-colored vanities were the only options available. The rise of black bathroom vanities has brought about a whole new level of creativity and boldness in bathroom design. From sleek matte finishes to glossy lacquered surfaces, there is an array of styles and designs to suit every taste and aesthetic preference.
For more: Black Bathroom Vanity
In this blog post, we will explore the benefits of choosing a black bathroom vanity, discuss different styles available on the market today, provide tips on how to incorporate them into your space seamlessly, as well as offer maintenance advice for keeping your vanity looking its best. So let’s dive in and discover why black is indeed beautiful when it comes to bathroom vanities!
The rise of black bathroom vanities
Black bathroom vanities have been steadily gaining popularity in recent years, and it’s easy to see why. With their sleek and modern aesthetic, black vanities add a touch of sophistication to any bathroom space. Gone are the days when white or wood-toned vanities were the only options available – now homeowners can embrace the boldness and drama that a black vanity brings.
One reason for the rise in popularity is that black is a versatile color that complements various design styles. Whether your bathroom has a traditional, contemporary, or even industrial vibe, there’s a black vanity out there to suit your taste. From minimalist floating vanities to ornately carved freestanding ones, you can find countless designs that will elevate the overall look of your bathroom.
Moreover, choosing a black bathroom vanity offers several benefits beyond aesthetics. Black is known for its ability to hide dirt and stains better than lighter colors – perfect for those who want an easier time maintaining their vanity’s pristine appearance. Additionally, black creates an illusion of depth in smaller bathrooms by absorbing light rather than reflecting it like lighter shades would.
In terms of incorporating a black bathroom vanity into your space, consider using contrasting elements such as white subway tiles or marble countertops to create visual interest and balance out the darkness. You can also play with different finishes like matte or glossy surfaces to achieve different effects.
When it comes to maintenance and care for your black vanity, regular cleaning with non-abrasive products is key.
Benefits of choosing a black bathroom vanity
A black bathroom vanity can instantly transform the look and feel of your bathroom, adding a touch of elegance and sophistication. Here are some benefits of choosing a black bathroom vanity for your space.
Black is a versatile color that goes well with any style or design theme. Whether you have a modern, minimalist bathroom or a traditional, vintage-inspired one, a black vanity will fit right in and enhance the overall aesthetic.
In addition to being visually appealing, black vanities are also practical. They tend to conceal stains and smudges better than lighter-colored options, making them easier to maintain. This is especially important in high-traffic areas such as bathrooms where accidents can happen.
Furthermore, opting for a black vanity allows you to create contrast within your space. Pairing it with light-colored walls or countertops can create an eye-catching focal point and make your vanity stand out even more.
Another advantage of choosing black is its ability to create depth and dimension in smaller bathrooms. The dark hue adds depth perception and creates an illusion of spaciousness.
Investing in a quality black bathroom vanity can increase the value of your home. Potential buyers often appreciate timeless features like these when considering purchasing properties.
With all these benefits considered, it’s clear that opting for a black bathroom vanity not only elevates the visual appeal but also offers practicality and versatility for any style preference you may have!
Different styles and designs available in black bathroom vanities
When it comes to black bathroom vanities, there is no shortage of styles and designs to choose from. Whether you prefer a sleek and modern look or a more traditional and ornate design, there is something for everyone.
One popular style in black bathroom vanities is the minimalist approach. These vanities feature clean lines, simple shapes, and often have sleek hardware for a streamlined look. They are perfect for those who prefer a contemporary aesthetic and want their vanity to be the focal point of the room.
For those who prefer a more vintage or antique feel, there are plenty of options available as well. Black bathroom vanities with intricate detailing, such as carved accents or decorative legs, can add a touch of elegance to any space. Pair them with vintage-inspired faucets and fixtures for an even more cohesive look.
If you’re looking to make a bold statement in your bathroom, consider opting for a black floating vanity. These types of vanities are mounted directly onto the wall, giving the illusion that they are floating in mid-air. This modern design not only looks visually stunning but also creates an open and spacious feel in smaller bathrooms.
Another option worth exploring is black double sink vanities. These larger vanities provide ample storage space and allow two people to use them simultaneously without feeling cramped. They work particularly well in shared bathrooms or master suites where multiple individuals may need access at once.
No matter which style you choose, it’s important to consider the overall theme of your bathroom when selecting a black vanity. You want it to complement your existing decor seamlessly rather than clash with it.
Remember that personal preference plays an essential role in choosing the right style for your space; take some time browsing through different designs until you find one that speaks to you.
Tips for incorporating a black bathroom vanity into your space
1. Consider the Overall Style: When incorporating a black bathroom vanity into your space, it’s important to consider the overall style and aesthetic of your bathroom. Are you going for a modern, minimalist look or a more traditional vibe? Choose a black vanity that complements the existing elements in your bathroom.
2. Balance with Lighter Colors: While black can add drama and sophistication to your space, it’s essential to balance it out with lighter colors. Light-colored walls, tiles, or accessories to create contrast and prevent the room from feeling too dark or overwhelming.
3. Play with Textures: To make your black vanity stand out even more, consider adding textured elements to the space. This could include patterned floor tiles, a textured backsplash, or even some decorative objects on display.
4. Add Plenty of Lighting: Since black tends to absorb light rather than reflect it, ensuring ample lighting is crucial when incorporating a black bathroom vanity. Install bright overhead lighting as well as task lighting around the mirror area to ensure proper visibility.
5. Use Mirrors Strategically: Mirrors not only serve their functional purpose but also help enhance the visual appeal of your bathroom vanity area. Choose mirrors that are proportionate in size and shape while considering how they will reflect both natural and artificial light sources.
6.Create Contrast with Hardware: Adding contrasting hardware such as brass or gold accents can elevate the look of your black vanity further while providing an element of visual interest.
Remember that each individual’s taste may vary when it comes to design preferences; therefore these tips should be considered as general guidelines rather than hard rules! Embrace creativity and experiment until you find what suits you best
Maintenance and care for a black bathroom vanity
Maintenance and care for a black bathroom vanity is essential to keep it looking sleek and stylish. Here are some tips to help you maintain the beauty of your black bathroom vanity:
1. Regular Cleaning: Wipe down the surface of your vanity regularly with a soft cloth or sponge dampened with mild soap and water. Avoid using harsh chemicals or abrasive cleaners that can damage the finish.
2. Prevent Water Damage: Be mindful of water spills on your vanity, as prolonged exposure can cause damage to the wood or laminate material. Wipe up any spills immediately to avoid staining or warping.
3. Use Gentle Products: When cleaning your black bathroom vanity, opt for gentle cleaning products specifically formulated for use on wood or laminate surfaces. Avoid using rough scrub brushes or scouring pads that may scratch the finish.
4. Protect from Heat and Sunlight: Direct sunlight can fade the color of your black vanity over time, so consider placing it away from windows or use curtains/blinds to block out UV rays. Additionally, avoid placing hot items like curling irons directly onto the surface as it may cause discoloration.
5.Handle with Care: Take care when handling heavy objects near your black bathroom vanity to prevent accidental scratches or dents in its surface.
By following these simple maintenance tips, you can ensure that your black bathroom vanity remains in excellent condition for years to come!
Conclusion
Black bathroom vanities are becoming increasingly popular due to their sleek and sophisticated aesthetic. They add a touch of elegance and modernity to any bathroom space, making it feel more luxurious and stylish.
When choosing a black bathroom vanity, consider the size, style, and design that best suits your needs and preferences. Whether you prefer a traditional or contemporary look, there are various options available to suit your taste.
0 notes
Text
Wayne Dalton Garage Doors

If you’re in the market for a new garage door or looking to upgrade your existing one, you’ve come to the right place. Wayne Dalton is a trusted and reputable brand that has been providing high-quality garage doors for decades. In this article, we will explore the history of the company.
Their wide range of product offerings, as well as the features and benefits that set Wayne Dalton apart from other brands. Whether you’re seeking durability, style, or enhanced security for your home.
For more: Wayne Dalton Garage Doors
Wayne Dalton has got you covered. So let’s dive in and discover why Wayne Dalton Garage Doors are a top choice among homeowners across the country!
History of the Company
Wayne Dalton Garage Doors has a rich history that spans over six decades. The company was founded in 1954 by Wayne Dalton, who had a vision of creating high-quality and innovative garage doors. From its humble beginnings in a small factory in Mt. Hope, Ohio, the company has grown to become one of the leading manufacturers of garage doors in the United States.
Over the years, Wayne Dalton Garage Doors has introduced several groundbreaking technologies and designs that have revolutionized the industry. One notable innovation is their Torque Master Plus counterbalance system, which provides smooth and quiet operation while increasing safety and security.
In addition to their commitment to innovation, Wayne Dalton Garage Doors also places great importance on quality craftsmanship and attention to detail. Each door is carefully crafted using premium materials to ensure durability and longevity.
The company’s dedication to customer satisfaction has earned them a reputation for excellence in the industry. They take pride in providing exceptional service from start to finish – from helping customers choose the perfect door for their home to ensuring professional installation and ongoing support.
As technology continues to advance at a rapid pace, Wayne Dalton Garage Doors remains at the forefront of innovation. They constantly strive to develop new products that meet evolving customer needs while maintaining their commitment to quality and reliability.
With such an impressive history and track record of success, it’s no wonder why Wayne Dalton Garage Doors is trusted by homeowners across the country. Whether you’re looking for a traditional raised panel door or a modern contemporary design, you can count on Wayne Dalton Garage Doors for superior quality and performance.
Product Offerings
Wayne Dalton Garage Doors offers a wide range of high-quality and innovative products to meet the diverse needs and preferences of homeowners. Whether you are looking for traditional or contemporary designs, Wayne Dalton has something for everyone.
One of their popular product offerings is the classic steel garage doors. These doors are not only durable but also provide excellent insulation, helping to keep your garage comfortable in all seasons. They come in various styles, colors, and window options to complement the overall aesthetics of your home.
For those seeking a more modern look, Wayne Dalton offers sleek aluminum garage doors that exude sophistication and elegance. These doors are lightweight yet strong, making them an ideal choice for homes with a contemporary design.
If you value natural light and want to enhance the appeal of your garage space, Wayne Dalton’s glass panel garage doors are a perfect fit. They combine durability with transparency, allowing plenty of sunlight into your garage while maintaining security and privacy.
In addition to their standard offerings, Wayne Dalton also provides custom-designed garage doors tailored specifically to suit your unique taste and architectural style. From wood carriage house designs to designer fiberglass models, they have options galore!
With such an extensive array of product offerings available from Wayne Dalton Garage Doors, finding the perfect door for your home is made easy! Stay tuned as we delve deeper into exploring the features and benefits provided by these exceptional products in our next blog section!
Types of Wayne Dalton Garage Doors
When it comes to Wayne Dalton garage doors, there is a wide range of options to choose from. Each type offers its own unique style and functionality, allowing homeowners to find the perfect fit for their needs.
One popular option is the classic steel garage door. These doors are durable and low-maintenance, making them a practical choice for many homeowners. They come in various designs, including raised panel, recessed panel, and flush panel styles.
For those looking for a more modern aesthetic, Wayne Dalton offers contemporary aluminum garage doors. These sleek doors are made with lightweight materials that are resistant to rust and corrosion. They can be customized with glass panels or full-view sections to create an open and inviting look.
If you prefer the look of natural wood, Wayne Dalton also offers beautiful wooden garage doors. These doors add warmth and elegance to any home exterior. They can be crafted from different types of wood such as cedar or mahogany and can be stained or painted to match your desired aesthetic.
In addition to these traditional options, Wayne Dalton also provides specialty garage doors such as fiberglass models that mimic the appearance of real wood without the maintenance requirements.
No matter which type of garage door you choose from Wayne Dalton’s extensive lineup, you can expect superior quality and craftsmanship. Their products are designed with durability in mind while still offering stylish options for every homeowner’s taste.
When it comes to selecting a new garage door for your home, Wayne Dalton has something for everyone. From classic steel designs to contemporary aluminum styles or even luxurious wooden options – there is no shortage of choices available!
Features and Benefits
When it comes to choosing a garage door for your home, Wayne Dalton offers an impressive range of features and benefits that set them apart from other brands. One notable feature is their innovative insulation options. With choices like polyurethane or polystyrene insulation, you can enjoy increased energy efficiency and noise reduction in your garage.
Another standout feature of Wayne Dalton garage doors is their durability. These doors are built to last with high-quality materials such as steel or wood composite panels. This means you won’t have to worry about frequent repairs or replacements.
In terms of design options, Wayne Dalton has something for everyone. Whether you prefer the classic elegance of a carriage house style door or the sleek modern look of a contemporary design, they have it all. Plus, they offer a variety of colors and finishes to match any home exterior.
Safety is also a top priority with Wayne Dalton garage doors. Many models come equipped with safety features like pinch-resistant panels and tamper-resistant bottom brackets, providing peace of mind for families with children or pets.
Additionally, Wayne Dalton offers convenient accessories like remote control openers and smart technology integration for easy operation and monitoring of your garage door.
The features and benefits offered by Wayne Dalton make them an excellent choice for homeowners looking for quality, style, durability, and safety in their garage doors.
Maintenance and Repair Services
Regular maintenance and timely repairs are essential for keeping your Wayne Dalton garage doors in optimal condition. By taking care of your garage doors, you can ensure their longevity and prevent costly issues down the line.
When it comes to maintenance, there are a few key tasks that should be performed regularly. These include lubricating moving parts such as springs, rollers, and hinges to reduce friction and promote smooth operation. It’s also important to inspect the door for any signs of wear or damage, such as frayed cables or dented panels.
If you notice any issues with your Wayne Dalton garage doors, it’s crucial to address them promptly by contacting a professional repair service. Attempting DIY repairs can be dangerous and may cause further damage if not done correctly.
A reputable repair service will have the expertise and experience needed to diagnose any problems accurately and provide effective solutions. Whether it’s fixing a broken spring, replacing damaged panels, or adjusting misaligned tracks, they will ensure that your garage doors are restored to full functionality.
In addition to repairs, some maintenance services may offer preventative measures such as weather sealing or upgrading insulation for improved energy efficiency.
By investing in regular maintenance and prompt repairs when necessary, you can extend the lifespan of your Wayne Dalton garage doors while enjoying reliable performance year after year.
Comparing Wayne Dalton to Other Garage Door Brands
When it comes to choosing a garage door for your home, there are many different brands and options available. One of the most popular choices among homeowners is Wayne Dalton garage doors. However, it’s always helpful to compare different brands before making a final decision.
0 notes
Text
Wood File Cabinet

In the realm of office furniture, few pieces embody the timeless charm and practicality quite like the wood file cabinet. Serving as stalwart guardians of organization and efficiency. These sturdy storage solutions have been an indispensable fixture in workplaces for generations.
With their classic aesthetics and reliable functionality. Wood file cabinets seamlessly blend form and function elevating both. The ambiance and productivity of any workspace.
For more: Wood File Cabinet
From traditional oak designs to sleek modern interpretations. The wood file cabinet remains a staple, symbolizing professionalism, order, and sophistication. Join us as we delve into the rich history. Enduring appeal and practical benefits of this essential office furnishing.
Wood File Cabinet as a Stylish Storage Solution
Wood file cabinets stand as a testament to both style and functionality in the realm of office storage solutions. Their enduring popularity stems from a combination of timeless aesthetics and practicality. Making them a staple in offices home offices and even living spaces.
Timeless Aesthetics: One of the primary draws of wood file cabinets is their timeless appeal. Crafted from high-quality wood such as oak, cherry, mahogany or walnut. These cabinets exude elegance and sophistication. The natural grains and rich tones of wood lend a warm and inviting atmosphere to any space. Whether it be a traditional office or a contemporary workspace.
Versatility: Wood file cabinets come in a variety of styles and finishes to suit different preferences and décor themes. From classic designs with brass hardware to modern interpretations featuring sleek lines and minimalist details. There’s a wood file cabinet to complement any interior design scheme. This versatility allows them to seamlessly integrate into various settings from traditional corporate offices to trendy space.
Durability and Longevity: Wood file cabinets are renowned for their durability and longevity. Unlike their metal counterparts. Which may dent or scratch over time wooden cabinets can withstand regular use. While retaining their aesthetic appeal. With proper care and maintenance. A well-crafted wood file cabinet can last for decades. Making it a worthwhile investment for any workspace.
Ample Storage Capacity: Whether storing important documents, office supplies, or personal belongings, wood file cabinets offer ample storage capacity to keep clutter at bay. Most models feature multiple drawers of varying sizes. Providing plenty of space to organize files folders and other essentials. Some cabinets also come with additional features such as adjustable shelves or integrated. Locking mechanisms for added convenience and security.
Enhanced Workspace Organization: With their organizational prowess, wood file cabinets contribute to a more efficient and productive workspace. By providing designated storage for documents and supplies, they help streamline workflow and reduce time spent searching for items. This not only boosts productivity but also fosters a sense of order and professionalism in the workplace.
Customization Options: Many manufacturers offer customization options for wood file cabinets, allowing customers to tailor the design, size, and features to their specific needs. Whether adding custom hardware, choosing a bespoke finish, or incorporating additional functionality like built-in charging stations or file rails, these options enable individuals to create a personalized storage solution that reflects their unique style and requirements.
Choosing the Right Wood File Cabinet for Your Needs
When selecting the ideal wood file cabinet to meet your needs. Several factors come into play to ensure you make a wise investment. Firstly consider the size and capacity required to accommodate your storage needs adequately.
Assess the volume of documents and supplies. You need to organize and opt for a cabinet with the appropriate number of drawers and storage space.
Additionally, pay attention to the dimensions of the cabinet to ensure. It fits comfortably within your workspace without overcrowding or obstructing traffic flow.
Secondly, consider the design and aesthetics that align with your personal taste and the overall décor of your space. Whether you prefer a classic traditional look or a more contemporary minimalist style. There are wood file cabinets available in various finishes and designs to suit your preferences. Choose a cabinet that complements the existing furnishings and enhances the ambiance of your workspace.
Next, prioritize durability and quality construction. When evaluating different cabinet options. Look for cabinets crafted from high-quality hardwoods such as oak, cherry, or walnut.
These materials are known for their durability and longevity. Assess the construction of the cabinet paying attention to details such as dovetail joints sturdy hardware and smooth drawer operation to ensure. It can withstand regular use and maintain its integrity over time.
Consider additional features and functionality that may enhance. The usability and convenience of the cabinet. Features such as integrated locking mechanisms for added security. Adjustable shelves for customizable storage options, and built-in file rails for organizing documents efficiently can significantly improve. The cabinet’s functionality and suit your specific needs.
Lastly, factor in your budget constraints and choose a wood file cabinet that offers. The best value for your money without compromising on quality or essential features.
Compare prices across different brands and retailers and consider factors such as warranty coverage and customer reviews to make an informed decision.
By carefully assessing your storage requirements aesthetic preferences durability expectations, and budget considerations.
You can choose the right wood file cabinet that meets your needs and enhances. The organization and functionality of your workspace.
Wood File Cabinets with Locking Mechanisms for Added Security
Wood file cabinets with locking mechanisms provide an additional layer of security for confidential documents and valuable belongings, making them an essential choice for offices and home offices alike. These cabinets offer peace of mind by safeguarding sensitive information and personal items from unauthorized access or tampering.
The locking mechanisms, typically located on the top drawer or integrated into each individual drawer, allow users to secure their files with ease.
Whether storing confidential client records, financial documents, or personal belongings, the added security provided by locking wood file cabinets ensures confidentiality and protects against potential theft or unauthorized access.
Additionally, the presence of locking mechanisms can help organizations comply with privacy regulations and maintain confidentiality standards. With their combination of stylish aesthetics and enhanced security features, wood file cabinets with locking mechanisms offer.
A practical and reliable solution for storing and organizing important documents and belongings in any professional or personal setting.
Incorporating Wood File Cabinets into Home Office Decor
Incorporating wood file cabinets into home office decor can seamlessly blend functionality with style, creating a cohesive and inviting workspace. These cabinets not only provide essential storage solutions but also add a touch of sophistication and warmth to the overall aesthetic.
To integrate wood file cabinets effectively into home office decor, consider matching them with existing furniture finishes or selecting complementary wood tones for a cohesive look. Position the cabinets strategically within the space to maximize both accessibility and visual appeal, ensuring.
They blend seamlessly with other furnishings and decor elements. Incorporating decorative accents such as plants, artwork, or decorative objects on top of the cabinets can further enhance their presence and contribute to a cohesive design scheme.
Additionally, consider accessorizing the cabinets with stylish hardware or decorative drawer pulls to add personality and charm. By thoughtfully integrating wood file cabinets into home office decor.
You can create a functional and visually appealing workspace that inspires productivity and creativity.
Wood File Cabinet Section
The wood file cabinet section of a furniture store or office supply retailer offers. A diverse array of options designed to meet various storage needs and aesthetic preferences. Here, customers can explore a wide range of wood file cabinets crafted from quality materials. Such as oak, cherry or mahogany, each boasting unique designs and features.
Whether seeking a traditional vertical filing cabinet with multiple drawers or a sleek lateral file cabinet for easy access to documents. Shoppers can find options to suit their specific requirements.
Additionally, the wood file cabinet section may showcase cabinets in different sizes and configurations. Catering to both compact home offices and spacious corporate environments.
0 notes
Text
What Do Grasshoppers Eat

Well, today we’re diving into the world of grasshopper dining habits to uncover the answer to that very question. From plant-based feasts to unexpected animal encounters.
For more: What Do Grasshoppers Eat
These little critters have quite the appetite! So, grab a snack and let’s explore what makes these hopping herbivores tick. Get ready for a wild journey into the gustatory world of grasshoppers!
The role of grasshoppers in the ecosystem
The role of grasshoppers in the ecosystem is often overlooked, but these little creatures play a crucial part in maintaining balance and biodiversity. As herbivores, they primarily feed on plants, which helps to regulate plant populations. By consuming grasses, leaves, and flowers, grasshoppers prevent overgrowth that could potentially shade out other plant species.
In doing so, they indirectly create space for a diverse range of plants to thrive. This not only benefits other herbivores who rely on different vegetation types but also provides habitats and food sources for countless insects and birds.
Additionally, grasshoppers are an essential link in the food chain. They serve as a source of nutrition for predators such as birds, reptiles, amphibians, and mammals. Insects like grasshoppers provide protein-rich meals that support the growth and reproduction of these higher-level consumers.
What do grasshoppers usually eat?
Grasshoppers, those fascinating creatures that leap and chirp in meadows and fields, have quite the appetite. Let’s take a closer look at their dietary preferences.
A grasshopper’s diet primarily consists of plants, making them herbivores. They have a penchant for munching on various types of vegetation such as grasses, leaves, and flowers. These leafy greens provide them with essential nutrients and energy to sustain their active lifestyles.
However, it’s not just plants that catch these hopping insects’ attention. Grasshoppers aren’t picky eaters when it comes to protein either! They are known to indulge in an occasional insect feast. Yes, you heard that right – grasshoppers sometimes snack on other insects like spiders or even their own kind!
This omnivorous tendency allows grasshoppers to adapt to different food sources depending on availability or environmental conditions. It gives them flexibility in finding sustenance wherever they may be.
But here’s where things get interesting: human impact can greatly affect the food sources available to grasshoppers. Pesticides used in agriculture can lead to a decline in plant populations – reducing the options for these hungry critters. This disruption can have widespread consequences throughout the ecosystem.
While grasshoppers primarily enjoy feasting on plants including leaves and flowers; they are also opportunistic carnivores who won’t say no to devouring some tasty insects if given the chance. Their ability to adapt makes them remarkable creatures indeed.
So next time you spot a nimble little hopper amongst nature’s bounty, remember how vital they are as both consumers and contributors within our intricate ecological web.
Plant-based diet: Grasses, leaves, and flowers
Grasshoppers, with their unique ability to jump high and blend seamlessly into their surroundings, are fascinating creatures. But have you ever wondered what these agile insects munch on? Well, let’s delve into the world of grasshopper dining habits!
When it comes to food preferences, grasshoppers have a strong affinity for plants. They are primarily herbivores and feast on a variety of plant materials. Their menu often includes an assortment of grasses, leaves, and flowers. These leaf-loving critters can decimate crops if left unchecked.
Grasses make up a significant portion of a grasshopper’s diet. With their specialized mouthparts designed for chewing vegetation, they happily nibble away at blades of grass in meadows or fields. Leaves from trees and shrubs also provide nourishment as they contain essential nutrients that sustain these voracious eaters.
In addition to indulging in greenery, some species of grasshoppers even show a fondness for flowers! The vibrant colors and sweet nectar attract them like bees to honey (pun intended). By feeding on flowers, these insects inadvertently aid in pollination – acting as tiny gardeners within the ecosystem.
It is worth noting that while most grasshoppers stick to plant-based diets predominantly comprising vegetation mentioned above; there are instances where they turn towards animal sources when faced with scarcity or opportunistic situations such as droughts or overcrowding.
In times when resources become scarce or competition intensifies due to population density increase; some species may resort to consuming other insects like aphids or spiders. In harsh environments where options are limited; cannibalism may occur among certain populations too – leading them to prey upon fellow members of their own kind!
With their omnivorous tendencies and remarkable adaptability skills; these versatile creatures demonstrate how they can survive by altering their diet based on changing circumstances.
Animal-based diet: Insects, spiders, and even other grasshoppers
Grasshoppers are not picky eaters when it comes to their diet. While they primarily consume plant-based foods, they also have a taste for animal protein. Yes, you heard that right! These seemingly innocent insects can turn into tiny carnivores.
When grasshoppers come across insects like beetles or spiders, they won’t hesitate to make a meal out of them. They use their strong jaws to chew through the exoskeletons and relish the nutrient-rich insides. It’s fascinating how these herbivores can transform into opportunistic predators!
But wait, there’s more! Grasshoppers aren’t just satisfied with feasting on other bugs; they will even devour their own kind if given the chance. Cannibalism may sound shocking, but it is an essential survival strategy for some grasshopper species.
So next time you see a grasshopper hopping around your garden, don’t underestimate its appetite for adventure in search of tasty treats. From plants to fellow insects, these little creatures prove that nature always has surprises up its sleeve!
Omnivorous tendencies: Grasshopper’s ability to adapt to different food sources
Grasshoppers, those elusive and fascinating insects found in fields and meadows, have a remarkable ability when it comes to their diet. While they are primarily known as herbivores, feeding on plant-based diets like grasses, leaves, and flowers, they also display omnivorous tendencies.
These versatile creatures can adapt to different food sources depending on their environment and circumstances. When plant life is scarce what do grasshoppers eat what do grasshoppers eat or during certain stages of their life cycle, grasshoppers will resort to consuming animal-based foods. Yes, you heard that right – these seemingly harmless insects sometimes turn into opportunistic predators!
Insects become fair game for hungry grasshoppers; small spiders fall victim too! It doesn’t end there – some reports even suggest that under extreme conditions or overcrowding situations, cannibalism occurs among grasshopper populations.
This omnivorous behavior showcases the resourcefulness of these insects in finding sustenance where available. Their adaptive nature ensures survival even when faced with limited food options.
However intriguing this may be from what do grasshoppers eat a biological standpoint, it’s important for us humans to consider our impact on the delicate balance of ecosystems where grasshoppers play a crucial role. Habitat destruction and pesticide use can disrupt their food sources significantly.
0 notes
Text
Closet System With Drawers

Well, that takes organization to a whole new level! Get ready to discover the benefits of having drawers in your closet system and learn how to choose the right ones for your needs. So let’s dive in and transform that cluttered mess into a beautifully organized haven.
For more: Closet System With Drawers
Benefits of Having Drawers in Your Closet System
Having drawers in your closet system can greatly enhance the functionality and organization of your space. With the ability to neatly store and categorize various items, drawers offer numerous benefits that can make your daily routine more efficient.
Drawers provide a hidden storage solution for items you may not want on display. This helps maintain a clean and clutter-free appearance in your closet, creating a peaceful environment for getting ready each day.
Additionally, having designated compartments within the drawers allows for better organization. You can separate socks from underwear, accessories from clothing, or even divide clothing by season. This makes it easier to find specific items when you need them without rummaging through piles or stacks.
Furthermore, utilizing drawers in your closet system maximizes the use of vertical space. Instead of relying solely on hanging rods or shelves, adding drawers allows you to take advantage of every inch of available space. This is especially beneficial if you have limited square footage in your closet.
Moreover, with carefully chosen drawer dividers or organizers, you can customize each drawer’s layout according to your specific needs. Whether it’s adjustable partitions for different sizes of clothing or compartments designed specifically for jewelry and accessories – these additions help create an efficient storage system tailored to fit your lifestyle.
Having drawers also helps protect delicate fabrics and accessories from damage caused by hanging them up or folding them improperly. By providing a flat surface inside the drawer where items can be neatly stacked or folded away without creasing or stretching them out – you can extend their lifespan while keeping everything easily accessible.
Different Types of Drawers for Closet Systems
When it comes to choosing drawers for your closet system, there are several options available that can cater to your specific needs and preferences. Let’s explore some of the different types of drawers you can consider for your closet system.
1. Wire Basket Drawers: These drawers are made from wire mesh and provide excellent visibility and ventilation. They are ideal for storing items like towels, linens, or bulky clothing.
2. Fabric Bins: If you prefer a more lightweight and flexible option, fabric bins might be the perfect choice. They come in various sizes and designs, making them versatile for organizing smaller accessories like socks or belts.
3. Plastic Drawers: Plastic drawers are durable and easy to clean, making them suitable for storing items such as shoes or handbags. They often feature multiple compartments to keep things organized within each drawer.
4. Wood Drawers: For a touch of elegance and sophistication, wood drawers make an excellent addition to any closet system. They offer a timeless look while providing ample storage space for folded clothes or miscellaneous items.
5. Acrylic Dividers: While not technically “drawers,” acrylic dividers can be used within existing shelves or cubbies to create separate compartments without adding extra bulkiness.
Remember that the type of drawer you choose will depend on factors such as the size of your closet space, the items you plan on storing, and your personal style preference.
How to Choose the Right Drawer for Your Needs
When it comes to choosing the right drawer for your closet system, there are several factors to consider. First and foremost, think about your specific needs and what you plan on storing in the drawers.
Next, consider the size of the drawer. Measure the space available in your closet and determine how much room you have for a drawer unit. You want to make sure that the drawer will fit comfortably without taking up too much space or overcrowding your closet.
Another important consideration is the material of the drawer. While wood drawers offer a classic look and durability, they may be more expensive than other options such as plastic or fabric drawers. Think about your budget and personal style preferences when deciding on the material.
Additionally, think about whether you prefer open or closed drawers. Open drawers provide easy access to your belongings but may not offer as much visual appeal if items are not neatly organized inside. Closed drawers with fronts can help keep things hidden away and create a cleaner aesthetic.
Don’t forget about functionality features such as dividers or compartments within each drawer. These can help keep smaller items organized and prevent them from getting mixed up or tangled together.
DIY vs. Professional Installation for Closet Systems with Drawers
When it comes to installing a closet system with drawers, you may find yourself wondering whether to tackle the project on your own or hire a professional.
DIY installation can be an appealing choice for those who enjoy hands-on projects and want to save some money. With the right tools and a little patience, you can assemble and install your closet system without outside help. Plus, there is satisfaction in completing the job yourself.
However, keep in mind that DIY installation requires time and effort. You’ll need to measure accurately, follow instructions carefully, and ensure everything is level and secure. Mistakes could lead to wasted materials or an unstable closet system.
On the other hand, hiring a professional installer offers convenience and expertise. These professionals have experience working with various types of closets systems and can ensure efficient installation. They also have access to specialized tools that may not be readily available at home.
By opting for professional installation, you can eliminate any worries about measurements gone wrong or wobbly shelves. They will handle all aspects of the project while you sit back and relax.
Of course, hiring professionals does come at a cost – both financially and in terms of relinquishing control over the process. It’s essential to weigh these factors against your budget constraints before making a decision.
Maintenance and Organization Tips for Closet Systems with Drawers
Maintenance and organization are key when it comes to keeping your closet system with drawers functioning smoothly. Here are some tips to help you keep your closet in top shape.
First, regularly clean out your drawers. Take the time to go through them and remove any items that you no longer need or want. This will not only declutter your space but also make it easier to find what you’re looking for.
Next, consider using drawer dividers or organizers. These can help separate different types of clothing or accessories, making it easier to keep everything neat and tidy. You can find a variety of dividers that fit easily into most standard-sized drawers.
In addition, take care when opening and closing the drawers. Avoid slamming them shut as this can cause damage over time. Instead, gently push them closed using the handles or knobs provided.
Another helpful tip is to rotate your clothing seasonally. If you have limited drawer space, store off-season items in bins or vacuum-sealed bags elsewhere in your home until they are needed again.
0 notes
Text
Samsung Refrigerator Not Making Ice

We’ve all been there – the frustration of a Samsung refrigerator not making ice can be enough to make anyone lose their cool. But fear not, because in this blog post, we’re going to dive deep into the world of refrigeration troubleshooting and show you how to fix this icy dilemma.
For more: Samsung Refrigerator Not Making Ice
Whether you’re hosting a summer party or simply enjoy a refreshing drink on a hot day, having an abundant supply of ice at your fingertips is essential. So let’s roll up our sleeves, put on our repair hats, and get ready to tackle the problem head-on. From simple DIY solutions to preventative measures for future prevention, we’ve got all the tips and tricks you need to restore that coveted ice production in no time!
So grab yourself a cold beverage sit back, and let’s unravel the mystery behind why your Samsung refrigerator isn’t making any ice. It’s time to chill out with some fridge-fixer knowledge!
Troubleshooting steps for a Samsung refrigerator not making ice
Is your Samsung refrigerator failing to produce ice? Don’t worry, you’re not alone. Many people encounter this issue with their refrigerators at some point. Luckily, there are some troubleshooting steps you can try before calling in a professional.
Check the water supply. Make sure the water line is connected properly and that there are no kinks or blockages. If everything looks fine, turn off the ice maker for a few minutes and then turn it back on again. This can sometimes reset any glitches and get the ice production back on track.
Next, inspect the temperature setting of your freezer compartment. It should be set between 0 and 5 degrees Fahrenheit (-18 to -15 degrees Celsius) for optimal ice production. Adjust if necessary.
Another potential culprit could be an overcrowded freezer. Ensure that there is enough space around the vents for proper airflow. A congested freezer can lead to poor cooling performance and consequently affect ice production.
Additionally, take a look at the ice maker itself. Check if there is any debris or frost buildup obstructing its operation. If so, gently clean it using warm water and mild soap before rinsing thoroughly.
If none of these troubleshooting steps work, it might be time to call in a professional repair service specialized in Samsung appliances repairs – they will have experience dealing with such issues specific to your model of refrigerator.
Prevention is always better than cure when it comes to appliance problems.
-Regularly clean your refrigerator’s coils as dust build-up can hinder its overall efficiency. -Keep an eye out for leaks or dripping from both inside and outside of your fridge. -Avoid overfilling your freezer with food items as this can disrupt air circulation. -Regularly defrost your freezer according to manufacturer guidelines. -Consider investing in a water filter system to ensure high-quality water supply for ice production.
By following these troubleshooting steps and preventative measures, you can hopefully
Cleaning and maintenance tips for better ice production
Cleaning and maintenance are essential for ensuring optimal ice production in your Samsung refrigerator. Here are some tips to keep your fridge running smoothly and producing ice efficiently:
1. Regularly clean the ice maker: Remove any built-up ice or frost from the ice maker using a soft cloth or sponge. Avoid using sharp objects that could damage the unit.
2. Check water supply: Ensure that the water supply line is properly connected and not kinked or blocked. A restricted water flow can hinder ice production.
3. Clean the water filter: If your refrigerator has a water filtration system, make sure to replace or clean the filter as recommended by Samsung. A clogged filter can affect both the taste of your ice and its production.
4. Maintain proper temperature settings: Set your freezer temperature between 0°F (-18°C) and -5°F (-21°C) for efficient ice production. Keeping it too cold can cause freezing issues, while setting it too high may result in slow or no ice production.
5. Keep the freezer well-organized: Make sure there is sufficient space around the vents inside your freezer for proper air circulation. An overcrowded freezer can inhibit airflow, leading to poor performance of both cooling and icemaking functions.
By following these cleaning and maintenance tips, you can improve your Samsung refrigerator’s ability to produce ample amounts of refreshing ice cubes for all occasions without any hassle!
Potential reasons for the issue and how to address them
There can be several potential reasons why your Samsung refrigerator is not making ice. Let’s explore some of them and discuss how you can address these issues.
1. Clogged Water Filter: A clogged water filter can hinder proper water flow, affecting ice production. To address this, locate the water filter (usually located in the upper right corner of the refrigerator compartment) and replace it according to the manufacturer’s instructions.
2. Faulty Water Inlet Valve: The water inlet valve controls the flow of water into your refrigerator’s ice maker. If it is faulty or blocked, it may need to be replaced by a professional technician.
3. Improper Temperature Settings: Check that your freezer temperature is set between 0-5°F (-18°C to -15°C). If the temperature is too high, it may prevent proper ice formation. Adjusting the temperature setting could resolve this issue.
4. Ice Maker Switch Turned Off: Ensure that your ice maker switch is turned on or activated. It may seem obvious, but sometimes small oversights like forgetting to turn on the switch can lead to frustration with no ice production!
When to call a professional repair service
If you’ve gone through the troubleshooting steps and cleaning tips mentioned earlier but your Samsung refrigerator still isn’t making ice, it may be time to call in the experts. While some minor issues can be fixed by homeowners, certain problems require professional assistance.
One sign that you should seek professional help is if there are any unusual noises coming from your refrigerator or freezer. This could indicate a mechanical issue that needs immediate attention. Another indicator is if there are leaks around the fridge or water dispenser, as this could be a sign of a faulty valve or seal.
Furthermore, if you notice that the temperature in your freezer is fluctuating significantly or if your ice maker has completely stopped working despite being properly cleaned and maintained, it’s best to reach out to a repair service.
Attempting complex repairs without proper knowledge and experience can lead to further damage and potentially void any warranty coverage you may have. By calling in professionals who specialize in Samsung refrigerators, you can ensure that the issue will be accurately diagnosed and resolved efficiently.
Remember, it’s always better to err on the side of caution when dealing with potential appliance malfunctions. Professional technicians have the expertise needed to safely diagnose and fix more complicated issues with your Samsung refrigerator’s ice-making capabilities.
Preventative measures to avoid this issue in the future
1. Regularly Clean and Maintain Your Refrigerator: Keeping your refrigerator clean is essential for its optimal performance, including ice production. Wipe down the interior regularly, paying special attention to the ice maker area. Remove any built-up debris or food particles that could clog the system.
0 notes
Text
Samsung Ice Maker Not Working

Introduction to common issues with Samsung ice makers
Are you craving a refreshing glass of ice-cold water or a chilled beverage on a hot summer day, only to find that your Don’t worry, you’re not alone.
Many Samsung refrigerator owners have experienced frustrating issues with their ice makers. But fear not! In this blog post, we’ll walk you through some troubleshooting steps and common causes of a malfunctioning Samsung ice maker.
For more: Samsung Ice Maker Not Working
Whether it’s a frozen water line or just routine maintenance, we’ve got you covered. So let’s dive in and get that ice flowing again!
Troubleshooting steps for a non-working Samsung ice maker
If your Samsung ice maker is not working, there are a few troubleshooting steps you can take to try and resolve the issue. Check that the ice maker is turned on and that it has power. Make sure the ice level arm is in the down position and not blocked by any objects.
Next, inspect the water supply line for any kinks or obstructions. A kinked or frozen water line can prevent water from reaching the ice maker. If necessary, defrost the line using a hairdryer on low heat.
Another potential problem could be a clogged water filter. Replace the filter if it hasn’t been changed in over 6 months or if you notice reduced water flow.
Additionally, make sure that nothing is blocking the ice maker’s vents or fan. Any obstruction can hinder proper airflow and prevent cooling.
Resetting your refrigerator may help solve any software glitches causing issues with the ice maker. Unplug it from power for a few minutes before plugging it back in.
By following these troubleshooting steps, you may be able to fix your non-working Samsung ice maker without needing professional assistance.
Common causes of a malfunctioning ice maker
Common causes of a malfunctioning ice maker can be frustrating, especially when you’re craving that refreshing glass of ice-cold water or need to chill beverages for guests. Understanding the common culprits behind your non-working Samsung ice maker can help you troubleshoot and resolve the issue quickly.
Over time, mineral deposits and debris can accumulate in the filter, obstructing the flow of water to the ice maker. Regularly replacing or cleaning the filter can prevent this problem.
Another potential culprit is a faulty inlet valve. If this valve is not functioning properly, it may not allow water to enter into the ice maker. Inspect and test the valve for any signs of damage or blockage.
A frozen water line is also a common cause of an ice maker malfunctioning. When temperatures drop too low, excess moisture inside the freezer can freeze around the water line, preventing water from reaching the ice maker. Defrosting and clearing out any obstructions in this area may solve this issue.
Additionally, improper temperature settings within your freezer could affect how well your ice maker operates. Make sure that both your refrigerator and freezer are set at appropriate temperatures according to manufacturer guidelines.
Inadequate power supply or electrical issues may also result in an unresponsive ice maker. Check if there are any loose connections or blown fuses that might be impacting its functionality.
By understanding these common causes of a malfunctioning Samsung ice maker, you’ll be better equipped to troubleshoot and address these issues on your own before seeking professional assistance.
How to fix a frozen water line in the ice maker
Is your Samsung ice maker not producing any ice? One possible cause could be a frozen water line. When the water in the supply line freezes, it can block the flow of water to the ice maker, resulting in no ice production.
To fix a frozen water line in your Samsung ice maker, follow these steps:
1. Start by unplugging the refrigerator from the power source to ensure safety. 2. Locate the water supply valve for your refrigerator and turn it off. 3. Find where the water line enters into the freezer compartment and disconnect it from both ends. 4. Use a hairdryer on low heat or a heat gun to gently thaw out any ice that has formed inside the water line. 5. Once all of the ice has melted, reconnect both ends of the water line securely. 6. Turn on the water supply valve and plug in your refrigerator.
By following these steps, you should have successfully fixed a frozen water line in your Samsung ice maker! Remember to always exercise caution when using heating tools near electrical appliances.
Tips for maintaining your Samsung ice maker to prevent future problems
1. Clean the Ice Maker Regularly: It is essential to clean your ice maker at least once every three months. Follow the manufacturer’s instructions on how to properly clean it. Remove any built-up residue or mineral deposits that can affect its performance.
2. Check the Water Filter: A clogged or dirty water filter can hinder proper water flow, leading to issues with ice production. Replace the water filter as recommended by Samsung or when you notice a decrease in ice quality or quantity.
0 notes
Text
SMART HOME Yellow Leaves On Tomato Plants

Whether you’re an experienced green thumb or just starting out, seeing those vibrant green leaves fade to a sickly yellow can be disheartening. But fear not! In this blog post, we’ll explore the various causes of yellowing leaves on tomato plants and provide you with practical tips and solutions to bring your beloved tomatoes back to their healthy, verdant state.
For more: SMART HOME Yellow Leaves On Tomato Plants
Causes of Yellow Leaves on Tomato Plants
One of the main culprits behind yellow leaves on tomato plants is nutrient deficiencies. Tomatoes require a balanced diet to thrive, and when they don’t receive adequate amounts of essential nutrients like nitrogen, potassium, or magnesium, their leaves may start turning yellow. Ensuring that your plants are receiving proper nutrition through regular fertilization can help prevent these deficiencies.
Environmental factors can also contribute to yellowing leaves. Excessive heat or cold stress, as well as fluctuations in temperature and humidity levels, can cause leaf discoloration. Insufficient sunlight or too much shade can also impact the health of your tomato plants. It’s important to provide them with an optimal growing environment by placing them in a sunny spot and protecting them from extreme weather conditions.
Pests and diseases are another common source of trouble for tomato plants. Insects like aphids, whiteflies, or spider mites can infest your plants and damage their leaves, leading to yellowing and wilting. Fungal infections such as early blight or powdery mildew can also affect the foliage. Regular inspection and prompt treatment using organic pest control methods will help keep these issues at bay.
Prevention is always better than cure when it comes to maintaining healthy tomato plants. To prevent nutrient deficiencies, make sure you use a balanced fertilizer specifically formulated for tomatoes. Test your soil regularly to determine any deficiencies beforehand and adjust accordingly.
Proper watering practices are crucial too – overwatering or underwatering can stress out your plants and result in yellow leaves. Water deeply but infrequently while ensuring good drainage.
When you notice yellowed leaves on your tomato plant, it’s important not to panic! Removing some lower leaves occasionally is normal as part of the plant’s natural growth process; however, excessive leaf loss could indicate an underlying problem that requires attention.
By identifying the causes behind those pesky yellow leaves on your tomato plants promptly and taking appropriate action through preventative measures such as proper nutrition, environmental control, and pest management, you can enjoy a b
Nutrient Deficiencies
Nutrient deficiencies can be a common cause of yellow leaves on tomato plants. These plants require a balanced supply of essential nutrients to thrive and produce healthy foliage. When certain nutrients are lacking, it can affect the plant’s ability to carry out important biological processes, leading to symptoms like yellowing leaves.
One nutrient deficiency that often causes yellow leaves is nitrogen deficiency. Nitrogen is an essential component of chlorophyll, the green pigment responsible for photosynthesis. Without enough nitrogen, the leaves may appear pale or yellowish-green.
Another common nutrient deficiency in tomatoes is iron deficiency. Iron plays a crucial role in the production of chlorophyll and other enzymes involved in energy metabolism. When iron levels are insufficient, new leaves may develop interveinal chlorosis – a condition where the veins remain green while the rest of the leaf turns yellow.
Magnesium deficiency can also result in yellowing leaves on tomato plants. Magnesium is necessary for chlorophyll synthesis and helps facilitate various enzymatic reactions within the plant. A lack of magnesium can lead to overall leaf discoloration and stunted growth.
To address nutrient deficiencies in tomato plants, it’s important to provide them with a well-balanced fertilizer that contains all essential nutrients. Soil testing can help determine which specific nutrients are lacking and guide appropriate amendments.
Incorporating organic matter into the soil can also improve its fertility over time by enhancing nutrient availability and promoting beneficial microbial activity. Additionally, regular watering practices should be maintained to prevent excessive leaching of nutrients from the soil.
Remember that prevention is key when it comes to nutrient deficiencies in tomato plants! Providing adequate nutrition from seedling stage through maturity will help ensure vigorous growth and minimize issues related to imbalances or deficiencies.
Environmental Factors
The health and vitality of tomato plants can be greatly influenced by various environmental factors. One common cause of yellow leaves is excessive heat or sun exposure. When tomato plants are exposed to intense sunlight for prolonged periods, it can lead to leaf burn and discoloration.
Another environmental factor that can contribute to yellowing leaves is improper watering. Overwatering or underwatering can stress the plant, leading to nutrient deficiencies and yellow foliage. It’s important to find a balance and provide consistent moisture without overdoing it.
Additionally, poor soil quality or lack of nutrients in the soil can result in yellow leaves on tomato plants. Soil pH levels that are too high or too low may prevent proper nutrient absorption by the roots, causing deficiency symptoms like yellowing leaves.
0 notes
Text
Room Layout Planner Free

After all, the way you arrange your furniture and organize your belongings can make a huge difference in how functional and aesthetically pleasing your space is. That’s where room layout planners come in handy!
For more: Room Layout Planner Free
In this blog post, we’ll explore the importance of room layout planning and discuss the benefits of using a free room layout planner. We’ll also introduce you to some of the top options available online that won’t cost you a dime. Plus, we’ll provide valuable tips for using these tools effectively and avoiding common mistakes along the way.
The Importance of Room Layout Planning
The importance of room layout planning cannot be overstated. It goes beyond simply arranging furniture in a visually appealing way. A well-planned room layout can maximize the functionality and flow of your space, making it easier to move around and use every inch effectively.
One key aspect is ensuring that each area serves its purpose. For instance, in a living room, you want to create a comfortable seating arrangement that encourages conversation and relaxation. In an office or study area, you’ll need to consider factors such as lighting, storage options, and ergonomic positioning of your desk and chair.
Another crucial factor is optimizing the natural light available in your space. Placing furniture strategically can help make the most of sunlight during different times of the day while minimizing glare or shadows.
Moreover, thoughtful placement can also enhance traffic flow throughout the room. By avoiding obstacles or cramped spaces between pieces of furniture, you create an open and inviting environment where people can easily move around without feeling restricted.
Last but not least, effective room layout planning allows for future flexibility. As your needs change over time – whether due to family dynamics shifting or work-from-home requirements – having a well-designed foundation makes it easier to adapt without major renovations or disruptions.
With all these considerations in mind, taking the time to plan your room layout ensures that every element works harmoniously together while maximizing both form and function within your space
Benefits of Using a Free Room Layout Planner
One of the biggest benefits of using a free room layout planner is that it allows you to visualize your space before making any physical changes. With a room layout planner you can easily experiment with different furniture arrangements and see how they would look in your actual space.
Another advantage of using a free room layout planner is that it helps you make more informed design decisions. By seeing your potential layouts on screen, you can better understand how different furniture pieces will fit together and whether they will create the desired flow and functionality in your room.
A free room layout planner also gives you the opportunity to try out various styles and aesthetics without committing to anything permanently. You can play around with different color schemes, patterns, and textures to see what works best for your personal taste.
Additionally, using a free room layout planner allows for easy collaboration with others. Whether you’re working with an interior designer or just seeking input from family members or friends, sharing your virtual floor plan makes it much easier to communicate ideas and gather feedback.
By utilizing a free room layout planner, you can avoid costly mistakes like purchasing furniture that doesn’t fit or clashing colors that end up looking awkward in real life. It gives you the chance to fine-tune every detail before making any major investments or commitments.
Top 5 Room Layout Planners Available for Free
1. Planner 5D: This versatile room layout planner allows you to create detailed floor plans with ease. With its user-friendly interface and extensive library of furniture and decor items, you can experiment with different designs until you find the perfect one for your space.
2. Room Sketcher: Whether you’re remodeling a single room or designing an entire house, Room Sketcher offers a range of tools to help you visualize your ideas. From drag-and-drop furniture placement to customizable wall colors, this free planner has everything you need to bring your vision to life.
3. Floor planner: If simplicity is what you seek, look no further than Floor planner. This intuitive tool lets you draw precise floor plans in minutes and even provides 3D visualization capabilities. Plus, its collaboration feature allows multiple users to work on the same project simultaneously.
4. Home style: Powered by Autodesk, Homestyle is an excellent choice for those looking for professional-quality design features at no cost. Its vast catalog includes thousands of real products from top brands, making it easy to create realistic room layouts that reflect your style.
5. Magic Plan: Magic Plan uses augmented reality technology to measure rooms and generate accurate floor plans automatically—simply by scanning the space with your smartphone or tablet camera! It’s ideal for quick mock-ups or when precise measurements are needed on-the-go.
With these free room layout planners at your disposal, there’s no limit to what you can achieve in terms of creating personalized and functional spaces within your home or office setting! So go ahead – unleash your creativity today!
Tips for Using a Room Layout Planner
1. Take accurate measurements: Before you start using a room layout planner, make sure to measure your space accurately. This will ensure that the furniture and décor items you choose will fit perfectly in your room.
2. Start with the focal point: Identify the focal point of your room, such as a fireplace or large window, and plan your layout around it. This will help create balance and harmony in the space.
0 notes
Text
Free Bedroom Layout planner

In this article, we will explore why a thoughtful bedroom layout is so important, what factors to consider when planning it, and how you can use free tools and resources to create your perfect design. Get ready to unlock the potential of your sleeping sanctuary!
For more: Free Bedroom Layout planner
The importance of a well-planned bedroom layout
A well-planned bedroom layout is more than just aesthetics – it can greatly impact your overall quality of sleep and daily functionality. Imagine waking up in a clutter-free space where everything has its designated place, allowing you to start your day on the right foot. A thoughtfully designed layout can optimize the flow and organization of your room, making it easier to navigate and maintain.
When considering the importance of a bedroom layout, think about how it can enhance relaxation and promote better sleep. By strategically placing furniture, choosing calming colors, and incorporating proper lighting, you create an environment conducive to restful nights. Additionally, a well-thought-out layout can maximize natural light and ventilation for improved air circulation.
Functionality is another key aspect that shouldn’t be overlooked. Arranging your bedroom with practicality in mind means having easy access to essential items like clothing storage or bedside tables for books and personal belongings. It also involves considering factors such as electrical outlets for charging devices or creating dedicated workspaces if necessary.
Investing time into planning your bedroom’s layout pays off by providing you with a space that supports both physical comfort and mental serenity
Factors to consider when planning a bedroom layout
When it comes to designing your bedroom layout, there are several important factors to consider. These elements can greatly impact the overall functionality and aesthetics of your space.
You need to think about the size and shape of your bedroom. This will determine how much furniture you can fit comfortably without overcrowding the room. It’s essential to measure the dimensions accurately before making any decisions.
If so, incorporating built-in closets or adding a dresser might be necessary. Alternatively, if you prioritize relaxation and comfort, investing in a cozy reading nook or a comfortable seating area could be ideal.
Furthermore, take into account natural light sources when planning your bedroom layout. Positioning your bed near windows can provide beautiful views and allow for plenty of sunlight during the day.
Additionally, think about traffic flow within the room. Ensure there is enough space to move around freely without bumping into furniture or feeling cramped.
Don’t forget about personal style! Your bedroom should reflect your tastes and preferences while also promoting relaxation and tranquility.
By considering these factors when planning your bedroom layout, you’ll create a functional and visually appealing space that suits all your needs
Tools and resources for creating a bedroom layout plan
When it comes to creating a bedroom layout plan, having the right tools and resources can make all the difference. Thankfully, there are plenty of options available that can help you visualize and design your dream bedroom.
0 notes
Text
Large Bedroom Layout Ideas

While having ample space may seem like a dream come true, it can often be challenging to figure out how to fill it without overwhelming the room or making it feel empty.
For more: Large Bedroom Layout Ideas
We’ll guide you through some fantastic ideas for maximizing your large bedroom’s potential and transforming it into a cozy and functional haven that reflects your personal style. So let’s dive in and discover some exciting layout possibilities together!
Understanding the purpose of a large bedroom
Understanding the purpose of a large bedroom is crucial when it comes to planning its layout. While some may view it as simply a space for sleeping, a large bedroom offers endless possibilities beyond just being a place to rest your head at night.
Or perhaps you see it as an extension of your living area, where you can relax and entertain guests in privacy. Understanding this purpose will help guide your design decisions.
A large bedroom also provides an opportunity for creativity. You could transform part of the space into a home office or study area, complete with a desk and comfortable seating. This way, you can have both productivity and relaxation within the same room.
Additionally, think about any specific needs or hobbies that could benefit from extra square footage. For book lovers, incorporating shelves or even creating a mini-library corner would be ideal. If fitness is important to you, consider adding equipment like yoga mats or small weights for quick workouts right in your own private haven.
Keep in mind that implementing proper lighting large bedroom layout ideas plays an essential role in setting the mood and enhancing functionality within your spacious sanctuary. From ambient lighting options such as overhead fixtures to task-specific lighting like bedside lamps or reading lights near seating areas – choose wisely based on how each section will be utilized.
By understanding the purpose behind your large bedroom’s layout, you’ll be able to create a personalized space that meets all of your needs while maximizing comfort and functionality without sacrificing style!
Maximizing space with furniture placement
When it comes to maximizing space in a large bedroom, strategic furniture placement is key. With the right arrangement, you can create an open and spacious feel while still utilizing every inch of your room.
Start by choosing furniture that fits the large bedroom layout ideas scale of your room without overwhelming it. Sleek and streamlined pieces that don’t take up too much visual or physical space. Place larger items like bed frames and dressers against the walls to free up floor space in the center of the room.
Consider using multifunctional furniture pieces that serve multiple purposes. For example, a storage ottoman can provide extra seating as well as a place to stow away blankets or pillows. A desk with built-in shelving can double as a workspace and storage solution.
Don’t be afraid to experiment with different layouts until you find what works best for your needs. Try placing your bed at an angle or floating it in the middle of the room instead of against a wall. This can create a more dynamic and visually interesting arrangement.
Remember to leave enough walking space around each large bedroom layout ideas piece of furniture to ensure easy navigation throughout the room. Avoid overcrowding by only including essential items and keeping decorative accents minimal.
By carefully considering furniture placement in your large bedroom, you’ll be able to maximize both functionality and style without sacrificing precious square footage!
Creating cozy and functional seating areas
Creating a cozy and functional seating area in a large bedroom can transform it into a comfortable retreat where you can relax, read, or simply unwind. To achieve this, consider incorporating plush seating options such as armchairs, loveseats, or even a small sofa.
Place the seating arrangement near a window to take advantage of natural light and create an inviting ambiance. Add soft throw pillows and blankets in complementary colors to enhance comfort and style.
Consider incorporating a coffee table or side tables within reach of your seating area for added functionality. These surfaces can hold books, magazines, or even a cup of coffee while you enjoy your personal space.
Don’t forget about lighting! Incorporate floor lamps or table lamps to provide ample illumination for reading or creating an intimate atmosphere during nighttime hours.
0 notes
Text
Restoration Hardware Cloud Couch

Imagine sinking into a cloud-like embrace after a long day’s work – that’s exactly what the Cloud Couch offers. Its innovative design and plush cushions provide an experience like no other, making it the go-to choice for those seeking both elegance and unmatched comfort in their homes.
for more : Restoration Hardware Cloud Couch
But what sets this couch apart from its competitors? In this blog post, we’ll delve into its features and benefits, explore the high-quality materials used in its construction, learn how to care for it properly, hear from satisfied customers through their reviews and testimonials, compare it to similar options on the market, and wrap up with some frequently asked questions.
So get ready to discover why the Restoration Hardware Cloud Couch is about to become your favorite spot in your home – where relaxation meets luxury in one heavenly package! Let’s dive right in!
Features and Benefits of the Cloud Couch
The Restoration Hardware Cloud Couch is a luxurious and stylish seating option that offers numerous features and benefits. One of the standout features of this couch is its cloud-like comfort. The deep, plush cushions provide an incredibly soft and cozy feel, making it the perfect spot to relax and unwind after a long day.
In addition to its exceptional comfort, the Cloud Couch also boasts a versatile design. It comes in various configurations, allowing you to choose the layout that best suits your space and needs. Whether you prefer a traditional sofa or a sectional with multiple pieces, there’s an option for everyone.
Another benefit of the Cloud Couch is its durability. Rest assured that this piece of furniture is built to last. Constructed with high-quality materials such as hardwood frames and reinforced corner blocks, it can withstand everyday use without losing its shape or support.
Furthermore, the Cloud Couch offers unmatched style and elegance. Its clean lines and minimalistic design make it a timeless addition to any home decor scheme. Whether your style is modern or classic, this couch seamlessly blends in with any aesthetic.
One cannot overlook the convenience factor of the Cloud Couch. With removable cushion covers that are machine washable, cleaning becomes hassle-free. This feature ensures that your couch stays fresh-looking even after years of use.
Materials Used in Making the Cloud Couch
The Restoration Hardware Cloud Couch is known for its luxurious and comfortable design, but have you ever wondered about the materials that go into making this iconic piece of furniture? Well, wonder no more! In this section, we’ll take a closer look at the high-quality materials used in crafting the Cloud Couch.
First and foremost, let’s talk about the upholstery. The Cloud Couch is upholstered in premium Italian aniline leather or durable fabric options. This ensures not only a soft and supple feel but also long-lasting durability. Whether you prefer the sleek elegance of leather or the cozy warmth of fabric, there’s an option to suit your personal style.
When it comes to cushioning, Restoration Hardware goes above and beyond with their unique blend of down feathers and foam. This combination provides exceptional comfort while maintaining shape over time. You can sink into the plush cushions without worrying about them losing their support.
In addition to the upholstery and cushioning, attention is also paid to every detail – even down to the frame construction. The Cloud Couch features a kiln-dried hardwood frame that is reinforced for added strength and stability. This ensures that your couch will withstand years of use without compromising its structural integrity.
Restoration Hardware takes pride in using top-quality materials throughout their furniture line, including the Cloud Couch. By choosing high-grade materials like premium leather or durable fabrics coupled with carefully crafted cushioning and solid construction techniques, they create a piece that exudes luxury while standing up to everyday wear and tear.
So next time you relax on your Cloud Couch, take a moment to appreciate not just its sumptuous comfort but also t
How to Care for Your Cloud Couch
Caring for your Cloud Couch is essential to maintain its beauty and extend its lifespan. Here are some tips on how to keep your couch looking pristine:
1. Regularly fluff the cushions: The Cloud Couch comes with down-filled cushions that may flatten over time. To restore their plushness, give them a good fluffing every few days.
0 notes
Text
Open Plan Kitchen Living Dining Layouts

In this blog post, we will explore the benefits of an open plan layout, discuss important considerations before choosing this design concept, provide tips for creating a functional and stylish space, delve into popular trends in open plan designs, address challenges that may arise with this layout, and conclude with answers to frequently asked questions. So grab a cup of coffee sit back and get ready to be inspired by the endless possibilities that an open plan kitchen living dining layout can bring to your home.
Definition of Open Plan Kitchen Living Dining Layouts
Open plan kitchen living dining layouts, also known as open concept or open floor plans, are architectural designs that combine the three essential spaces of a home – the kitchen, living room, and dining area – into one cohesive and uninterrupted space. Gone are the days of separate rooms with walls dividing these areas; instead, an open plan layout promotes fluidity and connectivity within the home.
for more: Open Plan Kitchen Living Dining Layouts
The defining characteristic of an open plan layout is its lack of barriers. Walls are removed to create a seamless transition between the kitchen, living room, and dining area. This allows for easy communication and interaction between family members or guests while engaging in different activities.
By removing physical barriers such as walls and doors, natural light can flow freely throughout the space. Large windows or glass sliding doors can provide stunning views while flooding the entire area with sunlight during the day. This not only creates a bright and airy atmosphere but also enhances visual continuity between indoor and outdoor spaces.
An open plan layout offers flexibility when it comes to furniture arrangement. Without restrictive walls determining where each piece should go, homeowners have more freedom to play around with different configurations that suit their needs best. Whether it’s placing a comfortable sofa near the kitchen island for casual conversations or opting for a large communal table that serves both as a dining area and workspace – there is no shortage of possibilities in creating functional zones within this versatile layout.
In addition to promoting better social interaction among family members or guests during gatherings or meals preparation times – an open plan design also encourages multitasking without compromising on connectivity. Parents can keep an eye on their children playing in the living room while preparing dinner in the adjacent kitchen; hosting parties becomes easier as hosts can seamlessly move from cooking to entertaining without leaving their guests unattended.
Open plan kitchen living dining layouts offer numerous advantages including improved functionality through enhanced communication among occupants of various household spaces; increased natural light penetration resulting in brighter interiors; flexible furniture arrangements catering to individual preferences and needs; and the ability to multitask while maintaining a sense of connection.
Benefits of an Open Plan Layout
An open plan layout is a popular choice for modern homes, and it offers several benefits that make it worth considering. One major advantage of an open plan kitchen living dining layout is the sense of spaciousness it creates. By removing walls and barriers, you can create a seamless flow between different areas of your home, making it feel larger and more inviting.
Another benefit is the increased social interaction that comes with an open plan design. With the kitchen, living room, and dining area all connected, family members and guests can easily interact with one another while cooking, eating, or relaxing. This not only fosters better communication but also allows for a more inclusive atmosphere during gatherings or parties.
Furthermore, an open plan layout can enhance natural light throughout your home. Without walls blocking sunlight from entering various spaces, you can maximize the use of windows and doors to bring in abundant natural light. This not only makes your space brighter but also helps save on energy costs by reducing the need for artificial lighting during daytime hours.
In addition to these benefits, an open plan layout allows for greater flexibility in furniture arrangement and interior design choices. You have more freedom to experiment with different layouts as there are no fixed walls dictating where furniture should be placed or how rooms should be divided. This gives you endless possibilities when it comes to creating a functional and stylish space that suits your lifestyle.
Opting for an open plan kitchen living dining layout has numerous advantages such as creating a spacious environment, promoting social interaction among family members and guests alike offering ample natural light exposure while allowing flexibility in designing your dream space!
Things to Consider Before Choosing an Open Plan Layout
When it comes to choosing an open plan layout for your kitchen, living, and dining areas, there are several factors to consider. First and foremost is the size of your space. Open plan layouts work best in larger areas where you can create distinct zones without feeling cramped.
Another important consideration is the flow of traffic. Think about how people will move through the space and ensure that there is enough room for easy movement between each area. This is particularly crucial if you have a busy household or frequently entertain guests.
Lighting is also key when designing an open plan space. Natural light can make the area feel more spacious and inviting, so think about how you can maximize the amount of sunlight coming into the room. Additionally, consider installing appropriate lighting fixtures in each zone to create ambiance and functionality.
Acoustics should not be overlooked either. With multiple activities happening simultaneously in an open plan layout, it’s essential to address sound control measures such as using rugs or curtains to absorb noise.
Don’t forget about storage options! Open plan layouts often require clever storage solutions to keep clutter at bay while maintaining a cohesive look throughout the entire space.
0 notes
Text
3D Bedroom Planner Ikea

In this blog post, we’ll dive deep into the benefits of using a 3D bedroom planner and guide you through the step-by-step process of creating your dream space with IKEA’s incredible tool. Whether you’re an interior design enthusiast or simply looking for inspiration for your next home makeover project, this article is your ultimate guide!
for more: 3D Bedroom Planner Ikea
So buckle up and get ready to unleash your creativity as we explore how a 3D bedroom planner can revolutionize the way you approach interior design. Let’s jump right in!
Benefits of Using a 3D Bedroom Planner
1. Visualize Your Dream Bedroom: One of the major benefits of using a 3D bedroom planner is the ability to visualize your dream space before making any purchases or commitments. With realistic renderings and detailed measurements, you can see how different furniture pieces will fit together and experiment with various layouts and color schemes.
2. Save Time and Money: Planning a bedroom makeover can be time-consuming and costly if you’re not sure about what works best in your space. However, with a 3D bedroom planner like IKEA’s, you can avoid unnecessary expenses by trying out different design options virtually. This way, you’ll have a clear idea of what fits within your budget without having to make numerous trips to the store.
3. Experiment with Styles: Whether you prefer modern minimalism or cozy rustic vibes, a 3D bedroom planner allows you to explore different styles effortlessly. You can mix and match furniture pieces from various collections until you find the perfect combination that matches your taste.
4. Customize for Functionality: A well-designed bedroom should not only look appealing but also serve its purpose efficiently. A 3D planner enables you to customize every aspect of your room, from storage solutions to lighting fixtures, ensuring that it meets both your aesthetic preferences and functional needs.
5. Collaboration Made Easy: If multiple people are involved in designing or deciding on the layout of the bedroom (such as partners or family members), using a 3D planner makes collaboration seamless. Everyone can contribute their ideas by adding or modifying elements in real-time until everyone is satisfied with the final result.
How to Use IKEA’s 3D Bedroom Planner
Using IKEA’s 3D Bedroom Planner is a breeze, even if you’re not tech-savvy.
First, start by visiting the IKEA website and navigating to their bedroom section. Once there, you’ll find the 3D Bedroom Planner option. Click on it to launch the program.
Next, choose your room dimensions and layout. You can either select from pre-set room sizes or customize your own measurements. This flexibility ensures that you can design a space that perfectly fits your needs.
Once you have set up your room dimensions, it’s time to get creative! Browse through IKEA’s vast collection of furniture and accessories and drag-and-drop them into your virtual bedroom space.
Don’t forget about colors and materials! The 3D planner allows you to customize everything from wall paint to flooring options. Play around with different shades and textures to create an atmosphere that suits your style.
As you add items to your virtual bedroom, don’t be afraid to rearrange them as well. The beauty of this tool is its flexibility – try out various placements until you achieve optimal flow and functionality in the space.
Take advantage of IKEA’s smart features like price calculations and shopping lists generated automatically based on your selections. This makes purchasing items for your dream bedroom a breeze!
Step-by-Step Guide to Planning Your Dream Bedroom with IKEA’s 3D Planner
Step 1: Start by measuring your bedroom. Grab a tape measure and jot down the dimensions of your space, including the length, width, and height. This will help you accurately plan out your furniture layout in the 3D planner.
Step 2: Explore IKEA’s wide range of bedroom furniture options. From beds and wardrobes to dressers and nightstands, they have everything you need to create a functional and stylish bedroom. Take note of the pieces that catch your eye as you browse their website or visit a store near you.
Step 3: Open up IKEA’s 3D Bedroom Planner on their website. This user-friendly tool allows you to visualize how different furniture arrangements will look in your space without having to physically move anything around.
Step 4: Input the measurements of your room into the planner. This step is crucial for accurate planning.
Step 5: Drag and drop furniture items onto the virtual floorplan according to where you want them placed in your real-life room. Experiment with different layouts until you find one that maximizes functionality and suits your personal style.
Step 6: Customize each piece of furniture with different finishes, colors, handles, or knobs available within the planner itself. This feature allows you to see how various design choices can transform the overall look of your dream bedroom.
Remember to save any designs or configurations that resonate with you so that it’s easy to retrieve them later when making final decisions about your purchases at IKEA!
Tips for Designing a Functional and Stylish Bedroom with the 3D Planner
When it comes to designing your dream bedroom, functionality and style should go hand in hand. Thankfully, with IKEA’s 3D Bedroom Planner, you can easily bring your vision to life. Here are some tips to help you create a functional and stylish space using the 3D planner.
0 notes
Text
3 D Room Planner

Gone are the days of relying solely on your imagination or making costly mistakes when redesigning your space. With this innovative tool, you can bring your vision to life before even lifting a paintbrush or moving a piece of furniture.
For more: 3 D Room Planner
Whether you’re an aspiring designer or simply looking to revamp your home, a 3D Room Planner is an essential solution for creating stunning and functional spaces.
In this blog post, we’ll explore what exactly a 3D Room Planner is, its benefits, top options on the market, and how to make the most out of this cutting-edge technology. So let’s dive in and unlock the endless possibilities that await you in the world of virtual room design!
What is a 3D Room Planner?
A 3D Room Planner is a powerful tool that allows you to digitally visualize and plan your ideal living space. It takes the guesswork out of interior design by providing a virtual platform where you can experiment with different layouts, furniture styles, color schemes, and decor elements. Essentially, it’s like having an advanced version of playing house but with professional capabilities.
Using advanced technology and graphics, a 3D Room Planner creates realistic representations of rooms in three dimensions. This means you can view your space from multiple angles and get a true sense of how everything will come together. Whether you’re decorating a single room or designing an entire home, this interactive software lets you explore various possibilities before committing to any physical changes.
With a 3D Room Planner, you have the freedom to customize every aspect of your space. From choosing wall colors to arranging furniture pieces with precise measurements, this tool empowers you to make informed decisions about your design choices. By visualizing the finished result ahead of time, you can avoid costly mistakes and ensure that every element complements each other harmoniously.
Not only does using a 3D Room Planner save time and money on potential design mishaps or purchasing incompatible items; it also sparks inspiration and ignites creativity within yourself. You’ll find joy in exploring different styles and experimenting with unique combinations that may have never crossed your mind otherwise.
Benefits of using a 3D Room Planner
Designing a room can be challenging, but with the help of a 3D room planner, you can bring your ideas to life and create the perfect space. Here are some benefits of using this innovative tool:
1. Visualize Your Design: One of the biggest advantages of using a 3D room planner is being able to visualize your design before making any changes in reality. This allows you to experiment with different layouts, furniture arrangements, and color schemes, giving you confidence that your final design will turn out just as you imagined.
2. Save Time and Money: By utilizing a 3D room planner, you can save both time and money in the long run. Instead of buying furniture or accessories blindly and hoping they work well together, you can evaluate how they fit into your space virtually. This helps prevent costly mistakes and ensures that every element complements each other harmoniously.
3. Explore Different Options: With a 3D room planner at your disposal, exploring various options becomes effortless. You can try out different styles, materials, textures, and finishes without physically purchasing anything or committing to permanent changes in your space until you’re completely satisfied.
4. Enhance Communication: Whether working on an individual project or collaborating with professionals such as interior designers or contractors, using a 3D room planner improves communication significantly. By sharing detailed visualizations of your design plans with others involved in the process, everyone is on the same page from day one.
5. Make Informed Decisions: A 3D room planner provides valuable insights into factors like lighting conditions throughout the day or how traffic flows within the space – all before implementing any physical changes! These insights empower homeowners to make informed decisions about their designs based on functionality as well as aesthetics.
Top 3D Room Planners on the Market
When it comes to designing your dream room, having a reliable and user-friendly 3D room planner can make all the difference. With so many options available, it can be overwhelming to choose the right one for your needs. That’s why we’ve curated a list of some of the top 3D room planners on the market that are worth considering.
1. Planner5D: This popular tool offers an extensive library of furniture, decor items, and materials to bring your vision to life. With its intuitive interface and realistic rendering capabilities, you’ll be able to create stunning designs in no time.
2. RoomSketcher: Known for its simplicity and ease of use, RoomSketcher allows users to visualize their ideas effortlessly. Whether you’re redesigning a single room or planning an entire home renovation, this versatile software has got you covered.
3. HomeByMe: If you’re looking for a comprehensive solution with advanced features, HomeByMe is worth checking out. It offers precise measurements, customizable layouts, and even virtual reality compatibility for an immersive design experience.
Remember that each 3D room planner has its own unique features and strengths; what works best for someone else might not necessarily work for you! Take some time exploring these options and find one that aligns with your specific requirements.
So go ahead – unleash your creativity using these top-rated 3D room planners! Whether you’re a design enthusiast or simply want to experiment with different layouts before committing to any changes in your space, these tools will help bring your ideas to life like never before. Happy designing!
How to Use a 3D Room Planner
When it comes to designing a room, using a 3D Room Planner can be an incredibly helpful tool. But knowing how to use it effectively is key to achieving the best results.
Start by selecting the dimensions and layout of your room in the software. Next, choose from a library of furniture and decor items that closely resemble what you have or plan to purchase.
0 notes