
Last Seen Blogs

scp-fakes
Mostly Fandom Based Fake SCPs

deeksha-seth-blog
Deeksha Seth Official Fan Blog

nothingreally-just
O___O

massage2u
Soothing
werewolf28081999-blog
werewolf28081999's blog
Text
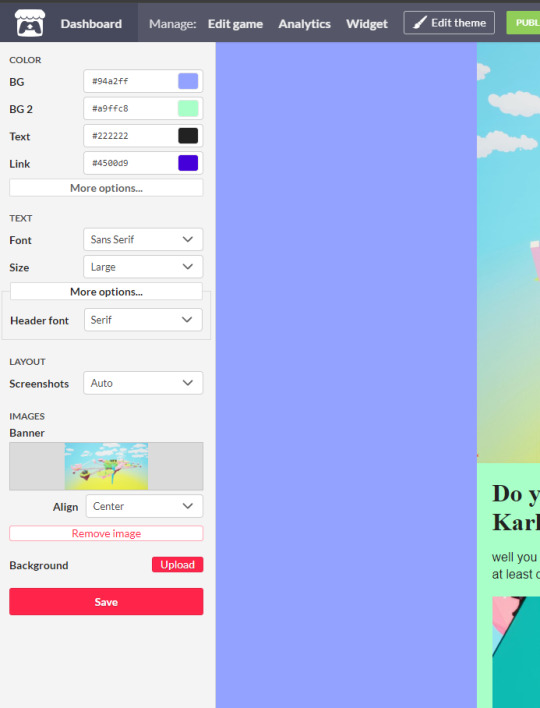
Setting up Itch page
In terms of setting up how the page looks I kind of just messed around with the editing options and just found what I liked in terms of Colours and layout etc.
I then had a look around at other game pages to see how they went about laying them out and information they included in their descriptions.
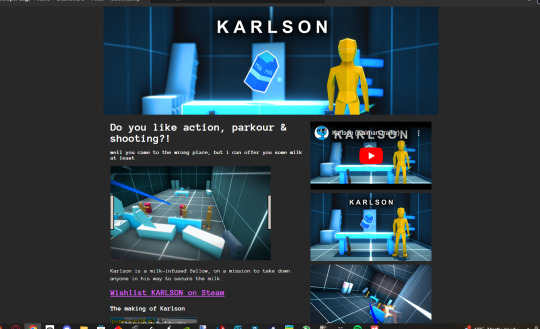
The first most obvious page I looked at was Karlson's page. It was quite dull in terms of colours which was the only part I didn't like about it but I preferred how the information was kept short and not too excessive. Plenty of screenshots, gifs and videos were used on the page as well which I tried to replicate in my own page.
The next page I looked at was Buckshot Roulette which had again a darker theme but its definitely more fitting. I liked how the developer had put the shotgun shells down the side of the screen I feel like its fitting and links to the games theme quite well. There is overall a lot more polish and information provided in this page but a little too much in my opinion.

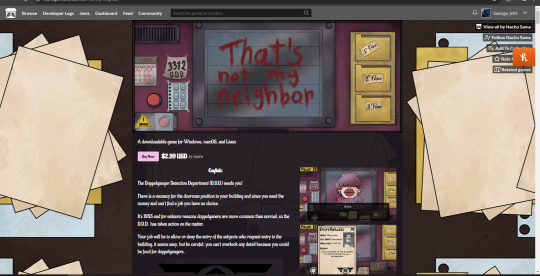
The final page I looked at was for was 'that's not my neighbour'. This games layout is also very similar to that of Buckshot Roulettes with a consistent appearance that relates to the game itself. I really like how both of these have cool repeating background so I am going to include it with my own.
Making of my page -
I started by starting with a probing question (not sure if that's the right terminology) to draw the person viewing the page in. I got this inspiration from how Dani does it on his page.
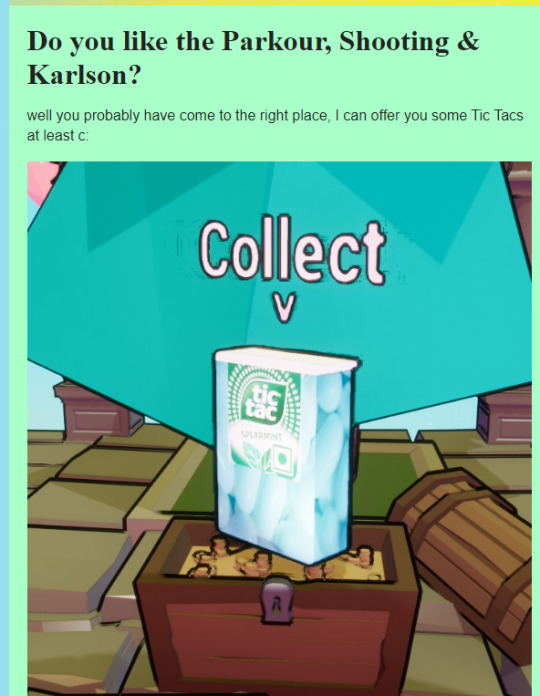
Next I moved onto writing a short description of what the game is and your goal. I made sure to make key information in bold to make it easier for the person reading to grasp information:
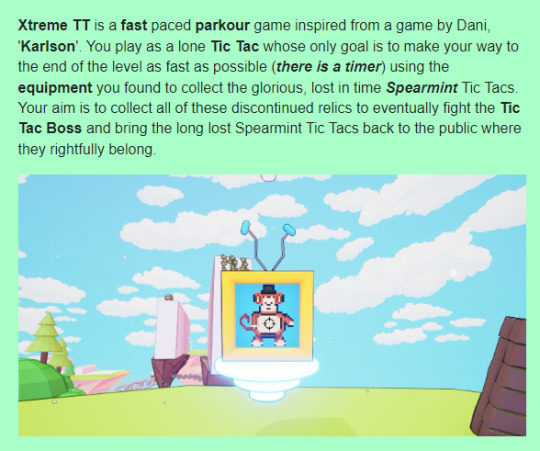
After that I did a little section which gives some context behind the game and why I made it in the first place:

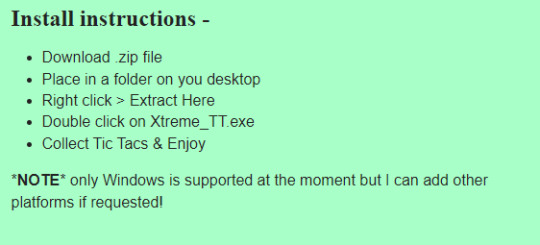
After that I gave a mini guide on how to install the game in the instance that someone wasn't very familiar with this process.
Now that all the information was out of the way I went into my game and took some screenshots for the page:
Now that this was done the final bit I did was I went into paint.net and edited a PNG of my monkey TV which took quite a bit. This is going to be for the background of my itch page.
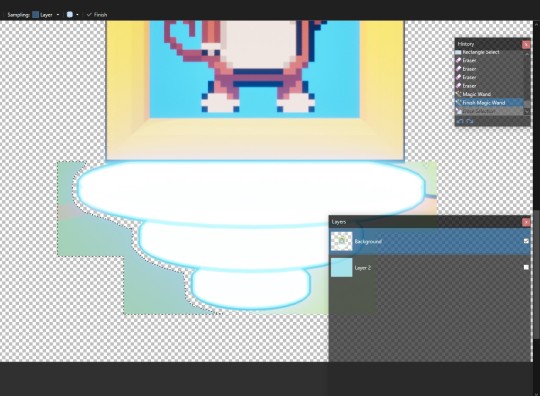
Once I had the png I made the canvas longer and created the background for my itch page:

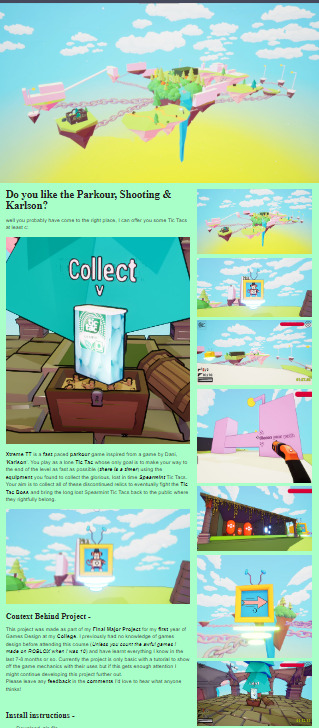
Here is what it looks like on the page:
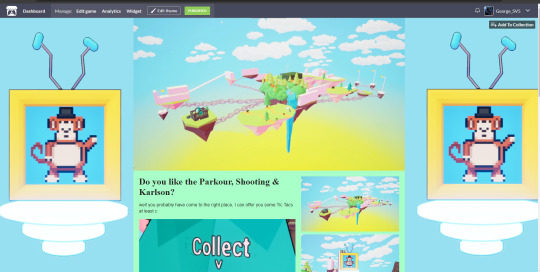
My page:
0 notes
Text
Uploading to Itch
I started by watching this video on how to upload my games to itch and setup the game page:
youtube
Once I finished it I quickly realised I was going to have to use 'Butler' to upload my game as it exceeded the 1gb max upload. I did a little bit of research and then landed on two videos. The first was this one:
youtube
I watched through and downloaded the .bat file in the description and edited it as shown in the video. The problem was that cmd couldn't find my butler installation and there wasn't much help provided in the comment section either for this issue. I decided to move on and not spend too much time figuring out whatever the problem was and found a new video.
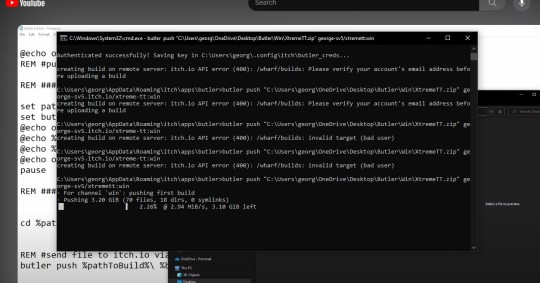
This video was a lot shorter and more to the point which I preferred but still encountered the same Issue. I then googled how to fix this and found that I need to go into the butler directory and type 'cmd' into it. Once done it opens up a cmd panel to the directory and allowed me to past the command into it to start the upload. The only thing I had to change was removing the '.itch.io' part from the game web address to get it to upload correctly otherwise it was saying the user was incorrect (seen in ss below).

0 notes
Text
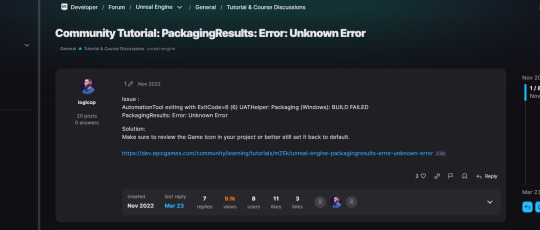
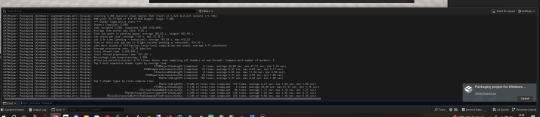
Problem Solved with Packaging
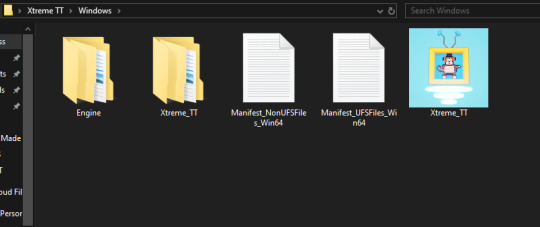
After doing countless research online and found nothing on why my game wasn't packaging with plugins I decided to start reading through the packaging lines. I ended up coming across a line which was saying that 'visual studio installed' to which it was followed by 'visual studio missing C++...' . So after finding this I opened the visual studio installer, did a fresh install and then selected the modify menu to select any option I saw that had any remote connection to C++ and installed it.
After it finished installing I relaunched the project, added back the game icon along with the splash screen back and started packaging the game. This time there were no error and the game packaged successfully.
0 notes
Text
What I haven't managed to complete with my project
Enemy Animations with an actual enemy you have to fight
Air Dashing
Boss Fight
Lots of tic tac branded ambient assets due to not having time to create loads.
0 notes
Text
Packaging Game
Today I started by watching and following this tutorial on how to package my project for windows:
youtube
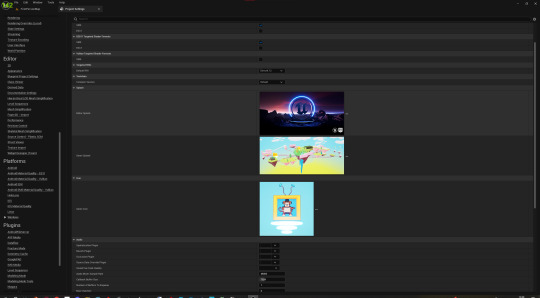
I then created two custom file images, one for the splash screen which was in the format of a .bmp file and the other being a game icon of a .ico file. When trying to package my game I encountered an 'unknown error' I did some research and found it could have been my new icons which were causing the issue so I reset them back to default and still encountered the same problem.
The next thing I could think of was the chance that it could be my loading screen plugin causing the issue so I disabled it and restarted the editor. So far my game has been in the process of packaging fine with no errors but I'm not going to give up on trying to figure out how to package the plugin with my game.
0 notes
Text
Game Mini Optimization
I was looking through my level and found that some areas had random Ambient particles that weren't in any place the player would move to normally. I then switched the game view into 'Shader complexity' mode to see where there might be anymore of these that needed removing.
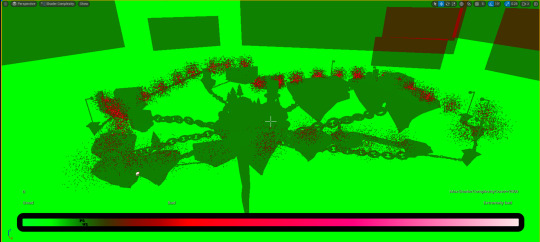
After removing all of the unnecessary particles I saved my game. After relaunching the game though I was met with this:
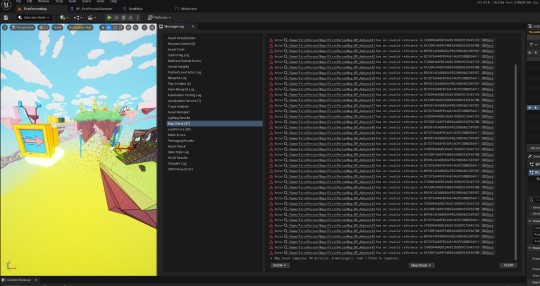
to go about fixing this I pretty much just had to go delete and then replace all of the broken particles around the map which fixed this error. My best guess is that the game didn't like that the order had changed for these particles so they needed fixing?
0 notes
Text
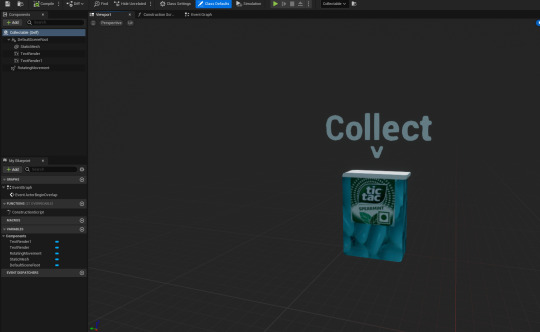
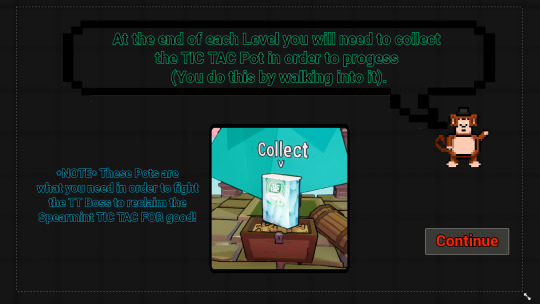
Tic Tac Collectable (END OF LEVEL) + Win Screen
I started by creating a new actor for the tic tac pot. I added the static mesh to it and then added a rotating component as I wanted it to be spinning at the end of the level as, 1. I think it would draw the player towards it and 2. Dani also does this with the milk carton in Karlson at the end of the level because spinning stuff is cool. To make it as obvious as possible that you need to get this item I put a big bit of obvious text above it telling you to collect it.
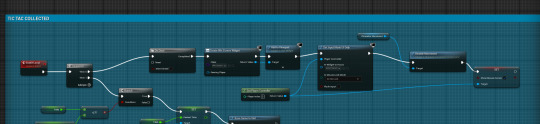
in the code for it I have an actor begin overlap which checks for a component tag which the player character has on its capsule component. If this is true then it will cast to the player character, trigger the end of level event shown in the previous post and then set the finished level Boolean to true to stop the timer.

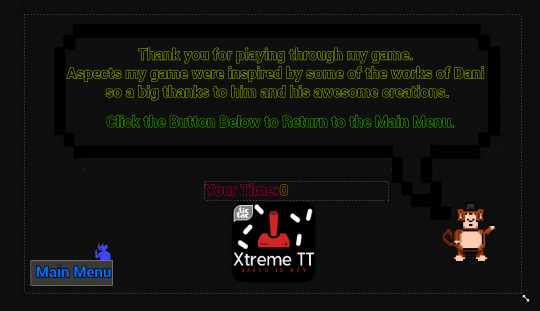
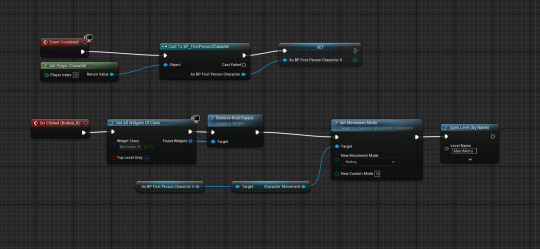
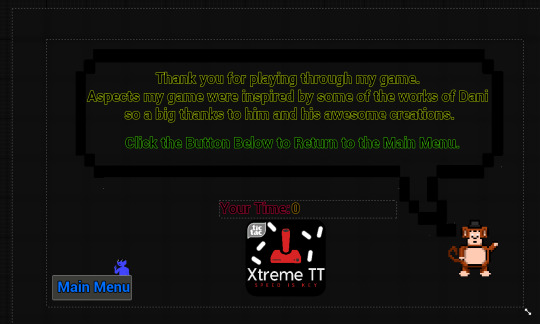
Going back to the first person character now I created a final widget which will display called the win screen. This thanks the player for playing and gives a mini credit etc. It displays the time the player got as well as that it information I figured a speed runner would like to know.
Here is where that gets added to the viewport:
A final note is that I made is so that when you press the main menu button it will return you to the main menu along with removing itself from the viewport and setting the movement mode back to walking just as a precaution.
0 notes
Text
Timer + Saving Fastest Time
I setup a timer system in my game which would be for the people trying to speed run my game. The inspiration for this Idea was yet again from Dani from his game Karlson.
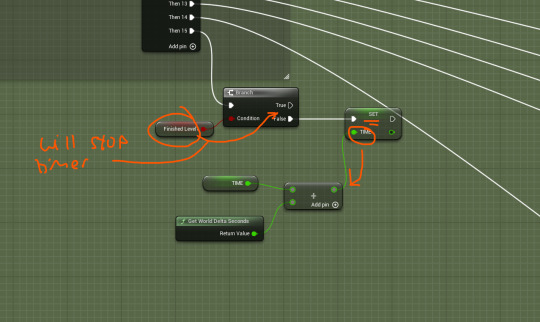
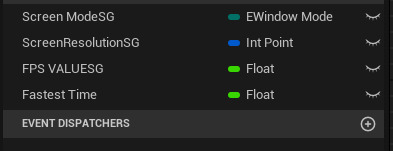
I started by setting up the necessary variables in the first person character to record the time. (Finished level is to stop the timer)


to get the time I ran a line of code off of the event tick which would get the world delta in seconds and add that to the times value.
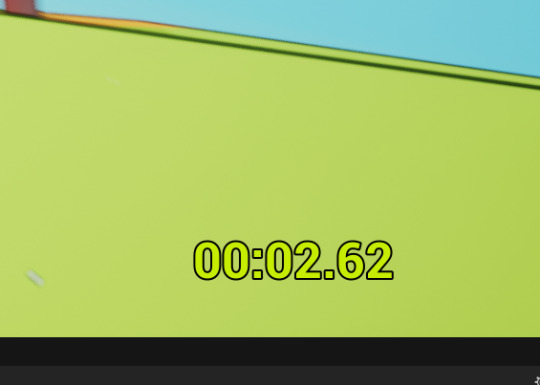
from this I added a new piece of text to my UI for the character which will display the timer.
I then created a text binding for it. This applies the same method of displaying a variable's value except it converts the time seconds to string.
Saving Fastest Time -
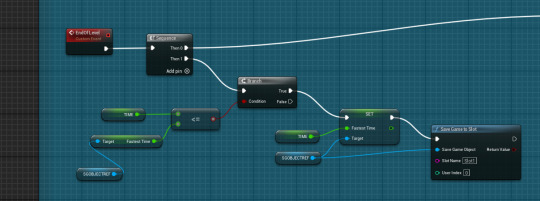
Next to be able to save the time I went into my 'SaveGame' blueprint and created a new variable to save the time.
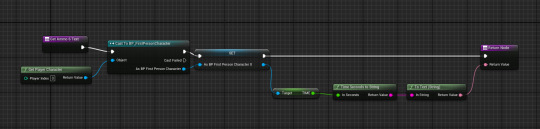
Back in the first person character I created a custom event for when you reach the end of the level which will check if the current time is faster than the previous time and if it is then it will replace that instead.
The plan is for this custom event to be triggered by the tic tac pot at the end of the level when you collect it.
0 notes
Text
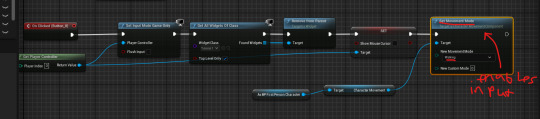
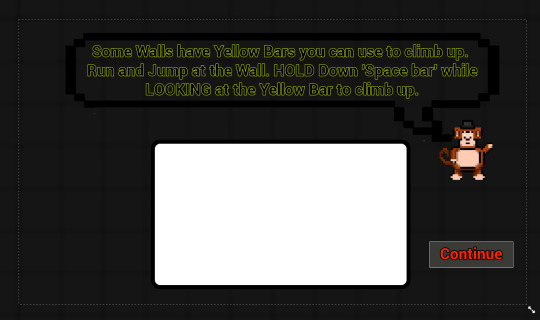
Tutorial Bots Fix
When doing some playtesting with my tutorial bot I noticed if I were to be walking towards the bot and tried to interact with it then it would open the screen but my character would just keep walking. To solve this I pulled in the character movement component and looked through what other options there were for stopping the character than just 'stop movement immediately',which only temporally works.
I found an option called 'disable movement' which did the treat perfectly. The only problem with it was that I couldn't find an 'enable movement' node so I did some research on the Unreal Forums. I quickly found that I have to re enable the character movement with a node called 'set movement mode' which I had to change to 'walking'.

This bit re enable the movement when you close down the tutorial widget:
Side Note
I also changed the press 'E' prompt to only become visible if the overlap box which you use to interact with is over the tutorial bot. This was a smaller detail but I think it cleared up some confusion on when the player can press 'E' to interact.

0 notes
Text
Respawn Locations (If you fall off)
For today I wanted to set up a respawn system for my game as I felt it would get quite annoying if you fell of the map and it just reopened the level. I split how the game does this up into 3 Parts. The first part is the death box you hit below you which is going to have to know, which checkpoint you were last at and to then trigger an event which will teleport you back to that location. The next part are the checkpoints these will be spread around the map and determine where you will be teleported back to. The final part is the code that will handle knowing where and when to teleport the player back to.
Here is a video below of me showing how I did this (Sorry Chris):
Evaluation: I feel that this is a big improvement over my previous projects respawning system as it required far less actors and overall I think is a more efficient way of setting up checkpoints if I were to keep developing this game later on.
0 notes
Text
Game Load Up screen
I wasnt happy with the loading up screen being the exact same as the loading screen so I looked up on YouTube 'Loading up screen' and came across this video:
youtube
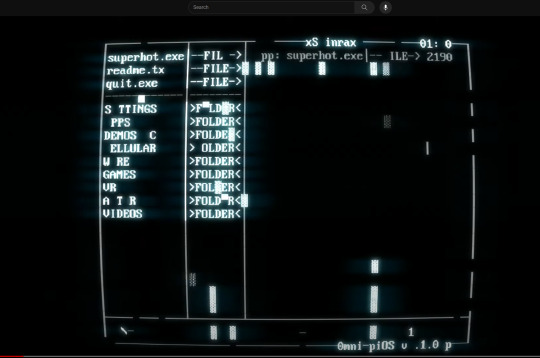
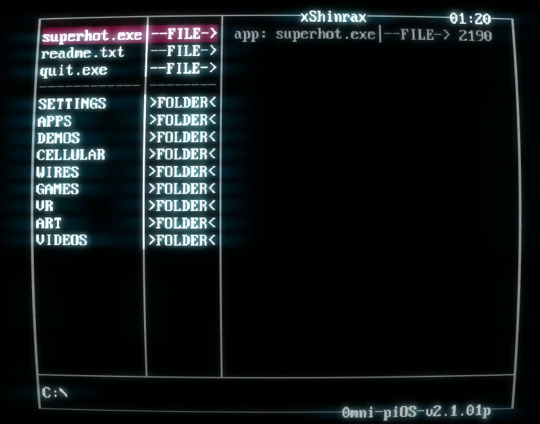
I really liked this as it reminded me a lot of when you boot up or go through the menu screen of Super Hot.
youtube
0 notes
Text
Loading Screen
I started today off by attempting to find if the current level had loaded. My thinking behind this was that if the level had loaded it would them remove the loading screen from the viewport. This proved to be a lot harder with as the methods Id found through unreal forum posts didn't seem to work. I found that lots of other forum posts had been to ask about how to do this but in C++.
I originally tried the first method on there which was to set it all up in a macro but I couldn't loop check the macro anymore due to unreal updates since the time of the post.
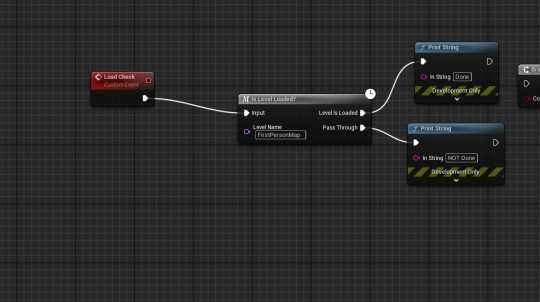
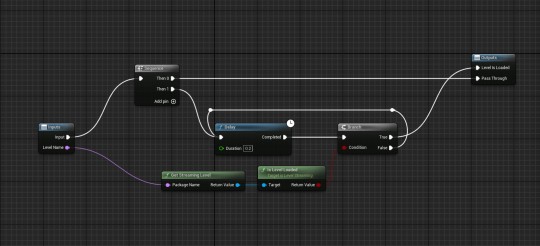
After that I tried a couple of more things like trying a similar bit of code in the level blueprint. This didn't work either and kept telling me that the level wasn't loaded.
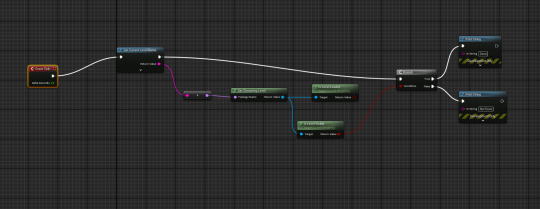
After that I looked up some YouTube Videos and came across this one which uses an external plugin called 'Async Loading Screen'. This is a free plugin which allows you to easily configure a Loading Screen System in the project settings, and automatically add a Loading Screen whenever you open a new level, without Level Streaming (My issue previously).
youtube
Before the tutorial I recorded a looping video which could be used with the plugin on the loading screen of the whole map in real time. Here is what the loading screens look like:
0 notes
Text
Goals for today
Setup Loading Screen
Setup Timer to work with save
Make Tic Tac Cartridge End Level
Respawn Checkpoints
0 notes
Text
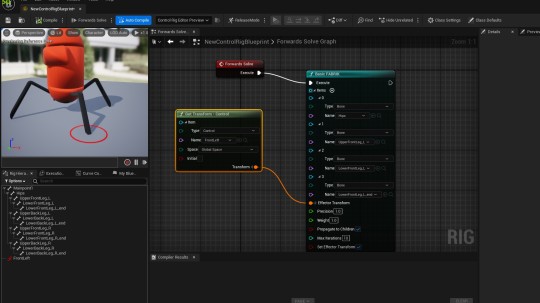
Enemies with Procedural Animations (Failure)
Since this morning I had been following a tutorial series on creating a spider like creature in Unreal with procedural animations. All had been going mostly fine, I had learnt about rigging in blender and exporting it into unreal with an FBX file. When it came to setting it up in blueprints I was definitely struggling to keep up and I am unsure if I missed something vital. In short I created a vector variable, plugged it in and it then crashed my Unreal. When I try and relaunch the project it will now crash every single time. So that version of the project is 100% Dead. Luckily I have a backup from yesterday and thankfully today I hadn't touched the project besides trying to add an enemy character.
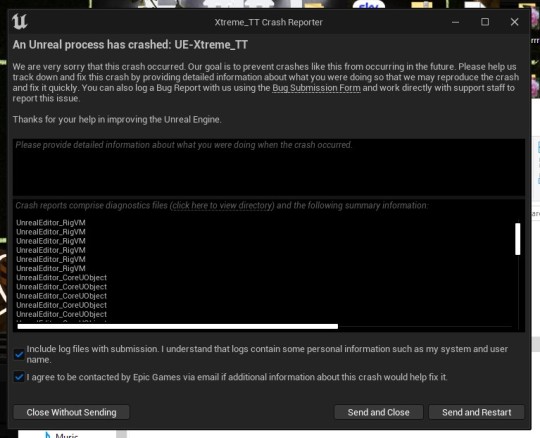
Here is the process of me making the enemy below:
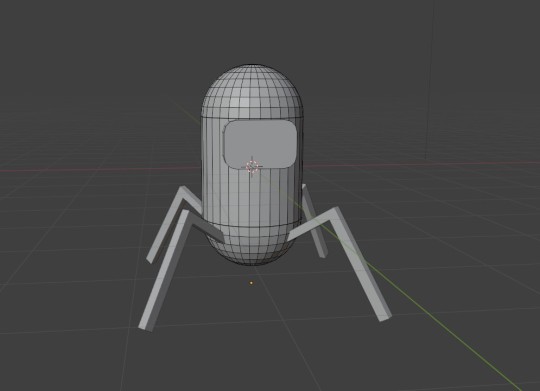
Colours + Rigging:
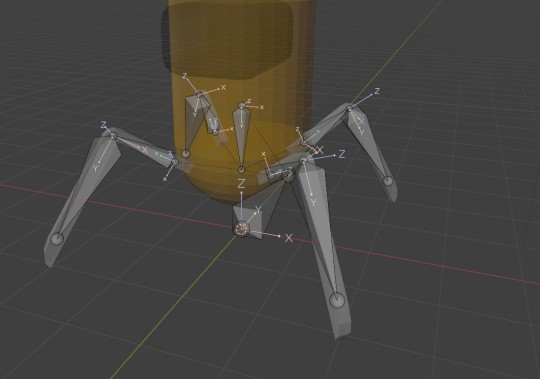
Imported into Unreal:
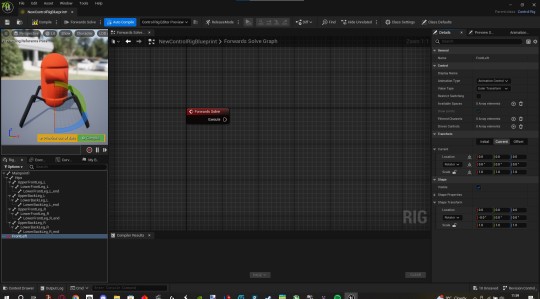
Starting to setup the leg orientations:
and that is all I have to show for my work unfortunately.
Evaluation: This has definitely a big lesson I learnt today about creating project backups even more frequently as I might have been to salvage some of the lost work from the last 4 Hours. On a more positive side of things I have learnt a lot about rigging with a help from a couple of other videos (sources will be below).
Sources:
Exporting Models to Unreal:
youtube
Setting up a rig:
youtube
Procedural Animations in Unreal:
youtube
0 notes
Text
Todays Goals:
Today I am looking into creating a Tic Tac enemy that has Procedural animations. I found a two part video on YouTube for how to do this going from blender then into Unreal. They're quite long videos so I feel that its going to take most of today to setup. However If I do have time then I will start work on making the enemies section of the tutorial level.
Videos:
youtube
youtube
0 notes
Text
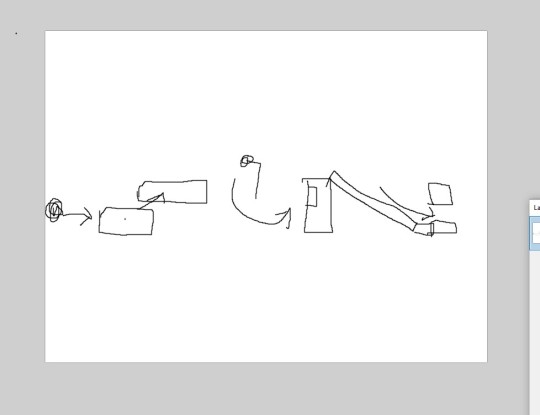
The Past Two Days of level Building
For the past couple of days have been spent building out my tutorial level for my game. I wanted the level to be very beginner friendly breaking down all the mechanics individually for the player to practice along with it still being fun for people who have already played the game before (Speed running the level). The final part of the level I wanted it to combine everything you had learnt from the previous sections but combined into one fluid combo. I drew a diagram for how I wanted this section to look in Paint.net:
I used the pre-existing testing level I already had made and expanded on the idea.
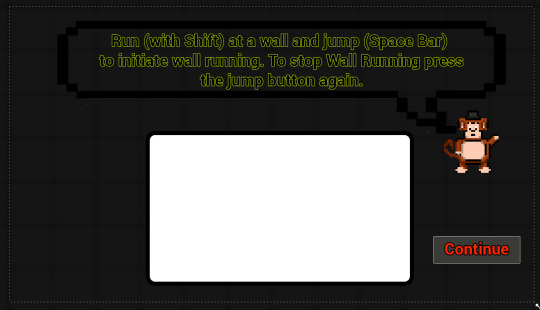
The first section I wanted to start easy which goes over wall running. I tried to make it as easy to understand and follow along with as possible. Here is an annotated screenshot of me breaking it down with how I laid this section out:
Tutorial Bot Screen:
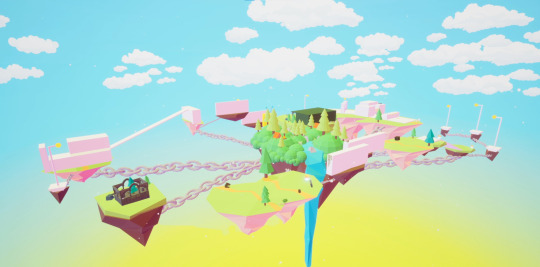
I also used what I had seen from my little bit of research into Skylanders with how I am connecting all my islands up with chains. The main islands have bigger chains which all connect to the central island whereas the mini islands connect with small chains to the host island.
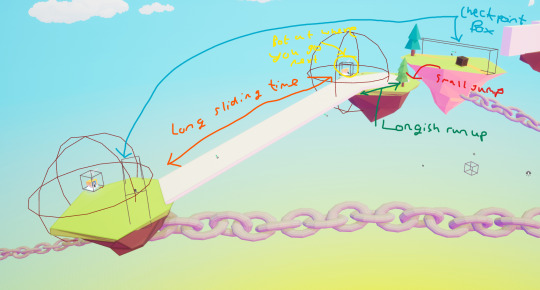
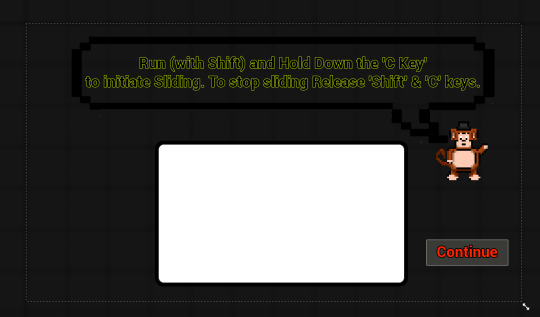
The next part was the sliding. I aimed to give the player enough room to and time to be able to get a run up and press the buttons necessary to star the sliding. Here is an annotated screenshot of me breaking it down with how I laid this section out:
Tutorial Bot Screen:
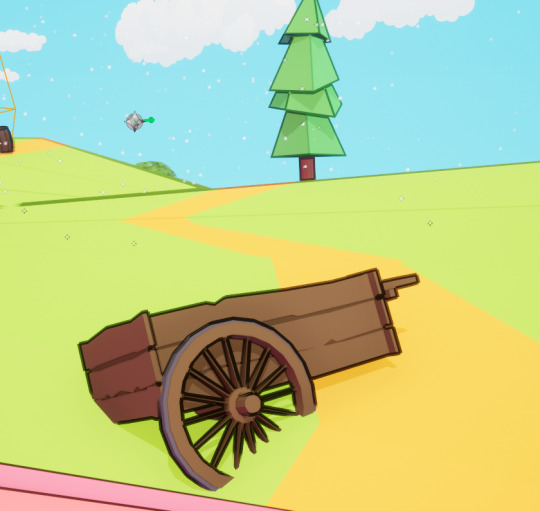
*NOTE* I have tried to place small decoration fillers such as trees, rocks, vines etc. which are aesthetically nice but don't get in the way of the player.

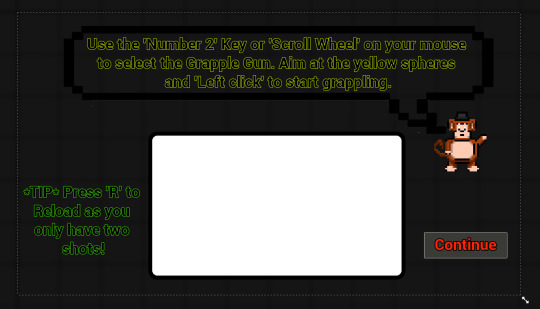
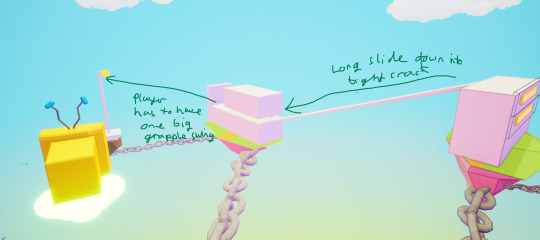
The Next part of the level I wanted to introduce the player to the inventory system partially along with also removing that comfort zone of being on land mostly forcing them to grapple. Here is an annotated screenshot of me breaking it down with how I laid this section out:
Tutorial Bot Screen:
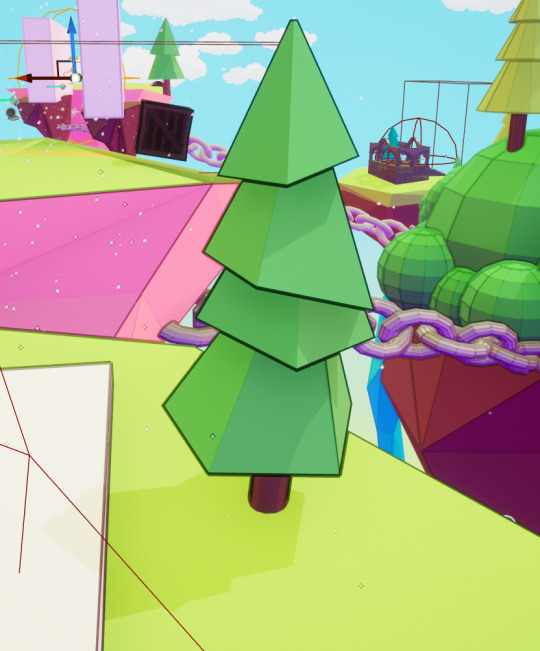
After this we move onto a much simple section for the player which shows them climbing. I tried to keep it simple with a smallish wall which I thought was relatively easy to get over. Here is an annotated screenshot of me breaking it down with how I laid this section out:
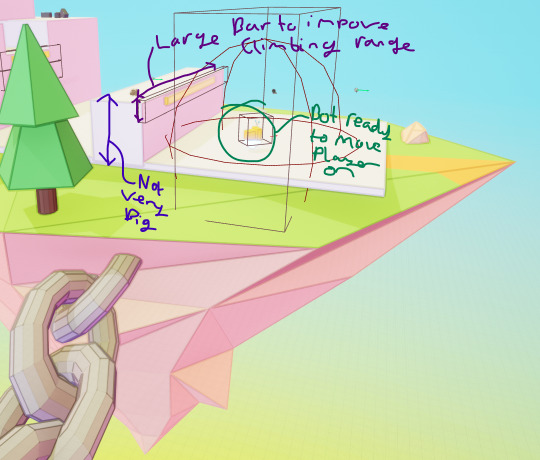
Tutorial Bot Screen:
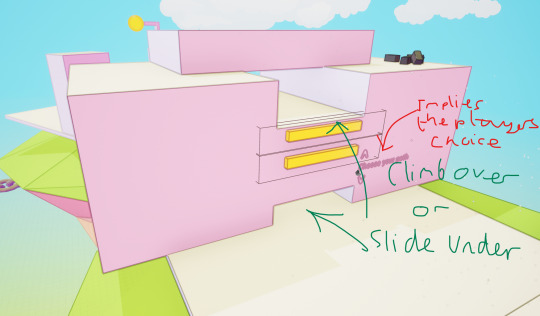
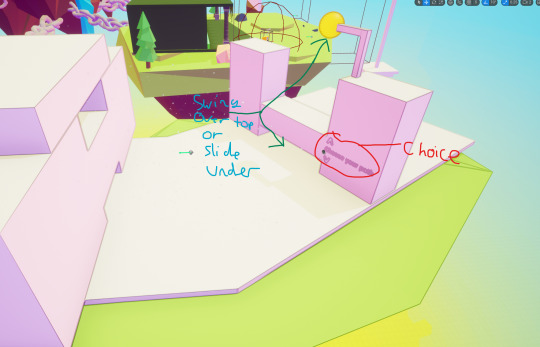
Moving away from the movement tutorials part, I wanted this next part of the games level to give the player a choice of what techniques they'd learnt and use them smoothly. This adds a segment in-between tutorials to give the player a break from the information dump. Here is an annotated screenshot of me breaking it down with how I laid this section out:
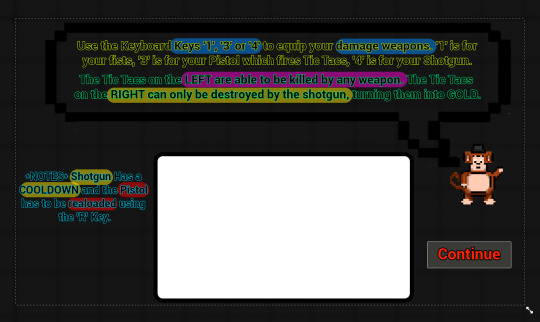
After this I made what I would call a 'break' (kinda) section for the player from lots of the fast movements previously seen. This next section I wanted to introduce the player to the two enemy types that they would encounter while also explaining/implying the weapons weaknesses/strengths through the tutorial widget. Here is an annotated screenshot of me breaking it down with how I laid this section out:
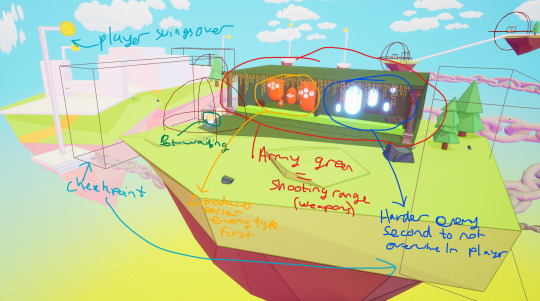
Tutorial Bot Screen (for this screen I decided to highlight key points and colour code them as I felt it was a lot of information for someone to read and take on in one go):
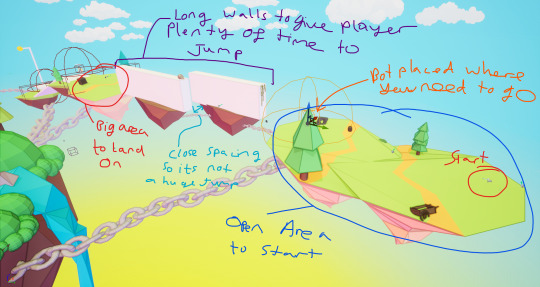
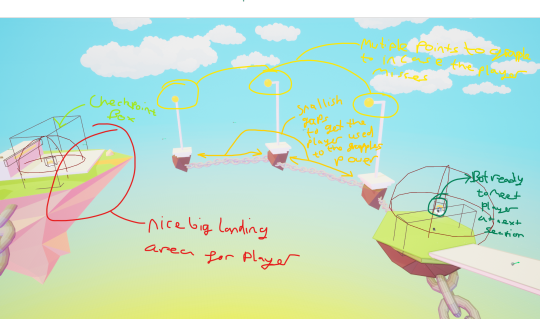
Now we move onto the final part of my level. As previously mentioned I created a mini plan in paint for how I wanted this final section to work. It needed to combine all the previous learnt skills and challenge the player at the same time. Here is an annotated screenshot of me breaking it down with how I laid this section out:

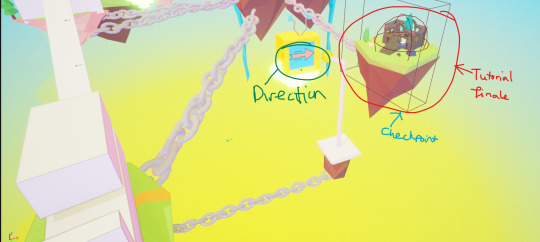
Now for the finale island, this is where the game concludes. I wanted to make this island feel very unique to the others, so I decided to make a shrine type thing (with the free assets I got from the pack I downloaded) where the player will collect the tic tac pot and save their fastest time. Here is an annotated screenshot of me breaking it down with how I laid this section out:
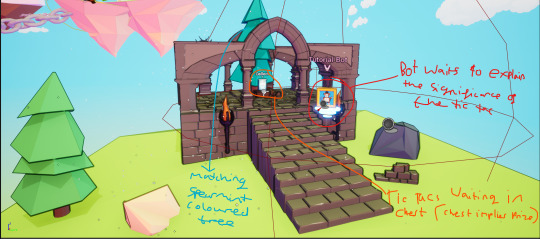
Tutorial Bot Screen (Tells you how to collect it and what the tic tac pots mean/do):
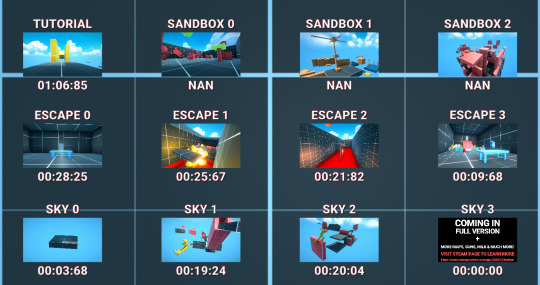
When the pot is collected you will get this screen which thanks you for playing, gives credit to some big inspiration for features in the game and tells your what time you got on your run.
Entire Map View:
Evaluation:
Overall I really like the levels entire design, I think it follows a solid knowledge and skill development path that gradually gets more challenging as the level progresses. If I could change anything it would to be simply make it longer as I love what I have made here so much.
0 notes