
escaping-this-shell
Escaping This Shell
Weight loss journey & motivation
[Height:5'6] [SW: 215] [CW:140] [GW: 130?]
260 posts
Don't wanna be here? Send us removal request.
Last Seen Blogs

psycheapuleius
Mind and Sensation

mirywyth
Dreams
ericksontackleandfishingblo-blog
Erickson Tackle & Fishing Blog


Text
just made these and they are delicious!! its such a good filling low cal meal srsly !!!!
the breakdown:
brussel sprouts 35 (depending on how much you make)
canola oil 40
garlic salt 0
sauce: 1 tbsp ketchup 20 + 1 tbsp mayo 35 (i didnt have the sauce she had)
total 130
39 notes
·
View notes
Text

125 calorie mint chocolate "truffles", as an added bonus, they have 20 g protein to keep you full
I eat these like every night for dessert!
you'll need: 1 tbsp peanut butter powder (35 cals), 2 tbsp protein powder (I use Anthony's Pea Protein, 70 cals), 2 tbsp coca powder (20 cals), a few drops of peppermint extract, and no-cal sweetener to taste
all you have to do is mix all the ingredients together and add water until it just starts holding together. form them into balls and dust with a little coca powder! easy peasy!
150 notes
·
View notes
Text

Picture via pinterest (dm for credit)
175 calorie pizza zucchini
1 zucchini, sliced - 30 calories
Salt to taste
1/3 cup tomato sauce - 60 calories
1/4 cup mozerella cheese - 85 calories
Preheat oven to 400 degrees.
Slice zucchini, and use a paper towel to lightly dry slices. Sprinkle with salt.
Arrange on a non stick (or sprayed) cooking sheet. Top zucchini slices with 1 tsp of sauce and a sprinkle of cheese (go easy on the sauce. Too much sauce will keep the zucchini soggy instead of crisping up in the oven.
Bake for 5-7 minutes, until cheese it melted.
Turn oven to broil. Broil zucchini until cheese is lightly brown (keep an eye on it, it browns pretty fast and you don't want it to burn)
1K notes
·
View notes
Text

Egg White Veggie Tamagoyaki 🥚🌸
(a.k.a. Gyeran Mari)
Directions
With a blender or food processor, blend your carrots, zucchini, and onion to chunky bits.
Add your egg whites, hondashi, and sugar (optional). *For salt, a good rule of thumb for seasoning eggs is 1/8 tsp per egg. 3 TBS of egg whites = 1 egg. For this recipe, use 1/4 tsp of salt.
Give your mixture another 3-5 pulses until fully combined.
Heat your Tamagoyaki pan or non-stick pan to medium heat. ( Rectangle pan is best for shape but you can still achieve the rolled omelette with a circle nonstick pan)
Spray the pan with a quick oil spray of your choice.
Add a small layer of the mixture to your pan and reduce the heat to medium-low.
When your layer is 90% set, carefully roll from one side to the other. (This will take some practice)
Gently push back the first rolled layer to the side you started from and add another layer of mixture. Allow some of the mixture to go under your first layer.
Repeat steps 6-8 until you are out of the mixture.
Let your rolled omelette cook for another 30 seconds on each side then turn off heat.
Let it sit on a plate for two minutes before cutting in. Enjoy!
408 notes
·
View notes
Text
Need to get this
OKAY Y’ALL ARE SLEEPING ON THIS SHIT!!!
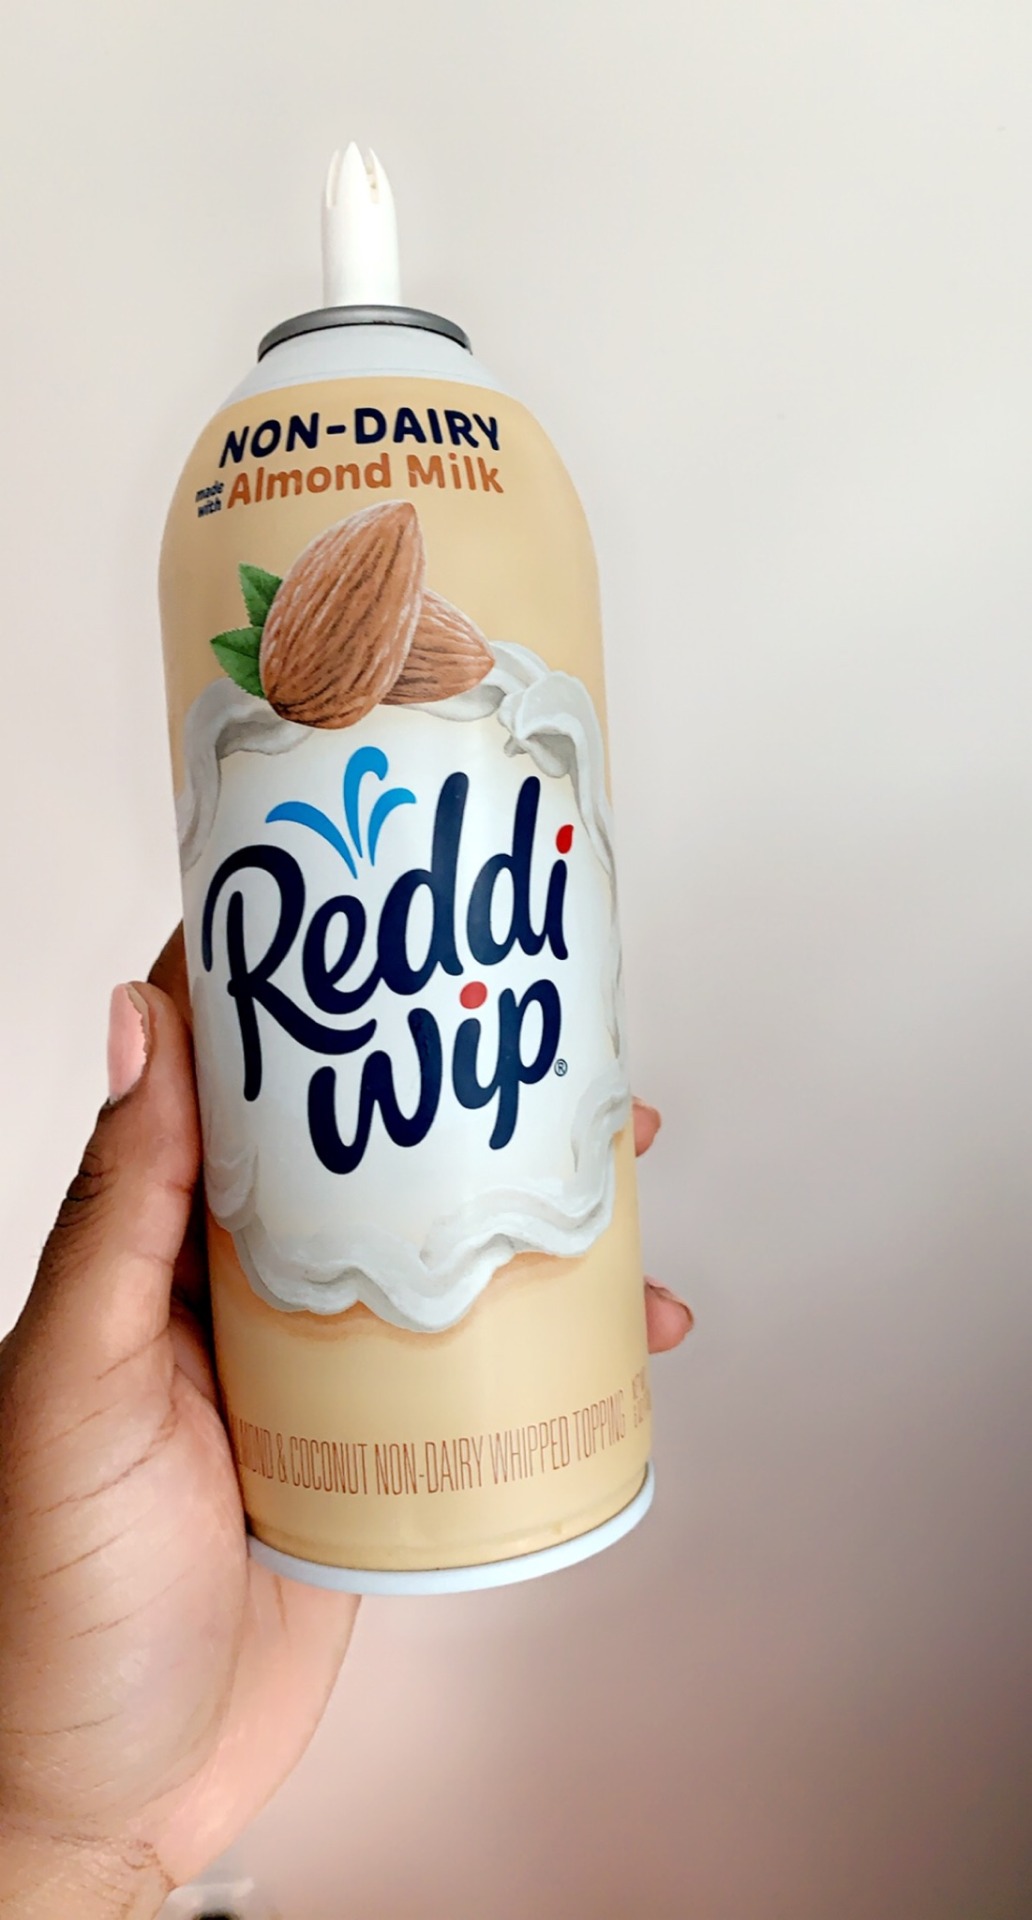
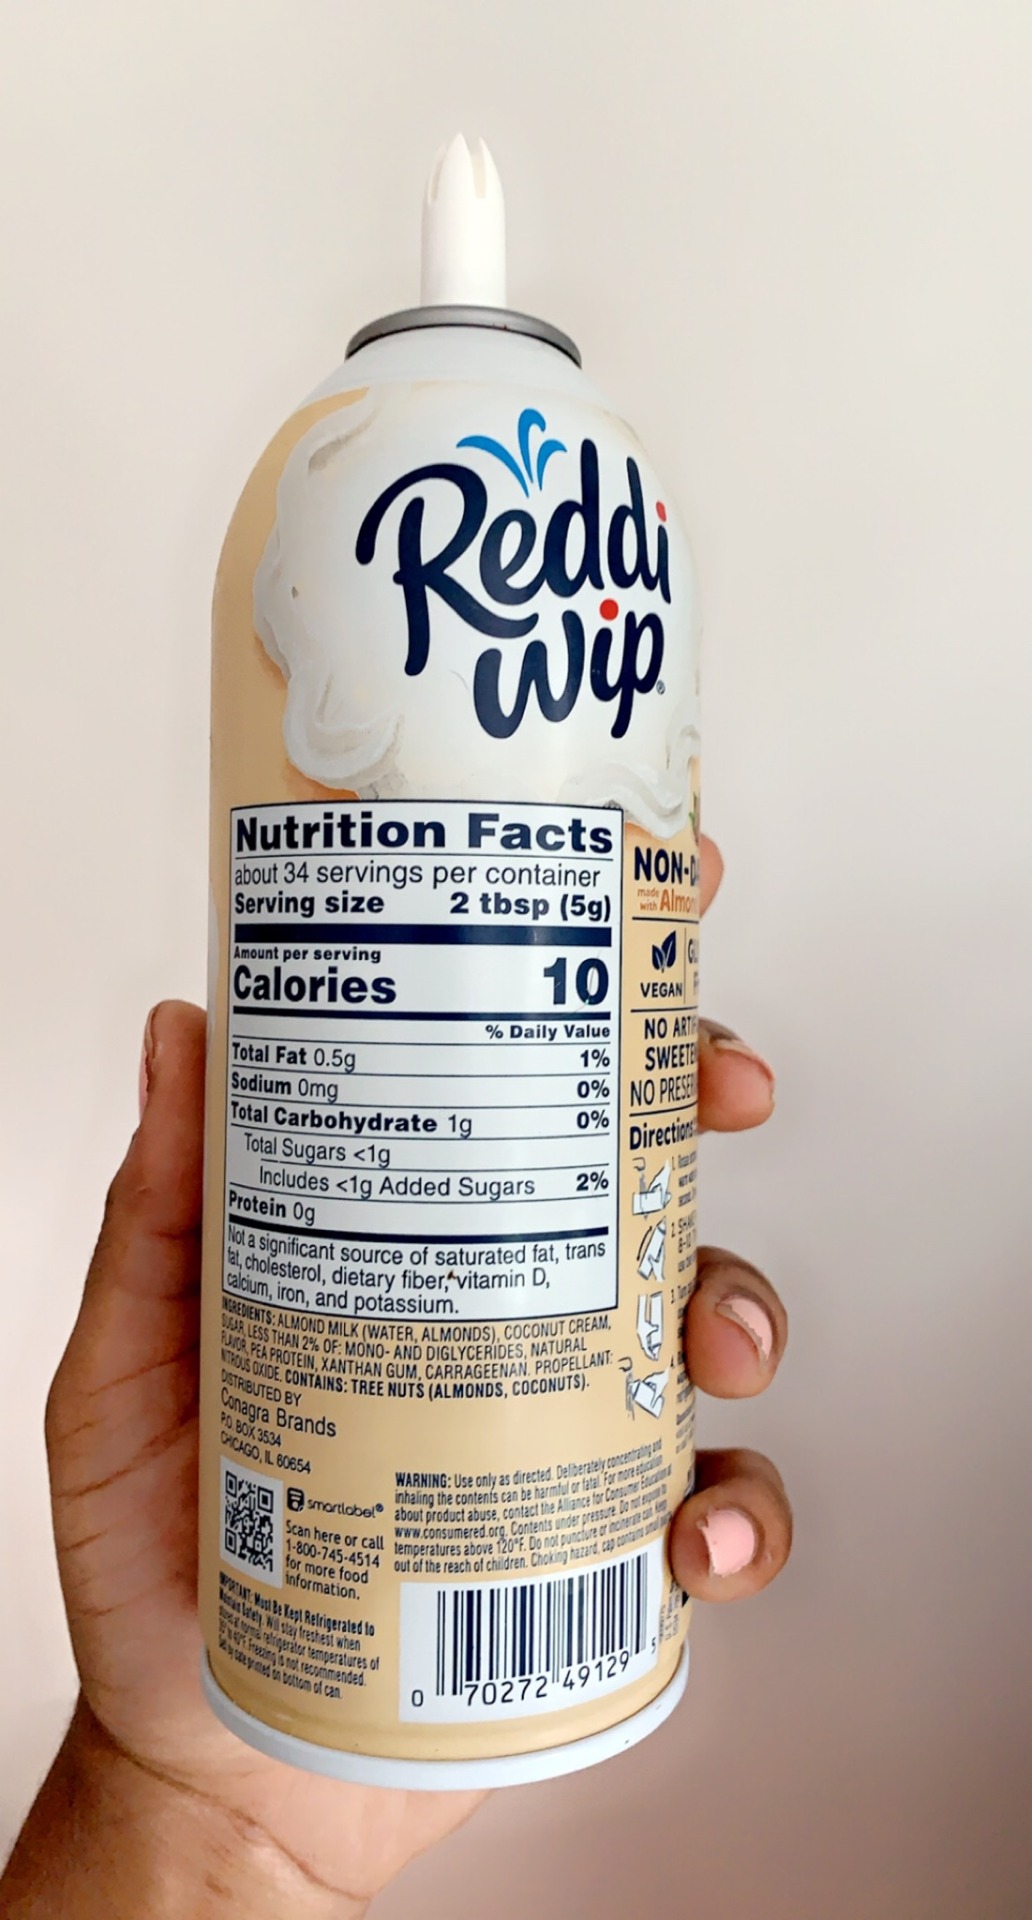
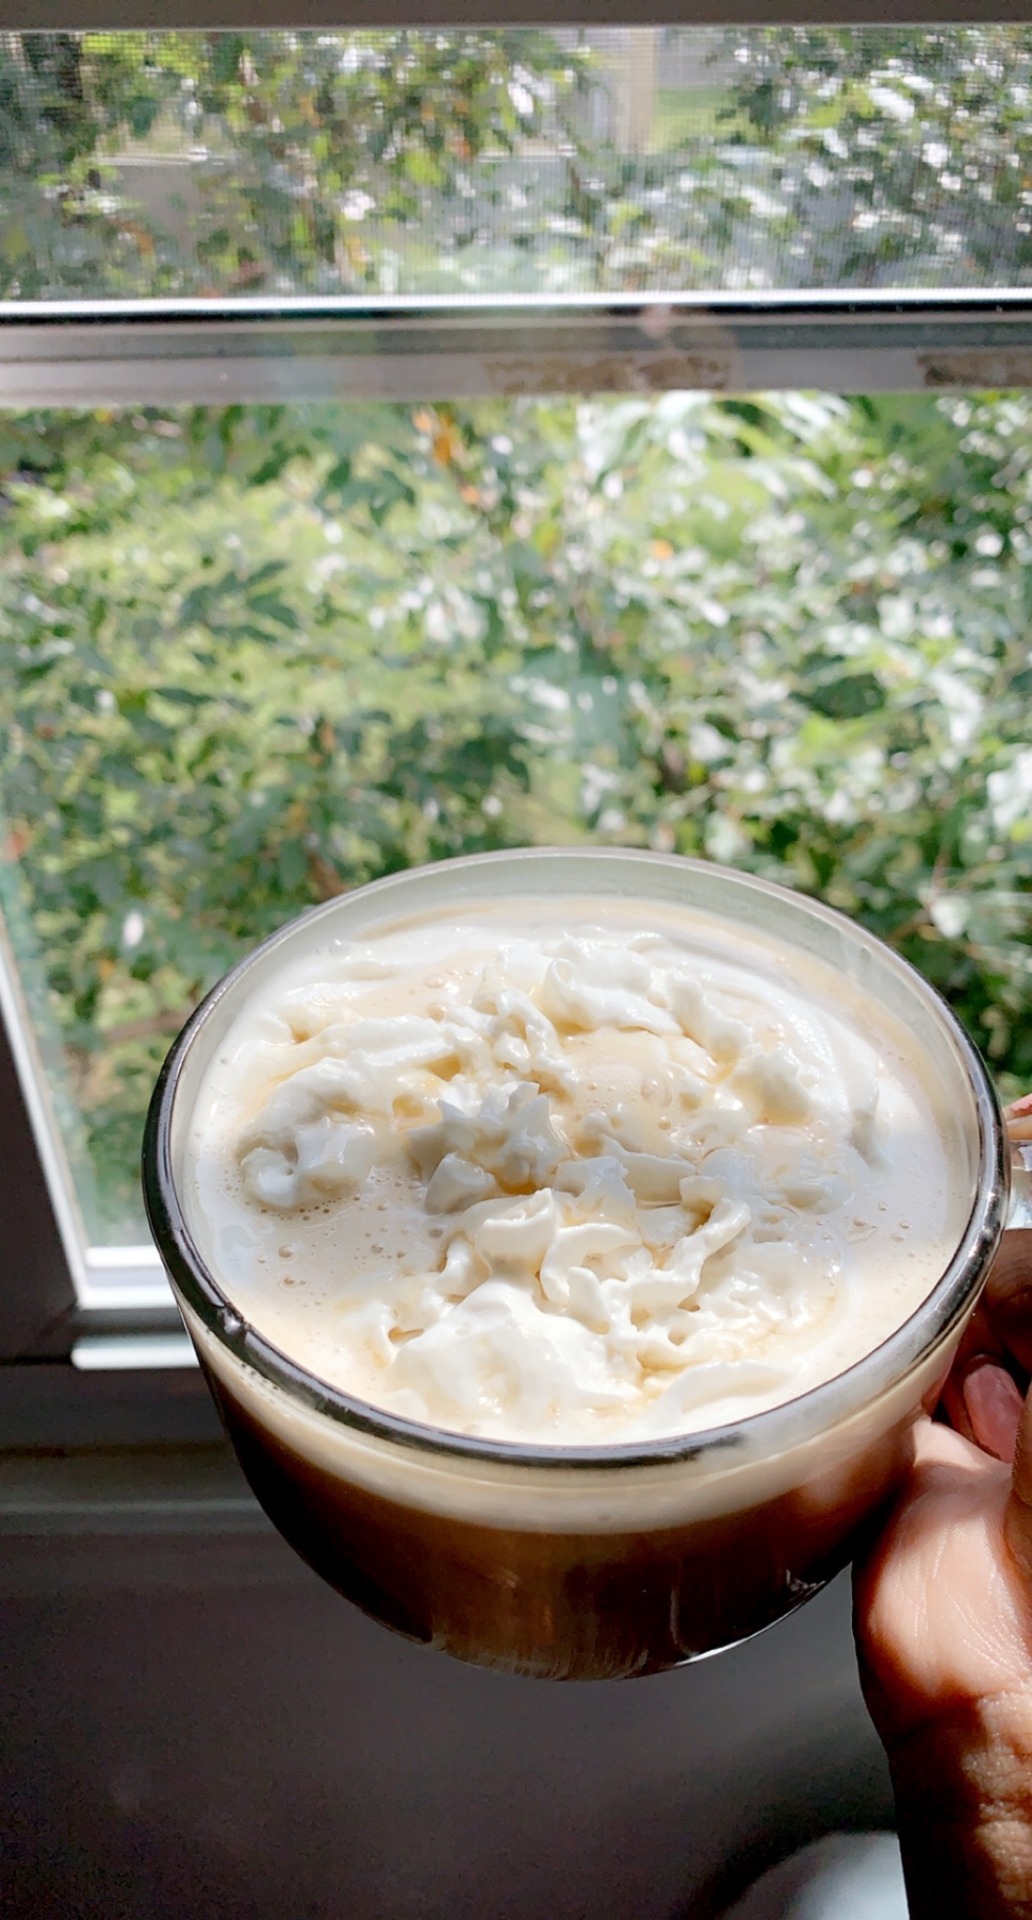
I made myself a caramel coffee with whipped cream. And I was like THIS SHIT, THIS WHITE SHIT RIGHT HERE?! IS GOING TO SET ME BACK JUST BECAUSE I WANT SOMETHING ✨AESTHETICALLY PLEASING ✨. So I checked the back to make sure I knew the damage I was doing and BAM! All my worries disappeared. The whole canister is 340 calories. That’s technically a whole day of snacks(snacks to me are 50-350kcal). It’s vegan, so no sluggish feeling that’s associated with dairy, and it’s super light and delicious! It’s roughly $3.50-$4.00 so I consider that pretty affordable 🤷🏾♀️. So if you fuck up the whole thing, just know, you’re going to be okay☺️💕✨
5K notes
·
View notes
Text
My favorite low-cal substitutes and options! All under 50 calories.
Feel free to add to this! I didn’t include everything out there :)
Drinks 🧋
0 cal - herbal tea 🫖
0 cal - green tea 🍵
0 cal - water flavoring like Mio
0 cal - Diet Coke 🥤
0 cal - pretty much any diet soda
2 cal - Black Coffee ☕️
2 cal - black tea
10 cal - monster ultra (I like paradise and fiesta especially)
20 cal - other sugar free energy drinks
39 cal - shot of sake 🍶
Breakfast (snacks, smoothies, etc)
25 cal - 1 large egg white 🍳
32 cal - 100g Strawberries (~50 cal per cup) 🍓
40 cal - 1/4 c low fat cottage cheese 🦴
42 cal - 1 kiwi 🥝
42 cal - 84 g (1 thick slice) pineapple 🍍
47 cal - 154g (1 c) watermelon 🍉
50 cal - 1/2 grapefruit 🍊
50 cal - 3 oz plain Greek yoghurt
50 cal - 2 tbsp serving powdered peanut butter 🥜
50 cal - 4 oz (120ml) low fat milk 🥛
Meals (mix and match this shit!) 🍴
0-10 cal - serving shirataki noodles 🍜
0-20cal - Broth 🐥
5 cal - 1 c lettuce 🥬
6 cal - 28g (1 oz) pickled onion (do this yourself! So easy! So good on everything) 🧅
7 cal - 1 c spinach 🥗
16 cal - 70g (1 c sliced) mushrooms
17 cal - 1/2 c kale
20 cal - 1 c zucchini 🥒
20 cal - 82g (1 c. cubed) eggplant 🍆
21 cal - 1 tbsp parmesan cheese 🧀
25 cal - whole tomato 🍅
25 - 148g (1 med) bell Pepper 🫑
30 cal - 78g (1 med) Carrot 🥕
30 cal - 116g (1 c) pumpkin
30-40 cal - 1/2 pack or can tuna 🐟
35 cal - 1/2 serving (1.5 oz) cod 🐠
36 cal - 1 c miso soup 🍲
37 cal - 40g shelled edamame
38 cal - 1 c Brussels sprouts
39 cal - 1/2 hard or soft boiled egg 🥚
39 cal - 1/2 serving (42g) halibut (white fish) 🐟
40 cal - 1 c arugula 🥗
40 cal - 186g (10 spears) asparagus
45 cal - 148g (1 med) broccoli 🥦
45 cal - 6 med raw oysters 🦪
45 cal - 3 oz/85g lite tofu
50 cal - 100g (1/2 small-med) sweet potato 🍠
50 cal - 1/2 corn cob 🌽
50 cal - 50g shrimp 🍤
Snacks 🍬
0-8 cal - pickles 🥒
5-10 cal - 1 tbsp salsa
17 cal - 1 passion fruit (18g)
23 cal - 1 tbsp hummus
25 - serving seaweed snack
25 - 1 med bell Pepper 🫑
30 cal - 22 Organic Yogis (okay technically this is baby food but it’s just freeze dried Greek yoghurt and fruit so shut up it’s good) 🍓🍌
30 cal - 300g/1 Cucumber 🥒
35 cal - 1 cutie (small orange/tangerine) 🍊
40 cal - 1 light babybel 🧀
47 cal - 1.5 c Air popped popcorn 🍿
50 cal - 6 oven-baked parm crisps 🧀
50 cal - >1/2 c unsweetened apple sauce 🍎
50 cal - 3 dried apricots 🍑
50 cal - 15 pistachios 🌰🥜
Dessert 🎂
0 cal - Diet Root Beer (I don’t care that it’s a drink! It’s so insanely sweet and it kicks the ass of my cravings. Also, my list my rules. Sue me) 🍺
5 cal - serving Sugar Free Jello 🍮
5 cal - 1 tbsp Hershey’s Sugar Free Syrup 🍫
~14 cal - WHOLE BOTTLE Too Tarts sweet sour spray candy (so a few sprays is just 0-3 cal)
20 cal - 2 tbsp Frozen Cool Whip Lite (seriously, eat this frozen) 🍨
20-50 cal - baked fruit (bake some peaches, apples, etc. and mix with Splenda, cinnamon, etc.) 🍑🍎
23 cal - fun size sweet tart pack
25 cal - no sugar added small outshine popsicles 🍧
25 cal - 1 pack smarties (American) 🍬
35 cal - swiss miss reduced calorie hot chocolate ☕️🍫
40 cal - small Outshine Popsicles 
40 cal - 5 sugar free hard candies 🍬
42 cal - 1 Hershey assorted mini 🍫
43 cal - fat free green yoghurt with sugar-free jam 🍧
46 cal - 2 regular marshmallows
48 - 8 mini Cinnamon Sugar skinny pop Rice Cakes
50 cal - 1-2 squares dark chocolate 🍫
50 cal - 2 Dum dum suckers 🍭
50 cal - ~25 sugar free jelly beans
50 cal - halo top pops (lots of flavors) 🍦
Miscellaneous
0-2 cal - any herb/spice 🌿
4 cal - 1 clove garlic 🧄
5 cal - 1 stick sugar free gum
50 cal - 1/4 container White cheddar seasoning (2 cal per 1/4 tsp) 🧀🧂
50 cal - 10 sugar free mints 🌱
Disclaimer: actual calorie counts may vary depending on serving, brand, food tracker, etc.
16K notes
·
View notes
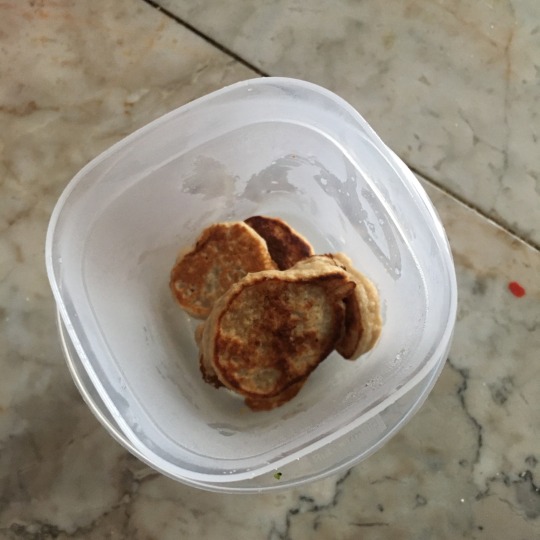
Text
choc chip pancakes (70 cals per piece!)
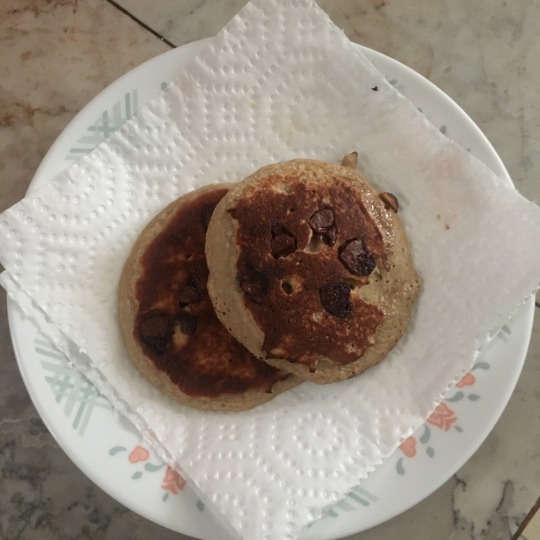
okay so i know this has a pretty high calorie count, but its sosososo yummy and it’s the best blender batter recipe i’ve tried.
ingredients:
1/4 cup of rolled oats (95 cals)
1 egg white (15 cals)
1/2 mashed banana (50 cals)
1/2 scoop of vanilla protein powder (38 cals)*
1 tsp choc chips (23 cals)
a sliver of butter (10 cals)*
The protein powder I use is the vannila bean flavored one from Orgain! It’s the only protein powder I’ve ever tried and I never felt the need to try others bc it tastes really good (even with just milk!)
Also, pls only use as much butter as you need. For me, I used just enough to have a thin layer of butter coating the pan I used. Butter has so much calories (100 cals per tbs!!) and I’d rather eat a snack w those calories than have it be wasted on butter!
instructions:
in a blender, add in the egg white, oats, protein powder, and mashed banana.
blend it until a smooth batter is formed. make sure to scrape the edges so everything is incorporated (make sure there aren’t any lumps or else the pancakes will be gritty!)
in a pan on high heat, add in butter and make sure the pan is entirely coated (this is so that the pancake doesn’t stick)
once butter starts to sizzle, pour in 1/8 cup of the pancake batter. add in half of the choc chips on top.
after 2-3 mins, lift the edge of the pancake to check if the bottom is golden brown. if it is, flip the pancake and cook the other side for 2-3 mins as well.
pour in another 1/8 cup of pancake batter on the pan and repeat the previous step.
plate the pancakes!!
after making the two pancakes, i saw that there was still some batter stuck to the bottom of my blender so i made tiny pancake bites with them to snack on. i’d say there was about 1/3 of the overall batter left so i guess the total cals for it would be 70 cals as well. however, i wasn’t able to scrape off all the batter from the blender so i’d say the pancake bites are right around 50 cals?
anyways, i just wanted to share this recipe in case anyone wants something sweet for breakfast (or for dessert tbh) that isn’t over 100 calories!
1K notes
·
View notes
Text
starbucks under/around 100 calories
ask for any sugar free syrups to make a vanilla latte, caramel macchiato, etc., they are like 0.1 calories per pump
syrups that are usually available sugar free: vanilla, hazelnut, caramel, peppermint, cinnamon dolce, mocha, gingerbread (maybe more? depends on where you live)
each drink listed is made with almond milk unless specified otherwise
café latte - tall (74), grande (92)
latte macchiato - tall (55), grande (78), venti (102)
espresso macchiato - solo (28), dopio (62)
cappuccino - tall (67), grande (74), venti (104)
café misto - tall (33), grande (48), venti (64)
flat white - short (47)
vanilla bean macchiato - short (69), tall (114)
roasted hazelnut macchiato - short (67), tall (113)
golden honey macchiato - short (72), tall (105)
matcha tea latte - tall (73), grande (96)
rooibos latte - tall (67), grande (86), venti (112)
chai tea latte - short (92)
cold brew latte - tall (40), grande (53), venti (63)
nitro cold brew with cold foam (skimmed milk) - regular (26), caramel (28)
iced café latte - tall (54), grande (65), venti (78)
iced cappuccino - tall (58), grande (70), venti (83)
iced cappuccino with cold foam (skimmed milk) - tall (57), grande (60), venti (93)
iced matcha tea - tall (53), grande (68), venti (80)
iced rooibos latte - tall (46), grande (59), venti (67)
coffee light frappuccino (skimmed milk) - tall (83)
mocha light frappuccino (skimmed milk) - tall (91)
caramel light frappuccino (skimmed milk) - tall (93)
espresso light frappuccino (skimmed milk) - tall (79), grande (112)
white mocha light frappuccino (skimmed milk) - tall (99)
all unsweetened teas are 0 cal, the plain coffee or cold brew is around 2-10 cal - add 0 cal sweetener if you want to
basically all of the sweetened iced teas are under 100 cal for venti though - if you can’t stand artificial sweeteners
I hope this helps - I used to avoid all social interactions that involved food/drinks but starbucks has basically made me kinda social again🙌🏼
2K notes
·
View notes
Text
20 Reasons I Want to Lose Weight
1. To be less insecure about my appearance.
2. So that I can wear all of the cute outfits I save on Pinterest.
3. So I won’t be as self-concious when my boyfriend wants to be intimate.
4. So when he wants to pick me up or give me piggy back rides, I won’t panic and be afraid he’ll realize how big I am.
5. So I can finally get that belly piercing and show it off proudly.
6. So that I, a born and raised California girl, can stop avoiding the beach and feel confident wearing a bathing suit.
7. So I can actually feel sexy in lingerie.
8. So that when I meet my boyfriends friends/family members, they all comment on how gorgeous I am.
9. So that I can shock everyone I know.
10. To no longer be the fat friend.
11. To not feel insecure and disgusting when I try on clothes at the mall with my skinny friends.
12. To make his jaw drop when I go back home.
13. So I can finally buy my first bikini.
14. To inspire my family.
15. So I won’t be embarrassed to tell people my size.
16. So my thighs don’t touch.
17: killer collarbones & hip bones.
18. To not feel ashamed of my body.
19. To stop hating myself when I eat.
20. To stop being self-concious when I go running by people.
21. So when my boyfriend and I finally go to a concert together, I won’t feel embarrassed when he puts me on his shoulders.
22. To have a great butt.
22. To be okay walking around my dorm/house in just shorts and a sports bra.
23. So when boyfriend tells me that I’m sexy and beautiful, I might believe him.
24. To feel comfortable when spooning.
25. To have confidence I never have.
358 notes
·
View notes
Text
My Reasons for Losing Weight
For My Health
To have better skin
So I don’t sweat profusely
So I can walk up a flight of stairs and not feel out of breath
So my back won’t hurt
So my knee won’t hurt
So my doctor will never say, “you really need to lose some weight” to me ever again
So I don’t have to worry about arthritis or other illnesses that accompany obesity
For Vanity
To feel better about myself
To look good in tight clothes
To be able to wear shorts in the summer
To be able to go into any store, and buy the clothes I like, not just the ones that fit
To not feel awkward about going clothes shopping or shoe shopping
To be able to order clothes from a catalogue without worrying if they will fit
To be able to wear something that doesn’t say PLUS on it
So my pants won’t wear out between my legs while the rest of them are still in good shape
So I can look in the mirror from the neck down and like what I see
So I can wear tight jeans
I want to wear underwear that looks sexy
So I can show off my legs
So I can go into public and not feel like people are judging me
So I can wear tops without worrying about the dents from my bra showing trough
So that my boobs stick out more than my stomach – not the other way around
For a Better Quality of Life
To be able to use a public toilets comfortably
I want to be able to read the scale by just looking down, straight down
So I don’t get those indents on my thighs from the arms of the chair I’m sitting in
So I can cross my legs
So I can get up from the floor in one smooth move and not a grab and hold on to something move
So I can sit on a bar stool and I’m actually sitting ON it, not on it and around it too
So a regular towel goes all the way around me
So my socks pull all the way up
So I can hug my knees to my chest again, and it’s comfortable
So I can fit into the cinema/stadium/airplane seats comfortably
So I can bend over comfortably to tie my shoes
For My Self-esteem
So I can go swimming without being self-conscious
So I don’t worry about chairs breaking
So I don’t have to ask for the additional seat belt on an airplane
So I can dance without being self-conscious
So I can go on rides at amusement parks again and not have to experience the embarrassment of having to get off because I don’t fit
So I don’t have to worry about the maximum weight before I using things
So I don’t feel awkward when people start talking about losing weight
So no one can ever call me “a big girl” ever again
So I’m not embarrassed to have my picture taken
So I can say my weight out loud
So furniture doesn’t groan when I sit on it, or wear out long before it should because I’m too heavy
5K notes
·
View notes
Text
The reasons why you should lose weight:
1. Your current clothes will hang beautifully on you.
2. You won’t worry about what other people will think of you.
3. You’re not gonna look at your friends jealously anymore.
4, You’ll be proud of yourself.
5. The first days will be hard for you, but then you’ll know you’re feeling easy.
6. Aren’t you going to be shy about going out.
7. All those who have insulted you/advised you will look at you with greed and envy.
8. Your skin and your body will feel fine.
9. You’re not gonna cry in the mirror anymore.
10. Elegant fingers.
11. Slim wrists.
12. Protruding clavicles.
13. Less food, less money.
14. You can pick out your own clothes in the little shops.
15. You will be proud to accept compliments about weight loss
437 notes
·
View notes
Text
Why I want to lose weight
• So I can finally be happy with what I look like
• So his hoodies actually look oversized on me
• So I am able to sit on his lap without worrying I will squish him
• So no one will ever tell me I need to lose weight ever again
• So I can fit into a size S / XS
• So I can read the scale without having a full breakdown
• So I am not ashamed to say my weight out loud
• So I can let him pick me up without worrying I will break his back
• So I can go swimming without being self-conscious
• So I’m able to go into any store, and buy the clothes I like, not just the ones that fit
• So I am able to wear shorts and dresses in the summer
• So I look good in tight clothing
• So I feel better about myself
• So I actually look good in lingerie
• So I can look at/take pictures of myself and not feel disgusting
• So I don’t feel ashamed of eating unhealthy food in front of people
• So I can finally start living life again.
• So my skin clears up
• So I am not the fat friend
• So I am not self conscious during sex
• So I don’t have to worry about my weight anymore
349 notes
·
View notes
Photo

It’s happened! I’ve finally hit my original ultimate goal weight, 140lbs down from 205lbs. Still not satisfied but so proud of myself 🙌🏻
7K notes
·
View notes
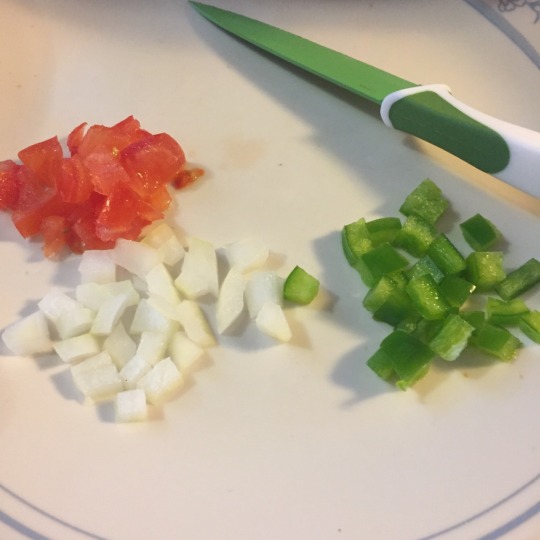
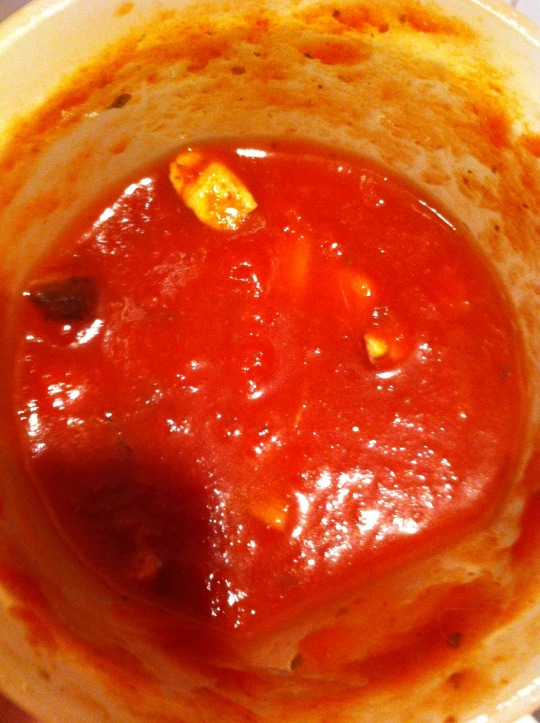
Text
🌸 100 calorie spaghetti 🌸

Hey guys c:
I thought I’d share my recipe for spaghetti in tomato sauce with you which I’m absolutely in love with. I can finally enjoy some spaghetti without regretti (I’m sorry).
I hope you enjoy it as well!
It makes one serving and it’s only 98 calories in total!

Ingredients
200g shirataki noodles (you can get those in Asian supermarkets) ~19 kcal
5g garlic ~7 kcal
70g onion ~20 kcal
200g diced tomatoes ~50 kcal
some seasoning (I added salt, pepper, chili, frozen basil & parsley) ~2 kcal
Instruction
Rinse your shirataki noodles and put them into a non-stick frying pan. Don’t add anything else yet, we want to dry the noodles a bit to get rid of their rubber-ish texture.
In the meantime you can dice the onions and mince the garlic.
When the noodles start to shrink, you can add the garlic and the onions. Stir it from time to time and be careful to not burn them!
I usually take half of the tomatoes and blend them with an immersion blender so the sauce will be a bit creamier. I then mix the diced tomatoes and the blended ones together and add the seasoning.
When the onions start to turn a bit yellow/brown-ish you can add the sauce.
Let it cook for about 4 minutes and you’re done!
I hope you guys enjoy the recipe as well! I also made a 100 calorie stir-fry recipe.

11K notes
·
View notes
Text
Figured I would share my favorite quick and easy safe food:

Microwave egg white omelettes!
All you gotta do is crack two egg whites in a mug

Add whatever veggies you want

And microwave for around 90 seconds or until done!

I love this. It’s so good and is only around 35 calories! Such a great staple for breakfast
17K notes
·
View notes
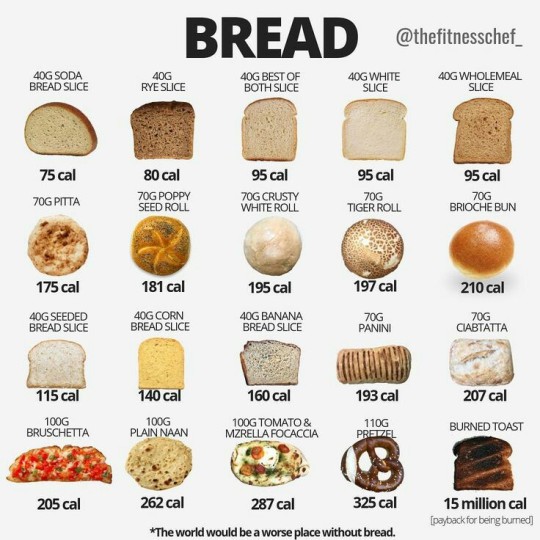
Text
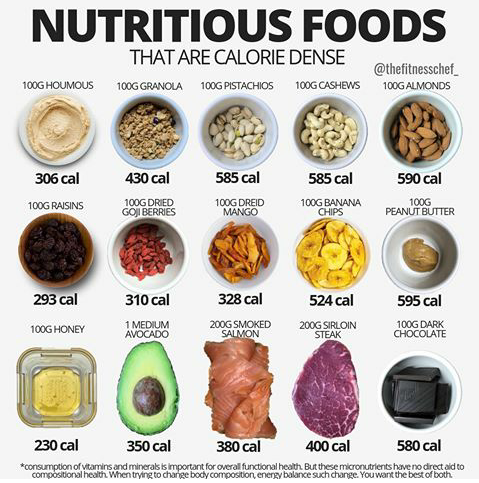
List of food w it’s calorie
Got this from thefitnesschef_ on IG, go ahead to their account for more.


34K notes
·
View notes
Photo
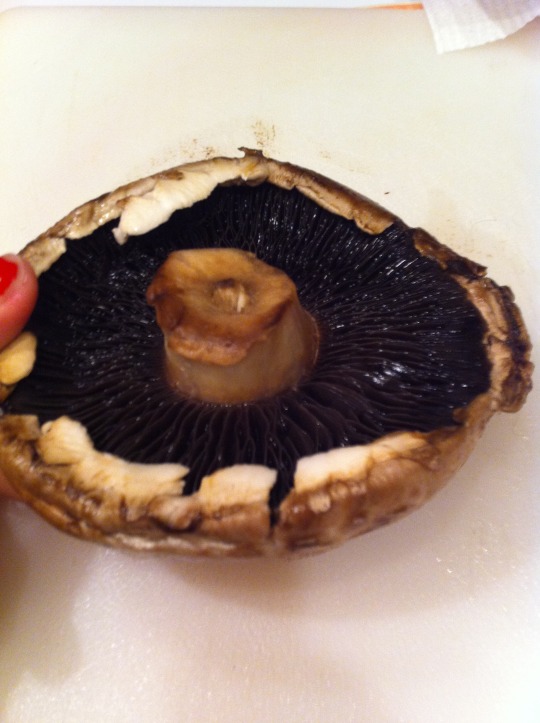


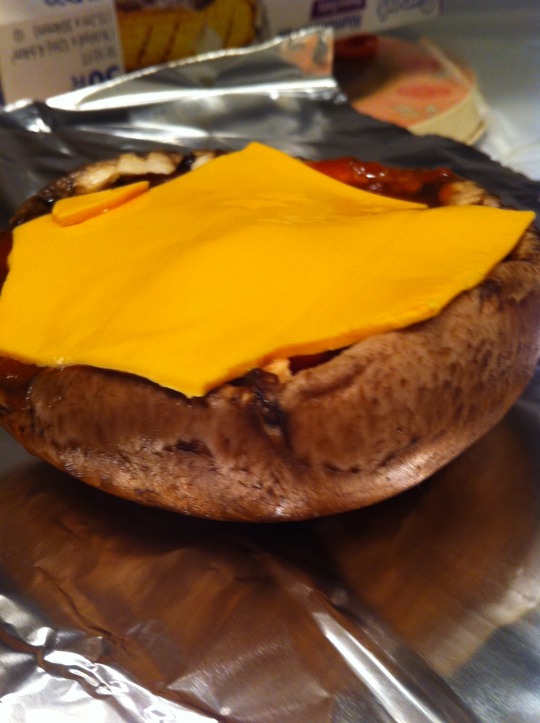
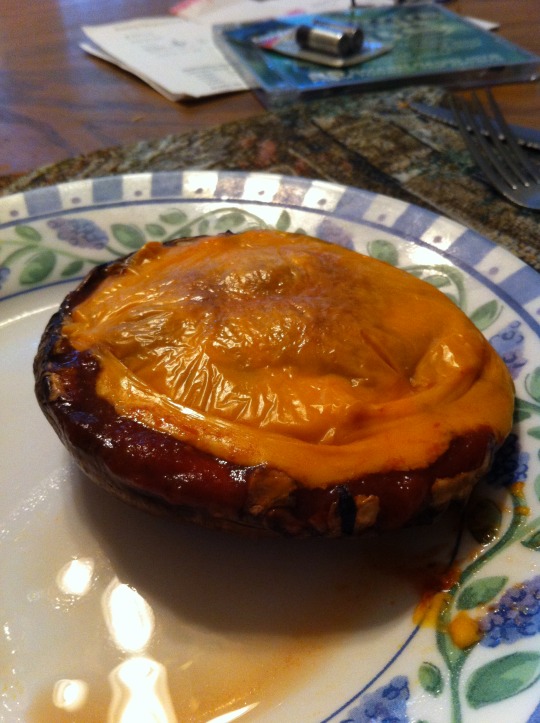
HEALTHY, LOW CAL, GLUTEN FREE, VEGETARIAN, VEGAN PIZZA
This delicious psuedopizza is made of only three necessary ingredients.
- 1 Portobello Mushroom Cap (20 cal)
- ¼ cup Organic Pizza Sauce (20 cal)
- 1 slice Cheese* (40 cal)
- Desired Veggies/Toppings
(your choice; I picked “Go Veggie” Vegan GF Cheese)
1. Wash your mushroom cap well and set to dry for a minute or two.
2. Preheat oven to 400 degrees.
3. Take a spoon or other utensile to carve out the “gills” of the mushroom. This is the black protrusions surrounding the stem; they are capable at holding water to ensure the fungus’ survival, however with cooking, extra water is not good. Keep the stem if you wish to dice it(not the very end, but the middle) and add it to your pasta/pizza sauce.
4. After your mushroom is de-gilled, pluck the stem and either toss it, or dice the middle of it. If planning to use this part, make sure to remove the very end where it had been cut originally as it’s usually pretty dry and inedible there.
5. Put mushroom into oven for 5 minutes on a foiled sheet. When you remove it, there will likely be water for you to drain. Not pre-baking the cap will add water to the sauce and you could lose flavour. It’s up to you.
6. Mix your sauce(pizza is usually thicker, for reference) while the “base” is baking; for this you can add whatever “toppings” you wish since the mushroom is forming a capable bowl to encompass such goodies. If adding excess toppings, it is suggested you reduce your sauce amount.
7. Once the mushroom cap is prebaked and drained, add the sauce carefully into the center of the base. Personally, my sauce was to the brim. Then add cheese slice; you may need to fold the edges of the “square” inward to prevent drippage and burning of the golden topping.
8. Place carefully into the centre of your oven and bake for 25 minutes. If you are using Vegan cheese, you are well aware of its melting capabilities. For this scenario, I recommend you broil it on high for five minutes, checking every thirty seconds.
9. Serve and enjoy!
80 cal of PIZZA GOODNESS
YEEEEEEEEEEEEEEEEEEEEEAAAAAAAAAAAAAAAAAAAAHHHHHHHH
(This recipe may or may not be Anna Safe. For me, it was.)
1K notes
·
View notes