
emmajustin20
Emma Justin
http://n360login.com/ |
http://webisclogin.com/
530 posts
Don't wanna be here? Send us removal request.
Last Seen Blogs

lavanuspoisonashes-blog
Mage, Assasin & Brawler

hate2love-rp
Femslash Fandom Roleplays

duckmageddon
Gizmos and Bulbs and Blots, oh my!

cubes-posts
cubie kill

firetti
What Did You Say? Knockers?
Text
How to Use Create Button on PS5 DualSense Controller
In this article, we have discussed how to use Create Button on PS5 DualSense Controller. The PS5 has brought up DualSense, its all-new controller, which is an upgrade over the previous-gen DualShock 4 controller, which use to be sipped alongside the PS4 and the PS4 Pro. This controller has bought several changes, and one of the biggest things you will observe is the “Share” button that has been named “Create” now. This button allows users to broadcast content, record clips, and capture screenshots. So, if you are thinking about how to start creating game media, follow the steps mentioned below to use “Create,” on your DualSense controller.

How to Use the Create Button in DualSense Controller
Using the “Create” button on your PS 5 controller, there are a certain things that you can do. You will find yourself making use of this button to record video clips or take screenshots if you want to share your in-game experiences with others.
Whatever the case may be, understanding how to use the “Create” button is crucial in order to get used to the all-new DualSense controller. So, in the titles below, we have mentioned the details on how to use the “Create” button, how to remap it, and more. On that note, let’s get started with the steps:
Use Create Button to Take Screenshots and Record Clips
As stated above, you would need the “Create” button in order to record clips and take screenshots. So, here’s how to do that.
Take Screenshot
If you want to take a screenshot using your DualSense controller, simply tap and hold the “Create” button present on your DualSense controller. A screenshot icon will appear on the upper-right corner of your device’s screen with a checkmark. Alternatively, you can also tap on the “Create” button and then click on “Take Screenshot” to capture a screenshot.
Record Clips
If you want to record your recent gameplay on your DualSense controller, you need to double-click on the “Create” button.
Alternatively, you can also tap on “Create” and further select the option “Save Recent Gameplay.” This will offer you two options. You can save a clip ranging from 15 seconds to 30 minutes, or if required, you can save an entire video; however, it should be within 60 minutes.
Change Default Clip Recording Time
You might be recording video clips by double-pressing the “Create” button on your controller, resulting in which you might want to make adjustments in the recording time so as to ensure the gameplay you needed to record gets saved. Below we have mentioned the steps to do the same:
Launch Settings and further click on the option “Captures & Broadcasts.”
There you need to click on “Shortcuts for Create Button,” appearing under “Captures.”
Now, you need to select the option “Length of Recent Gameplay Video Clip” and set it to the value according to your preference. You may select between a duration of 15 seconds to an hour.
Change Screenshot Format
The PS5 is set to capture screenshots in JPEG format by default. But, if you want to change the default format for the screenshots on your console, you can follow the steps mentioned below:
Launch Settings and “Captures and Broadcasts.”
Further, tap on the option “Screenshot Format” and further select your preferred format. You can either opt for PNG or JPG format.
Use Create Button to Broadcast Games
Using your PS5, you can let others watch your game by streaming it. If you want to get started with PS5 streaming, this will be great for you. It natively supports streaming to YouTube and Twitch. Just press the “Create” button, and you will be brought to the create menu. Now, tap on the broadcast icon appearing on the right side of the menu. Now, you can select either YouTube or Twitch to stream your PS5 games. You need to log in using your YouTube or Twitch account for the first time so as to get started with streaming on any of the two platforms.
Customize Create Button Key Mapping
While the default button mapping works completely fine for the “Create” button, however, if you want to change the working of the “Create” button on your PS5’s DualSense controllers, you can follow the steps mentioned below:
Tao on Settings and further click on “Captures and Broadcasts.”
Now, choose the option “Shortcuts for Create Button.”
Further, select the option “Button mapping,” and you may now choose your preferred option from “Standard,” “Easy Screenshots,” or “Easy Video Clips.”
So, these were the instructions with which you can use the “Create” button in order to stream PS5 games or record video clips using the DualSense controller. Though it’s really easy to use the “Create” button on the PS5 DualSense controller, in case you still face any issues, let us know in the comments section below:
Source: Create Button on PS5 DualSense Controller
0 notes
Text
How to Speed up Windows 10? Here’s How
In this article, we have discussed the ways using which you can speed up your Windows 10 PC, thereby improving its efficiency and responsiveness. To speed up your system’s performance, you don’t need expert help; instead, you need a bit of expert advice, which you can follow later to speed up your Windows 10 PC. It may sound complicated to you; however, it’s not.

From defragmenting or clearing out unused programs and files to turning off the special effects and more, let us show you how you can speed up your system’s performance to get maximum out of it in times of slow-downs.
With that said, let’s proceed further to the tried and tested methods to improve the efficiency of your Windows 10 system.
Restart your PC
One of the most basic and effective ways to speed up your Windows 10 PC is rebooting. Your PC might be running for weeks without getting rest for even a while. Though Windows 10, however, puts the display to sleep, any process which was started will continue to be carried on in the background. The data will get accumulated over time and affect the performance of your PC.
However, you can easily fix this issue by rebooting your PC each day when you have finished using it. Tap on the Windows button, and further click on the “Power” button. Before you reboot your system, make sure to close all your tabs. If your Windows 10 system has slowed down to the extent that it has stuck at a place and is not responding, then hold down the power button till the system turns off completely.
Keep Updating Your System
Microsoft releases updates on a regular basis. These updates deal with the common bugs and help remove them, thereby improving the performance of the systems. Some of them are minor ones; however, others do have the tendency to make changes to your system, thereby improving efficiency.
If the performance is lagging somewhere, try these fixes:
· Launch the Windows menu
· In the search bar, type “Update.”
· Further, click on the “Check for Updates” option.
· If you see a major update, then don’t just straightforward go for it. First, ensure you have taken the backup of data before you continue. Your PC needs to be restarted various times to apply the updates. You can manually check for the updates if it’s been a while since you did it.
Check Startup Apps
Your system’s performance can be brought down by various running processes. The significant reason behind this is the installers that command Windows to run their programs immediately after a user logs in, thereby slowing down the system speed. To track the startup programs:
· Open the Task Manager. You may use the shortcut Ctrl + Alt + Del.
· Further, click on the “Startup” tab.
· Now, you need to carefully watch the “Startup Impact” values for each program like “High.” This is a good way to track the apps that are slowing down your system.
· Further, you need to tap on the program you need to restrict from getting launched during login. This can be done using right-clicking the app and then selecting “Disable.”
Run Disk Cleanup
One of the most prominent built-in Windows utilities is the Disk Cleanup. It is used to clear out temporary files that might have heavily accumulated the resources of your machine, for instance, the image thumbnails, offline web pages, and downloaded program files. You can run a disk clean up by these steps:
· Go to the Windows menu.
· Under the search bar, type “Disk Cleanup.” Then select the files that need to be removed. Simply check mark each option adjacent to the files in question.
· Then, tap on “Clean up system Files.” The amount of space that will be saved will be shown by the Disk Cleanup after calculating.
· You have a great chance to remove the unnecessary files from your hard drive. You can start with the “Downloads” folder.
Remove Unused Software
It’s better to remove the unwanted/unused software from your PC than to keep them and bring unnecessary load on your system. Various system vendors ship their systems bundled with a vast number of third-party software, and due to their file sizes, they are referred to as “Bloatware.”
There are also cases when a user installs software for a specific purpose and never uses it again. So, these kinds of programs can take up a significant amount of space on your hard drive and thereby reduce its performance. To remove the unused software from your PC, you need to follow these steps:
· Visit the “Control Panel” settings.
· Go to the “Programs.”
· Now, head over to the “Programs and Features.”
· Click on “Uninstall a Program.”
· Further, right-click on any of the programs you don’t use any longer.
· Now tap on “Uninstall.”
· Tap on “Yes” when Windows 10 asks for permissions to make the changes on your system.
Disable Special Effects
When special effects are concerned, Windows 10 rather performs heavily. Windows and other features are by default programmed to fade in and fade out of the view. A few other resource-intensive apps like animations and translucency might be unnecessary. So, you need to disable them as soon as possible. Going back to the basics:
· Launch the Windows menu.
· Search “System”
· Go to the “Advanced Settings” tab.
· Head over to the “Performance Settings.”
· Now click on the radio button for “Custom” under the “Visual Effects” tab.
· On this screen, uncheck the boxes next to visual effects that need to be disabled.
· Now, tap on “Apply” to save the changes.
Disable Transparency Effects
Alongside displaying features like animation by making heavy usage of your system resources, Windows 10 also offers transparency effects for some features like the task menu. This seemingly simple and light effect is, however, quite complicated to draw. It’s because the system will have to calculate the same plane two times. So, you can disable the transparency effects, and for that:
· Launch the Windows menu.
· Enter the “Make Start, taskbar and Action Center transparent.”
· Now, you need to turn off transparency under the “Color” Settings.
· Meanwhile, if desired, you can also make changes to the default app mode between “Light” and “Dark.” You need not worry about the system speed. It will only make your Desktop easier on your eyesight.
Upgrade your RAM
You can improve your system’s overall speed significantly by increasing its RAM. To have a lag-free experience, you need to have at least 4GB of RAM on your Windows 10, although this isn’t applicable for the resource-hungry high-end games -like apps. So, what needs to be done? Well, you need to consider adding more virtual memory to your PC. Your PC must be having some RAM ‘slots’ into which you can insert additional chips.
Meanwhile, if you want to know the memory type of your system, then:
· Head over to the Task Manager
· You can also use the shortcut (Ctrl + Alt + Del) to reach the Task Manager.
· Further, tap on “Performance.”
· All the memory slots that are in use will be displayed alongside their type. For instance, the “DDR4.”
It’s very easy to install new RAM chips and if you are doing it by yourself, using an anti-static wrist strap is a must to prevent the delicate components from getting affected. You can visit a PC repair store to get your PC’s hardware upgraded.
Use an SSD
SSDs make use of the same kind of Flash memory found in USB sticks, thereby allowing faster writing times and access compared to the traditional mechanical hard drives, which make use of the magnetized disks. Though SSD is comparatively more expensive than regular hard drives, if you are willing to spend that much amount, you’ll observe a significant improvement in the system’s boot time, responsiveness, and file access times.
Run System Maintenance
Windows 10 offers a built-in utility that looks after the tasks related to routine system maintenance. For instance: regular malware checks, scanning for updates, and defragmentation of the hard drive.
Generally, these tasks operate in the background when the system is idle. However, you can run the maintenance checks manually on your system if you notice an issue with its performance. For that, you need to:
· Visit Control Panel,
· Head over to “System and Security,”
· Then go to “Security and Maintenance,”
· Tap on the arrow facing downwards to look for the complete list of maintenance options.
· From the options, you need to select “Start Maintenance,”
· Meanwhile, you need to save and close the open files, if there are any before you proceed further.
So, these were the instructions to speed up your Windows 10 PC.
Source: How to Speed up Windows 10? Here’s How
0 notes
Text
How to Auto-Delete Messages on Telegram
In this article, we have discussed the ways using which you can set the Telegram messages to auto-deletion. The recent update by Telegram offers the ability with which messages can get auto-deleted in channels, groups, as well as personal chats. Previously Telegram launched the self-destruct timer for the secret chats, and now the messaging app has brought a much similar implementation of the feature to normal chats. On that note, let’s get started with the instructions on how to auto-delete Telegram messages.
Auto-Delete Messages on Telegram
There’s a significant difference between the working of the secret chats and the newly added auto-delete feature. The auto-delete timer of Telegram,unlike secret chats, gets initiated when the user sendsa message and not when the recipient reads it. So, there are also possibilities that the message sent by you expires before it is read by the recipient. You can select from the two durations, i.e., 24 hours and 7 days, for the messages to remain on the app.
Auto-Delete Messages in Telegram Personal Chats
You can set the Telegram’s personal message to auto-deletion with the help of the following ways:
Launch the Telegram app and head over to any specific conversation
Then click on the three-dot menu appearing at the upper-right side of your screen.
Select“Clear history,” and below it, a pop-up will appear, displaying a newoption “Auto-delete messages in this chat.”
You may now select the duration for the messages to get auto-deleted, i.e., either 24 hours or 7 days.
Once you have selected the duration, tap on the button“Enable Auto-Delete.”And from now on, all the new messages will get deleted automatically for that specific chat within the duration you have set for the message to get self-destructed.
Meanwhile, you can also check for the countdown to the deletion time of any particular message by just tapping on it.
Auto-Delete Messages in Telegram Group Chats
This feature is limited to only group admins. If you have joined a group and want this feature to be set for the group, you need to request the admin of that specific group so as to set this feature for the group.Supposing you are a group admin of any specific group and want to set the auto-delete feature for your group, then simply follow the steps mentioned below:
Open Telegram and head over to your group chat.
Now tap on the option “Clear history.”
On the screen appearing further, head over to the “Auto-delete messages in this chat”and set the auto-delete duration. You may select from the two available durations, i.e., 24 hours and 7 days.
From now on, all the new messages sent within the group will expire automatically.
Please be noted that the group members will not be able to see the countdown timers. In order to view it, you need to be the admin so that you can easily see the expiry time of the messages. That’s it. These were the steps using which you can self-destruct the Telegram message. Please be noted that again, that countdown timer starts as soon as the message is sent and not when the recipient receives it.With that said, let’s end our discussion on this topic. Do let us know your opinion, and in case you are facing any issues regarding the steps, use to comment section below to state it. We will try to help you out as soon as we can.
Source: Auto-Delete Messages on Telegram
0 notes
Text
How to Cast Android or iOS Screen on Amazon Fire TV Stick
In this article, we have discussed how you can cast your iOS or Android device’s screen on Amazon Fire TV Stick. Both the devices (Android TV vs. Amazon Fire TV Stick) in our comparison run on Android OS under the hood. So, we do assume that casting will also offer a seamless experience as it’s on Chromecast-like devices; however, that’s not the case with Amazon Fire TV Stick. Things work in a bit different way on Fire TV Stick as you need to set up the casting page manually. Also, if you are casting from your iOS device to Fire TV Stick, you will require a separate app. So, if you need detailed instructions on how to cast your iOS or Android device’s screen on Amazon Fire TV Stick, you may follow along the steps listed below:

Cast Android or iOS Screen on Amazon Fire TV Stick
This article discusses steps to cast both iOS and Android devices’ screens on Fire TV Stick separately. You can go through the required details below:
Cast Android Screen on Amazon Fire TV Stick
To cast your Android device’s screen on Fire TV Stick, you need to follow these steps:
Before you get started, you need to ensure that both your Fire TV Stick and Android device are on the same network.
Further, you need to tap and hold the “Home” button on your fire TV remote for a while.
A mini prompt window will appear on your screen. On that window, you need to click on “Mirroring.”
Now that you have entered the Mirroring mode, your Android smartphone can easily figure out the Fire TV Stick that’s connected to the same network.
Head over to your Android device and then launch the Quick Settings panel and locate “Cast” or “Screen Cast” or “Mirror,” and tap on it to choose your Fire TV Stick.
In case your device isn’t showing the “Cast” option, you need to open Settings and locate “Bluetooth and Device Connection.”You will probably find the “Cast” option present there. Once located, you need to open it and choose your Fire TV Stick.
Now that your Android device’s screen has been mirrored on your Fire TVStick, you need to always keep in mind that it is relying on Wi-Fi’s Miracast technology and isn’t using Chromecast. So, the quality might not be that pretty, and you might not be able to play the content with the turned-off screen. Yet, the screen orientation, zoom in/out, and audio would no doubt work well.
Mirror Your iOS Device’s Screen on Amazon Fire TV Stick
Similar to the method listed above for Android, your iOS device and Fire TV Stick needs to be on the same Wi-Fi network. Alongside that, on your Fire TV stick, you need to install a third-party app. With that set, let’s proceed further to the steps to mirror your iOS device’s screen on Amazon Fire TV Stick.
On your Fire TV’s remote, you need to tap and hold the “Alexa” button and state “AirScreen.”
You will be redirected to the AirScreen page, where you need to tap on “Get” in order to install the “AirScreen” app.
After installing the app, launch it and tap on “Start.” Note that there’s no need to configure anything.
Now, head over to your iOS device and visit the Control Center.
Further, you need to click on the option “Screen Mirroring” appearing within the Control Center window. The search process for AirPlay-compatible devices will get initiated. Once your TV gets detected, click on “AS-AFT…”.
Your iOS device’s screen will get mirrored on your Fire TV Stick. That’s it.
So, these were the instructions using which you can cast your Android device or iOS device’s screen to the Fire TV Stick. The instructions listed for both iOS and Android devices are pretty straightforward and easy to follow. On top of that, the method listed for iOS devices also allows users to cast Chrome OS, Windows, and macOS devices on Fire TV Stick. The best part of this casting is that it provides great results when streaming is concerned, and you will experience almost negligible latency. Anyway, that’s all from us for now. Do let us know your opinion about this article, and in case you face any issues while you are following the instructions, you can use the comment section below to let us know about your issue.
Source: How to Cast Android or iOS Screen on Amazon Fire TV Stick
0 notes
Text
Skype Introducing Active Noise Cancellation Feature
By introducing the new active noise cancellation feature, Skype has attained a unique status in the industry. The Windows & Mac users are now relishing the benefits of this advanced version of Skype as this exclusive feature has been developed for the Microsoft teams & this feature has now been set up for Skype. Designed to put a mute button on everything except the user’s speech, the active noise cancellation feature is currently available for Mac & Windows.

Skype also allows the users to change the noise cancellation settings between low, medium, & high. This shows that the alteration of the noise cancellation settings is quite possible in this scenario in Skype. Another advantage of introducing the noise cancellation effect is that it allows making more efficient video calls. The company representatives stated in an interview that the noise cancellation feature functions by utilizing the specially trained deep neural networks, which drain out the noise without causing any effect on the speaker’s voice.
Role of Active Noise Cancellation Feature
Initially designed for the Microsoft teams, this bespoke feature has been extended to Skype now & the users are benefitting much more than from the original version. In the latest press conference, the professionals of Skype stated that the newest feature of Skype has been instrumental in suppressing the background noise in the desktop app. When the user meets someone on Skype, this feature helps to silence almost everything except the user’s voice.
The noise cancellation feature also helps in explaining the difference between speech & other noises. This feature helps in identifying & then diluting the effect of small, incoherent, & complex noises. Some common examples of these noises are mentioned below-
Howling sound made by a dog;
Typing noise produced on a keyboard;
crunching of a food wrapper;
movement of a fan
Advantages of Noise Cancellation Feature
The advantage of this noise cancellation feature is that they are much more advanced & sophisticated than the traditional noise suppression algorithms. These algorithms only pay heed & attention to simple & consistent noises like sounds caused by small movements in the home. Simultaneously, this noise cancellation feature pays attention to the complex & inconsistent noises that are hard to capture.
The newly developed noise cancellation feature is a product of the amalgamation of the techniques used in machine learning & artificial intelligence. These techniques help in differentiating between the clean & clear speech & the so-called “noise.” The combination of machine learning (ML) & artificial intelligence (AI) is used to identify the diversity in the dataset in terms of noise types & clean speech & then a special algorithm is used to filter them. This algorithm forms the core aspect of the noise cancellation feature currently being used in Skype.
Conclusion
A representative dataset trains the ML model used in the noise cancellation feature of Skype. This provides a very wholesome experience to the Skype users in terms of the quality of the user’s speech from the other end. In Skype, there is this facility of multiple users joining on in calls from various limitations. This facility leads to a lot of noise generation & this is where the noise cancellation feature of Skype comes in handy as it reduces the excessive noise produced from all ends. Thus, the new active noise cancellation feature from Skype is the currently trending topic in the town as far as electronic media is concerned & it is not a surprise that this feature has received rave reviews from the public and the media.
Source: Skype Introducing Active
0 notes
Text
Android 12 Developer Preview 2 is Out with New Improvements & Smaller Changes
Picture-in-Picture improvements, One-handed Mode, Dark Theme & some more updates are a part of tons of changes introduced in the new Android 12 Developer Preview 2. This version has brought many minor altercations & improvements to the next version of Google’s operating system. Released back in February, the first developer preview for Android 12 started the timeline for official Android 12. Between March & April, three previews will be launched by Google & in May, the first public beta will be made available. Also, in Q3, the final release of Android 12 is scheduled. It’s still a long way to go, with plenty of blockages on the way.

Features
Last month, Developer Preview 1 made its debut, giving the critics a lot to discuss & the most noteworthy fact was that its notifications were redesigned, which are mentioned below-
New Screenshot Interface;
Google’s Nearby Share Feature with Wi-Fi;
The Android had a radical look & a new User Interface (UI) named ‘Silky Home’ was a critical attractive feature of the Developer Preview 2. With a one-handed mode to Android, Google has introduced a massive change in the way androids function with Android 12 DP2. This feature is not like this feature for the first time in the market as Samsung has once experimented with this feature in their custom-developed Android interfaces. It’s heartening to see that Google is coming forward with this native feature as this type of experimentation is still in its nascent stage.
Owing to the increase in these trials, the one-handed mode will surely attain popularity in the future as it can be accessed by just swiping down after clicking on the bottom side of the interface. The same procedure is used in iOS. To enhance better reachability, users have the option of setting a timeout timer, and then they can turn it off after a certain point. According to the reviews of 9to5Google, the picture-in-picture works feature has a few improvements, and its working is also now functioning on a refurbished scale.
New Altercations
By taking cues from iOS, Android 12 DP2 has added pinch-to-zoom for altering the size of a PiP window. By double-tapping on the window, the window’s size is regulated from minimal to maximum & by moving the screen from left to right, the PiP player can be hidden off. These are user-facing challenges that need close attention in Developer Preview 2. In the future versions of Android 12, the new design of the widget list in the Pixel Launcher will have a significant role to play as Google has reduced the darkness of its theme & has added minor visual tweaks PIN. Changes have also been made to the pattern lock screen pages & according to the hints, a new search bar for Pixel Launcher will be unveiled, which can replace the Google Search widget. Before stating that Android 12 is all set for mass consumption, it is essential to emphasize that there is still a long way to go & it is pretty encouraging to see that Google is slowly catching up with its release and the latest trends in the market. In April, the final Developer Preview 3 will be released, and the public is looking forward to it. Further, Google will release its first public beta in May & it is pretty evident that after changing & updating a lot of policies, DP1 & DP2 will be fit for release in the global market.
Source: Android 12 Developer Preview 2
0 notes
Text
How to Use Apple Pay On Apple Watch
Without wasting time & words, let us get to know the steps of how to use Apple Pay on Apple Watch-
Configure & Install Apple Pay on Apple Watch
Use your iPhone for opening the Apple Watch
After tapping on My Watch, click on Wallet & Apple Pay.
Enter the CVV of the card if the card is present on the Apple device. Also, check that if the card isn’t removed, add the card you want by clicking on Add next.
If the other card is not present on the Apple device, then Add the Card by adhering to the instructions flashing in front of you on the screen.

Apple Pay is a very user-friendly, efficient & fast way to pay for various types of goods & services & since it is installed in the Apple watch, it can make the process even more, quicker & smooth. Whether it is executing mobile payments during online shopping or in a personal space at a store, Apple Pay always comes to the consumer’s rescue who is making the payment.
After announcing the mobile payments solution in 2014, Apple had concentrated all its attention to promote & upgrade Apple Pay as Apple Pay’s reach was only limited to that of store support at that time. With consistent effort, Apple has successfully managed to catapult Apple Pay into an easily accessible feature for executing payments during shopping & traveling. Coincidentally, Apple’s first watch came into existence after the announcement of Apple Pay & since then, the Apple smartwatch has gained a lot of new features.
Making the Payment Using Apple Pay
Since Apple Pay has already been installed on an iPhone, it becomes very convenient for the customer to pay for the goods & services using Apple Pay. Now, let us have a look at how to make the payment using Apple Pay with an Apple Watch in the below-mentioned points-
Double-click on the button located on the side of the smartphone if using the default card.
Fix a position of the Apple watch close to the payment terminal.
The face of the smartwatch display & the payment reader should be in front of each other.
In a matter of a few seconds, the User will hear a sound that will establish that a connection was successfully created between the watch & the payment gateway.
After the payment is sent, the User will get a notification in the Notification Center, which will mark the transaction’s success.
Final Thoughts
Although. The above points cover all the steps involved in making a successful payment using Apple Pay; there are scenarios where the process is slightly more complex. To maintain the transaction’s confidentiality, there is a pre-requisite of entering a PIN or signing a receipt, which depends on the amount of the trade & the needs of the payment gateway. If a user wants to use a card for making the payment, then he/she must keep in mind that they are using the right card & if they wish to change the menu on an Apple watch, they need to double-tap on the side button. Thus, from the above article, it is pretty clear that the User shall use the Apple Pay option in the app if the Apple Watch is being used to do online shopping. Also, it is essential to cross-check or review the order before completing the payment process. Thus, we can safely state that if the customer has an Apple Watch, then he/she can complete the payment without using an iPhone or a physical wallet.
Source: How to Use Apple Pay On Apple Watch
0 notes
Text
Top iOS 14.4 Features that You’re Going to Use Daily
Apple Makes the best devices, and their iPhone and iPad devices are now more capable and can do multiple tasks at once seamlessly. Current iPadOS and iOS are holding incredible features which are now making iPad and iPhone devices more powerful. The latest iOS and iPad update brought several extra security features and display and apps customization features.
There’s also a ProRaw feature for iPhone 12 and the iPhone 12 Pro Max. This new feature is capable of taking stunning photos. If you love photography, you can try out this ultimate feature to capture incredible images for your photo frames. However, this isn’t the only great thing about iOS 14.4, and you can explore more incredible features if your iPhone is running on iOS 14.4 or above.
New Home Screen Features
If you have updated your iOS version to at least 14.4, then you may have seen an app drawer. This new app drawer feature is useful when it comes to keeping the home screen clean and not filled with app icons. If you don’t use any specific app pretty much, you can place it in the app drawer without uninstalling it. App Drawer will keep that certain app in its app section and remove it from the actual home screen. You can open the App Drawer and open that app once again without any hassle.
Customize Your App Icons
Say no to the same old app icons because Apple has added the feature of customizing app icons. Now with the help of the Shortcut app, you can change the app icon. If you don’t like the Mail app icon, you can change it and set any object icon, animal image, anime image, or anything you like. You can change the icons of every app you prefer. This feature is worth exploring, so if your iPhone is running on iOS 14.4 or above, try out the customize app icon feature.
Get Fit with Fitness Plus
For fitness lovers, Fitness Plus subscription is really going to bring revolution. People who want to or don’t want to go to gyms can take suggestions from expert trainers worldwide. Fitness Plus is packed with a huge number of workout, cardio, yoga, and many more fitness activities videos. If you want to take your fitness level to the next level, you should definitely try out this subscription.
Deleting Apps is Now No More Confusing
Indeed, the old method of uninstalling or deleting apps was way too time-consuming and difficult sometimes. But Apple made it simple for those users whose iPhone is running on iOS 14.4 or above. Now you simply need to tap and hold on to a certain app, and then you can select multiple apps to delete from your iPhone. By following this new feature, you uninstall apps from your device in no time.
Change Your Default Mail and Browser
If you’ve been using an iPhone and iPad, you may have known that your default browser and the mail app are Safari and Mail. While searching anything, the Safari app automatically opens up, even if you don’t want to open it, and the same thing goes with the Mail app. However, this isn’t going to happen again if you change your default browser and mail app. iOS 14.4 or above, you can change your default browser and mail app effortlessly. Just open Settings and move into your preferred browser settings. Choose that browser as your default browser and follow the same step to change the default mail app in the mail app settings.
Conclusion
Features that are mentioned above are not the only new features on iOS 14.4. There are still plenty of many incredible features available that users can explore and use to their advantage. Above all these things make sure to check the ProRaw feature on iPhone 12 Pro and iPhone 12 Pro Max. It will bring elegant color and bring more details once the photo is captured.
Source: Top iOS 14.4 Features
0 notes
Text
Top Ways to Access Freeze Apps on Mac
The app freeze problem is not a type of issue every Mac user faces, but if you are facing a similar problem, then it can be resolved by following the right steps. Mostly the following problems happen due to the app crash, or with the older app version. However, it’s not certain every time, so you must know every possible way to resolve the frozen app issue.

macOS is a powerful OS, and its app optimization system works perfectly with every app. During the app freezing situation, removing it from the background usually works well, but when the system is unable to take the call and the app is not responding, then no action works. So you’ve tried everything to access the frozen app and nothing works out, follow the guide to make the app function properly.
Troubleshoot the Unresponsive and Frozen Apps on Mac
Force Close the App
Sometimes the app doesn’t stop working even after closing its window. While the app is frozen and you close its window, it may still be in working because of its frozen condition. So if you’re unable to stop the frozen app from running in the background, you should try out the Force Close method. Remember that force closing the app will remove all the unsaved data.
To try out the force close method, press the Apple icon over the Menu bar, and select the Force Quit option under the drop-down tab. Pressing the Force Quit option will open a separate window that will allow you to choose which you wish to stop running.
Reopen the Application
Once you force close the app, try to reopen it and check if it’s working fine or not. Mostly probably the app will start working again, but if that doesn’t happen, make a right-click on the app and press Quit.
Restart your Mac and reopen the app and check if it’s working. The following procedure will start running your app as normal, but the problem is the same, then try some other following methods.
Update the Application
macOS has recently received its new OS version, then your apps might have a new available version too. If you’re not aware of the new app version, then just open the App Store and search for the app. Sometimes using an older version of the app creates problems and freezing is one of them.
You can search for the app in the App Store or simply open the Update tab where you’ll see all installed apps on your device. Press the Update button next to the app, and start downloading and installing its new updating version. Once the new version is installed, reopen the app and check it.
Reboot the Mac
Even after force close, and updating the app method, the app is still not working fine, then Restart the MacBook. Well, restarting the Mac is the most basic method, but sometimes the basic methods can solve giant issues. Press the Apple icon over the Menu bar, and choose the Restart option under the drop-down tab.
Contact the Application Developer
If the app freezing problem isn’t solved yet, then you should contact the app developer. Even if after trying out several methods, if the app is still not working, then try to contact the app developer. Tell them the issue and version of your macOS and app. They might check the compatibility of the app with the macOS version and it needs a push update, they’ll release it soon.
Check the System Software Updates
Another final option you can try out is to check the system OS version. If you’re running an older macOS version, then update it as quickly as possible. Simply open the System Preferences tab and move into the Software Update section to check the currently running OS and latest available OS for your Mac.
Conclusion
By following all these methods users can solve their app-related issues easily. Most of the time, an app becomes unresponsive because of an older update or bugs. So by updating the version of the app, users can get rid of app bugs and older versions both.
Source: Freeze Apps on Mac
0 notes
Text
Troubleshoot “This Connection is not Private” Warning in Safari Browser
If you see an error on your Safari browser with a specific message, “This connection is not private,” then don’t worry because you’re not the only one receiving it. Many iPhone, iPad, and Mac users have complained that they see this message a lot of times while browsing from the Safari browser. Indeed, ignoring this message is pretty simple, but many users are not aware of this message.
This message’s main motive to pop-up on Safari’s screen is to alert the user that the website they are browsing, its security certificate fails. Websites that are not correctly configured with HTTPS or don’t have valid certificates. People should know that HTTPS is way more secure than HTTP. The reason is there are SSL certificates always missing in HTTP, which is why they’re never secured by default.
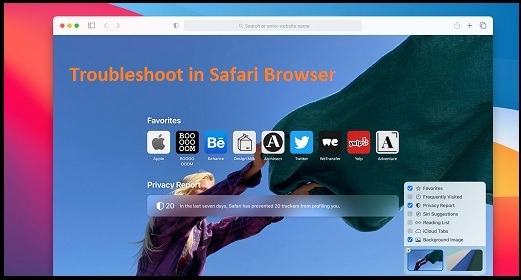
SSL certificates can expire, and the same problem can also happen with HTTPS websites too. So if you’re facing an issue like this, you should first check the time on your device and make sure it is running correctly. Sometimes, the wrong clock time can cause the security check certificate too.
However, always remember that if you see the same message on any banking site, a financial website, online account, or any other website with your essential data, you shouldn’t bypass the warning message.
Fix “This Connection is not Private” Warning in Safari Browser (iPad & iPhone)
The procedure of bypassing the warning message is pretty simple, but people who don’t read the message correctly face the problem mostly. So let’s get started:
Open the Safari browser on your preferred device.
Visit the website which shows the warning message.
Now once you see the warning message, press the Show Details option at the bottom.
Here you’ll see an accurate description of why you see the warning message.
Slide down further a bit, and press Visit this website.
Now you’ll be asked to confirm your action.
Press Visit Website once again.
By following these steps, you’ll be able to visit the website, but now you’ll see a Not secured icon near the address bar.
Fix “This Connection is not Private” Warning in Safari Browser (Mac)
The procedure of bypassing Mac’s warning message is also simple and pretty similar to the iPad and iPhone. So let’s get started:
Open Safari browser on your Mac.
Visit the website which shows the warning message.
Now once you see the warning message, press the Show Details option.
Here you’ll see an accurate description of why you see the warning message.
Slide down further a bit, and press the Visit this website option in the hyperlink.
Press Visit Website under the small pop-up window to confirm your command.
So this is how you can open the website regarding which you see a warning message. But remember, as mentioned above, if you’re trying to access a banking website, online account, or financial website, wait until the security gets better.
Less secured websites have more chances of getting user’s data breached, so before visiting any of these types of websites, think twice.
Conclusion
Numerous websites on the internet are running on low security or Not Secure conditions, and people should avoid visiting those websites unless there’s no better option. However, users can enable VPN and visit the website to keep their server secure in some way.
Source: Troubleshoot Safari Browser
0 notes
Text
Here’s How to Enable/Disable Emoji Shortcut for MacBook’s Keyboard
Apple is well known and a much popular brand that provides various great products and services to millions of users all over the world. iPhones, iPads, Mac devices, and Apple Watches are the most demanded products of this company. All of the Apple products are well known for providing the best experience to all of its users. For instance, MacBooks include a lot of great features that make computing work much easier for its users. MacBooks are used for multiple purposes. The MacBook comes with a clean and elegant design, and they are also super easy to use for any purpose. And now, the latest MacBook devices that this company produces include an M1 chip.

And these devices have now picked up a new trick from the iPad keyboard. Now, the function key on the MacBook’s keyboard works as an emoji picker. And enabling or disabling this emoji shortcut is also super easy.
Are you also a MacBook user? Want to know how you can enable or disable the emoji shortcut for your MacBook’s keyboard? If you are a new user of a MacBook device, then you might not be aware of how to use the emoji shortcut. And if that is the exact situation, then you are on the right page now. In the following article, we are going to show you how any MacBook user will be able to enable/disable the emoji shortcut on their device. So, if you want to get to the method, you must read this entire post.
The Method for Enabling/Disabling Emoji Shortcut for MacBook
Nowadays, using emojis for expressing our current mood, emotions or feelings has become quite popular. In fact, they make our conversations more fun and interesting. One can use the emojis on any of their devices with just a couple of quick taps on the keyboard icon. Here, we have mentioned the proper procedure for using the emoji shortcut on a MacBook device. So, let’s see the methods now:
The Steps to Enable the Emoji Shortcut for MacBook’s Keyboard
Here are the steps through which any MacBook user can easily enable the emoji shortcut on their device:
Firstly, go to the “Apple” icon given in the top-left corner of your screen and then click on it.
From the available options that you can see appearing on your screen, click on the “System Preferences.”
After this, click on the keyboard icon after reaching the next screen. And at last, click on the box placed next to the option of “Show keyboard and emoji viewer in Menu Bar.” And that’s all you will have to do to enable the emoji shortcut for your MacBook’s keyboard.
The Steps to Disable the Emoji Picker on MacBook
Here’s how you can disable the emoji shortcut for your MacBook’s keyboard:
Navigate to the Apple icon given in the top-left corner of your screen.
From the menu, go to the option of “System Preferences” and click on it.
And after you reach the System Preferences section, you will have to click on the “Keyboard” icon.
And now, click on the drop-down menu given next to the globe icon.
And finally, from the appearing options, you will have to click on the “Do Nothing,” which will stop opening the emoji shortcut on pressing the fn or globe key.
So, that is how any MacBook user will be able to enable or disable the emoji shortcut on their device. And that’s it for now. Try the steps now if you also own a MacBook device. And if you wish to explore more features of the MacBook, you can go through the website.
Source: How to Enable/Disable Emoji
0 notes
Text
The Best Photo Backup and Photo Recovery Apps for Android
Photo backup is an easy as well as a complicated process; it’s easy because photos don’t take much storage. It’s tricky because most people have thousands of pictures on their smartphones, and collectively, they need so much storage space. Fortunately, some decent photo backup apps are out there that can help you deal with this problem. On the other hand, having a photo recovery app is also crucial; it will help you get your photos back in case you accidentally delete them. In this article, we have included two kinds of mobile applications; photo back-up apps and photo recovery apps. So, let’s take a look at the best options that we have without wasting much more time. Here we go!

Amazon Photos
Amazon Photos is a pretty decent photo backup app with great settings and the ability to sort your photos automatically. Additionally, you can tell the app to upload photos only and not upload videos; in that way, you can save storage. However, if you are an Amazon Prime user, you will get 100GB of free storage and the ability to upload photos in high-resolution. The app is available for free for Amazon Prime subscribers, but it charges $19.99 for normal users for a year.
Dropbox
Dropbox is one of the most popular and reliable photo backup apps that provides you with an automatic photo backup tool, the ability to store other files, cross-platform support, and more. The free version of the app offers you up to 2GB of free storage that might not be enough for you. However, you can get up to 2TB of storage space to save your files by taking a subscription to Dropbox. The subscription charges for the app’s premium version are $9.99 for a month.
Google Photos or Google Drive
Google Photos is an excellent photo backup app that provides you with a variety of features, such as the ability to upload your photos, edit them, apply various effects on them, and more. It even has a face recognition feature that automatically identifies the person in a photo. Unfortunately, Google is planning to start charging for the Google Photos services, and it will be in effect from June 2021. Well, Google is not charging too much money, and the app is full of features. I think it’s a great photo backup app, and you should use it. The app’s subscription charges will be from $1.99 to $9.99; in this amount, you can get storage from 100GB to 2TB.
MEGA
MEGA is an excellent photo backup platform that provides you with up to 50GB of free storage space to save your photos and other files. It has an auto-upload tool for camera roll, and it’s end-to-end encrypted. It works fantastically, and if you need extra storage, you can take its subscription too. The subscription charges for the app’s premium version are between $4.99 and $29.99 for a month; the paid version will give you up to 16TB of extra storage.
OneDrive
OneDrive is another excellent photo backup app that provides you with a variety of features, including the ability to upload photos as well as other files, auto-syncing, and more. The app even includes an office suite if you take a subscription to its premium version. The free version of the app offers up to 5GB of storage, and the premium version gives from 100GB to 1TB of storage. The charges for the app’s premium version are between $1.99 and 6.99 for a month.
DiskDigger
DiskDigger is a fantastic photo recovery app available entirely for free with no limitations. The only downside of the app’s free version is that it lets you only recover your deleted photos and not any other files. The app has two modes: the basic scan and the advanced scan; you can use the basic scan mode on un-rooted devices, but you must root your phone to use the advanced scan mode. However, the basic scan mode works very nicely, but if you want to recover other files along with photos, then you shall root your device.
Dumpster
Dumpster is a pretty decent recycling app for Android. Once you install this app, it automatically starts making a backup of your data so that if you lose any data, you can get it back easily. The app is quite popular and has more than 30 million downloads on Google Play Store. The mechanism of the Dumpster is quite simple; it runs in the background of your device and makes copies of your photos. The app does not even require an internet connection to recover your data as it uses the mobile phone’s space to backup your photos. It supports more than 14 languages and is very easy to use.
DigDeep
It is one of the best photo recovery apps for Android to recover your deleted photos. Well, this app basically acts like a recycle bean that you can use to get your deleted photos back from your phone’s internal storage or the SD card. The best thing about this app is that it even lets you recover those photos that were deleted before installing this application. Isn’t it a great feature? However, the app features a straightforward user interface, and anyone can use it very easily. You just need to start and run the scanner on the app, and it will automatically find and recover your deleted files. The app runs nicely, but the recovered photos’ quality will not be exactly the same as they had before getting deleted.
Undeleter
Undeleter is an outstanding photo recovery app with the ability to recover photos as well as other files. The app lets you recover your files either from the internal storage as well as SD card in your device. You can use Undeleter without rooting your Android device, but if you want this app to run at its full potential, you shall have to root your device then. However, if you want to recover your data deleted from SD, you can get it without even rooting your phone. Additionally, This app allows you to recover your files, data, and hard drive damage. It even boasts a file recovery feature that helps you recover files such as images and videos. The data recovery tool allows you to recover lost messages or data from other apps. The hard drive damage function allows you to delete any data that is stored on your Android device if you don’t need them.
Deleted Photo Recovery
Deleted Photo Recovery is another great photo recovery app that you can use to recover your deleted photos. The app can easily retrieve the images deleted Either from internal memory or SD card. You just need to install this app and run the built-in scanner on it. The app will scan and find your deleted photos in a few minutes. These are all our picks for the best photo backup and photo recovery apps; you can try these apps to easily backup your data or get your deleted data back if you accidentally lose them. All the above-mentioned apps work fantastically, and you should try a few of them. That’s all for this article. I hope the above-written information will be helpful to you. Thank you for reading this article. Have a great day!
Source: Best Photo Backup and Photo Recovery Apps for Android
0 notes
Text
Moza Mini S Essential – Review
Moza Mini is a high-end but quite affordable smartphone gimbal that you can get now; it offers you smooth stabilization, a simple interface, various fun effects and shooting modes, a high smartphone weight limit, and a very comfortable and portable design. Well, its app is a bit confusing, it also limits endpoint range, and the build quality of this gimbal could also be improved a bit. However, let’s take a brief overview of this device and try to find out whether it’s a valuable product or not.

When it comes to smartphone gimbals, two names automatically come; DJI and Zhiyun. However, they are not alone; many other small manufacturers are also there in the market that offer great products at an affordable price range. Moza is one of them. Moza Mini Essential is a fantastic smartphone gimbal, and it’s capable enough to sway you away from the big brands.
Moza Mini S Essential offers you three-axis stabilization (pan, tilt, and roll), a 2,200mAh battery that can easily last up to 8 hours, and the ability to hold up to 498g. The battery of this gimbal gets charged completely in 1.5 hours.
The best thing about this gimbal is its ability to hold weight. Well, if you compare other gimbals, such as Zhiyun Smooth 4, and DJI Osmo Mobile 3, they can’t hold that much weight. The DJI Osmo Mobile 4 can hold up to 230g, but it’s twice as costly as Moza Mini S Essential, and it’s not even near to Moza Mini S Essential in terms of weight holding capacity. Besides that, this gimbal has an impressive design, a balanced body, and an ergonomic grip.
You can easily use this gimbal to shoot long videos. It is very compatible too, and you can carry it even in a small box.
In terms of stability, the Moza Mini S Essential gives you a very smooth and fast experience. You can easily shoot action shots with this gimbal. It doesn’t have so many buttons; that is another plus point for this gimbal; you will easily get used to it. Additionally, it boasts some cinematic presets to help you shoot your videos using cool angles and effects. It even includes the ability to add filters, use features, track objects, create time-lapse, shoot slow-motion videos, and more.
What I did not like about Moza Mini S Essential is the Moza app. The app’s interface is a bit confusing, and you will have to spend a lot of time in order to understand it. Besides that, you will have to connect your device manually each time you want to access the app. Even the shooting modes on the app overlap the recording button.
It undoubtedly offers great stabilization, but there are some limitations. You can pan only up to 270 degrees, tilt up to 200 degrees, and roll up to 315 degrees. So keep in mind that while shooting videos, you might feel that you reach limits too quickly. However, the build quality of the gimbal is decent.
Conclusion Well, Moza Mini S Essential is definitely not a perfect gimbal, but if you compare its price and features, it’s definitely a value-for-money product. So in this price range, this is an excellent option, and I would definitely recommend you buy it. That’s all for this article. Thank you for reading it
Source: Moza Mini S Essential – Review
0 notes
Text
Tips to Fix Delayed Notifications on Your Android Device
Getting delayed notifications on Android may be frustrating. One may get annoyed when they don’t receive important messages at the right time. App notifications sometimes take a long time to appear on an Android device. It may be frustrating enough. In order to fix the problem, anyone can apply the methods given below. Now is the time to know about the solutions.

Background Restriction
Android smartphones prevent several apps from working in the background to save battery life. When such apps don’t work properly in the background, the notifications take time to appear on your device. If your smartphone is restricting the functioning of any app on your device, you can allow these apps to work properly in the background so that you can receive notifications on time. Follow these steps:
Go to the “Settings” option on your device.
Now, tap on “App & Notifications”.
Now, choose “See all apps”. When you select the option, you will see all the apps installed on your device.
Tap on the “App Details”, and then tap on the “Advanced” option.
Now, you need to tap on the “Battery”.
You can choose which app you want to work in the background.
Configure Battery Optimization
In most of the cases, the afore-mentioned tip may not work. You can apply the information below to fix the problem. Follow the instructions:
Go to the Settings and tap on “Apps & Notifications”.
Now, tap on “Special app access.”
Tap on “Battery optimization” and select all the apps from the drop-down.
Tap on the app that shows delayed notifications. You will notice three options here. Choose the one that reads “Don’t Optimize.”
Now, the app will display the notifications as soon as they are received.
Turn Off Adaptive Battery
If your device is not still showing the notifications on time, turn the Adaptive Battery feature off if it is on. Turning it off may fix the problem of delayed notifications on your device. Follow these steps:
Go to the Settings option.
Select Battery.
Tap on the “Adaptive Battery”.
Simply toggle off. It may fix the problem.
Turn Off Battery Saver Mode on Your Android Device
Battery Saver Mode prevents many important apps from running in the background. The reason for delayed notifications on a device may be Battery Saver mode in running state. If the feature is in the running mode, disable it to allow the apps to run in the background. Android user can find this feature in the Settings on their device.
Clear Cached Data
You can fix such an issue by clearing cached data on the app. In order to clear cached data on an app, follow the steps mentioned below:
Go to the Settings option.
Simply choose “App & Notifications”.
Now, tap on the “See all Apps” option.
Tap on “Storage & cache” option.
Choose the “Clear Cache” button. Clearing cached data may speed up the functioning of an app.
Turn Off Data Saver on your Android Device
It may be a big reason for delayed notifications on your device. Data Saver stops the apps that work in the background. Turn off the Data Saver in following way:
First, go to the Settings.
Select “Network & Internet”.
Now, select Advanced.
Turn off the Data saver.
Turn On or Turn Off Airplane Mode
This simple trick may sometimes work. Turn on Airplane mode, and now turn it off. Now you need to turn on your mobile data. This may fix the issue. These were the best tips on how to fix the delayed notifications on your Android device. We hope you find the tips helpful.
Source: Fix Delayed Notifications on Your Android Device
0 notes
Text
Mac Keeps Crashing? Here Is How to Fix It
Nothing can be as annoying as Mac crashing when you are playing your favorite move in your favorite game. If your Mac keeps crashing, there is no need to get disappointed. The issue is easy to fix. Several factors can cause your Mac to crash. We have presented the ways to resolve the issue of Mac crashing. Let’s get started.

Why Mac Keeps Crashing?
Although Mac comes with great durability, yet it faces some common issues such as crash and freeze. The reasons for the crash may vary from user to user. Before you start resolving the problem, you first need to know the reason for your Mac crashing. Once you have understood the right reason behind the Mac crashing, sorting it out won’t take even a minute.
If your Mac runs out of system memory, this can lead to a crash.
If Mac has too many programs installed on it, this may affect the health of your Mac and lead to frequent crashes.
If there is insufficient space on the startup disc, this may be the reason for crashes.
Note: We have mentioned the reasons for Mac crashing. Below is how one can resolve the issue.
Recover Data from Your Mac
After you have understood the main reason for your Mac crashing, you can now go ahead and try to fix this issue. First and foremost, it is recommended to recover your essential data from a crashed Mac. If the situation goes out of hand, you will lose all of your data. To avoid any data loss, you need to recover the important data on your crashed Mac. You can use a good recovery tool for this task.
Reset System Memory Controller
System Memory Controller, also known as SMC, supports a Mac. If you reset SMC, the problem may be fixed to a great extent. If you own a Mac desktop without a T2 chip, you need to turn off the device, turn off the power supply, and wait for about two minutes. Then, connect your Mac to the power source and turn it on.
Run Apple Diagnostic
Disconnect all external devices from a power source. Let the mouse, keyboard, and internet connection remain connected. After 5 minutes, restart your Mac and hold down the Option + D key until the Apple Diagnostic screen appears. If the Diagnostic tool does not appear on the screen, hold down Option + D when you restart your Mac again. If your device has any issues, this will show you how to fix the problem and provide the reference codes.
Boot into Safe Mode
After upgrading your Mac to the Latest Mojave or Catalina, a Mac may sometimes freeze or crash. It is recommended to restart your Mac in Safe Mode. Safe Mode can repair the directory issues. Follow the steps given below:
Restart Mac and quickly hold down the Shift key until you see the login window.
Open Mac’s spotlight and type in “System Information.”
Now, click “Software” to verify the boot mode as safe.
If you notice that everything is okay with Safe Mode, restart your machine without pressing any key.
Use the Disk Utility to Fix the Issue
Disk Utility is an excellent in-built program that you can use to fix various problems. It is helpful in fixing the crashing issues also. Follow the steps below:
Restart your Mac. Keep holding down CMD + R until you hear a bell chime. This will boot your machine in Recovery Mode.
When the Recovery Mode is in process, launch Apple’s Disk Utility app.
Select your startup disk, then click First Aid, then choose Disk Utility. It will fix the crashing problems.
We have mentioned several helpful ways to fix the issue of Mac crashing. We hope you find the article useful.
Source: Mac Keeps Crashing? Here Is How to Fix It
0 notes
Text
The Top 10 Photo Storage and Sharing Sites
Are you here in search of the best photo storage and sharing sites? You are in the right place. This article will be a complete guide for you for the best photo storage sites.

Digital photo-sharing sites are great if you want to keep your photos in your pocket. No doubt, physical storage drives or SD cards are also excellent to store images but remember that your photos are at risk with these physical drives. You may lose your memory in the form of pictures if they are damaged or lost.
For this good reason, digitally storing photos is both a safe and reliable place. The online images sharing sites provide a wide range of facilities in addition to an online backup. They allow you to do many more things with your photos, such as organizing, editing, and sharing them with friends and family. Some of these services are free, and many are used by professionals to generate revenue by selling their photos.
Moreover, having an online storage site is always advantageous in this digital age where everyone wants to capture their moments and make them last longer. We have included the ten best photo storage and sharing sites to digitize your memories. Let’s see a brief description of all of them.
Flickr
We have included Flickr at the top of our list because of some unique advantages. It offers vast storage space, and the interface is simple to use. A power shooter can also consider this service. This service has many useful tools and features that allow you to download or view an image with your desired resolution. Flickr also represents stats about the viewers of your images. You can use drag and drop tools to organize your photo album. With a free account, you can store up to 1000 photos. The premium account costs a subscription price of $60 annually.
500px
It has been mainly developed for power photographers. 500px prepares a photo from the front and center with an attractive look. It allows you to combine your photos using a specific theme called Sets and Stories that represent your photos in a striking manner. The free version allows you to store up to 2000 images, but you can upload only seven pictures in a week. The company doesn’t provide printing facilities for photos. 500px offers two types of affordable premium subscriptions: $4.99 monthly and Pro $9.99 monthly. There are no restrictions on uploads with both plans.
Google Photos
Google Photos is an ideal option if you are looking for ways to back up your smartphone’s photos. Google developed this app to digitize smartphone videos and pictures, but now it is used as a popular image editing and storage service. You can edit the photos stored on Google Photos and make several changes like cropping, enhancing colors, and more. After completing the editing process, the app allows you to combine your artwork into an album and also lets you share with any Google users or other people. On a free account, you can share photos up to 16 megapixels and videos up to 1080p. The subscription price starts at $2 for 100MB monthly.
Amazon Prime Photos
If you have an Amazon Prime subscription, you don’t need to look for another photo storage service. Because Amazon provides its own photo-sharing service called Amazon Prime Photos for Prime members. This Amazon photo storage service allows you to store unlimited photos through your computer, smartphone, and tablet. The uploaded photos and videos are automatically tagged according to the type and location. Unlike 500px, Amazon Prime Photos lets you print your images, cards, calendar, and more. There isn’t any free subscription for this service. The premium subscription price starts at $120 annually for unlimited uploads.
Apple iCloud
Apple has specially developed this service for Apple device users. iCloud requires integration with Apple Photos to run on iOS and Mac devices. Many basic features can also be used on Windows PC. Under a free subscription, you get 5GB of free storage space to upload photos. You can tag images based on names and locations. You can also add pictures from other iCloud users, which is a great feature to get images from more than one photographer. If you have uploaded photos with the same face, the service automatically groups those images for a better user experience. If your free subscription gets exhausted, you can go for premium plans. The premium plans include 50 GB for 99 cents monthly, 200GB for $2.99 monthly, and 2TB for $9.99 monthly.
Adobe Portfolio
Adobe introduces an excellent photo-sharing service and Portfolio creator for its Creative Cloud subscription users. There is no free subscription to this service. The premium plan starts at $9.99 monthly with 20 GB of storage space, including services like Adobe Fonts, Photoshop, and Lightroom. If we talk about the top-tier plan, it is $52.99 monthly for storage of 100 GB, including other benefits like InDesign, Photoshop, Premiere Pro, Illustrator, and more.
ImageShack
If you want an affordable but unlimited photo storage service, ImageShack is one of the best alternatives. It has no free subscription. The paid subscription starts at $3.99 monthly and $37.99 annually for unlimited uploads. The service also allows us to do many more things, such as watermarking photos, embedding photos, and sharing them. If we talk about the Pro and Premium subscription, they cost $29.99 monthly and $99.99 monthly, respectively. These plans provide extra bandwidth for downloading and viewing photos. ImageShack is available for all Android, Windows, iOS, and MacOS.
Photobucket
Photobucket comes with many editing and eCommerce tools for professional users. You get limited uploads of up to 250 photos on the free subscription. The free version also shows unwanted ads. The paid version comes with three types of facilities, including ad-free, Intermediate, and Expert. All these plans have different pricing methods. Using the paid pans, you can also access your images from a third-party site.
SmugMug
It is also one of the best design-oriented image-sharing sites for professionals. SmugMug provides a beautiful home to show photos, including a custom homepage and many premade templates. You won’t get a free subscription to this service, but a 14-day free trial is available. The affordable plan is $8 monthly and $55 annually. The Pro plan costs $432 yearly for advanced features like eCommerce tools. No matter which plans you have, you get the ability to unlimited uploads. You also get some editing tools to make some changes to the photos.
Dropbox
Finally, we have come to the last photo-sharing sites. Dropbox allows you to store photos through its iOS and Android apps. The service also lets you store pictures available on your computer. With cloud photos, creating slideshows becomes easier, and anyone can use the same. Dropbox doesn’t have features of tagging, printing, and photo editing. However, you get a free collaborative editing tool which is known as Dropbox Paper. You can’t do photo editing with this tool. The free plan offers 2GB of free storage. The Pro subscription costs $16.58 monthly for 3TB of space.
Hello, K.blair, and I’m from Ontario. I completed Social Media Marketing course, and I am currently assisting my clients regarding how to use social media to expand their businesses online. and how to build own website on the word press platform here is the my blog On the following links, I’ve shared some of my work:
alexa.amazon.com | alexa.amazon.signin.com
Source: Top 10 Photo Storage and Sharing Sites
0 notes
Text
Quick WordPress Security Vulnerability Fixes
Like all other sites, WordPress sites are also vulnerable to web-based threats. Hackers can hack WordPress sites once they find a loophole in your network security. It is quite essential to keep your WordPress site safe from hackers. If you are in fear of your site getting hacked, you have come to the right place. We have brought you a list of several quick and easy ways to protect your site from being hacked. Let’s take a glance at the quick fixes below.

Outdated Plugins
WordPress comes with several plugins. When a plugin becomes outdated, it may become vulnerable to online attacks. It is essential to keep your plugins updated as hackers can target your WordPress site using their advanced tactics. It is recommended not to use outdated plugins. To update the outdated plugins, you can visit Admin Panel and check for the updates.
Upgrade WordPress to the Latest Version
The latest version brings extra security features and adds multi-security layers so that any WordPress site does not face any security issues. If you are still using an obsolete version, you should update it. The latest version offers advanced security features and fixes all the vulnerabilities to hackers. To update the version, go to the Admin Panel and click “Update.” You can set it to auto-update mode, so there is no worry about updating it manually.
Poor Hosting Service
The better your hosting service is, the tighter security it may provide to your site. You should know which PHP version your hosting provider is offering. If your PHP has become outdated, update it. The outdated PHP version makes your site open to online attacks. In order to know which PHP version your WordPress site uses, go to Tools > Site Health. If it is outdated, you will see the option to update it.
Avoid Granting Different Users Permissions
If you permit different users to manage your website, this too can be risky. They can edit the site, payment details, and much more. WordPress site offers different roles for which permission can be granted. These include Author, Editor, Administrator, and Subscriber, and Contributor. If the permission falls into the wrong hands, your WordPress site can be hacked. Give users access to the WordPress site only if they are trustworthy to your organization.
Avoid Weak Password
It is always recommended to create a strong password as weak passwords are more vulnerable to hackers. Never use your phone number or lucky number as a password because it may be risky enough. If someone is making repeated attempts to log in to your WordPress site, it may crash. If your password is not as strong, you can change it by going to the WordPress Admin.
Use Default Login Area in WordPress
You can keep the WordPress site safe from hackers by using your default login area. In order to create a customized login area with Defender, go to “Advanced Tools” and just click to get started and create a custom URL. Masking your login area is a great way to avoid getting hacked.
Use SSL/HTTPS
SSL/HTTPS is an encryption method that protects your WordPress site from the evil eyes of hackers. It does an excellent job of securing the connection between your hosting server and the user’s browser. Add SSL/HTTPS to your WordPress site to protect it from hackers. Most hosting providers offer encryption technology. It becomes quite difficult for hackers to access SSL/HTTPS enabled site.
We have mentioned various methods to protect your site from hackers. These methods will ensure the security of your WordPress site. We hope you find the information of great help to you.
Source: WordPress Security
0 notes