ellieswilliam
it wasn’t so bad.
thay, gmt-3. sideblog for posting and reblogging rp and editing resources. i follow back from @gravesdomain.
168 posts
Last active 60 minutes ago
Don't wanna be here? Send us removal request.
Last Seen Blogs

grey1580
Untitled
clashpistols
god's lonely man
zeltk
Zel
jennifxrjareua
The truth is rarely pure and never simple.

justescortbabesfan-blog
Escort services in Zirakpur
Text
SAMANTHA LOGAN GIF PACK .
click the source link to access # 108 GIFS of SAMANTHA LOGAN in all american, season four. ━━━━ all these were made from scratch by me. please like or reblog if you found these useful.


do not edit, redistribute, claim as your own.
content warning: none.
79 notes
·
View notes
Text
TALIA RYDER GIF PACK
PUBLIC COMMISSION !! by clicking THE SOURCE LINK you will be redirected to a page with 451 gifs of TALIA RYDER as LILLIAN in THE SWEET EAST (2023) made from scratch by me, sophie ! talia was born in 2002 ! please don’t edit these or add them to gif hunts and like or reblog if you use them ! :) thank you so much to my commissioner, and click this link if you’d like to know more about my commissions !

80 notes
·
View notes
Text
・゚✧ ・. MALESE JOW GIF PACK
click the source link (or visit my directory) to be directed to a page where you’ll find #52 gifs of Malese Jow (Melise) in Casual. all gifs were made by me from scratch. you may use them in sidebars, as reaction gifs, or edit them into gif icons. do not repost into gif hunts or gifsets. please make sure to credit me with an @ if resharing them as gif-icons/crackship gifs.
please like or reblog this post if you find it useful!
warnings: lightly implied sexual content, alcohol consumption.


88 notes
·
View notes
Text
madeline ford, { commissioned } 𝐆 𝐈 𝐅 𝐏 𝐀 𝐂 𝐊
by clicking on the content source below, or here, you’ll find #420 gifs of model & influencer madeline ford in various videos. all of the gifs were made from scratch by me, and intended to be used for roleplaying purposes only. please don’t claim them as your own or add into other hunts! if you do, please credit/tag me, or contact me, before you intend to repost edited versions, that would be kind. last but not least, a like / reblog would be the best!
content warnings: flashing lights
92 notes
·
View notes
Text
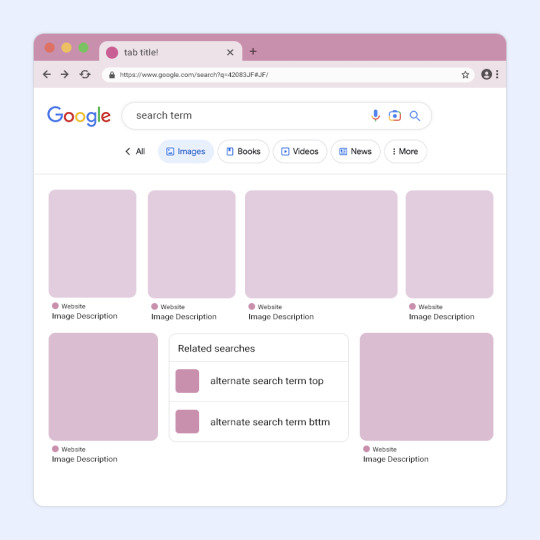
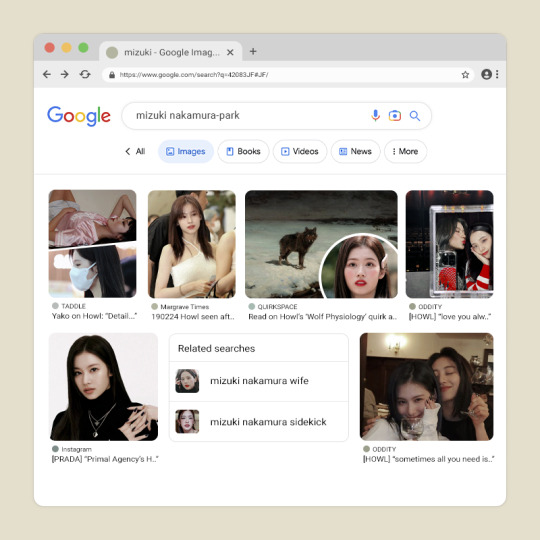
DAYSLILY DELIVERY 💌 template #42: image search.
by clicking the source link, you will be redirected to a psd download of the template shown above (via deviantart). as you can probably tell, this template is inspired by the google image search screen. this has been sitting in my cloud docs for so long so i hope everything makes sense! i added a layer to explain editing tips as well.
usage guidelines: read here.
fonts needed: roboto (google fonts).
if you like my work, consider donating to my dog’s surgery.
296 notes
·
View notes
Note
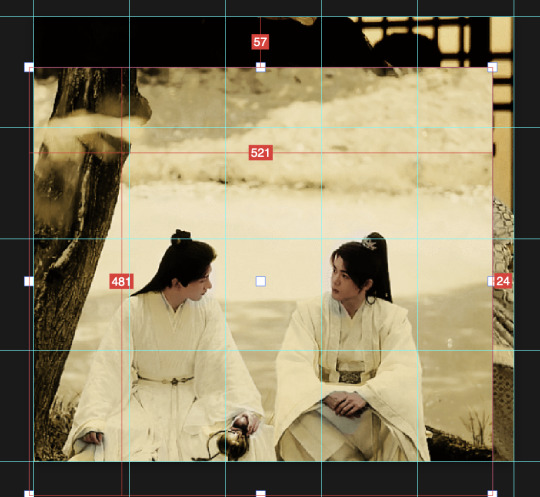
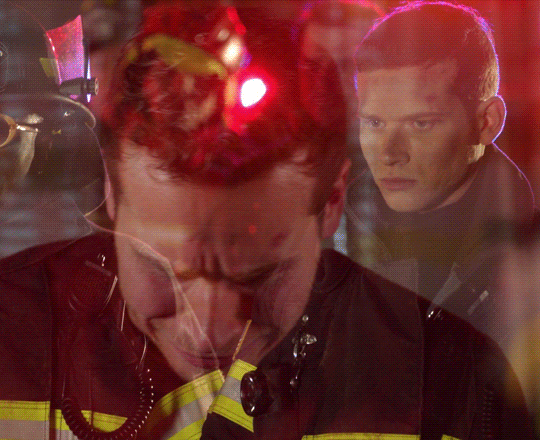
Hii you're so talented!! i wonder if you could explain how you did this gif effect with the squares? and do you have any tips on colouring because yours is always top notch <3333
heyy thank you so much 🥹 and of course! i've never really done a tutorial before but i'll try my best to explain it in a way that makes sense 😅

so i start off with making my two gifs seperatly and colouring them as i normally would, once i've done that i load both gifs into the same project and once i've done all that i started on the grid part:
now go to view -> add guides and this window should pop up:
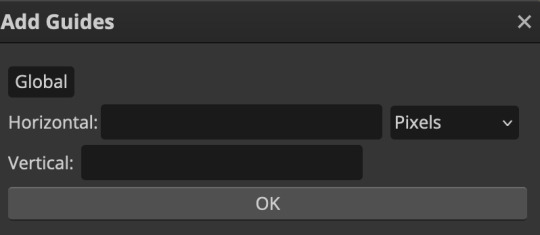
(it's was so daunting at first when i saw this i was like ????? and started putting in random numbers and was like oh that's how this works 🤣)
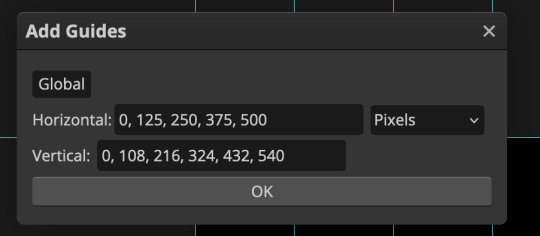
here's the settings i used for my gif which is 540px x 500px in size with 5 squares x 4 squares: (if you want more or less you just have to play around with it)
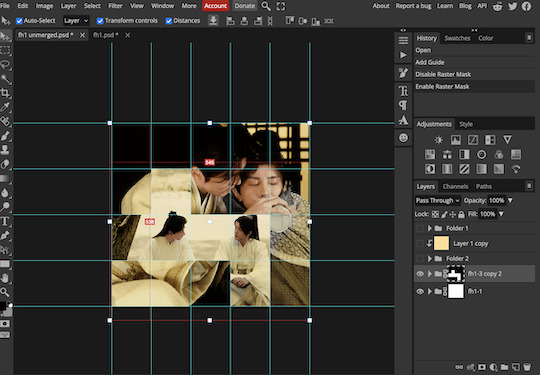
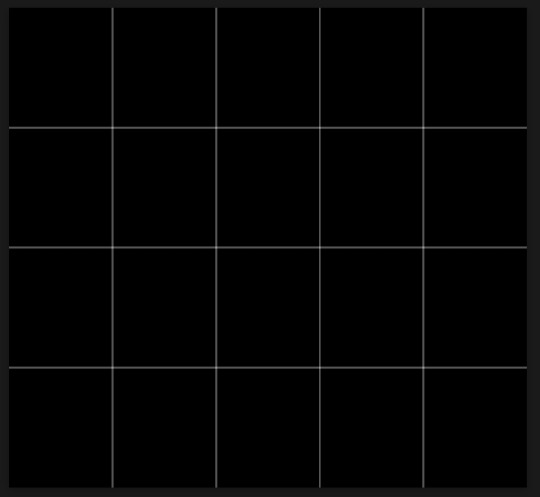
once you've done that it should look something like this:
now the next part is really up to preference again: add a vector mask onto the gif that's above the other one like this: (ignore the name of my folder that is irrelevant 🤣)

and then i used the rectangle select tool (this is because the rectangle select should lock onto the grid squares making it easier to erase certain sections) + a black brush tool to erase the squares to show the other gif that's underneath (you can reposition both gifs to your liking which is what i did)
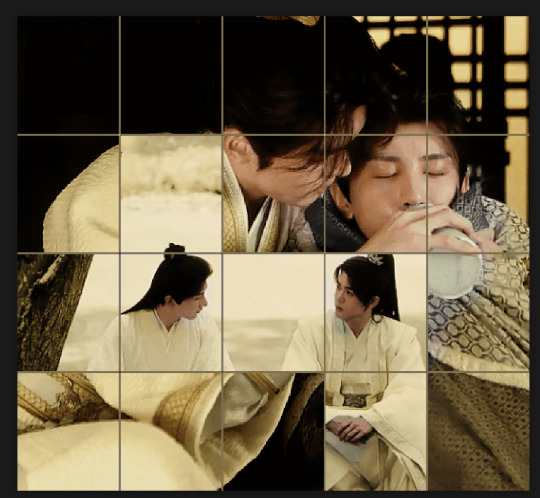
before & after:

so my vector mask looks like this afterwards

(you don't have to do the squares so close together like i did it was just how i liked it & because of the scenes i had chosen that mine turned out this way)
now onto the grid lines: i used the line tool with these settings

just like with the rectangle select tool the line tool should lock onto the grid line you want to redraw, do this for every line that you want/have for your grid & once you're done go to view -> clear guides and it should look something like this: (added a version with just a black background so it can be seen a little easier)

(i'm ngl idk why my lines ended up kinda faded and not white 🤣 i think it might be because i used a white fill instead of white stroke but it doesn't really matter to me because i got my ideal outcome anyway 🤣)
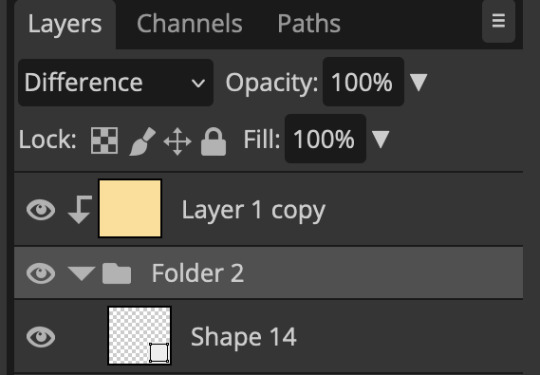
bonus step: you can stop here if you'd like but i wanted my lines to match my colouring & my intended typography so i put all my line layers into a folder and set the mode to difference & added a yellow fill layer with a clipping mask, like this:
and it should look like this:
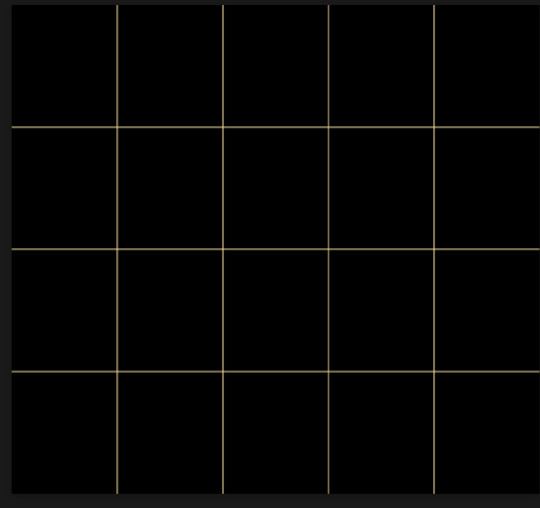
you can also play around with the opacity of the lines too which is what i tried out but i prefered for my set the lines being at 100% opacity but it's really up to you with what you want to play around with
now once you're happy with everything merge those layers together (make sure they have the same amount of frames first before merging them) and either save as it is or add some typography like i did and you should end up with this:
for tips when it comes to colouring it really depends on what you're colouring, if you want to manipulate the colours as much as i do i recommend choosing a colour within the scene so you're not having to change too much, or finding scenes that have colours that can be manipulated more easy (any colour that aren't skin tones, unless you're working with red or yellow like i did here, i chose yellow because one of the outfits in the gif was yellow toned and it looked better with the gifset being yellow than my original colour which was blue), also looking for scenes were the people in it don't move as much also is a big help!
i hope this helps :) feel free to ask more questions if you didn't understand or want some more tips i honestly don't mind!
123 notes
·
View notes
Text
˖ ࣪ . ♡ ˚ . 𝒔𝒂𝒎𝒂𝒏𝒕𝒉𝒂 𝒍𝒐𝒈𝒂𝒏 gif pack.
by clicking the source link , you will gain access to #103 gifs of samantha logan in episode 1 of season 6 of all american ! this pack will be constantly updated as new episodes come out ! all of them were made by me for roleplaying purposes . you CANNOT claim as your own , repost , use in your own gif packs or edit . DO NOT use my gifs in real life celebrity , sm*t and t*boo rps or this will result in immediate block . if using , please like / reblog the post .
87 notes
·
View notes
Text
#264 gifs of IMADA MIO in 'oyabaka seishun hakusho (2020),' can be accessed by joining my discord server, or sending me a message off anon. mio is of japanese descent and was born in 1997, so cast accordingly. please like and reblog if you found these useful.
tw: violence, injury, alcohol
please read my rules before using. all gifs were made by me, so do not redistribute or claim as your own.

126 notes
·
View notes
Text
✧ * Tanaya Beatty Gif Pack * ✧
In this gif pack, you will find a total of #500 gifs of Tanaya Beatty (b. February 12, 1991) in her role as Annie Bird in Through Black Spruce (2018). With this pack, it brings the total amount of gifs of her on my blog to #539. She is Da’naxda’xw & Himalayan, so remember this when using her as a faceclaim.
Triggers: Guns, drugs, alcohol, flashing lights
Please like/reblog if you use these and make sure to read my rules!
@tasksweekly: #015 (Indigenous Peoples of the Americas)
[ DOWNLOAD / GIF PAGE / RULES ]

595 notes
·
View notes
Text
in the source link there are 46 gifs of talia ryder in dumb money, made for roleplaying purposes. feel free to edit for personal use! please do not my gifs if you write ‘t*boo’ plots (including extreme age gaps, she is only 21! be respectful!). like and reblog if you want to support my work.
content warnings: harsh lighting, kissing.


167 notes
·
View notes
Text
in the source link there are 188 gifs of lukita maxwell in shrinking (2023). they are chinese-indonesian/white & born in 2001, please cast accordingly. these were made for roleplaying purposes. feel free to edit for personal use, but credit is loved! please do not my gifs if you write ‘t*boo’ plots.
like and reblog if you want to make me smile! ♡
content warnings: eating.


147 notes
·
View notes
Text
FIVEL STEWART GIF HUNT
clicking on the SOURCE LINK you will find 85 ( 268x151 ) gifs of FIVEL STEWART in interviews. all gifs were made by me from scratch, so PLEASE do not claim as your own or redistribute. LIKE/REBLOG if you found this helpful.

34 notes
·
View notes
Text

Heeey everyone. Today, I’m releasing an EXTENDED CHARACTER STATS TEMPLATE that I worked on with @jemsourced. Please do check her blog and out follow her! As with my other contents, this is also suitable for period/fantasy muses. Without further ado, click the read more! TW alcohol and drug mention.
Like or reblog if you find this useful ♡ If you enjoy my content, please consider donating to seeturtles or teamtrees!!
Keep reading
377 notes
·
View notes
Text

theme 89 / preview - code
theme with custom post and font size, unnested captions and a lot of colour options. dashboard-inspired post styling with full npf support and sticky post headers.
sidebar with title, two icons (60x60), basic info, description and one extra link.
read my terms of use. please reblog if you plan on using!
287 notes
·
View notes
Note
Can you please do a blending/overlay tutorial!?!?!
ohhh i can definitely give you some tips on how i do it!
so, assuming you know how to make gifs and use the timeline/smart object gifs, this is how i usually go about it. I use photoshop cs5, for reference.
i'll use this recent gif from my don’t blame me gifset as an example:

1. Choosing what to blend
It's much easier to blend 2 gifs together when at least one of them has dark areas. Two bright gifs don't usually work as well, but it's still doable with some work. For example these 2 moments are both mostly dark, so it makes things easier:

2. Bringing 2 gifs together
To put 2 gifs on the same canvas, what I usually do is:
In one of the gifs, I select the size I want with the crop tool (540px by 400px in this case). You then drag the resize box how you want it on your gif. This will resize and crop your gif.
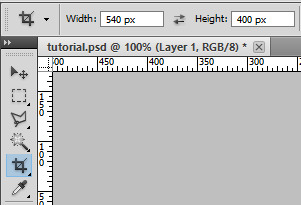
Then I go to the other gif and do the same thing. With that resized and cropped layer, I right lick on it, go Duplicate layer... and then choose to send it on my other gif's document. When both gifs are on top of each other you can start moving them around and blending them.
3. Blending options
Photoshop has multiple blending options that will give you many different results. What works best for blending gifs is usually the option Screen. This is what I get when I put these 2 gifs on top of each other, with the top group with the left gif set to Screen. Make sure the Screen layer is always on top.
I like to put the gifs in groups, it makes things easier (and tidier) further down the road, but it will work anyway with the smart object gif layers. For this particular gif, groups were not 100% necessary, but for more complicated gifs with different colorings, it's definitely a must in my book.

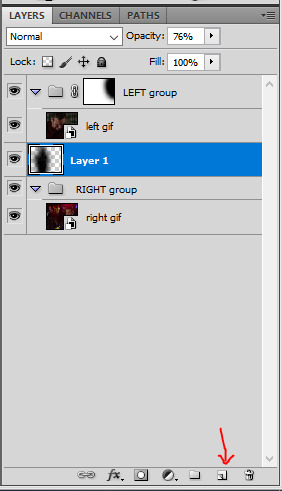
4. Layer masks
As you can see, this works, but there are definitely parts I would like if they didn't overlap, especially on the right ride. You can easily remove unwanted parts by painting them out with a Layer mask. In this particular case I want to remove the right side of the left gif, so I selected that group and made a layer mask by clicking on the icon at the bottom of the layers window. You'll get a white window next to your layer name. Select it. You then want to use a very soft brush and paint in black what you want to remove.
These layer masks act as "alphas" to drive the opacity of the layer. What is white will be at 100% opacity, and what is black will be at 0% opacity. You can definitely brush in some gray if you want an in-between look. Here I went full black.

This is the result I get after masking out the unwanted right part. Now I only have that one gif showing on the right side, instead of a blend of the two:

5. Painted layer
So you can see other characters still showing through on the left side of the gif. You can definitely go and paint the parts you want to remove on the right group as well, but if your layer masks overlap, it can create some transparency in your gif and we don't want that. Instead, I create a new empty layer by clicking on the icon, and put it in between the two groups. This layer doesn't need a different blending mode. With a soft brush and the black color, I go paint where I want to mask the right gif, so it doesn't show on the left side.
I played with that layer opacity because I liked to still see some of the right gif's details peeking through. Here's the result:
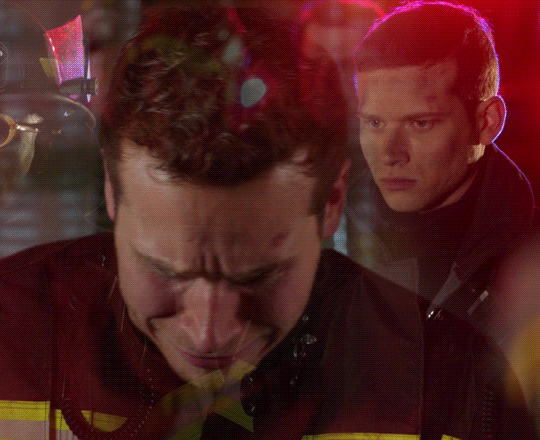
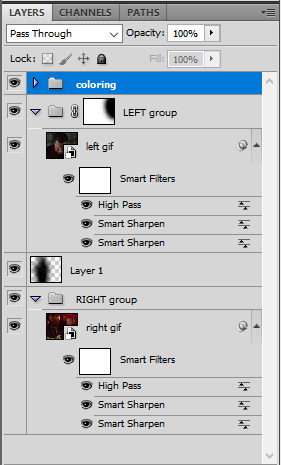
6. Final touches
At this point I will usually sharpen both gif layers and make the coloring, and then I will adjust the layer masks if I feel like I need to. In this case I thought it was fine as it was so I didn't change anything.
For this one I simply put the coloring on top of both gifs because it worked fine for this example, but you can also have a different coloring for each gif if you want. Just make sure you put the two different colorings in their respective gif groups. Remember that the top folder should always be set to Screen for the blending to work, even with coloring layers/groups inside that "main" gif group.
And that's pretty much it! This one was quite simple, but it's incredible what a screen layer and some layer masks can do :) I hope it helps!
Also, @usergif has an amazing tutorials directory for more resources if you need! I always find great tutorials there.
664 notes
·
View notes
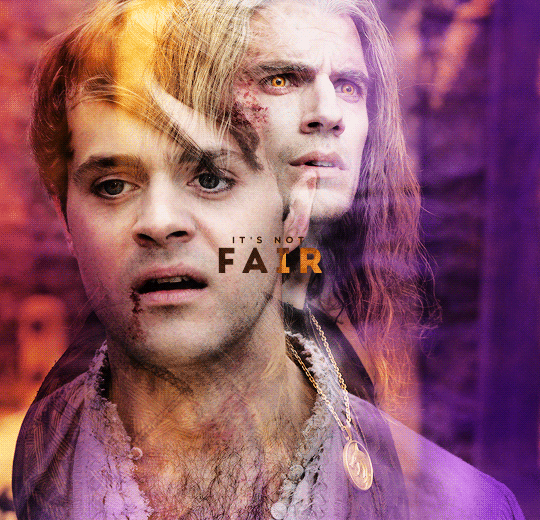
Note
Would you mind going over how you did your coloring set like this? /post/678272066966978560/jaskiers-feelings-for-geralt-as-expressed-by it's so beautiful
i like to call this the @yenvengerberg method, as she is the absolute queen of this type of coloring and i am in awe of her talent and how she always nails these perfectly. the trick is to basically to color the two gifs you want to overlay separately with complementing colors and blend them.
(slightly more detailed explanation under the cut)
select the two scenes you want to blend. color them like you would normally, and then add a color layer on top (layers -> new fill layer -> solid color, and then set the blending to ‘color’). choose two colors that complement each other. i usually choose two scenes where there isn’t too much movement - as you need to avoid coloring the face/body. don’t worry too much about the background - even if the original gif doesn’t look great (like the first gif here, where the background players look all yellow 😂), you could probably edit it later.
when blending two gifs i also usually like to crank up the black, either by using selective color layer -> blacks -> add more black %, or by adding a new curves layer and using the 'set black point’ tool.
overlay the two gifs together, and that’s... pretty much it. you can add some brightness/contract to make the colors sharper, or play around with the color layers you chose earlier to make the end result prettier if the colors don’t really mesh that well with each other. :) add layer/group masks in the areas where you want to highlight one gif over the other (in this case, over jaskier’s face).

it really depends on the scenes you choose, the colors, the brightness, etc. - but after you blend the two gifs, look at what you get and just play around with it!
for example here, after blending, due to the gifs being very bright, i got these lovely shades of dark pink - so i added a couple more touches of it between the layers to highlight them.
and, yeah, that’s pretty much it! let me know if you have any more questions!
162 notes
·
View notes
Text
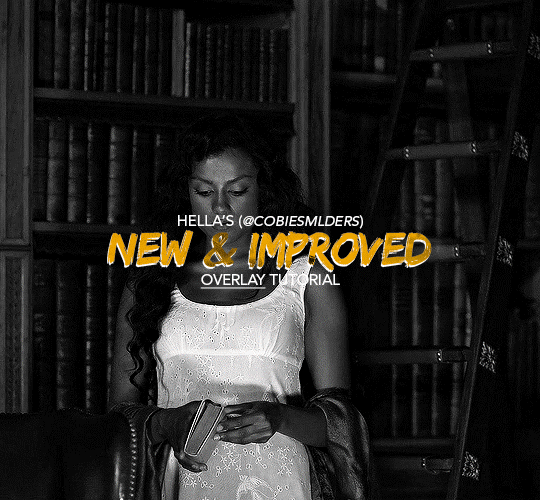
Hello!! A couple years ago I posted this tutorial for making gifs with a moving overlay effect. In the two and a half years since I made that tutorial, I've learned some new tricks for this gif effect but most importantly I've learned how to explain things better.
For that reason, I've created this new and improved tutorial for my overlay gif effect. The basics are the same but it's simpler, I go into more detail, give better explanations, and have more comprehensive instructions.
The easiest way to do this effect with this method is to use smart objects and work in timeline. For this tutorial, I’m assuming you know the basics of giffing like cropping, resizing, colouring, etc. If you need help with this I’d suggest you look at some other tutorials and guides!!
First, we’re going to start off with three things.
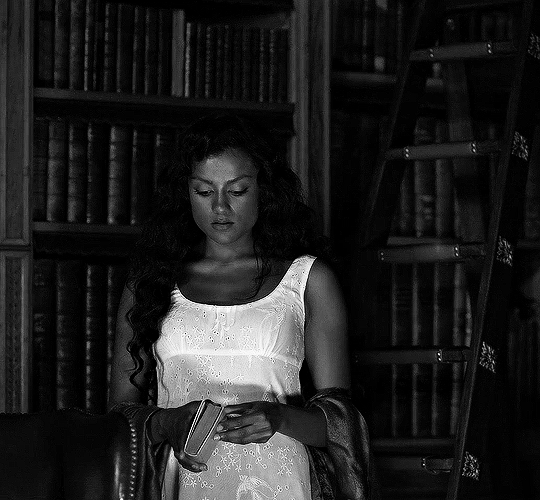
1. A completed gif converted into a smart object that is going to be the base gif. I'm going to call this "gif1". You’ll want this gif to be at least 3 seconds because it needs to last as long as the overlay plus a little bit of extra time in the beginning.
This is the base gif I’ll be using in the example (except I trimmed it so that I could meet the size limit).
2. A second completed gif converted into a smart object that is going to go over the base gif. We’re going to call this "gif2". This gif should be at least 2 seconds but I’ve made it work with shorter. Gif2 needs to be the same dimensions or bigger than gif1.
This is the gif I'll be using in the example (except I trimmed it so that I could meet the size limit).

3. An overlay in video form. These can be found on tumblr and youtube by search for overlay or transition packs. For this example, I'll be using an ink drop overlay I found on youtube.
Step 1: Turning the overlay video into an overlay gif
Most overlays aren’t going to instantly fit the gif effect you’re trying to achieve right away. This is the overlay I got from youtube and as you can see it’s too slow and needs a crop/resize to be usable.

To fix it, I sped the frame rate up, cropped the overlay, and resized the overlay so it fits over my base gif. I also sharpened the overlay (500% amount, 0.3px radius) so that the edges were smooth. This is the new overlay gif and the one I’ll be using for the gif effect.

A tip: I also like to add a brightness/contrast layer to get rid of the grey on the overlay gif. Because we’re working with blending modes to achieve this effect, any parts of the overlay that are grey will be a blended mix of gif1 and gif2. If you think this will look good for your gif effect then don't worry about it!
Another tip: try to get the entire overlay movement to fit into a 2-3 second window. Anything longer than that will likely be cut off when you have to trim your gif to meet the upload size limit and it would suck to only have half of the overlay.
Step 2: Creating the gif effect
Drag a copy of gif2 and a copy of the overlay gif onto the gif1 canvas. I like to use Ctrl+Shift+V so that the layers are pasted in the same position as they were on the previous canvas. MAKE SURE that both overlay layers are in the same position on the canvas. If one of the overlay layers is higher/lower/etc. than the other then the effect won't work properly.
Then, make a second copy of the overlay and invert it (Ctrl+i). These are the layers you should have:

Before you go any further, trim gif2 and both overlay layers so they are all the same length.
Now, we need to rearrange the layers and set blending modes. The top layer should be whichever overlay goes from black to white. This is because when we change the blending modes, the white part of this layer will disappear and look like its being replaced by gif2. In this case, that is the overlay (inverted) layer. Then we want gif2, the other overlay layer, and then gif1.
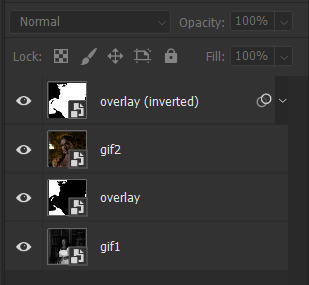
A tip: this process can be done the other way where the top layer is the overlay that goes from white > black however, you are much more likely to have an error where there is a grey/black line around the overlay effect in your final gif. In order to avoid that, I always use the black > white layer on top.
Next, set the top overlay layer to darken. You should only see the black part from the overlay and gif2 should fill in the white part. Here’s how that looks in my example.
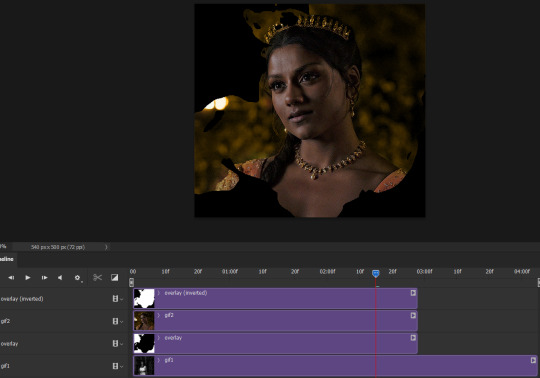
Next, select the top overlay layer and gif2 and convert both layers into one smart object. Your layers tab should look like this now.

Now, set the new layer’s blending mode to lighten and the overlay layer’s blending mode to darken. Once you do this, you should be able to see gif1 as well as the overlay gif.
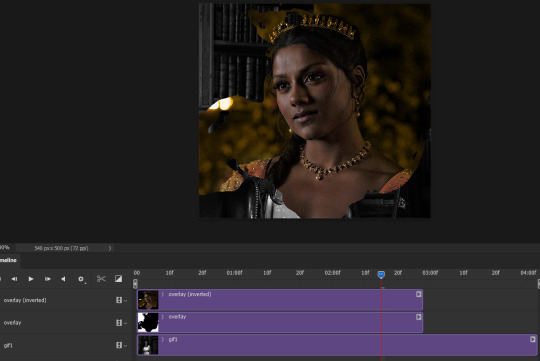
Step 3: Timeline and exporting
At the moment, gif1 is still significantly longer than the overlay gifs. Since this gif is just over 10 mb (which is pretty small for this effect) I’m going to trim about 1/4 of a second off the end of gif1 and then drag the overlay layers so they all end at the same time.

Now you’re free to export the gif! This is the finished effect for the example gif!

A tip: sometimes, when I convert to from timeline to frames, the gif becomes a little longer and slower. It has to do with different frame rates across the videos and photoshop but I'm not smart enough to understand it. If that happens, just set all the frames with the overlay layers to 0.04 speed instead of 0.05.
And we're finished! I hope that was helpful and made sense. If you have any questions feel free to drop them in my inbox or send me a message!! <3
1K notes
·
View notes