
Last Seen Blogs

les-is-more-blog1
Fight me, pretty boy

shilpvaishnodevi
Untitled

bjhardy
✨ ben hardy ✨

drawntomath
Prof. Bastion Misawa

browar70000000
Bez tytułu
Text
linux and 2 monitors
If I have my 2nd monitor connected via HDMI cabel, i open the terminal and run xrandr
The output should have LVDS1 connected primary and HDMI1 connected 1280x1024+0+0 and if i have my 2nd monitor on the left, i do xrandr --output HDMI1 --left-of LVDS1 NOte that the main panel will be on the HDMI monitor.. well but at least the dragging of mouse between them will be smooth and the resolution will be right. So the main panel thing doesn't really matter..
and if i want to turn off the 2nd monitor, i do xrandr --output HDMI1 --off
1 note
·
View note
Text
Xfce error.
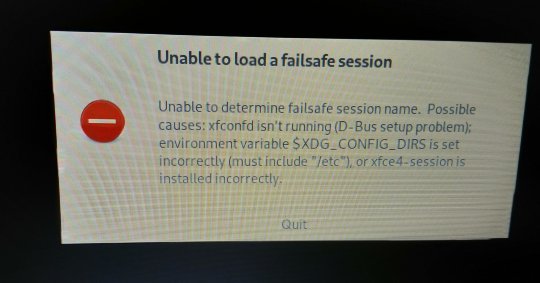
So first of all, I switch on my laptop and see this:
I was able to click enter which was the Quit option. Next it took me to the login screen. I was able to log in to the desktop environment only as root. I was looking for fixes and found advice that told me to check the ~/.config permissions. (~ means the home directory a . means that config is hidden). My user has read and write permission to that, so that probably wasn't the issue. Next I found that I should rename the ~/.config to ~/.config-old and ~/.cache to ~/.cache-old. Then I logged out from root and logged in as my user. This worked. But. The desktop looked fucking ugly. Well, better than a file system error, still, right? It looked like the default Xfce desktop i guess. So here are some stuff to look for when thing like this happens: - the windows like menu is called whisker menu. make sure you have whiskermenu plugin installed. youtube tutorial to add it to panel Basically click on panel, right-click panel, expand panel and add new items and look for whisker menu. - to put panel back to bottom, right click panel, expand panel, panel preferences, uncheck lock panel. then there will be row of dots at the far left or far right of the panel. grab the panel and put it to the bottom, then check lock panel again.
These were the stuff I had trouble with but then also just change whatever is necessary in the appereance settings, this was fairly straightforward.
0 notes
Text
dealing with superblock error on linux
I switched on my computer running manjaro linux and encoutered a black screen with the following message:
mount: /new_root: wrong fs type, bad option, bad superblock on /dev/sda2, missing codepage or helper program, or other error. You are now being dropped into an emergency shell. sh: can't access tty; job control turned off [rootfs ]#
Then I burned ISO file onto a USB (the same system and desktop that i had on the laptop) opened command prompt and typed fsck /dev/sda2. fsck is a program that checks filesystem for errors.
How to use fsck to repair filesystem errors in Linux
You cannot run fsck on a disk that is mounted. To check what is mounted, you can use the file manager and go to the /mnt/ folder to see if your disk is there. Or you can run the command mount that shows what devices are mounted. Or you can run lsblk which shows information about block devices, including the mountpoint if there is any. (block device is a computer data storage device, so disk, usb, etc).
Unfortunately fsck did not work and it showed me this message
fsck.ext4: Attempt to read block from filesystem resulted in short read while trying to open /dev/sda2 Could this be a zero-length partition?
Variants of fsck you can try are fsck.ext4 (ext4 is the linux filesystem). I googled a bit and found this resource:
fsck does nothing
So running it with the -f flag (force to check clean) did help. I figured I should get into the sda2 storage, and just take out my files I wanted to save and reinstall Manjaro from scratch. So I tried searching on options how to do that. The sda2 was not mounted so it could not be seen in the file manager from the live USB. So I looked for guidances on how to mount it Unfortunately mount failed and showed the same error as fsck did before.
Looking further I found How to recover from a bad superblock which links to Surviving linux filesystem failures This page tells you to run fsck, well this failed for me, so it says you should try it with some number that says where the superblock is … i guess? like for example e2fsck -f -b 8193 /dev/sda2
If you don’t know what number to use, you should run
mke2fs -n /dev/sda2
now ATTENTION mke2fs is a command that creates a filesystem, wiping out that disk. But! the -n flag means that mke2fs does not actually create a filesystem, but displays what it would do if it were to create a filesystem.
source
It output a bunch of numbers “Superblock backups stored on blocks: 32768, 98304, 163840, 229376, 294912, 819200, 884736, 1605632, 2654208, 4096000, 7962624, 11239424, 20480000, 23887872” So following one of the posts from above I tried running the command with the 1st number e2fsck -f -b 32768 /dev/sda2
It started at about 10 AM, it wrote Pass 1 bla bla..
At about 3pm it got to pass 5
then I went away and at about 4:30pm when i came back i saw a prompt asking me if i want to fix something and before that a wall of number codes. I pressed yes a couple times (it said free inodes count wrong for group xxxxx) and then it offered to press a to say yes to all.
At the end it said /dev/sda2 **** FILE SYSTEM WAS MODIFIED ****
yes bitch!
So I am in the live session USB, i make a directory called storage2 in /mnt folder. and type mount /dev/sda2 /mnt/storage2 into the terminal. Now I can open this in the file explorer and see basically all the directories like bin, boot, dev, etc, home, lib, lib64, mnt, opt etc etc. Home is where my super precious files are. Like 1GB of pictures of some boy and a couple rare movies i illegally downloaded.
I inserted a sd card stuck in a usb sd card reader into the laptop, after doing lsblk it was listed there as sdc partitioned to sdc1 and sdc2. So i mounted it with mount /dev/sdc2 (the bigger one ) onto /mnt/temp. For some reason I couldnt create a copy files in the file manager there, so i had to be logged in as root in the terminal this whole time and do mkdir /mnt/temp and copy the files with cp -vr /mnt/storage2 /mnt/temp where /mnt/storage2 is the mountpoint of dev/sda2. After being done with backing up my files, I unmounted the sd card with umount /dev/sdc2 and the sda2 disk, opened GParted to do the partitions….. and snap. sda2 has the same error I started with, eg the short read error. So I ran e2fsck -f -b 32768 /dev/sda2 all over again. This time it goes by a little faster, 10 minutes elapsed and I am at Pass 5 and there was 1 error on Pass 1.
Now let’s learn something about partitioning.
You generally want to create 3 parittions when installing a Linux system:
Root: this is where the filesystem goes, and it is required to boot a Linux system.
Home: holds user and configuration files separate from the operating system files.
Swap: when the system runs out of RAM, the operating system moves inactive pages from RAM into this partition. It is also useful if you want to use functions like hibernate or suspend which is something like sleep in windows. It should be twice the size of RAM if RAM is less than 2GB, or the same size as RAM.
All partitions must be unmounted in order to be modified (this means you cannot resize a partition on a working system (since it is obviously mounted)). To create a new partition, you must have some unallocated space.
Manjaro installer manual partitioning. – all partitions that have a mount point specified will be used during the installation of Manjaro. !!! swap should have a linuxswap filesystem all others that you wish to access from linux can have ext4. Also, specifically for Manjaro, EFI system partition is necessary to start Manjaro. So you need to create a partition with the FAT32 filesystem, mount point /boot/efi and esp flag enabled.
The resulting partitions I did can be seen on this image:

I had some of the backup files on sda4 that is NOT mounted so that it was not touched during the re-installation of Manjaro.
In the Manjaro wiki They talk about primary and Extended partitions and that there can only be 4 primary partitions. The GParted gui talked about primary partitions on my drive, and my drive is GPT. But, GPT does not have a concept of primary partitions, it has only partitions and it can have about 128 of them. Extended partitions are only available on an MBR disk.
some useful commands
sudo su to get to root mode
exit to exit root mode
cp -rv foo bar copy directory foo and its contents to directory bar and print output on screen
rm -rf foo remove directory foo and its contents
lsblk to list disk and partitions plus some info
0 notes
Text
some notes on 눈치
sources: this youtube video and a TTMIK course Iyagi with Andreas.
눈치(를) 보다 vs 눈치를 채다
First, what does 눈치 mean?
눈치 = (noun) to know a person's mind from the moment's circumstances, the ability to read between the lines, catch social cues
눈치 보다 = trying to see what others think of me
다른 사람이 날 어떻게 생각할까? "내 머리 괜찮나?" 뭐 이런 식으로
"오늘 칼퇴근 해도 되나?" 이러면서 눈치 보고.. 다른 사람을 보고 반응을 좀.. 추측해 보는 거예요.
What do others think of me? "Is my hair ok"? like this... "Is it ok if I leave on time today?" you use your 눈치 looking at others and trying to guess their response.
그리고 눈치 채다는 말은 내가 이 사람이 어떤 생각을 했는지 알게 된 상황에서 눈치 채다는 표현을 써요.
Situation where I end up knowing what the other person was thinking, we use 눈치 채다
눈치 보다= mind others, care about how others see me
눈치 채다 = figure out what others are actually thinking, notice
1 note
·
View note
Text
Typing hangul (Korean alphabet) on Linux Manjaro
step1: install ibus
reference on the Arch wiki
in terminal:
sudo pacman -Syu ibus ibus-hangul
then type:
ibus-setup
click yes a few times and this brings about the iBus setup where you can add other languages and configure preferences.
step2: install korean locales
go to Settings --> Manjaro Settings Manager --> Locale Settings click on “Add” and look for 한국어 (see? i could type this! lol) go through with this installation
step3:
again in the Manjaro Settings Manager, go to Language Packages. Here you should see the option to install ko_KR language packages. Do that.
Now iBus should work. I had a problem that upon restaring the system, i had to go to terminal and type ibus-setup again so that the icon would appear in the system indicators (that’s where the icon for time and wi-fi etc are) So, go to Session and startup --> Application Autostart. Click on “Add” name it iBus or something and the command should be:
ibus-daemon -drx
Trigger: on login. Now iBus icon should appear upon login.
0 notes