
Last Seen Blogs

wangxianficrecs
Wangxian Fic Recs

coolx2-nodoubt
"Happy Beeps Here, Buddy"

ts3-trash
Pure Trash

ladyofsstuff
Bsally :3

dollybites
daydreaming
Photo
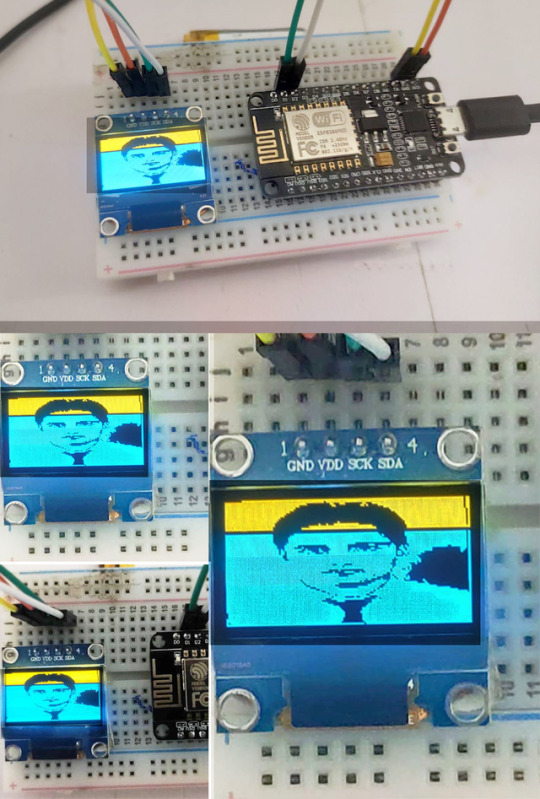
OLED Graphic Display Interfacing with NodeMCU
This guide shows how to use the 0.96 inch SSD1306 OLED display with ESP8266 using Arduino IDE. We’ll show you how to write text, set different fonts, draw shapes and display bitmaps images.
The OLED display doesn’t require backlight, which results in a very nice contrast in dark environments. Additionally, its pixels consume energy only when they are on, so the OLED display consumes less power when compared to other displays.The model we’re using has four pins and communicates with any microcontroller using I2C communication protocol. There are models that come with an extra RESET pin or that communicate using SPI communication protocol.
0 notes
Video
youtube
How to Make Arduino Smoke Level Detector with Alarm using MQ-135 Sensor ...
0 notes
Photo
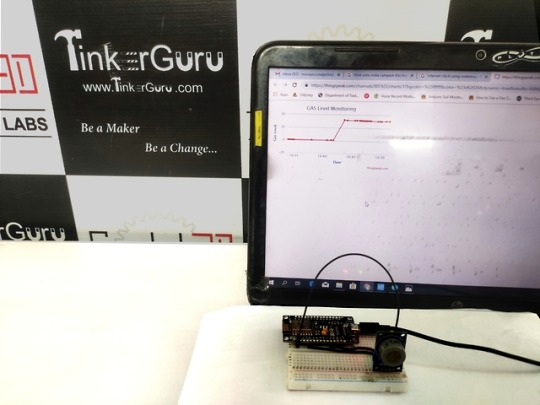
Gas Level Monitoring Over Internet Using ESP8266, Gas Sensor & thingspeak serverIn this project we will learn about Gas Level Monitoring Over Internet Using ESP8266 & Gas Sensor Module, i.e MQ7. We will measure the quantity of gas in percentage and send it over the internet using the thingspeak server. With this system, the data can be monitored remotely staying at any part of the world. We just need gas/smoke/LPG sensor like MQ2/MQ3/MQ5/MQ7/MQ135 that is directly connected to Nodemcu ESP8266-12E Module.ThingSpeak is an open source Internet of Things (IoT) application and API to store and retrieve data from things using the HTTP protocol over the Internet or via a Local Area Network.#AIMToInnovate/ #Tinkerguru/#atalinnovationmission/ #NITIAayog/ #StemChange/#RobotsMovie/ https://goo.gl/Z2h9Ro
0 notes
Photo
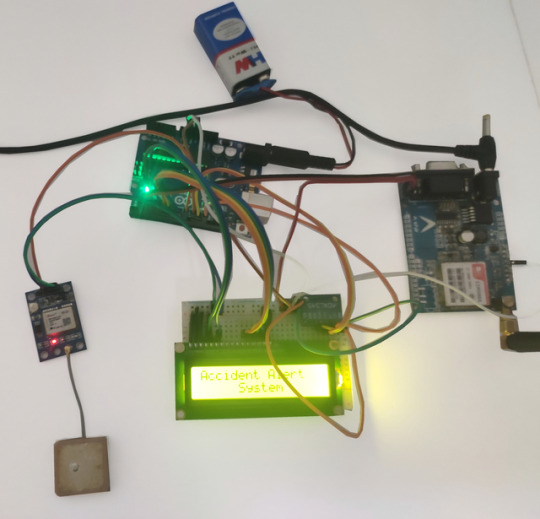
Accident alert system using Arduino
.#AIMToInnovate/ #Tinkerguru/#atalinnovationmission/ #NITIAayog/ #StemChange/#RobotsMovie/ https://goo.gl/Z2h9Ro
0 notes
Video
youtube
how to make digital gps clock using Arduino & NEO6m module || Automatic ...
0 notes
Photo
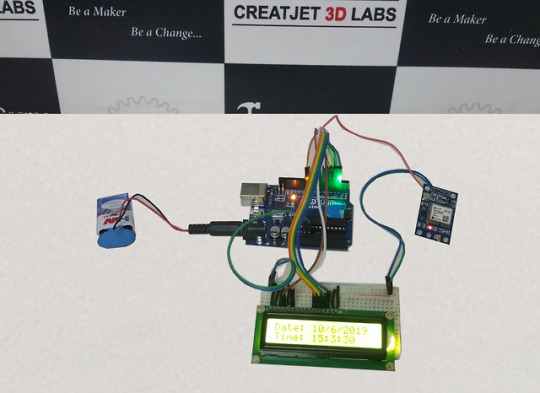
Arduino GPS ClockThere are many GPS satellites around the Earth which are used to provide the exact location of any place. Along with the location coordinates (Latitude and Longitude), it also provide other data like time, date, altitude, direction tracking angle etc. We have already learned to read this GPS data from Satellite using Arduino. So we make a GPS clock using the ‘Time and Date’ data from the GPS satellite. GPS Updated Clock is very accurate and provides the real time data with precision of milliseconds.#AIMToInnovate/ #Tinkerguru/ #atalinnovationmission/ #NITIAayog/ #StemChange/ #RobotsMovie/ https://goo.gl/Z2h9Ro
0 notes
Photo

Arduino based Medicine Reminder Using RTC Module.We always want to stay them healthy and fit. But what will happen if they get ill and forget to take medicine on time. We would be worried, right? At hospitals, there are many patients and it is difficult to remind every patient to take medicine on time. The traditional ways require human efforts to remind to take medicines on time. The digital era doesn’t follow that and we can use machines to do that. The application of Smart Medicine Reminder is very wide and can be used by patients at home, doctors at hospitals and at many other places. When it comes to reminding, there can be many ways to remind it.#AIMToInnovate/ #Tinkerguru/ #atalinnovationmission/ #NITIAayog/ #StemChange/ #RobotsMovie/ https://goo.gl/Z2h9Ro
0 notes
Photo
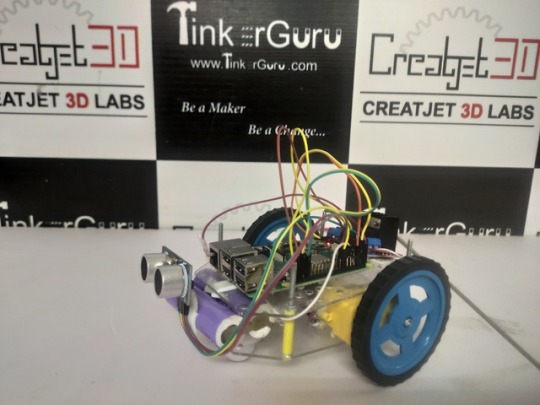
Raspberry Pi Based Obstacle Avoiding Robottoday we are here with a Automatic Robot which moves autonomously without any external events avoiding all the obstacle in its path, yes we talking about Obstacle Avoiding Robot. In this project, we have used Raspberry Pi and Motor driver module to control the robot and Ultrasonic sensor for detecting objects in the path of Robot.#AIMToInnovate/ #Tinkerguru/ #atalinnovationmission/ #NITIAayog/ #StemChange/ #RobotsMovie/ https://goo.gl/Z2h9Ro
0 notes
Photo

Hand Gesture Control Car Using Mpu6050 and NRF Module we have designed a simple Hand Gesture Controlled Robot using Arduino. This Hand Gesture Controlled Robot is based on Arduino Nano, MPU6050, RF Transmitter-Receiver Pair and L293D Motor Driver.#AIMToInnovate/ #Tinkerguru/ #atalinnovationmission/ #NITIAayog/ #StemChange/ #RobotsMovie/ https://goo.gl/Z2h9Ro
0 notes
Photo
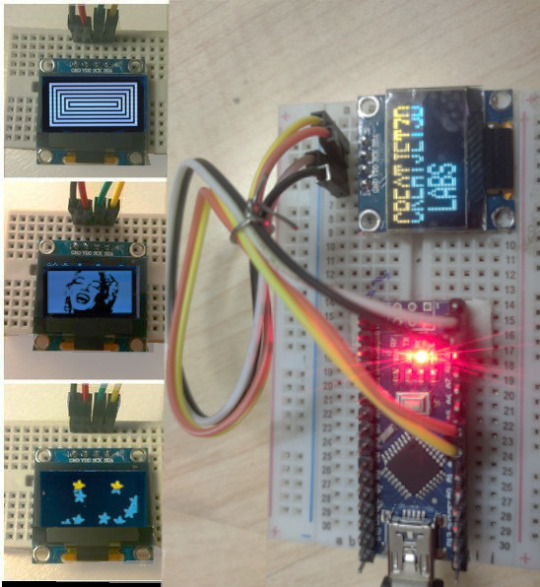
OLED DISPLAY WITH ARDUINO
We’ll show you some features of the OLED display, how to connect it to the Arduino board, and how to write text, draw shapes and display bitmap images. #AIMToInnovate/ #Tinkerguru/ #atalinnovationmission/ #NITIAayog/ #StemChange/ #RobotsMovie/ https://goo.gl/Z2h9Ro
0 notes
Photo


Biometric Attendance System using Fingerprint sensor and Arduino Uno
In this project we will be interfacing fingerprint sensor with Arduino , LCD Display & RTC Module to design the desired project. In this project, we used R305 fingerprint Module and Arduino to take and keep attendance data and records.
0 notes
Photo
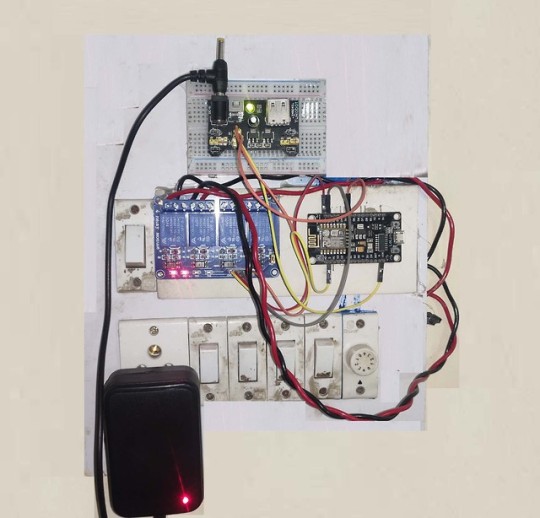
IOT Home Automation using Blynk
Blynk is a mobile application which has its own server to process user requests. It is an open source application and anybody can use it in their Home Automation to control devices, monitor sensor data and get a notification by some trigger actions. It has a nice GUI with Graphs, Timers, Slider, Joystick and even Video Streaming.
0 notes
Photo
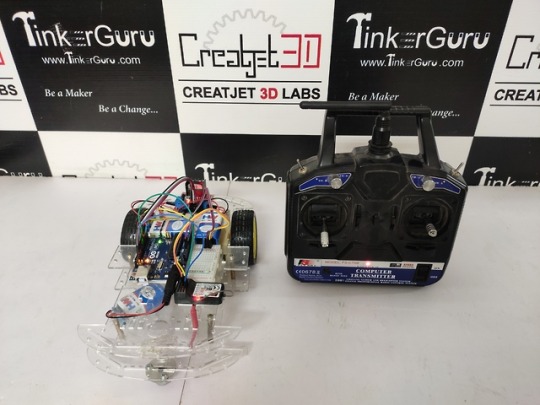
RC Car control with an airplane Transmitter using Arduino
#AIMToInnovate/ #Tinkerguru/#atalinnovationmission/ #NITIAayog/ #StemChange/#RobotsMovie/ https://goo.gl/Z2h9Ro#AIMToInnovate/ #Tinkerguru/ #atalinnovationmission/ #NITIAayog/ #StemChange/ #RobotsMovie/ https://goo.gl/Z2h9Ro
0 notes
Photo
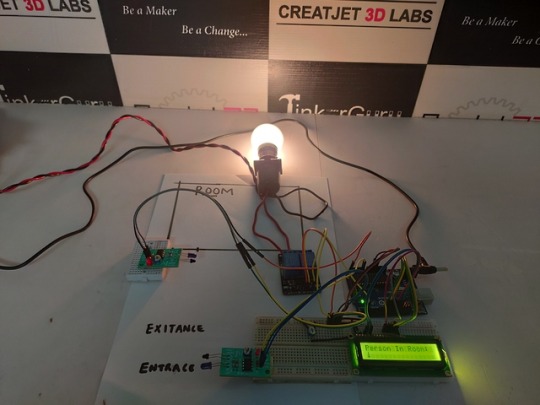
Automatic Room Light Controller With Bidirectional Visitor Counter Using Arduino. #AIMToInnovate/#Tinkerguru/ #atalinnovationmission/ #NITIAayog/#StemChange/ #RobotsMovie/https://goo.gl/Z2h9Ro
0 notes
Photo
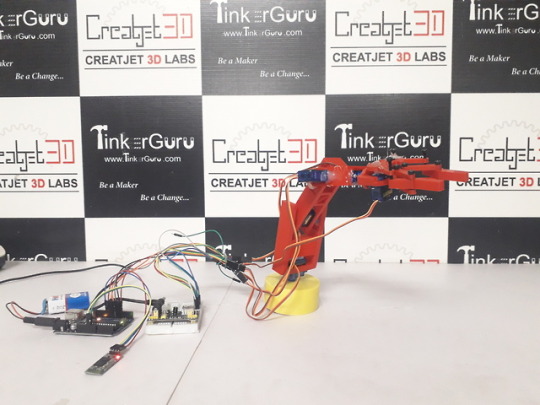
DIY 3D PRINTED ROBOTIC ARM
This robot arm is made almost entirely of 3D printed parts that snap together. It has three servo-controlled joints, plus a rotating base and gripper. The arm is controlled by bluetooth that connect to an Arduino Uno.
0 notes
Photo
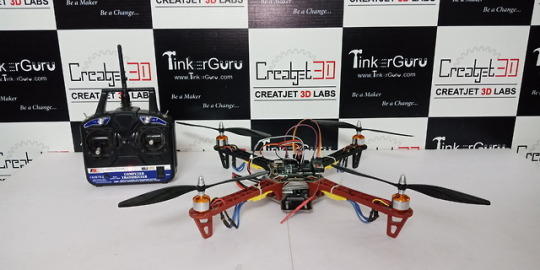
Arduino controlled Drone using MPU6050
Full Arduino based drone. I build the flight controller using the Arduino UNO and the MPU6050 gyro//accelerometer.
0 notes