Last Seen Blogs

expertcostseg-us
Untitled

weresoul
C.E.O. of bitch

sen-ya
bonk punch

mrrazashaikh
Raza Shaikh

evanrobins15
Untitled
Text
a little list of links to how-to posts and videos. i'll add more on as i find them! these are tutorials i found really helpful. if there's something you wanna learn how to do and it isn't linked here, then send me an ask and i'll search for a tutorial for it lol.
meshing tutorials by platinumluxesims
changing lot sizes in s4s
turning builds into deco houses
how to make animations by pixifiedtips
neon sign tutorial by simslife
how to make cc objects by sieory
how to make cc clothing by powluna
how to make custom tv shows by pixifiedtips
how to make backdrops into objects by awingedllama
how to make custom loading screens by goddessgamez
how to make custom poses by katsverse
how to make animations by simmer_creator
how to make objects by illogicalsims
newborn overlay tutorial by awingedllama
how to make alpha hairs by iconicsims
how to make maxis match hairs by alerii
how to make alpha clothing by famsimsss
blender render tutorial by famsimsss
ts4 studio tutorial index
how to make cc nails by pinkpusay
last updated: 08/22
613 notes
·
View notes
Text
hello! looking for testers for my NPC neighbor doors + room hiders. it's my first proper tuning mod so i want to be sure it works as intended before releasing it 'publicly'
if you download, please leave feedback! as well as suggestions for how i can make it better/more functional
293 notes
·
View notes
Text
Simblr accessibility tips
I was browsing through the #s4cc tag the other day. I saw this one post which had the download link labelled as "dl (ea)". I spent a good amount of time wondering what "ea" stands for. My first thought was "Electronic Arts" which made me go "huh", second thought was "I need to click this to figure it out". Turns out it means "early access" lol
Quick disclaimer: I also still fall into a trap of not using plain langauge when creating Tumblr posts or adding links. But, recently I started to work a lot with digital accessibility. I thought I'd make a list of tips as a reminder of things to consider, for myself and for others.
Avoid unusual abbreviations. Not everyone knows what "bgc", "dl" or "ea" stands for. Here's a bad example of abbreviations in my own old post. Use "base game compatible", "download", "early access" instead.
Use meaningful link text. Don't make people wonder where a link would take them. When using a screen reader, navigating to a link with a label "dl" outside of post context can be confusing.
Avoid using Unicode characters. Using stylized Unicode characters may look cool, but here's what Unicode sounds like when using a screen reader.
Tumblr autoplays all GIFs. It's good to add a "gif warning" tag to your post if you use GIFs. Another option is to omit GIFs altogether. Motion can be a source of distraction to some, and very harmful to others. Read more about digital accessibility and motion
Tumblr gives an option to add alt text to images. Alt text is a summary of graphic content. Keep your alt text short and descriptive.
Try to use plain language. Also, pay attention to how you format text. Read more about clear language on Readability Guidelines
There's so much more to talk about when it comes to digital accessibility. I tried to keep this short and keep this list Simblr-related. I hope that you will find these tips and resources useful!
799 notes
·
View notes
Photo
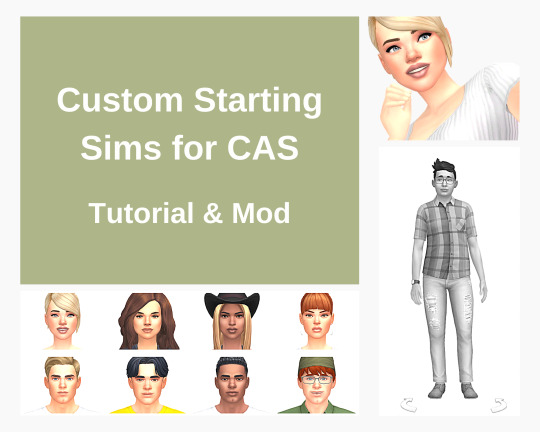
Custom Starting Sims for CAS (Tutorial & Mod)
Making my way through various CAS files, I found something that I thought might be interesting to at least someone?👀😊
You know, how when you go into CAS, one of EAs sims shows up as the starting sim? You can replace these sims with your own sims. Or, in case you have a certain sim style, you can make it so that only a certain sim, that you want to use as a base, shows up.
Below I show how to do it and share files that you can use as a base (as well as some examples with my own sims).
Afficher davantage
920 notes
·
View notes
Text
Making dynamic poses/animations that adjust to a sims body with Animation Tools by thepancake1
Made this short guide after talking to thepancake1. I haven't seen many people use this feature yet and felt like it might be worth sharing? There are some limitations to be aware of, but I think it's a useful option (for poses as well as animations) 😊
Many thanks to thepancake1 for the tools and for the helpful explanations he provided for this guide.
1. Background and in-game mechanics
The way TS4 handles different body shapes and clothes in animations (for example, in order to avoid clipping) is basically by putting markers (“slots”) on the surface of a sims body that can be then used as (IK) targets with the in-game IK system.
As you probably know, IK (Inverse Kinematics) – as opposed to the default FK (Forward Kinematics) – is a set-up where bones in a chain are influenced backwards. So, for example, when you move a hand, the arm will follow.
In a similar way, what in-game IK does, is assigning a bone or slot to animate relative to. For example, if your sim is posed with hands on the hips, you can assign the hands to the hips slot and the game will then process the pose/animation and perform IK in real time to change the position of the arms and hands relative to the hips.
Note that there are limitations to this system, though, as only hands, feet and the root bind can procedurally target other bones/slots.
Hereby, feet targets and root target are mainly used in interactions with objects, in particular in sitting animations (where, for example, the root is targeting a chair slot).
Hand targets are mainly used for adjusting a pose/animation to a sims body shape and clothes.
The in-game IK always influences the complete arm/leg (chain: foot-calf-thigh/hand-forearm-upperarm).
You can find an article that provides some background information here: https://simsvip.com/2014/08/20/community-blog-the-sims-4-animations/
2. Using the feature in custom poses/animations
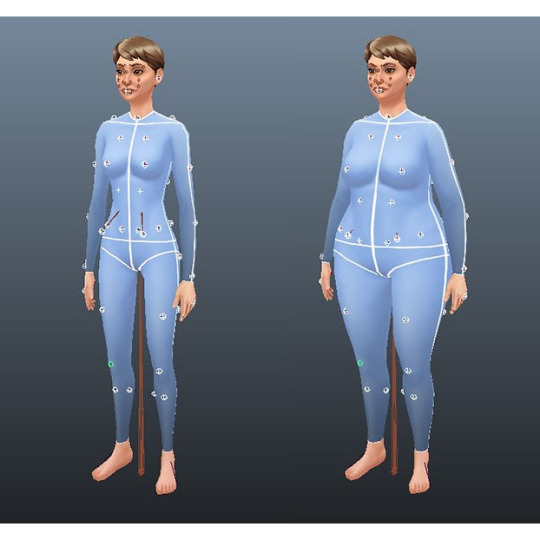
Per default, when you make custom poses/animations with Blender and S4S, the relevant information that the game requires to apply in-game IK is not included. And so, you will notice that while a pose might look good with the base rig in Blender, it might not fit other sims with a different shape in game, in particular causing clipping.
You can use TS4 SimRipper to fine-tune a pose for a certain sim, but this might not be the solution you’re looking for, if you share your poses and/or want them to be compatible with different kinds of sims.
The animation tools now include a feature that makes it possible to use in-game IK with custom poses/animation as described in part 1.
Disclaimer:
The animation tools are in development and subject to change.
Currently TS4 SimRipper sims are not properly supported. (Although, imo for the purpose of the task, it doesn't make much sense to use them as models.)
As you can see in the comparison below, there might be some accuracy loss for the flexibility gained. (The position of the arms in the version without IK targets matches exactly the pose I made in Blender but doesn't work at all for the heavier sim causing extreme clipping. At the same time, the version with IK targets deviates a bit from the pose I made, but works for any sim.)

Below a short guide on how to set it up with the example pose I made.
1) You can download the tools HERE. Make sure to check the installation guide and tutorials in the wiki tab for the basics. (Note: The tools were originally made for Blender 3.0 but also support newer versions, in particular Blender 3.3.)
Some additional tips for poses in another post of mine HERE.
After you set up the tools in Blender and have made your pose:
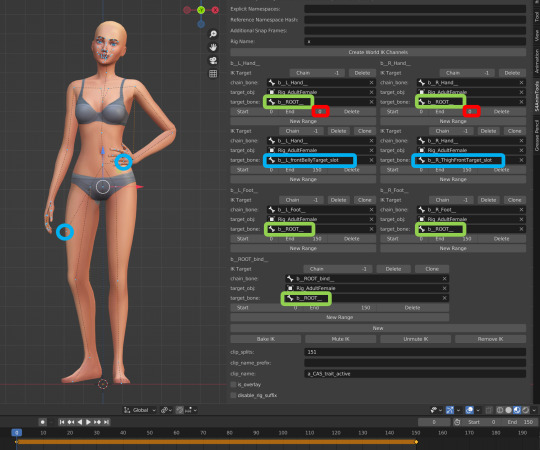
2) Go to the S4AnimTools panel. Fill out rig name, clip splits and clip name as described in the tutorials linked above (also make sure to select “Allow Jaw Animation”).
3) Find & click “Create World IK channels”.

This will create 5 IK channels for the afore mentioned hands, feet and b_ROOT_bind bone. You can also add channels either by cloning the existing ones or clicking “Create World IK channels” again. To get rid of unwanted channels click “Delete”.
4) Set up the targeted bones/slots based on the type of pose you made.
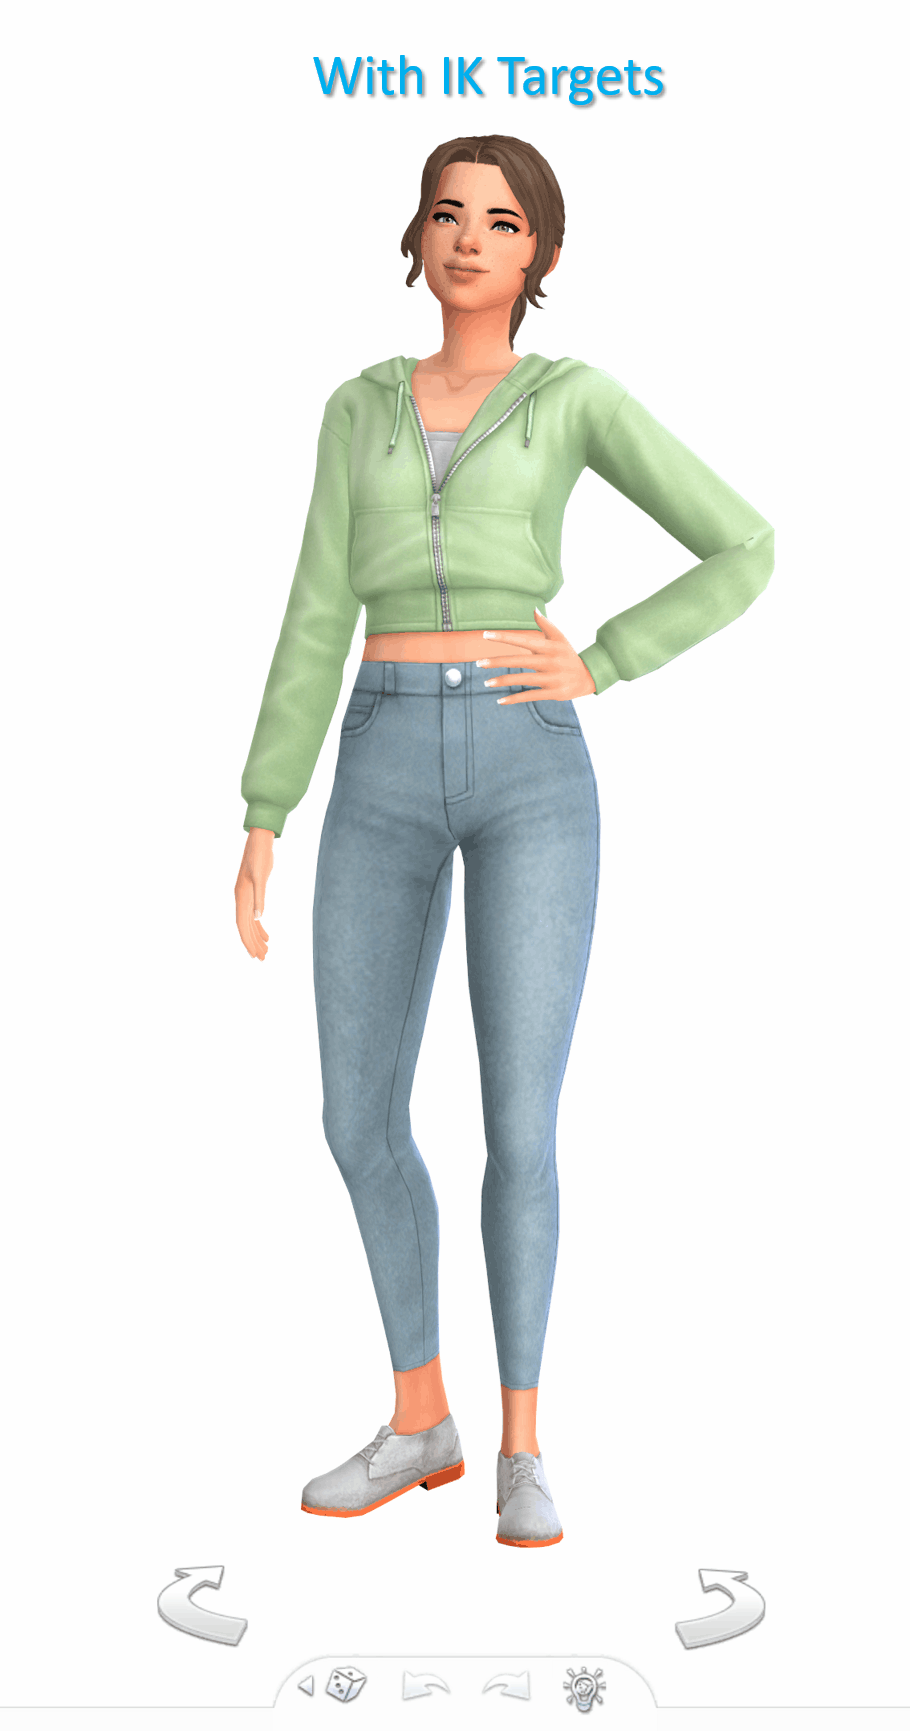
In my example, I created a pose where a sim has the left hand on the hip, and the right hand close to the thigh. Therefore, I added IK channels targeting the “b__L_frontBellyTarget_slot” and “b__R_ThighFrontTarget_slot”.
The slots are marked blue in the picture below. Some notes:
The slots are hidden by default, I made them visible for the picture. You can unhide all bones/slots available by pressing Alt+H. But I recommend doing this on a separate rig/in another blend file or undo it directly afterwards if you don't want all the (unneccessary) bones/slots blocking your view.
The selected slots worked well enough for my example, but you should figure out what is suitable for you.
As orientation you can also look up clip files for EA poses/animations via the S4S Game File Cruiser and see what bones/slots are used as targets ("Warehouse" tab -> "SlotAssignments"; IKChainIndex: 0 - left hand / 1 - right hand / 2 - left foot / 3 - right foot /4 - root bind). On that note: The Clip Pack export loses/resets the slot data, but you can use it to find an animation and check its Instance ID to then search for in the Game File Cruiser. (If you know the name of an animation you can also determine its Instance ID by converting the name with the S4S Hash Generator.)
5) Each IK channel should (also) target b_ROOT of the rig to ensure it’s working properly according to pancake (though in my first test using Andrews pose player it seemed to also work without, so might be only a restriction for poses/animations that are played via interactions in game, but I can’t be sure.)
The bones are marked green in the picture below.
6) The start and end frame is set according to the length of the pose/animation (I want to use the pose as a CAS trait pose and set the duration to 150 frames = 5 seconds), except for the b_ROOT target for hands where the end frame is set to 0 in my example, since they are also targeting the slots “b__L_frontBellyTarget_slot” and “b__R_ThighFrontTarget_slot” during the animation.
Note: My example is a static pose. In animations, however, you can also target different slots at different times by setting up multiple IK channels and specifying the start frame and end frame respectively.
7) Bake the animation by pressing “Bake IK”.
8) Export the clip and create a package with your pose/animation as described in the linked tutorials above.
@ts4-poses @thefoxburyinstitute
661 notes
·
View notes
Note
would you ever consider making more variants of your lighting mod? with different colors like yellow or purple or green.
Hi hi 👋
I have been getting quite a few asks of this kind 🙂 It's difficult for me to come by every wish (plus I don't wanna spam) but you can create any colour variants of the lighting yourself, those are just a few simple steps.
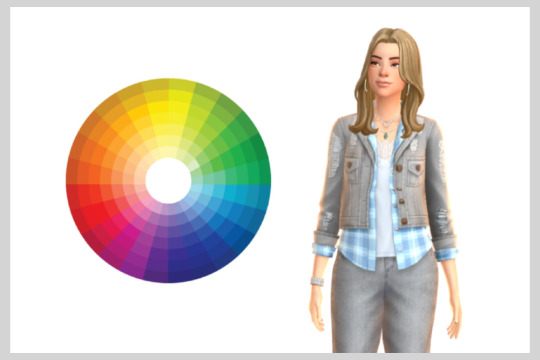
Mini Tutorial:
Open the package file with the lighting mod in Sims 4 Studio.
Inside the package file you will find parameters for RimLight0 (creates glow on the right side of the sim) and RimLight1 (creates glow on the left side of the sim).

You can set the colour of each rimlight with an RGB-code (Red,Green,Blue):
(1,0,0) is Red
(0,1,0) is Green
(0,0,1) is Blue
And you can create any colours inbetween. I show below how.
I can recommend this tool to pick a colour and create an RGB-Code (used it quite a lot for another project):
https://imagecolorpicker.com/
Next you need to convert the values into values from 0 to 1 by deviding each value by 255.
Example: I uploaded a colour pallette as a reference to pick from; then picked a shade of orange. The site displays the rgba-code (245,119,34,255). You can ignore the last value, this is the opacity.
The converted RGB-code after deviding the values by 255 is (0.96,0.47,0.13). Put in those values as the colour code for the rimlights.
Note: You might need to change the S4S language settings to English, in order for the decimals to save properly.
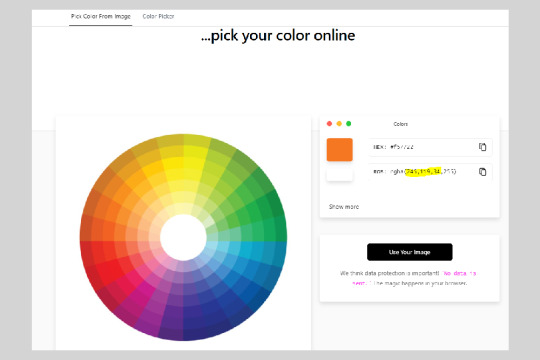
Et voila, you created an orange glow ✨:
Of course, you can also adjust the colour of the main lighting the same way.
Feel free to create any variants! However, if you use my lighting as a base to create and then share small variants like this, I would appreciate if you tag me and link back to the original lighting 💛
@thefoxburyinstitute
458 notes
·
View notes
Text
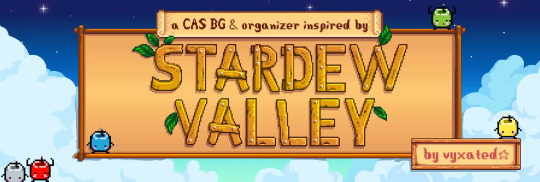
Stardew Valley - TS4 CAS Background
So! I was looking at various of games for inspiration and came to notice that Stardew Valley's character creator reminds me of TS1's CAS, and since I had the latter made already I decided to create a SV inspired CAS set. Enjoy!

Info & TOU
Don’t re-upload & claim as yours! Just link back here :)
You can recolor the CAS BG and include the mesh. Tag me if you do ^^ (recolor psd coming soon.)
Let me know if there are something I missed!
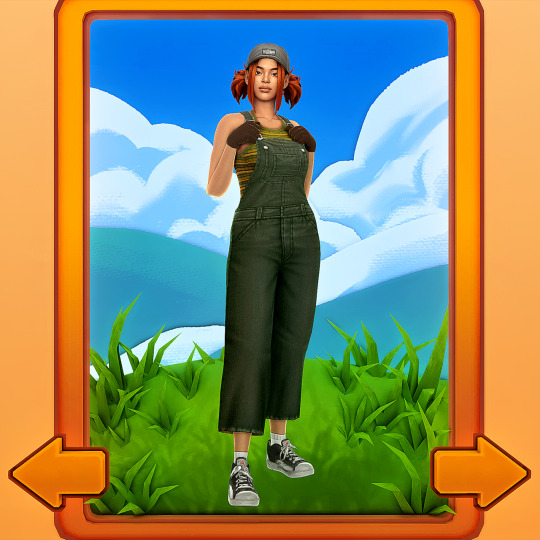
*DL & no reshade previews under cut ✂️
DOWNLOAD
SimFileShare / Google Drive
// CAS Organizers
Keep only one CAS organizers at a time.
cr: @/yoruqueenofnightsims for the resources used.
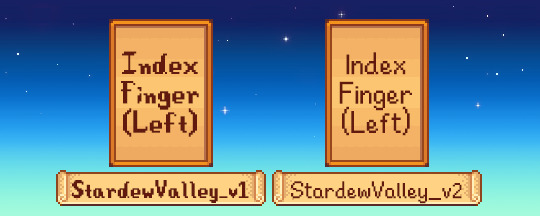
// CASBG_04 - StardewValley
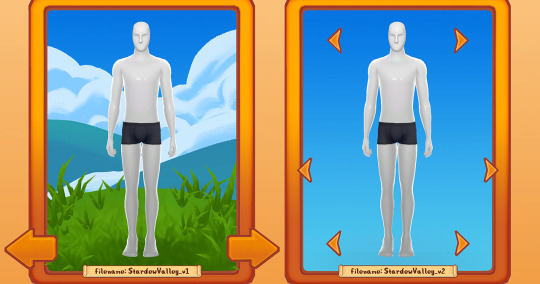
v1: closer match to original reference.
v2: simple recolor of TS1's CAS BG.
Keep only one CAS BG replacement in your Mods folder.
@maxismatchccworld @sssvitlanz @public-ccfinds @alwaysfreecc

695 notes
·
View notes
Note
Hi Anna, I know you mentioned a while ago that you had made your own lighting mod so I was wondering if you have a tutorial for how to go about that?
there used to be a great in-depth tutorial for this by lunar-nelfean (which is how i learned to do it, so all credit for the discovery to them), but since they've deactivated their blog i'll make a quick one. for posterity. and google results
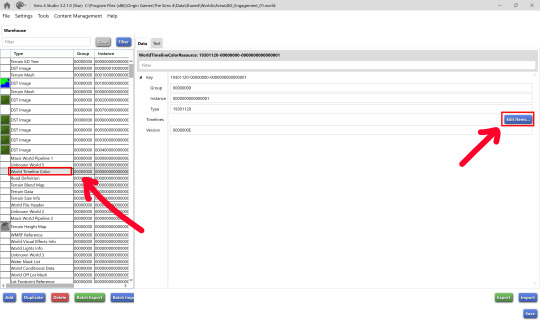
Sims 4 Edit World Lighting Tutorial
Navigate to Program Files (x86)\Origin Games\The Sims 4. If you want to change the lighting for an expansion pack world, go to the Delta folder and choose an EP folder. If you want to change the Base Game lighting, go to Data\Shared\Worlds\Areas. BGEngagement 0-3 is Newcrest, all worlds with a GD prefix are Willow Creek and SO prefix is Oasis Springs.
Copy the .world files you want to edit, as you can't save files in your game folder. I recommend saving a backup of the original EA ones too, just in case you don't like your edits and want a clean slate, or want to go back to EA lighting without having to repair your game.
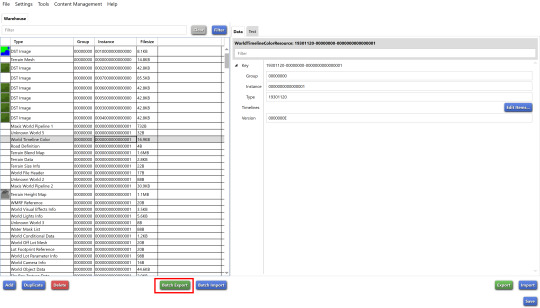
2. Open "World Color Timeline" and click Edit Items.
3. From there, you're off to the races. Change any values you like. The names are mostly are self-explanatory as to what they change. Sometimes you notice a huge difference on changing values, and other times you might not. Some effects (like bloom) are only visible when you have Post Processing Effects on in your settings. You just have to experiment!
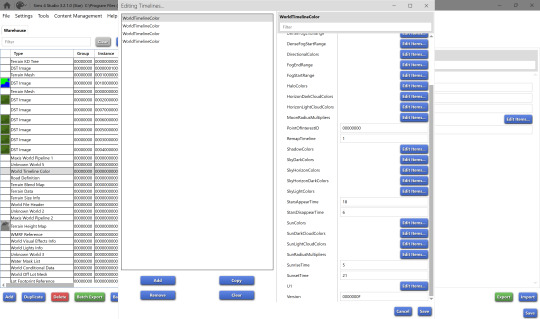
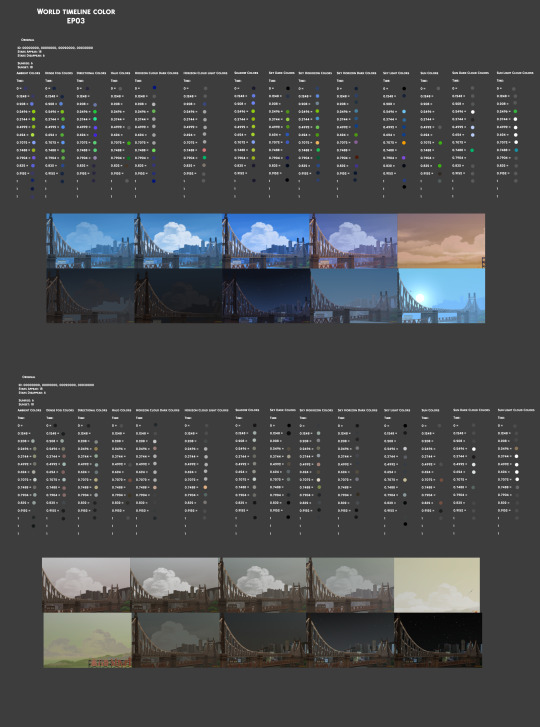
It's a bit difficult to visualize what each one of those colors is going to look like in game, so back when I was still planning to make a lighting mod, I spent way too much time making a sheet to help visualize what each color looks like at each time of day for certain values. The top colors are EA's original for San Myshuno, and the bottom is basically a recolor I made by just changing the hue/saturation (I used the eyedropper in Photoshop to get the RGB and changed the values in S4S to match). Hopefully this can help you get a rough idea of what decimal number corresponds to what time of day.
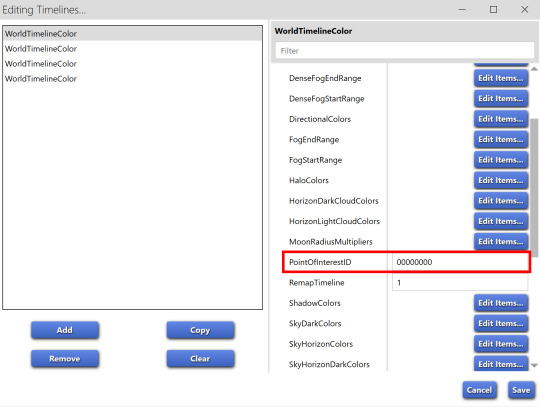
4. Each 'World Timeline Color' represents a season, hence the 4 entries in the box. When you're done editing, if you want the same values for each season, delete the bottom 3 World Timeline Color entries, then copy your edited one 3 times. Change the PointofInterestID. Make sure you have 00000000, 00010000, 00020000 and 00030000. When you're ready, save!
5. To quickly copy your custom lighting to the other neighborhood files for the world, batch export the World Timeline Color file.
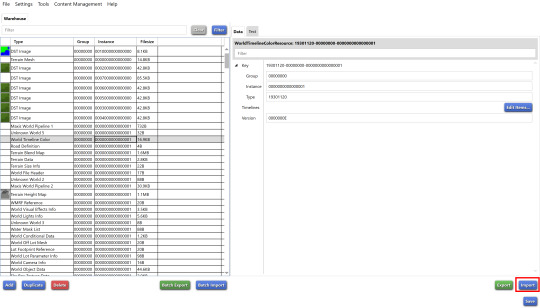
Open another neighborhood, click on World Timeline Color and click Import.
6. Save, repeat for the rest of the neighborhood files, and you're done! Drag your edited files into your Sims 4 game folder, replace the existing ones, and go in game to see your changes :D
i hope this was easy to follow. if you have any questions I'll do my best to answer them, just shoot me a message!
199 notes
·
View notes
Text
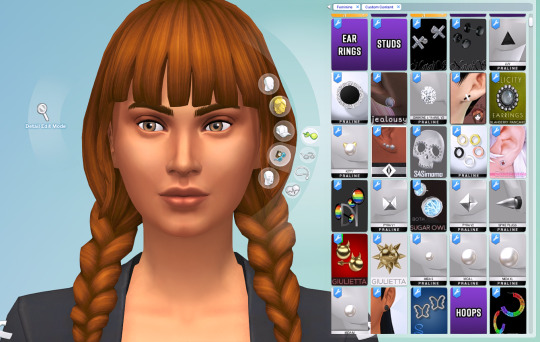
How to create visual "custom categories" with the new Sims 4 Studio Batch-Edit
As discovered by @vyxated Sims 4 Studio now supports batch-changing the Display Index number which allows you to easily sort your CC (see post here)
Using that, you can create visual "custom categories" for any existing category to sort your CC into smaller groups that share a thematic.
━━━━━━ ・❪ ☾ ❫ ・ ━━━━━━
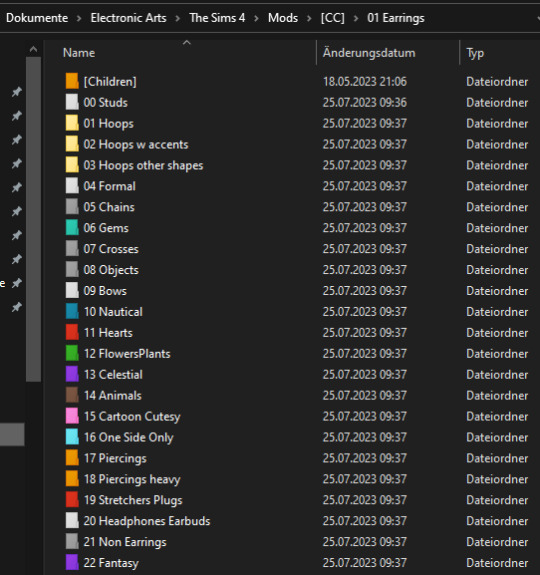
Step 1: Creating folders
First you need to sort your CC into whatever categories you want.
I am sorting my earrings.
( I use Folder Painter to get colored folders)
━━━━━━ ・❪ ☾ ❫ ・ ━━━━━━
Step 2 (Optional): Creating dividers
I highly recommend you to make some sort of divider for your categories (basically like my TidyCAS).
For that, in S4Studio start out by cloning any basegame CAS item.
I usually always use the sunscreen facepaint, but it doesn't really matter, you shouldnt use smth with a mesh.
Or you can download this file and place it in Documents\Sims 4 Studio\Mods.
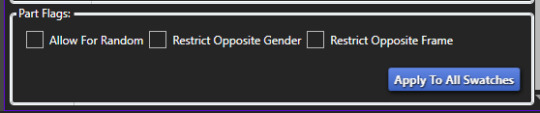
It has no texture, is enabled for a lot of things and disabled for random.
IMPORTANT: For every new divider you want to create, you have to clone the CAS item from S4Studio again. You cannot simply duplicate your divider CC and simply change it.
Save it as the number and name of your category. For me it would start with "00 Studs".
In that file, first import any type of custom thumbnail you want to use to display the category name.
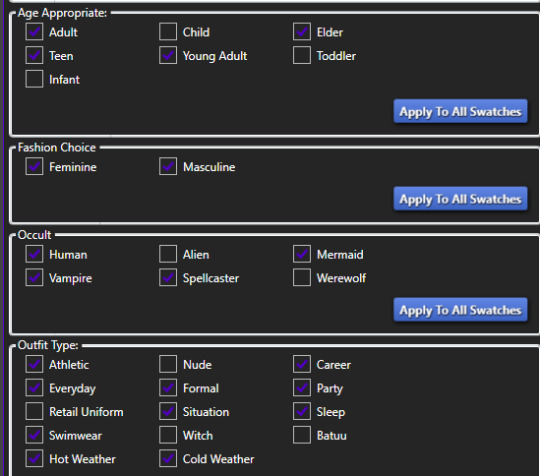
Then, change the category to whatever category you are working on and enable it for all ages, genders, fashion choices & outfit types you want and disable it for random.
Now if you want, import an empty texture to get rid off the sunscreen, but since you won't apply that CC, it won't matter.
Download the empty texture here
Make sure to place the dividers OUTSIDE your sorted folders.
━━━━━━ ・❪ ☾ ❫ ・ ━━━━━━
Step 3: Batch processing in S4Studio
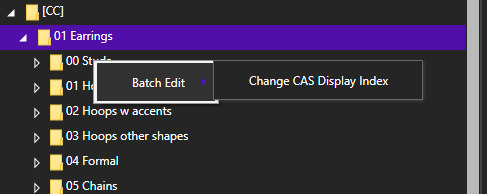
Now you want to batch process your folders in S4Studio.
First click on "My CC" and let it load.

Now right click your first folder and select "Batch Edit - Change CAS Display Index"
In the next window, press "Run".
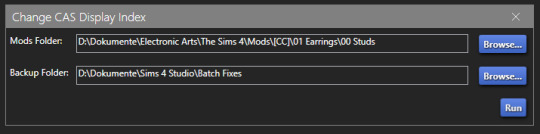
Then, enter whatever number you want to start with.
The smaller the number, the higher up the content is. You can go into negatives and the limit is a veeeeeeeeeery high number.
If you just want to sort some normal CC, I recommend starting with 0 simply.
For the next folder I then always go up by 10, so 0-10-20-30-etc.

Then press "OK".
You will then get a popup with all your changed files (I sorted mine before so it's non lol)
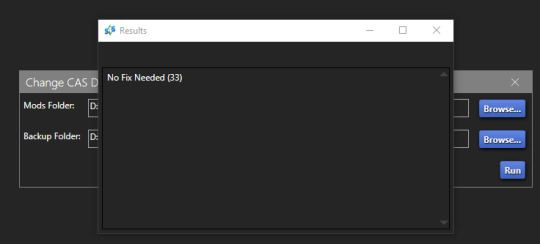
Note: Keep in mind that it does not sort your CC alphabetically.
Apparently it's by last modified date.
━━━━━━ ・❪ ☾ ❫ ・ ━━━━━━
If you have done step 2:
Step 4: Sorting your dividers
Lastly you want to make sure that your dividers show up at the beginning of the custom categories.
Open up your divider in S4Studio again if you closed it.
Click on "Warehouse", select the "CAS Part" and on the right in the "Filter" field search for "display".
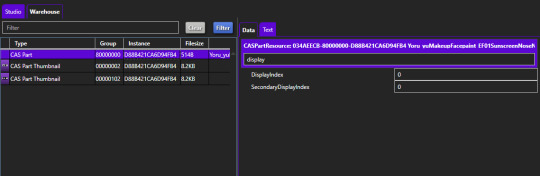
Under "DisplayIndex" you now want to input a number that's before your category.
My category starts at 0, so I will change it to -1.
If the category starts with 10, I input 9 and so on.
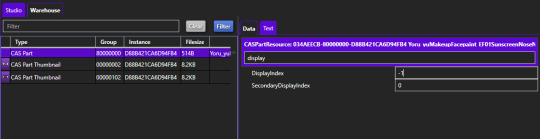
"SecondaryDisplayIndex" is swatch order, so it doesn't matter here.
Then just save it.
━━━━━━ ・❪ ☾ ❫ ・ ━━━━━━
And that's it!
@thefoxburyinstitute
327 notes
·
View notes
Text
Updated for the accessories !
Download (419.44KB)

Tidy details by Sparrowcc - Updated
With the addition of new content in the game, the tags from this mod aren't placed properly. As the creator isn't active anymore, here's an update !
Be sure to remove the previous version. Only available for skin details and tattoos.
Download (527.55KB)
You can also check this amazing work by @yoruqueenofnightsims !
Credits to @sparrowcc
Custom content and mods used on the preview by @miikocc, @pyxiidis, weerbesu and @claudiasharon.
7K notes
·
View notes
Text
Updated for infants !
Download (527.59KB)
Tidy details by Sparrowcc - Updated
With the addition of new content in the game, the tags from this mod aren't placed properly. As the creator isn't active anymore, here's an update !
Be sure to remove the previous version. Only available for skin details and tattoos.
Download (527.55KB)
You can also check this amazing work by @yoruqueenofnightsims !
Credits to @sparrowcc
Custom content and mods used on the preview by @miikocc, @pyxiidis, weerbesu and @claudiasharon.
7K notes
·
View notes
Text
Tidy details by Sparrowcc - Updated
With the addition of new content in the game, the tags from this mod aren't placed properly. As the creator isn't active anymore, here's an update !
Be sure to remove the previous version. Now available for skin details, tattoos and accessories.
Download (946.79KB)
You can also check this amazing work by @yoruqueenofnightsims !
Credits to @sparrowcc
Custom content and mods used on the preview by @miikocc, @pyxiidis, weerbesu and @claudiasharon.
7K notes
·
View notes
Text
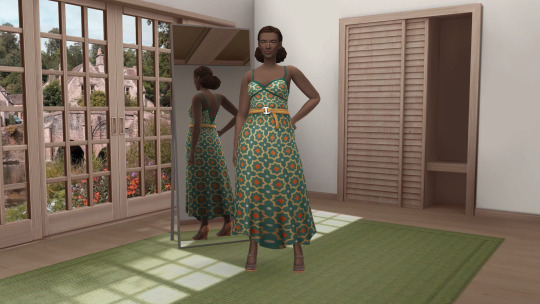
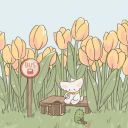
[WIP] Countryside CAS Background
Only put one CAS background in your mods folder for it to work.
I plan on adding details in the background and in/around the dresser, I just need some inspiration and a little bit more time.
Download (3.18MB)
Credits to @cloudcat, @littledica, @syboubou
Preview shown without reshade, but with custom content.
Pose by @lou-from-moonwood
/!\ Horses won't fit in the room as they are bigger than human sims, it might look strange if you use this mod with them /!\
250 notes
·
View notes