
Last Seen Blogs

androidsenfan
android


froglegsblogs
Froggie
astro-royale
「AstroRoyale♛」

btspeaker-blog
Quality Bluetooth Speaker
Text
Make Animations work
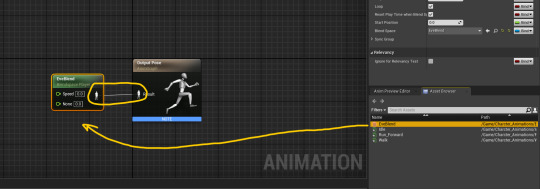
In the Blueprint
Drag the animation blendspace
and connect the circled line togther.
this will now need a value to read from - this requires code.
finally i connected it to the player blueprint

0 notes
Text
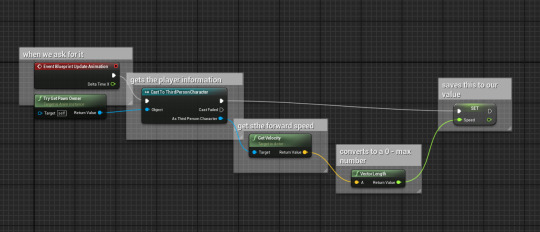
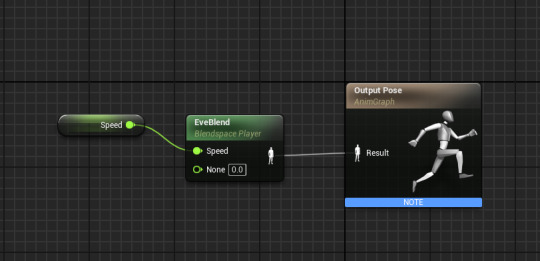
Animations and blendspaces
Importing the animations you need to make sure you link it to the character model.
The animations need to use a Blueprint - controls the animations and a blendspace - this smoothly links one animation to another.


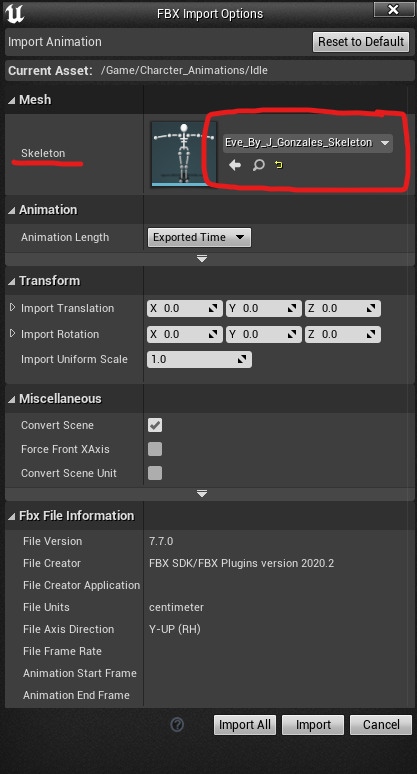
you need to make sure its linked to the right skeleton
the blend space is a graph controlled by a value in this regard we will use player speed. the speed will basically control like a gradient from 0 - max speed.

so if you are at 0 idle will play and 1 walk will start and if your at max speed 2 you are fully running.
0 notes
Text
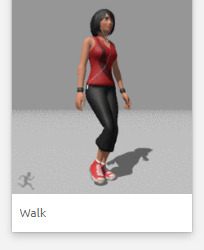
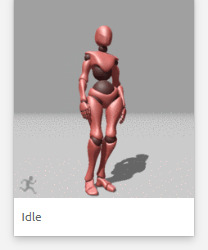
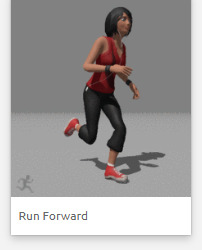
Animations in Mixamo
The animations I think I need are
Idle - add some interest to standing still
Walk - slow motion movement
Run - Full speed
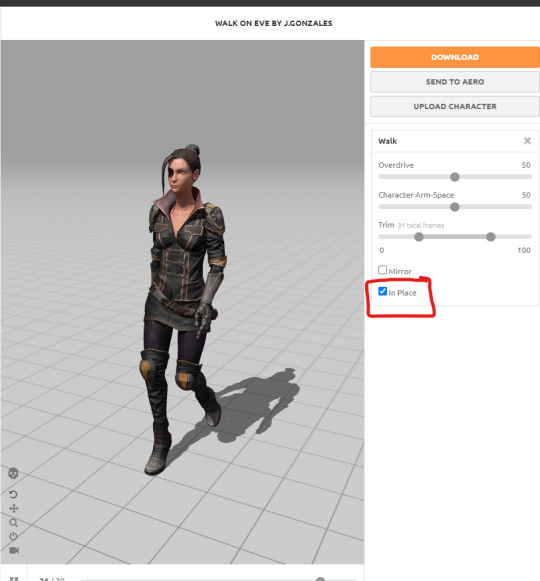
When downloading these animations you need to make sure that you use IN PLACE of the animations will not link together correctly.
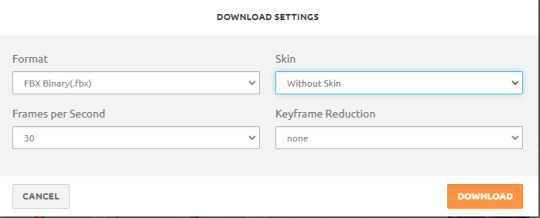
Without Skin is also an option as we already have this from the character - this allows for just the animation to be used. this saves space in the game.
0 notes
Text
Replacing the Character
My initial idea was to use my 2D character design but on reflection using a 2D character in a 3D world just didn't seem right to me.
Doing this would have also have involved creating a complex series of animations as its 3D space more directions would have ben required and reviewing my timeframe this would not fit into my project now.
MIXAMO
Mixamo is an online application owned by Adobe. this is a free resource for getting game ready characters and animation to use in Unreal Engine.

In Mixamo i looked through the character options and selected EVE.
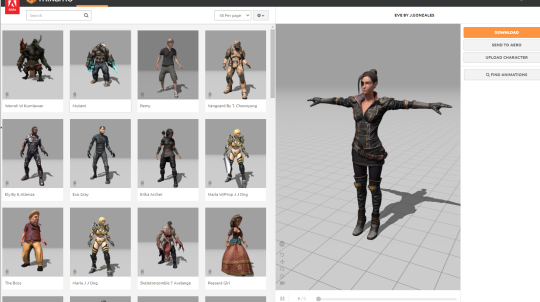
although not obviously an Asian character the clothing on this model was more in keeping with an Asian aesthetic.
The pose is called a T pose this is the most common way to make a default model as it make it easier for the skeleton to be made.
To download the file you just hit download and it makes an FBX file for Unreal Engine.
This will have the model and the skeletal mesh. When importing into Unreal Engine you get this pop up.

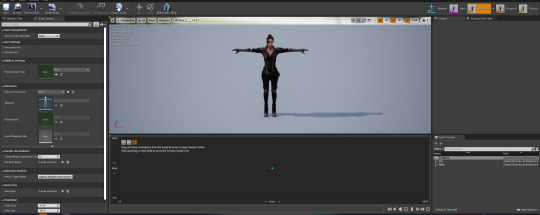
Making sure that when I import I make a new skeletal mesh -this is what the animations will attach to.
TO change the default character in Unreal you need to open the player blueprint and replace the Skeletal Mesh Actor.


Next is the Animations.
0 notes
Text

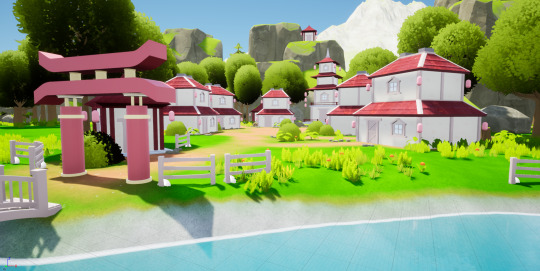


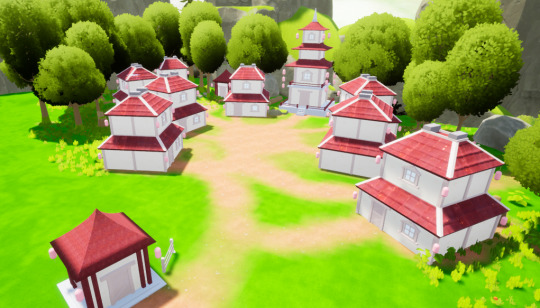
final game design.
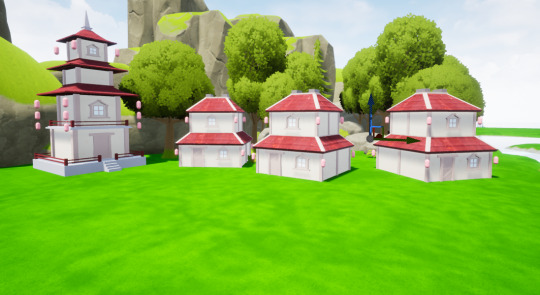
this is my final game design outcome and i think it looks really good. they way everything just fits makes it have a really calming feeling when looking at it. im so happy with how this has turned out. i really like village design its very simple but not to basic and empty. i wanted the village to look like some people would live there so i made sure i placed down many plants and stones around the houses. one thing i would change in this village is the roofing colours on some of the buildings. this is because when i look from the top it looks very boring and all the same because i didnt use any of my other colour variations in it, this would give a better feel to the village instead of it being all the same. i love creating mini seculded areas with i have a few in, they just look and feel so magical and special that not everyone will know they are there. with my models they are really light and you cant really see the doors, windows and brickwork which is a little sad, and i dont know if its because of the colours i picked in maya or if its the lighting in unreal but i didnt know how to change it so i have had to keep it as it is, thats just one of the things i would change if i had more time on it.
0 notes
Text


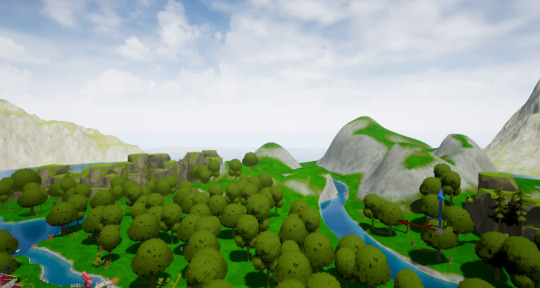
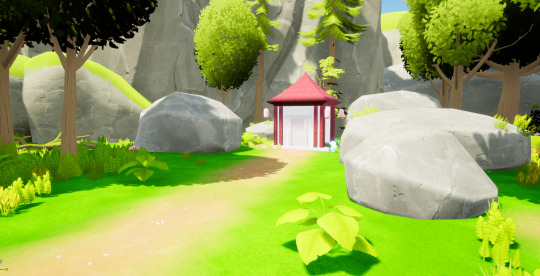
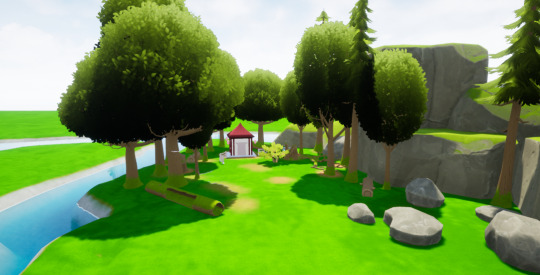
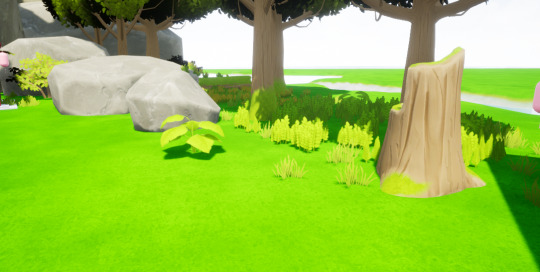
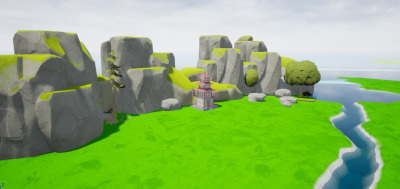
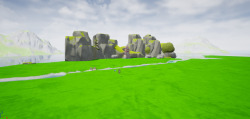
final outcome.
this is the final outcome of my map i have created, i barried off the edge of the map with big rocks that have been sized up and then planted a lot of trees and little forrest decorations like tree stumps. this took longer than it should of because i actually lost my foliage tool so i couldnt paint on the trees i had to induvidually place them myself. but i think the outcome hast turned out really well and im very pleased with it.
0 notes
Text


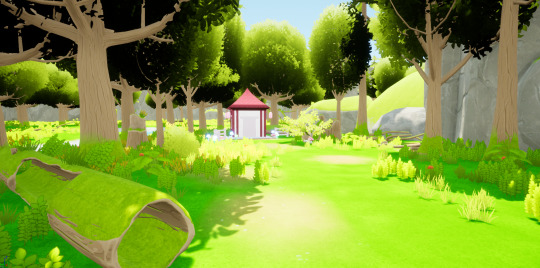
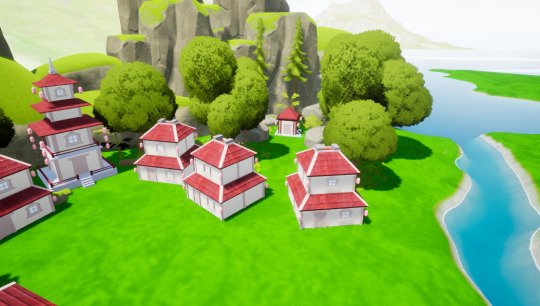
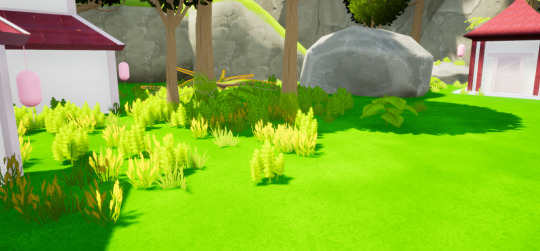
Landscape painting
i have found a dirt track paint brush in one of the packs and wanted to use it as a path around the village, so i went into the landscape mode and went on to the paint tool, picked the layer i wanted to use as paint and started painting around the village. this adds composition to the village and makes everything look connected and meant to be there. this just completes the village i think.
0 notes
Text

i have started pieceing my models together to create a little village, i really like how this is coming along and think it will look really cool when its all complete. i got the trees and rocks from a resource pack so i didnt have to make my own and i think they look great and really look like i have made them by having them match my style.
0 notes
Text

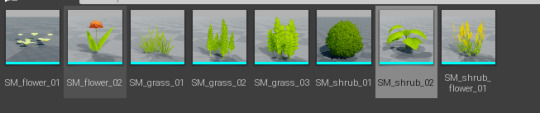


foliage mode
here i have learnt how to use the foliage tool for the first time, this was so i could put in a lot of grass and plants without having to induvidually place them myself. so at the top you change it from select mode to foliage mode, then you move what you want to paint on into the box on the left, then once they are in you can paint as many as you want onto the ground. you can then edit it to how many you want to place down per brush stroke, and also you can hide some, so if you want one section to have no flowers you just uncheck the flower box and then they wont appear when you next paint on the ground. this tool is a massive helper when it comes to wanting a lot of grass and trees aroudn your world. i think you can use this tool with any asset in your collection.
0 notes
Text


unreal engine
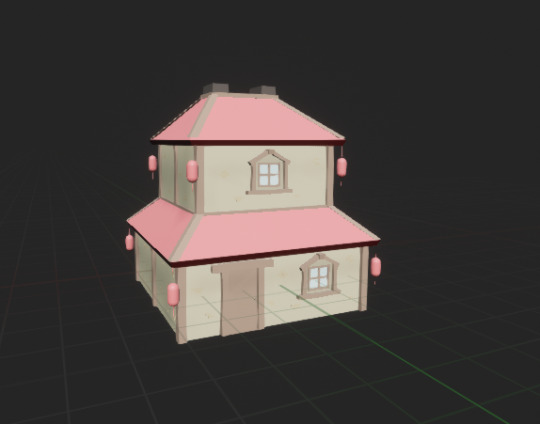
i have now imported my other two buildings and they have turned out better tham i thought, they have also been imported with the roof texture. the only problem is that all the tiles are different sizes on each building, the house also has the tiles going the in the wrong direction, but i prefer this so much more than having no tiles.
0 notes
Text


making a bluprint
when importing models from maya it seperates them all into induvidual objects, and i did the stupid thing of not grouping them all up together. so when i was creating which is shown in the images above i had to select them all and put them into the bluprint. this puts all the objects together how they were in maya so there is not need to rebuild it in unreal engine, and it puts all the materials on at the same time.
0 notes
Text

This is my A2 sheet for my end of year exhibition to show off all our work. it is difficult for me to show off my work in the same way as other people because my work has been made for a game and them being an image doesnt get the same recognition as other 2D work. so i have put my character sheet big at the top which gives everyone the idea that this is the main character, and then having some 3D models underneath it sets the scene of where and when my project is based. also putting my characters nect to some of the models allows people to compare the sizes in game, this also gives the idea of my characters being childeren much clearer. i am also putting in my models into unreal engine to create a game to allow people to run around my village and really see what my models would look like in a game.
0 notes
Text


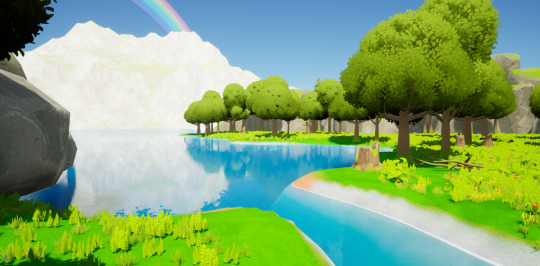
unreal engine
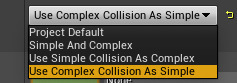
i have started to put together my environment and landscape around my village in unreal engine to present my work at the end of year show. i started off by getting my base map done, and then i got a few asset packs for my trees and rocks that i will be using in my final game outcome. in these screenshots i have had to individually edit each small art of my models, for example the door frame and the lanterns, and i had to edit them to make them use complex collision as simple. this makes it so it gets rid of the outside invisible box maya gives it and but still makes it have collision so you should just be able to run up to it and then stop when you hit the wall. i started off by making the river and adding in some rocks around the outside of the village. this makes the village feel secluded and makes it so you cant run off the edge of the map. i then imported my bridge over the river and the temple i created in maya. i then added a texture i found off of some website of some roof tiles to go on the roof, this is because i didn't really like how it looked with just plain colour so this makes it a lot better, and because i didn't have much time left to texture it myself i had to use a free texture i found.
0 notes
Text


what is uv mapping
UV mapping is the 3D modeling process of projecting a 2D image to a 3D model's surface for texture mapping. you then take this 2D sheet into photoshop and draw on creating your own texture by drawing what you want, so maybe having a base colour and drawing wood grains over the top to create a wood looking texture. once this has been drawn you can put it back onto the 3D model and then the 2D texture wraps itself onto the model and then its completed. this was going to be an option for my models when i finished creating them, but due to the lack of time i had left on this project and me not having any idea on what i was doing, which made me scared of doing it and ruining my work, i decided not to texture by UV mapping. but i do really want to try this out in the future next year and get good at it, because when you can texture your models it can look really good, and looking at some games texture work and how good it can look has really made me want to try it out and get bette at it.
0 notes
Text
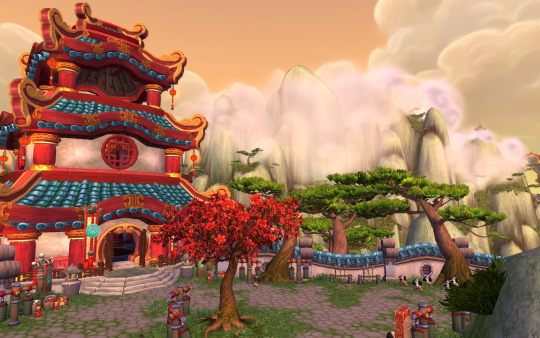
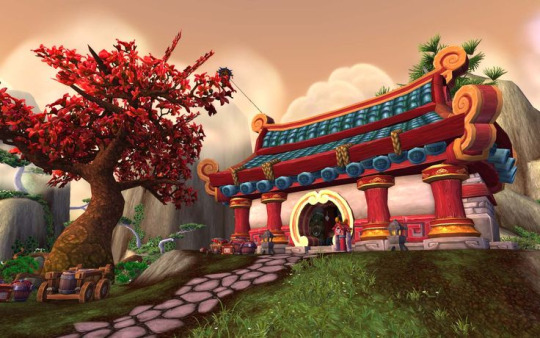


i have took some images of the Japanese styled expansion in world of warcraft, i feel like some of my decision of making a Japanese based fmp was because of these zones and buildings. these are some of my favourite zones in world of warcraft, i just love the story, music, and design and artwork that has gone into it. i wanted to look at these as inspiration on the landscaping and environment but also compare my models to these. the landscape is very hilly and has a lot of mountains, which jut brings the zone together and excludes it from everything else, making it feel trapped but loved, because everything is in one place and the story is just kept together and you don’t get lost running around else where. obviously my work wont be as good quality as this but i feel like i have gotten a good colour scheme which is similar to these and the style is recognisable and similar to this. looking at this gives me an idea on how i could of textured my models. these buildings seem to have a lot more rounder edges and shapes in it than mine, mine seems very boxy but then i guess i could say i was going for the low poly look because i sort of was because of the childish looking cartoony game.
0 notes
Text


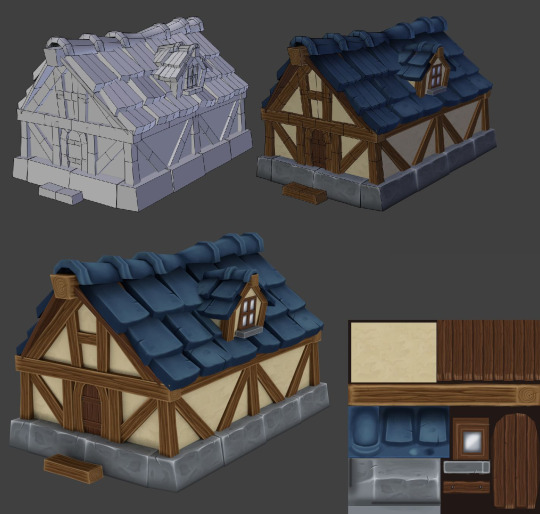
these are some world of warcraft styled buildings that have been shown before their render and texture. i like looking at these worksheets because it gives me an idea on how they were created and the process it went through to get to that final outcome. also showing the texture uv map makes me feel more comfortable doing it. looking at these designs give me ideas on what to make and how to make the different models. this gives me an idea of what i can do in the future when creating models and has helped me. i found making my models a little difficult but on these it looks super easy, i think because i was learning the new software and learning to model i was confused a lot and just went for the easier option more than the technical option.
0 notes