chill-art-n-things
Hi I Like Art
Previously-dead art blog for @wheres-my-chill | I won't use this much now except for the odd post here and there
61 posts
Last active 2 hours ago
Don't wanna be here? Send us removal request.
Last Seen Blogs

trippswim-blog
TRIPP Swim

midpointart
midpointart

ihowtotech-blog
HOW TO TECH

anzomi-blog
Untitled

mich-cooper
QUIMERA QUINTOS
Text
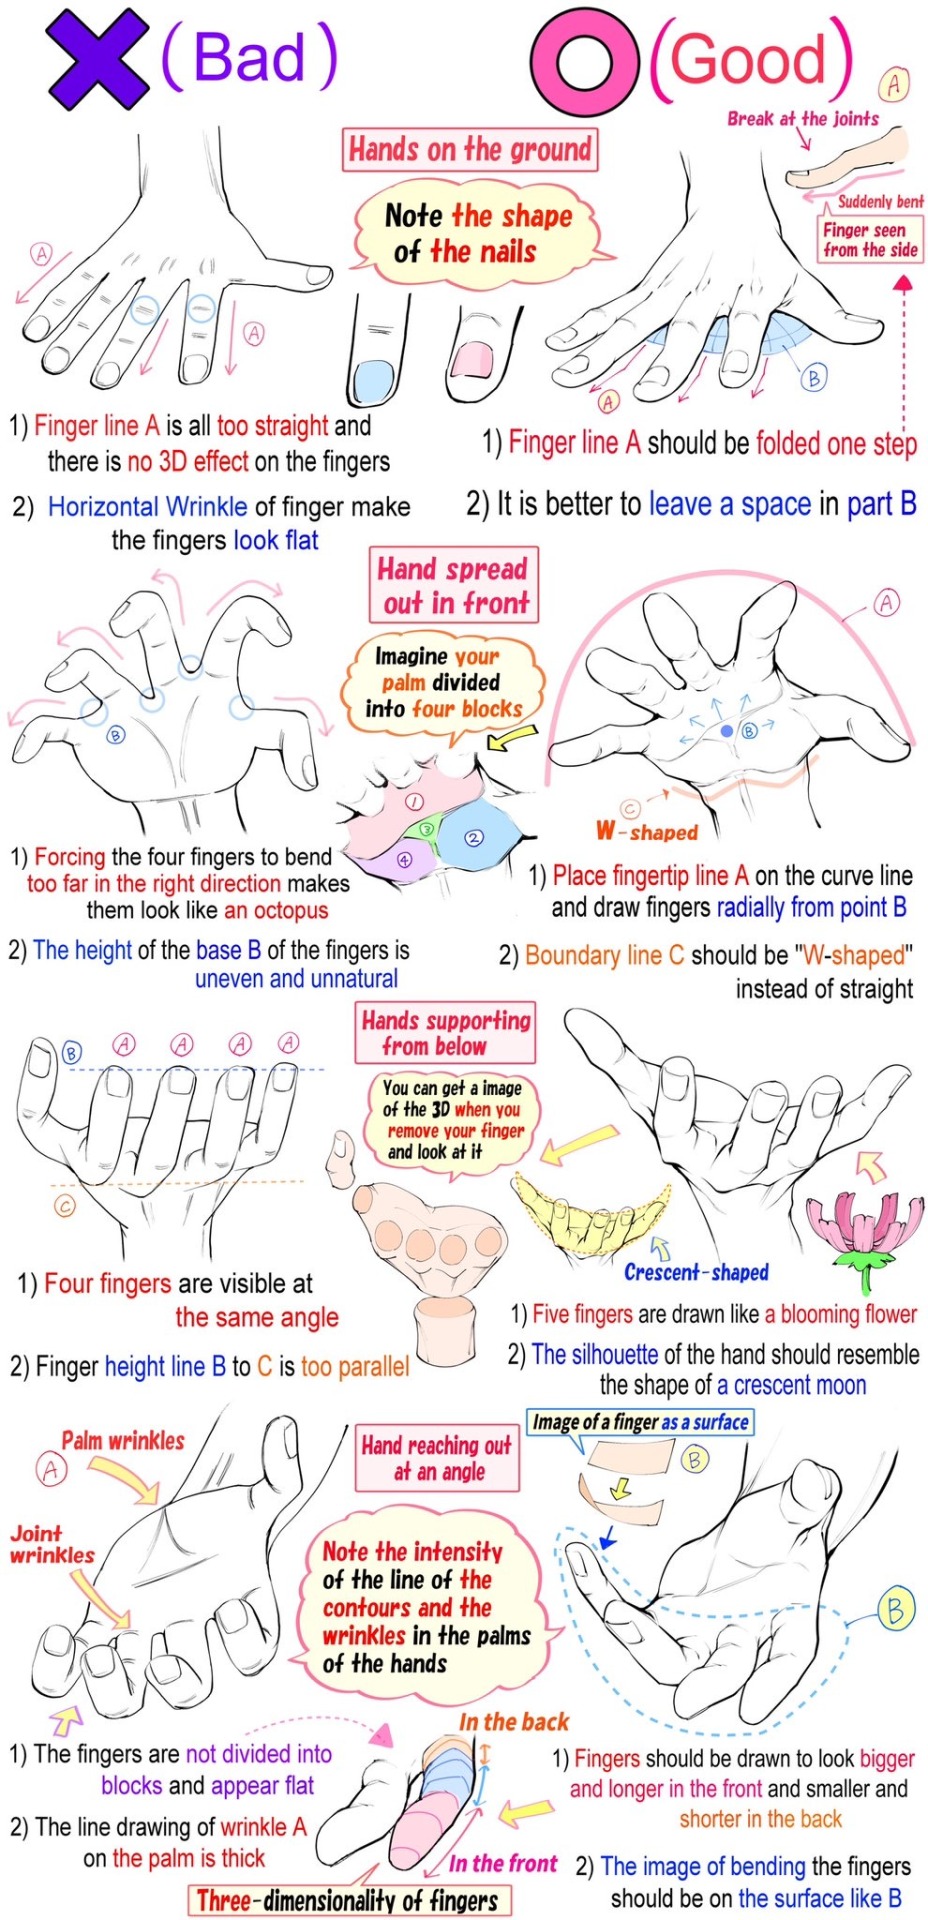
“Drawing techniques for the structure and appearance of the fingers when the hand is extended”
Source: Twitter
30K notes
·
View notes
Text
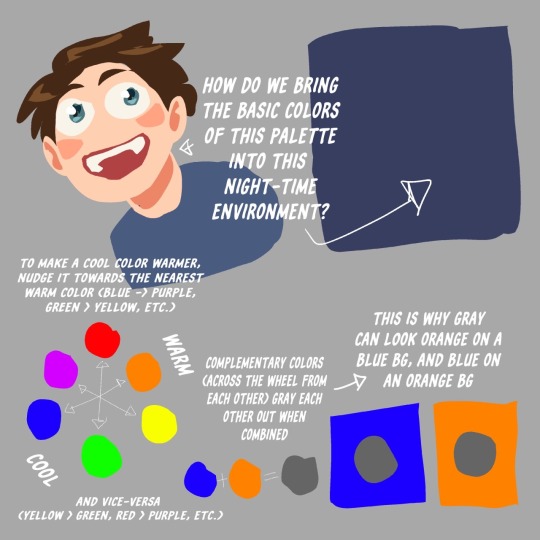
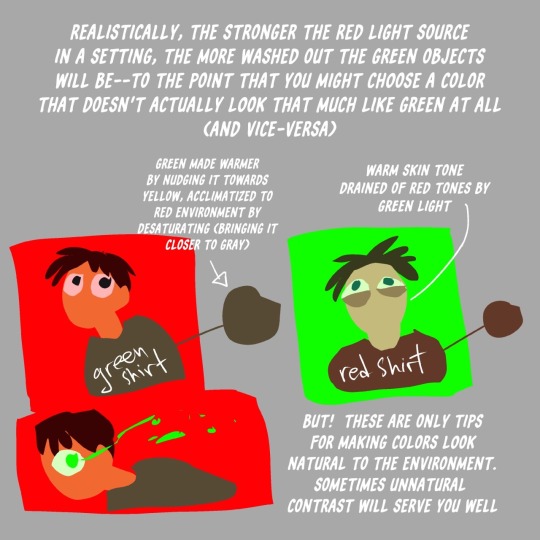
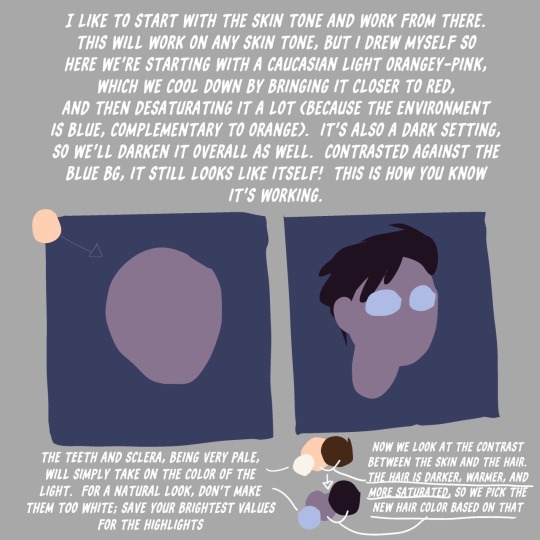
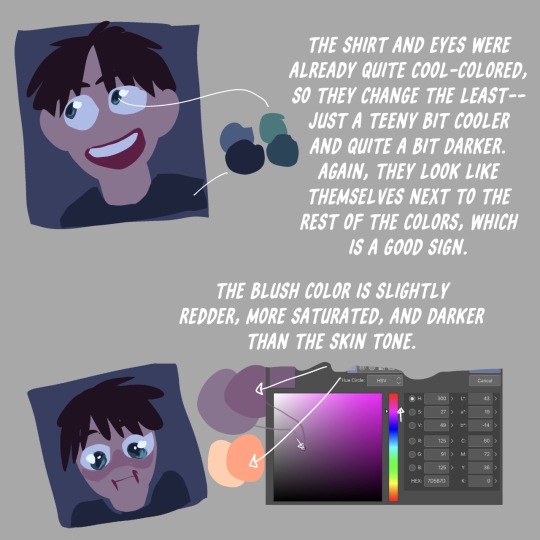
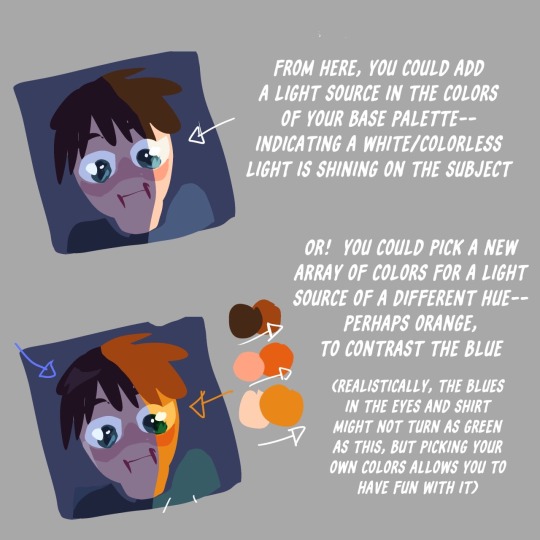
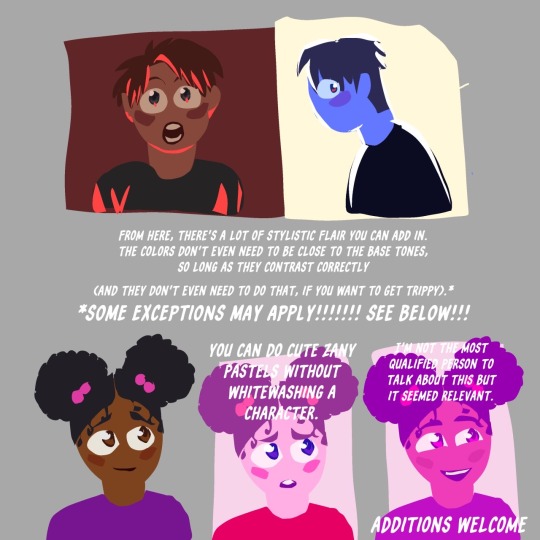
Toastyglow: “local colors!!!! relative hues!!!! listen I love a good adjustment layer they are so helpful especially when you need to work fast. but I also love picking special colors myself so here is a crash course in that–as I understand it, anyway.”
Source: Twitter toastyglow
344 notes
·
View notes
Text


I never wanted to hurt you, and I never wished to break the bond between us.
(Original scene belongs to @beauty-and-passion. Closeup under cut)
224 notes
·
View notes
Text
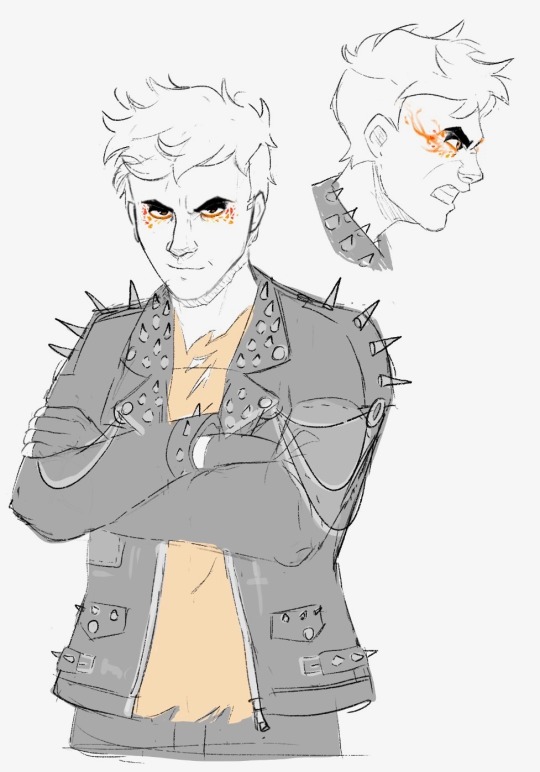
(Orange side concept belongs to @beauty-and-passion)
Plus a few close-ups under the cut

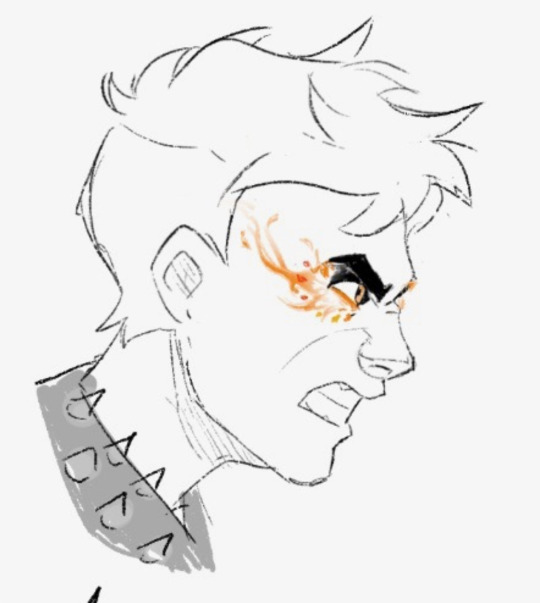
#sanders sides#sanders sides fanart#ts orange side#my art#originally i went for a mix of the 3 references for the jacket. however i ended up with a bit of a mess#so i just stuck with 1
467 notes
·
View notes
Text


@beauty-and-passion finally, I colored them in. I especially like how the first one came out
#my art#sanders sides#ts janus#janus sanders#hope you dont mind me posting more art here and there#wouldn't wanna spam either#but i have a sketch of the orange side i havent posted yet (partly 'cause the jacket gave me a bit of struggle)#also wow tumblr killed the quality on this
449 notes
·
View notes
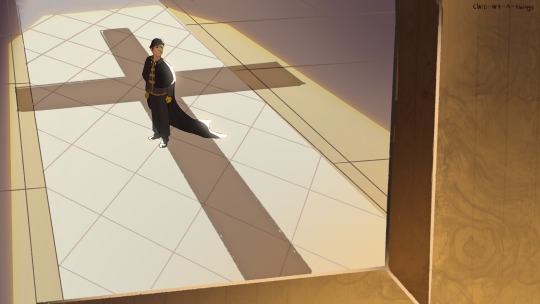
Text
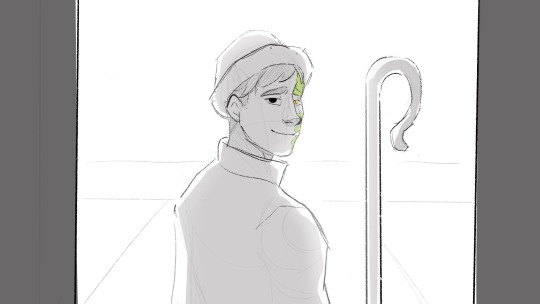

I am gnawing your s3 episodes i love it so much. Reading the 10th episode I just knew I had to draw at least one scene (technically one and a half, since the 2nd drawing is more based off the scene given it isn't fully accurate)
I'd like to clean these up a bit more and actually color them in when I can (likely closer to christmas break 'cuz college). Anyways @beauty-and-passion thank you for making FSS3 its awesome
24 notes
·
View notes
Photo
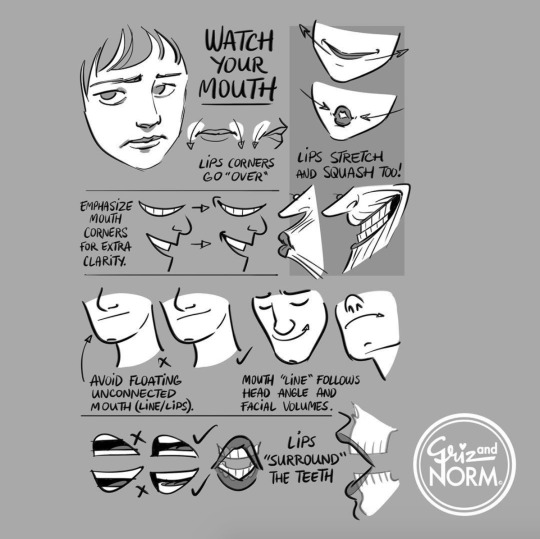


Art tutorials by Disney artists Griz and Norm Lemay
94K notes
·
View notes


Note
Hi! I absolutely adore your art in every single way and I really wanted to ask if you have any tips on coloring? I also apologize if you have already answered this type of question. ;u;
Thank you so much for the compliment! Let it be known that I’m not the best with coloring (especially color theory; hello beiges and greys :) ) but I’ll try to provide some quick tips on what I do to make coloring easier and what colors I prefer!
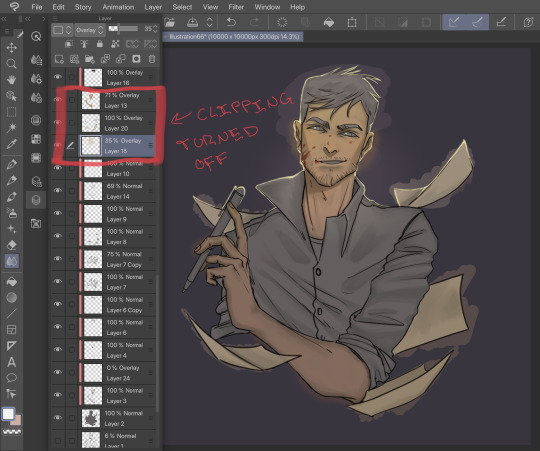
Tip 1 - Clipping is your friend and prevents messiness.
I usually set a base gray layer beneath my lineart before I color and start clipping my color layers above it. In almost every drawing program, there is some sort of clipping function that allows you to set a base layer that the layers above cannot draw beyond. This prevents you from accidentally coloring outside of the lines, and makes filling large spaces a lot easier.
Clipped layers:
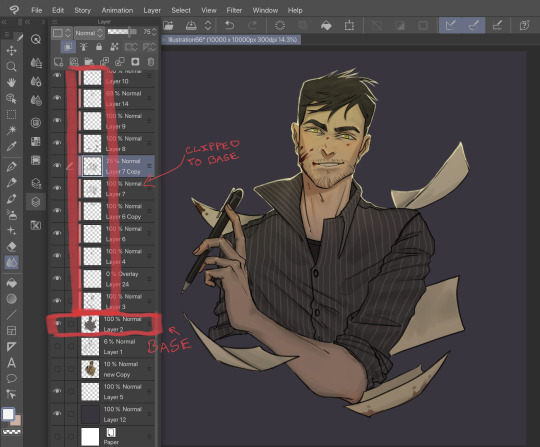
Vs. Not-clipped layers
Tip 2 - On Rendering and Greyscale
I stick to greyscale when I’m rendering big pictures because 1) it allows me to better view my values without colors messing up my perception of light vs dark and 2) it gives me far more control of changing my colors later if I don’t like them later on. I will then add color to a top overlay layer.


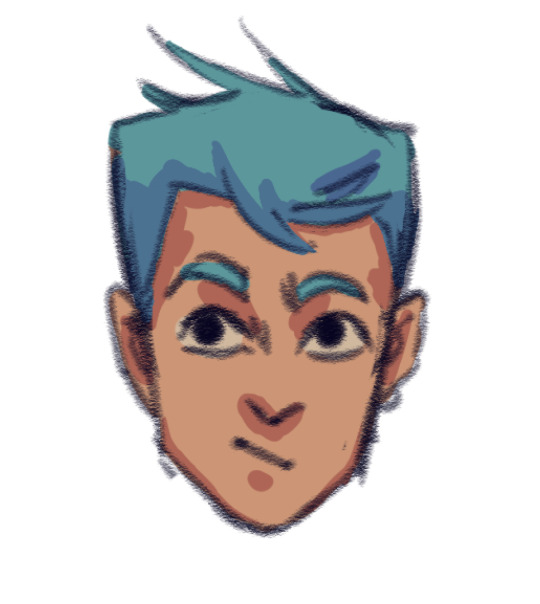
Tip 3 - When shading, don’t choose a “blacker” version of your base color.
Your shading will look flat and lifeless. Instead, chose a warmer or cooler version of your base color. I usually lean towards cool colors – particular purples – but it’s a matter of style, experience, and your own opinion.
“Blacker” Vers:

Specific color selection vers:
This is a bit short (or long, if you include the enormous pictures that I wish I could make smaller), but I’ll admit that I started drafting a “How I Color” tutorial when I got this ask because I read it wrong. (I believe the exact phrasing I used when I discovered my mistake was “a little fucky wucky.”) So, keep your eyes peeled for that. I’ll try to give a detailed overview of my coloring process in that post. But thanks again for the ask!
73 notes
·
View notes
Photo
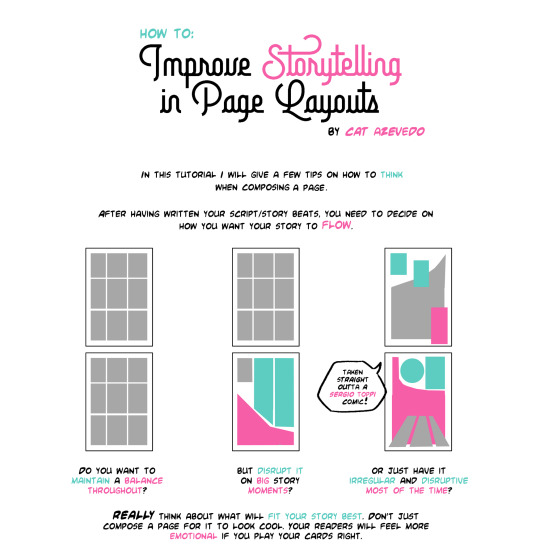
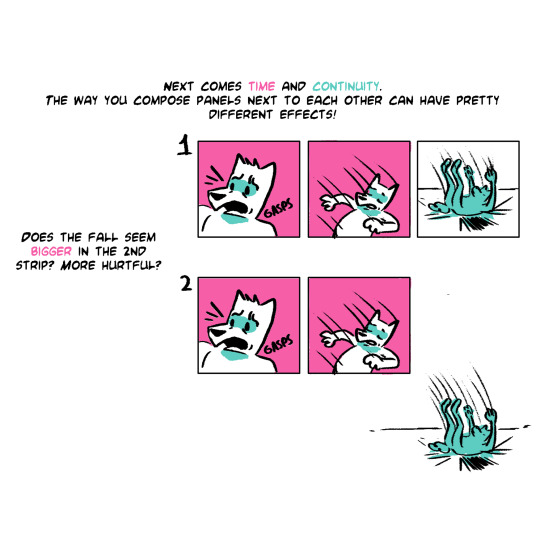

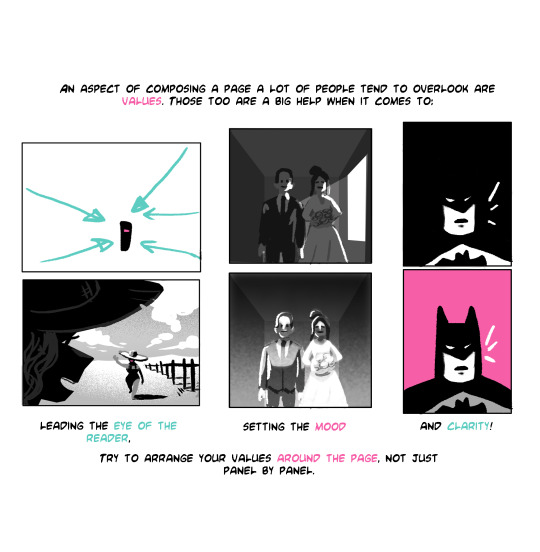


Did a small #tutorial for class on “How to Improve Storytelling in Panel Layouts”! Thought it might help some peepz around here!
44K notes
·
View notes
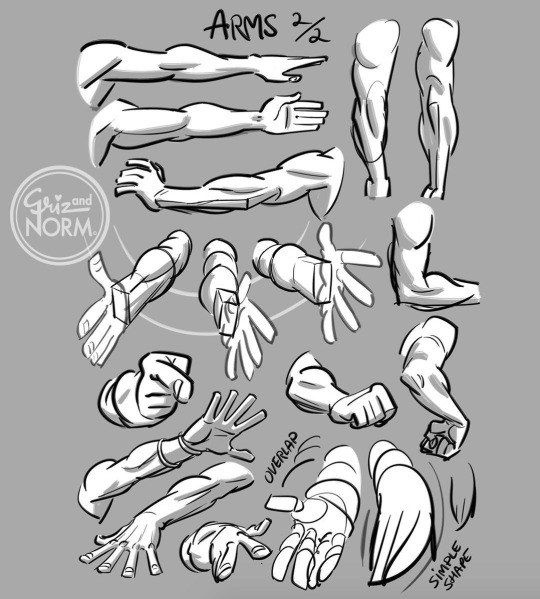
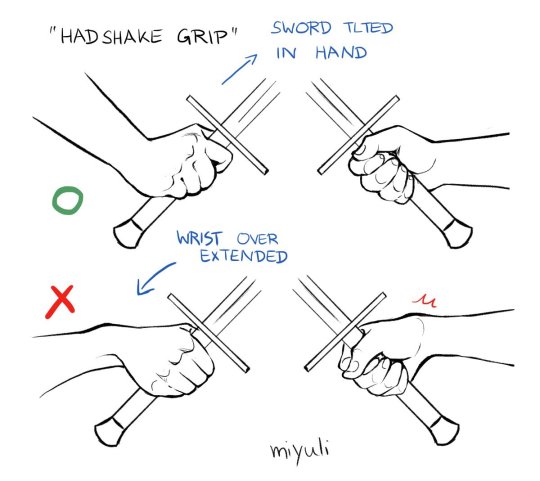
Photo
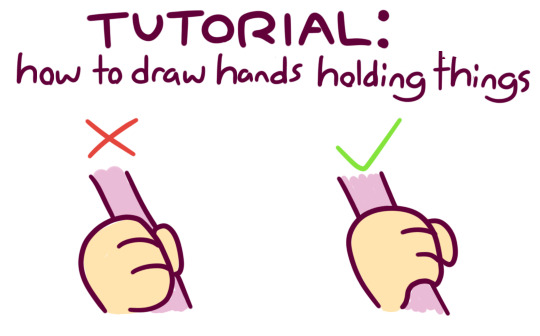

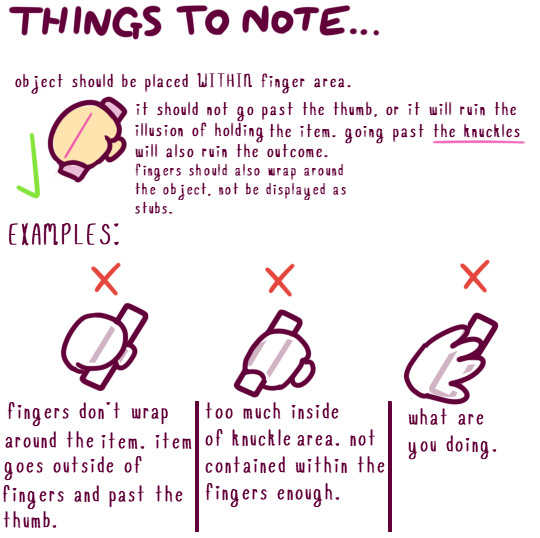
just a lil pet peeve i’ve seen around artists !!! i hope this helps!! (note: i like using cartoon-y 4-fingered hands, but this applies to 5 fingers too !)
21K notes
·
View notes
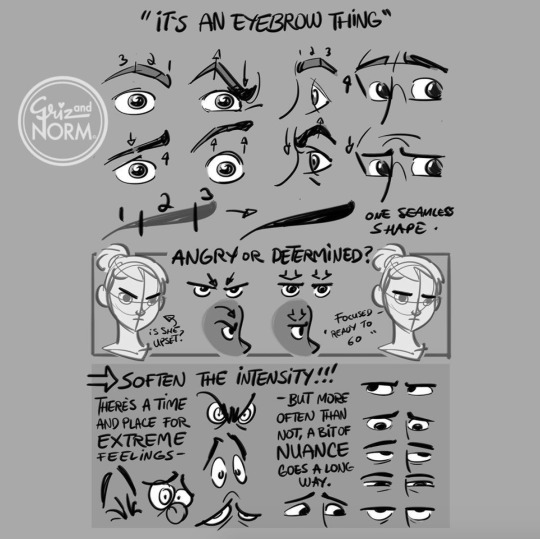
Photo
Art tutorials by Disney artists Griz and Norm Lemay
94K notes
·
View notes

Note
Herb do you have any advice for drawing eyes? I keep getting stuck in drawing because my eyes are never very expressive.
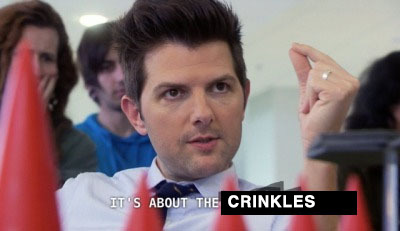
[ID: Parks and Rec meme edited to say “It’s about the crinkles” ID]
The lines around the eye are IM-PER-A-TIVE for expressing emotion! Think about when you smile for a picture: Often times the expression comes off looking false. This is because you’re just smiling with your mouth. When we smile and laugh genuinely, our eyes crinkle up. Upward wrinkles are often a sign of sincerity and squinting is a sign of intense focus.
I favor thicker eyebrows in character design because they’re easier to read from a distance, especially when you’re looking at a drawing on a small screen. But it’s possible to make small or thin eyebrows work too, as long as the rest of the face is carrying the emotion.
Open eyes show more white around the iris. Open with raised brows can express intrigue, surprise, and curiosity. Lowered brows can express distrust and severity. Resting eyes will have the lids touch the iris, but not obscure it. They can mean a lot of things depending on the eyebrows. Knit brows can be frustration, conflicted emotions, or sadness. Relaxed brows will signal comfort or neutrality.
Wide pupils can express passive emotions like amusement, arousal, and spaciness. Very shrunk pupils can indicate intense emotions, like fear and hatred. Also think about how the head tilts. A downward tilt can come off as challenging. An upward tilt can come off as assessing.

Eyes that are tearing up or crying will take on a very “wet” look. Added light closer toward the bottom of the iris can help achieve that. Scrunched eyes express very “in the moment” emotions. Removing light from the eyes and relaxing the face can give the affect of someone looking through/past you.

615 notes
·
View notes
Photo

Having troubles with facial angles in your drawing style?
Try a 3D sculpture of your art in your own style in a free program that is simple and very easy to use.
The program is called Sculptris and is a free off-shoot program from Zbrush, that program that you keep hearing about but either takes selling your kidneys or piracy to actually use.
If you download it and sculpt out a facial model, you can have references for your own work for all of time. No more endlessly searching Google for reference materials or twisting/rotating/flipping a drawing to see if there are flaws. And you can easily edit it to create more facial types. This way, you can make character references for any and every face and facial angle that you can think of.
The program offers mirroring right from the start, so your faces will be perfectly symmetrical. You can turn off the symmetry for things like scars or otherwise.
It takes a little time. For instance, I downloaded the program on Christmas and, in my spare time, this took a few days of getting familiar with the program (first day) and then sculpting for a few minutes each day, mostly due to my perfectionist nature. And this one isn’t even done. I still have to mold the mouth, ears, and other smaller aspects before I consider it done. However, I was so giddy over the possibilities that I wanted to share this with my fellow artists.
From now on, I have reference for a face in my own style and will be able to create things so much easier in the future.
I hope that this helps you guys and that you have fun with it.
177K notes
·
View notes
Text

So you might be saying: Lion why a guide on drawing black people? Well young blood it’s because a lot of people cant…seem…to draw…black people..Amazing I know.

Racist (caricatures) portrayals of black people have been around forever, and to this day people can’t seem to draw black people like they are human. If your artwork resembles any of the above even remotely your artwork is racist and offensive. If you try to excuse that as a stylistic choice you’re not only a terrible artist, but racist too!!! Congrats.
Whitewashing is also a problem. A lot of people refuse to draw black features on canonly black characters. While this example isn’t colored, lightening the skin-tone of a character is also considered whitewashing. So lets start with features!

Now all black people have different noses thats a no-brainer, but black noses tend to have flatter bridges, and wider nostrils. Please stay from triangular anime noses and small button noses. Your drawings should not depict black people with abnormally large noses. (Especially if you do not draw other characters this way)

If you feel like the way you draw lips on black characters is offensive or resembles a caricature,it probably does and you should change it. ABSOLUTELY AVOID PLACING LIPS AT THE BOTTOM OF THE FACE.
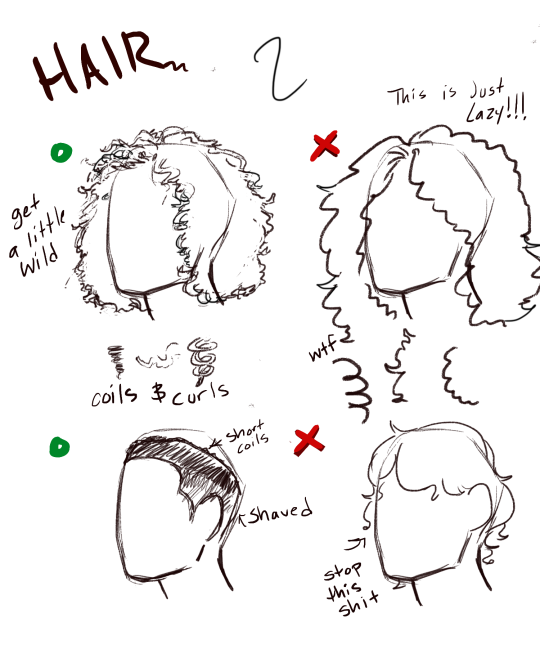
Hair is so diverse! Please get used to drawing braids, locs,kinks and coils! If you can learn to draw ringlets and long waves you can learn how to draw black hairstyles.
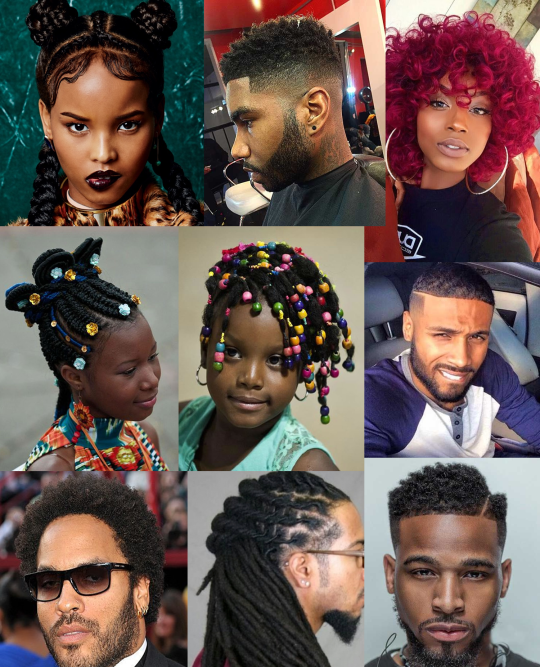
Add clips! Learn how to draw baby-hairs and never be afraid to add color Pinterest and Google are free my dudes! Also try using square brushes for blocking in coils.
OK THAT’S ALL YOU GUYS

123K notes
·
View notes