
Last Seen Blogs

bitescars
ladybird is my dog's girlfriend

ohsoswiftly
Oh So Swiftly

xxrawrmuffingirliexx
Learning The Ropes, And Surviving Life.....

labaribabi
Labaribabi

whatwooshkai
that woosh kai
Text
Brave New World: Can AI generate reliable code?
Introduction:
Recently, I conducted an experiment using ChatGPT-4, a state-of-the-art AI language model by OpenAI, to write HTML and JavaScript code for a running pace planner. The key observations and findings from this endeavor offer insights into the effectiveness of AI-generated code.
Key Observations and Findings:
1. Final code is 98% AI-generated: The vast majority of the code was generated by ChatGPT-4, with minimal human intervention.
2. Assumptions and debugging: I didn't edit the code or debug it myself, but only provided error messages directly to the AI.
3. Code generation issues: The AI made several mistakes, such as losing focus, missing variable names and function names, and confabulating about non-existing functions.
4. Follow-up difficulty: Tracking changes and updates in a long codebase (over 100 lines) proved challenging.
5. Requesting unified diffs: To fix the code, it's better to ask the AI for a unified diff explicitly.
6. Unused code: ChatGPT-4 rarely removes unused code and may hang in response after around 80 lines of code.
7. Reliability: The AI is quite reliable in solving problems in the code but falls short in complex scenarios, such as calculating the number of seconds when dealing with a runner's pace in a specific format.
8. Code organization: The AI-generated code is well-organized and easy to understand, but may leave developers feeling detached from their work.
9. Loss of personal touch: While the AI-generated code was impressive, it felt soulless and lacked the personal connection I usually have with code I create myself.
10. Human intervention still required: Despite the code being mostly AI-generated, it wouldn't work without human intervention to debug and test critical aspects.
11. Project duration: The finished product took about a week of interactions with ChatGPT-4, averaging around 2 hours per day.
Conclusion:
AI-generated code has come a long way and is now capable of creating functional and well-organized code using natural language interactions. However, it still has limitations and cannot replace the personal touch of a human developer. As AI continues to improve, we can expect even more impressive results in the future, but it's essential to balance the efficiency gains with the joy of programming and personal connection to our work.
Check out the complete code on GitHub: https://github.com/kolargol/running-pace-planner and the working page at: https://planner.onefellow.com
0 notes
Text
New APU2 F-1 firmware released
Today I have uploaded most recent version of firmware for APU2. It is based on just released official version. This fills long gap between previous version. Binaries are available in github repo.
0 notes
Text
APU2 4.9.0.7-F1 Released
After long break I have updated my “F1″ firmware releases for APU2. Since this update is major one please refer to pcengines release page. As always my builds include updated AMD microcode.
0 notes
Text
c0x0.com blog now open
I decided to open https://blog.c0x0.com to separate commercial stuff from various other projects I am working on. If you look for information regarding c0x0.com then please head to that blog.
0 notes
Text
Protect your privacy by protecting your e-mail address
Since many years i was considered by the fact that I need to give away my e-mail address to various 3rd party services - often breached, leaked causing my e-mail to circulate all over the internet. I started to fight against this by issuing aliases on my own e-mail server. I ended up with long unmanagable list of random hashes that was hard to grasp...
The need was born to do something about that situation...
The c0x0.com service was founded. c0x0.com is a service that allows to create aliases and attach them to existing accounts. It builds random alias impossible to track. Service was designed as a help to protect from leaking e-mail addresses all over the internet but it also have this benefits:
hide your identity
help fight spam (you can disable/enable alias anytime)
provides phishing protection: if you use random alias you know that legitimate e-mail have to be sent to correct alias that is impossible to guess
helps organize e-mail flow as each alias should be used to exacly one service
in case some service you were signup was breached, your main e-mail address stay safe. Simply disable alias or remove it. That’s it.
prevents tracking you by e-mail address, it’s no longer possible to link your activity using e-mail address (now everyone uses single e-mail for multiple services)
Historically creating alias was hard. If possible users were able to create their own alias. c0x0.com do not allow creating custom aliases, instead it uses unique hash that’s make it impossible to correlate with any user behind it.
For more demanding users there is hosting option. This means you can bring your domain and attach it to c0x0.com, so you can have your own forwarding service.
Ah, and there is something for developers! c0x0.com have nice API so you can create application. For example Firefox extension that creates alias automaticaly when signing up to new service.
If you have any questions do not hesitate to contact me! In any case you can start using c0x0.com for FREE, yes! there’s zero dolar option as well.
0 notes
Text
New APU firmware released with TPM
New firmware with TPM support was just released for PC Engines APUs. This release have major changes and fixes. Since v4.8x it is possible to build firmware with AMD microcode (see) and this time firmware is available as well:
https://onefellow.com/apu/apu2_v4.9.0.1-F1.rom.tar.gz (GPG signature)
sha256: 490d246c2316d73613c5b9b3a8e1fab9668f3c45cb0807b192557bca81dca57d
My public GPG key can be downloaded here.
Since this release I have also created github repository: https://github.com/kolargol/apu2_firmware that include all firmwares i am releasing.
0 notes
Text
APU2 Spectre Mitigation
Finally team from coreboot allowed anyone to build firmware for APU (2,3,4,5) with microcode updates. This updates are important as they contains mitigations around Spectre vulnerability. Instruction on how to build firmware can be found here. Unfortunately we will never see official builds with microcode as AMD did not responds to queries from the coreboot team. You can read it here.
Meanwhile, if you do not have time or experience on building your own firmware, here you can find firmware I have build. It is only for APU2:
https://onefellow.com/apu/apu2_v4.8.0.7.1.rom.tar.gz (GPG signature)
sha256: 7483dacf88b8da2d8a2d9481e7e4b97ba93b174616b7d17c5be9ff5823376f36
My GPG public key can be found here.
I am adding .1 postfix to build numbers to indicate incremental update to official build.
0 notes
Text
How to require SmartCard (Yubikey) to login to the macOS
It is possible to require SmartCard to login to macOS, contraty what is written on Yubico website:
“SmartCard (...) cannot require the YubiKey at login”
to require SmartCard (here Yubikey but probably works with any other smartcard), you’ll just need to load proper configuration profile. And here I am with help (and proper Apple Support document). If you want to require Yubikey to log-in, install below profile:
https://saturn.onefellow.com/d/SmartCardOnly.mobileconfig
(sha256: 39666f0c3284d05df71f8e055b428838dad873b18fa4dfe736d354b0dc84fa73)
This profile is signed with valid Apple developer certificate but if you are not trusting me, go ahead with above support document and create profile yourself.
After downloading profile, double click on it, you should see window as below:
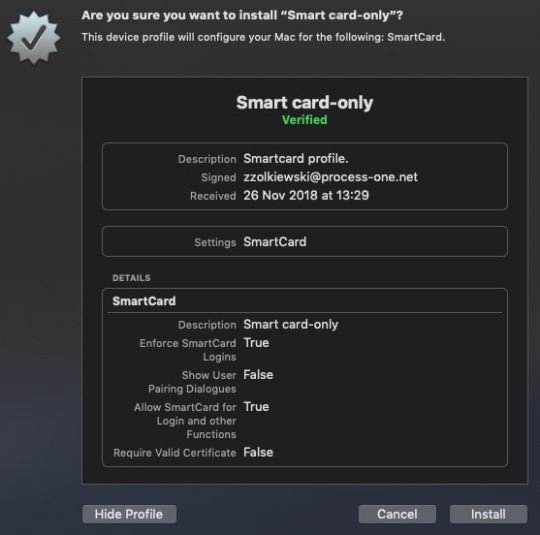
you can see all the details regarding what this profile is doing and that it is signed. If you are OK with this, click Install. From now on, Yubikey is required to login into your Mac.
Remember that this profile enables restrictions on all mac accounts, so anyone who want to use your mac, need to have it’s own Yubikey!
Updated on 15.10.2019 with regenerated Apple Certificate valid for macOS Catalina.
0 notes
Text
Yubikey forwarding SSH keys
Here is how to properly forward SSH keys to remote machine, to be able to use it as jump-host to other servers:
On localhost, gpg-agent config:
echo “enable-ssh-support“ >> ~/.gnupg/gpg-agent.conf echo “extra-socket /YOUR/HOME_PATH/.gnupg/S.gpg-agent.extra” >> ~/.gnupg/gpg-agent.conf
On localhost, ssh config (~/.ssh/config):
Host 192.168.0.1 RemoteForward /YOUR/REMOTE_HOST/.gnupg/S.gpg-agent /YOUR/LOCAL_HOME_PATH/.gnupg/S.gpg-agent.extra RemoteForward /YOUR/REMOTE_HOST/.gnupg/S.gpg-agent.ssh /YOUR/LOCAL_HOME_PATH/.gnupg/S.gpg-agent.ssh
On localhost, start gpg-agent:
eval $(gpg-agent --daemon)
On localhost, export your GPG public key from Yubikey:
gpg -a -o YOUR_KEY_PUB.txt --export KEYID
On remote, import your public key and set trust:
gpg --import YOUR_KEY_PUB.txt gpg --edit-key KEYID trust 5 save
On remote, config gpg to use agnet:
echo "use-agent" >> ~/.gnupg/gpg.conf
On remote, add to sshd_config this directive:
StreamLocalBindUnlink yes
On remote, add SSH_AUTH_SOCK var to your shell init script:
echo "export SSH_AUTH_SOCK=~/.gnupg/S.gpg-agent.ssh" >> ~/.bashrc
restart sshd, this will cause sshd to remove stale sockets when you logout.
Now, log-out, login, at this point when you invoke ssh-add -L on remote you should see your SSH public key - If not, start over ;) Also you will be able to perform all gpg usuall operations on remote-host (as long as your yubikey is plugged into localhost, of course...)
0 notes
Text
How to obfuscate dovecot encryption key
Perhaps you read my blog post about server side email encryption and you are wondering how to protect secret key from leaking with your data. There are probably dozen ways to do this, but i will describe one that i particularly like.
I am talking about removing private key from server at all...or at last from it’s file system. Idea is as follow: after dovecot start, we remove private key from disk. Private key is still loaded into system memory but it is not on disk anymore, and access to it via memory dumps is limited (at last on OpenBSD). Anyway, access to the key is much harder then simple copy&paste. Add to it some nice obfuscate procedure and you are good to go. There is one problem: how to load that key when restart of the process is needed or server reboot happens...
Maybe you heard about Authy Two-factor app and service. Among pretty standard features related to 2FA they support very nice feature: OneTouch. It replace entering numbers to simply approving/declining requests. This feature is very important if you are away from server console.
Next you will need some kind of keystore, in this case it can be some remote server with ssh/scp allowed from dovecot machine. On the keystore server you will need to install onetouch-ssh - this will talk via API to Authy servers. You will need to setup all that manually, and there is no shortcuts.
here, how it looks on diagram
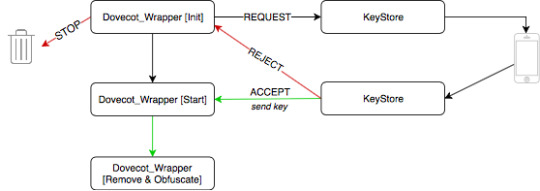
New stuff there: Dovecot_Wrapper, yeah this is another thing needed, once Authy account is set, app installed on the phone and onetouch-ssh works on keystore, you have to put wrapper script over rc dovecot startup script.
Let’s see what Dovecot_Wrapper do. First it passes all the init functions to original rc script except one related to stop/start daemon. When this call is intercepted, it make scp connection to the keystore using trusted ssh-keys, keystore (dcu) then send login request to the phone where admin see the command and can take action (approve/decline). If timeout happen or request is declined - key cannot be accessed and copied to dovecot machine, Dovecot_Wrapper bails-out as dovecot wont start without private key.
When approved, private key is copied to dovecot machine - it can be copied on the disc or to temporary MFS, or whatever you want. After verify that key hash is correct, dovecot can start now. If all is OK, we can now remove private key off the server by wiping it out (remember to use special command like rm -P, not just rm - to prevent restoring it from filesystem). You can now perform nice obfuscation by replacing original key with some newly generated - just remember to place it exactly in the spot where old one was. Do not worry - this key won’t be used by dovecot process.
While this is not very elaborate, removing key from server and obfuscation protect your encrypted mails from being accessed by many occasions:
fs dumps are useless as data is encrypted and there is no key to decrypt
potential RCE that lead to data leackage is limited or not possible - no key on server, attacker see only encrypted data
cloud provider backups are safe - same - no key, no access
perhaps many more...
This is just one of the techniques that “naively” protects your data - by “naively” - i mean - there are no solid ways to protect your data - you can only make life harder for hackers (but just imagine the face of the guy who pwned your mail server and see later that all he has is fake key and GBs of encrypted data)
0 notes
Text
How to setup personal VPN server in less then 5 minutes
This post is mainly for non-technical people who want to setup OpenVPN for their use, simple words no complex stuff.
So you feel convinced that your privacy matters, you do not want anyone to peek your traffic to get to know that you are looking for fancy pink pants for yourself. Whatever reason you have, it is always good idea to protect your traffic using VPN. It is utmost important if you are using mobile internet and public WiFi hotspots - that are newer safe (jut remember that, safe is only things that you do yourself). You go to that coffee shop every day and know people who work there and drink coffee with you, and you think, that using their WiFi is OK, because you know them, what can possibly go wrong?
When you join WiFi all traffic from your phone/laptop is routed via unknown device somewhere on the back of that coffee shop. Someone who runs router can literally do anything with your traffic, that - not only includes malicious actions like stealing credit cards, login information, or directly attacking your device but also can passively record all your activity and then sell your data to 3rd party - and you even cannot imagine how easy it is to setup by any fool (and that’s probably most scariest of all).
To avoid all that risks, there is easy solution: VPN (here precisely OpenVPN). Putting simply: VPN wraps all your traffic info highly secure, encrypted tunnel that terminates on server where your VPN is. Say, you have VPN server in Frankfurt, Germany - wherever you go on the world - your traffic will be always virtually “wired” and encrypted to that Frankfurt datacenter where you host VPN server. I am skipping all the problems related to cryptography and if OpenVPN is 100% secure or not as this is mainly academic talk. For god sake, OpenVPN if maintained with latest releases is safe case closed.
When deciding to use VPN you can select 3rd party services - and there is really plenty of them, cheap prices and so one. If you are careful reader you spot immediately one problem: again you give all your traffic and data to 3rd party - that again can collect and mangle your traffic (example1, example2 and there is more...). That’s sucks.
There is solution to that: host your own, truly private OpenVPN server. But to do that you need a lot of knowledge, right? Well no more! :) I have made some effort to make life easier and start server in couple of minutes.
Of course you still need basic knowledge, like you need to know how to issue simple linux/unix commands, and ability to read with understanding.
Prerequisites
have account on one of supported cloud providers (read more in README) with running OpenBSD 6.2 server. This basically determinate where your exit traffic go. I recommend selecting provider that is nice for your data, and actually care for users privacy like Swiss Exoscale. Typically setting account on Exoscale or Vultr takes few minutes.
have ansible installed on your local computer. Ansible process playbook that automatically configure remote machines (servers). In our case - it configure whole OpenVPN server, DNS and Certificate Authority - that issue certificates for you.
SSH key to access servers in the cloud from above step (of course...)
have some OpenVPN client installed. Ansible playbook generate configuration profiles automatically for Viscosity VPN and iOS OpenVPN Connect app - and this is something that I recommend, but you can use any opensource software you want.
Once you have it all, start server of your choice, note it's IP address and clone repository to your local host:
git clone https://github.com/kolargol/openvpn.git
next, go to openvpn dir and edit private_vpn_inventory file by replacing IP_OF_YOUR_SERVER by the real IP address of the server you have just stared. Now, run ansible playbook by issuing following command:
ansible-playbook -i private_vpn_inventory openvpn.yml
when this script complete, your VPN server is ready to use. For detailed descryption, please see README on github.
Now, you need encryption keys to connect to the server and configuration profiles. This are generated by ansible script, and to copy them to your local host, do:
scp root@SERVER_IP:/etc/openvpn/export/archives/* .
this will copy two archives, one: Desktop and second Mobile as names states - one is for desktop, second for iOS. You can issue as many certificates as you need, see README how to do it. Untar the archives by
tar -zxvf archive.tar.gz
On Desktop open Viscosity and go to:
Preferences-->Import Connection-->From file
and select .visc profile, save, connect. Hurray. That's all.
On iOS - connect iPhone to iTunes using cable, go to application data and search for OpenVPN app and add all files that are in Mobile archive. Sync with iTunes and disconnect cable. Next, on your iPhone - go to OpenVPN app settings in General tab, set options as follows:
Seamless tunnel -> ON Connect via -> Any network Reconnect on wakeup -> ON Protocol -> UDP Compression -> No Connection timeout -> None Network state detection -> Full IPv6 -> Enabled Minimum TLS version -> TLS1.2 Google DNS fallback -> OFF Layer 2 reachability -> ON
pfiu. Open OpenVPN app, you should see request to add new profile, accept. Once it is set you can use troggle in General settings to connect to VPN.
Final Notes
refer to README if you see for detailed information
playbook setups IPv6 and IPv4 dual stack, if you do not know what is that, no worry, say to your frieds - you will be cool
DNS resolver enables DNSSEC, that makes you even more secure
if you live in China see master branch with scramblesuit :)
if you decide on Exoscale please use my reference code gLrEOdv5hVgv or register from this link, you will get 50 CHF credit after second payment - that's amount will let you use VPN server for free for next 5 months
0 notes
Text
Server side email encryption with Dovecot
If you are running custom mail server in order to protect users privacy and security it is good idea to encrypt local mailstore. Finally we have good way of doing that (yeah there were trees before, but usually admins want something that is maintained by core team) and it is mail-crypt plugin for Dovecot.
Setup is easy and will take you 5 minutes, first create keypair, here i am using todays reasonable encryption settings for ECC:
create private key used for decrypting mail:
openssl ecparam -name prime256v1 -genkey | openssl pkey -out master.key;chmod 0400 master.key
create public part out of private key used for encryption:
openssl pkey -in master.key -pubout -out master.pub
optionaly you can protect keypair from accidental damage by setting immutable flags (OpenBSD):
chflags schg,uchg master.pub chflags schg,uchg master.key
configure plugin in dovecot.conf:
mail_plugins = $mail_plugins mail_crypt plugin { mail_crypt_global_private_key = </etc/dovecot/crypt/master.key mail_crypt_global_public_key = </etc/dovecot/crypt/master.pub mail_crypt_curve = prime256v1 mail_crypt_save_version = 2 }
do not forget to add mail_crypt to any protocols you are using in your local config, like:
protocol imap { mail_plugins = "mail_crypt notify imap_zlib" }
restart server and all new mail will be encrypted by default.
OK, so what about old mails? According to Dovecot developers, supported way of encrypting mails is to move them around (like move from folder to folder), but that's just, ehhh.. So i wrote simple script that will make your life easier. You can use it to encrypt all old mails. Setup is easy, you need to update your magic(5) database (usually some /etc/magic file) by adding this lines:
0 string CRYPTED MailCrypt
script is on my gist, please read it before usage. Updating magic is nessesery to avoid double encryption if you re-run it. And remember - always backup your data! I take no resposibility if you loos anything using this script.
Usage: encrypt_maildir.sh user directory example: encrypt_maildir.sh john_doe .MyShoppingMails
Mail folders are encrypted one-by-one, and with the "progress-bar", so you will know where you are. I have used it to encrypt ten of thousands of email messages and so far no problems there.
Now, if you are wondering how this mail encryption give you advantage in case server breach (if someone gain root access) then i say, it give you nothing as private key for decryption reside on the server itself, so it is easy to decrypt all e-mails once bad guy get there. There is one solution for this, and i will write how to do it in next blog post. Stay tuned...
1 note
·
View note
Text
Verify TLSA (DANE) records using OpenSSL
Here is quick one, you can use various validators online to check weather your DANE TLSA records are correct but number of them do not support multiple certificates and in general they work badly. So best is to test yourself:
Have openssl 1.1.x handy, also RR data for TLSA records will be needed. When you generate them you should know how they look, in case you don’t just use this sample query - in this case SMTP records:
host -t TLSA _25._tcp.onefellow.com _25._tcp.onefellow.com has TLSA record 3 1 1 43EF2EE319070B64915F61B83209D97B3B632EC15B0E89642CE8B7BD 03154D3A _25._tcp.onefellow.com has TLSA record 3 1 1 A254C1E9945AF14159A815A2E74AC48EB04620D4287512950FC2BF71 D7101D1E
As you can see in this example there are 2 certificates, one is RSA and second is ECC. Now, to check if this records match certificate on server use following command for RSA:
openssl s_client -starttls smtp \
-connect onefellow.com:25 \
-cipher ECDHE-RSA-AES128-GCM-SHA256 \
-dane_tlsa_domain "onefellow.com" \
-dane_tlsa_rrdata "3 1 1 a254c1e9945af14159a815a2e74ac48eb04620d4287512950fc2bf71d7101d1e"
In the response you should see something like that:
Verification: OK
Verified peername: onefellow.com
DANE TLSA 3 1 1 ...287512950fc2bf71d7101d1e matched EE certificate at depth 0
Now, for ECC certificate (note cipher change and hash, gosh):
openssl s_client -starttls smtp \
-connect onefellow.com:25 \
-cipher ECDHE-ECDSA-AES256-GCM-SHA384 \
-dane_tlsa_domain onefellow.com \
-dane_tlsa_rrdata "3 1 1 43EF2EE319070B64915F61B83209D97B3B632EC15B0E89642CE8B7BD03154D3A"
and again, response:
Verification: OK
Verified peername: onefellow.com
DANE TLSA 3 1 1 ...5b0e89642ce8b7bd03154d3a matched EE certificate at depth 0
Here are some sample error messages you might get:
wrong hash (certificate hash do not match provided hash):
Verification error: No matching DANE TLSA records
wrong domain (domain do not match):
Verification error: Hostname mismatch
Easy, right? Of course you can use above example to test other protocols like http, imap, and whatever is supported.
Note that due to the fact that onefellow.com certificates rotate frequently, above examples are functional until 6th of Oct 2017
0 notes
Text
Disable mouse support in vim
If you are going through madness because after upgrade to Debian 8 (stretch) you cannot use mouse in vim anymore, here is your solution:
autocmd BufEnter * set mouse=
just put it into ~/.vimrc or /etc/vim/vimrc , you welcome
0 notes
Text
Lista polskich spamerów
Zdecydowałem się upublicznić czarną listę polskich spamerów i oddać ją w ręce społeczności w celu edycji i jej usprawnienia. Lista to 2 pliki access dla postfixa ale jeśli ktoś używa innego serwera, pewnie nie będzie problemu żeby ją odpowiednio przystosować.
Czym różni się ta lista od tych z pyzora/razora i generalnie spamassasin-a? Otóż maile od zablokowanych hostów nie są dalej przetwarzane - są odrazu blokowane. Lista jest edytowana i analizowana ręcznie więc nie ma możliwości pomyłki - serwery które się na niej znajdą odpowiedzialne są za wysyłanie maili marketingowych/spamu bez zgody właścicieli kont mailowych. Lista ta nie zawiera tzn “common spam” - czyli spamu wysyłanego przez malware - jest ona wycelowana w “przemysł” mail-marketingowy i ich klientów - tak - blokujemy nie tylko serwisy spamerskie ale też klientów którzy zdecydują sie na takie usługi. LIsta jak narazie jest krótka - ale liczę na to że szybko się rozrośnie.
Odsyłam po więcej szczegółów na github: https://github.com/kolargol/polish_spam_blacklist
0 notes
Text
iPhone(iOS) OpenVPN disconnections
If you are tired by constant OpenVPN disconnections on iPhone (iOS), despite enabling all the options to stay connected, then use this advice.
Problem: When using OpenVPN on iPhone it is often when your phone roams on different networks or stay in stand-by mode for longer time - to disconnect from VPN. You have to manually reconnect. This is annoying. Lately I come up with solution to this problem - quite simple one. All you have to do is to setup your Mail.app account to connect to your mail server via VPN tunnel. That’s it.
It is not enough to sent all traffic via VPN, you have to explicitly change settings in IMAP (i checked that only for IMAP) for incoming mail server. You have to ensure that it will be only reachable via tunnel. (you can use for example IPv6 for this)
0 notes
Text
Debug RFlink from Rpi
If you want good alternative for minicom for serial connection to arduino (in this case - to RFlink) you gonna love this tip:
python -m serial.tools.miniterm -b 57600 -p /dev/ttyACM0 -e
happy 10;rfdebug=on;
0 notes