bingoblinronanps1
Gizmo Garage
my design study digital work
8 posts
Don't wanna be here? Send us removal request.
Last Seen Blogs
borzojka
xoxoxo

kiratherussiangoddess
Please, Mommy Kira

red-devil330
Karma
painfullyselfaware
Why Am I Back On This App?
sallioff
Салли Офф
Text
Indesign speedrun part II
make a new file with 12 pages

create text to show front and back covers


on the parent pages create text boxes and to add page numbers type page in the text box and go to type, add special characters, markers, current page number

then from the page select drag the [none] page down to the front and back cover pages
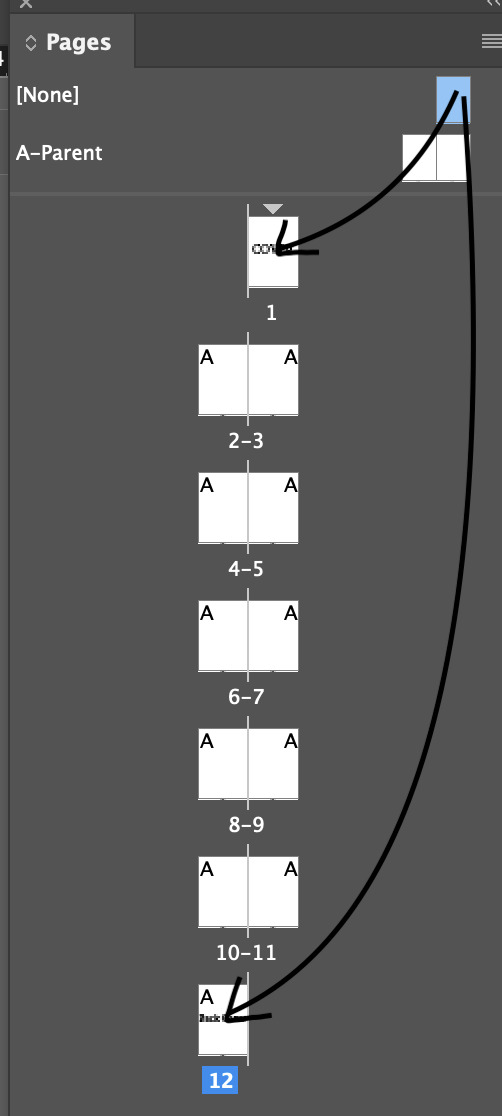
next while black filled black stroke is selected draw around one of the pages to make it black
while selected on page parent create a new parent (its the same way you make a new layer in photoshop)
and recreate the page number from before but make the text white
(from here i got lost)
0 notes
Text
Indesign Speedrun
so i missed the classes as i was sick so i had flynn (legend that he is) quickly run me through what i missed so i apologise if this information is slightly inaccurate to the class.
first i made an a4 file

next i used the text tool to place a textbox within the pink space on the page
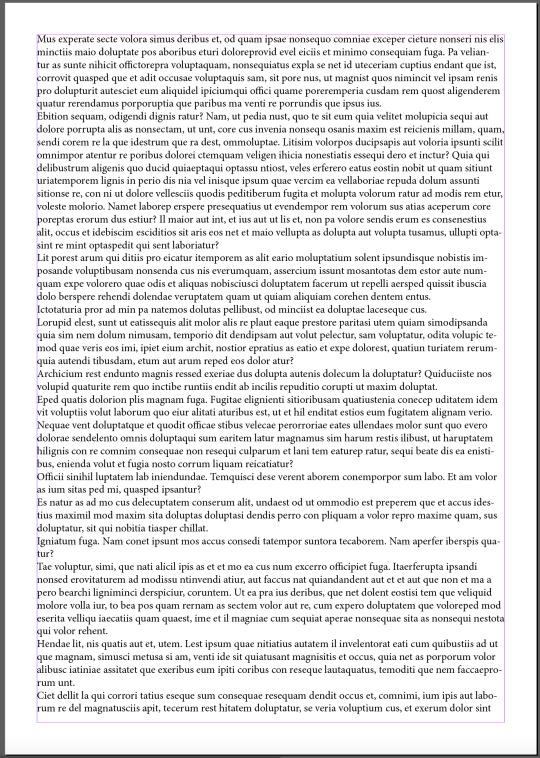
next i select the text box with V (direct select tool) and increase the test frame
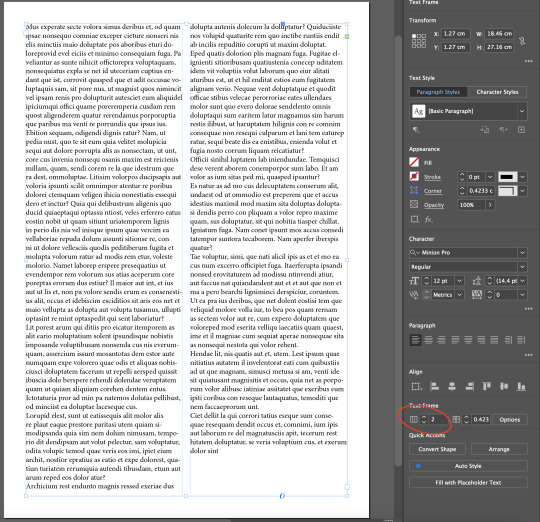
next click file then place to add an image, and press shift command then drag on the corner to resize without cropping the image
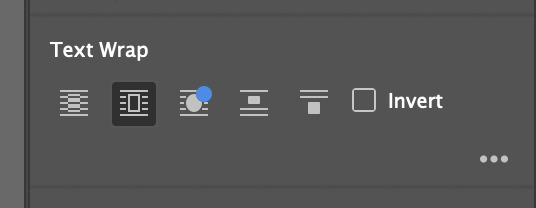
then click on the image and use the text wrap option to have the text go around the image
0 notes
Text
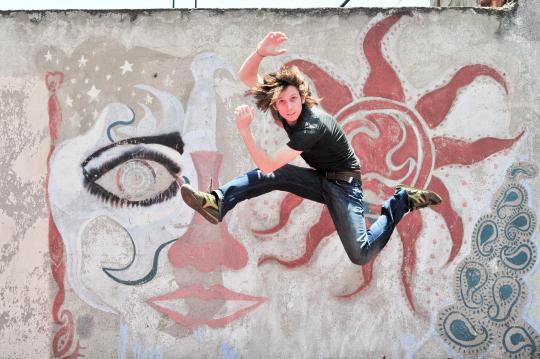
Compositing
Today we put our new combined photoshop and illustrator skills to the test to composite an image of a man jumping through an abstract shape on a new background


0 notes
Text
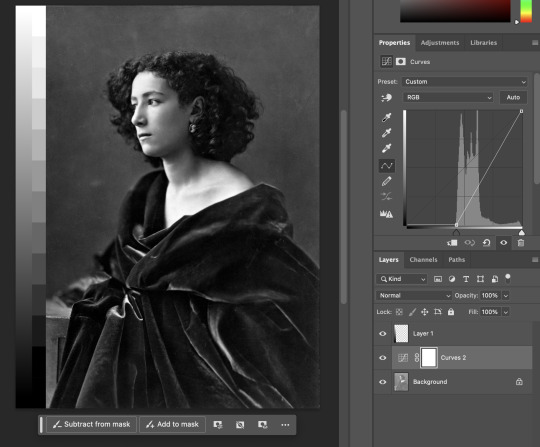
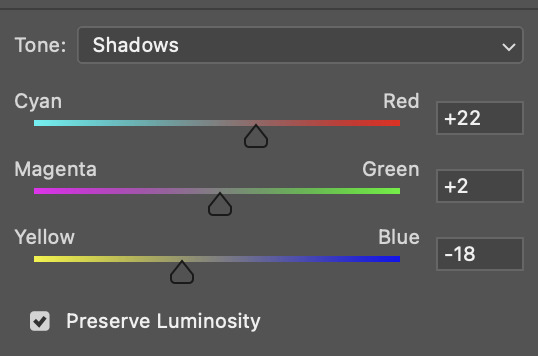
Photoshop Classes
we did some altering of images in photoshop, its been a while since those classes so itll be hard for me to say exactly what we did but ill try to add as much as i can remember.
first we messes around with curves to fix the black and white levels of this first image:
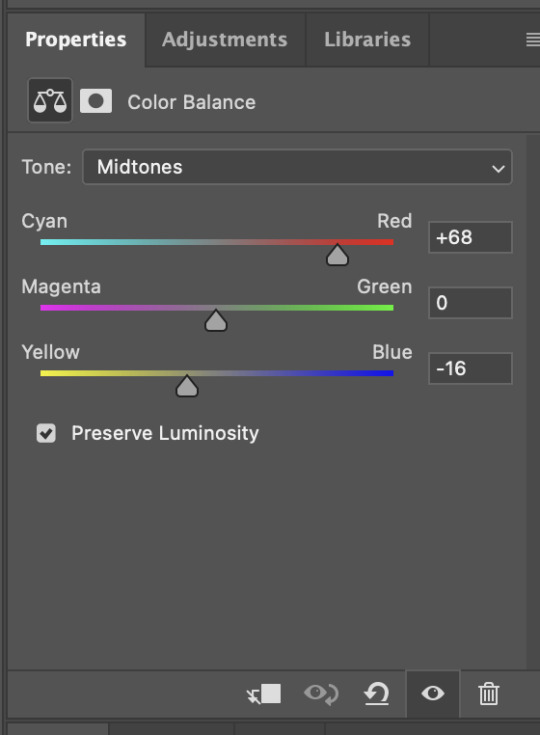
next we messed around with the colour balance on this fella


next we did more curves and colour balance on this landscape image


more curves stuff:

next we learned how to do masking to add a duplicate of a boat into this image:


next we used more masking techniques where we sut the background out of the bird image and added it to the plant to look like he was slurping on it.


0 notes
Text
Illustrator Homework
here are my draft designs for the illustrator homework
i am planning to recreate 3 album cover designs and stylising the to simplify to designs making the translate better to illustrator.
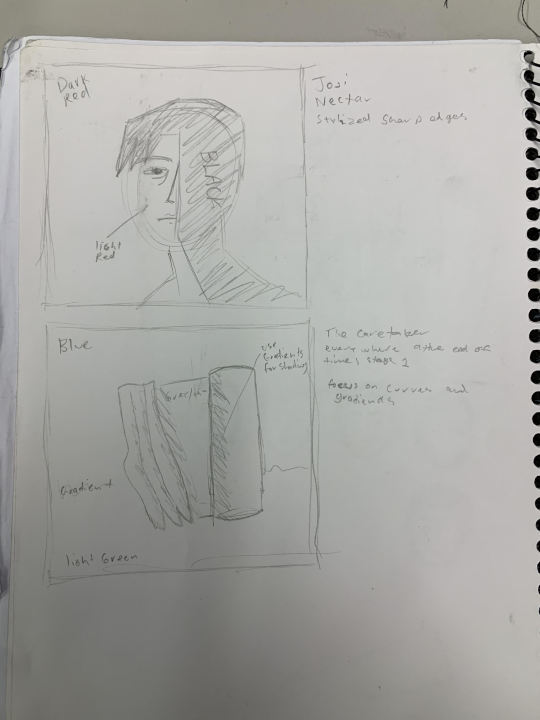
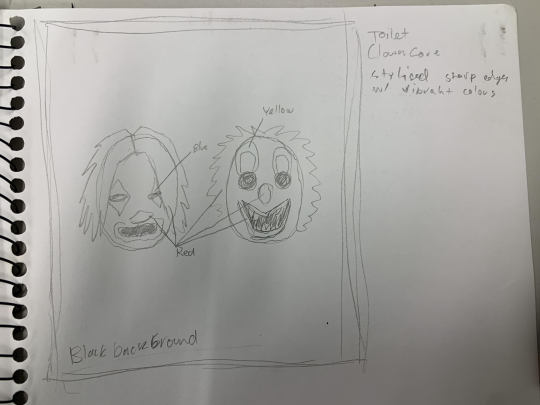
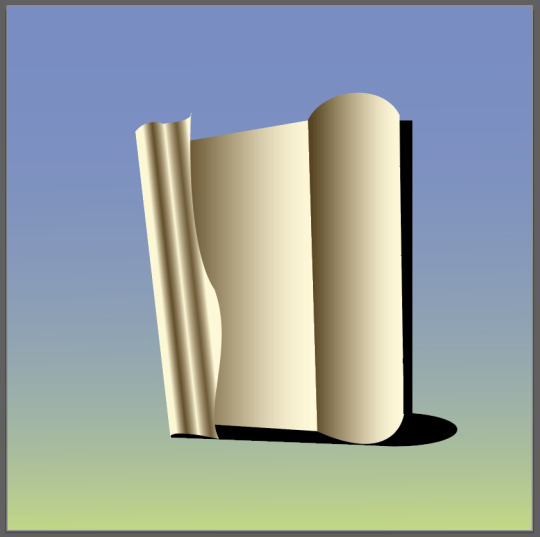

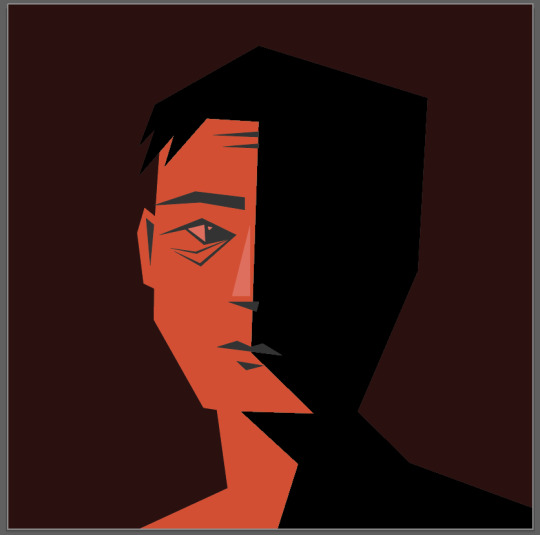
these were very fun to make, using different techniques for each one such as blocky shading for 'Nectar' (bottom image) and lots of curves and gradients for 'Everywhere at the End of Time, Part One' (top image) and simplfying shapes as much as possible for Toilet (middle)

here are all the points used to make up the images made for this project.
(bonus Garfield drawing for your pleasure)

0 notes
Text
Penguin Tutorial
here are the steps to drawing a penguin in illustrator
ellipse tool - shift click to draw a circle
marquee select bottom half of the circle
command X to cut the circle in half
shift command V to paste the half circle back on the canvas
select the bottom half circle and shift click to drag half circle down the canvas
direct select the open points of the broken circle
command J to connect these points with a line
now you have the pill shape that makes up the body of the penguin

8. anchor point tool - click mid point of the bottom right curve
9. direct select this point and drag it out to the side (adjust the bottom point too)
10. adjust the angle of the tail curve
11. add two more anchor points just above the tail
12. drag the top one of these points out to create an extra plume to the tail
13. adjust the curves to get the desired body shape
14. add 3 anchor points to the top of the penguins head
15. drag out the middle of these points and shape them into a feather shape.

16. with pen tool drag from the middle of the body down at a slightly right angle and make another curved point at the bottom of the wing then bring it back up so its back and slightly down from the front point.
(the wings came later when we did it in class but the tutorial video put this step here maybe ill move the step down later)
17. use rectangle tool to make the vague beak shape, then move the points back in slightly to define the shape a bit more. then round the points on the beak out by selecting the front 2 rounding points and bringing them in a bit. round the bottom one a bit too.
18. open the swatches and gradient windows.
19. swap the stroke and fill colours.
(from here i deviated from the the tutorial slightly for the eyes)
20. make the eye shape using the ellipse tool.
21. select the radial gradient preset
22. make the white colour red for evil devious conniving eyes
23. drag the red part of the gradient back on the gradient slider
24. reselect gradient tool
25. drag the little white gradient bar attached to the eye to relocate the pupil.
26. click the stroke colour picker, select black and increase the pixel width
25. press v and drag over the whole eye and press g to group the parts if u added the white part to the eye
26. click the eye then while holing down the click hold down option and drag the eye to duplicate it
27. then add some curves under the eyes to create eye bags (this wasnt in the tutorial but i added them for funnies)

28. with no fill black stroke use the pen tool to draw the shape of the toes and top of the foot with curves make sure the middle toe aligns with the back of the foot and that these points have vertical anchors, we do this so we could mirror flip it in the following steps.

29. select the half foot and press O to use the reflect tool, click the right most point then hold down shift and option then click the left most point.
30. select the two points at the end of the middle toe and press command J and do the same at the back of the foot
31. now resize the foot (and reshape if u wanna follow what i did)
(i missed writing down most of the steps from here on out but i got screenshots so ill add them)

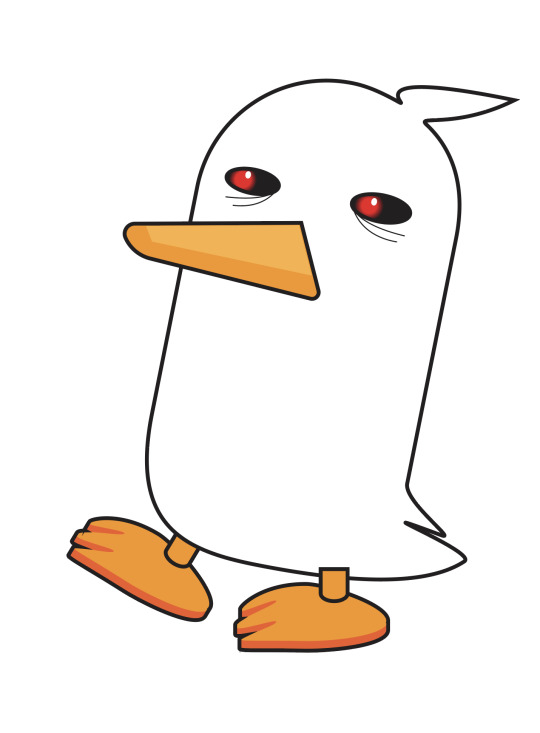

i missed the last bit of colouring but i coloured most of it so im sure thats fine
0 notes
Text
FEB 29
today we did a similar exercise to the 27th where we drew some basic shapes and recreated them in illustrator, these shapes were slightly more complicated and required me to think more about the basic shapes making up the more complex ones.


using a guideline box in a different colour i could more accurately recreate the overall shapes being represented

next we started using curves, where u drag the mouse while holding click to crate a handle then select another point and click and drag again to create a curve.

multi curves are slightly harder but making sure the handles are perpendicular make it easier to control where the curves are going
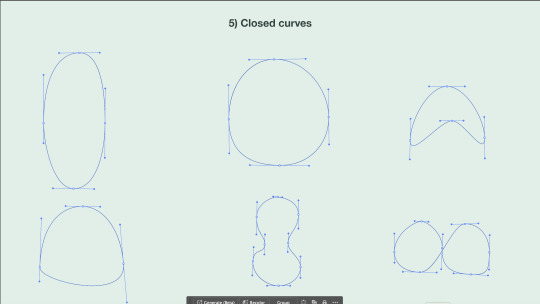
closed shapes are also easier when you make sure the handles are perpendicular and also helps the shape stay more symmetrical.
we also talked about the four point types;
- corner - click
- curve - drag
- hybrid - curve into a straight line
- broken - hold option to break handle
we then used this information for new shapes

there were more shapes to do that i have still not completed but i plan to finish them and practice more before our next class tomorrow.
0 notes
Text
FEB 27
Today was our first fundamentals class, we started using Adobe Illustrator and learnt some shortcuts for both Mac Finder and Illustrator.
Basic Design Stuff
Bézier curve
- scaleable and keeps quality when enlarged
- illustrator
- better for shape based images
Raster image
- pixel based image
- photoshop
- better for photos
Shortcuts
Finder:
command+n - new finder window
shift+command+4 - screenshot to desktop
Illustrator:
z+Rclick/drag mouse R - zoom in
z+Lclick/drag mouse L - zoom out
Space+drag - pan
/ - clear fill/stroke
X - toggle fill/stroke
P - pen
V - selection tool (all)
A - direct selection tool (parts) (make sure to click off selected object before using)
command+click - drop pen
click nowhere - deselect
Illustrator Exercise
Next we started on a basic exercise where we drew some basic shapes and then recreated them in Illustrator.

Drawn shapes on paper
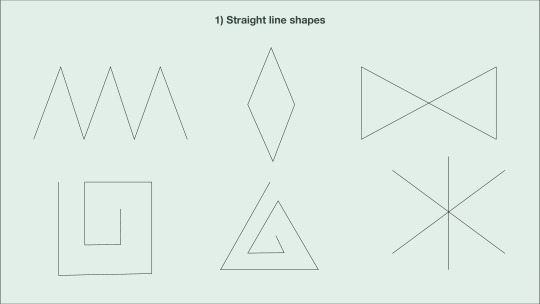
Recreated shapes in Illustrator
1 note
·
View note