
beta-source-technologies
Beta Source Technology
1 posts
Don't wanna be here? Send us removal request.
Last Seen Blogs


Photo
Flutter: Introduction to Flutter
Flutter is the creation of Google – you know, the company that pretty much controls the Internet, for better or worse (in the case of Flutter, I think for the better). Flutter began its life under the name “Sky” in 2015 at the Dart developer summit (don’t forget that word, Dart, because we’ll be coming back to that before long). At first, it ran only on Google’s own Android operating system, but was before long ported to Apple’s iOS, which covers the two leading mobile operating systems today.
Various preview versions of Flutter were released subsequent to its initial announcement, culminating in the December 4th, 2018, release of Flutter 1.0, the first “stable” release. That signalled that Flutter was ready for prime time and it was time for developers to jump onboard – and jump onboard they have! The popularity of Flutter could realistically be described as meteoric, and for some pretty good reasons.
One of which is this: the original stated goal of Flutter, or at least one of the main ones, was being able to render app UIs at a consistent 120fps no matter what. Google very much understands that a consistently smooth UI is one that users will be delighted by and want to use, so it was at the forefront of their thinking with Flutter. This is a lofty goal to be sure and few cross-platform mobile frameworks ever achieve it (even ones that aren’t cross-platform often have a tough time of it).
One of the key decisions Google made when designing Flutter is something that differentiates it from most other mobile development options, and that’s the fact that Flutter renders its own UI components. Unlike most other frameworks, Flutter does not use native platform components. In other words, when you tell Flutter to display a button, for example, Flutter itself renders that button, it’s not just asking the underlying OS to render the button, which is what most other frameworks do. This represents a big difference between Flutter and nearly anything else out there and is primarily what allows Flutter apps to be consistent across platforms. This also has the benefit that new UI components, or widgets (remember that word too because like Dart it’s going to come back in a big way shortly) can be added to Flutter quickly and easily without worrying about whether the underlying platform supports them.
This also allows Flutter to provide design-specific widgets. What this means is that Flutter offers two sets of widgets: Material design widgets and Cupertino design widgets. The former implement Google’s own Material design language, which is the default design language for Android. The latter implements Apple’s iOS design language.
Under the covers, Flutter can be conceptualized as being comprised of four main parts, beginning with the Dart platform. I’m going to skip this until the next section because it’s big on its own to warrant a separate section, so let’s move on to the second component, the main Flutter engine. This is a (mostly) C++-based codebase, so performance is near-native levels at the core, and this codebase uses the Skia graphics engine to do its rendering. Skia is a compact, open-source graphics library, also written in C++, that has evolved to have excellent performance across all supported platforms.
Flutter also provides, as its third major component, an interface over the native SDKs of both platforms which is called the foundation library. This library has the goal of obviating the differences between the APIs of the native platforms in favour of a Flutter supplied API that is consistent. In other words, you don’t need to worry about how to launch the camera app on iOS vs. how you launch it on Android, you don’t need to think about what API to use on one platform vs. another. You merely need to know the Flutter API call to make to launch the camera app, and it’ll work on both platforms.
The final component is the widgets, but like Dart, they too deserve their own section, so let’s come back to that in a bit.
That, in a tiny nutshell, is what Flutter is all about. To be clear, there’s not too much of that information that you need to internalize to develop Flutter apps. However, I think it’s always useful to know a little history and a bit of the internals of the tools we use.
The Pros and Cons of Flutter
As with any framework, as good developers, we need to evaluate the benefits and pitfalls of any option we might consider, and Flutter is no different. I for one think Flutter has a lot going for it, but it’s not a panacea, and it’s not without its blemishes, and anyone that says it’s perfect is a snake oil salesman (and that goes for anything, not just Flutter). Flutter has its issues, and it won’t fit every single project, though I would humbly suggest that there are few where it wouldn’t be an excellent choice, if not the best choice.
As such, let’s talk about the pros and cons of Flutter and, where it makes sense, compare to some of the other options available:
§ Pro: Hot reload – This is something I’ll come back to after we’ve walked through getting set up for Flutter development and had a look at a first sample app, but this is a big advantage for Flutter, as you’ll see. React Native can have this capability as well if you use the third-party Expo component, but what Flutter provides is arguably better and, indeed in my experience, is much more consistent. Few other frameworks have anything similar.
§ Pro: Properly cross-platform – Your Flutter apps will, with minimal effort, work correctly on iOS and Android (and, eventually, Android’s successor Fuscia). Flutter, out of the box, supplies two sets of widgets, one specific to iOS and one to Android, so not only will your apps work the same, but they can also look appropriate for each platform (although that’s entirely up to you, it’s not a requirement). Few other frameworks can manage this with the ease Flutter does (you typically must write a lot of branching code to make it happen, and while that’s still true with Flutter, the degree to which it’s true tends to be a bit less).
§ Con: Comingling of code – Some developers, especially those that come from a web development background where separation of UI from logic code is common (vis-a-vis, HTML/CSS defines the UI, JS, and then whatever runs on the back end defines the logic), tend to have a visceral reaction to seeing all of it more or less mixed together in Flutter code. This isn’t specific to Flutter of course: React Native, for example, suffers the same complaints sometimes.
§ Pro: Dart – Dart is simple and powerful, object-oriented, and strongly typed, allowing developers to be very productive very quickly and to do so with safety. Once you get over the (not unusually large) initial learning curve, most developers tend to like Dart as compared to languages like JavaScript, Objective-C, or Java.
§ Con: Google – I’m listing this as a con, but it’s very much a subjective thing, and you definitely may or may not agree (to be honest, I argue with myself about it all the time). Some people are uncomfortable with the amount of control Google has over the Internet, even if that control isn’t something they actively cultivate. When you’re the dominant player, you tend to have the majority of control. However, some people will look at the notion of using something created by Google to build mobile apps and think that’s a bridge too far. Others, of course, will look at it and say it’s great that such a big player is backing this technology. So, this “con” is very much up for debate. But it’s a debate you must answer for yourself.
§ Pro: Widgets – A rich set of widgets come with Flutter, and it may, in fact, be all you ever need to build any app. However, you can also create your own (in point of fact, you’ll always create your own, but to what level they go can vary) and you can even pull in many third-party widgets to extend Flutter’s capabilities. Those widgets are just as easy to use as any that ship with Flutter. Compared to React Native, for example, which has a relatively sparse set of widgets without adding third-party widgets, Flutter provides much more power out of the box.
§ Con: The widget tree – This can become a con because you wind up sometimes with a very deeply nested hierarchy and, if for no other reason, it can be challenging to look at the code and understand the structure. We’ve kind of become used to this sort of thing over the past two decades with the rise of the World Wide Web because HTML itself is the same sort of thing. But, because virtually everything is a widget in Flutter, the hierarchy can sometimes be deeper even than HTML, and the code style of Dart sometimes makes looking at such a thing tricky. There, of course, are techniques you can use to alleviate this somewhat, and I’ll talk about those later as we look at real application code in later chapters, but it’s still a con because you have to be consciously aware of it and deal with it yourself. Neither Flutter nor Dart will do you any favours in this regard.
§ Pro: Tooling – As you’ll see in the next section, getting a basic development environment setup for Flutter is easy. However, you can move beyond that basic environment and use many of the same tooling you’re used to doing other development with. This, again, means low developer friction.
§ Con: Reactive programming and state management – Flutter is generally considered to be a reactive programming paradigm, which means that you define your UI in Flutter in terms of the current state of a given widget. The build() method that you saw earlier takes as an argument the current state, and what it returns is a visual representation of that widget incorporating that current state. When the state changes, the widget “reacts” to the change by being rebuild via a call to build() again, passing it the new state. This all happens as a function of Flutter and the event lifecycle it presents; it’s not something you (usually) have to think much about aside from supplying the build() method. Contrast this to frameworks where you construct a widget, then call some series of mutator methods on it to set it up in the proper state. This paradigm is compelling, in Flutter and elsewhere, but it can be a con in Flutter too because it sometimes makes doing trivial things more difficult than it arguably should be (you’ll see some of this difficulty in later chapters, and ways to deal with it). Related to this is the topic of state management, which, at least at the time of this writing, is a deficiency in Flutter in the sense that there is no canonical right and wrong way to do it. There are numerous approaches, each with pluses and minuses, and you’ll need to decide which fits your needs best (and yes, I’ll be providing what I see as being a good approach). Google is working on such a canonical approach right now, but it’s not ready yet, so until it is, I’ll consider this lack of solid direction as something of a con (though to some ways of thinking such flexibility can be regarded as a pro, and I wouldn’t get into any barroom brawls over it either way!).
§ Pro: Platform-specific widgets – Since Flutter UIs are constructed in code, it becomes straightforward to have a single codebase that supports both iOS and Android, even where there are differences you need to account for. As an example, you can always interrogate the Platform.isAndroid and Platform.isIOS values at runtime to determine what your code is running on, and then branch based on the value to construct a platform-specific widget. Maybe you want a RaisedButton on Android but a plain Button on iOS. There’s no need to create two different codebases; just a simple branch will do the trick in many cases.
§ Con: App size – Flutter apps tend to be a bit larger than their purely native counterparts because they have to include the core Flutter engine, the Flutter framework, support libraries, and other resources. A dirt simple “Hello, world!” Flutter app can be upward of 7mb in size. It’s a trade-off for sure, so if you have a use case where app size is really a driving factor, then Flutter may not be your best choice.
Flutter SDK
The first step you absolutely must accomplish is downloading, installing, and configuring the Flutter SDK. Everything hinges on this! The second step, which technically is optional but which we’re going to consider required for the purposes of this book, is downloading, installing and configuring Android Studio (and as part of this will be setting up an Android SDK and emulator).
Installing Flutter SDK on Windows
Flutter SDK supports Windows platform. Installing Flutter on Windows is not a hard task as you may think. First of all, you need to make sure that your local development environment meets the minimum requirements. You’ll need to have 64-bit Windows 7 SP1 or later and at least 400MB free disk space for Flutter SDK to use. Flutter SDK also requires Windows PowerShell 5.0 or newer and Git for Windows to be available on the machine. Windows PowerShell 5.0 is pre-installed with Windows 10. For Windows versions older than Windows 10, you need to install PowerShell 5.0 manually by following instructions from Microsoft (https://docs.microsoft.com/enus/powershell/scripting/setup/installing-windowspowershell ). You may already have Git for Windows installed since Git is a very popular tool for development. If you can run Git commands in PowerShell, then you are good to go. Otherwise, you need to download Git for Windows ( https://gitscm.com/download/win ) and install it. When installing Git for Windows, make sure the option “Git from the command line and also from 3rd-party software” is selected in the page “Adjusting your PATH environment”; see Figure 1.1.
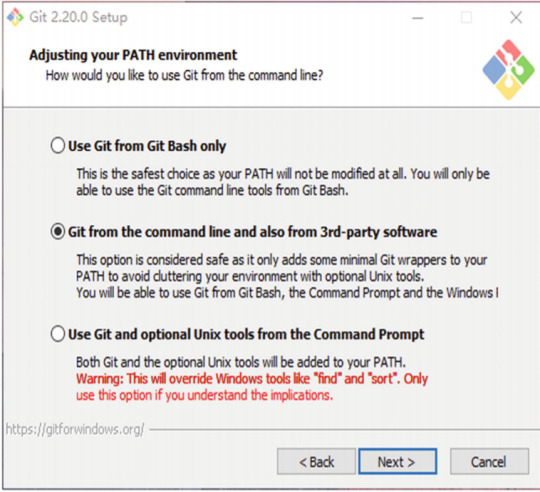
Figure 1-1 Git for Windows setup
After these minimum requirements have been satisfied, you can download the Flutter SDK zip bundles from the official web site (https://flutter.dev/docs/getstarted/install/windows ). Extract the downloaded zip file to the desired location on the local machine. It’s recommended to avoid using the system driver where Windows is installed. In the extracted directory, double-click the file flutter_console.bat to start Flutter Console and run Flutter SDK commands. To be able to run Flutter SDK commands in any Windows console, we need to add Flutter SDK to the PATH environment variable. The full path to bin of the installation directory should be added to the PATH. To modify the PATH on Windows 10
1. Open the Start Search and type “env” and select “Edit the system environment variables”.
2. Click the “Environment Variables…” button and find the row with “Path” in the first column under the “System Variables” section.
3. In the “Edit environment variable” dialog, click “New” and input the path of the bin directory of installed Flutter SDK.
4. Close all dialogs by clicking “OK”.
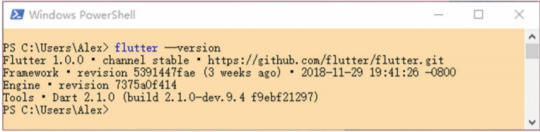
Now you can open a new PowerShell windows and type the command flutter --version to verify the installation; see Figure 1.2.
Figure 1-2 Success installation of Flutter SDK on Windows
Installing Flutter SDK on Linux
Flutter SDK supports Linux platform. However, given that there are many different Linux distributions available, the actual steps to get Flutter SDK installed may be slightly different. This recipe is based on installing Flutter SDK on Ubuntu 18.04 LTS.
Flutter SDK requires several command-line tools to be available in the local environment, including bash, mkdir, rm, git, curl, unzip, and which. For most Linux distributions, the commands bash, mkdir, rm, unzip, and which should already be included by default. The easiest way to verify that is to open a terminal window and type these commands to see the output. You’ll see “command not found” error if a command is not installed. git and curl are unlikely to be included by default. Most Linux distributions provide built-in package managers to install these tools. For Ubuntu, you can use apt-get; see the following
Command:
$ sudo apt-get update
$ sudo apt-get install -y curl git
After the installation finishes successfully, you can type commands curl and git to verify. Now you can download the Flutter SDK zip bundles from the official web site (https://flutter.dev/docs/getstarted/install/linux ). Extract the downloaded zip ile to the desired location on the local machine. Open a terminal window, navigate to the directory of extracted Flutter SDK, and run the following command to verify the installation.
$ bin/flutter --version
It’s recommended to add the bin directory of Flutter SDK to the PATH environment variable, so the flutter command can be run in any terminal session. For Ubuntu, you can edit the file ~/.profile.
$ nano ~/.profile
Add the following line to this file and save.
export PATH=<flutter_dir>"/bin:$PATH"
In the current terminal window, you need to run source ~/.profile for the change to take effect. Or you can simply create a new terminal window. Type flutter --version in any terminal window to verify. You’ll see the same output as Figure 1.2.
Note: Only Android platform is supported on Linux.
Installing Flutter SDK on macOS
For macOS, Flutter SDK requires several command-line tools to be available in the local environment. These tools are bash, mkdir, rm, git, curl, unzip, and which. macOS should already have these tools as part of the system. You can simply type these commands in the terminal to verify. The easiest way to install missing tools is to use Homebrew ( https://brew.sh/ ). Homebrew is also important when setting up the iOS development environment. Use brew install to install tools, for example, brew install git to install Git.
After installing required tools, we can download the Flutter SDK zip bundle from the official web site ( https://flutter.dev/docs/get-started/install/macos ). Extract the downloaded zip ile to the desired location on the local machine. The flutter command is located under the bin directory of the extracted location. To run flutter command in any terminal session, the PATH environment variable should be updated to include the bin directory of the Flutter SDK. This is typically done by updating the profile of the shell. For the default bash, this file is ~/.bash_profile. For zsh, this ile is ~/.zshrc. Modify this file to include the following line.
export PATH=<flutter_install_dir>/bin:$PATH
To make the current terminal window use the updated PATH, you need to run source ~/.bash_profile. You can also start a new terminal window which will automatically use the updated value of PATH. Run flutter --version in any terminal window to verify the installation. You’ll see the same output as Figure 1.2.
Note: Only Android platform is supported on Linux.
Setting Up iOS Platform
To develop Flutter apps for iOS, you need to have a Mac with at least Xcode 9.0. To set up the iOS platform, you need to go through the following steps:
1. Install XCode ( https://developer.apple.com/xcode/ ) from App Store.
2. Verify the path of the XCode command-line tools. Run the following command to show the current path to the command-line tools. Usually, you should see output like
/Applications/Xcode.app/Contents/Developer.
$ xcode-select -p
If the path shown in the output is not the one you want, for example, you have different versions of Xcode command-line tools installed, use xcode-select -s to switch to a different path. If you don’t have the command-line tools installed, use xcode-select --install to open the installation dialog.
3. You need to open Xcode once to accept its license agreement. Or you can choose to run the command sudo xcodebuild - license to view and accept it.
4. Flutter SDK requires other tools for iOS platform, including libimobiledevice, usbmuxd, ideviceinstaller, ios-deploy, and CocoaPods (https://cocoapods.org/ ). All these tools can be installed using Homebrew. If you run the command flutter doctor, it shows the commands to install these tools using Homebrew. Simply run these commands and use flutter doctor to check again. When you see the green tick of “iOS toolchain,” the iOS platform is set up successfully for Flutter SDK to use; see Figure 1.3 for a sample output.

Figure 1.3 Output of flutter doctor
Dart: The Dart Language
When Google started working on Flutter, they had an early decision to make:
what programming language would it use? It could be a web-based language like
JavaScript, or perhaps the natural choice would have been Java given that Android
uses that. Or, since support for iOS was something that they of course desired, maybe Objective-C or Swift would be a good choice (after all, Swift is ostensibly opensource, so a good argument, I’d wager, was made by some on the Flutter team for it early on). Maybe something like Golang or Ruby would be better. What about going “old-school” with C/C++? Or take a cue from Microsoft and go with C# (since it too is open-source)?
I’m sure there were a lot of choices available, but in the end, Google decided (for reasons!) to go with a language that they themselves had created a few years earlier: Dart.
The entire next chapter is devoted to Dart, so I’m going to refrain from going into too
many details here, but at the least, I think a quick sample is in order, so have a look at
this:
import "dart:math" as math;
class Point {
final num x, y;
Point(this.x, this.y);
Point.origin() : x = 0, y = 0;
num distanceTo(Point other) {
var dx = x - other.x;
var dy = y - other.y;
return math.sqrt(dx * dx + dy * dy);
}
Point operator +(Point other) => Point(x + other.x, y + other.y);
}
void main() {
var p1 = Point(10, 10);
var p2 = Point.origin();
var distance = p1.distanceTo(p2);
print(distance);
}
It isn’t terribly important to understand every last thing you see here. Actually,
at this point, it’s not important for you to understand any of it! That said, if you have
experience with any Java or C-like language then I’m willing to bet you can actually
follow this without too much trouble, and that’s one of the big benefits of Dart: it’s
similar enough to what most modern developers know for them to be able to pick it up pretty quickly and easily.
Note: It’s interesting that we call then C-like languages, but C itself, along with
other C-like languages, are descendants of ALGOL, a much older language. It never
seems to get the historic respect it deserves though, so I threw this note in to try
and change that and get ALGOL some love!
Without getting into all the nitty-gritty details (that’s what the next chapter is for), I think a little background on Dart is in order. As I mentioned, Google created Dart back in 2011, and it was initially unveiled at the GOTO conference in Aarhus, Denmark. The initial 1.0 release took place in November 2013, roughly two years before Flutter was released. You have Lars Bak (also the developer of the V8 JavaScript engine underpinning chrome and Node.js) and Kasper Lund to thank for Dart by the way!
Dart is a neat language that is rapidly gaining a lot of traction, thanks in no small part to Flutter, though being a general-purpose language, it can and is used to build all sorts of stuff, from web apps to server code to IoT (Internet of Things) apps, and so on. At around the time I was writing this chapter, a survey about which languages are most important to developers in 2019 (in terms of their own interest in it) came out, published by JAXenter (see https://jaxenter.com/poll-results-dartword-2019-154779.html ) with the pertinent result being that two languages stood out by quite a bit from the rest: Dart and Python, with Dart winning out overall. It also says that Dart experienced the most growth in 2018 and while Flutter is almost certainly the single biggest driver, it’s probably not enough on its own to account for those results, so it’s fair to say Dart is coming on strong from all corners!
So, yeah, Dart is getting a lot of attention for sure.
What’s Dart all about? Well, in a nutshell, there are a few key points about it, and the preceding code sample demonstrates much of it:
o Dart is fully object-oriented.
o It’s a garbage-collected language, so no memory allocation/ deallocation worries.
o It has a C-based syntax style that is easy for most developers to pick up (that said, it does have a few peculiarities that might throw you at first, but it’s no worse than any other language with a similar syntax).
o Supports common language features like interfaces, mixins, abstract classes, reified generics, and static typing.
o A sound typing system (but with flexibility around typing at the same type that makes it not a burden but a genuine help for developers).
o Isolates for concurrency so that you can have independent workers that do not share memory but instead use message passing for communication, yielding good performance while reducing the risk typically associated with other forms of concurrent programming paradigms.
o Dart can use ahead-of-time compilation to native code in order to reach the highest levels of performance this side of Assembly. It compiles to ARM and x86 code, but it can also transpile to JavaScript so your Dart code can run, after a fashion, on the web even. Putting aside that transpilation (is that even a word?!), with Flutter targeting a mobile platform, you’ll wind up with AOT compiled Dart code.
o Dart supports a rather large package repository that provides additional functionality on top of the core language for virtually anything most developers would need and makes it easy to bring those packages to bear in your projects.
o Tooling support from a lot of popular developer tools including Visual Studio Code and IntelliJ IDEA.
o Snapshots as a core part of the Dart VM, which are a method to store and serialize objects and data at runtime (Dart programs can be compiled to snapshots, which contain all the program code and dependencies pre-parsed and ready to execute at startup, and snapshots are also used heavily in the use of isolates).
Dart is now an ECMA standard under technical committee TC52, and you can view the latest specification at www.dartlang.org/guides/language/spec (and, more generally, www.dartlang.org is the home page of the Dart language). As I said, the entire next chapter is devoted to getting you up to speed with Dart enough to tackle the Flutter code to come, but for now, I think this should serve as a decent enough introduction.
Okay, I think by this point it’s safe to say you’ve got a basic Flutter vocabulary, so to speak, built up, and you have an idea of what Flutter is all about. Let’s get do to work now and get to some real code!
Oops, before we can get to real code though, we probably should get Flutter installed, plus whatever tooling we’re going to need, huh? As I’m sure you can imagine, it’s not especially easy to build Flutter code into an executable app without that step being done first! Fortunately, as I mentioned earlier, getting our development environment set up for Flutter is pretty easy.
Follow the link for a power point presentation
https://docs.google.com/presentation/d/1mlvnTZelYSg7jJ7RwfOpaITwXWmzsWcc/edit?usp=sharing&ouid=104911709259791830028&rtpof=true&sd=true
1 note
·
View note