
Last Seen Blogs
bookspls1815
A Collection of Fandom Nonsense

poetvalley
poet of roseberry

redauction
제목 없음


hajidumps
*panwhatplan*
Text
References
Akai S900 (5th May 2017)
Akai S900 | Vintage Synth Explorer (accessed 21st March 2023)
A history of graffiti – The 60s and 70s (16th August 2018)
Black Noise – Rap Music and Black Culture in Contemporary America (1994) (Accessed 14th March 2023)
Brooklyn Museum: Lady Pink
Brooklyn Museum: Lady Pink
Hip-Hop evolution - Netflix
Iris Van Herpen Fall 2021 Couture (5th July 2021)
Iris van Herpen Fall 2021 Couture Collection | Vogue (accessed 15th March 2023)
Invention Hot Spot: Birth of Hip-hop in the Bronx, New York in the 1970s (15th October 2010)
Invention Hot Spot: Birth of Hip-Hop in the Bronx, New York, in the 1970s | Lemelson Center for the Study of Invention and Innovation (si.edu) (accessed 21st March 2023)
Iris Van Herpen
(6th & 7th May 2023)
Jamal Shabazz’s most iconic images from the Streets of New York (17th March 2017)
Jamel Shabazz's Most Iconic Images From The Streets Of New York (allthatsinteresting.com) (accessed 21st April 2023)
Lisa Leone’s best photograph: the Fugees on Harlem rooftop (14th January 2015)
Lisa Leone’s best photograph: the Fugees on a Harlem rooftop | Photography | The Guardian (accessed 24th March)
Martha Cooper: The icon of street art photography (23rd October 2021)
Martha Cooper: The Icon Of Street Art Photography (artplugged.co.uk) (accessed 25th March 2023)
Martha Cooper – Artists – Steven Kasher Gallery (3rd June 2017)
Martha Cooper - Artists - Steven Kasher Gallery
(accessed 27th March 2023)
New Metamaterial Could Improve Sound Wave Technologies (2nd January 2019)
New Metamaterial Could Improve Sound Wave Technologies - Research & Development World (rdworldonline.com)
On Martha Cooper’s exhilarating photos of 1980s NYC graffiti (8th September 2022)
On Martha Cooper’s Exhilarating Photos of 1980s NYC Graffiti ‹ Literary Hub (lithub.com)
Photography / Vinyl record music close up-photography HD wal.. (20th March 2016)
Vinyl record music close up-photography HD wallpaper Preview | 10wallpaper.com (accessed 24th April 2023)
The products that shaped DJ history (2nd October 2022)
The 5 products that shaped DJ history - DJ TechTools
The History of hip-hop in the 1970s
ATL Vibes The History of Hip-Hop in the 1970s
0 notes
Text
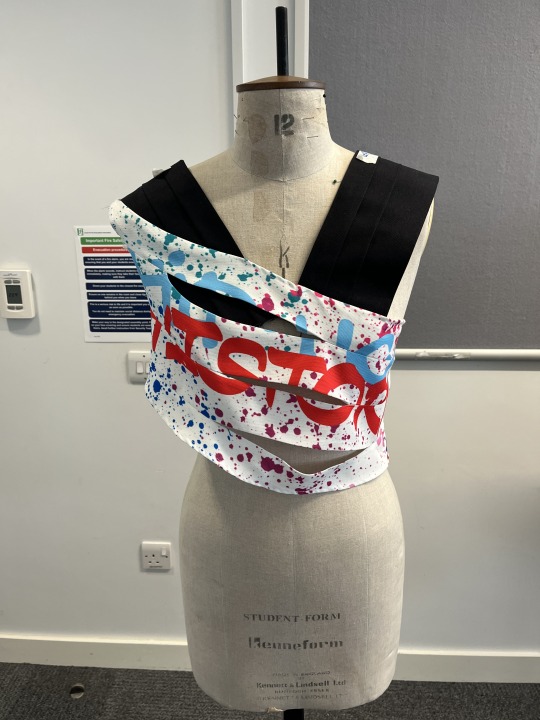
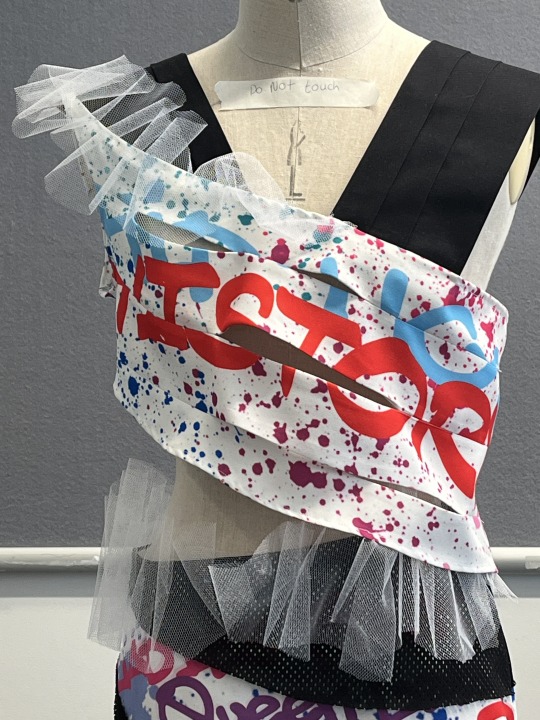
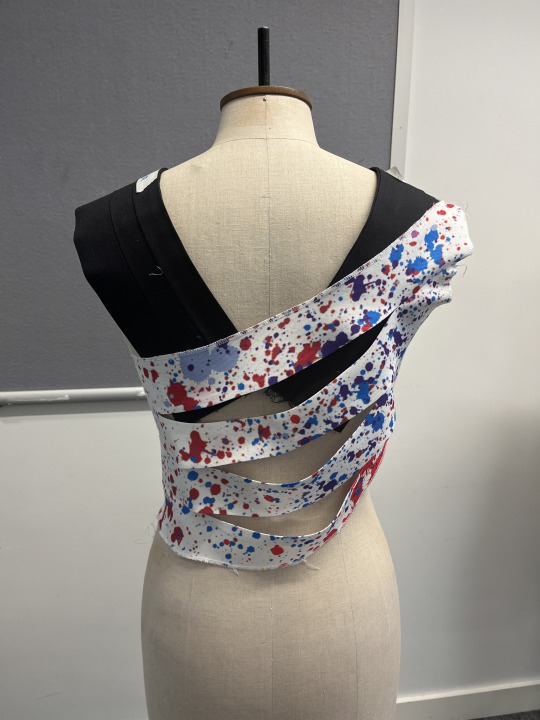
Overall Final Garment and Evaluation

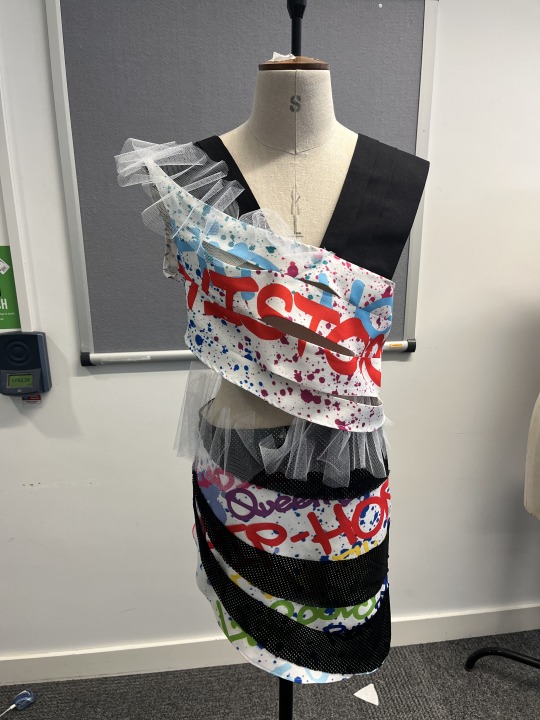
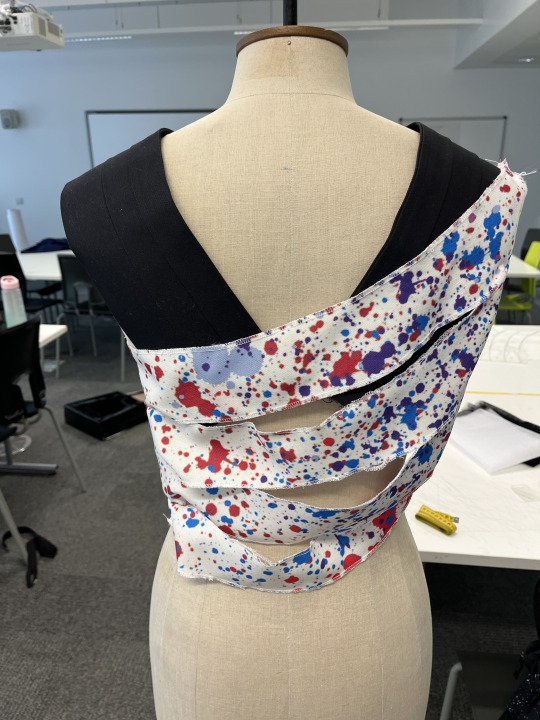
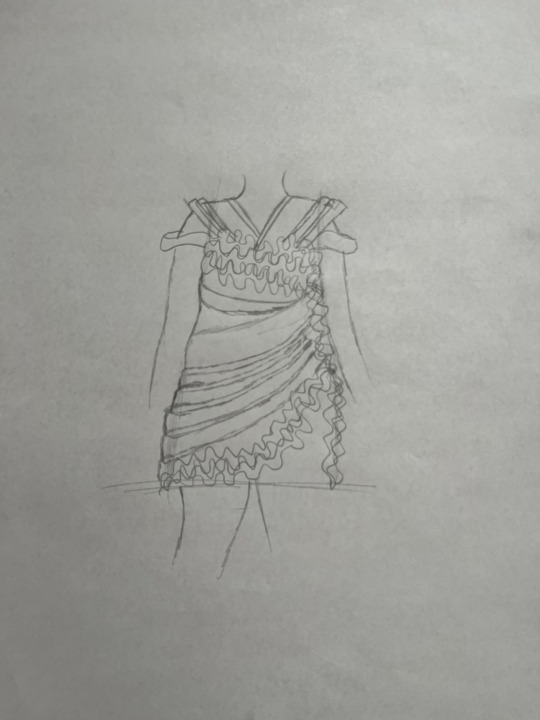
Now finished with my garment, I would say that if I had more time to actually get everything done the outcome would have been slightly better than it is now as I didn't feel like I had enough time as well as forgetting the main part of my garment, the waves, and leaving it last minute. I do feel like the final outcome still came out really well.
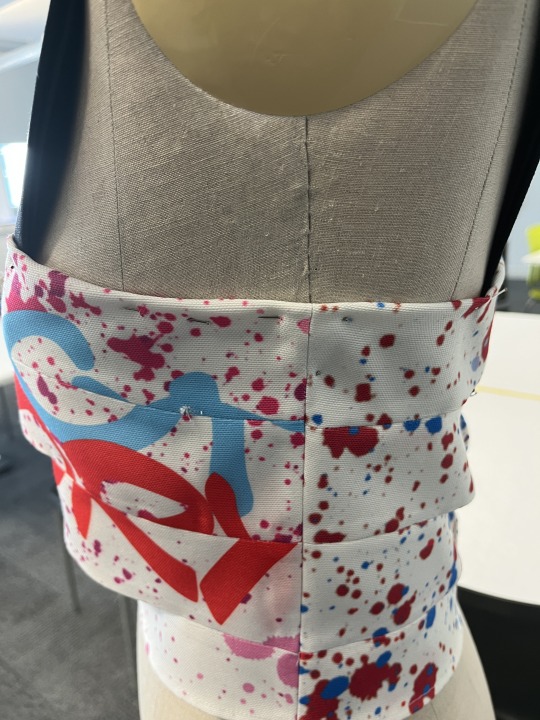
I really like how the prints for both the top and bottom look as well as how the good the pleats came out. if I had time I would have layered more of the mesh netting on top for the skirt and the top.
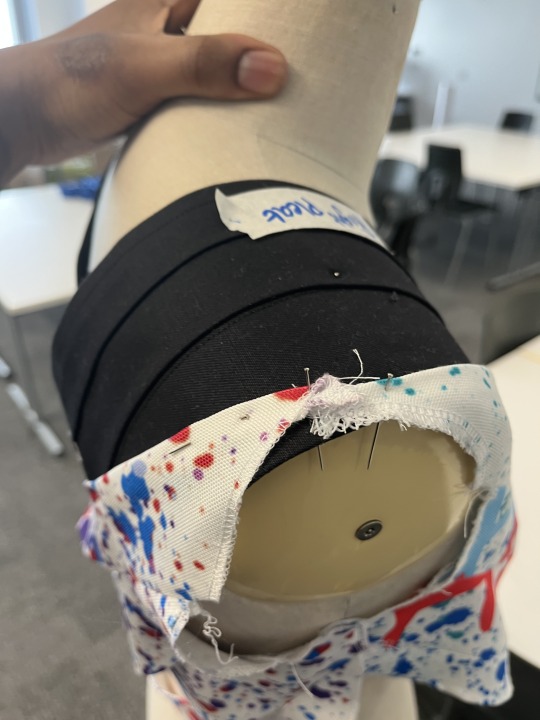
For the top I wasn't actually going to be using the white mesh, I was going to be using black but It actually came out a lot nicer than if I had the black mesh on the bottom with the white at the top of the skirt. I feel like it would have looked too "bulky" if I had done that.
Throughout this whole module I feel like I've been able to test out my creativity even more as I've actually made a garment or tried to make something I already have into something new. The part I didn't really mind the most about this module was the designing part and just trying them out on the mannequin to see if the idea actually looks good enough. I also quite enjoyed using the sewing machines as because I didn't want to mess anything up I was really focused making sure that everything was pretty much perfect.
0 notes
Text
Personal Brief
Ashleigh Jansola Ebe
Fashion & Textile Foundation
Pathway Degree: Fashion Design
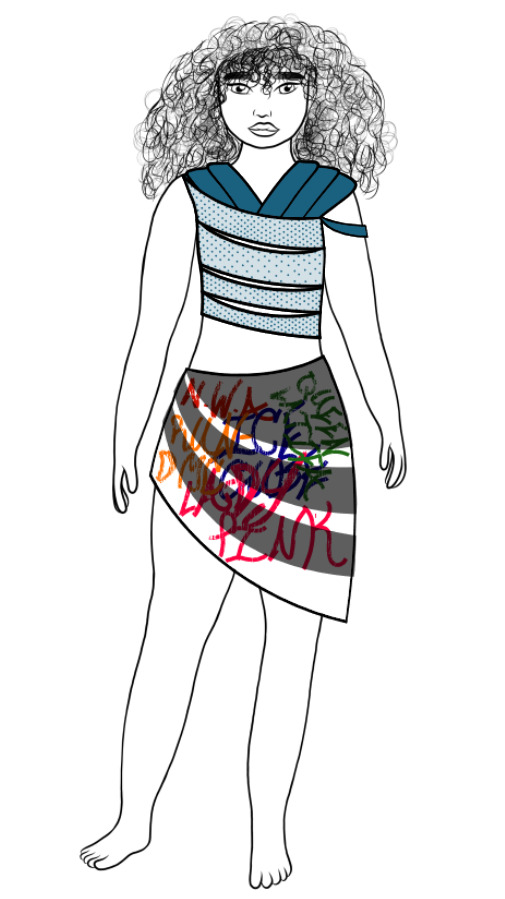
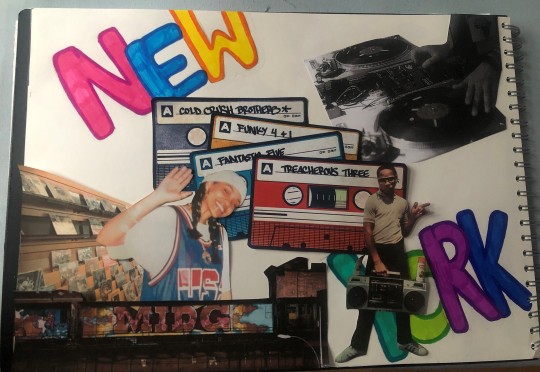
‘The Making of African American Hip-Hop’
My aim for this project is to try and show the history of African American hip-hop from where it originated, New York, to how its influence on the rest of the world and giving them their own sound as well as helping develop their music.
This project started with my interest in looking into black history in America and then looking into the history of hip-hop because of my interest in music. A lot of the artists that I have shown are African American as I feel like the core of music as a whole is black culture.
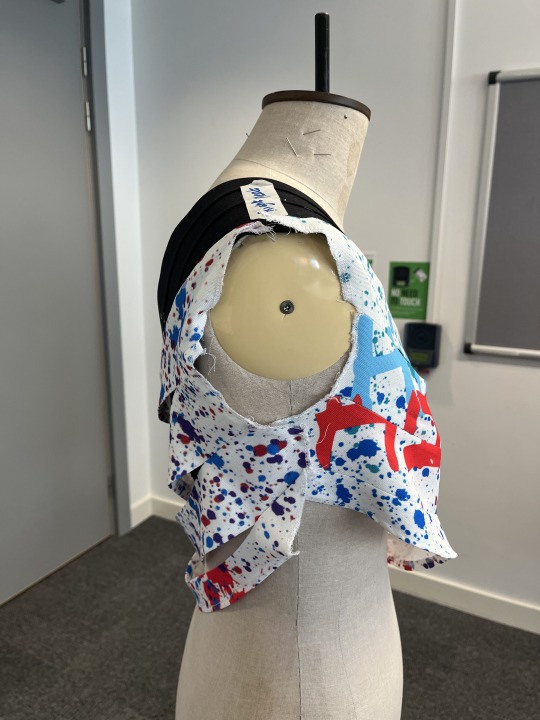
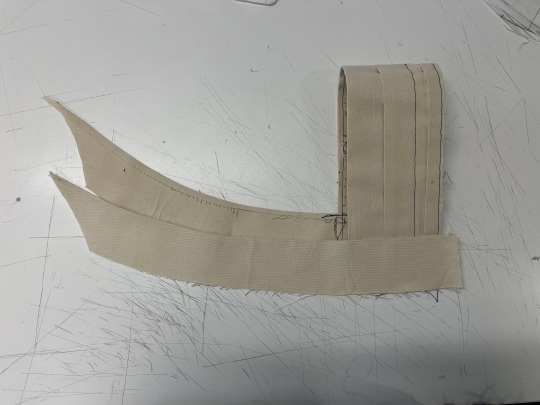
Within the garment the main feature is the waves at the front as they are an interpretation of soundwaves coming from the songs as well an interpretation of what music makes me feel when listening to it. The rest of the garment represents where the music used to be stored, like vinyl records and then I wanted to use graffiti to have the different artists name on.
Objectives
Produce well developed designs that focus on and aim to be cohesive with concept.
I will produce a reflective blog journey.
I will create samples that are relevant to my research imagery.
0 notes
Text
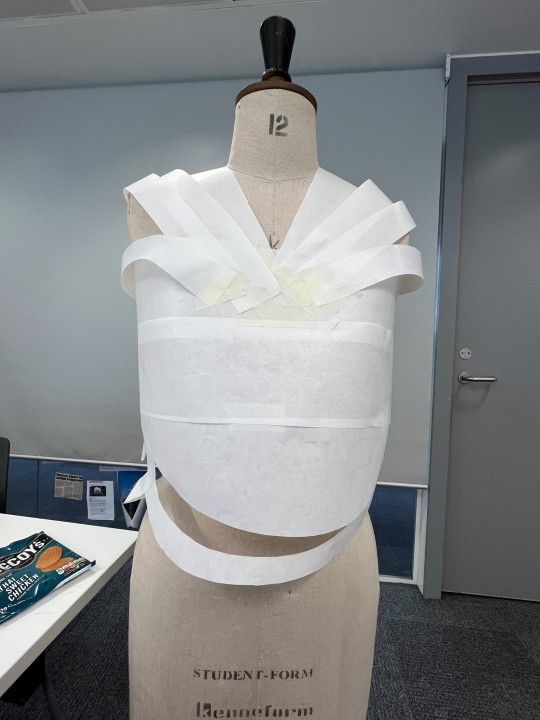
My plan for today is to have the top sewn together fully and if I have time to I will add the mesh netting to have as the ‘soundwaves’ as it was something that I really wanted to have on my garment. I probably won’t be adding it in the original areas that I wanted to have them in I still want them to be there to represent the sound waves of music as well as the like a visual representation of how music makes a person feel.


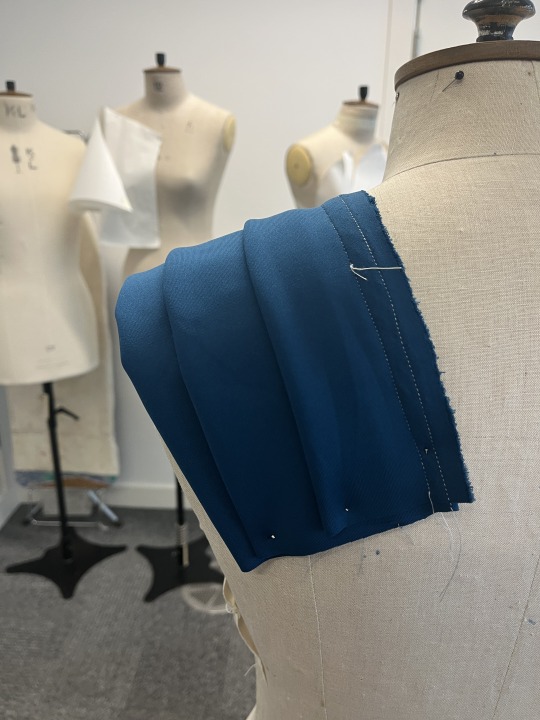
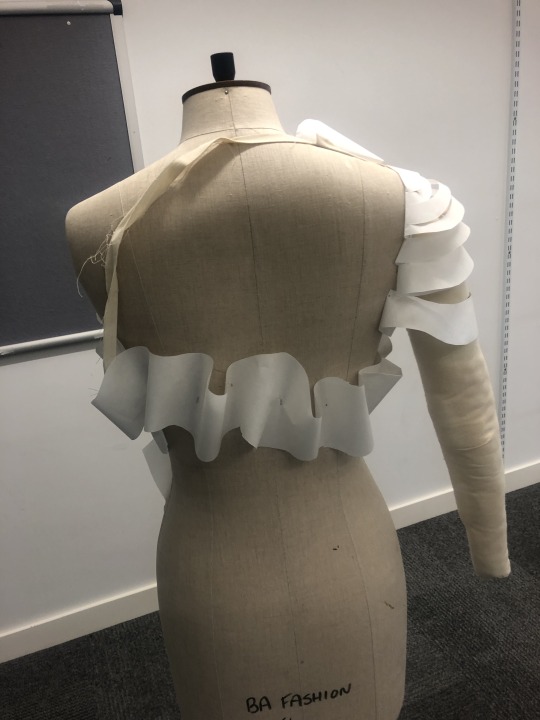
I spent my time pinning everything on the mannequin so that everything was positioned properly. Before I even tried to sew the pleats on, the first thing I did was sew the hem of the bottom of the top and make the gap of the first 2 panels on the front of the top smaller.
The next thing that I did was attach the front and the back together but when I went onto pinning everything to the pleats and sewing them together I kind of regretted doing that first as it was a bit fiddly whilst sewing everything together.
Before I even sewed the right side of the top together, I cut the access end of the pleat and then I overlocked it, so it doesn’t fray. Once I had sewn everything together, I actually started to like how everything looked. I then started to hand stitch the mesh netting on to the skirts and top, just creating a stitch where I wanted it to sit.


For the mesh section of my garment I actually ended up stitching it on the waist of the skirt but in only one layer of mesh and then I stitched some more mesh from the top of the right shoulder of the mannequin to the beginning of the pleat on the left shoulder.
0 notes
Text
Today my main focus was to try and get as much of my garment sewn and to also go to the fabric store to get some white netting to hand stitch onto the top of my skirt as well as the bottom of the top.
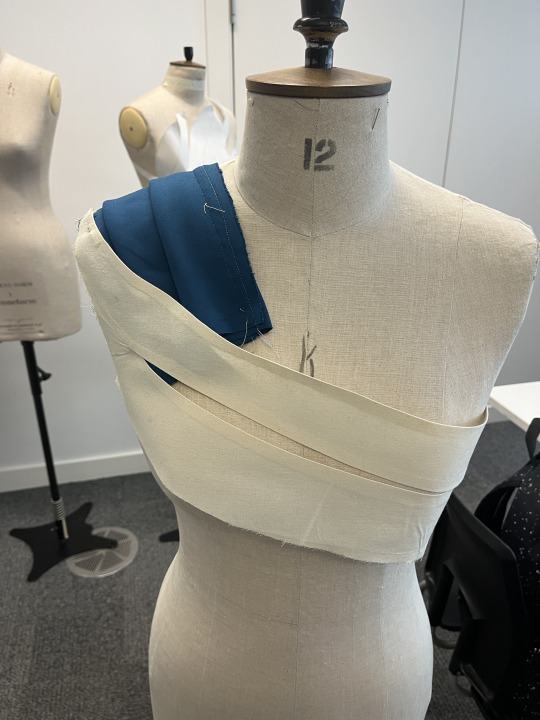
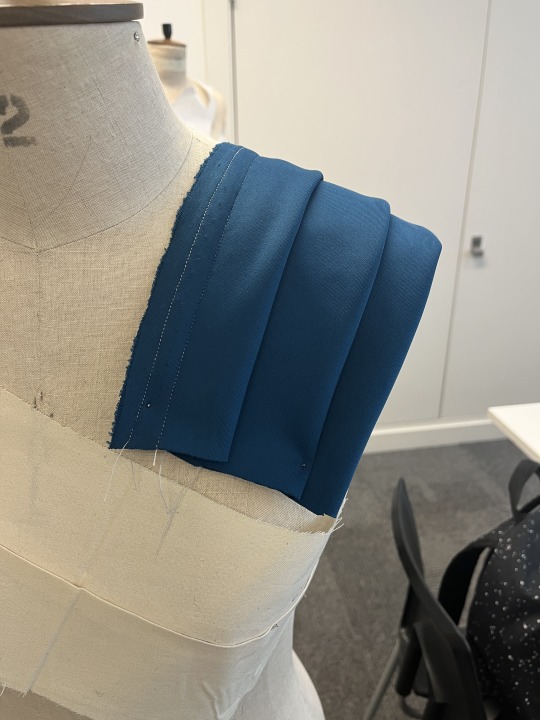
As I had already sewn the skirt together, I went upstairs to get help from Paula so I could try and sewn the zip and waistband onto to it. Paula had sometime and actually ended up sewing them together for me leaving to focus on trying to put together the top for my garment. The first thing I did was position the pleats on the mannequin they I wanted them to be. This part became quite hard as I wasn’t sure how they were meant to be positioned. Then thought to just use the original temple of the front and back of the top and then I laid all the panels on top of the temple, pinned them depending on how big I wanted the gaps to be and then I pinned the whole thing onto to the mannequin.


This actually helped a lot. Once I had pinned it on to the back, I had pinned the gaps to be wider or smaller depending on how it was sat on the mannequin. After I had done that, I went upstairs to the sewing machines and sewed them together, as I was doing that when Paula had just finished sewing my skirt.
Once I had finished sewing the top I went, and I did the back. For the back there wasn’t a specific size I wanted them, so what I did was making sew on each of the panels the length of two pins which actually turned out pretty nice.
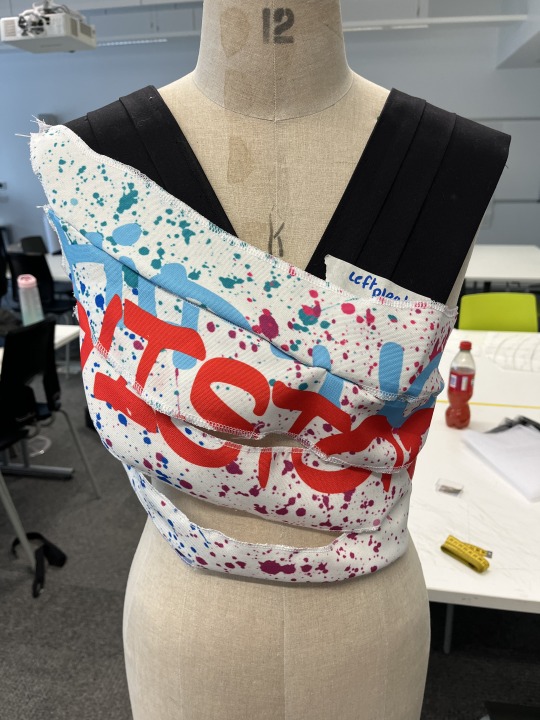
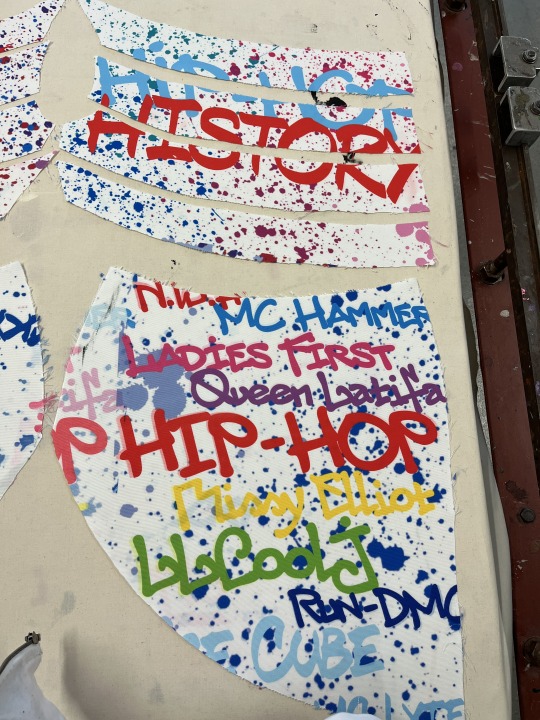
For the front the only thing that I liked but at the same time slightly irritated me was that you couldn’t really tell what was written on the front. The word that looked fine was ‘History’ you couldn’t really read the word ‘hip-hop’ that much. You could see the word ‘hip’ more though. Both parts of the top were made the same way I had made it in calico, only doing the first two panels.
To add the pleats my idea was to sew the pleats on to the top cut of what can be seen and the overlock the end of the pleats so it doesn’t fray, which Paula actually agreed what I would be doing next. For the zip though, she suggested as the shoulders on the top are actually quite wide, I should sew the top together fully and them try put it on the mannequin. If need to I should then rip the seam of the side, I want the zip on and then I would get one of the technicians to sew my zip on for me.
I ended the day finishing the skirt and nearly finishing the top. The only thing I need to get done is to add the “soundwaves” part, which is where the netting will come in as like I was doing when I was working on the mannequin pinning the paper in the position, I will be hand stitching it into place.
23/05/2023
0 notes
Text
Technical Drawing
As I thought that I could potentially have the time for it, I decided that I should try and get at least the main body of my top and skirt done for my technical drawings. So far, they’re actually pretty good. I did get confused when trying to do certain parts as I wasn’t sure how they would connect together but I managed to do a small part of it


0 notes
Text
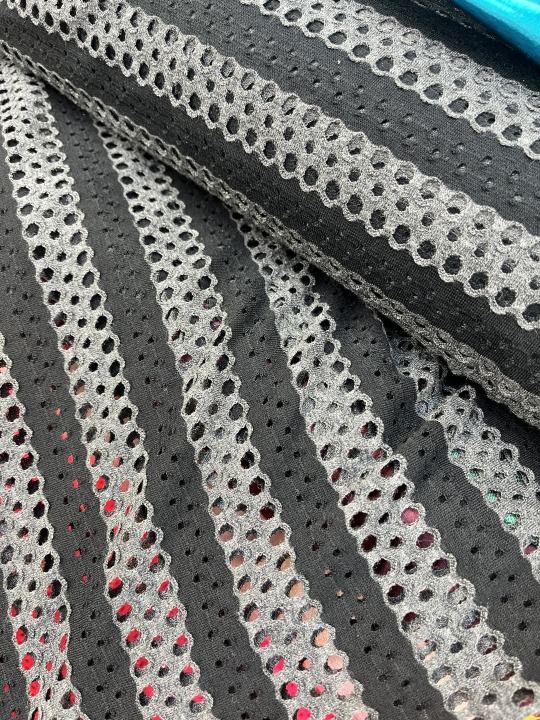
On the Friday I managed to actually get quite a bit done, enough for Monday I did end up coming into university if not Tuesday. That morning I went to the fabric store to get some black netting for the “soundwaves” part of my garment as I had completely forgotten about it. When I had arrived at university I went straight up to print to sublimate. The whole process didn’t actually take as long as I thought it would. By the time it was lunch I had my design printed out and then I had printed them out onto my fabric. I really liked how the top came out.


For the skirt I actually had to heat press the design on the skirt twice as I didn’t print out the design big enough but if I had printed out the design bigger more of the words would have been cut off, so I actually don’t mind the way it looked.

After lunch I then started sewing the skirt together. The first thing I had to do was mark and sew the darts first so that everything else fits. Those were actually simpler than I actually thought they were. After I had done that, I could then sew on the Airtech mesh fabric on top. The next thing that Paula got me to do was to actually overlock the edges of the skirt which is where I kind of messed up as I had accidentally cut part of the mesh in the back but at the same time, I didn’t really care about it. I then sewed the whole skirt together forgetting that I should actually leave some space for the zip but Paula that next I should just open like half of the seam so I can them add the zip.
15/05/2023 – 21/05/2023
0 notes
Text
During this week my plan was to make sure that I have my print design was made and printed onto my fabric, as well as getting the rest of my fabrics so then I can focus on making my garment.
I tried to see how I wanted to have the pleat and top panels would be sewn on the top panels, but I messed up the first time, so I had to get rid of the seams and start again and then when I had finally done the pleat right, but I had sewn it the wrong way round, but it was fine.

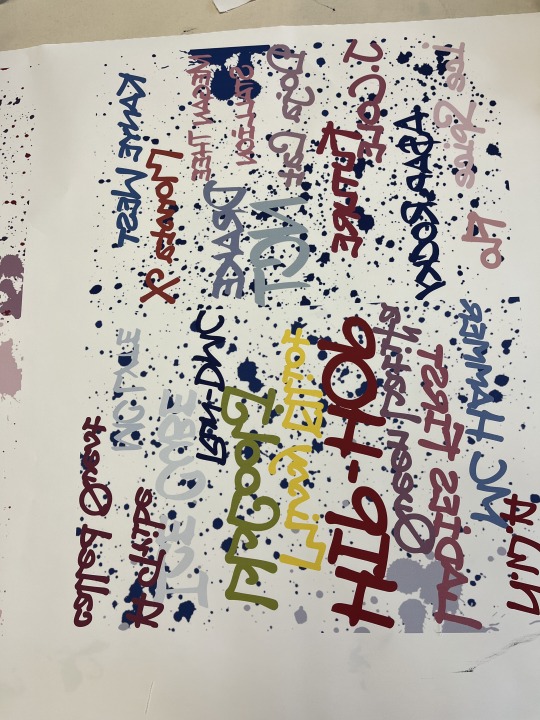
Using adobe fresco, I decided to try and create the official design for the skirt. My plan for the print design on the skirt was to have on the front the popular MCs and rappers and then on the back I would have the new artists that are influenced by hip-hip so wanted to try and think globally by having American artists, British artists and some Korean groups and artists that I knew are heavily influenced by hip-hop.


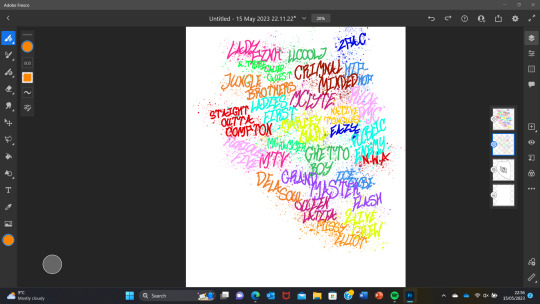


I liked the front design but when I tried to do the back design it just started to look messy as I had quite a lot of people’s names on it. So, I then decided that I should try and design the print on photoshop instead.

As I had found a synthetic fabric that was similar to the cotton drill that I had gotten I was ready to cut everything out onto the fabric. I didn’t manage to cut everything out so I left it until Thursday to cut and because I had to order the Airtech mesh that came the next day so by the end of Thursday, I should be able to cut everything out.
On Thursday I actually didn’t do as much as I wanted to. My plan was to finish cutting out my fabric and then spend the rest of the day creating my design to print the next. On Wednesday I managed to partially get they front of the skirt done.
By the end of the day, I had managed to cut out all of the pieces to my garment and I didn’t even have time to even start my designs yet, so it wasn’t until I got home where I decided to work on my designs.


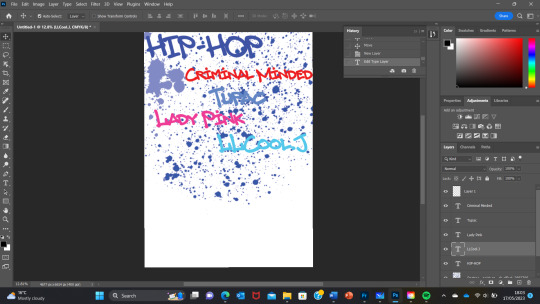
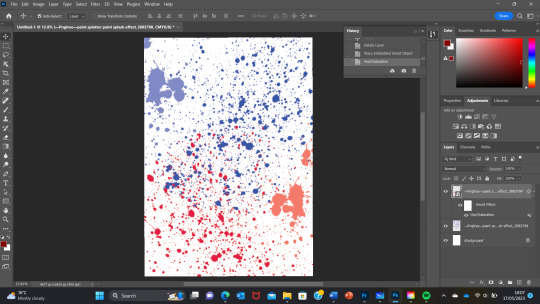
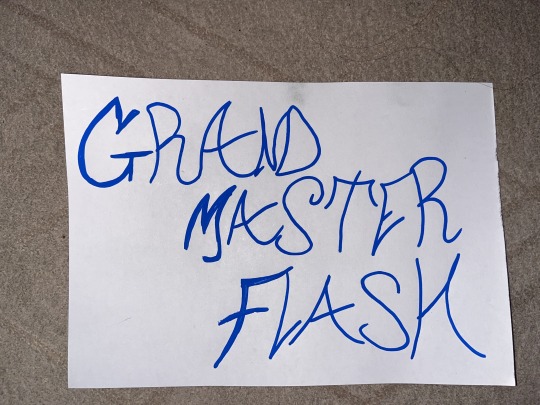
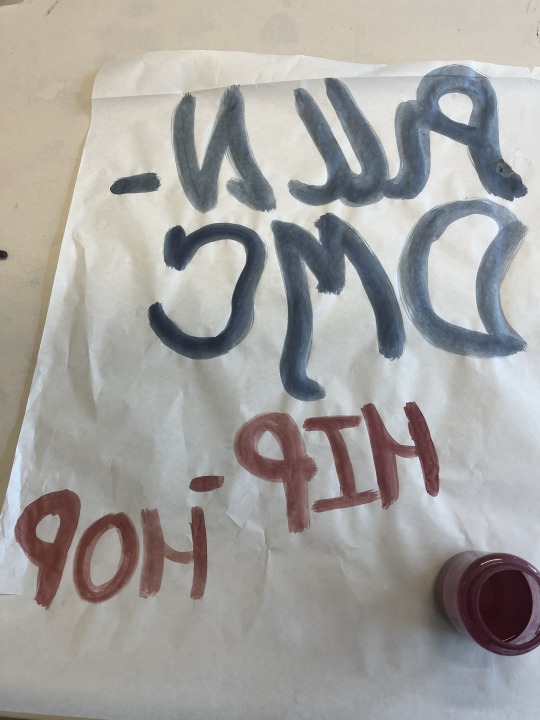
Whilst working on the front of the skirt I decided, so that it didn’t look really chaotic and to keep it in theme with my concept, to just have the front of the top say Hip-Hop History as it’s literally what I am looking at and then I would have paint splatter on the back, which I actually managed to finish first and then I moved onto working on the front of the skirt.
15/05/2023 – 21/05/2023
0 notes
Text
This week I felt like wasn’t really as productive as I wanted to be as I spent most of my time trying to figure out what fabric I should use.
I showed Natalie my print design as well as the pleat sample that I had done. With the fabric that I had used for the pleats I quite liked the feel of it as well as the colour of it, but I felt like the pleats are kind of thick and would be hard to try and sew the top on to it too. Natalie thought the same thing and said that I should make the pleats have more of a structure to them by using a drill or canvas type material, which I decided to take on board with. I also showed her my illustration and she liked my idea for it but even with the top, she said that instead of doing 2 layers of the panels I should use a fabric that would be similar to the pleats and actually print on the top too as well as the skirt.
I spent the rest of my time pattern cutting as I needed to pattern cut the mesh layer of my skirt as well as have my centre front and back of my waistband done for my skirt which Paula had done for me.
On the Thursday me and a few others went out and did some fabric shopping, we went around trying to find fabric that would be best for our garments. There were two cotton drills that had a nice feel nice to them, but they weren’t the right colour for my work. When it came to trying to find a mesh that is similar or an actual basketball type jersey material, I found the exact fabric, but the only problem was that I found it in every other colour but black or white. I thought that I could dye it, but Louise said that I should try and order the fabric instead, but it took a week to come.


On the Friday I went back to the fabric shop and got samples of the cotton drill and got Natalie and Paula to pick which one actually felt nicer and then I went back to the fabric shop and purchased 1 meter of black cotton drill which is quite a lot since I’m only doing two pleats with them, but I just wanted to have enough just in case I messed up.
For next week I planned to use calico to try and see how I would attach the pleat to the top panels and how they would look.
08/05/2023 – 14/05/2023
0 notes
Text
Private study week
During private study week I did quite a bit of work and tried to get some samples do. I wrote out a few words in a graffiti type style to use when I did go to do some printing. As the I hadn’t really had any thought of it yet, I went into university and worked on my pleats.


Before I even tried to start sewing the pleats, I used fabric that was found in the fabric waste bins to use that was big enough for pleats. First, I pinned the sample I did on Friday of the first two panels of the top so that I could see how I wanted them to be positioned. I actually really liked the feel of the fabric and the colour it so I was thinking that I could potentially use it for my final garment. So, I decided to keep it with me since there was actually quite a lot of it. After I had pinned it on to the mannequin in the way I wanted them to be I then took it upstairs for me to then sew and then I pinned it back on the mannequin to see how it looked. The first pleat I did had 3 pleats as that’s how many I wanted to do on the right side of the mannequin. On the left side of the mannequin, I wanted to see what 2 sets of pleats would look like so I did one with 2 pleats as I thought that the 3rd pleat wouldn’t be seen as much but it would.


As I still had the idea that I wanted to use fabric for my final piece I decided to do an illustration of what I wanted the actually garment to look like if was to use it using adobe fresco.
The next time I came into university, I came in to do some printing. There were 2 types of printing that were set that I could do for the skirt of my garment. The first one was using the disperse paint and heat pressing that onto fabric and the second one was sublimation, where I can print out my design using the sublimation printers and print them directly on the fabric.
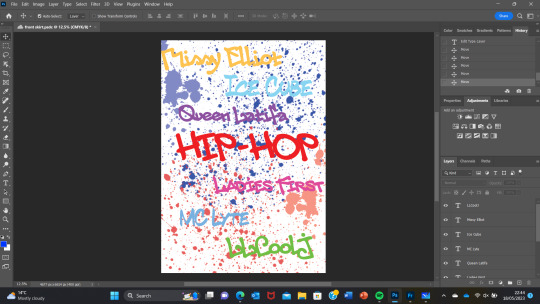
I decided to try out using disperse paint first to see how that looks. Since I was printing words, I forgot that I that they would be flipped when I had heat pressed them, which the technician reminded me, so I started again but writing the words backwards this time. On the last 3 prints I decided to try and add a paint splatter look to it as well just by tapping the paint brush lightly above the paper.

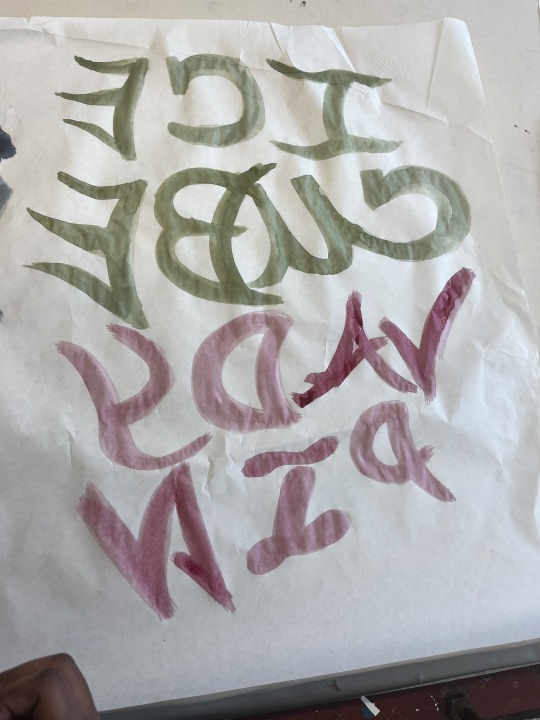

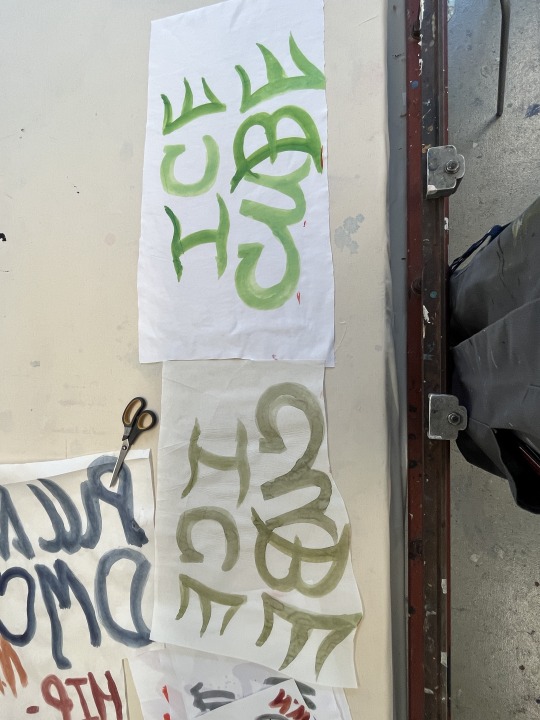

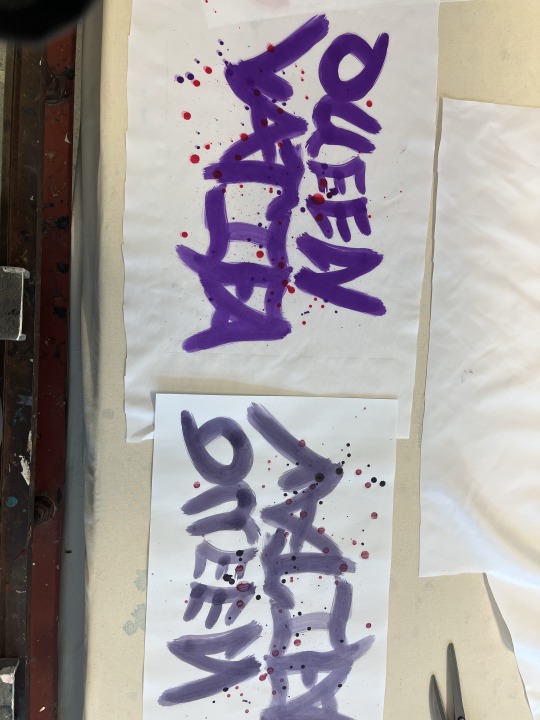

I was actually really happy with the way they turned out. The only print I didn’t really like was the one had Ice Cube written as I felt like it would have looked better if I had done it in a different colour instead of the green. I like the Lady Pink one too but that came really bright.
The next day I decided to layout my designs in my sketchbook as well as the print samples.
0 notes
Text
Designer Research (graffiti artist)- Lady Pink
As I've been wanting to include a graffiti design within my garment, I tried to look at popular graffiti artists.
The graffiti artist I decided to look at was Lady Pink, who started graffiti in 1979 and became known as the only female to be capable of competing against the boys in the graffiti subculture.
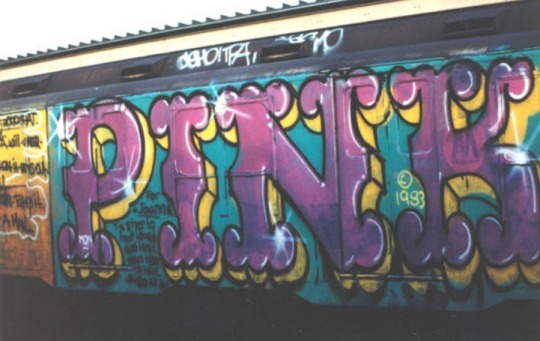

Found her work quite unique and individual to her. Even whilst she was in high school she already had her work exhibiting in art galleries.
To try and practise how I wanted my design to be written I had just searched up graffiti style font and tried writing based of those.


0 notes
Text
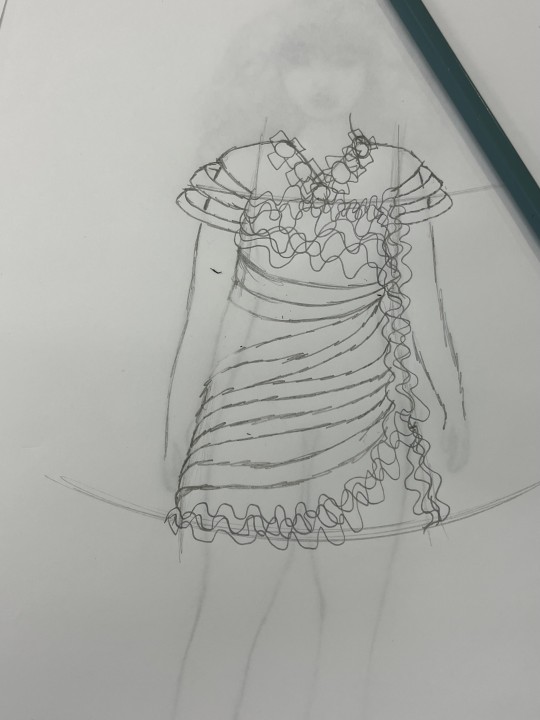
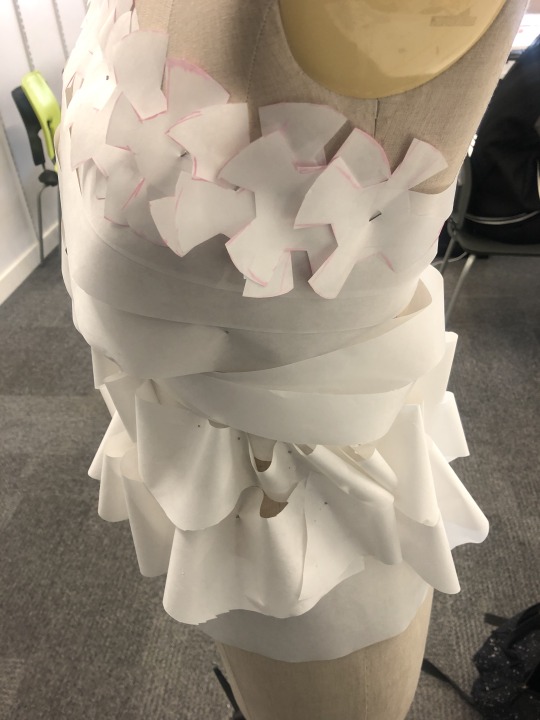
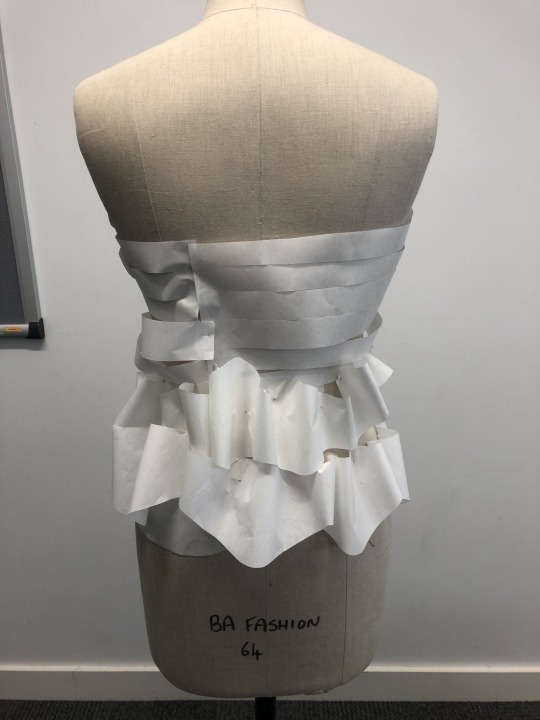
Over the weekend I ended up creating another design. For this design I thought that I could actually try and combined part of the jersey style design with what I had done previously.


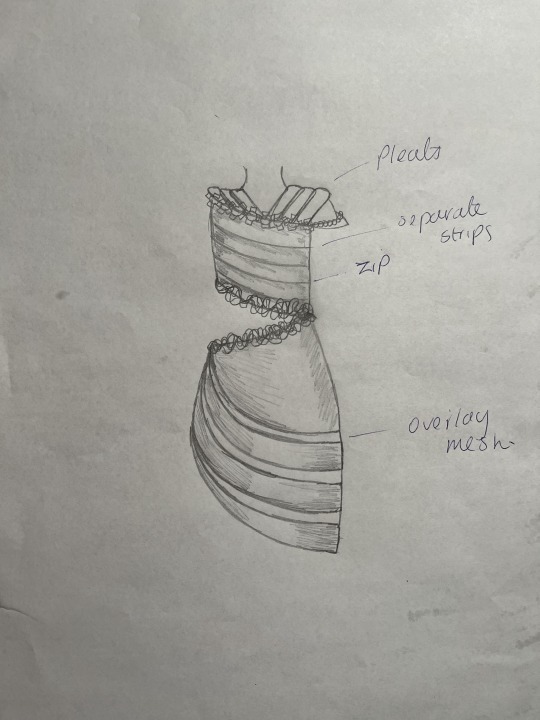
So, for this design my idea is for the skirt, keeping in the idea of someone actually wearing it, I could have two layers to it. The first layer would have a graffiti design and then on top would a mesh that is used to make things like basketball jerseys which would be black. The top would be a cut into strips and then for the shoulders they would be pleats. For some of the detailing I still want to include the waves as well as having the cassette tape detail on the top by the pleats.
As I was quite confident that this was my final design and Natalie also felt like I’m ready to start making, I started to work on the templates with Paula.
During the interim both Natalie and Louise were pointing out things that I already knew that I needed to do, like I needed to do some designer research as well as the actual process of the whole thing and what actually went well and what hadn’t, which I had missed out but overall, they liked my work so far. I spent the rest of the day printing out more images and then later we had an induction on the industrial sewing machines which took me a while to get the hang of.
The next day I spent the day pattern cutting. By the end of the day, using calico, Paula got me to try out one way I could have the panels of the top.

I couldn’t really visualise what she wanted me to do so I just went along with it anyway, but I was happy with the way it turned out. What I did was sew the two panels only a couple of centimetres in on each side and then using the iron, fold over around 1/2cm to 1cm of the fabric and iron it down to create a slight opening.

Over the weekend I decided to cut out the images that I had printed out previously and laid them out in my sketchbook as well as the sample I just done.


0 notes
Text
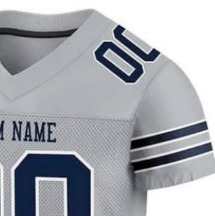
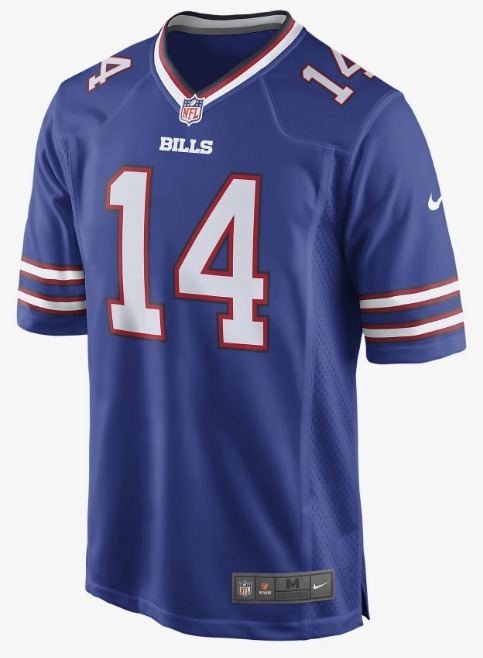
There were a few things that I wanted to get done for the day but there wasn’t a structured plan as to what I was doing for the day. I explained to Louise and Natalie what I had done the previous and my design and they suggested, so that it falls in with what was worn during the 80s and 90s in America as hip-hop grew, that I try and make an American football style jersey version of what I had already on the mannequin.
I started off with trying to sketch out like a base of what I wanted or what was coming to mind when they suggested the idea, but Louise suggested that I just work right on the mannequin instead as she thinks I work best doing that.

As I was working on the mannequin, I generally couldn’t tell whether I actually liked what I was doing or not. Something didn’t look right. It probably didn’t look right to me as I pretty much did something that was completely different as to what was on the previous mannequin and Natalie and Paula were saying how they liked the strips as well. I was thinking about what I could do, I decided to just sit and sketch some ideas out from what I have just done on the mannequin.


0 notes
Text
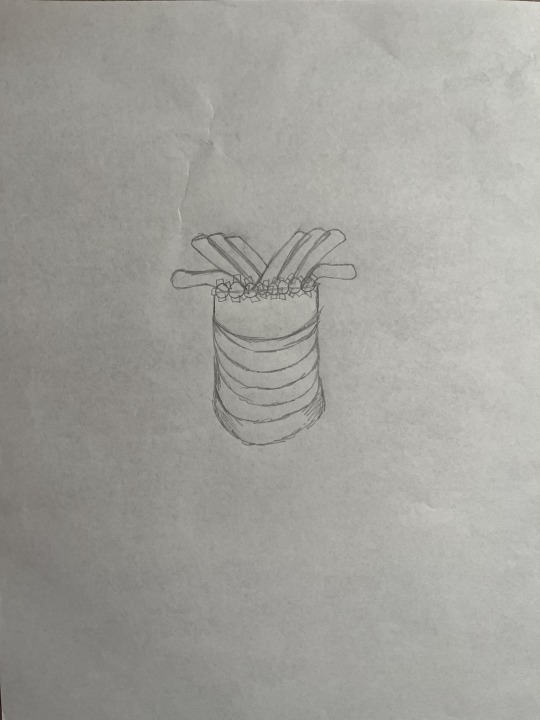
Designer Research - Iris Van Herpen
A designer that we had previously looked at is Iris Van Herpen.
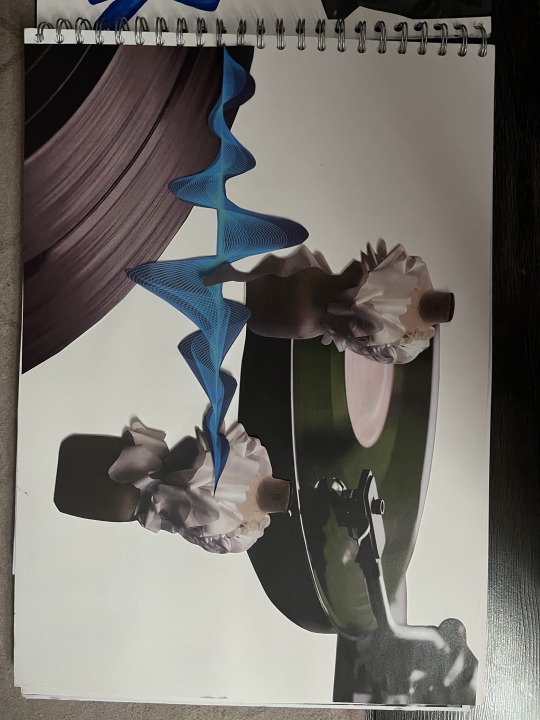
I actually went and did some research on her other projects and looking at her meta morphism collection there was a garment that was actually pretty similar to my idea of the waves.
on her garment they are quite big but I would have it smaller and just placed on the centre of the front.
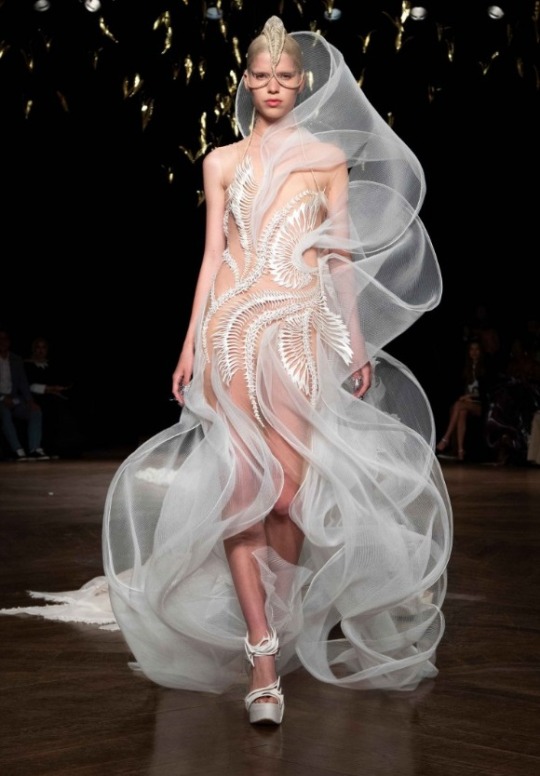
Another one of her garments had the wave look to it but it was in a way more flat but still quite sculptural. I actually found this garment really nice and went really well with my idea for my garment.

(syntopia photography)
0 notes
Text
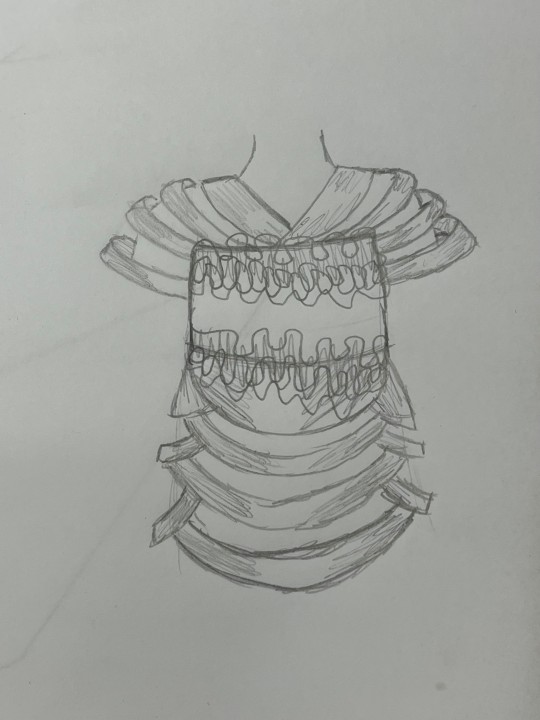
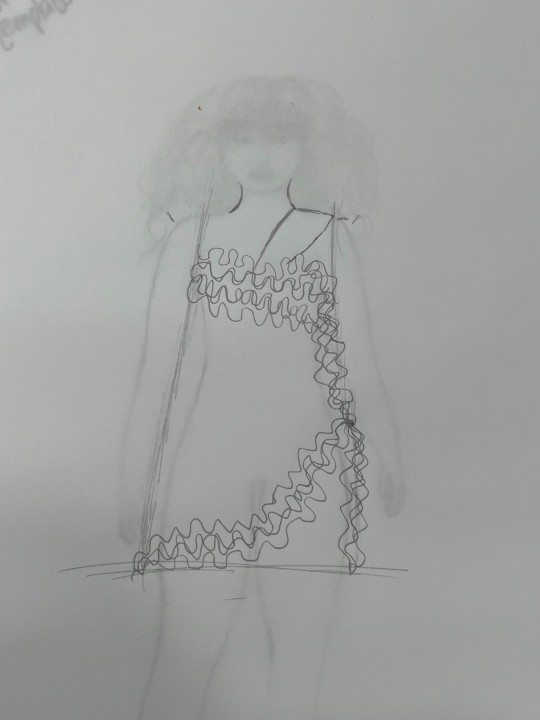
My plan for the day was to work on my sketchbook and produce some more designs. Louise felt like the designs that I had done over the Easter holiday weren’t enough and that I could’ve done more. She thought that what I have done on the mannequin was more “Vivienne Westwood” and the design I had done were more “Topshop” as they were just a top and a skirt, but my final design was going to end up as a dress or a top and a skirt anyway. She also said how both of he designs were quite similar to each other which I understand though as I didn’t really have an idea as to what I actually wanted to make, I just knew I wanted to have to waves that I had on the sculptural garment.
I ended up spending the day working on my mannequin trying to make a new design, but I had zero idea as to what to actually do. I decided to just develop what I had previously done.


I decided to keep the soundwaves on the front and then on the shoulder Paula had an idea where I could try and imitate stacked records, so I tried that which I actually liked. One thing I definitely wanted to keep and realised that I just kept doing was, making the top asymmetrical. I just liked the look of it.
As I felt like Louise’s comment threw me off my game, I decided to stop what I was doing on the mannequin and then the next day I drew two more designs based of what I had done on the mannequin.
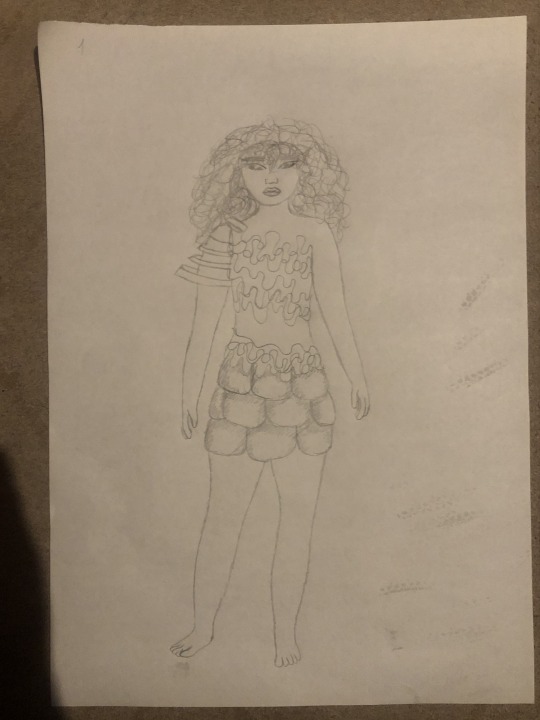


I didn’t really like the first design as I felt like the skirt didn’t necessarily go with the top. The second I really liked especially having both the top and skirt be asymmetrical. I still managed to keep the waves in it. The top would be made up of strips and then on the hem of the top, there would be fabric cut up to look like the part of a cassette where you can rewind it and then on the skirt you would have the tape of the cassette on it. For the skirt, the idea of someone actually wearing flew out my head so it, would quite revealing but that’s the part to imitate a record. The third design was just a random design I thought of during the morning that I could do.


I then decided to try and see how the second design would look on the mannequin which I think actually looks really pretty but at the same time you wouldn’t really guess that the concept of the garment was hip-hop. It was one of my best designs yet.
18/04/2023 -20/04/2023
1 note
·
View note
Text
So far within my sketchbook I have completed another page. Within this page I wanted there to be more colour and I wanted to actually try draw in my sketchbook as it’s something that I have been avoiding throughout my sketchbook, like I wanted to add some wavy lines but was scared that it would look weird. The only slight problem which I didn't think bout was that the ink came through the previous, just slightly
I tried to add images that had a bit more colour to them, but I haven’t yet stuck them down yet as I’m still deciding whether I should add a black outline to the words or whether I should leave it as it is.


For the next page I wanted to include my sculptural garment from the first week and either draw the final design for it or to just put images around them that are based of the ideas that I had for the garment. For the page after that I have made another design based off the different images and then I have sketched out the final outcome.

10/04/2023 – 16/04/2023
0 notes
Text
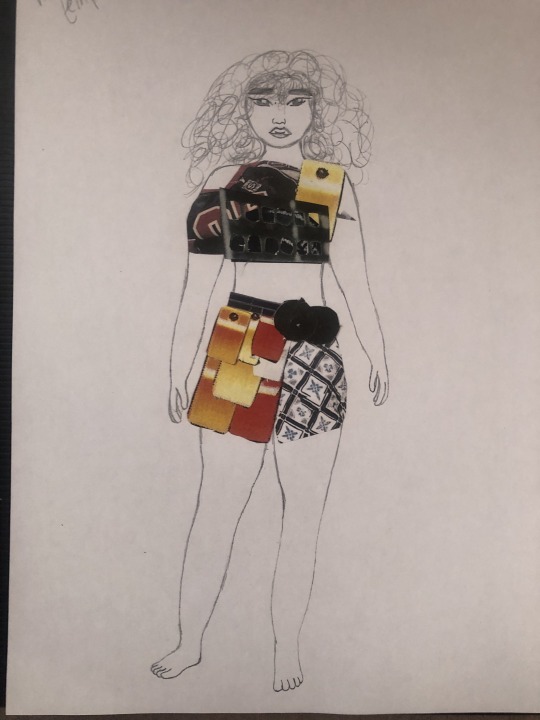
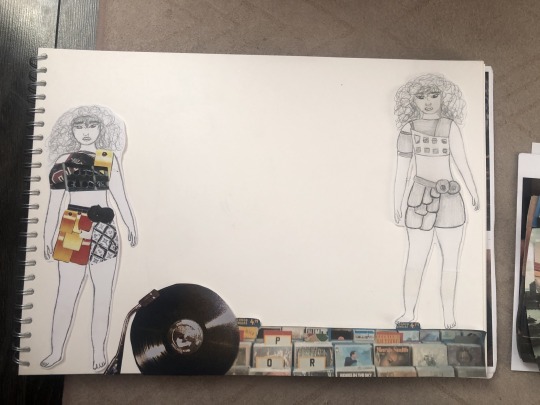
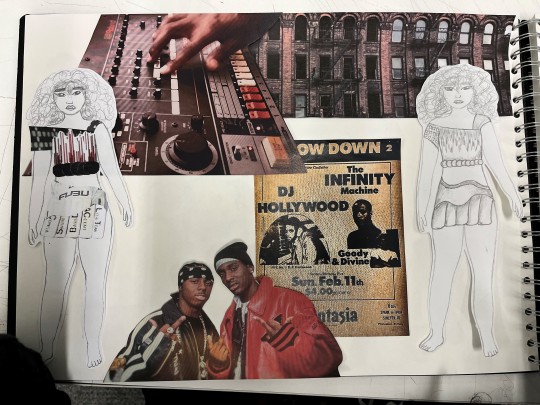
During the first week of the Easter holiday, I managed to do a few things with my sketchbook. As I hadn’t yet done any illustrations, I made a new template as well as collate images from watching Hip-hop evolution to then go into university to photocopy and print. Natalie advised on the Friday that I should use the images that she has printed out for me bigger and cut out the different shapes from the images and to stick them onto my template, which I then did. To me it did look quite basic, but it was only the start.
After I had done that, I then sketched out what outcome of the garment would actually look like. I then stick the two models on either side of the page and then stuck images in the centre.


3/4/2023 – 9/4/2023
I did the same thing but with different images. I actually liked this more than the first one that I did but I wouldn't say it was something that would use for my final design.


I was going to have the designs spread between 2 pages but I struggling with the first page so ended up just having one page for them.
0 notes