
Last Seen Blogs

rozaryder4
Filmotec

qilukaxu
Untitled

uniquefreak737xnsfw
I own nothing I post unless specified otherwise

ssphynx
my dear melancholy

abseok
i'm thirsty and he's sweaty so i mean
Text
Spring Cloud Eureka and Hystrix Circuit Breaker using Microservices
In this tutorial, we will use a microservice application created in previous post ( Microservices Example using Spring Cloud Eureka ) and add circuit breaker pattern using Hystrix Spring library in java.
Using Hystrix in your application helps to add defensive mechanism and makes applications more resilient and fault tolerant.
Tools Required –
- Java 8
- IntelliJ IDE
We have created three different applications as below –
- Eureka Service– This Service will register every microservice and then the client microservice will look up the Eureka server to get a dependent microservice to get the job done.This Eureka Server is owned by Netflix and in this, Spring Cloud offers a declarative way to register and invoke services by using Java annotation.
- demo-server – This service will return a simple hello message.
- demo-client – It is similar to the standalone client service created in Bootiful Development with Spring Boot. It will consume the APIs provided by demo-server through Eureka Service .
Hystrix Documentation - https://github.com/Netflix/Hystrix/wiki
Microservices are deployed on Cloud . As cloud provides a distributed environment , there are more chances that some of your services may be down at some point of time. You can have several micro-services in your application which are dependent on each other. So one service can call to other service. If destination service is down then source will get an exception in normal scenario. But with the help of Hystrix annotations , you can add fallback mechanism and handle the exception in services. Thus it makes your service more fault tolerant, resilient .
You need to add below dependency in your demo-client service application to enable Hystrix circuit breaker pattern -
org.springframework.cloud
spring-cloud-starter-hystrix
1.2.5.RELEASE
We just have to add few annotations to handle fallback or break the service call in case your destination service(demo-server) is down. We need to change main class to enable Hystrix circuit breaker -
package com.myjavablog.democlient;
import org.springframework.boot.SpringApplication;
import org.springframework.boot.autoconfigure.SpringBootApplication;
import org.springframework.cloud.client.circuitbreaker.EnableCircuitBreaker;
import org.springframework.cloud.client.discovery.EnableDiscoveryClient;
import org.springframework.cloud.client.loadbalancer.LoadBalanced;
import org.springframework.cloud.netflix.hystrix.EnableHystrix;
import org.springframework.context.annotation.Bean;
import org.springframework.context.annotation.Configuration;
import org.springframework.web.client.RestTemplate;
@EnableCircuitBreaker
@EnableDiscoveryClient
@SpringBootApplication
public class DemoClientApplication {
public static void main(String args) {
SpringApplication.run(DemoClientApplication.class, args);
}
}
@Configuration
class Config{
@Bean
@LoadBalanced
public RestTemplate restTemplate(){
return new RestTemplate();
}
}
Also we need to change controller class to add fallback mehod as below -
package com.myjavablog.democlient;
import com.netflix.hystrix.contrib.javanica.annotation.HystrixCommand;
import org.springframework.beans.factory.annotation.Autowired;
import org.springframework.web.bind.annotation.GetMapping;
import org.springframework.web.bind.annotation.RequestMapping;
import org.springframework.web.bind.annotation.RestController;
import org.springframework.web.client.RestTemplate;
@RestController
@RequestMapping("/demo/hello/client")
public class TestController {
@Autowired
public RestTemplate restTemplate;
@GetMapping
@HystrixCommand(fallbackMethod = "handleFallback")
public String test(){
String url = "http://demo-server/demo/hello/server";
return restTemplate.getForObject(url, String.class);
}
public String handleFallback(){
return "Fallback hello service";
}
}
By default hystrix has timeout of 1 second for every request. So we need to disable timeout by setting below property in application.properties file -
hystrix.command.default.execution.timeout.enabled=false
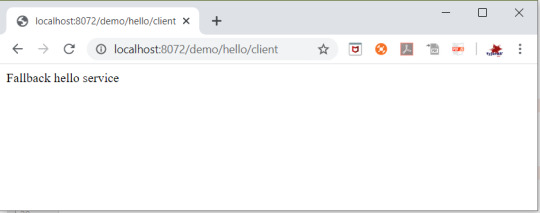
So now i am intentionally stopping demo-server microservice and then we will make call to api to see fallback is working properly .You can see demo-server is not registered with Eureka below -

So now when you call the service ,it should show you a fallback message as below -
Github Downlod Link:
Download
Read the full article
0 notes
Text
Monitoring Spring boot applications using actuator and prometheus
In this article ,we will see how we can monitor spring boot applications using actuator spring boot project and prometheus tool .
Prometheus
Prometheus is a time-series monitoring application written in Go. It can run on a server, in a docker container, or as part of a Kubernetes cluster (or something similar). Prometheus collects, stores, and visualizes time-series data so that you can monitor your systems. You can tell Prometheus exactly where to find metrics by configuring a list of "scrape jobs". Applications that are being monitored can provide metrics endpoints to Prometheus using any one of the many client libraries available; additionally, separate exporters can gather metrics from applications to make them available in Prometheus. Metrics get stored locally for 15 days, by default, and any Prometheus server can scrape another one for data. Additionally, remote storage is another option for Prometheus data - provided there is a reliable remote storage endpoint.
Benefits:
- The option of "service discovery" allows Prometheus to keep track of all current endpoints effortlessly.
- Outages are quickly detected .
- The PromQL query language is incredibly flexible and Turing-complete.
- There's also a very low load on the services monitored (metrics get stored in memory as they get generated), allowing fewer resources to get used.
- Additionally, Prometheus users can control traffic volumes, access metrics in the browser, and allow for easy reconfiguration.
Part 1: Spring boot application configuration
We will create a simple spring boot REST application which will expose the metrics to prometheus. Please find below project structure of application -
Project Structure
Below is the pom.xml required for project -
4.0.0
com.db
spring-boot-prometheus
1.0-SNAPSHOT
org.springframework.boot
spring-boot-starter-parent
2.1.9.RELEASE
1.8
org.springframework.boot
spring-boot-starter-actuator
org.springframework.boot
spring-boot-starter-web
io.micrometer
micrometer-registry-prometheus
org.springframework.boot
spring-boot-starter-test
test
org.springframework.boot
spring-boot-maven-plugin
We need spring-boot-starter-actuator dependency ,this would expose the endpoints of our application and makes it available to prometheus server. You can run the application and check the endpoints exposed by actuator by hitting below link in browser -
http://localhost:8081/actuator
Micrometer
micrometer-registry-prometheus dependency is required to register metrics with prometheus server. It exposes Actuator metrics to external monitoring systems such as Prometheus, Netflix Atlas, AWS Cloudwatch, and many more.
Similarly, Micrometer automatically exposes /actuator/metrics data into something your monitoring system can understand. All you need to do is include that vendor-specific micrometer dependency in your application.
Micrometer is a separate open-sourced project and is not in the Spring ecosystem, so we have to explicitly add it as a dependency. Since we will be using Prometheus, let's add it's specific dependency in our pom.xml:
Part 2: Prometheus Server Configuration
For this example , i will be installing portable prometheus on local system . You can download the prometheus setup from official prometheus website as below -
https://prometheus.io/download/
You need to make below changes in prometheus.yml file of prometheus configuration to scrape the metrices your application .Please add below job to scrape the metrices of your application -
# Details to connect Prometheus with Spring Boot actuator end point to scrap the data
# The job name is added as a label `job=` to any time series scraped from this config.
- job_name: 'spring-actuator'
# Actuator end point to collect the data.
metrics_path: '/actuator/prometheus'
#How frequently to scape the data from the end point
scrape_interval: 5s
#target end point. We are using the Docker, so local host will not work. You can change it with
#localhost if not using the Docker.
static_configs:
- targets:
Run the prometheus server by double clicking prometheus.exe flie .
Now prometheus console will open and it will strat gathering the metrices of your application. You can access the prometheus server in browser using http://localhost:9090
Targets for metrics
Classes loaded in JVM prometheus metrics
Number of Threads in different states
You can gather the metrices of your application by selecting the various parameters provided by prometheus like -
- jvm_classes_loaded_classes
- jvm_threads_live_threads
- jvm_threads_states_threads
- jvm_threads_states_threads
- tomcat_global_request_seconds_count
These parameters are useful to monitor your systems. In the next article, we will create a prometheus server using docker and expose the metrices.
Github Downlod Link:
Download
Read the full article
0 notes
Text
Spring Boot + Spring Data JPA + H2 Database
In this example , we will create a simple Spring boot application which will interact with the H2 database using Spring JPA library.
H2 database is an in memory database .For this tutorial , we will use H2 database for this demo so that we don't need to perform heavy installation for other database like Oracle,MySQL.
GitHub Link -
Download
Tools -
- Spring Boot
- Spring JPA
- H2 Database
- IntelliJ IDEA editor
- Maven
- Lombok
Step 1: Create the simple spring boot web application in IntelliJ IDEA editor
Project Setup Guide
Our final Project structure will look like below–
Step 2: Now define all maven dependencies required in this project
4.0.0
org.springframework.boot
spring-boot-starter-parent
1.5.1.RELEASE
com.myjavablog
springhibernatewithh2database
0.0.1-SNAPSHOT
springhibernatewithh2database
Demo project for Spring Boot
1.8
org.springframework.boot
spring-boot-starter-security
org.springframework.boot
spring-boot-starter
org.springframework.boot
spring-boot-starter-test
test
org.springframework.boot
spring-boot-starter-web
org.springframework.boot
spring-boot-starter-tomcat
org.springframework.boot
spring-boot-starter-data-jpa
org.apache.tomcat
tomcat-jdbc
com.h2database
h2
org.projectlombok
lombok
true
org.springframework.boot
spring-boot-maven-plugin
- Lombok - We will be using lombok third party library to reduce boilerplate code for model/data objects, e.g., it can generate getters and setters for those object automatically by using Lombok annotations. The easiest way is to use the @Data annotation.
- spring-boot-starter-data-jpa - This jar is used to connect to database .It also has a support to provide different JPA implementations to interact with the database like Hibernate, JPA Repository, CRUD Repository etc.
- h2 - Its used to create H2 database when the spring boot application boots up. Spring boot will read the database configuration from application.properties file and creates a DataSource out of it.
Step 2: Create the Model class
package com.myjavablog.pojo;
import javax.persistence.*;
import lombok.AllArgsConstructor;
import lombok.Builder;
import lombok.Data;
import lombok.NoArgsConstructor;
@Data
@Builder
@AllArgsConstructor
@NoArgsConstructor
@Entity
@Table
public class UserDetails {
@Id
@Column
@GeneratedValue(strategy = GenerationType.IDENTITY)
private int id;
@Column
private String firstName;
@Column
private String lastName;
@Column
private String email;
@Column
private String password;
}
We have used Lombok library in Model class . You can see below annotation which are coming from Lambok jar -
- @Data - Define this class as Model class
- @Builder - To build the model object at runtime ex. Create mock object for unit testing
- @AllArgsConstructor - Create constructor with all arguments
- @NoArgsConstructor - Default constructor
So Lombok takes care of everything for you right from creating setters/ getters, Constructor , Build runtime objects and avoids boilerplate code .
Step 3: Configuration for the H2 database bean
package com.myjavablog.config;
import org.h2.server.web.WebServlet;
import org.springframework.boot.web.servlet.ServletRegistrationBean;
import org.springframework.context.annotation.Bean;
import org.springframework.context.annotation.Configuration;
@Configuration
public class BeanConfig {
@Bean
ServletRegistrationBean h2servletRegistration() {
ServletRegistrationBean registrationBean = new ServletRegistrationBean(new WebServlet());
registrationBean.addUrlMappings("/console/*");
return registrationBean;
}
}
We can also configure the security for the application.
package com.myjavablog.config;
import org.springframework.context.annotation.Configuration;
import org.springframework.security.config.annotation.web.builders.HttpSecurity;
import org.springframework.security.config.annotation.web.configuration.WebSecurityConfigurerAdapter;
@Configuration
public class SecurityConfig extends WebSecurityConfigurerAdapter {
@Override
protected void configure(HttpSecurity httpSecurity) throws Exception {
httpSecurity.csrf().disable().authorizeRequests().antMatchers("/").permitAll().and().authorizeRequests()
.antMatchers("/console/**").permitAll()
.antMatchers("/list/**").permitAll();
httpSecurity.headers().frameOptions().disable();
}
}
Step 4: Service layer
package com.myjavablog.service;
import com.myjavablog.pojo.UserDetails;
import java.util.List;
public interface UserService {
public List getUserDetails();
}
package com.myjavablog.service;
import com.myjavablog.dao.UserDao;
import com.myjavablog.pojo.UserDetails;
import org.springframework.beans.factory.annotation.Autowired;
import org.springframework.stereotype.Service;
import java.util.List;
@Service
public class UserServiceImpl implements UserService {
@Autowired
UserDao userDao;
@Override
public List getUserDetails() {
return userDao.getUserDetails();
}
}
Step 5: DAO layer
package com.myjavablog.dao;
import com.myjavablog.pojo.UserDetails;
import java.util.List;
public interface UserDao {
public List getUserDetails();
}
package com.myjavablog.dao;
import com.myjavablog.pojo.UserDetails;
import javax.persistence.*;
import javax.persistence.EntityManager;
import javax.persistence.PersistenceContext;
import javax.persistence.criteria.CriteriaBuilder;
import javax.persistence.criteria.CriteriaQuery;
import org.hibernate.Criteria;
import org.hibernate.Session;
import org.springframework.stereotype.Repository;
import java.util.List;
@Repository
public class UserDaoImpl implements UserDao {
@PersistenceContext
private EntityManager entityManager ;
@Override
public List getUserDetails() {
Criteria criteria;
criteria = entityManager.unwrap(Session.class).createCriteria(UserDetails.class);
return criteria.list();
}
}
Step 7: Create Controller class
package com.myjavablog.controller;
import com.myjavablog.pojo.UserDetails;
import com.myjavablog.service.UserService;
import org.springframework.beans.factory.annotation.Autowired;
import org.springframework.http.HttpStatus;
import org.springframework.http.ResponseEntity;
import org.springframework.stereotype.Controller;
import org.springframework.web.bind.annotation.RequestBody;
import org.springframework.web.bind.annotation.RequestMapping;
import org.springframework.web.bind.annotation.RequestMethod;
import java.util.List;
@Controller
public class UserController {
@Autowired
private UserService userService;
@RequestMapping(value = "/list", method = RequestMethod.GET)
public ResponseEntity userDetails() {
List userDetails = userService.getUserDetails();
return new ResponseEntity(userDetails, HttpStatus.OK);
}
}
Step 8 : Create a properties file to configure Spring boot application and database
spring.datasource.url=jdbc:h2:mem:testdb;DB_CLOSE_ON_EXIT=FALSE
spring.datasource.username=sa
spring.datasource.password=
spring.datasource.driverClassName=org.h2.Driver
spring.jpa.hibernate.ddl-auto=update
spring.jpa.properties.hibernate.dialect=org.hibernate.dialect.H2Dialect
server.port=8081
server.error.whitelabel.enabled=false
Step 9: Now application is ready . Run the application and Java application and access URL http://localhost:8081/console to access H2 database.
Once you connect to it you can insert records to table.
Now you can access the application to get the list of users.
Read the full article
0 notes
Text
Deploy a Spring Boot Java app to Kubernetes on GCP-Google Kubernetes Engine
Kubernetes is an open source project, which can run in many different environments, from laptops to high-availability multi-node clusters, from public clouds to on-premise deployments, and from virtual machine (VM) instances to bare metal.
You'll use GKE, a fully managed Kubernetes service on Google Cloud Platform, to allow you to focus more on experiencing Kubernetes, rather than setting up the underlying infrastructure.
In this post , i will show you the steps to deploy your simple react application to GCP app engine service .
Before going for actual deployment you should consider below pre-requisites -
GCP account – You need to create at least Free tier GCP account by providing your credit card details which will be valid for 3 months. You can create it using https://cloud.google.com/
Github project - Spring boot project on github (https://github.com/AnupBhagwat7/gcp-examples)
Below are the steps to deploy application to App Engine -
- Package a simple Java app as a Docker container.
- Create your Kubernetes cluster on GKE.
- Deploy your Java app to Kubernetes on GKE.
- Scale up your service and roll out an upgrade.
- Access Dashboard, a web-based Kubernetes user interface.
1. GCP Setup
Go to Google cloud console(https://console.cloud.google.com/) and click to open cloud shell -

Run the following command in Cloud Shell to confirm that you are authenticated:
gcloud auth list
This command will give you below output -
Credentialed Accounts
ACTIVE ACCOUNT
* @
To set the active account, run:
$ gcloud config set account `ACCOUNT`
Now run the below command to get the list of projects present under your GCP account -
gcloud config list project
If project is not set then you can do it by using below command -
gcloud config set project
2. Package your java application
Get the application source code from github -
git clone https://github.com/AnupBhagwat7/gcp-examples.git
cd gcp-demo-springboot-app
Now run the project in gcp cloud shell -
mvn -DskipTests spring-boot:run
once the application is started , you can click on web preview as shown below -

You will be able to see your application launched in browser as below -

3. Package the Java app as a Docker container
Next, you need to prepare your app to run on Kubernetes. The first step is to define the container and its contents.
You need to take below steps to package your application as a docker image -
Step 1: Create the JAR deployable for the app
mvn -DskipTests package
Step 2: Enable Container Registry to store the container image that you'll create
gcloud services enable containerregistry.googleapis.com
Step 3: Use Jib maven plugin to create the container image and push it to the Container Registry
mvn -DskipTests com.google.cloud.tools:jib-maven-plugin:build -Dimage=gcr.io/$GOOGLE_CLOUD_PROJECT/gcp-demo-springboot-app.jar
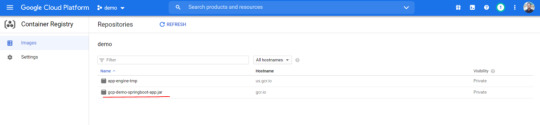
Step 4: If all goes well, then you should be able to see the container image listed in the console by navigating to CI/CD > Container Registry > Images. You now have a project-wide Docker image available, which Kubernetes can access and orchestrate as you'll see in next steps .
Step 5: You can locally test the image with the following command, which will run a Docker container as a daemon on port 8080 from your newly created container image:
docker run -ti --rm -p 8080:8080
gcr.io/$GOOGLE_CLOUD_PROJECT/gcp-demo-springboot-app.jar
Step 6: You can go to web preview feature of cloud shell to check if docker container is started successfully .You will see response in browser -

4. Deploy your application to Google Kubernetes
Step 1: Create a cluster
You're ready to create your GKE cluster. A cluster consists of a Kubernetes API server managed by Google and a set of worker nodes. The worker nodes are Compute Engine VMs.
First, make sure that the related API features are enabled
gcloud services enable compute.googleapis.com container.googleapis.com
Create a cluster named springboot-java-cluster with two n1-standard-1 nodes using below command -
gcloud container clusters create springboot-java-cluster
--num-nodes 2
--machine-type n1-standard-1
--zone us-central1-c
This will take few minutes to create a cluster. You can see all the clusters by navigating to Kubernetes Engine > Clusters

It's now time to deploy your containerized app to the Kubernetes cluster. You'll use the kubectl command line (already set up in your Cloud Shell environment).
The rest of the tutorial requires the Kubernetes client and server version to be 1.2 or higher. kubectl version will show you the current version of the command.
Step 2: Deploy app to Kubernetes cluster
A Kubernetes deployment can create, manage, and scale multiple instances of your app using the container image that you created. Deploy one instance of your app to Kubernetes using the kubectl run command.
kubectl create deployment springboot-java
--image=gcr.io/$GOOGLE_CLOUD_PROJECT/gcp-demo-springboot-app.jar
To view the deployment that you created, simply run the following command:
kubectl get deployments
To view the app instances created by the deployment, run the following command:
kubectl get pods
At this point, you should have your container running under the control of Kubernetes, but you still have to make it accessible to the outside world.
Step 3: Allow external traffic
By default, the Pod is only accessible by its internal IP within the cluster. In order to make the springboot-java container accessible from outside the Kubernetes virtual network, you have to expose the Pod as a Kubernetes service.
In Cloud Shell, you can expose the Pod to the public internet with the kubectl expose command combined with the --type=LoadBalancer flag. The flag is required for the creation of an externally accessible IP.
kubectl create service loadbalancer springboot-java --tcp=8080:8080
O/P: service/springboot-java created
The flag used in the command specifies that you'll be using the load balancer provided by the underlying infrastructure. Note that you directly expose the deployment, not the Pod. That will cause the resulting service to load balance traffic across all Pods managed by the deployment (in this case, only one Pod, but you'll add more replicas later).
The Kubernetes Master creates the load balancer and related Compute Engine forwarding rules, target pools, and firewall rules to make the service fully accessible from outside of Google Cloud.
To find the publicly accessible IP address of the service, simply request kubectl to list all the cluster services.
kubectl get services
O/p:
NAME TYPE CLUSTER-IP EXTERNAL-IP PORT(S) AGE
kubernetes ClusterIP 10.3.240.1 443/TCP 44m
springboot-java LoadBalancer 10.3.250.58 34.123.60.207 8080:32034/TCP 85s
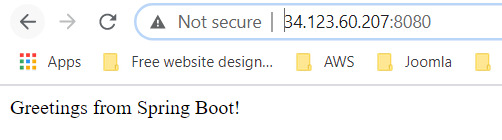
Notice that there are two IP addresses listed for your service, both serving port 8080. One is the internal IP address that is only visible inside your Virtual Private Cloud. The other is the external load-balanced IP address. In the example, the external IP address is aaa.bbb.ccc.ddd. You should now be able to reach the service by pointing your browser to http://34.123.60.207:8080

Step 4: Scale your application
One of the powerful features offered by Kubernetes is how easy it is to scale your app. Suppose that you suddenly need more capacity for your app. You can simply tell the replication controller to manage a new number of replicas for your app instances.
kubectl scale deployment springboot-java --replicas=3
O/P: deployment.apps/springboot-java scaled
kubectl get deployment
NAME READY UP-TO-DATE AVAILABLE AGE
springboot-java 3/3 3 3 23m
Step 5: Roll out an upgrade to your service
At some point, the app that you deployed to production will require bug fixes or additional features. Kubernetes can help you deploy a new version to production without impacting your users.
You can launch editor in CLOUD Shell and update the controller to return a new value as shown below-

Use Jib maven plugin to build and push a new version of the container image.
mvn -DskipTests package
com.google.cloud.tools:jib-maven-plugin:build
-Dimage=gcr.io/$GOOGLE_CLOUD_PROJECT/springboot-java:v2
In order to change the image label for your running container, you need to edit the existing springboot-java deployment and change the image from gcr.io/PROJECT_ID/springboot-java:v1 to gcr.io/PROJECT_ID/springboot-java:v2.
You can use the kubectl set image command to ask Kubernetes to deploy the new version of your app across the entire cluster one instance at a time with rolling updates.
kubectl set image deployment/springboot-java
springboot-java=gcr.io/$GOOGLE_CLOUD_PROJECT/springboot-java:v2
Step 6: Rollback to previous version
Perhaps the new version contained an error and you need to quickly roll it back. With Kubernetes, you can roll it back to the previous state easily. Roll back the app by running the following command:
kubectl rollout undo deployment/springboot-java
This marks the end of this tutorial. Thanks for following.
Github link -
https://github.com/AnupBhagwat7/gcp-examples/tree/main/gcp-demo-springboot-app
Read the full article
0 notes
Text
Spring Boot profiles
In this article, we will see profiles for spring boot project -
Github Link -
Download
Every enterprise application has many environments, like:
Dev | Test | Stage | Prod | UAT / Pre-Prod
Each environment requires a setting that is specific to them. For example, in DEV, we do not need to constantly check database consistency. Whereas in TEST and STAGE, we need to. These environments host specific configurations called Profiles.
How do we Maintain Profiles?
In spring boot application, we need different configurations for different environments. We have application.properties file to maintain application specific properties. In order to create profiles for different environments , we need to create various properties files as below -
DEV - application-dev.properties
TEST- application-test.properties
PROD - application-prod.properties
Step 1: Create below project structure in IntelliJ
Step 2: We are creating 3 different property files for below mentioned environments -
DEV - application-dev.properties
TEST- application-test.properties
PROD - application-prod.properties
Of course, the application.properties will remain as a master properties file, but if we override any key in the profile-specific file, the latter will gain precedence.
Step 3: Specify in application.properties file which environment property needs to be loaded
spring.profiles.active=prod
spring.application.name=springbootprofiles
app.message = This is Application property for ${spring.application.name}
Here we are loading PROD properties when application gets booted.
Step 4: Define DB configuration properties for in respective properties file and add code in DBConfiguration.class to pick the appropriate settings.
package com.myjavablog.config;
import org.springframework.boot.context.properties.ConfigurationProperties;
import org.springframework.context.annotation.Bean;
import org.springframework.context.annotation.Configuration;
import org.springframework.context.annotation.Profile;
@Configuration
@ConfigurationProperties("spring.datasource")
public class DBConfiguration {
private String driverClassName;
private String url;
private String username;
private String password;
public String getDriverClassName() {
return driverClassName;
}
public void setDriverClassName(String driverClassName) {
this.driverClassName = driverClassName;
}
public String getUrl() {
return url;
}
public void setUrl(String url) {
this.url = url;
}
public String getUsername() {
return username;
}
public void setUsername(String username) {
this.username = username;
}
public String getPassword() {
return password;
}
public void setPassword(String password) {
this.password = password;
}
@Profile("dev")
@Bean
public String devDatabaseConnection() {
System.out.println("DB connection for DEV - H2");
System.out.println(driverClassName);
System.out.println(url);
return "DB connection for DEV - H2";
}
@Profile("test")
@Bean
public String testDatabaseConnection() {
System.out.println("DB Connection to TEST -H2");
System.out.println(driverClassName);
System.out.println(url);
return "DB Connection to TEST -H2";
}
@Profile("prod")
@Bean
public String prodDatabaseConnection() {
System.out.println("DB Connection to PROD - H2");
System.out.println(driverClassName);
System.out.println(url);
return "DB Connection to PROD - H2";
}
}
This will load the properties file as per the spring.profiles.active property we have mentioned in application.properties file.
Step 5: Output
As per the application boot time logs below, you can see PROD database is loaded during application boot up.
2019-12-01 23:29:07.199 INFO 5728 --- rmationExtractorJdbcDatabaseMetaDataImpl : HHH000262: Table not found: user_details
2019-12-01 23:29:07.419 INFO 5728 --- j.LocalContainerEntityManagerFactoryBean : Initialized JPA EntityManagerFactory for persistence unit 'default'
DB Connection to PROD - H2
org.h2.Driver
jdbc:h2:mem:proddb;DB_CLOSE_ON_EXIT=FALSE
2019-12-01 23:29:09.147 INFO 5728 --- s.w.s.m.m.a.RequestMappingHandlerAdapter : Looking for @ControllerAdvice: org.springframework.boot.context.embedded.AnnotationConfigEmbeddedWebApplicationContext@e25951c: startup date ; root of context hierarchy
You can connect to database as shown below -
Read the full article
0 notes
Text
Spring Cloud Eureka and Hystrix Circuit Breaker using Microservices
In this tutorial, we will use a microservice application created in previous post ( Microservices Example using Spring Cloud Eureka ) and add circuit breaker pattern using Hystrix Spring library in java.
Using Hystrix in your application helps to add defensive mechanism and makes applications more resilient and fault tolerant.
Tools Required –
- Java 8
- IntelliJ IDE
We have created three different applications as below –
- Eureka Service– This Service will register every microservice and then the client microservice will look up the Eureka server to get a dependent microservice to get the job done.This Eureka Server is owned by Netflix and in this, Spring Cloud offers a declarative way to register and invoke services by using Java annotation.
- demo-server – This service will return a simple hello message.
- demo-client – It is similar to the standalone client service created in Bootiful Development with Spring Boot. It will consume the APIs provided by demo-server through Eureka Service .
Hystrix Documentation - https://github.com/Netflix/Hystrix/wiki
Microservices are deployed on Cloud . As cloud provides a distributed environment , there are more chances that some of your services may be down at some point of time. You can have several micro-services in your application which are dependent on each other. So one service can call to other service. If destination service is down then source will get an exception in normal scenario. But with the help of Hystrix annotations , you can add fallback mechanism and handle the exception in services. Thus it makes your service more fault tolerant, resilient .
You need to add below dependency in your demo-client service application to enable Hystrix circuit breaker pattern -
org.springframework.cloud
spring-cloud-starter-hystrix
1.2.5.RELEASE
We just have to add few annotations to handle fallback or break the service call in case your destination service(demo-server) is down. We need to change main class to enable Hystrix circuit breaker -
package com.myjavablog.democlient;
import org.springframework.boot.SpringApplication;
import org.springframework.boot.autoconfigure.SpringBootApplication;
import org.springframework.cloud.client.circuitbreaker.EnableCircuitBreaker;
import org.springframework.cloud.client.discovery.EnableDiscoveryClient;
import org.springframework.cloud.client.loadbalancer.LoadBalanced;
import org.springframework.cloud.netflix.hystrix.EnableHystrix;
import org.springframework.context.annotation.Bean;
import org.springframework.context.annotation.Configuration;
import org.springframework.web.client.RestTemplate;
@EnableCircuitBreaker
@EnableDiscoveryClient
@SpringBootApplication
public class DemoClientApplication {
public static void main(String args) {
SpringApplication.run(DemoClientApplication.class, args);
}
}
@Configuration
class Config{
@Bean
@LoadBalanced
public RestTemplate restTemplate(){
return new RestTemplate();
}
}
Also we need to change controller class to add fallback mehod as below -
package com.myjavablog.democlient;
import com.netflix.hystrix.contrib.javanica.annotation.HystrixCommand;
import org.springframework.beans.factory.annotation.Autowired;
import org.springframework.web.bind.annotation.GetMapping;
import org.springframework.web.bind.annotation.RequestMapping;
import org.springframework.web.bind.annotation.RestController;
import org.springframework.web.client.RestTemplate;
@RestController
@RequestMapping("/demo/hello/client")
public class TestController {
@Autowired
public RestTemplate restTemplate;
@GetMapping
@HystrixCommand(fallbackMethod = "handleFallback")
public String test(){
String url = "http://demo-server/demo/hello/server";
return restTemplate.getForObject(url, String.class);
}
public String handleFallback(){
return "Fallback hello service";
}
}
By default hystrix has timeout of 1 second for every request. So we need to disable timeout by setting below property in application.properties file -
hystrix.command.default.execution.timeout.enabled=false
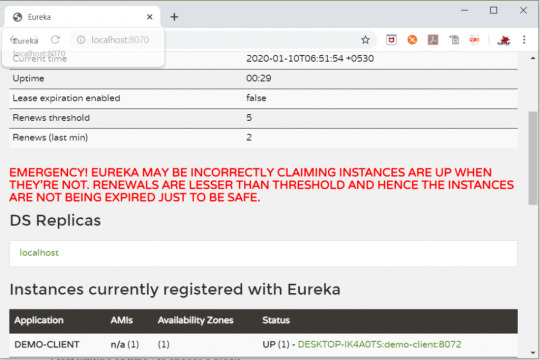
So now i am intentionally stopping demo-server microservice and then we will make call to api to see fallback is working properly .You can see demo-server is not registered with Eureka below -
So now when you call the service ,it should show you a fallback message as below -
Github Downlod Link:
Download
Read the full article
0 notes
Text
Spring Cloud Eureka and Hystrix Circuit Breaker using Microservices
In this tutorial, we will use a microservice application created in previous post ( Microservices Example using Spring Cloud Eureka ) and add circuit breaker pattern using Hystrix Spring library in java.
Using Hystrix in your application helps to add defensive mechanism and makes applications more resilient and fault tolerant.
Tools Required –
- Java 8
- IntelliJ IDE
We have created three different applications as below –
- Eureka Service– This Service will register every microservice and then the client microservice will look up the Eureka server to get a dependent microservice to get the job done.This Eureka Server is owned by Netflix and in this, Spring Cloud offers a declarative way to register and invoke services by using Java annotation.
- demo-server – This service will return a simple hello message.
- demo-client – It is similar to the standalone client service created in Bootiful Development with Spring Boot. It will consume the APIs provided by demo-server through Eureka Service .
Hystrix Documentation - https://github.com/Netflix/Hystrix/wiki
Microservices are deployed on Cloud . As cloud provides a distributed environment , there are more chances that some of your services may be down at some point of time. You can have several micro-services in your application which are dependent on each other. So one service can call to other service. If destination service is down then source will get an exception in normal scenario. But with the help of Hystrix annotations , you can add fallback mechanism and handle the exception in services. Thus it makes your service more fault tolerant, resilient .
You need to add below dependency in your demo-client service application to enable Hystrix circuit breaker pattern -
org.springframework.cloud
spring-cloud-starter-hystrix
1.2.5.RELEASE
We just have to add few annotations to handle fallback or break the service call in case your destination service(demo-server) is down. We need to change main class to enable Hystrix circuit breaker -
package com.myjavablog.democlient;
import org.springframework.boot.SpringApplication;
import org.springframework.boot.autoconfigure.SpringBootApplication;
import org.springframework.cloud.client.circuitbreaker.EnableCircuitBreaker;
import org.springframework.cloud.client.discovery.EnableDiscoveryClient;
import org.springframework.cloud.client.loadbalancer.LoadBalanced;
import org.springframework.cloud.netflix.hystrix.EnableHystrix;
import org.springframework.context.annotation.Bean;
import org.springframework.context.annotation.Configuration;
import org.springframework.web.client.RestTemplate;
@EnableCircuitBreaker
@EnableDiscoveryClient
@SpringBootApplication
public class DemoClientApplication {
public static void main(String args) {
SpringApplication.run(DemoClientApplication.class, args);
}
}
@Configuration
class Config{
@Bean
@LoadBalanced
public RestTemplate restTemplate(){
return new RestTemplate();
}
}
Also we need to change controller class to add fallback mehod as below -
package com.myjavablog.democlient;
import com.netflix.hystrix.contrib.javanica.annotation.HystrixCommand;
import org.springframework.beans.factory.annotation.Autowired;
import org.springframework.web.bind.annotation.GetMapping;
import org.springframework.web.bind.annotation.RequestMapping;
import org.springframework.web.bind.annotation.RestController;
import org.springframework.web.client.RestTemplate;
@RestController
@RequestMapping("/demo/hello/client")
public class TestController {
@Autowired
public RestTemplate restTemplate;
@GetMapping
@HystrixCommand(fallbackMethod = "handleFallback")
public String test(){
String url = "http://demo-server/demo/hello/server";
return restTemplate.getForObject(url, String.class);
}
public String handleFallback(){
return "Fallback hello service";
}
}
By default hystrix has timeout of 1 second for every request. So we need to disable timeout by setting below property in application.properties file -
hystrix.command.default.execution.timeout.enabled=false
So now i am intentionally stopping demo-server microservice and then we will make call to api to see fallback is working properly .You can see demo-server is not registered with Eureka below -
So now when you call the service ,it should show you a fallback message as below -

Github Downlod Link:
Download
Read the full article
0 notes
Text
Deploy a Spring Boot Java app to Kubernetes on GCP-Google Kubernetes Engine

Kubernetes is an open source project, which can run in many different environments, from laptops to high-availability multi-node clusters, from public clouds to on-premise deployments, and from virtual machine (VM) instances to bare metal.
You'll use GKE, a fully managed Kubernetes service on Google Cloud Platform, to allow you to focus more on experiencing Kubernetes, rather than setting up the underlying infrastructure.
In this post , i will show you the steps to deploy your simple react application to GCP app engine service .
Before going for actual deployment you should consider below pre-requisites -
GCP account – You need to create at least Free tier GCP account by providing your credit card details which will be valid for 3 months. You can create it using https://cloud.google.com/
Github project - Spring boot project on github (https://github.com/AnupBhagwat7/gcp-examples)
Below are the steps to deploy application to App Engine -
- Package a simple Java app as a Docker container.
- Create your Kubernetes cluster on GKE.
- Deploy your Java app to Kubernetes on GKE.
- Scale up your service and roll out an upgrade.
- Access Dashboard, a web-based Kubernetes user interface.
1. GCP Setup
Go to Google cloud console(https://console.cloud.google.com/) and click to open cloud shell -

Run the following command in Cloud Shell to confirm that you are authenticated:
gcloud auth list
This command will give you below output -
Credentialed Accounts
ACTIVE ACCOUNT
* @
To set the active account, run:
$ gcloud config set account `ACCOUNT`
Now run the below command to get the list of projects present under your GCP account -
gcloud config list project
If project is not set then you can do it by using below command -
gcloud config set project
2. Package your java application
Get the application source code from github -
git clone https://github.com/AnupBhagwat7/gcp-examples.git
cd gcp-demo-springboot-app
Now run the project in gcp cloud shell -
mvn -DskipTests spring-boot:run
once the application is started , you can click on web preview as shown below -

You will be able to see your application launched in browser as below -

3. Package the Java app as a Docker container
Next, you need to prepare your app to run on Kubernetes. The first step is to define the container and its contents.
You need to take below steps to package your application as a docker image -
Step 1: Create the JAR deployable for the app
mvn -DskipTests package
Step 2: Enable Container Registry to store the container image that you'll create
gcloud services enable containerregistry.googleapis.com
Step 3: Use Jib maven plugin to create the container image and push it to the Container Registry
mvn -DskipTests com.google.cloud.tools:jib-maven-plugin:build -Dimage=gcr.io/$GOOGLE_CLOUD_PROJECT/gcp-demo-springboot-app.jar
Step 4: If all goes well, then you should be able to see the container image listed in the console by navigating to CI/CD > Container Registry > Images. You now have a project-wide Docker image available, which Kubernetes can access and orchestrate as you'll see in next steps .

Step 5: You can locally test the image with the following command, which will run a Docker container as a daemon on port 8080 from your newly created container image:
docker run -ti --rm -p 8080:8080
gcr.io/$GOOGLE_CLOUD_PROJECT/gcp-demo-springboot-app.jar
Step 6: You can go to web preview feature of cloud shell to check if docker container is started successfully .You will see response in browser -

4. Deploy your application to Google Kubernetes
Step 1: Create a cluster
You're ready to create your GKE cluster. A cluster consists of a Kubernetes API server managed by Google and a set of worker nodes. The worker nodes are Compute Engine VMs.
First, make sure that the related API features are enabled
gcloud services enable compute.googleapis.com container.googleapis.com
Create a cluster named springboot-java-cluster with two n1-standard-1 nodes using below command -
gcloud container clusters create springboot-java-cluster
--num-nodes 2
--machine-type n1-standard-1
--zone us-central1-c
This will take few minutes to create a cluster. You can see all the clusters by navigating to Kubernetes Engine > Clusters

It's now time to deploy your containerized app to the Kubernetes cluster. You'll use the kubectl command line (already set up in your Cloud Shell environment).
The rest of the tutorial requires the Kubernetes client and server version to be 1.2 or higher. kubectl version will show you the current version of the command.
Step 2: Deploy app to Kubernetes cluster
A Kubernetes deployment can create, manage, and scale multiple instances of your app using the container image that you created. Deploy one instance of your app to Kubernetes using the kubectl run command.
kubectl create deployment springboot-java
--image=gcr.io/$GOOGLE_CLOUD_PROJECT/gcp-demo-springboot-app.jar
To view the deployment that you created, simply run the following command:
kubectl get deployments
To view the app instances created by the deployment, run the following command:
kubectl get pods
At this point, you should have your container running under the control of Kubernetes, but you still have to make it accessible to the outside world.
Step 3: Allow external traffic
By default, the Pod is only accessible by its internal IP within the cluster. In order to make the springboot-java container accessible from outside the Kubernetes virtual network, you have to expose the Pod as a Kubernetes service.
In Cloud Shell, you can expose the Pod to the public internet with the kubectl expose command combined with the --type=LoadBalancer flag. The flag is required for the creation of an externally accessible IP.
kubectl create service loadbalancer springboot-java --tcp=8080:8080
O/P: service/springboot-java created
The flag used in the command specifies that you'll be using the load balancer provided by the underlying infrastructure. Note that you directly expose the deployment, not the Pod. That will cause the resulting service to load balance traffic across all Pods managed by the deployment (in this case, only one Pod, but you'll add more replicas later).
The Kubernetes Master creates the load balancer and related Compute Engine forwarding rules, target pools, and firewall rules to make the service fully accessible from outside of Google Cloud.
To find the publicly accessible IP address of the service, simply request kubectl to list all the cluster services.
kubectl get services
O/p:
NAME TYPE CLUSTER-IP EXTERNAL-IP PORT(S) AGE
kubernetes ClusterIP 10.3.240.1 443/TCP 44m
springboot-java LoadBalancer 10.3.250.58 34.123.60.207 8080:32034/TCP 85s
Notice that there are two IP addresses listed for your service, both serving port 8080. One is the internal IP address that is only visible inside your Virtual Private Cloud. The other is the external load-balanced IP address. In the example, the external IP address is aaa.bbb.ccc.ddd. You should now be able to reach the service by pointing your browser to http://34.123.60.207:8080
Step 4: Scale your application
One of the powerful features offered by Kubernetes is how easy it is to scale your app. Suppose that you suddenly need more capacity for your app. You can simply tell the replication controller to manage a new number of replicas for your app instances.
kubectl scale deployment springboot-java --replicas=3
O/P: deployment.apps/springboot-java scaled
kubectl get deployment
NAME READY UP-TO-DATE AVAILABLE AGE
springboot-java 3/3 3 3 23m
Step 5: Roll out an upgrade to your service
At some point, the app that you deployed to production will require bug fixes or additional features. Kubernetes can help you deploy a new version to production without impacting your users.
You can launch editor in CLOUD Shell and update the controller to return a new value as shown below-

Use Jib maven plugin to build and push a new version of the container image.
mvn -DskipTests package
com.google.cloud.tools:jib-maven-plugin:build
-Dimage=gcr.io/$GOOGLE_CLOUD_PROJECT/springboot-java:v2
In order to change the image label for your running container, you need to edit the existing springboot-java deployment and change the image from gcr.io/PROJECT_ID/springboot-java:v1 to gcr.io/PROJECT_ID/springboot-java:v2.
You can use the kubectl set image command to ask Kubernetes to deploy the new version of your app across the entire cluster one instance at a time with rolling updates.
kubectl set image deployment/springboot-java
springboot-java=gcr.io/$GOOGLE_CLOUD_PROJECT/springboot-java:v2
Step 6: Rollback to previous version
Perhaps the new version contained an error and you need to quickly roll it back. With Kubernetes, you can roll it back to the previous state easily. Roll back the app by running the following command:
kubectl rollout undo deployment/springboot-java
This marks the end of this tutorial. Thanks for following.
Github link -
https://github.com/AnupBhagwat7/gcp-examples/tree/main/gcp-demo-springboot-app
Read the full article
0 notes
Text
Deploy Your React App On Google Cloud Platform's App Engine
In this post , i will show you the steps to deploy your simple react application to GCP app engine service .
Before going for actual deployment you should consider below pre-requisites -
GCP account – You need to create at least Free tier GCP account by providing your credit card details which will be valid for 3 months. You can create it using https://cloud.google.com/
Github project - Simple hello world react project on github (https://github.com/AnupBhagwat7/gcp-examples)
Below are the steps to deploy application to App Engine -
1. Create your app in the GCP
Go to Google cloud console(https://console.cloud.google.com/) and click on App Engine -
You need to create a new project to before you start using cloud as below -
Create new project
Once its created , you will see App Engine screen as below -
App engine dashboard
Now click on create application and select region from below screen -
region
Select Laguange as Nodejs and environment as standard-
2. Clone our app from our GitHub repository
Now you can clone the application from github using Cloud shell present at right top corner -
Open cloud shell
git clone https://github.com/AnupBhagwat7/gcp-examples.git
3. Build our app for deployment
Now navigate to your project -
cd
cd gcp-examples/gcp-demo-react-app/
Now you need to install the dependencies required and then build the project -
npm install
npm run build
These commands will create the build artifacts in build folder .
4. Add an app.yaml
Read the full article
0 notes
Text
Spring Cloud Eureka and Hystrix Circuit Breaker using Microservices
In this tutorial, we will use a microservice application created in previous post ( Microservices Example using Spring Cloud Eureka ) and add circuit breaker pattern using Hystrix Spring library in java.
Using Hystrix in your application helps to add defensive mechanism and makes applications more resilient and fault tolerant.
Tools Required –
Java 8IntelliJ IDE
We have created three different applications as below –
Eureka Service– This Service will register every microservice and then the client microservice will look up the Eureka server to get a dependent microservice to get the job done.This Eureka Server is owned by Netflix and in this, Spring Cloud offers a declarative way to register and invoke services by using Java annotation.demo-server – This service will return a simple hello message.demo-client – It is similar to the standalone client service created in Bootiful Development with Spring Boot. It will consume the APIs provided by demo-server through Eureka Service .
Hystrix Documentation - https://github.com/Netflix/Hystrix/wiki
Microservices are deployed on Cloud . As cloud provides a distributed environment , there are more chances that some of your services may be down at some point of time. You can have several micro-services in your application which are dependent on each other. So one service can call to other service. If destination service is down then source will get an exception in normal scenario.
Read the full article
0 notes
Text
Spring Boot profiles
In this article, we will see profiles for spring boot project -
Github Link -
Download
Every enterprise application has many environments, like:
Dev | Test | Stage | Prod | UAT / Pre-Prod
Each environment requires a setting that is specific to them. For example, in DEV, we do not need to constantly check database consistency. Whereas in TEST and STAGE, we need to. These environments host specific configurations called Profiles.
How do we Maintain Profiles?
In spring boot application, we need different configurations for different environments. We have application.properties file to maintain application specific properties. In order to create profiles for different environments , we need to create various properties files as below -
DEV - application-dev.properties
TEST- application-test.properties
PROD - application-prod.properties
Step 1: Create below project structure in IntelliJ
Step 2: We are creating 3 different property files for below mentioned environments -
DEV - application-dev.properties
TEST- application-test.properties
PROD - application-prod.properties
Of course, the application.properties will remain as a master properties file, but if we override any key in the profile-specific file, the latter will gain precedence.
Step 3: Specify in application.properties file which environment property needs to be loaded
spring.profiles.active=prod
spring.application.name=springbootprofiles
app.message
Read the full article
0 notes
Text
How to create database instance in Azure
Step 1: Azure Subscription
You would need to subscribe for azure portal in order to use azure services. Below is the link for azure portal –
https://portal.azure.com/
If you do not have an Azure account, provide your email or telephone number and it will verify that you are not in the system and will invite you to create an account. There is an option for a free trial account with $200 USD in credits for 30 days, so you can play with Azure resources without spending money during those 30 days.
Step 2: Create SQL Database
Once you are subscribed on azure , you can go to “SQL Databases” link and click "Create SQL Database". Once you click on "Create SQL Database" , you will see the form as below –
Step 3: Create Server
In order to create database instance ,you need to create server as highlighted below -
Step 4: Create Database Instance
After all the configuration is done , you can create database instance by clicking Review + Create button as shown below -
Now the database instance is up and running as shown below screen -
Step 5: Access Database
You can see database details once you open the resource as below -
You connect to database using visual studio to perform various operations -
You need to install below plugin in Visual Code Studio to connect to database.
Once the plugin is installed , you can connect to database by giving database details .
Read the full article
0 notes
Text
Microservices
This series of tutorial introduces you to the microservice architecture and why you should consider building your applications with them. We’re going to look at how to build microservices using Java and two Spring framework projects: Spring Boot and Spring Cloud.
If you’re a Java developer, Spring Boot and Spring Cloud will provide an easy migration path from building traditional monolithic Spring applications to microservice applications that can be deployed to the cloud.
Please find link for below topics on microservices -
http://www.myjavablog.com/2019/12/29/whats-a-microservice/
http://www.myjavablog.com/2020/01/01/benefits-of-microservices/
http://www.myjavablog.com/2019/12/29/microservices-example-using-spring-cloud-eureka/
http://www.myjavablog.com/2020/01/10/spring-cloud-eureka-and-hystrix-using-microservices/
Read the full article
0 notes
Text
Securing Angular 7 application with Spring Boot JWT Security
As we have secured our angular application using spring boot basic security. In this article , i will take you through all the steps to secure your angular application with spring boot JWT(JSON Web Token) security. Using Spring boot basic security , we can provide in token based authentication and authorization to our application.
We need to configure users and their roles in in separate configuration file. We are creating two projects here -
Spring boot JWT security application - This will handle the authentication and authorization for our UI application. UI for Todo manager in angular - This is the Todo manager application which will leverage the spring boot security feature.
In this part , we will be creating a spring boot application which provides JWT security. Its basically a RESTful webservice which has endpoints to access and modify Todos information. To access the Todo information through API , user needs to authenticate himself. Below configuration enables basic security.
SecurityConfig.java
package com.myjavablog.config;
import org.springframework.beans.factory.annotation.Autowired;
import org.springframework.context.annotation.Bean;
import org.springframework.context.annotation.Configuration;
import org.springframework.http.HttpMethod;
import org.springframework.security.authentication.AuthenticationManager;
import org.springframework.security.config.annotation.authentication.builders.
Read the full article
0 notes