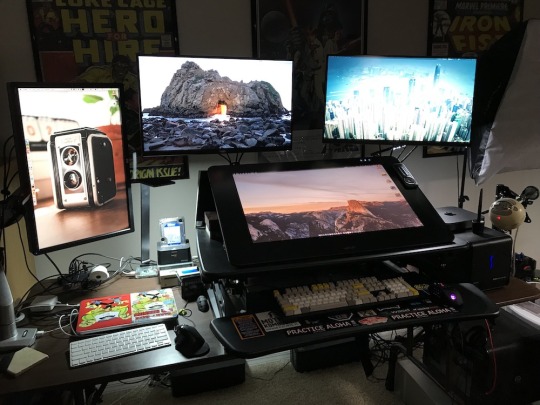
#ok so i used my pc to edit this instead of my macbook and i don't know how i feel
Photo


i may have gone slightly over board with this one but look how cute they are 😍😍😍
#wynonna earp#wynonnaedit#wayhaught#wayhaughtedit#nicole haught#waverly earp#mine#gifset#wynonnaearp*#1k#ok so i used my pc to edit this instead of my macbook and i don't know how i feel#about the quality but whatever i give up#also hows the coloring?
1K notes
·
View notes
Text
Mini Dv Import Software

mean1ng.netlify.app › Best Mini Dv Video Import Software For Mac ▆ ▆

Select the transfer method based on your camera and computer: Connect your Digital8™ or MiniDV camera to the computer using the Audio Video (A/V) cable. Follow the steps in the article How to Transfer the Video to a Computer using the A/V cables. The computer must have A/V input ports or a video capture device. NEW VERSION 1.2.3. NO LONGER DEVELOPED. WinDV is a small and easy to use Windows application for capturing videos from DV device (camcorder) into AVI-files and for recording AVI-files into DV device via FireWire (IEEE 1394) interface. In order to watch or transfer your tapes to your computer, Mini DV tapes require a player or a camcorder that is compatible to record or play MiniDV cassette tapes. This means that you will not be able to play MiniDV tapes on on your home VCR or computer without first digitizing them, or transferring the video off of the tape.
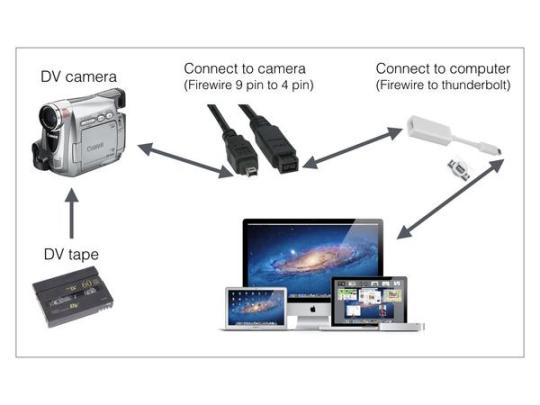
They’re not as popular anymore, but you still may own a camcorder that employs MiniDV tapes, DV, or HDV. These connect to a Mac through FireWire, but remember that fewer and fewer Mac models have FireWire connectors, so you may need an adapter.
Mini Dv Import Software Reviews
Apple sells a Thunderbolt–to–FireWire adapter. And if you happen to have an Apple Thunderbolt display, it has a FireWire port. For the moment, though, let’s assume that you have a Mac with FireWire and a FireWire–capable camcorder. Proceed with the following steps:
Nov 20, 2016 How to transfer Mini DV content and movies from a Panasonic PV-GS85 Mini DV camcorder to a MacBook PRO year 2010 using a firewire thunderbolt with a fire wire 800 to 400 adapter. Mar 06, 2015 Autoplay When autoplay is enabled, a suggested video will automatically play next. Up next Import Mini DV, HDV or DVCAM Tapes to an Apple Computer - Duration: 3:38.
LifeFlix is designed to have no learning curve and just import your MiniDV or HDV tapes to your computer. We believe you shouldn't have to learn about formats, compression, aspect ratios. Jul 08, 2018 I have a number of home movies that I filmed on a Sony Mini DV camera (DCR-TRV20). I would like to import them all to my HP Spectre running on Windows 10. However, Windows 10 does not recognize this device when connected by USB cable and I cannot locate any drivers online that may resolve this issue. Would appreciate your help. Thanks, Marc. May 07, 2015 The.best. method is to connect the camcorder's DV port to the computer's firewire port and import. The resulting imported video file should be in the decompressed DV. LifeFlix 2.5 review: Your old Mini-DV camcorder’s new best friend LifeFlix makes it easy to import Mini-DV tapes from your camcorder to QuickTime movies for digital archiving, or quickly create.
Connect one end of the FireWire cable to your camcorder and the other to an available FireWire port on the Mac.
Switch the camcorder to VTR (shorthand for video tape recorder)mode.
Camcorders vary; some devices call this Play or VCR mode.
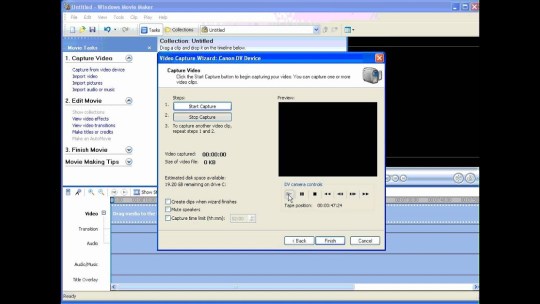
Click the Import button on the toolbar or choose File→Import Media.
Choose your camcorder by clicking its name in the Camera section of the iMovie Sidebar.
The import viewer shows the image from the current position of the tape in the camera.
Use the mouse or trackpad to position the pointer in the upper portion of the import window.
If you want to advance from one clip to the next, or go back to look a clip that comes before the one you’re viewing, click the Next button or the Previous button, respectively.
If you happen to be more than 5 seconds deep into a clip, clicking the Previous button takes you to the start of the clip that you’re currently in. To fast-forward or rewind rather than jump from one clip to another, position the pointer over the Next button or Previous button, and hold down the mouse or trackpad button.
Do one of the following and then click OK:
If you want to choose an existing event to import clips into, choose the event from the Import To pop-up menu at the top of the import event.
If you’d rather place the footage in a newly created event, choose New Event from the Import To menu and name the event.
When you’re at the point in the tape where you want your movie to begin importing, click Import.
iMovie imports from where you are to the end of the tape unless you click Stop Import or Close instead.
When you’re done importing, click Close to close the Import window.
Apr 21,2020 • Filed to: Video to Device • Proven solutions
A video file that is created through a digital video camera is known as a DV file. With limited compatibility and playback support converting these files to popular formats like MP4, MOV, and others become important. Using the good program, you can convert DV to MP4, MOV, and other formats in a hassle-free manner.
Part 1. Best Way to Convert DV to MP4 or Other Format
With Aimersoft Video Converter Ultimate all your video conversion tasks can be taken care in a hassle-free manner. The software supports over 500 formats for conversion in lossless quality. You can use it to convert DV to MP4, MOV, AVI, MKV, and many other formats without compromising on the quality. With advanced hardware acceleration, files are converted at a super fast (90X) faster speed. The videos to be converted can be added directly by connecting your camera to the PC. Video download, recording, editing, transfer, DVD burning are additional features.
Happily, there’s no need to learn – the simple drag-and-drop interface makes it possible to start editing videos on your MacBook or any other Apple computer right away. Free hd video editing software mac.
Aimersoft Video Converter Ultimate
Allows converting DV to MP4, MOV, AVI, MKV, and other formats easily.
DV to MP4 and other format conversion supported at super fast speed and with lossless quality.
The built-in editor allows trimming, cropping, cutting, and performing other functions before DV to MP4/MOV and other formats conversion.
Files to be converted can be added from a PC or directly from a DV device.
Download video from YouTube, Vimeo, Vevo, and other 1000 sites supported
Allows burning videos in an array of formats to a DVD disc.
Windows and Mac version of the software are available.
Guide to Convert DV to MP4/MOV and Other Formats using Aimersoft DV to MP4 Converter
01 Run Aimersoft Video Converter Ultimate and load DV videos
Install, download, and open the converter software on your PC. Connect the digital video camera having the files to be converted. At the Convert tab of the software interface, open the drop-down menu at +Add Files and select the device option. The interface will show the videos present on the connected camera. Choose the ones to be converted.
02 Choose the target format
Mini Dv Import Software Online
Best Mini Dv Video Import Software For Mac Download
At the top-right corner, click on the drop-down icon at Convert all files to: option and the list of supported Video, Audio, and Device format appears. Choose MP4, MOV, AVI, or any other desired format and the resolution from the Video list.
03 Convert DV to MP4 format
Click on the Convert All button to start converting DV to MP4 or other selected format. At the Output tab, the computer location where processed files will be saved has to be selected.
An online tool can also be used for converting DV to other video formats in a simple manner. One such program is FreeFileConvert that is free to use and need no installation or registration. Using the tool, your DV files on computer, URL or cloud storage can be added to the interface for the process. Maximum 5 files having a combined size of 300MB is supported for conversion at a time at FreeFileConvert. All popular video, audio, archive, and other file types are supported by the tool. The files once converted can be downloaded to your PC. See the steps below:
Mini Dv Import Software Windows 7
Step 1: On your PC browser, open https://www.freefileconvert.com/dv-mp4. Click on the Choose File button to browse and load DV videos.
Step 2: At the Output format section, choose the desired target format from the supported list.
Step 3: Click on the Convert button to start uploading and converting added DV videos to the desired output format.
Upon process completion, the files can be downloaded to your PC. There is also an option to get the converted file on your email id.
An online converter is a simple and free tool but have a number of disadvantages associated. Some of the major ones are as follows:
Pros:
Import Dv Video From Camcorder
Limitation to the file size and number of files that can be processed at a time
The converted file needs to be downloaded
The site comes with ad
The software is dependent on internet connectivity and speed
No additional features or options for file editing
Although MiniDV gains popularity in personal and semi-professional video recording, there are still some users want to convert MiniDV to DVD due to the following respects:
It uses tape recording as a carrier, which greatly limits the way to store media files.
MiniDV must be played on VCR or camcorder (Mini DV player), but DVD can be accessed on TV, DVD player or other potable devices.
Copy Mini DV/ DV to DVD can protect the footage from degradation.
As a result, you may ask how to convert Mini DV to DVD without losing quality. The whole process is a bit complicated for ordinary users. You should convert Mini DV to digital via computer and a piece of video editing software, and then burn it to DVD. Please read our steps-by-steps guide, you will find things become easy.
>> What Should Prepare Before Converting Mini DV to DVD
>>How to Convert MiniDV to DVD on Mac and Windows?
>>How to Copy Mini DV/ DV Tapes to DVD?
>> Best Format for Backing up Mini DV Tapes
What Should Prepare Before Converting Mini DV to DVD
An AV connecting cable or a FireWire (IEEE1394) cable, the terminals required on the computer respectively are USB terminal and FireWire terminal. You can import video recorded on a Memory Stick via USB cable without a dedicated driver.
Install a program for capturing MiniDV videos, like iMovie, Tape transfer services, LifeFlix, Final Cut Pro X, VideoStudio, Adobe Premier Pro, Windows Movie Maker (not available on Windows 7, you can free download it from Windows Live Essentials.), Premiere, etc.
Save the file as MPEG-2 or AVI format. When editing is finished, you will probably render the audio/video stream to convert it to the best format.
A Blank and writable DVD disc.
Authorize and convert MiniDV to DVD using DVD burning software, like Cisdem DVD Burner and ImgBurn. If you have a DVD recorder, then you are able to record files from camera via FireWire direct to DVD.
How to Convert MiniDV to DVD on Mac and Windows?
There are two parts for converting MiniDV to DVD on Mac and Windows.
Firstly, you should convert Mini DV to digital format (e.g. AVI or MPEG-2) on computer. Transferring cable and video capture program is necessary. For detailed steps, you can refer to the page: https://www.sony-mea.com/en/electronics/support/articles/00028223. It provides links in a variety of ways
Secondly, you can burn DV camcorder video to DVD with the authoring software. Now, let's focus on how to burn Mini DV to DVD on computer devices.
1. Convert MiniDV to DVD Mac
Cisdem DVD Burner for Mac is one such program designed specifically to assist you to do the digital video (DV, DIV) burning with ease. In addition to converting Mini DV to DVD on Mac, it allows you to burn most popular video formats to DVD in super quality. That the embedded editing features, different styles of menu templates and precise parameter settings will prompt you to complete a satisfactory, perfect DVD from MiniDV.
Best MiniDV to DV Converter for Mac
Burn standard/ HD video, background music, subtitle to any type of DVD
Foolproof drag workflow to create DVD from a variety of file formats
Edit MiniDV video by cropping, rotating and adding subtitles & effects
Offer stylish menu templates, like Holiday, Business, Cartoon, Classic, etc.
Customize menu with rich parameters, such as title, background image, etc.
Adjust MiniDV video aspect ratio to fit the player screen
Free Download
Step 1Add Captured MiniDV/ DV Videos to the Software
Launch Cisdem DV/ MiniDV to DVD converter on Mac after installation.
You can simply drag and drop the AVI or MPEG-2 videos to the gray box on the right, and the loaded video thumbnails will be displayed automatically.
Alternatively, you can click the 'Folder' or 'Media Manager' icon to add target videos.
If needed, use the built-in editor to personalize your MiniDV videos to make them appealing. All you should do is to double click the thumbnail and go to the video editor window. You can change the video size, adjust effects, enable rotation, etc. in the way you favor.
Click the 'Menu' tab to see the list of current DVD menu templates and elements. Choose and apply one for better out looking. For further customization, you can change text, add background music, picture and more.
Preview your videos > insert a blank DVD > ensure the output parameters are well set > click 'burn' icon to convert Mini DV to DVD on Mac. Once complete, you can watch videos on many other devices without MiniDV players.
2. Convert MiniDV to DVD Windows
ImgBurn is a free and flexible CD/DVD/HD-DVD/Blu-ray burning program for Windows. It's capable of writing images to DVD, creating ISO images, burning batch of video files including MiniDV to DVD, and creating DVD/ Blu-ray discs from VIDEO_TS/BDAV/BDMV folders.
Meanwhile, this MiniDV to DVD converter can verify and discover disc for checking its situation and burning quality. In short, 5 main features: Read, Build, Write, Verify, and Discovery. But the defect is that ImgBurn Mini DV to DVD converter comes without customization function.
Step 1. Install ImgBurn on your PC, and open it.
Step 2. Click 'Write files/ folders to disc' option on the main interface.
Step 3. Convert transferred MiniDV files which are in AVI or MPEG-2 format to ImgBurn DVD format, as the software can only burn ready DVD format.
Step 4. Click the 'Browser for a folder' to open converted MiniDV video files
Step 5. Set the max 'Write Speed' low under 'Device' > make sure 'File System' is set to 'ISO9660 + UDF'.
Step 6. Insert a blank DVD into the drive of your PC.
Step 7. Click the 'Burn' icon to convert Mini DV to DVD on Windows.
If you haven't an encoder tool installed, converting AVI or MPEG-2 to DVD format will be troublesome. At the moment, I will recommend DVDFlick (free), 1Click DV to DVD, AVStoDVD to burn MiniDV to DVD.
How to Copy Mini DV/ DV Tapes to DVD?
Copying DV to DVD with DVD recorder is also a viable approach. A DVD recorder can copy any personal video made from camcorder, but it's unable to copy commercial videos due to copy-protection and the price of each DVD recorder is expensive. So if you don't need to copy DV to DVD very often, the first method is more economical.
Step 1. Plug the camcorder into DVD recorder via FireWire (best choice), HDMI (best choice), S-Video (better), or RCA Audio-Video (good).
Step 2. Choose the Input on the DVD recorder that the camcorder is connected.
Step 3. Place the MiniDV tape that you want to copy in the Camcorder, and also insert a recordable DVD into your recorder.
Step 4. Press play on the camcorder, and press record on the DVD recorder. It will start to copy MiniDV tape to DVD.
Step 5. When the copy process is finished, press stop on both devices.
Best Format for Backing up Mini DV Tapes
MiniDV produces a maximum file frame size of 720x480, and DVD is also 720x480. Obviously, therefore, the best resolution for transferring Mini DV to DVD is 720x480. As for the best format, MPEG- 4 or DV-AVI can maintain the high quality, and MPEG-2 is a digital video standard on which DVD is based. Look at the compare table below:
FormatProsConsRecommendAVI
Superb video quality
Can record back to DV tape
Large file size
MPEG-1
Original standard video format to make DVD
Lower video quality
Some DVD players don't support VCD playback
/MPEG-2
Good Quality
Can burn onto DVD disc
Large file size
MPEG-4
Superb video quality
Can burn onto DVD disc
Larger file size
Can have a tryDivX
Good Quality
Small size
Not a standard video format
Can't produce video to DVD
/XviD
Good Quality
Small size
Slightly harder to configure than DivX
/
Conclusion
There you have it, two ways to convert MiniDV to DVD on Mac and Windows. You might wonder which one suits you the best. Admittedly, using DVD recorder to copy DV to DVD can save your time, since it's easy to operate. But considering the money, it also cost much. As for the first way, the steps are a bit too much, thus you need spend more time preparing and finishing for it. Every coin has two sides, so does converting Mini DV to DVD. Just weight the pro and cons, and choose the best executable solution for yourself.
0 notes
Text
Excel Manual Calculation Key Macminerenew

F1 | F2 | F3 | F4 | F5 | F6 | F7 | F8 | F9 | F10 | F11 | F12
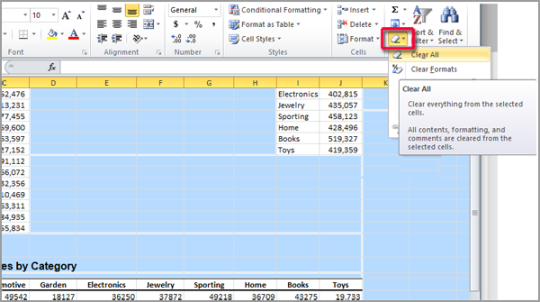
Then, in the Calculation section of the Formulas tab, click the “Calculation Options” button and select “Manual” from the drop-down menu. Once you’ve turned on manual calculation, you can click “Calculate Sheet” in the Calculation section of the Formulas tab, or press Shift+F9, to manually recalculate the active worksheet.
Calculations: key figure calculations based measure marked in result area RA ADD Dynamic Calculation: new measure with new single values; ADD Calculation: new measure based on simple calculation between two marked key figures in result area; ADD Advanced Calculation: new measure based on calculations between available key figures in the query.
With the manual calculation mode, you need to recalculate the formula cells to get the updated result when changing reference cell values. In this article, we will show you how to recalculate or refresh only the selected cells in Excel. Only recalculate or refresh selected cells with shortcut key.
Function keys allow you to do things with your keyboard instead of your mouse to increase your speed.
Nov 03, 2005 When planning Excel 12, we started a small investigation to look at different ways we could make Excel calculate faster on computers that had multi-processor or dual-core chips. The investigation turned out to be promising, so we continued the work, and the result is a very exciting feature that we refer to as multi-threaded calculation, or MTC.
F1
Opens Excel Help.
Apple may provide or recommend responses as a possible solution based on the information provided; every potential issue may involve several factors not detailed in the conversations captured in an electronic forum and Apple can therefore provide no guarantee as to the efficacy of any proposed solutions on the community forums. When the Mac is hot, it is uncomfortable to put the Mac on my lap, since it is so hot. Your MacBook Airis a notebook, not a laptop When you’re using your MacBook or charging the battery, it's normal for the bottom of the case to get warm. For prolonged use, place your Macbook on a flat, stable surface. Mac is bad hotlinemac is bad credit. Bad news, everyone. Macs sometimes have bugs. Time to ditch your Mac and, uh well, the next step isn’t so clear. Writing for the Forbes contributor network and set of the gameshow “What’s. I grew up on Apple IIs, back in the days when you had to add an 80-column card to ’em! I was one of the few holdouts using an Apple IIgs when the rest of the world had gone to DOS and Windows PCs.
Excel Manual Calculation Key Macminerenew Pdf
F2
Moves the insertion point to the end of the contents of the active cell. For example, select cell B6 below and press F2.
Note: turn off Allow editing directly in cells (File, Options, Advanced, Editing Options) and pressing F2 will move the insertion point to the formula bar.
F3
Displays the Paste Name dialog box. For example, select cell E2 below, type =SUM(, press F3 and select a name.
Note: of course, first create at least one named range.
F4
Cycles through all 4 types of cell references (absolute, mixed reference (2x) and relative). For example, select cell B5 below, click in the formula bar, move the insertion point in or to the right of G2, and press F4.
Note: if you are not editing a cell, F4 repeats the last action, if possible.
F5
Best vm for macos. Displays the Go To dialog box. For example, to select cell C15, in the Reference box, type C15, and click OK.
Download ARF Player from WebEx: The WebEx network recording player is available for both Windows and Mac and it is free of cost provided by WebEx. When the First time you download your recording from WebEx it will ask you download the WebEx player to play. Download the file and convert it to.WMV and edit like any video. Get the Webex Player and Recording Editor There are two types of Webex recording files —.ARF and.WRF. Webex arf player download for mac.
Note: you can also select named ranges, or click Special to quickly select all cells with formulas, comments, conditional formatting, constants, data validation, etc.
F6
Moves to the next pane in a worksheet that has been split.
Excel Manual Calculation Key Macminerenew Problems
F7
Displays the Spelling dialog box (the same as clicking Spelling on the Review tab).
F8
Turns on/off Extend mode. If Extend mode is turned on, select cell A1 and press → and ↓ a few times.
Note: if Extend mode is turned off, hold down SHIFT and press → and ↓ a few times.
F9
Calculates the workbook. By default, any time you change a value, Excel automatically calculates the workbook. Turn on Manual calculation (on the Formulas tab, in the Calculation group, click Calculations Options, Manual) and change the value in cell A1 from 5 to 6.
Press F9.
Note: if you are editing a cell, F9 replaces a formula with its own result.
F10
Shows the key tips (the same as pressing ALT). Key Tips allow you to quickly perform any task available on the Ribbon without using the mouse.
F11
Creates a chart sheet of a selected range.
F12
Brings up the Save As dialog box.
Excel Manual Calculation
Note: to change the default file location, on the File tab, click Options, Save.
0 notes
Text
Download Mac Os X Mountain Lion Iso File
Mac Os X Mountain Lion Iso File Free Download
Os X Mountain Lion 10.8.4
Mac Os X Lion Iso
Download Mac OS X 10.4 - 10.15 Original - All Versions. If you want any Mac OS then link is avaiable in this article. ISO and DMG File of Mac OS X. Download file - MacOS X 10.8.5 Mountain Lion.iso. Some our other sites that you can take much advantage from: MacDownload.ORG: Download Mac Software, App & Games Full version.; AdobeDownload.ORG: Download Premium assets: Photoshop actions, Lightroom Presets, After Effects Templates, Premier Pro Transitions. LUTs, Sound Effects, and many Tutorial Courses. Nov 29, 2017 The following method allows you to download Mac OS X Lion, Mountain Lion, and Mavericks. Start your Mac holding down Command + R. Prepare a clean external drive (at least 10 GB of storage). Within OS X Utilities, choose Reinstall OS X. Select external drive as a source. Enter your Apple ID.
Get the latest 10.8.5 OS X Mountain Lion the newest version of the world’s most advanced desktop operating system. It has over 200 new features that update the Mac and make it the best computer there is. Use the new Messaging app to write and send photos, videos, contacts, links and documents to anyone using another Mac, iPhone, iPad or iPod touch.
Install OS X Mountain Lion On Any Computer Including AMD CPUs. For detail Installation Guide and Instruction read: Install Hackintosh Mountain Lion on PC/Laptop. Hackintosh Mountain Lion supports AMD and Intel Atom Hackintosh Mountain Lion is distributed as an ISO file Hackintosh Mountain Lion works with regular DVDs There are two versions. Mac OS X ISO DVD is very safe download if you have any question on this software please contact THE TECH SHOP 715-446-4333 or [email protected]. Feb 18, 2019 Mountain Lion Iso Download; OS X Mountain Lion for Mac, free and safe download. OS X Mountain Lion latest version: Download Mountain Lion for Mac. OS X 10.8 Mountain Lion is Apple's latest operating system for Mac. May 23, 2013 Watch video How to Install OS X Mountain Lion 10.8.2 on Virtual Box with Niresh & Full Screen Resolutions.
OS X Mountain Lion 10 DMG enables you to start a conversation on one device and continue on another. Send to all files, web pages, photos, videos and tweets with the new Share button, directly from the app you are using. Create to-do lists and alerts that will appear in the new Notification Center, with the Reminder app. Take notes of all your ideas with Notes, and write aloud with the Dictation feature.
Download OS X Mountain Lion Mac and enjoy the most useful operating system for mac users. And if you want to have fun, challenge friends who have a Mac or an iOS device in fantastic games on the Mac with Game Center. And in addition iCloud is standard: so keep up to date on all your mail devices, contacts, calendars, reminders, notes, to-do lists, music, photos, iWork documents, PDF and much more is really easy.
OS X Mountain Lion 10 DMG Features:
Messages
• Send messages from your Mac to anyone with an iPhone, iPad or another Mac.
• With iMessage you can start a conversation on your Mac and continue it on your iPhone or iPad.
• Messages also supports traditional instant messaging services such as AIM, Yahoo! Google Talk and Jabber.
iCloud
• Documents in the cloud lets you create and edit documents on your Mac, iPhone and iPad.
• The new Reminder app simplifies task management. Pin up your ideas with the new Note app. And with iCloud, keep your reminders and notes up-to-date on all your devices.
Safari
• Use the new smart search field to write addresses and search the web.
• Pinch to view panels with the panel view and scroll to switch between them.
• With iCloud panels, the last websites you’ve visited are accessible from your iPhone, iPad and Mac. *
Daily DealsPatch Timeline (PDT)3.12 (Heist) Launches (PC):3.12 (Heist) Launches (Console): Stash Tab Sale Dates (PDT):Last sale: September 25th - 28thNext sale: October 16th - 19thStash tab sales usually occur every 3 weeks. I play PoE on my Macbook Pro whenever im away from home or on vacation. Rules.Community Communication.Trial/Completion Sharing: /global 820.Service/Challenge/Harvest Craft Trading: /trade 820 or.Sulphite Rotations: /global 840 or.Challenge Completion Trading: /trade 4040.Map Swapping: /trade 159.In-Game Chat: /global 5055.Questions/Help: /global 411.SSF Chat: /global 773Useful Links.Related Communities.and.and.and.Looking for Group?.Flair Filters. Path of exile pc download.
Notification center
• New notifications appear in the upper right corner of your screen.
• Open Notification Center from anywhere in OS X to see the latest notifications.
• Configure your notifications to receive only the ones you want.
But before we proceed to possible solutions, allow us to share with you some causes why your Mac always restarts on sleep mode. A number of solutions have been suggested already. Again, it’s not a ghost. Why Macs or Mac Minis Always Restart on Sleep ModeIf you have discovered that your Mac suddenly woke up from sleep mode even without interaction, just relax. Download stops from mac going to sleep mode. We’ll discuss more of them below.
Sharing
• Share links, photos, videos and other files directly from the app you are using.
• Share with Mail, Messages and AirDrop.
• Log in to Twitter, Flickr and Vimeo once, and then start sharing.
• Tweet directly from your apps.
Game Center
• Play live multiplayer and turn-based matches against your friends on iPhone, iPad, iPod touch or Mac.
• Log in to the Game Center app to see friends on your gaming network.
• Check the rankings and results.
• See what your friends are playing and keep track of your progress.
Key features of Mountain Lion DMG:
Dictation allows you to speak instead of writing: there is no need for training or configuration.
AirPlay Mirroring shows the screen of your Mac on an HD TV via Apple TV.
Power Nap keeps your Mac up to date while you’re sleeping, so it’s ready to go.
With Gatekeeper downloading apps from the internet is safer because it allows you to control which apps can be installed on your Mac.
What’s new in Mac OS X Mountain Lion 10.8.5 ?
The 10.8.5 update improves the stability, compatibility and security of your Mac. This update:
• Resolves an issue that may prevent Mail from viewing messages.
• Improves file transfer performance over AFP over 802.11ac Wi-Fi.
• Resolves an issue that may prevent the screen saver from starting automatically.
• Improves Xsan reliability
System requirements:
Manufacturer :Apple IncLanguage :Multi-languagesMac Platform :IntelOS Version :macOS X 10.8.5CPU Type:86-Bit & 64-bitSize : 4.2 GB
(indeed-social-locker sm_list=’fb,tw,li,go1,pt,vk,ok’ sm_template=’ism_template_1′ sm_list_align=’horizontal’ sm_display_counts=’false’ sm_display_full_name=’true’ unlock_type=1 locker_template=2 sm_d_text='<h2>This content is locked</h2><p>Share This Page To Unlock Download Links.</p>’ ism_overlock=’default’ )
(/indeed-social-locker)
The fourteenth significant arrival of macOS and Apple Inc’s is the macOS High Sierra which has a variant 10.13. The framework was working for Macintosh PCs by the work area. macOS Sierra was declared at a mega event named WWDC which was scheduled on June 5, 2017. On 25, 2017 the preceding being discharged, and on September 24, 2018, its successor macOS Mojave was discharged.
The name “High Sierra” officially comes from the area of high Sierra which is located in California. Other software versions of macOS like Snow Leopard, El Capitan, and Mountain Lion are also from California. These names are additionally equivalent to its status as a revision of its introduction. The software is completely focused on bringing up enhancements through introducing updates instead of focusing on only the client spotlight. Photos and safari are remarkable changes among all the applications.
Tutorials: How to Clean Install Mac OS using a USB drive on Mac
License
Official Installer
File Size
5.0GB / 4.85GB
Language
English
Developer
Apple Inc.
Download: Mac OS Sierra 10.12 ISO and DMG Image
Mac OS High Sierra 10.13 ISO or DMG
Download only the stub installer means web installer is the main reason that only users may be downloading from the app store. The stub installer is mainly little in size. After running the stub installer, the real operating system will begin being introduced.
This article is focused more on the process part of downloading macOS High Sierra 10 on ISO River platform. With the article, the users can easily understand the bootable USB process to install macOS High Sierra 10.13 full installer. Moreover, this is encouraging a new introduction and an updated side of the macOS software.
Apple security updates: it does not untapped, examine affirm security issues until an examination has stopped only for the client insurance where fixes or discharges are accessible. Apple security discharge page can record the discharge pieces of evidence. Its users may know the more data they must have to see the Apple product’s security page. Users can interchange with Apple utilizing the Apple product security PGP key.
About Macintosh OS Server 1.0
Macintosh OS Server 1.0- 1.2v3 based on Rhapsody which is half and half of OPENSTEP from NeXT Computer and Mac OS 8.5.1. The GUI looks like the blend of MAC OS 8’s Platinum appearance with OPENSTEP’s NeXT based interface. This Blue box is for running inheritance MAC OS based applications which have a different window. There was a discussion of the ‘straightforward blue box’. MAC OS X Server 1.0- 1.2v3 are Incorporated with the following:
Apple File Service.
Macintosh Manager.
Quick Time Streaming Server.
Web objects.
NeetBoot.
To use these servers it cannot be used up the FireWire gadgets. To copy a quote or image for video copy is very easy from one device to another device operating system. Users must be copied and pasted between the devices with a universal clipboard. Users must access their file on the Mac from the iPhone with iCloud Desktop and documents. Users must save all the files on the desktop or share them on iCloud. Users may keep the same file on their desktop also and documents folder on another Mac. Users may easily optimize their Mac by optimizing, storing, and freeing up space.
Users may rediscover the meaning of full moments of the photos in their gallery. They also enjoy memorable moments. Users may display their images using face recognition technology for the same group photo slideshow together. Users may search their photo with the keyboard like a beach dog or concert. For this user may thank for the smart search. Users may enjoy the convenience and security of the Apple pay when the user may focus on the Apple store and they may use Apple pay easily.
Productive Features of macOS High Sierra 10.13
These are some of the new features and enhancements that can be seen in macOS High Sierra 10.13:
High-Efficiency Video Coding(HEVC)
Since the introduction of iOS 11, iPads and iPhones have started saving their pictures in the HEVC mode. The same model has now been added to macOS High Sierra. Thus, users can now send their photos in HEVC mode to their Mac without converting them. HEVC also does a great job of maintaining excellent picture quality.
Apple File System(APFS)
The new file system, APFS, is a fine improvement over the Hierarchical File System(HFS) Plus that was used before. By the new cloning mechanism that is available under APFS, macOS can now make copies of files on the same volume without utilizing any extra space. Snapshots can also be made now. An excellent security feature in the form of full-disk encryption has been introduced with a variety of options including single key-encryption and multi-key encryption.
The capacity for storing files has increased greatly. Checksums are used to ensure the integrity of the files’ metadata. Copying large files has been made much easier under APFS.
General features of the macOS Sierra
Siri system must be added to macOS.
Unlocking must be watched by auto unlocking Apple.
Apple pays the web must be paid by Apple pay.
iCloud improvement must be used by the New Storage Optimization.
Apple Music app overview
F. From one Apple device copy the content including text, image, photos, and videos, and paste the same to another device.
Sierra- iCloud space expanded from 20GB to 150 GB, so image to image capabilities and multi Windows capabilities are shown.
h.one must have to enjoy the favorite and forgotten favorite picture from the photo gallery.
Apple pay must be used for the security payment when shopping in Safari on the user’s macOS High Sierra.
Apple security archives the vulnerability by CVE- IR when it is conceivable.
System Requirements of MacOS High Sierra 10.13 ISO/DMG File
To get macOS High Sierra 10.13 ISO in your operating system the user needs to have the below requirements which are needed to install the software.
Yahoo messenger download for pc. Download vpn master for pc full version for free. Internet & Network tools downloads - VPN Unlimited by KeepSolid Inc. And many more programs are available for instant and free download. Now you can download and install this app 21VPN for PC on your Mac, Windows 7-8-10, and Computers. From this app, you can get many features like fast Speed, secure VPN, location spoofer and much more. VPN server software enables this bridge easily, allowing you to join the private networks (from any place in the world) like as if you are actually at local PC on that particular network. This way, you will have easy access to the shared folders & several handy stuff- in fact.
macOS High Sierra 10.13 ISO must be run on this PC.
MacBook: It must be late 2008 or fresher.
MacBook Air: It must be also late 2008 or freshers
MacBook Pro: It must be mid-2007 or freshers
Macintosh Mini: It must be of 2009 or freshers
iMac: It should be 2007 or freshers.
Macintosh Pro: It should be early 2008 or the fresher
Xserve: It should be in early 2009.
Pcs are mostly accompanying models which were decorated with the 1 GB RAM. This is the standard choice on the base model when they were delivered at the initial stage. macOS High Sierra 10.13 ISO can run possibly by them. As they possess only 2GB of RAM.
iMac: It should be 2007 or freshers.
iMac: It should be of early 2008.
Macintosh Mini: It should be of Early 2009.
There may be an Airdrop between the Mac PCs and iOS gadget’s new manual API.
iMac: Which is mainly late 2012 or more up to date.
MacBook: It should be of early 2015 or more up to date.
MacBook Air: It should be mid-2012 or more up to date.
MacBook Pro: It should be mid-2012 or more up to date.
Macintosh Mini: It should be of late 2012 or more up to date.
Macintosh Pro: Should be of late 2013.
More about macOS High Sierra 10.13 ISO
Mac Os X Mountain Lion Iso File Free Download
MacOS 10.13 is renowned as the High Sierra operating system whose main focus on the continuity, iCloud, and operating system experience. The operating system X extension will be removed from Apple. Apple converts it to Mac OS. It is because of the nominal similarity to iOS, tvOS, and watchOS. Siri has been merged with the opening system and users must use it in their Macs. The ability to display image to image is another new feature of Mac OS Sierra. Besides these multi Windows capabilities Which look the same the iPad Pro and Mac computers.
An auto-lock is another character of this operating system with the unlock option. This unlock option is password depending if the user has their Apple Watch in hand. The name Sierra comes from one of the world’s largest mountain ranges in Spain. The principle of continuity between the internal components of the operating system and its compatibility with iOS is used in Apple in case of making the new version of macOS. Improving the iCloud system is another good character of the Mac OS High Sierra on Virtualbox.
Apple can support the 10 billion files on the user’s iCloud driver. The desktop experience of the iCloud files on the iPhone, iPad, Mac, and Mac book will be of the same type. The new Mac operating system is able to automatically transfer the older files to iCloud so that it is unable to take up any extra space on the user’s Macbook or Mac.
Need for Speed Most Wanted by Electronic Arts is a very popular car racing game, but, unfortunately, the developer hasn't released Need for Speed Most Wanted for Mac. However, with the help of this list of alternatives, you can find many games with similar gameplay and graphics. Gameplay Need for Speed Most Wanted Mac. But first, let’s describe the game we cracked and unlocked for you today. Need for Speed Most Wanted is re-freshed version of the most popular racing title ever created by Electronic Arts. Need for Speed Most wanted combines the tuner customization of Need for Speed Underground with an expanded take on the police chases of the Need for Speed: Hot Pursuit series. In Need for Speed Most Wanted, users will also be able to go head-to-head with their opponents while simultaneously trying to avoid more than six different police cars at. Need for speed most wanted 2 download mac.
The Siri feature is a great feature of this system among many. Siri’s system is constructed with the new features specially designed for the desktop only. Their message and music system are more enjoyable and handful. Users may enjoy their favorite features of iOS as well as be optimized for Mac. Sending messages, creating a reminder, searching the Web and many other processes are so easy for handling. Viewing of files, settings, and system information is only possible by the Siri system.
If the download of user’s software fails
Os X Mountain Lion 10.8.4
The macOS was released to positive reviews on its release. Many of the new small updates and features received a big thumbs up from the public as well as critics. The new file system that was introduced was offered a much more stable and effective OS. Users who enjoy using the Photos feature are in for a treat as there are new editing features that have been added that are incredibly exciting to try out. The introduction of Safari was seen as a big plus by users who loved the attention paid by the new browser to their privacy.
There were many security issues that arose with High Sierra that was a cause of concern. Users who expected this new version to be more focused on gaming and other entertainment features were disappointed as they did not get what they were looking forward to. In spite of these slight setbacks, mac OS High Sierra was an excellent attempt that helped lay the groundwork for the future of Apple’s products.
To better explain, the article is provided by macOS High Sierra 10.13.6 download DMG. Besides that the macOS High Sierra comes up with advanced software named macOS High Sierra ISO for VMware & VirtualBox. There is no other reason as macOS High Sierra DMG is most loved and highly recommended by the users.
Reviews from the users
During this period new macOS were also introduced but people didn’t stop selecting High Sierra as it was the best software macOS ever had. macOS High Sierra was a tremendous hit even after macOS Catalina was launched during the days. In 2020, macOS High Sierra is available on both Mac computers and Windows computers. Both the segment users can get the benefit of using the same software. After macOS High Sierra macOS Mojave was introduced but it wasn’t as popular as High Sierra.
According to folks, macOS High Sierra does have better performance than traditional macOS versions. Apple is consistently showing its creativity and raising its standards by introducing new computers and laptop devices. In every update, they have been impressively consistent enough in showing innovations with new features and functional settings, formats, and more. The users can easily use, download, and install on new Macs and get the benefits of the updates. Through macOS, the users can really learn about other applications’ performances and stability.
Mac Os X Lion Iso
Mac OS High Sierra 10.13 ISO & DMG file Download for free - ISORIVER
The fourteenth significant arrival of macOS and Apple Inc's is the macOS High Sierra which has a variant 10.13. The framework was working for Macintosh PCs by
Price Currency: USD
Operating System: Mac OS High Sierra 10.13
Application Category: OS
0 notes
Text
Mac Os X Iso Download 64 Bit For Virtualbox

Mac Os High Sierra Iso For Virtualbox
How To Install Mac Os On Virtualbox
Mac Os Iso For Vmware
Mac Os Vm Iso
Mac Os X Download Iso
Mac Os 64 Bit Download
If you have 64 bit Operating system then you can download Virtualbox 6.0. 1) Just again visit this Link 2) Now under Virtualbox 6.0.0 click on your OS. 3) Now the download will start automatically, it will 200mb in size. The 'System Type' of your copy of Windows needs to be 64-bit, because OS X Mountain Lion is a 64-bit operating system. If you have a 32-bit copy of Windows, you can only install Mac OS X Snow Leopard on Virtualbox.
Downloading process of macOS Catalina Image file for VirtualBox and VMware. Mac OS 10.15 Catalina is named because of a special kind of update for Apple and for its operating system which is known as Mac. It has some outstanding features, applications, and a voice record facility which we already discussed earlier.
Mac Os High Sierra Iso For Virtualbox
VirtualBox is a general-purpose full virtualizer for x86 hardware, targeted at server, desktop and embedded use.For a thorough introduction to virtualization and VirtualBox.
For VMware or VirtualBox virtual machines, click the button below to download the image file to your computer via google drive. Download ISO File. Update (June 8, 2018): Mac OS 10.13.5 Released! Update: (July 26, 2018): Mac OS 10.13.6 Released! Update: (July 26, 2018): Mac OS Mojave 10.14 Released!
Want to install macOS on Virtualbox?
If yes, then this post is definitely for you.
In the previous posts, I have already talked about installing linux ubuntu on Virtualbox & other operating systems also.
Everyone knows Mac OS is one of the most premium Operating systems.
And everyone wants to use it but it’s a little expensive.
And that’s why people try to find out different ways to install Mac OS on their PC.
Two years back I also installed Mac OS High Sierra Hackintosh on my PC.
And now I am installing the Mojave version.
So in this post, I will show you how to install macOS Mojave on Virtualbox on Windows PC.
Let’s see How it works.
Also Read: Chromebook ChromeOS on Virtual machines.
How to Install macOS on Virtualbox in Windows 10 PC [ Mojave ]
But before we begin.
Please make sure that you have downloaded the Oracle Virtualbox and the macOS Mojave ISO file from the given link.
Virtualbox: Download link
macOS Mojave Virtualbox image: Download link
I know you might be thinking of creating your own iso file but it’s a little time-consuming.
And that’s why I have already given the link for the Mojave image file.
Now I hope you have already downloaded all the given files & installed Virtualbox successfully.
Note:- Please check the VT-x or AMD-V virtualization feature must be enabled in your BIOS settings.
So Let’s get started & follow this step by step guide.
How To Install Mac Os On Virtualbox
1. Open & Install Virtualbox Extension Pack
Now Open Virtualbox and install the Extension Pack from the given link. Download link
Now that you have installed the extension pack, it’s time to create a virtual machine.
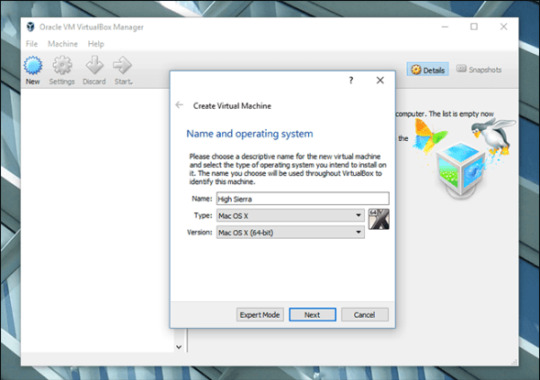
2. Create a macOS Mojave Virtual Machine
Open Virtualbox and Click on the “New” button to create a macOS virtual machine.
Now type the name as “macOS Mojave“, type of OS as Mac OS X and the version of OS as Mac OS X (64-bit). And then Click on Next.
3. Memory Size (RAM)
Now select the amount of RAM to be allocated to the virtual machine. And to run macOS on Virtualbox, the minimum recommended RAM size is 2048Mb.
4. Setup a Virtual Hard Disk
Now the next step is to create a virtual disk for this machine. But here instead of creating a new virtual hard disk, we will import the macOS Mojave 10.14 disk image file which we have downloaded earlier. So Click on Use an existing virtual hard disk file.
And then click on the Folder icon and browse to the image file.
Now select the image file and Click Open.
And you can see that you have successfully created the macOS virtual machine and here comes the configuration part.
5. Configuring macOS Virtual Machine
Note:- All these settings are mandatory to run and install macOS Mojave on Virtualbox on Windows PC properly.
Now Click on Settings.
Now in the Next screen Go to System, then Click on Motherboard Tab and Select the Boot Order as Optical and Hard disk. And in the Extended Features Enable I/O APIC, Enable EFI (Special OSes only) and Hardware Clock in UTC Time. Click OK.
Next Go to Processor Tab. And select the minimum processor as 2 and Enable PAE/NX in the extended features. Click OK.
Further, Go to Display Settings and change the Video Memory to 128 MB or the maximum you can have.
Next, Go to the Storage tab and Enable the Use Host I/O Cache and Click OK.
Now, Go to the USB tab and Enable the USB 3.0 (xHCI) Controller and Click OK.
6. Modify Virtualbox Virtual Machine using Command Prompt
Note:- Before running the Command Prompt, please make sure that you have Closed the Virtualbox & it is not in the running state.
Also, I would recommend you to Restart or Reboot your pc before using these command-line codes.
Now add the following commands to Virtualbox Virtual Machine using Command Prompt (CMD). And to Open Command Prompt, click on Search and type “CMD” and Right Click on it and select Run as Administrator.
Now run each command one by one in the command prompt. And before running each command, please make sure to change the “Your VM Name” part with the name of the virtual machine that you have created earlier.
cd “C:Program FilesOracleVirtualBox”
VBoxManage.exe modifyvm “Your VM Name” –cpuidset 00000001 000106e5 00100800 0098e3fd bfebfbff
VBoxManage setextradata “Your VM Name” “VBoxInternal/Devices/efi/0/Config/DmiSystemProduct” “iMac11,3”
VBoxManage setextradata “Your VM Name” “VBoxInternal/Devices/efi/0/Config/DmiSystemVersion” “1.0”
VBoxManage setextradata “Your VM Name” “VBoxInternal/Devices/efi/0/Config/DmiBoardProduct” “Iloveapple”
VBoxManage setextradata “Your VM Name” “VBoxInternal/Devices/smc/0/Config/DeviceKey” “ourhardworkbythesewordsguardedpleasedontsteal(c)AppleComputerInc”
VBoxManage setextradata “Your VM Name” “VBoxInternal/Devices/smc/0/Config/GetKeyFromRealSMC” 1
Like I will replace “Your VM Name” with “macOS Mojave” in all the codes.
It will be easier if you first copy all the codes to a notepad file & edit them and then paste them in the CMD.
And you are done with the configuration part. Now comes the major part to install the macOS Mojave on Virtualbox Virtual machine.
Install macOS Mojave on Virtualbox PC
Note:- All this installation process of mac on Virtualbox works the same as on the original MacBook. This means that this process is also applicable to Mac Users installing the Mac operating system.
So Let’s get started & install it properly.
1. Start & Run macOS Mojave
Now Open Virtualbox & select the virtual machine and then Click on Start.
Now, wait for a few minutes while the virtual machine boots up and start loading the installer or the installation files.
2. Select Country & Keyboard Layout
Now select the United States as a country & Click on Continue.
And Keyboard layout as the US and Click on Continue.
Mac Os Iso For Vmware
3. Data and Privacy
Now in the next screen, it will ask for the Data and Privacy settings which are by default. So Click on Continue.
4. Transfer information to this Mac
On this screen, it will ask if you want to transfer any sort of information from any Mac or Windows PC. So, select Don’t transfer any information now and Click on Continue.
5. Sign in with Your Apple ID
Now it will ask to sign in with your Apple ID. If you already have the apple ID then you can enter or you can simply on Set up Later. And Continue.
6. Term and Conditions
Now the Term and conditions part, So simply Click on Agree.
7. Create a Computer Account
Its time to create a computer account that is similar to the user account created in Windows PC. So, fill out all the details like Full name, Account name and Password. And Click on Continue.
8. Express Set-Up
Next is Express Set Up where you can also customize settings or you can simply click on Continue.
9. Choose your MacOS Look
Since macOS Mojave comes in two different looks, one is the Light look which is similar to normal and the other one is the Dark look. You may choose according to your Preference & Click on Continue.
10. Installed Mac OS Mojave on Virtualbox
And Done! You have successfully installed the macOS Mojave 10.14 on Virtualbox virtual machine in Windows 10 PC.
That’s it for now…
Conclusion

So that’s how you can easily install a Mac OS on Windows 10 PC using Virtual Box Virtual Machine. And you can also follow the same method for other different OSes like Catalina & High Sierra.
Stay tuned for the next post on install mac os on VMware.
Feel free to share your thoughts and also tell us if you know any better way to Install macOS on Virtualbox in Windows 10 PC [ Mojave ].
If you liked this post, Don’t forget to share this awesome post with your friends.
Table Of Content
1- Download Mac OS
2- Create Mac OS Virtual Machine
3- Configure VBoxManage
4- Start the Mac OS virtual machine
View more Tutorials:
1- Download Mac OS
2- Create Mac OS Virtual Machine
3- Configure VBoxManage
4- Start the Mac OS virtual machine
1- Download Mac OS
Mac OS is a computer operating system developed by Apple. This is a operating system with beautiful interface, however, to own a the computer of Apple with this operating system, you need to use a lot of money, normally with the double price than that of common computers using Windows operating system. Fortunately, you can experience the Mac OS right on your computer by installing a Mac OS virtual machine on VirtualBox.
Mac Os Vm Iso
Below is the list of Mac OS versions released in recent years:
Mac OS VersionNameRelease Date10.10YosemiteJune 201410.11El CapitanSeptember 30, 201510.12SierraJune 12, 201610.13High SierraJune 5, 2017
Mac Os X Download Iso
In this post, I will show you how to install the Mac OS on VirtualBox. First of all, please download an installer.
Mac Os 64 Bit Download
After finishing downloading, there is one file:
Extract the file that you have just downloaded in a folder.
2- Create Mac OS Virtual Machine
On the VirtualBox, create a new virtual machine.
Enter a name for the virtual machine and select a Mac OS version suitable for the Mac OS version that you have downloaded..
Mac OS operating systems need a large amount of RAM to work, You should provide it with about 4GB RAM.
The Mac OS file downloaded by you in the above step is a complete operating system and you can be willing to use without installation. Therefore, on the VirtualBox, you only need to point to this postion of this file.
OK, your Mac OS virtual machine has been created.
You can carry out other configurations for Mac OS, for example, Network configuration, specifying the quantity of Processors,..
3- Configure VBoxManage
After you create VirtualBox virtual machine, the Meta information of this virtual machine will be found in the folder (Depending on your operating system):
LINUX (Ubuntu,..):/home/{user}/VirtualBox VMs
WINDOWS:C:/Users/{user}/VirtualBox VMs
There are some advanced configurations that you can perform via the interface of VirtualBox, and you must carry out it via a command:
Replace 'Your-VM-Name' by your virtual machine name. Your virtual machine name can be found in the 'Setting > General > Basic' (Like the following illustration).
On the Linux (Ubuntu,..), open Terminal windows and CD to go to your Mac OS virtual machine directory. If you use the Windows operating system, open the CMD windows with Administrator privilege and CD to go to the Mac OS virtual machine directory.
Perform the above commands respectively (after having replaced 'Your-VM-Name'):
OK, all the commands have been performed successfully.
4- Start the Mac OS virtual machine
Press on 'Start' button to start your Mac OS virtual machine:
Enter username/password (to be used to enter your Mac OS virtual machine).
OK, at this moment, you have installed Mac OS Virtual Machine on VirtualBox successfully .
View more Tutorials:
0 notes
Text
Mac Mini For Photoshop

The entry-level Mac mini offers a 3.6GHz quad-core i3 processor for £799/$799 which may not fulfil the needs of the typical designer, but the £1,099/$1,099 version offers a 3.0GHz 6-core i5. Apple FINALLY updated their Mac Mini product line late in 2018 (with a minor update in March 2020), making it a pretty good option for photographers to run Lightroom and Photoshop. This buying guide provides insight into which model and what configuration options photographers should consider. The best budget Mac for photo editing is the 2019 Mac Mini for about $900 and the best budget PC is the Dell Inspiron 3670 for about $650. Add the ViewSonic VA2719-2K-SMHD 27 Inch display for about $220 and a 4TB hard drive for another $100. So you are a photographer on a tight budget in need of a computer to run Lightroom and Photoshop. Hi John - The PA272W-BK-SV 27' 16:9 IPS Monitor with SpectraViewII from NEC comes equipped with the NEC SpectraViewII color calibration tool and features enhanced color accuracy covering 99.3% of the Adobe RGB color space, 94.8% of the NTSC color space, and 146.4% of the sRGB color space. With a variety of input connectors including DisplayPort, Mini DisplayPort, HDMI, and DVI-D Dual-Link, you.
Mac Mini For Photoshop Cs6
Mac Mini For Photoshop Software
What is Final Cut Pro X like running on a new Mac mini? We take a look at the new model, its features and how well FCPX performs. It even beats an iMac Pro in one of our tests!
Before we plug the new Mac mini up, it is important to understand that this version of the unit has changed. Changed a lot.
Back in 2005, the Mac mini was designed for switchers from PCs. It didn’t come with a screen, keyboard or mouse and keeping the price down helped make the transition to Mac OS 10.3 Panther and a PowerPC processor as painless as possible.
Times and technology have changed, no need now for the DVD slot or a spinning hard disk for storage.
The switchers of today are buying MacBook Airs and MacBook Pros as their first Macs, not the mini.
So this gives Apple a chance to change and retarget the use of the Mac mini. Consequently, that’s exactly what they have done with the new range of models.
But instead of offering (To quote Steve Jobs) a ‘stripped down Mac’ they’ve actually put the logic board on steroids!

The fourth generation Mac mini now has a choice of quad and 6-core processors, up to 64GB of Ram, up to 2TB of SSD storage and the option of a 10GigE port over the standard GigE.
There are also four USB-C Thunderbolt 3 ports fed from two controllers, an HDMI port that supports 4K and two USB 3 ports. So yes, you can plug your own keyboard and mouse in without having to buy any adaptors.
Can the user upgrade the RAM in the new machine? Yes, it is possible, but it is not a case of flipping up a slot and exchanging the cards out.
You have to remove the cooling fan and then slide out the logic board. Make a mess of it and you’ll invalidate the warranty, so it is best to stick to an Apple approved centre for the upgrade. Should you want to get your spudger out and see the insides of the new Mac mini, head over to the excellent iFixit site.
The machine on test is a 3.2GHz 6‑core 8th‑generation Intel Core i7, 32GB 2666MHz DDR4, Intel UHD Graphics 630, 1TB SSD storage and the 10 Gigabit Ethernet option.
If the colour of the Mac mini looks familiar, it is exactly the same as the iMac Pro and (after seeing them side by side) the Blackmagic external GPU. This also makes sense of the decision for Apple to sell the black keyboard and mouse and also probably hints at the new Mac Pro colour. (And possible footprint- a skyscraper sized oblong trashcan?)
Connecting it up
I’m lucky to have 2 10GigE connections on the back of my QNAP NAS. Final Cut Pro X needs fast drives to be able to build the ‘always live’ waveforms and thumbnails.
Plumbing the Mac mini into the edit system is easy and I’ve detailed how to do point to point 10Gig connection before if you haven't got a router/switch.
If you need the internet on the machine, a cheap USB to Ethernet adaptor from Amazon for $15 works as well as anything else. Run a speed test to make sure you are accessing the NAS via the higher speed route.
I powered a 4K monitor from the HDMI port; this works well and avoids any more dongles having to be bought.
After 25 years of Mac ownership, I have enough keyboards and a spare mouse to finish off the system!
Power On
The machine comes with Mojave installed and defaults to dark mode on the now silent boot. The machine is very quiet and can’t be heard over the fan of the nearby QNAP, which isn’t that loud either. This machine could easily sit on your desktop and not annoy you or your co-worker.
I read a recent review that the sound was pretty terrible out of the Mac mini. I’d disagree. It isn’t great, but it isn’t bad either. I’d say it was better than the old cylinder Mac Pro, but not in the league of the Mac notebooks. You wouldn’t want to use it as edit monitoring.
The Mac mini does have a headphone socket and I can see many editors sitting in offices with the machine on the desk and headphones on editing all day.
Although I worked the machine hard with rendering, the shell didn't get too hot. However I did feel the warm rush of air out of the back of the machine which caught me by surprise when the mini was angled away from me.
I wouldn't have it in this orientation for continuous use, ie situated under a central monitor post with cables pointing at you. Instead I suggest putting the cables and heat exhaust to the back. It will make plugging the headphones in a bit trickier, but I hate sitting in draught!
Final Cut Pro X Performance!
Let’s give it a real test and put it up against an iMac Pro!
I thought I’d dive straight in with a 4K Project and use a Library with a short minute and a half sequence with large still images, transitions, multiple title and adjustment layers.
It is in a Library that I duplicated to both machines with the media staying on the QNAP. The cache was set to both desktops respectively as the RAM in both runs at up to 3Gig speed.
Mac Mini For Photoshop Cs6
Although I didn’t time it, it felt like the thumbnails were taking a longer time to draw than I’m used to on the iMac Pro. All render files were deleted before all tests.
Unrendered, the Mac mini played the sequence back in Better Performance, but dropped frames on Better Quality. The iMac Pro played back in both settings without a problem.
Skimming seemed just as fast as the iMac Pro and it didn’t feel underpowered when navigating the timeline or browser.
The iMac is an 8 core machine with 64GB of RAM and more importantly a Radeon Pro Vega 64 GPU.
Both machines are connected to the same storage via 10GigE and renders and exports went to the respective desktops. (Ok I know it is NBase-T which supports 1Gb, 2.5Gb, 5Gb and 10Gb)
Render time
Mac mini 7’03”
iMac Pro 1’43”
Mac Mini For Photoshop Software
4K ProRes 422 Export
Mac mini 6’45
iMac Pro 1’40”
As expected here as FCPX uses the GPU for image processing, the much lower powered Mac mini takes a lot longer.
Compressor Convert to HEVC 4K 8Bit
Mac mini 54”
iMac Pro 55”
Well, the Mac mini beat the iMac Pro! This is because all of the conversion is done on the CPUs.
Not really worth testing for Motion as apart from a few things like particles, Motion almost lives on the GPU.
Compressor Clusters
No, not a new breakfast cereal, but Compressor allows you to share the work out over connected machines.
I didn’t realise that the ability to set up a cluster of machines running Compressor was easy to do. Well, when I say easy my first attempt failed, but that might be down to my slightly quirky network topology with the QNAP.
To build a cluster, on the machines you want to add, open up a copy of Compressor. In the preferences, turn the option on for other computers to process batches.
Then on the host machine, make a cluster from the available machines in the list. Here you can see we have got something very wrong! We will be revisiting this topic with the issue fixed when we have more time.
Then having named your cluster (or other single machine), you can then toggle the processing destination in the dropdown menu on the bottom of the host machine's Compressor GUI.
To work properly and fast, all the machines need to be connected with 10GigE via a 10GigE switch. The costs of this networking is now a lot cheaper, Netgear and QNAP make a suitable budget switch.
There is no limit to the amount of Mac minis you can have in a cluster. You'll probably run out of switch ports first!
One note here. For distributed processing, it has to be a self contained movie that gets automatically diced and sliced and sent off to the cluster machines.
Conclusions
Not what I expected. I guess I was in the state of mind thinking that the Mac mini wasn’t a serious machine for anything other than web browsing, Plex serving or basic Photoshop.
It’s a lot more than than. It is a component in building a modular system, which is a new thought considering that Apple has been criticised over the past few years for lack of upgradability in the Mac Pro and iMac Pro.
There are two reasons for this new direction. The first are Thunderbolt 3 connections giving the option of using an external GPU and therefore factoring out the limited onboard Intel offering.
The second is the option of a 10GigE port. Being able to connect to high speed shared storage without going through an adaptor is a huge plus.
Why? Take sever centres for example. Every App on the iOS App Store has been compiled on a Mac. Rack up rows of Mac minis connected with 10GigE and you have a facility that can get apps ready quickly. No need for costly large GPUs here, all the work will be done by the CPU cores. Once set up, the Mac mini is more than happy to run in a headless mode. I've worked with a few producers like that.
This is also true of building a small Mac mini cluster to do the hard work of making all the different deliverables of an FCPX exported finished movie - while you carry on editing something else with your main machine. It would make sense for a large production or facility house to have a rack of these that everybody could access when needed.
Put five or ten of these together in a rack and you have a very fast DIT tool for making proxies and dailies on set. The Mac mini above gets its first on set DIT experience tomorrow!
I’ll leave you with a final thought.
Spec up a 6-core Mac mini with 32GB of RAM, 1TB of SSD storage and the soon to ship Blackmagic RX Vega 56 eGPU and you have a machine that’s not too far from the base model iMac Pro, wait for it... with over £1,200 left spare.
Granted, you’ll have to supply your own monitor, keyboard and mouse, but if upgradability is important to you, this could be a very clever way of getting the power with the flexibility.
Hopefully we will have an eGPU to test soon :)
Peter Wiggins is a broadcast freelance editor based in the UK although his work takes him around the world. An early adopter of FCP setting up pioneering broadcasts workflows, his weapon of choice is now Final Cut Pro X.
You can follow him on Twitter as @peterwiggins or as he runs the majority of this site, you can contact him here.
0 notes
Text
I Bought the New iPad Pro So You Don’t Have To
I’m no stranger to the iPad. In fact, it once caused me not to get a job at an Apple store shortly after college. I was asked in an interview, “What do you think of the new iPad,” and I answered honestly (mistake number one in a job interview I would learn).
“I’m not sure how I feel about it, it doesn’t really do what I would want it to do.”
I didn’t get a call back for a second interview. Little did I know this would be the start of my rocky relationships with tablets.
In 2012, I bought refurbished a 32GB “New iPad.” With its retina screen, I told myself it would be the perfect portfolio alternative, and I could make myself look so cool by bringing a digital device to a client meeting, instead of a printed book.
“Who prints photos anymore? Clients will see me as cutting edge!”
That device currently is sitting on the floor next to my bed, unable to be updated past iOS 9, with a dead battery. I rarely use it anymore because of how slow it has become. And it certainly didn’t win me any clients. I think I may have used it professionally once or twice to have someone digitally sign a contract or a model release.
When the first iPad Pro was released I found myself holding it and thinking, “Well…it sure is big,” before using the newly launched apple pencil to crudely draw a penis on it and handing it back to my friend. I still didn’t see a good use for what was essentially a laptop without a keyboard.
Flash forward to 2017, where I found myself standing at the counter at my local Apple store looking at the three size options in front of me for “Pro” level iPads. I was sold (or so I told myself). I just needed to know what size fits me best. After a few hours of going back and forth with the demo models, I eventually decided to walk away. It just didn’t hold up to the experience I was getting from my laptop.
When the 2018 Apple announcement of the new iPad Pro came through, I once again found myself enamored with the idea of getting a laptop replacement. I studied the keynote, watched every review video, and made an appointment with myself to visit the apple store as soon as possible to play with one myself.
The idea that now this tablet was “more powerful than most PC laptops” and (would be) capable of running a “full” version of Photoshop really intrigued me.
The Tech Specs
To be fair, a lot of this section is pulled directly from Apple’s sales literature on the new iPad, and I will try my best to keep things brief here. This isn’t anything you can’t find for yourself with a quick Google search.
Liquid Retina display
11 or 12.9-inch (diagonal) LED-backlit Multi‑Touch display with IPS technology
2732-by-2048-pixel resolution at 264 pixels per inch (ppi)
ProMotion technology
Wide color display (P3)
True Tone display
A12X Bionic chip with 64-bit architecture
Neural Engine
Embedded M12 coprocessor
USB-C
10 hour battery life
New Apple Pencil with magnetic charging
I sent this photo to several people who knew how much I was dreading this purchase.
After another agonizing hour going back and forth with price and specs, I decided to pull the trigger on the 12.9” model with 256GB of storage, with the new Apple Pencil. $1,380.24 retail after estimated Atlanta taxes.
To be fair, I had a friend hook me up with an Apple Friends and Family discount, which brought my price down to a little under $1200 after tax. Even with the discount, this is a pretty large chunk of change to throw down on something that I didn’t even know if it would fit into my workflow properly.
Once the device was delivered to me an hour later, I rushed home and completed the setup process and began playing with my new toy. I was determined to make it work for me.
Pros
Just about everything with the design of the device
The 12.9” screen is gorgeous and, combined with the True Tone Technology and night shift, I found it very easy to use in a variety of lighting conditions. Never did it blow out my eyes when used in the dark.
The new Apple Pencil is very responsive and feels great in hand. The new magnetic charging system makes it a great way to store and charge.
Battery life is pretty good. Apple rates it at 10 hours, and with moderate usage, I was able to only drop down to around 50% before it was time for bed.
The refresh rate still makes me very happy. It feels snappy when I swipe between pages on the home screen, or between pages in a book or magazine. I am impressed at how smooth everything is.
All of this packed into a device that is a great size that fits comfortably in my hands.
And I’ll be the first person to say I have tiny hands.
iOS 12
For the most part, I am very happy with the latest version of iOS. When used on the iPad Pro it does a great job at coming VERY close to a desktop-class OS. For the average user who is looking for a laptop replacement or substitute, it makes for a pretty good argument against competing products.
USB-C (Kinda)
Apple choosing to move to a standardized charging/syncing solution is super smart. No more proprietary cables (for the most part), and if you are ok with dongles of varying sorts you can basically connect this device to just about anything (even if that connection can’t exactly do anything…more on this later). Even though I didn’t get a chance to try it, the ability to mirror to a 5K display was an impressive demo.
Cons
Price
Let’s talk about the elephant in the room straight away. This thing is not cheap. And for a similar price point, you are already into 13” Macbook territory. This makes the decision much harder when comparing side by side. Yes, technically you get more storage with the iPad, and that new processor supposedly is nothing to laugh at. But what you lose is RAM, and a FULL operating system (And at least for me, Capture One).
USB-C
For all the great things that the iPad pro can do with its new port, there is one HUGE thing that it can’t do. At the time of this writing, the USB-C port cannot be used to interface directly with an external hard drive. This is a huge bummer because, in order to be competitive with a traditional laptop, I can’t really get around needing expandable storage.
But, you say, “The cloud! Can’t you use the cloud?” And my response to this is a decided “Yes and No.”
I downloaded the WD MyCloud app onto the iPad. It’s the same app that I use to manage my personal cloud from the go on my phone. And while I was able to eventually download a file into the iPad for editing, it was far from an elegant experience.
Wait…where are my thumbnails?
While iOS 12 can support plenty of different RAW files, it can only read them while in the Photos app, unless specifically coded into each individual app. Even in the Files app, you can’t see any thumbnails by default.
I sure do hope I remember that SPECIFIC file name for the file I want to edit.
Now, once you download the file to your device, you can see a thumbnail just fine.
Too bad I’d have to import all of these into my camera roll first before I can see them.
Now I suppose this could be solved by a product like a Gnarbox or the Lacie DJI Co-Pilot since they have a computer of sorts built in for processing (RAW previews), and generally can interface with other apps nicely. But by that point, you are spending ANOTHER $299-$499 on top of the storage you already spent which further makes the argument for a traditional laptop.
The one thing I didn’t try was Tethering.
But unless I’m using the Lightroom app I don’t think this will work for me as intended as well. From what I have seen, connecting a camera basically just opens up the photos app and downloads files from the SD card on the camera. Not a direct tethered shooting solution that I am used to from Capture One.
I suppose you could also use the USB-C SD card reader, but then you are once again having to load every file directly onto the internal storage of the iPad itself. And then moving them back off for long-term archiving brings up a whole other conversation.
I think that the lack of USB-C mass storage support is something that Apple could (and hopefully will) fix in an upcoming version of iOS. This two-way data movement and storage would change a LOT of my feelings about the iPad Pro as it stands today.
Lack of “Desktop Strength” photo editing solutions
This is one “con” where I think things are ALMOST there. A “full” version of Adobe Photoshop will be coming next year, but Lightroom CC already has a large user-base and supposedly does a pretty good job. I’m still not sold, I don’t like Adobe’s charge per month model. It’s just not for me. And all of it adds to the overall cost ($120 a year). There are some cheaper (and single purchase) options available, however.
Affinity Photo has long been the Photoshop analog that many photographers have fallen in love with. At the time of this writing, however, Affinity Photo hasn’t been updated in over a month, and likely hasn’t been optimized for these new processors yet. I fully believe that the next version of Affinity will work just fine and will be a very speedy piece of software.
But for me, I found it to be a touch clunky and certainly when I was doing some basic retouching there were several times I had to wait 15 seconds or so while the app crunched the data.
For those who aren’t familiar with the Affinity Photo UI
Affinity isn’t a bad option at all, and I think that part of my problems with it was just in learning a new piece of software. And once I got rolling I feel that things went rather smoothly. With the exception that it took me over an hour to retouch the above file, and even then I’m not 100% happy with the results. But I’ll let you guys judge for yourselves.
Backup and Archiving Workflow
My final gripe comes after you export the files out. By default, most of the apps I have played with wanted to export everything back into the camera roll of the iPad itself. Which then, of course, leads to duplicate files and space being eaten up by final deliverables.
I found a way to move things manually back to my WD Cloud, but it wasn’t elegant and took some experimenting with to move everything over. Then I was still left with having to delete the file manually to free up space on the device itself.
Conclusion
I like the 2018 iPad Pro, I really do. But I’m not IN LOVE with it.
Ok, I’m lying. I do love it. I think it’s designed well, I think the screen and pencil are both great, I think the audio on it is some of the best I have heard across any device. I like the idea of having iOS on a larger screen, that is still light enough to carry around one-handed. I like all of the potential that comes from multitasking.
From an Apple fanboy perspective, I really do love this device.
I even used the Squarespace blog app to type some of this post!
But from a photographer standpoint, it falls short. For me. My workflow just can’t accommodate the iPad Pro as it currently stands. But it’s so close!
With a few simple changes (USB-C Mass Storage, RAW Support in the Files app, and more Pro “Desktop Level” Apps from the likes of Adobe, Capture One, etc) all of which could potentially come at a software level without the need of additional hardware.
For day to day web surfing, email, notes, and other media consumption I love what has come from this latest generation of iPad. This makes me excited for what is to come with lower-spec devices that I would likely use more frequently.
I was at a meeting today and loved using the iPad to take notes on, and I loved being able to quickly surf the Web and find info I needed. I really want to have this device in my life, but unfortunately…I’m probably going to return it.
I’m going to give it through the weekend to grow on me a little more, maybe do some more playing around to see if I can better fit things into my life. But at this moment right now, I just can’t justify paying $1200 for something that I can already do (arguably better) on my already paid for MacBook Pro. Thankfully Apple has a 14-day return period, because I would hate to have to try and re-sell this on the open market.
Maybe I’ll just wait a while and snatch up one of these once they hit the Refurbished section of the Apple store, or maybe grab one of last year’s models at a killer deal.
Or there is always next year’s model…
About the author: Blake Griffin is a photographer based in Atlanta, Georgia. The opinions expressed in this article are solely those of the author. Griffin runs UNEXPhotography and has his Bachelors of Arts with a concentration in film and photography, from Montana State University – Bozeman. You can find more of his work on his website, Facebook, Twitter, and Instagram. This article was also published here.
source https://petapixel.com/2018/11/13/i-bought-the-new-ipad-pro-so-you-dont-have-to/
0 notes
Text
Linux, after a while
So, I’ve a Windows 10 PC, and I code a lot (work and personal interest). Though I’ve a MacBook 12 as my current dev PC, it’s really underpowered and slows down after length periods of use cos of thermal throttling, and there’s nothing you can do about it short of dunking it in iced water.
youtube
On the other hand, Windows 10 and development don’t go too well together (no nginx support, I’m used to Linux servers, ssh pains, git pains, no bash tools, bla bla), and so I considered trying out Linux again.
Previous experience with Linux? A long time ago...
I’ve tried Linux on and off since I was 12, when I had my first laptop. Back then, I’ve tried various distributions (distros), such as Slackware, Debian, Mandriva, Knoppix (Live Linux from a CD in 2002!), DSL, Gentoo, and a few others, some of which are sadly now defunct. In 2002-2006, compatibility with your hardware meant tinkering with `conf.d` files a lot, and though KDE and Gnome were already pretty usable back then, it barely compares to its current state.
In the intermediate years, I’ve used Ubuntu and its derivatives such as Mint, Xubuntu, Lubuntu, Kubuntu, and they were pretty usable, though because of various reasons such as not having powerful enough apps for daily use outside of coding (photo/video editing, office suite, gaming... typical reasons why Linux isn’t popular), I stopped using them.
However, now, since one of my main activities is coding, I figured, it’s a good time to go back into it.
Which distro? A new one!
I was planning on waiting for Ubuntu 18 LTS, as it goes back to Gnome and XOrg, and provides a stable base for daily use, but I couldn’t stand Windows for dev any longer, and decided for a recently trending linux distro called MX Linux.
I used to install Linux as a separate partition and dual boot, but given how easy it is to fuck up your boot options, I’ve decided against it, and decided to do virtualization instead, since my PC is likely to run OK with it.
Experience so far? Real good!
I installed it in VMWare, and surprisingly, everything ran really well, given a pretty basic PC setup I have (i3-8100, 16GB RAM, 2TB HDD).
After two days of tinkering around with it (with GUI settings/tools no less!), I’m pretty happy with MX Linux so far. I like Xfce, even with Xubuntu, as it’s elegant and practical without having too much useless bells and whistles. Virtualization means most things work out of the box, without me having to tinker with drivers. Modern PCs also have a lot of power and have modern virtualization extensions, compared to my 2002 laptop, which had a single core 1.4 GHz Intel Pentium 4 and 512MB of RAM, which meant back then I dealt with a lot with just unfucking bootloaders.
Also, a lot of day-to-day stuff now work out of Chrome/Firefox, such as password managers, emails, calendars, music/video, and they even have almost native notifications. I think this is one of the reasons why it’s a lot less frustrating, and you miss out on a lot less features of not having native apps, codecs, or plugins.
A plus point in Linux, that I sorely missed, is that configuring fonts is a lot better than Windows OR macOS, as you have a full range of fonts you can use system-wide, and even hinting levels. Well at least macOS has a better text renderer than Windows, which is still using shitty ClearType which butchers all semblance of font design (except for Segoe UI, because it’s Microsoft own special child, so it gets special treatment and rendering).
Postscript
I’m going to wait for Ubuntu 18 LTS, and compare them, and we’ll see how it goes! It’s good days for Linux!
0 notes
Text
My Windows 10 Experiment : Perspective From a Mac User.
My Windows 10 Experiment : Perspective From a Mac User.
In this thread, I will describe my experiment with Windows 10 as a Mac user.
About me : I’m 31 years old and have been using a Mac for pretty much all my life. Once, my dad bought a Windows PC so my brother and I could play Baldur’s Gate and Unreal Tournament. It worked for a while but didn’t last because we caught some viruses and it was shit to keep up with the drivers. I don’t remember what OS it was but think something like XP or 98. Finally my father put the PC in the trash and bought an iMac instead.
I always owned Macbooks (white Macbook then Macbook Air then Macbook Pro) for college and never thought about buying a PC because that’s what I was used to and because of all the shit you hear about Windows. And also because my parents helped me to pay for those computers and they always suggested Macs.
Now I’m out of college. I don’t need a laptop anymore so I’m looking for alternatives to Macs because those are expensive when you buy them with your own money. I’m always a “good bang for the buck” kinda guy so I’m looking for the best value, according to my use case. I’m also not pleased with the butterfly keyboard and lack of legacy ports. In January, I purchased a 2016 unit and tried to get used to it for 2 weeks writing essays on it but ended returning it because I just despised the typing experience. I like travel on my keyboards and for me, good design is adapted to the end used, not the other way. Despite what some people say around this subreddit, I think a keyboard has to be adapted to me, I don’t have to get “used” to it. I always loved Apple keyboard and enjoy typing on my 2015.
So I recently bought a used (Craigslist) Intel NUC with an i7, 8gb RAM and 256 SSD M.2 drive for 500$ Canadian so about 395$ USD. It runs Windows 10 Pro. Usually, you have to buy the NUC, Ram, SSD and OS but since it was pre-owned, the guy already assembled it. Here is the link for the unit I own : http://ift.tt/2fQ8Jqa
For the geeks, it’s a 5th Generation Intel Core i7-5557U processor, so a little bit faster than the i5 in my 2015 Macbook Pro.
I’ve been using this (tiny) computer for about 2 weeks now and I’m very surprised at how good it is for my workflow. I’m mostly doing Microsoft Office stuff and browsing with Chrome. No games, and I would be disappointed because it has integrated graphics anyway. I downloaded all my files from the cloud with Google Drive, installed Microsoft Office 365, Spotify, Utorrent, VLC, etc. I must confess I’m very pleased because I had zero blue screen, driver issue or annoying software update. It was basically plug and play with my mouse, display, keyboard and printer. It boots quicker than my 2015 Macbook Pro and is even a little bit snappier for everyday work. I’m not yet used to the shortcuts so it may take some time before I’m as quick as on the Mac but I’m sure I’ll get used to it.
My guess is most bugs on Windows 10 are now ironed because the OS is already 2 years old. Also, since I’m using an SSD, it’s super quick and most people probably still use HHD so that slows their computer.
Pros • Upgradable: up to 32gb or RAM and 2Tb SSD • Also cheap to upgrade… get your SSD and RAM on Amazon for much less than Apple’s BTO unit • It’s super tiny, can carry it easily • Work very well with my 32 Inches BenQ monitor • Boots in 10 secs. • Way cheaper than a Mac Mini
Cons • Meh UI: While it’s functional, I must confess Windows 10 isn’t as beautiful as macOS. I don’t care much honestly, but for those who are very attached to the prettiness of macOS, it may be a bummer. I also couldn’t find nice Calendar and Email apps so I just use the Windows 10 apps instead. They are not pretty, I prefer Spark and Fantastical 2 (or even macOS’ own email and calendar) but they work OK so for the moment I stick to them. • No iMessage app. Most of my friends are also on Facebook so I just switched to Facebook Messenger. It works alright. I’m not going to pay a premium for a proprietary messaging app. Not an issue for me. • Noise: The computer isn’t loud per se, but I can certainly hear the fan even on idle. It may be because mine is an i7 and it runs a little bit hotter than an i3 or i5. I’ve heard it’s normal to hear the fans purring on the background on Windows PCs. Mac users who don’t use PCs don’t realize that but their computers are dead silent when they aren’t under load. • Choosing a PC can be very exhausting. There is SOOO much choice! How do you know what to pick? I overcame this problem by tracking my computer usage with a small App I downloaded on my Mac (Usage is the name of the App). After a month of tracking, I realized I was spending my time between Microsoft Office, Mail, Chrome. I also used Lightroom but very rarely (2 times a month, to edit some images for Wordpress). So I realized I didn’t need horsepower of anything fancy, certainly not a quadcore or a fancy graphics card. I wanted a very small form factor, cheap system, upgradable and SSD.
I realize it’s something weird because when you spend so much time on an OS, you get used and attached to it. People still like to call themselves a “Mac guy” or “PC guy”. I like to say OS are tools and don’t care much about labeling myself to my operating system. So overall, I’m a happy camper with my new computer. For my use case, it does all I need it to do. And with the SSD in it, it will probably not slow down over time like Windows PCs can do after a couple of years. I can say that Windows 10 is NOT the piece of shit operating system people like to describe on Apple forums all around the web. I enjoy the freedom of not being “trapped” in the Apple ecosystem. I use Gmail, Google Drive and Google Photos so I don’t loose much. Never really liked iCloud. I still have my 2015 Macbook Pro but didn’t use it since I set up this computer. It’s still worth about 1800 CND on Craigslist… and to be honest, I’m thinking about selling it and get a cheap Chromebook for browsing on the couch and call it a day.
I’m aware that all this is very recent and I didn’t test it extensively yet. If you guys like the thread, I intend to do a follow up or “Part II” in a month or two to report my experience and if I still feel the same about Windows 10.
TLDR : Mac user all my life, decided to try the “dark side” and see how was Windows 10. I’m very pleased to say the least and may even sell my 2015 MBP.
Cheers!
http://ift.tt/2iaeeAE
0 notes
Text
My Windows 10 Experiment. From a Mac user.
My Windows 10 Experiment. From a Mac user.
Disclaimer : English isn’t my first language, so please don’t focus too much on my mistakes and mostly on the message. 😊
In this thread, I will describe my experiment with Windows 10 as a Mac user.
About me : I’m 31 years old and have been using a Mac for pretty much all my life. Once, my dad bought a Windows PC so my brother and I could play Baldur’s Gate and Unreal Tournament. It worked for a while but didn’t last because we caught some viruses and it was shit to keep up with the drivers. I don’t remember what OS it was but think something like XP or 98. Finally my father put the PC in the trash and bought an iMac instead. I always owned Macbooks (white Macbook then Macbook Air then Macbook Pro) for college and never thought about buying a PC because that’s what I was used to and because of all the shit you hear about Windows. And also because my parents helped me to pay for those computers and they always suggested Macs.
Now I’m out of college. I don’t need a laptop anymore so I’m looking for alternatives to Macs because those are expensive when you buy them with your own money. I’m always a “good bang for the buck” kinda guy so I’m looking for the best value, according to my use case. I’m also not pleased with the butterfly keyboard and lack of legacy ports. In January, I purchased a 2016 unit and tried to get used to it for 2 weeks writing essays on it but ended returning it because I just despised the typing experience. I like travel on my keyboards and for me, good design is adapted to the end used, not the other way. Despite what some people say around this subreddit, I think a keyboard has to be adapted to me, I don’t have to get “used” to it. I always loved Apple keyboard and enjoy typing on my 2015.
So I recently bought a used (Craigslist) Intel NUC with an i7, 8gb RAM and 256 SSD M.2 drive for 500$ Canadian so about 395$ USD. It runs Windows 10 Pro. Usually, you have to buy the NUC, Ram, SSD and OS but since it was pre-owned, the guy already assembled it. Here is the link for the unit I own : http://ift.tt/2fQ8Jqa
It’s a 5th Generation Intel Core i7-5557U processor, so a little bit faster than the i5 in my 2015 Macbook Pro.
I’ve been using this (tiny) computer for about 2 weeks now and I’m very surprised at how good it is for my workflow. I’m mostly doing Microsoft Office stuff and browsing with Chrome. No games, and I would be disappointed because it has integrated graphics anyway. I downloaded all my files from the cloud with Google Drive, installed Microsoft Office 365, Spotify, Utorrent, VLC, etc. I must confess I’m very pleased because I had zero blue screen, driver issue or annoying software update. It was basically plug and play with my mouse, display, keyboard and printer. It boots quicker than my 2015 Macbook Pro and is even a little bit snappier for everyday work. I’m not yet used to the shortcuts so it may take some time before I’m as quick as on the Mac but I’m sure I’ll get used to it. My guess is most bugs on Windows 10 are now ironed because the OS is already 2 years old. Also, since I’m using an SSD, it’s super quick and most people probably still use HHD so that slows their computer.
Pros • Upgradable: up to 32gb or RAM and 2Tb SSD • Also cheap to upgrade… get your SSD and RAM on Amazon for much less than Apple’s BTO unit • It’s super tiny, can carry it easily • Work very well with my 32 Inches BenQ monitor • Boots in 10 secs. • Way cheaper than a Mac Mini
Cons • Meh UI: While it’s functional, I must confess Windows 10 isn’t as beautiful as macOS. I don’t care much honestly, but for those who are very attached to the prettiness of macOS, it may be a bummer. I also couldn’t find nice Calendar and Email apps so I just use the Windows 10 apps instead. They are not pretty, I prefer Spark and Fantastical 2 (or even macOS’ own email and calendar) but they work OK so for the moment I stick to them. • No iMessage app. Most of my friends are also on Facebook so I just switched to Facebook Messenger. It works alright. I’m not going to pay a premium for a proprietary messaging app. Not an issue for me. • Noise: The computer isn’t loud per se, but I can certainly hear the fan even on idle. It may be because mine is an i7 and it runs a little bit hotter than an i3 or i5. I’ve heard it’s normal to hear the fans purring on the background on Windows PCs. Mac users who don’t use PCs don’t realize that but their computers are dead silent when they aren’t under load. • Choosing a PC can be very exhausting. There is SOOO much choice! How do you know what to pick? I overcame this problem by tracking my computer usage with a small App I downloaded on my Mac (Usage is the name of the App). After a month of tracking, I realized I was spending my time between Microsoft Office, Mail, Chrome. I also used Lightroom but very rarely (2 times a month, to edit some images for Wordpress). So I realized I didn’t need horsepower of anything fancy, certainly not a quadcore or a fancy graphics card. I wanted a very small form factor, cheap system, upgradable and SSD.
I realize it’s something weird because when you spend so much time on an OS, you get used and attached to it. People still like to call themselves a “Mac guy” or “PC guy”. I like to say OS are tools and don’t care much about labeling myself to my operating system. So overall, I’m a happy camper with my new computer. For my use case, it does all I need it to do. And with the SSD in it, it will probably not slow down over time like Windows PCs can do after a couple of years. I can say that Windows 10 is NOT the piece of shit operating system people like to describe on Apple forums all around the web. I enjoy the freedom of not being “trapped” in the Apple ecosystem. I use Gmail, Google Drive and Google Photos so I don’t loose much. Never really liked iCloud. I still have my 2015 Macbook Pro but didn’t use it since I set up this computer. It’s still worth about 1800 CND on Craigslist… and to be honest, I’m thinking about selling it and get a cheap Chromebook for browsing on the couch and call it a day.
I’m aware that all this is very recent and I didn’t test it extensively yet. If you guys like the thread, I intend to do a follow up or “Part II” in a month or two to report my experience and if I still feel the same about Windows 10.
TLDR : Mac user all my life, decided to try the “dark side” and see how was Windows 10. I’m very pleased to say the least and may even sell my 2015 MBP.
Cheers!
http://ift.tt/2i9WPbi
0 notes
Last Seen Blogs

captain---rabbit
intergalactic shitposting

cookieamongthemachines
McLuhan in Reverse

lbxbx
Mischief Managed

zakustalker
ザク

eduardo-cocom
Eddiiee Cocom