#making my gifs extra blue just for you ines <3
Photo

@beomgyutie was asking me about giffing with topaz and i couldn’t find a tutorial that was similar to how i gif and me being me i decided to be Extra and just make a whole tutorial for it! tutorial under the cut
things you will need:
photoshop (i’m using photoshop cc 2018, but i’ve used this same/similar process on cs6)
topaz plug ins clean and denoise downloaded and installed
downloaded video to gif in the highest quality you can find
side note: i’ve seen people say “don’t bother giffing something if it isn’t at least 720p”, but like that isn’t always practical or possible. so just find the video in the highest quality you can
.ts files are the way to go for giffing live stages! you can find a really great guide for how to find .ts files here.
one of the main things that determines gif quality is the video quality of what you’re giffing, so it’s important to use the highest definition you can!
if you’re interested in seeing my vapoursynth process you can see it here! the tutorial i used to learn how to use vapoursynth has been deleted, so if you would like a more detailed explanation let me know!
also i did not include how to add text or how to blur out part of a gif, so send me an ask if you’d like help with it!
all right so here we go:
1. figure out which part(s) of the video you’d like to gif! people do this in lots of ways; i usually watch the video through then make notes of what time stamps i want to gif.
2. open up photoshop and go to file -> import... -> video frames to layers
3. this window will pop up with your video! use the little slider things i’ve circled in red to select where you want your gif to start and end. don’t worry about it being too exact; we’ll narrow it down further in a minute. make sure that the limit to every x frames box is NOT checked!

4. it will create a frame animation from the clip you’ve selected. now you can trim the gif down even further and get the exact moment you’d like to gif by deleting frames from the beginning and/or end of the animation. i usually aim to have between 60-80 frames in a gif. keep in mind that bigger gifs mean bigger file sizes, so if you’re going for a big gif it might be best to go with fewer frames. (ex. if you’re making a gif that’s 540px by 400px, aim for 60 frames to help keep the file size down)

5. tbh it doesn’t matter when exactly you crop your gif in the process, but i usually crop and resize it at the beginning. i ended up cropping this gif again at the end too, so it really, truly doesn’t matter when you crop it.
you’ll also want to make sure your gif fits the current tumblr sizes for photosets which you can find by googling. the main ones i keep in mind are 540px wide for one gif per row and 268px wide for two gifs per row. for posting purposes, the height is not as important as the width, so don’t worry too much about the height.
you can crop the gif to whatever looks good to you then go to image -> image size and change it to the appropriate width. make sure you’ve clicked the little chain/handcuff looking button so your height will also be adjusted to maintain the height to width ratio!

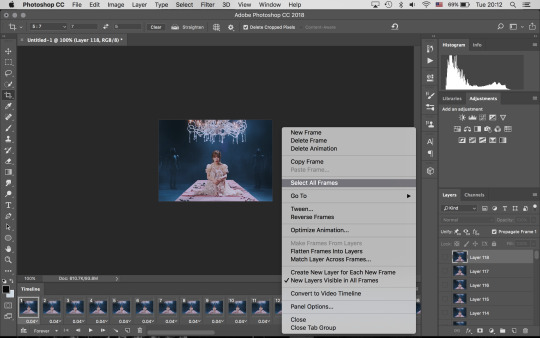
6. next we’ll need to convert the frames into a smart object in order to sharpen and use topaz. click on the three bars just above your frame animation to select all frames, and also select all of your layers by using shift + click on the first and last layers (you can see the layers in the bottom right corner of the second image). you’ll want to make sure every single layer and frame is selected, otherwise part of the gif won’t be converted into a smart object.

7. convert frame animation to timeline animation by clicking this button i’ve circled in the bottom left corner

you’ll want to make sure the blue play head button thing is at the very beginning of the gif before continuing

8. click filter -> convert for smart filters and your smart object will be made!
9. next we’ll use smart sharpen to sharpen the gif. go to filter -> sharpen -> smart sharpen, and this window will pop up. these are the settings i use for every gif, unless it is a lower quality video in which case i will turn down the amount percent

10. now it’s time to use topaz! i always start with topaz clean for whatever reason, but regardless you’ll go to filter -> topaz labs -> topaz clean. there are two settings i choose from that i’ve saved as presets. for this handong gif i chose the first settings. you can compare the settings with the unedited version by clicking the original button at the top of the preview window.


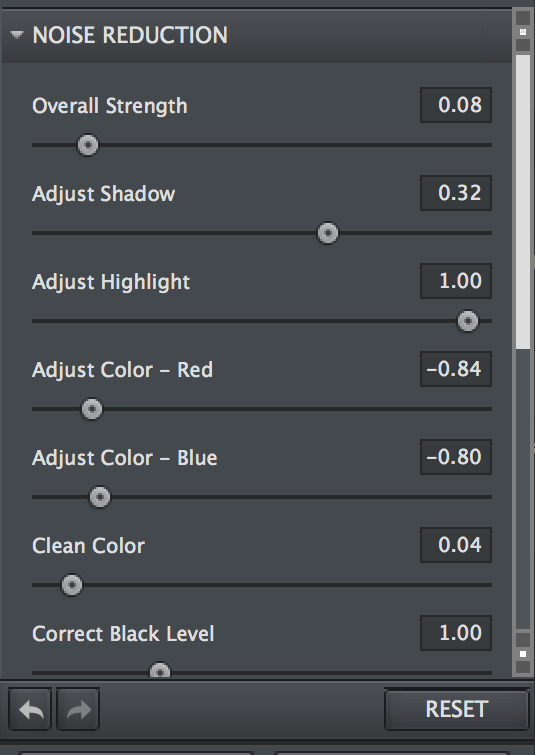
11. next up is topaz denoise! same process as before: filter -> topaz labs -> topaz denoise. i always use these settings but adjust the overall strength. i usually end up somewhere between 0.03 and 0.05.

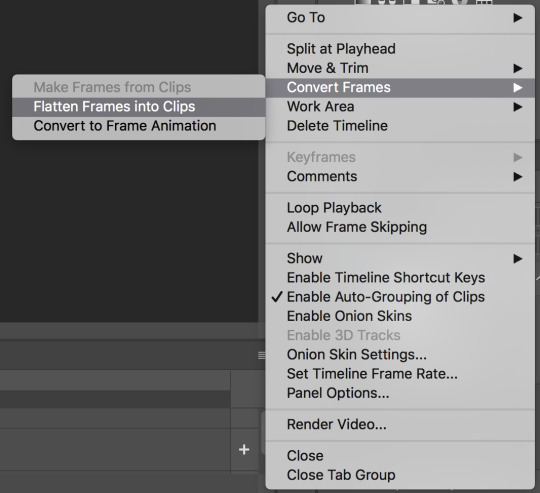
12. now we’ll click on the three bar menu again and select convert frames -> flatten frames into clips. do NOT touch your computer while it’s processing!! topaz is a finicky creature, and we cannot upset it while it’s working. there’ll be a progress bar so you can have an idea of how far along it is in the process. it does take a while, so be patient!
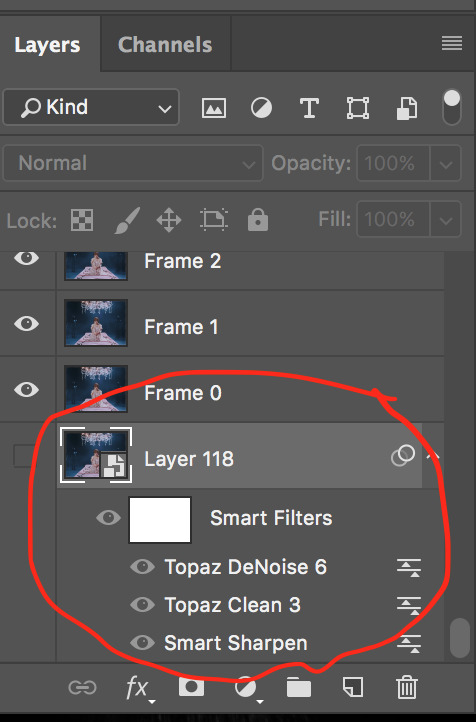
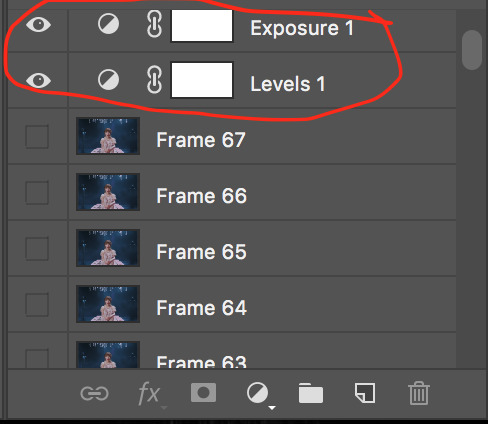
13. the process of flattening frames back into clips creates an extra layer that we don’t need, so go ahead and delete the layer where you can see all the smart filters we’ve just applied listed. it will be at the very bottom of the layers list, and also the only one labeled layer (you can see the rest are called frames now) as well as the only one that’s hidden (aka it doesn’t have the little eye icon to the left of its name)
14. for the moment we’ll still be in timeline animation, so we’ll want to click on the three squares in the lower left corner to go back to frame animation

15. you should only see one frame in the animation window for now. click on the three bar menu again and select “make frames from layers” and we’ll have all of the frames we started with back except this time with sharpening and topaz-ing!
16. using the three bar menu again, you can select all frames then adjust the delay between frames (aka the timing!). once the frames are selected, click on the little arrow next to the number underneath one of the frames (doesn’t matter which one as long as they’re all selected). then you can choose a preset time or enter your own. my gifs are usually 0.04, 0.05, or 0.06. for this handong gif, i went with 0.05.

17. now you can add coloring! i’m not really going to get into how to color, but you can either find psds (aka premade colorings) that creators have shared on tumblr as a starting point or just mess around with different editing layers (like levels, selective color, curves, etc) until you land on something you like. when coloring while in frame animation make sure you drag the editing layer to the top of the layer list so the coloring is applied to all the frames!
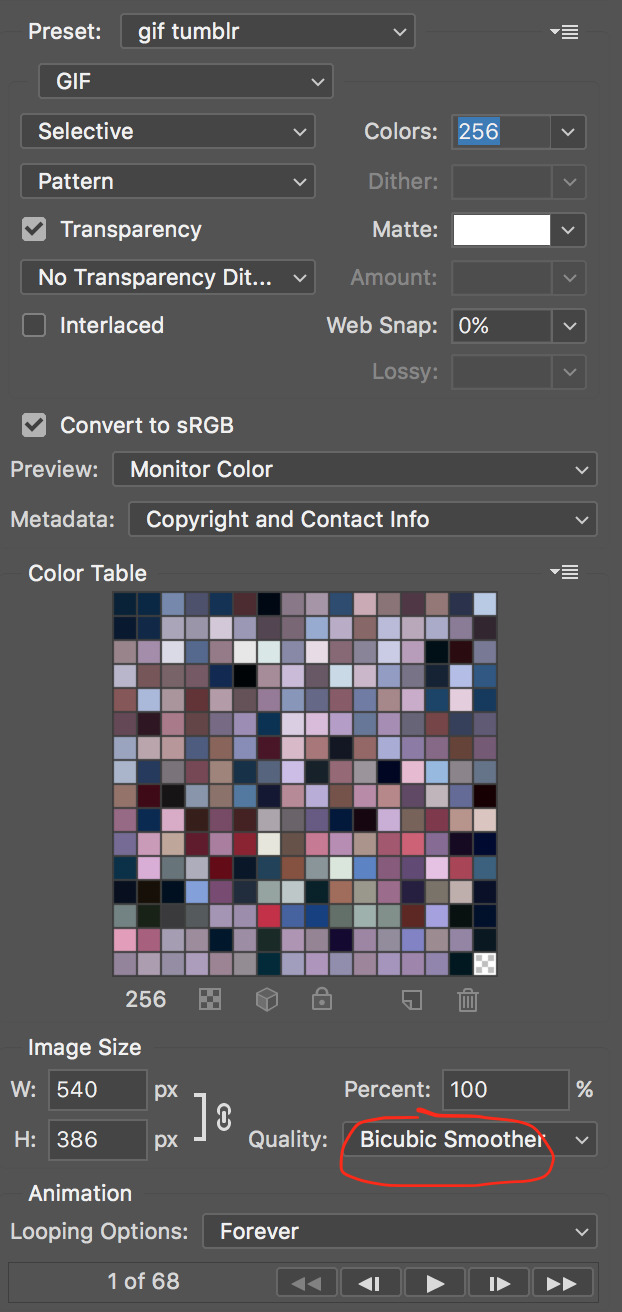
18. now we can export the gif! i use save for web and these settings. sometimes i will change the quality (circled in red) from bicubic smoother to bicubic sharper, but i usually leave it on bicubic smoother
19. and now you can upload it to tumblr and you’re done! here’s the final result without text

let me know if you have any questions!
#gif tutorial#mine#tutorial#i'm not the best gif maker in the world but i'm pretty happy with how my gifs turn out so yeah#also i am v sleepy so i hope this makes sense ;alksdjf;aslkdjfas#giffing info
57 notes
·
View notes
Last Seen Blogs

ststoreshopee
无标题

jrox311
Untitled

giftcardgenerators342-blog
Untitled

duaa-lipaaa
Dua Lipa
davidtennantpussytulpa
gentleman crawler