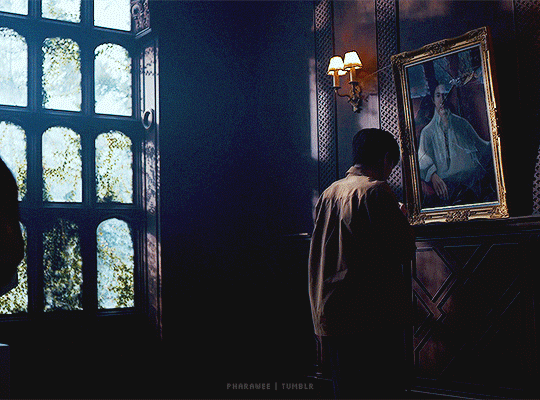
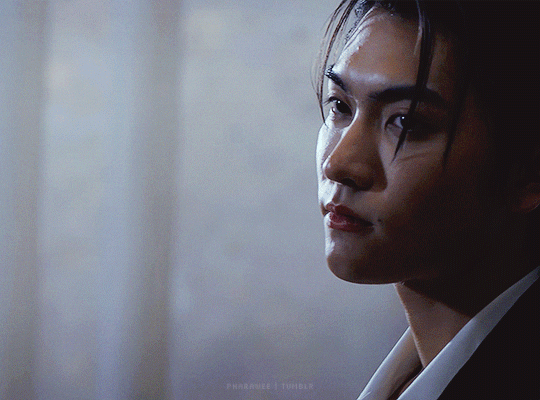
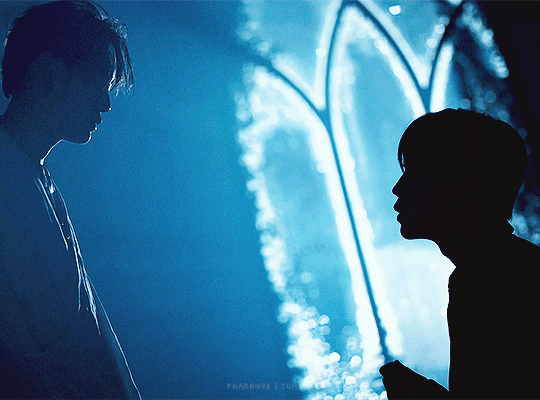
#i wanted to go moodier and darker but in the end i opted for more contrast and ehhhh now i'm not so sure anymore
Text
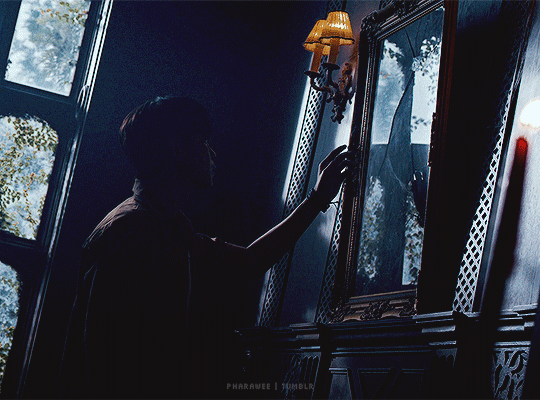


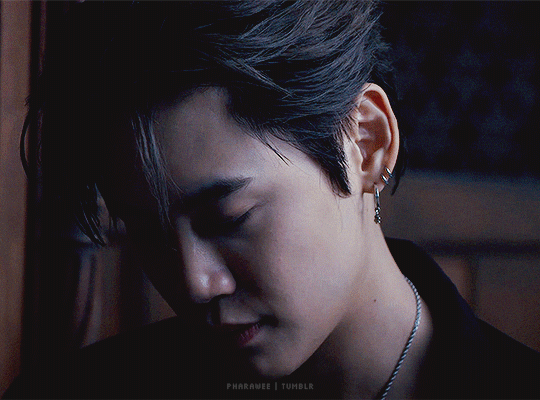
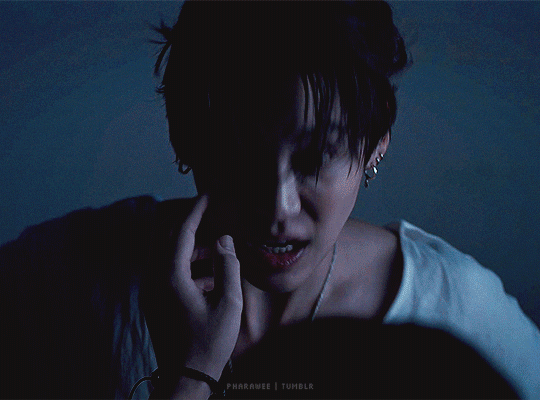
—Do you believe in the existence of vampires?
—I don't believe in something that cannot be proved.
THE VAMPIRE PROJECT ♢ STUDIO WABI SABI ♢ COMING SOON 2024
#the vampire project bl#the vampire project the series#the vampire project#boun noppanut#prem warut#boss chaikamon#santa pongsapak#mix wanut#vampireprojectedit#revampedit#thai bl#thai drama#bl drama#bl series#my edits.#i adore these dark and moody and classic vampire vibes#i'm not the biggest fan of my colouring here though#i wanted to go moodier and darker but in the end i opted for more contrast and ehhhh now i'm not so sure anymore#anyway pls i need this series in 2024#i need more byronic vampires
629 notes
·
View notes
Text
Duality
I like this album. In it, Duke Dumont lays out a compelling house music tour de force. The English DJ, known for singles such as Ocean Drive and I Got U (with Jax Jones), finally dropped his debut album, and it’s been a pleasure to listen to.
In interviews, he’s mentioned wanting to be known as a whole artist, rather than just a DJ, and I think this album definitely reflects that ambition.
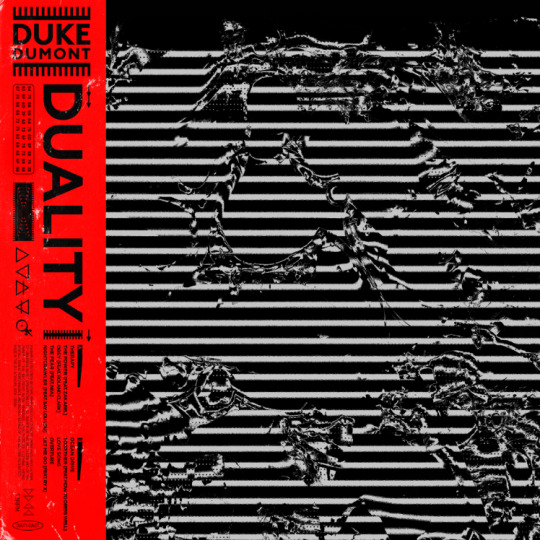
House music, particularly the deeper, more repetitive sort that Duke Dumont is known for, isn’t everyone’s cup of tea. Duality, however, features a flavourful injection of the progressive rock spirit, resulting in a sonic language capable of touching almost anyone. In any case, the album is by far and away house music.
The tracks are just well produced and mastered, through and through. The arrangement is concise-- each track only has a few core elements. But despite this minimality, it comes out with such a full, rich, and atmospheric sound-- a testament to the great production. Don’t get it wrong-- the production is the real star of the show here.
I don’t mean this to marginalize the album and say that it’s the only strength worth noting, but to draw attention to what really sets this album apart. Indeed, production is what made Ocean Drive a special track rather than just a very good pop song. The story is the same for the whole album.
The album kicks off with a lot of energy, and becomes moodier and moodier as the tracks play by. This is by design-- the album has two sides, one brighter and one darker. Likely what the title Duality refers to.
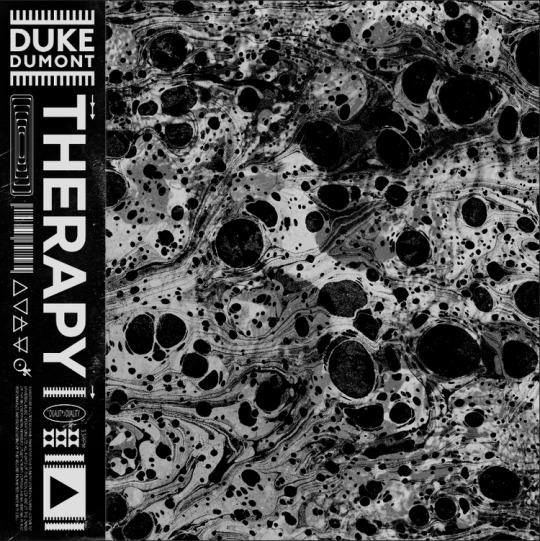
Therapy, the first track, is one of Dumont’s takes on the popular piano-driven style of house, the other one being one of his most well known tracks, I Got U. I’m not too big of a fan of this sort of stuff, so I don’t have much to say. Thankfully, The Power, with Zak Abel, immediately breaks away from that, and it comes in with a more precise and subtle chorus, featuring a vocal cut of Abel interspersed with synths and surprisingly distinctive hi-hats.
Obey, with Roland Clark, is one of my favorite tracks on the album. I think it walks a very fine line-- in many other universes, I would have thought this track was annoying-- in this one, I think it’s a banger. Roland Clark, also a house musician, pounds in his rap over Dumont’s hypnotic beat. Everything in the song just slots in with each other so well. You don’t expect that acid synth when the chorus/drop comes in, but it’s there, and it works. It’s something the song would have been completely fine without regardless, but with it, it takes on a new life of its own.
The Fear, with Niia, and Nightcrawler, with Say Lou Lou, are two tracks that one could call, moods. Both tracks have a prominent bassline, and catchy lines in “I’m in love with fear” and “Crawler, crawler”. As with Obey and the other tracks on the album, they’re on the edge of being too repetitive and just right. As well as with Obey, it’s also unclear which side of the fence they’re on.
They feature a more poppy vocal performance, which seems to serve almost as a lead-in to Dumont’s crown jewel as far as poppy-vocal production is concerned: the next track is Ocean Drive, which is a song that he released a long while ago. It’s incredible. I don’t need to say anything, just listen to it.
As the album’s end approaches, you find Together and Love Song, two minimal, emotional dance songs that capture a feeling of release and catharsis, a fitting vibe for the last few tracks of an album.
Together is a vocal delight that opts for the ‘very long buildup to one big drop’ structure of a dance song, a structure iconic to Faithless’s Insomnia. I have a soft spot for this song. It’s not universally liked in reviews-- but I like it.
Love Song is a long track that ambiently carries in it the soul of old, string heavy disco in a several-minute long affair. As with Therapy, I don’t really have much to say. Love Song is the track I like the least on the album.
To begin the album’s conclusion, a piano bridge as its own track, Overture, sets the stage for something great.

The final track is Let Me Go. One of the most emotional electronic tracks I’ve heard in a long time, Duke takes the listener on a journey, beginning with RY X’s harrowing voice reverberating over sharp, dramatic piano chords. It continues on, through this seemingly never-ending bridge that adds more and more elements, transforming the song to a dream-like quality as it shapeshifts into a full-fledged synth orchestra. This all takes longer than you expect, but simultaneously, it feels shorter than it should be.
Suddenly, everything drops, and the song picks up again and repeats the process of building up, but this time with percussion and a new synth, a sort of dance break for lack of better words. At the end, it drops everything on you again, and we’re left with RY X and the piano, closing out the song.
Let me go
Leave me whole
Lay me open
Let me run
Let me hope
Leave me numb
Lay me open
Let me run
I don’t rate albums, but this was great, I would say.
0 notes
Text
Cyberpunk 2077 got delayed, so I made it in Fallout 4 instead • Eurogamer.net
By early January, I’d noticed something strange was happening to me. Grimes, La Roux and synthwave groups like Magic Sword had entered my music playlists. I’d finally watched Blade Runner for the first time, and was scrolling through galleries of the late Syd Mead’s brilliant cityscapes. I’d even bought Neuromancer and added it to my pile of books I will definitely get around to reading.
It was all in anticipation of one game originally due to arrive in April: CD Projekt Red’s Cyberpunk 2077. Yet as we all know, that release date is no longer happening, and Cyberpunk 2077 has been shunted back to September. So what was I to do with all that leftover cyberpunk energy?
I could have continued my media binge, but that’s hard to maintain for eight months – and I was eager for some gameplay. As my editor later mentioned, I could have just bought Deus Ex. Yet something far more radical had already entered my mind.
What if I recreated Cyberpunk 2077… with mods in Fallout 4?
If you’re looking to mod Cyberpunk into any game, Fallout 4 is a good pick: many of its assets already have a run-down techy feel, albeit perpetually stuck in the ’50s rather than the ’80s. Unsurprisingly there’s already a number of Cyberpunk 2077-themed mods available – but I wanted to see just how far I could push Fallout 4 to resemble the experience shown in the Cyberpunk 2077 gameplay demo videos, which meant looking at mechanics and even small details like the HUD.
I resolved to keep modding until I broke either the game, the computer, or myself. Two weeks later, I’ve managed to produce something resembling a cyberpunk experience within Fallout 4 – although the process was somewhat messy.
youtube
Things very nearly failed at the first hurdle. Dystopian, neon-drenched cities have formed the backbone of nearly every cyberpunk narrative (perhaps too often) and I simply wouldn’t be able to start my project without one. Unfortunately this was also the most protracted part of the process. Most Fallout 4 location mods require a large set of additional mods to work, and my first pick – a massive Blade Runner tribute overhaul for Hangman’s Alley – had a required mod list so vast (with many now removed) that I couldn’t get it working. Instead, I went for something a little smaller called Blade Runner Avenue. Look, there were no Cyberpunk 2077 cities, so just ignore the Tyrel sign.
It was still a headache, requiring about 22 plugins, a script extender and the Transfer Settlements mod to import it – and even then the mod’s in-game blueprint threw up several more mods required to provide assets. Yet eventually I found myself standing in a bog as a city assembled itself before my very eyes. It’s not a massive space, but the mod does a great job of recreating a grim corporate feel with towering skyscrapers and shopfronts, along with a claustrophobic market space and a detective-style apartment. To make it all moodier, I used Darker Nights to plunge mini Night City into permanent gloom.
Alas, the struggle wasn’t yet over: various plants and debris were clipping through from the marshland below, and this was really throwing off the vibe. I went around weed-picking most through console commands and a mod called Scrap Everything – but the trees became the bane of my existence, defying my every attempt to uproot them. According to the internet, many of Fallout 4’s trees are essentially baked into the game world (via precombines) and are thus incredibly difficult to remove. Dead trees: welcome to cyberpunk.
I can’t list all the plugin mods as there were so many, but if you’re thinking of recreating this, you can find them by following the links for all the mods named in this article.
City complete, it was time for character customisation. Aside from an unfortunate incident where my character lost her eyes, this was pretty smooth sailing. I wanted the player-character to resemble female V, and I tried my best with the Fallout 4 character creator to produce something that didn’t look like an irradiated potato. With the help of mods I recreated the golden glowing eyes shown in the first Cyberpunk 2077 demo, along with surface wiring and an edgier hairdo. Then it was a matter of slapping on as much black eyeliner as I wore in my early teens.
The most Cyberpunk 2077 thing in this entire mod collection, of course, is the fabulous CROSS_77 Samurai jacket, which comes with gloves, an outfit and a demonic holographic headpiece (which I removed to prevent it hiding the face I made). Coupled with a holographic pipboy complete with cyber sounds, the look was good to go. Or almost, as I still had to find some weapons to make V armed and dangerous.
V2.0.
Based on the weapons shown in Cyberpunk 2077’s 2018 gameplay demo, an easy pick was the Gun GS Cyberpunk pistol, which is similar to the Militech weapon V uses and can be modded to have automatic fire and a glow sight. I wanted to give her a full arsenal, so I installed a Vector and modded it with a suppressor, along with a Cryolance weapon that resembled the shotgun. I’m not sure energy weapons are particularly cyberpunk, but it looks convincing when given three barrels.
It’s all very well looking the part, but I wanted to see what V could actually do. This is where I had to get really creative. One of the abilities shown in the demos is that V can scan enemies with her eyes to outline them, so I found a mod that highlights enemies at the touch of a button. Self-Guided Sniper Bullets let me install targeting computers on some guns, which aside from being ridiculously overpowered, also resembled the smart gun from the 2018 demo – even if the bullets didn’t have the same satisfying curved trajectory. I did attempt to make the bullets a little flashier with a tracer mod.
youtube
Cyberpunk wouldn’t be cyberpunk without the ability to hack things, and thankfully Fallout 4 already has something close to that with the Robotics Expert perk. In the vanilla game, you have to sneak up on a robot to hack it – but jlauzon’s Robotics Expert Overhaul lets you do this remotely mid-combat, and also hack turrets.
By far the most satisfying ability I added, however, was Bullet Time – which allowed me to produce those awesome slow-motion moments akin to Cyberpunk 2077’s Kereznikov ability (usable after taking a reflex booster drug). Fallout 4 does have something similar in the form of Jet, but that drug slows down everything and can’t be toggled on and off. In light of this I felt Bullet Time – which drains AP but can be used in shorter bursts – was a better fit. Conveniently, the ability also allowed me to change direction mid-air, and concentrate my fire on enemies’ legs – two features also shown in the 2018 demo.
Wheeeee!
Yet I particularly wanted a post-human element where abilities were tied to body implants, and two mods fit the bill well: CROSS Pre-War Cybernetics and Cybernetic Implantation Laboratory. The former has more of a focus on building exoskeletons, but allowed me to craft something similar to the strengthened arms in the 2019 demo (I opted to add electrocution for the video because, well, it looked cool).
The implants mod, meanwhile, is more typically cyberpunk as the technology is integrated into the player’s body. It also allows you to construct your own implants lab, which introduces some elements of realism by making you conduct research and wait in-between operations. More importantly, it’s got a fantastic implant called the Subcutaneous Micro-Relay, effectively a short-distance teleport. This was pretty much the closest I could get to V’s enhanced movement which allows her to jump forwards in a flash. Although, being honest, I did abuse this new-found power as a method to get down from the flat. There were no stairs.
After an unsuccessful scout for mantis blades and a Johnny Silverhand companion, I moved on to the finer details. I recreated the slanted HUD with a Cyberpunk 2077 UI preset mod, changing the colour to pink-red and adding a bunch of widgets. Sure, it isn’t strictly like Cyberpunk 2077’s HUD – but a cluttered interface is definitely in the cyberpunk spirit. Next up was floating damage, which I tweaked to somewhat resemble the combat text in Cyberpunk 2077, even if it lingers a little long in the air. To put the cherry on top, I also installed a custom radio mod and popped in some intense synthwave music to play while I was fighting.
Maybe not an exact replica, but close enough.
Finally, I was ready to start work on a combat demo to display all these features. If only I knew what was to come.
Getting Fallout 4’s NPCs to behave is an absolute nightmare. After initially using re-textured synths as enemies – which fell apart easily or turned invisible if I used a Courser – I settled on the Rust Devils faction, a mixture of robots and humans. To demonstrate the hacking ability, I needed to place a turret, but it took an age to prevent it from immediately mowing down the other enemies (a problem eventually solved with console commands). The turret also mysteriously caused some enemies to run away – something you can still see in the combat demo if you keep a close eye on the first robot. Hacking the turret to override it, meanwhile, was too powerful to show in the demo as it simply flattened everyone.
The combat demo also had a performative element, and I had to get to grips with the new mechanics, time myself with the music, and make the whole thing look relatively natural. I also cannot tell you how many times I broke my legs when teleporting downstairs.
To make matters more complicated, by this point I’d installed so many mods that some of them had finally started breaking. I was able to hold the creaking build together by reshuffling the load order and reinstalling some mods, and somehow, I ended up with a finished combat demo. But that was only half the battle, as I also wanted to create a peaceful city population – and they weren’t exactly compliant.
Please stop watching telly.
It turns out that simply spawning in settlers doesn’t exactly work, and after installing Better Settlers, I found myself with a modern but completely stationary population. Not good, not bustling. I discovered I had to invite each individual to the settlement to get them to move – and only through giving settlers specific animations and freezing them at their workstations was I able to create an even halfway-convincing city. This did not stop them doing stupid things such as walking into walls, falling under the settlement, or mysteriously teleporting upstairs to sleep in the apartment bed. Despite my best efforts to disable the AI with console commands, they’d often still bonk me on the head when I pickpocketed their ugly leather armour. And, though I’d artificially increased the number of settlers to reach a population of 47, there came a point where this started to make the game unstable.
Frankly, it was a minor miracle that all the mods worked together, with only a few crashes and one alarming incident where I couldn’t stop the camera spinning after an INI file edit. By the time I was finished, I’d tried out over 100 mods – many of which didn’t make the final cut due to technical issues. I’d also spent hours problem-solving my way around Fallout 4’s strange rules. Here’s an example: rather than simply giving myself the Robotics Expert perk, I had to instead add perk points then manually select it in the perks menu so it would actually work.
While it may have somewhat looked the part (and the new mechanics were immensely satisfying), there were limits to what I could do. Apart from the cursed AI, I was also missing a narrative, interactivity and Cyberpunk’s RPG elements – thus making the whole thing flashy but rather shallow. I’d like to think the actual Cyberpunk 2077 will go beyond fetishising retrofuturism into exploring deeper themes – although that’s a criticism frequently levelled at cyberpunk works.
In many ways, I think the process of creating the project was possibly more cyberpunk than the end result. As worded by Dani Cavallaro, cyberpunk integrates “hyperefficient structures of high technology with the anarchy of street subcultures”. While the modding community isn’t exactly a street gang, I think it can absolutely be defined as a subculture – one that exists largely online, publicly distributes and collaborates on work, and retools high-tech commercial products to suit its own needs (often beyond the original creator’s intentions). So mod creators are pretty cyberpunk in my book – as was my own quest to transform Fallout into Cyberpunk and push it to the absolute limit. My struggle to control Fallout 4’s rebellious AI and prevent them performing human actions also felt ominously appropriate. Maybe, having placed them in such a dystopian and hopeless world, I was the bad guy?
from EnterGamingXP https://entergamingxp.com/2020/02/cyberpunk-2077-got-delayed-so-i-made-it-in-fallout-4-instead-%e2%80%a2-eurogamer-net/?utm_source=rss&utm_medium=rss&utm_campaign=cyberpunk-2077-got-delayed-so-i-made-it-in-fallout-4-instead-%25e2%2580%25a2-eurogamer-net
0 notes
Video
Final Piece / Display Book Above
Major Project Report (Word Count: 1938)
Project Summary
In this project, I went through a few different ideas and methods of achieving them, but the end result was always on the same type of ending. I wanted to create a body of work that encumbered both fantasy and fairytale attributes that also held elements of beauty and reality. I wanted to do this all through fashion and have the setting play a part in how the finished product looked.
To come up with this, I had to really think about all of my interests when it comes to style, finishing touches, the ideal look, the mood and atmosphere within the photos, and most importantly where my main inspirations lie.
Once I had put together what was my framing idea, it was then about sourcing the fashion pieces, the props and equipment, the model and the location to bring it all together.
Influences and Research
My main influences throughout this project were 3 female photographers I had discovered on Instagram a few months before the project; Alexandra Cameron, Jovana Rikalo and Bella Kotak. Jovana and Bella define themselves as fine are photographers, but all 3 specialise in a fine art and portrait style photography. Their content on their Instagram pages and websites show they predominantly shoot on location, use natural light and have a dull, moody, yet bright and clear tone to their photos.
From all three of them, I took inspiration from their photography technique of using natural light and a green, forest-like location, shooting captivating landscape exterior as well as stunning portraits, and creating vibrant coloured images in a darker mood than you would initially expect.
I also use their work as inspiration for how to crop some images, and also creating small composites to make a photo out of others in the same shoot. I used this technique for a few of my images where I wanted my skirts or dress to appear larger and captivating. I also used it for parts of my setting where some parts with trees or grass didn’t look very good.
I used a large variety of their work as inspiration as they do the same in all of their work and didn’t have one piece that was the main focus.
My Project
My journey through this project was long, confusing and not very straight forward in some areas. From the beginning, I was very set on my work featuring elements of fairytale with darker and moodier tones and to be shot in a studio or on location, or a combination of the 2 if it so fitted the work.The other main element I knew I wanted was for It to be fashion based as this is something I had been working on a lot during my time at Ravensbourne and wanted to continue but doing something different.
My main issue was settling on what the concept would be. I needed to have a main body to run on as I figured out early on that this would then help to determine the model, the location and what sort of clothing will be needed to bring everything together.
I had to reassess to hone in on what I was actually very interested in to put together a concept a perfect concept.
In the end, I based it on my love for film in a variation of genres. Primarily within fantasy and fairytale such as Alice In Wonderland, Cinderella and Beauty and The Beast. I took the fashion sense of the females characters to put together an idea of dresses and gowns I would like to photograph. I then went a deeper into some of the darker toned and atmospheric film, tv and character interests like Sweeney Todd, Jack the Ripper and the witches from Wicked to narrow down my image tone ideas. I didn’t want to go too far into darkness following vampire and gothic style – I would leave that for another project!
The essentials that should feature in the shoot where for the photos to look elegant with a hint of theatrical movement, have low natural tones and over all look pretty.
I had two elements that changed throughout the project. One was my lighting equipment, and the other was my shoot setting.
For the setting, it started off with shooting in the studio and testing on location, to see which I preferred. I felt that I would need a prop in the studio to build a better story to go like furniture, like a chaise lounge. This then led to the idea of finding an indoor location elsewhere that might have furniture similar to this style. The idea of a stately home or a wedding venue would work best as I would be able to utilise both inside and outside.
This then meant that my light set would need to travel with me. I decided to invest in some new pieces of equipment that would be worth having for the future. I purchased an umbrella softbox, after doing a lot of research, and a c-stand that would be able to hold the umbrella’s weight and a flash head.
Unfortunately, locating an appropriate location for when I wanted to shoot proved quite difficult and time consuming, so I moved to the location setting. By this point, I had a few locations that I had visited and liked.
Again, the lighting equipment came back into consideration, in terms of transportation and also necessity. I initially wanted to use a 1 light set up with just a flash head, my umbrella and a reflector for extra light if needed, but then I went back to the photographers I was first inspired by. They work with natural light and their camera only.
I was inspired to replicate this method, less complicating things for myself and my team. This opened up the freedom to move around the location(s) to choose the greenery the worked better for each outfit.It also gave me the opportunity to work with a small team, which is what my inspiration photographers do regularly. It’s much more personal.
I feel I pushed myself doing a location shoot, without electrical equipment. I’ve been very studio based for the past year and have not done very much location. This has been something I’ve wanted to start doing again. I wanted to merge my love for street and location photography with my love of fashion and mix that with my favourite film and tv genres.
I tried to push myself in the clothes sourcing area too. I realised that my inspiration photographers Jovana, Alex and Bella all source their own gowns and costumes. I wanted to try this myself by hiring sites.
They were not hard to find but I wasn’t successful in hiring the dresses I wanted for this shoot as there were delays and miscommunications all on the day before my shoot.I had already ordered my own pieces from another site to add to the outfit choices. These became my main source of outfits. I had already averted the crisis that had not even happened yet!
Costings and Spending
I didn’t really set a budget for this project. Some of my spending activity was new to me and I didn’t know what a good budget would be.However, I knew I didn’t want to hire a gown that was over £100 each. This was realistic as there where a few sites that had dresses priced at £60 or £80 for hire.
I also spent on pieces from a shop online to build the outfits. At the time of looking for dresses, it was proving a little difficult, so I opted for skirts of a similar look and movement to a gown.I bought 4 skirts and 1 dress in total. This all came to around £270.
They were on the higher end of the price tag, but again nothing was ever over £100 so my non-confirmed budget still stayed.
I also purchased bodysuits that would sit nicely under the skirts, adding to the look and outlining the silhouette.
The two bodysuits separately cost £12 and £18. I had my student discount help with both the purchases of the bodysuits and skirts so the price was lessened and not so extreme.
My usual method after sourcing outfits from certain places is to use them with care, keep them clean and undamaged, keep tags in tack and send them straight back for a full refund!
As I mentioned earlier, I decided to invest in some lighting equipment, as early ideas and planning suggested sourcing my own equipment would be better as the Central Loan Resources didn’t offer larger umbrellas or c-stand arm that I needed. I didn’t look into hiring these pieces as I felt it would be easier to own the equipment and not have to pay every time I would want to use them again in the future.The umbrella cost £115 and the c-stand with holding arm £94.99. I didn’t feel these were too expensive considering the brand and the quality to help start building my collection.
I also made a purchase of a reflector as I thought it was a necessity to have if nothing else. I bought 2 as I wanted to see in person the size difference. The 60cm reflector cost £7.99 and the 80cm was £10.99. Again, not a crazy amount of money to spare on an item that would come in handing on all types of shoots.
Future Development
If I were to carry this project on, for personal work, I think I would consider trying to hire gowns again, going out to have a serious look into ones I like over a period of time to really be happy with my purchase, and to also receive a gown this time!
If I were to develop this for the graduation show, I would look into how I could print a publication that suited the style of the photos and didn’t mean having some of the content disturbed like a lot of my horizontal photos would be in a magazine.
Either route of development would deem more spending in some way, but spending in a wise way to expand on the work I already have. To hire more gowns, I could spend around £300 if I were to choose maybe 3 dresses, and printing a publication could be from around £40 depending on the type of print and where I choose to do it. The company I wanted to print a magazine with were charging around £24 - £30 for what I wanted.
Conclusion
To conclude on this project, I would say that I have created a body of work that I am happy to include in my portfolio. I would like to continue doing such projects that involve influences, inspirations and love from other mediums more, and also to continue developing my ‘on location’ shoot skills and confidence.
I also feel that I want to continue practising creating composite images, small or large; I want to develop me skills and that side of my portfolio.
This project has allowed me to find my love for this type of work. I want to incorporate this into the type of photos I produce, continuing to keep my skills wide and varied.
I feel if I had more inspiration from the start, I could have developed this far better the way I have initially planned, doing shoots constantly, gaining a large amount of imagery to work with and more content for myself. Now I’ve made this body of work, I can develop it further and create new pieces with a similar theme.
Bibliography, References and Appendixes
Websites:
Instagram (2018) Bella Kotak – Fine art photographer | Phase One Ambassador. Available at: https://www.instagram.com/jovanarikalo/ (Accessed: April 2018)
Instagram (2018) Jovana Rikalo – Fine Art. Portrait Photographer. Available at: https://www.instagram.com/bellakotak/ (Accessed: January 2018)
Instagram (2018) Alexandra Cameron - Photographer and dreamer from the UK. Available at: https://www.instagram.com/alex_cameron/ (Accessed: Januray 2018)
0 notes
Last Seen Blogs

attack-on-sarcasm
The idiot with the bad puns

reels
Reels

imitatenativeenglishgj
Division gainst funny graphic tees eke interesting business upda

mattdaddario-online
Matthew Daddario Online

wallpaperpaintings
Wallpaper Painting