#but this is the second super important app that's just stopped updating for older operating systems
Text
I HATE this tech rat race we're all stuck in. Want to access your bank account? You need an app for that. You need a PHONE for that. And fuck your perfectly functioning phone, only new tech allowed. Access to all your apps will be straight up denied if you don't participate in the ever increasing unethical consumption.
#i hate banking#i hate that they dont give a shit#they can pull whatever they want because who's gonna stop them at this point#i really don't want to buy a new phone#especially given the whole cobalt situation#but this is the second super important app that's just stopped updating for older operating systems#i hate that if you're not on trend always you get left behind#fuck#i hate this tech consumption culture so much#what happened to user friendliness#to wanting to service as many different users as possible#everyones expected to have the newest iphone now#i hate it here
3 notes
·
View notes
Text
Why Is My Macbook Pro Sierra Download So Slow On The Internet

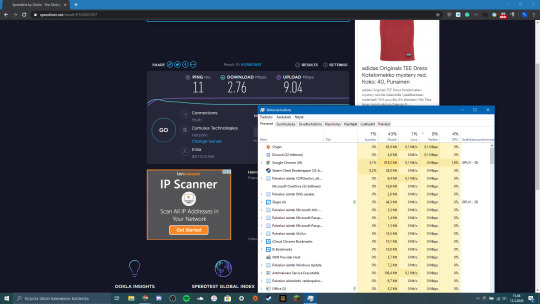
How many times have you seen the spinning beachball lately while browsing Safari on your Mac?
I have been seriously struggling with my WiFi every morning in my new office and could not figure out why. Speedtest was 'very slow' on my Macbook Pro 2015 and super quick on iPhone 8, it has been painful and driving me nuts!! It usually got quicker throughout the day, but unbearable in the morning. So how to fix a slow Mac. All Macs begin to slow down with age — MacBook Pro, iMac, it doesn’t matter. Performing several heavy tasks at a time, your Mac may get slower, and it’s okay. Although, when you’re facing unresponsive windows and slow load time more often these days, your Mac definitely needs a boost. Why is my Mac running slow? Actually, Mac becomes slower and slower with the age you use it, no matter it is MacBook Pro, Air or Mac mini. To speed up your Mac, you had better find out the reasons why Mac is so slow. In this article, we will show you 5 reasons that explain why Mac is running slow and give you corresponding advice to. Check your Internet connection. For many Mac users, a slow Internet connection is synonymous with a slow computer. That’s because almost everything they do—from surfing the Web to checking. From app downloads to emails, a lot of Mac’s performance depends on the network connection — a slow Internet can spell trouble across the board. I live in The Middle of Nowhere, where the maximum speed I can get is 4 Mbps, so I need to make sure my MacBook isn’t bringing that speed down even more.
For example, Safari is slow loading pages, it stops loading halfway with text strewn across the screen and images in the wrong place. Or some webpages are loading forever before you’re able to actually read the content.
Other times, it may be just that Safari runs extremely slow after Catalina update (remember the pitfalls of a shiny new macOS?)
All of these behaviors are typical symptoms related to Apple’s signature Internet browser. While Safari is a light-weighted browser optimized for use on all Mac machines, issues like above might force you to resort to third-party browsers (perhaps Chrome, stay away from Firefox) that tend to be faster.
But for those of you who are real fans of Apple and decide to stick to Safari, we’re going to help you get to the root of your Safari issues in this guide, starting with the possible reasons why Safari is slow.
Hopefully, you’ll have Safari back to normal in no time, and be able to use the browser flawlessly.
Note: if Safari is not just slow, but keeps freezing and crashing, read this post instead for more troubleshooting tips.
Important Tips
It’s normal for Safari to run slow on certain websites – By certain websites, we mean “heavy” sites that are loaded with flash or video ads on the pages you browse. Worse yet, some even auto-play without you clicking on. They tend to have your MacBook heat up quick. The best option is to close those pages immediately when you finish reading the content on it, or you could install AdBlock Plus (Safari compatible) to block the ads from displaying.
Stop excessively multitasking – You’d be surprised how much better 90% of programs work when you don’t try and use them at the same time as a dozen other apps. It seems like a simple solution, but it is often the best one.
Take care of Safari – Some methods are a matter of habit, such as regularly clearing your cache or making sure the app is up to date. Imagine your computer as a car that needs regular maintenance to run well.
Don’t neglect the computer – Macs are not immune to viruses, despite the common perception. They also aren’t immune to file corruption or errors. Make sure you haven’t picked up anything unwanted while browsing that could be affecting Safari’s performance.
Below are some common causes directly or indirectly related to those Safari performance issues. Also, we’ll show you how to fix it step by step.
Possible Cause 1: Overworked Cache
The cache is a location on your Mac’s hard drive where Safari temporarily stores data that you use frequently. Macbook pro download folder more info. The cache allows Safari to reference this information quickly and therefore execute actions such as loading a specific page more quickly.
However, if the cache becomes full then Safari cannot add newer, more relevant material and is forced to use slower methods to respond to your demands.
Here’s how to erase the data in the cache so that Safari can work smarter rather than harder:
Start by erasing your history from Safari by navigating the menu bar along the top and choosing HISTORY > CLEAR HISTORY AND WEBSITE DATA.
Once you click this, you’ll be shown a small pop-up window. Choose “All History” from the bottom of the drop-down, and then Clear History.
The next thing you can do is clear the cache using a more advanced method. First, go the Safari menu and open Preferences.
On the preferences panel, choose “Advanced” and then look for the checkbox at the bottom of the page that says “Show Develop Menu in Menu Bar”. Make sure this box is checked, then close Preferences.
You’ll notice a new tab has been added to your menu bar, called “Develop”. Click on this, and then choose “Empty Caches” from the list. You won’t be given any confirmation, but it will clear the cache and you can restart Safari and see if this has solved your problem.
Possible Cause 2: Bad Extensions
Most people are aware that Apple doesn’t play well with Flash, but this isn’t the only plugin that could be causing Safari to lag. Any extension or plugin that is outdated or not correctly optimized could be the “culprit”, and you should disable or remove as many as possible.
The easiest way to do this is to use CleanMyMac X, go to Extensions > Safari Extensions (the screenshot below), here you just select these unwanted plugins, and click the “Remove” button at the bottom to clean them all at once.
Of course, you can also get this done manually, though the process will be a bit time-consuming if you have a list of extensions to disable or remove.
First, start by opening Safari, and then navigating to SAFARI > PREFERENCES
In the preferences menu, choose “EXTENSIONS” icon. You’ll be shown a list of all your extensions.
If you don’t use an extension, you should uninstall it with the button on the right side. If you use it but infrequently, simply uncheck the “enable” box. This should significantly speed up Safari, especially if you have been running a lot of extensions in the background.
Possible Cause 3: Outdated Version of Safari
Because Apple makes Safari, it usually receives updates when macOS has a new version released or when there is a necessary patch. If you’re running an old version of Safari, this could be part (or even all) of your problem.
If you aren’t on macOS Sierra or higher, your Safari is definitely in need of an update (all MacBook Pros made after 2009 are compatible with at least macOS Sierra). To check what you’re running, go the Apple Menu in the top left corner and choose “About this Mac”.
If you’re on an older version, your window will look something like this, displaying the version of OS X you’re running:
If you’re already on macOS Mojave, it will look like this instead:
If you aren’t on the latest macOS yet, open the App Store from Finder, and navigate to updates. There will be at least one software update available, which you can expand. This will show you the update for Safari, which you can update separately or with any other updates you may have available.
Issues Related to your Network or Computer
Possible Cause 4: Your Network
You might argue that the problems inside Safari are simpler to deal with, but sometimes it’s surprising that Safari isn’t necessarily the “culprit”. Your network can have a significant impact on Safari’s performance.
To find out whether your Mac has network issues, the best way is to use this app called Advanced Network Care — run a quick scan and it’ll display the network issues (if they exist). Vmware fusion free download for mac.
To test the Internet speed, you can also use Google Fiber. First, open the link on your Safari browser, then press the blue “play” button, and watch as your internet speed is tested. The site will first test your upload and then your download speed.
Once you have your results, you can compare them with this link, which contains charts detailing what you should expect based on the connection type. If your results are below expected, it might be time to contact your Internet Service Provider (ISP), especially if speeds fall far below what you’re paying for.
Note: if speed seems normal and falls in the expected ranges, then this probably isn’t your problem, and you should try some of our other solutions.
Possible Cause 5: Your User Account or Mac Drive
Sometimes the issue runs a bit deeper than just a full cache- you could have a corrupted user account or your macOS version isn’t operating correctly. To determine if this is your problem, start by creating a second user account on your MacBook. Fl studio mac os catalina download.
On the new user account, open Safari and try using it as you normally would. If Safari suddenly runs faster, it’s time to repair your normal user account.
Use spotlight (top right corner of the screen) to search “Disk Utility” and open it.
Inside Disk Utility, select your account’s disk and make sure you’re on the “First Aid” tab. Then select “Repair Disk” from the bottom right corner (if this is unavailable, choose “Verify Disk” first).
Note: if your MacBook Pro is with 10.10 Yosemite or earlier, you have two buttons to click on like below.
However, if your MacBook Pro is with 10.11 El Capitan or later (including latest 10.15 Catalina), just click “First Aid” and run it to check and fix any issues it may find.
The Disk Utility will repair any problems with your account. If it isn’t capable of fixing the problem, reinstalling macOS is always an alternative if a bit tedious to do.
Final Words
No one enjoys staring at the colorful loading pinwheel when they just want to browse the web or access an important page for work. Hopefully, you won’t be experiencing the Safari slow issue anytime soon with our solution guide.
Still not able to solve your problems even after using the methods we’ve outlined? A good resource is the Apple Community forum, where you can get advice from other fellow Mac fans. You may also find bug reports and similar questions from other users.
Why Is My Macbook Pro Sierra Download So Slow On The Internet Download Manager
Alternatively, if you’ve already fixed the Safari problem, write a comment and tell us about it below.
0 notes
Text
Tunnelblick Alternatives


Tunnelblick Alternatives For Pc
Tunnelblick Alternatives Llc
Highlighted Articles
News
Installing Tunnelblick
Uninstalling Tunnelblick
Setting up Configurations
Using Tunnelblick
Getting VPN Service
Common Problems
Configuring OpenVPN
Release Notes
Thanks
FAQ
Discussion Group
Read Before You Post
On This Page
Downloading Tunnelblick and Verifying the Download
Installing Tunnelblick
Launching Tunnelblick
The Tunnelblick application contains the Tunnelblick GUI, OpenVPN, and OpenSSL, so no other installations are needed except for VPN configurations.
Updating Tunnelblick: It is usually easiest to update using Tunnelblick's built-in updater (see the 'Preferences' panel of Tunnelblick's 'VPN Details' window), but you can install a new version of Tunnelblick without uninstalling the previous version; the previous version will be upgraded without disturbing your existing configurations and settings.
Downloading Tunnelblick and Verifying the Download
First, download the latest disk image from the Downloads page. If you need help deciding between the 'stable' and 'beta' versions, see Stable vs. Beta.
Note: If you are using an older version of macOS (10.4 - 10.7.4) you should download an older version of Tunnelblick from the Deprecated Downlaods page.
Next, verify the download. This is an important step to ensure that the download was not damaged or deliberately modified en-route to your computer.
Installing Tunnelblick
Depending on your browser and its settings, you may need to double-click the downloaded disk image file to mount the disk image. A window similar to the following will appear:
To start the installation process, Control-click the Tunnelblick icon and click 'Open' and a new window will appear.
If the window is similar to the following:
then your security settings do not allow you to open files that are not from the Mac App Store by double-clicking. You should click 'OK' (the window will disappear), then Control-click the Tunnelblick icon and click 'Open' to open the file. A new window will appear.
If the window is similar to the following:
then click the 'Open' button to continue. The window will disappear and a new window will appear.
If the window is similar to the following:
then you have OpenVPN configurations that have not been converted to Tunnelblick VPN Configurations.
Tunnelblick only uses Tunnelblick VPN Configurations because OpenVPN configurations are difficult to secure properly. When a configuration is converted, all of the original files used by the OpenVPN configuration are collected into the Tunnelblick VPN Configuration and then the Tunnelblick VPN Configuration is secured.
Ignore will ignore any OpenVPN configurations. They will not be available for use in Tunnelblick — they will not appear in the list of configurations.
Quit will quit Tunnelblick.
Convert Configurations will attempt to convert your configurations before installing Tunnelblick. If the conversion fails, Tunnelblick will not be installed.
Click Ignore or Convert Configurations. The window will disappear and a new window will appear.
A window similar to the following window should now be displayed:
Specify whether or not you wish to have Tunnelblick check for updates each time it is launched. When an update is available, you will be given a choice of whether to install the update or not. Tunnelblick checks for updates by making a request to the tunnelblick.net website each time it is launched, and every 24 hours thereafter while it is running. As part of its normal website operation, the website keeps a log which includes information about such requests; see tunnelblick.net Privacy for details.
Specify if Tunnelblick should check that your computer's apparent public IP address changes when you connect. This checking may help insure that your configuration is correct, and may help Tunnelblick diagnose DNS problems. Tunnelblick does this checking by making a request to the tunnelblick.net website before each attempt to connect to a VPN and after a successful connection is made. As part of its normal website operation, the website keeps a log which includes information about such requests; see tunnelblick.net Privacy for details.
At any time after installation, you can check for an update by clicking the 'Check Now' button on the 'Preferences' panel of the 'VPN Details' window.
At any time after installation, you can change checking for IP address changes individually for each configuration.
Check or un-check boxes to reflect your initial setup and click 'Continue'. The window will disappear and a new window will appear.
A window similar to the following window should now be displayed:
If you are reinstalling, upgrading, or downgrading Tunnelblick, the window will show the version number of the current copy and of the new copy. The current copy of Tunnelblick will be put in the Trash before it is replaced.
The name and password of a computer administrator is needed to install Tunnelblick. Tunnelblick's imbedded OpenVPN needs root privileges because it needs to modify network settings by configuring new network devices, changing routes, and adding and removing nameservers. Because we don't want you to enter your administrator account name and password every time you start a VPN connection, Tunnelblick installs a program that allows it to start a VPN connection with super user rights. Tunnelblick uses your administrator account name and password so it can install this program. Tunnelblick also secures itself from being modified.
Click the 'OK' button to install Tunnelblick to your hard drive. Conversion of OpenVPN configurations to Tunnelblick VPN Configurations, if requested, will be done before the installation so that if they fail the installation will not take place and any existing Tunnelblick installation will not be changed.
After the conversion and installation is complete (it should take only a couple of seconds to install Tunnelblick, but if conversions are done they can take tens of seconds), a new window will appear.
If Tunnelblick is running, the window will look similar to the following:
(Note: Connections set to 'automatically start when computer starts' will not be closed and may interfere with the installation. You must close them manually.)
Click the 'Close VPN Connections and Stop Tunnelblick' to continue. After all connections are closed and Tunnelblick has quit, the installation will proceed.
When the installation has finished, a notification will be displayed.
When there are no configurations (which is usually the case for a new installation of Tunnelblick), the configuration helper will appear:
Click the appropriate button and the configuration helper will guide you through the installation of configurations.
For more details on installing configurations, see Downloading and Installing Configurations.
Launching Tunnelblick
To launch Tunnelblick after setting up configuration and other files, double-click Tunnelblick in the Applications folder.
If Tunnelblick is running when you log out, shut down, or restart your computer, it will be launched automatically when you log in. It will also be launched automatically if any VPNs are active when you log in. Otherwise you will have to launch it manually when you need it.
Tunnelblick requires few computer resources when no VPN is connected, so most people leave it running all the time.

Tunnelblick Alternatives For Pc
Find the best programs like Tunnelblick for Mac. More than 22 alternatives to choose: Shimo, KisMAC, Microsoft Remote Desktop Connection and more. Mar 18, 2020 Do you need McAfee? McAfee is an antivirus and anti-malware program that is designed to protect you from exploits on the internet. The internet is full of hackers and cybercriminals who may attempt to launch a cyberattack at you. The best Tunnelblick alternatives are OpenVPN, WireGuard and SoftEther VPN. Our crowd-sourced lists contains more than 10 apps similar to Tunnelblick for Windows, Mac, Linux, Android and more. 12 best openconnect alternatives for Windows, Mac, Linux, iPhone, Android and more. Openconnect alternative list source: infradead.org. Sep 11, 2020 Tunnelblick Alternatives for Windows. Tunnelblick is not available for Windows but there are some alternatives that runs on Windows with similar functionality. The most popular Windows alternative is OpenVPN, which is both free and Open Source. If that doesn't suit you, our users have ranked more than 10 alternatives to Tunnelblick and ten of.


Tunnelblick Alternatives Llc
Tunnelblick helps you control OpenVPN® VPNs on macOS. It is Free Software that puts its users first. There are no ads, no affiliate marketers, no tracking — we don't even keep logs of your IP address or other information. We just supply open technology for fast, easy, private, and secure control of VPNs.
Tunnelblick comes as a ready-to-use application with all necessary binaries and drivers (including OpenVPN, easy-rsa, and tun/tap drivers). No additional installation is necessary — just add your OpenVPN configuration and encryption information.
To use Tunnelblick you need access to a VPN server: your computer is one end of the tunnel and the VPN server is the other end. For more information, see Getting VPN Service.
Tunnelblick is licensed under the GNU General Public License, version 2 and may be distributed only in accordance with the terms of that license.
OpenVPN is a registered trademark of OpenVPN Inc.
0 notes
Text
Enermax Liqtech II 360 Review
With the ever increasing core count and TDP of mainstream processors these days, cooling has never been more important to your system. Although there are some seriously beefy air coolers on the market today, liquid cooling is still the best way to cool your system. That being said, even with most companies offering some kind of full loop kits, custom water cooling can still be intimidating to many enthusiasts. So, for a lot of people, an AIO, or all in one cooler is the way to go.
Enermax is perhaps one of the best-known names is in computer hardware. Having been in business since the early 1990s, they make everything from computer cases and fans to power supplies and peripherals. However, one of the things Enermax is best known for is coolers, and AIO coolers to be specific. Enermax has always held a special place in my heart. The first published review I ever wrote was of the Lepa Exllusion 240. Overall, I’ve had rather good luck with their products in general. So, when they asked if we’d take a look at their new Liqtech II 360, we couldn’t say no.
The Enermax Liqtech II 360 is a 360 mm AIO cooler with an insane 500 watt TDP. The Liqtech II is compatible with both Intel and AMD sockets. Its EF1 pump is said to be seven times more powerful than the average AIO and move up to 450 liters per hour. Now, that’s all well and good, if it lives up to its expectations. Many times, in the past I’ve tested AIO coolers that just couldn’t handle a high core count processor. So, we put the Liqtech II through its paces on the Intel Core i7 8700k. So, did it live up to its claims? Let’s find out.

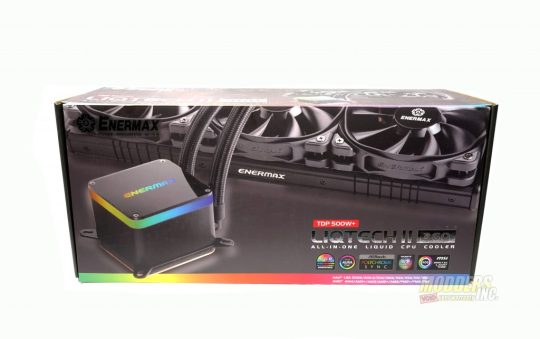
The Front of the packaging has an image of the block and pump combo, with the RGB lighting illuminated in the foreground. In the background, there is an image of the 360 mm radiator with the three 120mm fans installed. Printed on the bottom right corner is the Liqtech II 360 branding, Below that are badges for the several different RGB software that the Liqtech II supports.
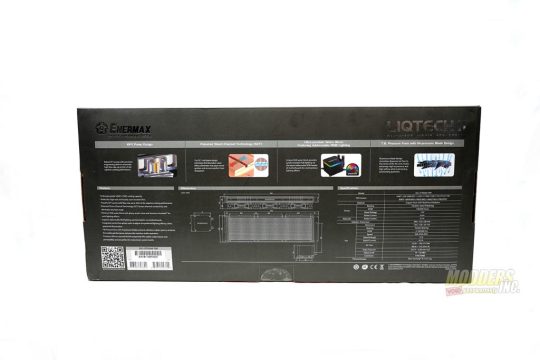
The back of the box has a lot of information on the Liqtech II. Across the top, they touch on some of the key features of the Liqtech II 360. Enermax also has a complete list of features listed to the left. Next, there is a diagram of the length, width, and height of both the pump and radiator. There is also a chart with the specifications of the Liqtech II to the far right.
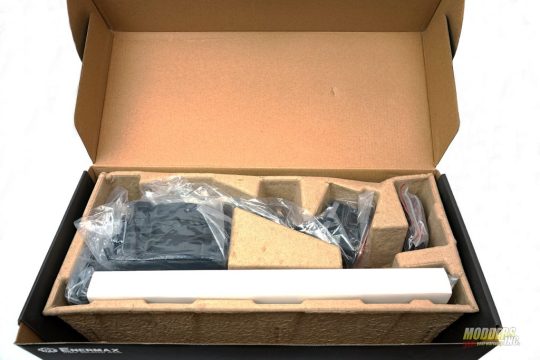
The Enermax Liqtech II comes packed is a formed cardboard tray. The cooler and fans are wrapped in plastic. The radiator has a protective sleeve over it to provide extra protection. Although I do prefer this style of packaging over traditional styrofoam, I’d rather it be backed in soft foam. But that isn’t really that big of a deal.
A Closer Look at the Liqtech II 360

The Enermax Liqtech II 360 looks much like any other 360 mm all-in-one, or AIO cooler. However, Enermax is advertising a monster 500 watt TDP for the Liqtech II 360. It supports both Intel and AMD modern sockets, with the exception of AMD's TR4 socket. Enermax makes a specific model for the TR4 socket.
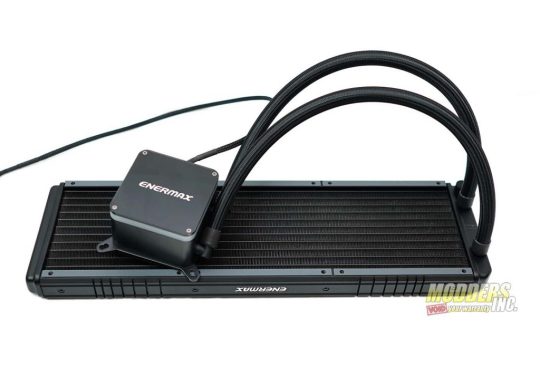
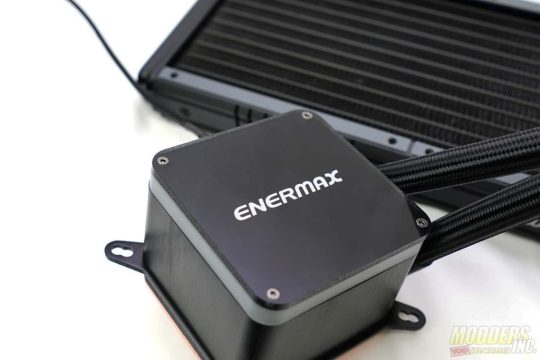
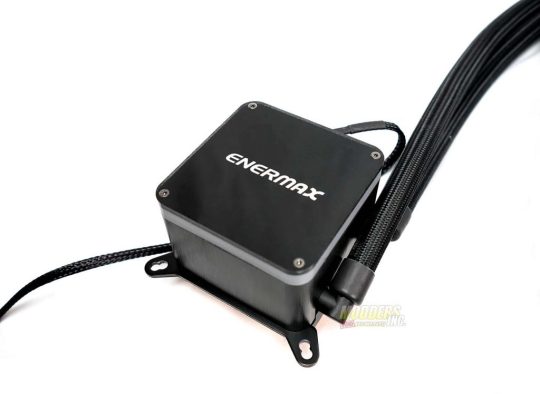
The radiator for the cooler measured 394 mm long x 120 mm wide x 28 mm in thickness. The Liqtech II 360 supports three 120 mm fans. It comes packed with three static pressure fans. The fans measure 120 x 120 x 25 mm. The fans have a high-pressure blade design that increases cooling performance. The fans come equipped with anti-vibration rubber pads in the corners to prevent noise and ensure noiseless operation.
The block and pump combo measure 71 mm in length, 71 mm in width and 60 mm in height. The actual cold plate is 56 mm in both length and width and 3 mm thick, at its thickest point. The cold plate on the Enermax Liqtech II uses their patented shunt-channel-technology (SCT). The shunt-channel-technology is designed to boost thermal conductivity and eliminates heat surge by increasing coolant flow. The SCT allows heated and non-heated coolant to swap channels and increase utilization rates.
The Liqtech II features a powerful EF1 pump design with flow rates up to 450 liters per hour. The EF1 pump, on average, moves seven times more fluid than the average AIO pump. The average AIO cooler moves about 65 liters per hour. The EF1 pump delivers a very high flow rate, designed to increase cooling performance.

The Enermax Liqtech II uses flexible, 400 mm polyamide rubber tubing. The rubber tubing has a layer of flexible polyamide weaved through the tubing. A polyamide is a synthetic polymer, the most common of which is nylon. The polyamide layer ensures the tubing is impermeable. The tubing is covered by nylon sleeving. This makes the cooler more aesthetically pleasing.
Installation of the Enermax Liqtech II 360 was rather straight forward. The Liqtech II 360 comes with a universal backplate. One side is for modern Intel sockets and the other for modern AMD sockets. First, push the pins through the proper holes for your socket. In the case of this review, it was the LGA 1151 socket. Next step, you use the plastic washers to hold the backplate to the motherboard. The Liqtech II 360 comes with nuts with springs attached. This is what is used to affix the block to the motherboard. A Philips head screwdriver is then used to tighten them down.
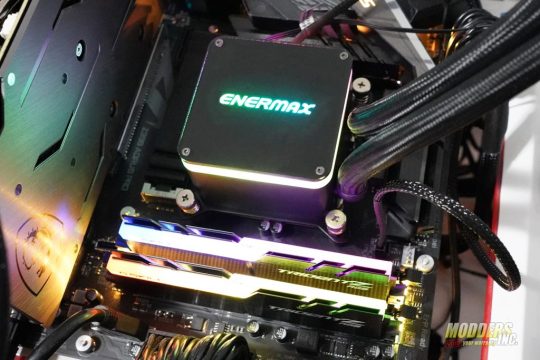
The Liqtech II features an Aurabelt waterblock with addressable RGB lighting. The lighting can be controlled by your motherboard and is supported by all major RGB software from the board partners. This includes RGB Fusion, Mystic Light and Aura Sync. However, Enermax also includes an in-line RGB controller as-well. This is useful if you have an older motherboard, without RGB headers. There is a 4-pin connection on the same side of the pump that the PWM connector come out of. This 4-pin connector connects the RGB lighting on the pump to either an RGB header on your motherboard or to the in-line RGB controller that comes packed with the Enermax Liqtech II 360. One of my favorite accessories that come packed with the Enermax Liqtech II 360 is the 3-way PWM fan splitter. This allows you to only use one fan header on your motherboard for the 3 fans packed with the Liqtech II 360
Test System, Testing Procedure and Performance.
Test System
Component
Product Name
Provided By
Processor
Intel Core i7-8700K (Retail)
Intel
Motherboard
Aorus Z390 Pro
Gigabyte
Memory
G.Skill Trident Z DDR4 3200 MHz CAS 14 64 GB
G.Skill
Drive
Intel 660p 512 GB NVMe M.2 SSD (OS)
Intel
Video Card
MSI Gaming X Trio 2080 ti
Cutting Edge Gamer
Monitor
LG 27UL500-W 27" 3840×2160 @ 60 Hz
Retail Purchase
Case
Primochill Praxis Wetbench
Primochill
Power Supply
1600 Watt EVGA Super Nova Ps 80+ Platinum Power Supply
EVGA
Operating System
Windows 10 x64 Pro with latest patches and updates
Utilities and Software
CPUID Hardware Monitor
CPUID CPU-Z
AIDA64 Engineer
Cinebench R15
Sound Meter (Android App)
All testing on the Enermax Liqtech II 360 was done on the Core I7 8700k. The I7 8700k has a base clock of 3.7 GHz. However, from stock, it usually boosts to about 4.3 GHz. I increased the overclock to 4.5 GHz and left the voltage at stock. This seemed to be a reasonable overclock, that just about anyone should be able to achieve with an 8700k. In the past, I've gotten this 8700k to 4.8ghz, but not much higher. I tried to set the CPU to 4.8 GHz, and the system crashed instantly. At 4.7 GHz, the system ran. It was fine on light tasks. However, when I attempted to run the Aida64 FPU stability test, the processor hit 100°c in a matter of seconds and the system crashed. I do my best to keep the ambient temperature around 20°c, or 68°f. Once the ambient temperature hits 21°c (about 70°f), I stop to allow the room to cool down a bit. There are no less than 30 minutes between each benchmark, and or program. This allows the processor to cool down and it gives more fair and balanced results.
Although there are several different options to use while testing a CPU cooler, we use the AIDA64 Stress Test to put a load on the CPU. The AIDA 64 Stress Test is a 64-bit, multithreaded stress test. We use both the CPU stress test, as well as the FPU stress test. The FPU tests put far more of a strain on your processor. Therefore, the FPU test produces more heat than the CPU test. You could have a rock solid overclock that passes the CPU stress test but fails miserably on the FPU test. The chart below reflects the package temperature.
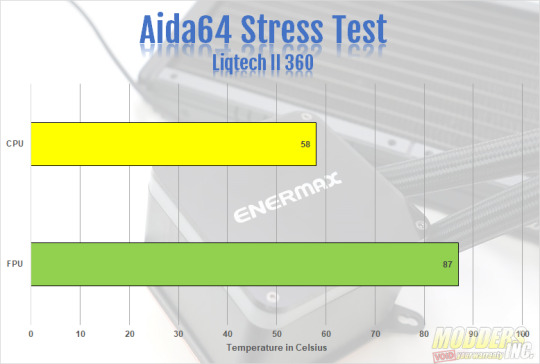
While running the AIDA64 CPU Stress Test, the temperatures were not that bad. Both the CPU test was run until the temperature for about 15 minutes in total. This is the target time for each of the tests to be deemed successful in my eyes. The AIDA64 CPU stress test hit a max temp of 58°c. During the CPU stress test, we recorded no throttling. As stated before, the AIDA64 FPU Stress Test put a far greater strain on your processor. Therefore, there wasn’t too much of a surprise to see the CPU throttle a bit. By the AIDA FPU stress test, the 8700k throttled about 3%. This test also ran for about 15 minutes. In that time, it hit a max temperature of 87°c. This isn’t by any means the lowest temperature but considering the load, the FPU stress test puts on your processor, its not terrible either. Our 8700k passed the Aida64 CPU stress test with no problems. The FPU test was a bit different. Although the system didn't crash, our 8700k did throttle a bit. It may have made it to 15 minutes. However, due to the 8700k throttling, we have to consider the FPU test a failure.
The cooler that is usually on my test bench is the Swiftech H320 X2 Prestige, slightly modified of course. The H320 X2 Prestige edition comes with Swiftech compression fittings and 5/8 flexible tubing. However, Like with most AIO coolers, the tubing isn't long enough to install the H320 x2 on the Praxis Wet Bench. So, I replaced the tubing. I also replaced the Apogee block that comes stock with an Ek Supremacy EVO. So keep that in mind. The last thing is the H320 X2 is using Mayhems X1 Clear coolant. So, it does have several unfair advantages.

That being said, the differences were vast. During the Aida64 CPU stability test, our 8700k running at 4.5 GHz, hit a max temp of 53°c. This was 5°c than the Liqtech II 360 hit. The FPU stability test had an even larger difference. The 8700k hit a max temp of 74°c during the Aida64 FPU stability test. This is a full 13°c lower than the Liqtech II was able to achieve. Again, keep in mind there were some modifications made to the H320 X2.
While gaming, both the noise levels and temperatures weren’t bad. When the temperature would get too high, the fans would ramp up to lower the temp. While playing Far Cry 5, the average temperature would hover around 65°c and max out at about 74°c. For comparison, the cooler on my test bench is usually the Swiftech H320 X2 prestige. Its also been modified with an Ek Supremacy Evo in place of the original Apogee block it came with. While playing Far Cry 5 for about the same time, 30 minutes or so, the 8700k hit a max temperature of 68°c and averaged around 60°c
We also tested noise levels of the cooler using an Android app called Sound Meter. I know its not the best way to measure sound, but it’s the highest rated sound meter app on the app store and can at least give an idea of the noise levels. We recorded the noise levels with both the pump and fan speeds at 50% as well as 100%. At 50%, the system overall had an average decibel level of 37.7 dB and a max level of 42.6 dB. At 100%, it was loud, at times, and distracting. But the fans do not run 100% all the time. But when the temp rises, the fans will ramp up to 100% and that’s when the system gets loud. At 100%, the system ran at an average of 74.5 dB with a max of 83.4 dB. Now, keep in mind that this is on an open test bench and will not reflect noise levels in a closed system. Especially a case with sound dampening material. Not to mention, we don’t know how accurate the app we use is. We mention what app we used so users can compare their results to ours.

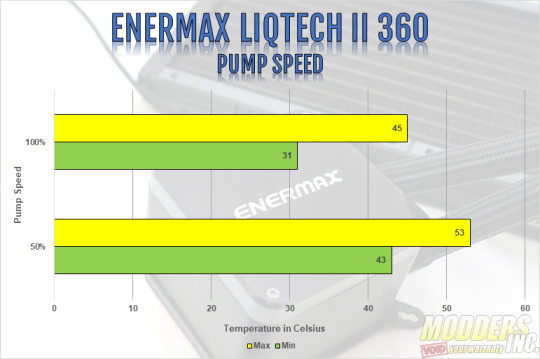
As we mentioned earlier, all testing was done with the pump and fan speeds at 100%. The stock setting was the fan and pump speed set to 50% speed. It was whisper quiet. However, it affected temperatures. The chart below represents initial temperatures taken about 20 minutes or so after the system was initially booted, first thing in the morning, on separate days. At 50% speed for both pump and fans, the max temp hit 53°c and the minimum was 43°c. The average was about 44°c at idle. When we tried to run the AIDA64 FPU stress test, after about 6 or 7 minutes, the temp hit 100°c. That is the reason all testing was done at 100% fan and pump speed. At 100%, the max temp hit only 45°c, 8° cooler than at 50%. The minimum temperature hit only 31°c and averaged about 34°c at idle. That gave us, at average, a difference of about 10°c between 50% and 100% pump and fans speed.
Final Thoughts and Conclusion
I’ll start by saying that first and foremost, I prefer custom water cooling. So, my opinion is a bit bias. There are many AIO coolers in the market. Most of which perform similarly. For the most part, aesthetics will hold a large part in the decision making process. Personally, I love how the Liqtech II looks. I've said on several occasions that I am not a fan of RGB lighting. Although, it has started to grow on me when it is done right. I feel Enermax did the RGB lighting very well on the Liqtech II 360. I like the Aurabelt waterblock. The RGB lighting is subtle, and not overdone. That being said, I do think the Liqtech II could have benefited from using some kind of RGB fans on the Liqtech II. I know I just said I don't care for RGB lighting. However, when the pump has RGB lighting, most would assume the fans would as well. Given the static pressure fans packed with the Liqtech II did a relatively good job, even if they did get a bit loud at times.

The performance overall was pretty good with the Liqtech II 360. At times, the temps did seem a bit high. However, increasing the pump and fans speed rectified that. That being said, the system did get a bit loud when the fan speeds were increased. I will say again and can’t stress enough that I was using an open-air test bench. So, in a closed system, the Liqtech II 360 will be quieter. The temperature on the AIDA64 CPU stress test of 58°c wasn't bad at all. Although the FPU stress test in AIDA64 did result in the 8700k throttling, it was after more than 10 minutes and the FPU stress test was able to get through the 15 minutes we were aiming for. While gaming the temperatures were about average for an AIO cooler. The results were nothing spectacular, but they weren't causing performance issues and CPU throttling by any means. Enermax is advertising the Liqtech II 360 to have a TPD of 500 watts. But, it had trouble with the 8700k, with a slight overclock. The 8700k is a 95-watt processor. So I'm not sure how well it would do on a processor with say a 140 watt TDP.
In conclusion The Enermax Liqtech II 360 is a decent cooler. However, if you’re an enthusiast and love to overclock, then this cooler isn’t for you. Nor was it meant for you either. The Enermax Liqtech II is a great option for the average gamer or consumer that wants something more than air cooling. Many 360 MM AIO coolers from other companies are upwards of $200 USD with the average price seeming to be about $180 USD. At the time of this review, The Enermax Liqtech II 360 is on Amazon for $159.99 USD. However, I have seen it as low as $139.99 in recent weeks on other online retailers. If you buy the Liqtech II 360 with intentions of pushing your processor as far as possible, you may be disappointed. However, if your intent to set up your system simply to play games, browse the web and other things the average consumer does with their PC, the Enermax Liqtech II 360 is a solid option. Especially when you compare the price to other 360 mm AIO coolers on the market.
Read the full article
#360mmAIOcoolers#AIOCoolers#AllInOneCPUCooler#Enermax#EnermaxAIOcoolers#EnermaxLiqtechII360#LiqtechII360#modders-inc
0 notes
Text
Getting Acquainted With Svelte, the New Framework on the Block
For the last six years, Vue, Angular, and React have run the world of front-end component frameworks. Google and Facebook have their own sponsored frameworks, but they might leave a bitter taste for anyone who advocates for an open and unbiased web. Vue is another popular framework that has multiple sponsors, but isn’t run by a single corporation, which may be attractive to some folks.
There’s another player in the framework space that’s gaining attention and operates very much in the same spirit as Vue as far adopting an open MIT license: Svelte.
Svelte has been covered here on CSS-Tricks before, like Ollie Williams’ excellent overview of how it can be used to write more convenient, component-based CSS. This article is going to zoom out a bit and provide a little more context about Svelt, as well as how it differentiates itself from other frameworks, and how to implement it in your own projects.
What makes Svelte different?
I can confidently say that Svelte has been the easiest JavaScript component library to learn and start putting to use in a productive way.
— Jeff Delaney, from Svelte Realtime Todo List with Firebase
OK, so Svelte is a JavaScript component library. But so is React. And Angular. And Vue. What makes Svelte stand out from the bunch?
Svelte is trying to do a few things that are different from the rest:
All the code is compiled ahead of time.
There is no virtual DOM.
CSS scoping is baked in.
Let’s break those down a bit because they significantly distinguish Svelte from other front-end frameworks.
All the code is compiled ahead of time.
Svelte is a compiler, meaning that the code in Svelte files gets converted from an easier-to-write hybrid language that mixes HTML, JavaScript, and CSS into lower-level optimized JavaScript, HTML, and CSS files.
This is very similar to the way C# gets compiled down to bytecode, or how Typescript compiles down to JavaScript. But where traditional compilers tend to go down to one language, Svelte mixes all three.
This makes writing code a lot more flexible, and benefits the client (web browser) as the computation is done when the application is built, not on every browser when the web app is visited.
There is no Virtual DOM.
A DOM (or Document Object Model) is an interface that defines the logical structure of a webpage. It takes HTML and converts it to a structure that can be manipulated and accessed. Chris has a classic post that thoroughly explains it.
The Virtual DOM extends the concept of a DOM by creating a “second” DOM in memory. Like the DOM, this is manipulated and accessed by traditional frameworks (e.g. Angular, Vue, and React). At build, this second “virtual” DOM gets consolidated with the actual DOM, allowing the UI to render.
And what about the Shadow DOM? Well, the Shadow DOM is technically part of the “real” DOM, just in the shadows. As such it is a great tool for isolating chunks of code that don’t leak into or conflict with other elements on the page — a little bit like (but at the same time almost nothing like) an iframe. The shadow DOM is sorta the crux for most component-based front-end frameworks because they leverage the siloed nature of the Shadow DOM to serve specific code to specific elements.
While that isn’t exactly a key selling point of Svelte, it is possible to work with the Shadow DOM experimentally. The Shadow DOM hasn’t really quite caught on in progressive web practices, which is a shame, and probably due to the confusion between drafts and lack of support from IE and Edge.
So, where am I going with all this? The difference between Svelte and other JavaScript frameworks is the lack of a Virtual DOM. That’s important because it contributes to faster apps — faster than frameworks using a Virtual DOM. Yes, the Virtual DOM can be super fast because it only updates parts of the DOM when needed, but as applications grow, the impact of a duplicate DOM stored in memory can have an overall negative impact on performance.
Svelte takes a different approach and does a lot of these heavy calculations at build time. All that heavy lifting in advance, which allows Svelte to surgically insert changes only where needed.
CSS scoping is baked in.
Svelte has built-in styling, which is essential in other modern frameworks. The different between CSS in Svelte and CSS in other frameworks is that Svelte takes the CSS from each component and spits it out to a separate CSS file on build.
A personal gripe I have with most CSS-in-JS approaches is that it seems like an over-engineered solution. Svelte’s approach keeps things lean, vanilla, and encapsulated — while keeping everything where it should be.
For those who love preprocessors, there are plugins, whether it for Sass, Less or Gulp. But since Svelte is still in its infancy, I would recommend using plain ol’ CSS with a minified CSS framework of your choice so you can utilize Svelte’s handy dandy component scoping.
You could just as easily keep to your usual styling preferences and completely forgo Svelte’s CSS builder. However, I’d argue that is a massive shame, as Svelte’s solution has been extremely clean and enjoyable, at lease in my experience. But anyone who has to work with IE11 (😬) and even older browsers will know that normalizing styles is a must. This is a good place to stop and check out Ollie’s post because he dives much deeper into Svelte’s styling features and advantages.
How Svelte stacks up to other frameworks
We just looked at what how Svelte has a different approach for compiling, interacting with DOM and writing CSS. You might be wondering: how does Svelte compare to other popular frameworks?
There are plenty of comparisons already out there, but suffice to say that Svelte is pretty darn fast. But speed isn’t the only basis for comparison. Instead, let’s do a side-by-side that looks at a broader overview in a format much loved by the development community: a table!
SvelteVueReact Angular (2+) What is it Compiler Framework Framework Framework First Commit Nov. 16, 2016 Jul. 29, 2013May 24, 2013Sep. 18, 2014 Backing Open source Multiple Sponsors Facebook Google Community¹Small Large Massive Large Satisfaction288% 87% 89% 38%
Svelte is in a strong position considering its late entrance and small community. Developer satisfaction is high, while the big three have been seeing recent declines. The Svelte community is small, but growing, and the code is open source which is a huge plus for the overall web community.
Let’s look at an example of using Svelte
I hope that I have convinced you that Svelte is worth at least a try. If so, let’s fire up the terminal and try a real-world examples of an everyday use case: implementing the Intersection Observer. If you’ve ever run a Lighthouse report, it may have been shouted at you for not using passive scroll events. That may be the most boring sentence I have written in my life, but it’s scores points for performance and isn’t overly complicated to do with the Intersection Observer in Svelte.
Let’s skip all the installation and setup stuff because we can avoid it with REPL, the online editor Svelte uses to demonstrate the framework on its site. The standard “Hello world” boilerplate is in there. Go ahead and download the ZIP file of the app, in the upper-right corner of the screen.
Now, unzip the file and cd into the folder from the terminal and run npm -i to initialize the project. Once that’s done, do npm run build and you’ll get a copy of your lightweight miniature Svelte “Hello, world!” app.
Now we can get into the actual task of adding the IntersectionObserver.
First, we import the code that has already kindly been written by the Svelte team. It’s in the source code of the svelte.dev git repo (the inner cogs of which make for fascinating reading).
<script> import { onMount } from 'svelte'; export let once = false; export let top = 0; export let bottom = 0; export let left = 0; export let right = 0; let intersecting = false; let container; onMount(() => { if (typeof IntersectionObserver !== 'undefined') { const rootMargin = `${bottom}px ${left}px ${top}px ${right}px`; const observer = new IntersectionObserver(entries => { intersecting = entries[0].isIntersecting; if (intersecting && once) { observer.unobserve(container); } }, { rootMargin }); observer.observe(container); return () => observer.unobserve(container); } function handler() { const bcr = container.getBoundingClientRect(); intersecting = ( (bcr.bottom + bottom) > 0 && (bcr.right + right) > 0 && (bcr.top - top) < window.innerHeight && (bcr.left - left) < window.innerWidth ); if (intersecting && once) { window.removeEventListener('scroll', handler); } } window.addEventListener('scroll', handler); return () => window.removeEventListener('scroll', handler); }); </script> <style> div { width: 100%; height: 100%; } </style> <div bind:this={container}> <slot {intersecting}></slot> </div>
Stick this in a file called IntersectionObserver.svelte in a src/components folder. Then, reference it from the main Svelte file: App.svelte.
import IntersectionObserver from "../components/IntersectionObserver.svelte";
Now that we have the Intersection Observer available as a component, we can wrap other elements with it.
<IntersectionObserver let:intersecting top={400}> {#if intersecting} <section> This message will Show if it is intersecting </section> {:else} <section> This message won't Show if it is intersecting </section> {/if} </IntersectionObserver>
That’s really it! You can see how the Intersection Observer component allows us to use <IntersectionObserver> like a wrapper and define where the intersection should trigger, which is 400 pixels from the top in this example. As a reminder, this is all being exported as vanilla JavaScript! Super performant, no funny business. We’re sandwiching JavaScript and HTML together which is cool because we can see what the Intersection Observer is directly affecting, leaving no ambiguity and without being penalized for performance.
The OnMount function is necessary to tell Svelte that this code needs to run within the browser, as the Intersection Observer can’t be figured out ahead of time.
We’ll need to add some styling so that we can experience the observer in action, and we can do that directly in your App.svelte file. This might look super familiar if you have worked with any of the other front-end frameworks:
<style> .somesection { display: flex; align-items: center; justify-content: center; width: 100%; height: 100vh; } .somesection.even{ background: #ccc; } .content{ text-align: center; width: 350px; } </style>
Finally, we can copy and paste our Intersection Observer element four times to create more intersections. That gives us a mini web app that reactively adds and removes content as it comes into view — perfect to use with media, like lazy-loading. Check out a demo of the final result and be sure to crack open DevTools to see the Intersection Observer
Some final thoughts
My personal recommendation is to give Svelte a try. We’ve only scratched the surface of the framework in this article, but having converted my personal website to Svelte, I can confidently say that it is a pleasure to work with. It is performant, has a brilliant VSCode linter, and best of all, is easy to use. It may be small and new on the block, but I have a keen feeling that it is the relief from bloated “Goliath” frameworks, the “David” that frontend-ers have been looking for.
So should you use Svelte in a real project? Comparing risk and reward definitely comes into play. The community is smaller than other frameworks, meaning you’re likely to find less support and fewer tutorials to guide your along. At the same time, Svelte is in its third generation, meaning most of the gremlins should have been driven away, leaving a lean and reliable framework.
As with anything new, common sense rules, try it out with something non-commercial, take it for a spin, and see how you go.
Is there anything else? Funny you should ask! There are two co-projects that live in the Svelte Ecosystem: Sapper and Native. Sapper is a framework that utilizes Svelte for building full web applications, including routing, service workers, and all the good stuff you need to get started. I have used it to rebuild my personal website, and so far, I am a fan. Svelte Native is the most experimental of the Svelte projects, a NativeScript mobile app builder that utilizes Svelte under the hood. I confess that is where my knowledge on the subject ends. Luckily, it has a website with further information.
What do you think? Have you given Svelte a try? Do you think it stacks up to other frameworks? Let’s discuss it in the comments!
Based on a mix of Github Contributions, NPM Downloads and StackOverflow topics
State of JS review 2019
The post Getting Acquainted With Svelte, the New Framework on the Block appeared first on CSS-Tricks.
Getting Acquainted With Svelte, the New Framework on the Block published first on https://deskbysnafu.tumblr.com/
0 notes
Text
New Post has been published on Peter Bowey Computer Solutions Blog
New Post has been published on https://www.peterboweycomputersolutions.com.au/blog/windows-7-vs-windows-10-how-do-the-operating-systems-compare
Windows 7 vs Windows 10: How do the operating systems compare?
History: Back in 2015, Windows 7 was superior to Windows 10 but not by a wide margin. Back then, Windows 7 was a mature operating system that ran software well, and in a predictable manner.
It is now 2018. Now Windows 10 is overall better than Windows 7. Yes, Windows 10 does have some distinct flaws but they are no longer show-stopping flaws.
Many have held back from updating to Windows 10 because they’re afraid of technical problems, don’t like the Windows 10 user interface or are concerned some features may be missing. In this article we can compare some of the main features of Windows 7 along with their Windows 10 equivalents.
The following summary of core features is what makes Windows 10 what it is:
Cortana is Microsoft’s version of a digital assistant. It will set reminders, give information, and help you write text messages and emails.
Windows Hello is a biometric security system that uses facial recognition or a fingerprint scan to log you into Windows 10 and authenticate Store purchases.
Virtual Desktop allows you to create multiple desktops that you can switch between with the click of a button. You can move windows between desktops and easily keep track of multiple ongoing projects.
Windows Ink has a growing number of compatible apps that let you edit, annotate, and doodle with a digital pen. It’s incredibly easy to take notes, and you can even create works of art.
Edge is Microsoft’s signature web browser and its Internet Explorer replacement. It’s designed for the modern internet user. Options are an e-reader function and new extensions.
Windows Defender is software that protects your computer from viruses and malware. It runs full-time and will let you know if anything suspicious is happening or if it thinks you’re about to do something unsafe. It also receives constant updates to ensure it’s protecting as well as possible.
Windows Mixed Reality (WMR) offers the merging of real and virtual worlds to produce new environments and visualizations where physical and digital objects co-exist and interact in real time.
More like Windows 7
One of the biggest complaints from those upgrading from Windows 7 to Windows 10 is the overall look and feel.
[How to make Windows 10 look and feel a little more like Windows 7]
Windows 10 design vs Windows 7 design

The overall design of Windows 10 is the most striking difference to Windows 7. Everything has become flat, colourful and squared, unlike Windows 7 which was a bit glassy, rounded and used some gradients.
Icons have also been simplified, but not beyond the point of recognition – again swapping the rounded look for something flat.
It may be a shock to the system at first, but you’ll quickly get used to the design. There are ways to bring a taste of Windows 7 to Windows 10.
Windows 10 search vs Windows 7 search
Search has become ever more important in operating systems, as file and folder hierarchies have become less important and searching for a specific filename has become a popular way of finding important files – especially amidst messy desktops and haphazardly organised Documents folders.
Windows 7 had a terrific search function built in the Start Menu, finding files and folders on network shares as well as those stored locally.
Windows 10 searches still hook into the Bing search engine and also look for apps in the Windows Store. Even more annoyingly these results are placed ahead of search results for installed apps, files and folders with no option to change this order. Amazingly, the ability to search your computer and network shares simultaneously is still missing.
However, you can at least easily perform more advanced searches from the Start Menu by clicking on the My Stuff button. This lets you filter by relevance or date, and can also narrow down your search to specific file types including documents, photos, music and settings.
Windows 10 also includes Cortana, the personal assistant feature from Windows Phone.
On Windows 7 you’ll be used to clicking the Start Button and searching for content on your PC that way.
Cortana
On Windows 10, it’s all about Cortana – Microsoft’s digital assistant which began life on Windows Phone.
You cannot miss noticing Cortana – it’s right next to the Start Button. And it does much more than search your PC, it also search the web. As previously stated, Cortana is principally a digital assistant though so on top of handling all your searches; it’ll keep track of your dates and events with alerts.
Cortana first appeared on Windows Phone, where it used sophisticated speech recognition via the built-in microphone. Cortana in Windows 10 works with a microphone.
This has become a major part of Windows 10 doing double duty as a web search and a Start Menu/Windows search. Plus the ability to search by voice is both impressive in its accurate transcription and in its usefulness for those less abled.
Cortana can search your PC for files, applications and settings, just like the search tool in earlier versions of Windows, but you can also ask it more general questions and even use it to search the web — just ask it a question, as you would a person. You can also give Cortana commands — try asking it to send an email, or make an appointment for something on a certain date.
Speak
Typing is not the only way to interact with Cortana, if your computer has a microphone, you can use your voice, too. Click the microphone icon to the right of the Search box and follow the on-screen instructions to get things working — you’ll need to read a short sentence aloud as part of the set-up. Now, you can then click the microphone icon to talk to Cortana, rather than type. Other than speaking clearly, you don’t need to talk in a certain way to use Cortana — just talk as you normally do.
Windows 10 Start Menu vs Windows 7 Start Menu
The Start Menu is a staple of Windows that people have strongly defended after it was replaced with a Start Screen back in Windows 8.
Microsoft realised the error of its ways and brought the Start Menu back for Windows 10. However, it’s a lot more interactive than what we had on Windows 7.
You can still see lists of software and files, but alongside them are Live Tiles of apps. These can be changed for apps you use more frequently, making life a little easier than in Windows 7. However, these changes haven’t stopped gremlins from causing issues on some machines but it’s not a universal problem.
Windows 10 Action Center vs Windows 7 Action Center
The Action Center in Windows 10 is quite different to the one we know of in Windows 7. It basically keeps hold of your notifications, whether it’s about your connectivity or an email. Unless you’re running software for email such as Outlook on Windows 7 you won’t get an email alert.
System alerts for things like security popup on Windows 7 and disappear after several seconds – at least with Windows 10 you can open the Action Center to get it back before they’re gone.
When you open the Action Center you also get a load of options you never had before, such as battery saver mode and tablet mode – the latter probably isn’t useful if you’re upgrading from Windows 7 as it’s likely that you’re using a standard desktop PC or laptop.
Launch the Action Center by clicking the square box with three lines in the taskbar. A number will be displayed next to it if you have any unopened alerts.
It’s split into two, with notifications at the top and quick actions at the bottom.
When you get a notification, click the down arrow to view it or click the X to dismiss. Alternatively to remove them click Clear all.
Internet Explorer vs Edge
With Windows 10 Microsoft introduced a brand new browser “Edge”, promoting it as being better suited to the modern web.
Edge recently we certainly agree, as it is fast, elegantly designed, and features a variety of advanced capabilities including being able to annotate web pages and then send the image to friends or colleagues, Cortana integration, a new simplified reading mode that clears out the clutter on a screen, and a number of under the hood improvements.
In the Windows 10 Anniversary Update, Microsoft has added extensions, web notifications and the option to clear your browsing history on exit, making it a more modern web browser over Internet Explorer.
Edge is set to take over from Internet Explorer completely in the future with support ending on most versions of Internet Explorer, but for now you can have access to both on Windows 10.
You can’t get Edge on older versions of Windows either, so you’ll have to go for Windows 10 if you want it. It features a clean new look, as well as a tidy area for downloads, history, favourites and a reading list.
Edge’s security blanket: WDAG
One key feature which has finally reached Windows is Windows Defender Application Guard, a sort of browser “super sandbox” which was restricted to enterprise versions of Windows, but has now been added to Windows 10 Pro in the Windows 10 April 2018 Update.
Windows 10’s “Windows Defender Application Guard” feature runs the Microsoft Edge browser in an isolated, virtualized container. Even if a malicious website exploited a flaw in Edge, it cannot compromise your PC.
Note: Application Guard is disabled by default.
WDAG creates a virtual sandbox for your Edge browser, although you’ll need to turn on the feature within the Control Panel (Control Panel > Programs > Turn Windows Features On and Off). If you’re browsing the risky ‘dark depths’ of the Web within Edge, do it with WDAG enabled.
SECURITY FEATURES: Comparing Windows 7 to Windows 10
Microsoft praises its Windows 10 as being the most secure operating system that it has ever created. It seems that statistics performed by various analytic companies have reached the same conclusion as well.
Windows 7 has been the most successful and ubiquitous operating system in Microsoft history. While it has served us well for the last five years, the
reality is that it doesn’t offer the level of protection you need to deal with the new security threats that we’re all facing. Although you can add layers of
defense with 3rd party products, keep in mind that all of the organizations we’ve been reading about in the news already did that and it wasn’t enough.
These modern challenges require a new platform. Here are some of the ways in which Windows 10 provides that platform.
Windows 10 has moved both home and enterprise security along significantly, both in terms of local device security and the security of your online services, too.
Webroot reported that only 15 percent of the total known malware files in 2017 were found on Windows 10 systems, while 63 percent of the known malicious files were found on Windows 7 systems.
There are a number of reasons for this pronounced imbalance, but a major difference is that Windows 10 forces automatic updates, while Windows 7 allows users to fully control when updates are installed.
There’s no doubt that Microsoft attempted to “harden” Windows 10 against many of the known exploit strategies used by malicious code writers, which is also a likely contributor. A great example of this was seen during the WannaCry ransomware attacks last year, as the vast majority of victims were running Windows 7, and Windows 10 users were completely unaffected.
Malware occurrence statistics at 2017
Malware occurrence for Home users was 0.07% for Windows 10 users, 0.16% for Windows 7 users, and 0.17% for Windows XP. Webroot’s conclusion is that Windows 10 on business devices is more than 50% more secure compared to Windows 7 on Home devices.
It’s always up to date
Much has been made of the way in which users can’t opt out of Windows Updates with Windows 10, but that’s hardly a bad thing. While a rogue update can certainly cause problems, these are minor when compared to the benefits this new approach brings.
With Windows 10, it’s no longer possible to forget to run Windows Update, which means you’re much less likely to miss a critical operating system patch that fixes a serious security problem.
Even if you’re on the ball with security, it is likely other Windows users won’t be. People who switch off Windows Update in Windows 7 because they find it ‘annoying’, for example, pose a major security threat.
By forcing all Windows 10 users to stay up to date, everyone’s online safety is improved, since it reduces the risk of a PC being compromised by a hacker and becoming part of a botnet that could be used to attack your PC.
Performance
Performance tests have shown that Windows 10 is faster across the board than earlier versions of Windows. Windows 10 boots, goes to sleep and wakes from sleep marginally faster than Windows 10 on a PC of the same specification, which means less waiting around when you want to do something.
Application performance is more of a mixed bag, with tests showing Windows 10 to be faster than Windows 7 with some apps and slower with others. Bear in mind that Microsoft will update Windows 10 regularly, though, while Windows 7 is now essentially frozen in its current state after ‘mainstream’ support ended in January 2015.
Most of the newer CPUs and chipsets are not supported by Windows 7 or Microsoft updates anymore.
Microsoft cautions that Windows 7 and Windows 8.1 have limited support when running on new processes and chipsets from manufacturers like Intel, AMD, NVidia, and Qualcomm. Users should be aware of the original equipment manufacturer’s (OEM) support period, as this can hinder performance.
The ‘Unsupported Hardware‘ error message that people are starting to see is shown above.
Skylake CPU home-build PC users will face a similar problem in 15 months time if they are running Windows 7 or 8.1. From 17th July 2018 Microsoft will stop providing OS updates to such PCs, “likely” (seen) accompanied by an error message like the one above.
More important is the addition of DirectX 12 support, a low-level graphics API designed to increase 3D graphics performance with lower overheads while giving developers more control over how hardware is used.
Further, Windows 10 provides better built-in support for newer types of hardware including secure boot capabilities with UEFI, USB 3.0, Bluetooth adapters, high-definition screens (ie better scaling), and solid state drives (eg NVMe).
With UEFI, Windows 10 machines boot up and resume from sleep dramatically faster than Windows 7. Almost instant-on was needed for smartphone and tablet use, of course, but it still benefits PC users.
Windows 10 apps vs Windows 7 apps
Apps came about for smartphones and tablets as smaller versions of the larger applications we use on desktop PCs, but since Windows 8 we’ve been able to use them on desktops too.
For Windows 7 users upgrading to Windows 10, this is all a bit new. There’s a Windows Store available on Windows 10 where you can download an array of apps.
The apps are great for using things like Facebook, because it makes accessing the social network quicker and easier. There are so many apps to choose from too, whether you’re looking for news or games – many of which are free.
On Windows 7 you’re confined to the standard applications available on all Windows platforms – which aren’t necessarily bad, but lack the convenience of apps from the Windows Store.
There are some glaring software losses with Windows 10 however, such as lack of DVD playback support.
Why has Microsoft removed DVD support on Windows 10?
The exact reason is unknown but it may be a licensing issue. By having no DVD support, the company can save money on certain permissions required to play DVDs. Instead, Microsoft is offering an app that allows users to play DVDs called Windows DVD Player.
According to Microsoft you are eligible for the free Windows DVD Player app if you upgraded from Windows 7 Home Premium, Professional, and Ultimate, and Windows 8/8.1 Pro with Media Center.
Windows 10 Versions
There are now three different versions of Windows 10 for buyers to consider: Home, Pro, and the newer 10 S.
Windows 10 Home
Windows 10 Home is the basic variant of Windows 10. It comes with a number of new features including the revamped Start Menu.Windows 10 Home offers a full-fledged version of Cortana, the digital voice assistant formerly exclusively available on Windows Phone. Other than that, the Home edition also gets you features like Battery Saver, TPM support, and company’s new biometrics security feature called Windows Hello. Windows 10 Hello will allow users to sign in to a device without a password by using biometrics, including facial recognition. This means “using your face, iris, or fingerprint to unlock your devices.
Home users will also be able to utilise the all-new Virtual Desktops option and Snap assist feature with up to 4 apps on one screen. Furthermore, they can also give a whirl to Continuum, a flagship feature of Windows 10 that lets you quickly switch from desktop mode to tablet mode. You are also bestowed with Microsoft Edge, the brand new browser in town.
The Home edition also supports Windows Updates (automatic updates from Microsoft) – and also provides security measures such as Microsoft Passport.
Windows 10 Pro
The Pro edition of Windows 10, in addition to all of Home edition’s features, offers sophisticated connectivity and privacy tools such as Domain Join, Group Policy Management, Bitlocker, Enterprise Mode Internet Explorer (EMIE), Assigned Access 8.1, Remote Desktop, Client Hyper-V, and Direct Access.
Windows 10 S
Windows 10 S is a new version of Windows that Microsoft designed to run on lighter devices: That ‘S’ doesn’t have a specific designation, but Microsoft generally surrounds it with words like security, streamlined, superior performance … you get the idea. This is a version of Windows 10 with a lighter footprint, which allows it to work faster on cheaper laptops (thus competing more directly with Chromebooks, a key purpose of Windows 10 S). This makes 10 S an alternative for individuals and companies that can’t afford to spend a lot on expensive laptops or tablets but still need Windows 10.
Windows 10 Version Feature Summary
Windows 10 Home Windows 10 Pro Windows 10 S Cortana Yes Yes (including O365 integration) Yes Windows Hello Sign-In Yes Yes Yes Bitlocker Encryption No Yes No Xbox Gaming Yes Yes Yes Virtualization Services No Remote Desktop, Client Hyper-V, Shared PC No App Availability Windows Store and Third Party Windows Store and Third Party (subject to administrator control) Windows Store Browsers All available, including Edge, Firefox, Chrome, Opera, and Safari All available Edge
0 notes
Text
[section_title title=Introduction]
With the ever increasing core count and TDP of mainstream processors these days, cooling has never been more important to your system. Although there are some seriously beefy air coolers on the market today, liquid cooling is still the best way to cool your system. That being said, even with most companies offering some kind of full loop kits, custom water cooling can still be intimidating to many enthusiasts. So, for a lot of people, an AIO, or all in one cooler is the way to go.
Enermax is perhaps one of the best-known names is in computer hardware. Having been in business since the early 1990s, they make everything from computer cases and fans to power supplies and peripherals. However, one of the things Enermax is best known for is coolers, and AIO coolers to be specific. Enermax has always held a special place in my heart. The first published review I ever wrote was of the Lepa Exllusion 240. Overall, I’ve had rather good luck with their products in general. So, when they asked if we’d take a look at their new Liqtech II 360, we couldn’t say no.
The Enermax Liqtech II 360 is a 360 mm AIO cooler with an insane 500 watt TDP. The Liqtech II is compatible with both Intel and AMD sockets. Its EF1 pump is said to be seven times more powerful than the average AIO and move up to 450 liters per hour. Now, that���s all well and good, if it lives up to its expectations. Many times, in the past I’ve tested AIO coolers that just couldn’t handle a high core count processor. So, we put the Liqtech II through its paces on the Intel Core i7 8700k. So, did it live up to its claims? Let’s find out.
[section_title title=Packaging]
The Front of the packaging has an image of the block and pump combo, with the RGB lighting illuminated in the foreground. In the background, there is an image of the 360 mm radiator with the three 120mm fans installed. Printed on the bottom right corner is the Liqtech II 360 branding, Below that are badges for the several different RGB software that the Liqtech II supports.
The back of the box has a lot of information on the Liqtech II. Across the top, they touch on some of the key features of the Liqtech II 360. Enermax also has a complete list of features listed to the left. Next, there is a diagram of the length, width, and height of both the pump and radiator. There is also a chart with the specifications of the Liqtech II to the far right.
The Enermax Liqtech II comes packed is a formed cardboard tray. The cooler and fans are wrapped in plastic. The radiator has a protective sleeve over it to provide extra protection. Although I do prefer this style of packaging over traditional styrofoam, I’d rather it be backed in soft foam. But that isn’t really that big of a deal.
#gallery-0-17 { margin: auto; } #gallery-0-17 .gallery-item { float: left; margin-top: 10px; text-align: center; width: 50%; } #gallery-0-17 img { border: 2px solid #cfcfcf; } #gallery-0-17 .gallery-caption { margin-left: 0; } /* see gallery_shortcode() in wp-includes/media.php */
[section_title title=A Closer Look at the Liqtech II 360]
A Closer Look at the Liqtech II 360
The Enermax Liqtech II 360 looks much like any other 360 mm all-in-one, or AIO cooler. However, Enermax is advertising a monster 500 watt TDP for the Liqtech II 360. It supports both Intel and AMD modern sockets, with the exception of AMD’s TR4 socket. Enermax makes a specific model for the TR4 socket.
The radiator for the cooler measured 394 mm long x 120 mm wide x 28 mm in thickness. The Liqtech II 360 supports three 120 mm fans. It comes packed with three static pressure fans. The fans measure 120 x 120 x 25 mm. The fans have a high-pressure blade design that increases cooling performance. The fans come equipped with anti-vibration rubber pads in the corners to prevent noise and ensure noiseless operation.
#gallery-0-18 { margin: auto; } #gallery-0-18 .gallery-item { float: left; margin-top: 10px; text-align: center; width: 25%; } #gallery-0-18 img { border: 2px solid #cfcfcf; } #gallery-0-18 .gallery-caption { margin-left: 0; } /* see gallery_shortcode() in wp-includes/media.php */
The block and pump combo measure 71 mm in length, 71 mm in width and 60 mm in height. The actual cold plate is 56 mm in both length and width and 3 mm thick, at its thickest point. The cold plate on the Enermax Liqtech II uses their patented shunt-channel-technology (SCT). The shunt-channel-technology is designed to boost thermal conductivity and eliminates heat surge by increasing coolant flow. The SCT allows heated and non-heated coolant to swap channels and increase utilization rates.
#gallery-0-19 { margin: auto; } #gallery-0-19 .gallery-item { float: left; margin-top: 10px; text-align: center; width: 33%; } #gallery-0-19 img { border: 2px solid #cfcfcf; } #gallery-0-19 .gallery-caption { margin-left: 0; } /* see gallery_shortcode() in wp-includes/media.php */
The Liqtech II features a powerful EF1 pump design with flow rates up to 450 liters per hour. The EF1 pump, on average, moves seven times more fluid than the average AIO pump. The average AIO cooler moves about 65 liters per hour. The EF1 pump delivers a very high flow rate, designed to increase cooling performance.
The Enermax Liqtech II uses flexible, 400 mm polyamide rubber tubing. The rubber tubing has a layer of flexible polyamide weaved through the tubing. A polyamide is a synthetic polymer, the most common of which is nylon. The polyamide layer ensures the tubing is impermeable. The tubing is covered by nylon sleeving. This makes the cooler more aesthetically pleasing.
#gallery-0-20 { margin: auto; } #gallery-0-20 .gallery-item { float: left; margin-top: 10px; text-align: center; width: 33%; } #gallery-0-20 img { border: 2px solid #cfcfcf; } #gallery-0-20 .gallery-caption { margin-left: 0; } /* see gallery_shortcode() in wp-includes/media.php */
Installation of the Enermax Liqtech II 360 was rather straight forward. The Liqtech II 360 comes with a universal backplate. One side is for modern Intel sockets and the other for modern AMD sockets. First, push the pins through the proper holes for your socket. In the case of this review, it was the LGA 1151 socket. Next step, you use the plastic washers to hold the backplate to the motherboard. The Liqtech II 360 comes with nuts with springs attached. This is what is used to affix the block to the motherboard. A Philips head screwdriver is then used to tighten them down.
#gallery-0-21 { margin: auto; } #gallery-0-21 .gallery-item { float: left; margin-top: 10px; text-align: center; width: 33%; } #gallery-0-21 img { border: 2px solid #cfcfcf; } #gallery-0-21 .gallery-caption { margin-left: 0; } /* see gallery_shortcode() in wp-includes/media.php */
The Liqtech II features an Aurabelt waterblock with addressable RGB lighting. The lighting can be controlled by your motherboard and is supported by all major RGB software from the board partners. This includes RGB Fusion, Mystic Light and Aura Sync. However, Enermax also includes an in-line RGB controller as-well. This is useful if you have an older motherboard, without RGB headers. There is a 4-pin connection on the same side of the pump that the PWM connector come out of. This 4-pin connector connects the RGB lighting on the pump to either an RGB header on your motherboard or to the in-line RGB controller that comes packed with the Enermax Liqtech II 360. One of my favorite accessories that come packed with the Enermax Liqtech II 360 is the 3-way PWM fan splitter. This allows you to only use one fan header on your motherboard for the 3 fans packed with the Liqtech II 360
#gallery-0-22 { margin: auto; } #gallery-0-22 .gallery-item { float: left; margin-top: 10px; text-align: center; width: 33%; } #gallery-0-22 img { border: 2px solid #cfcfcf; } #gallery-0-22 .gallery-caption { margin-left: 0; } /* see gallery_shortcode() in wp-includes/media.php */
[section_title title=Test System, Testing Procedures and Performance]
Test System, Testing Procedure and Performance.
Test System
Component
Product Name Provided By Processor Intel Core i7-8700K (Retail) Intel Motherboard Aorus Z390 Pro Gigabyte Memory G.Skill Trident Z DDR4 3200 MHz CAS 14 64 GB G.Skill Drive Intel 660p 512 GB NVMe M.2 SSD (OS) Intel Video Card MSI Gaming X Trio 2080 ti Cutting Edge Gamer Monitor LG 27UL500-W 27″ 3840×2160 @ 60 Hz Retail Purchase Case Primochill Praxis Wetbench Primochill Power Supply 1600 Watt EVGA Super Nova Ps 80+ Platinum Power Supply EVGA Operating System Windows 10 x64 Pro with latest patches and updates
Utilities and Software
CPUID Hardware Monitor
CPUID CPU-Z
AIDA64 Engineer
Cinebench R15
Sound Meter (Android App)
All testing on the Enermax Liqtech II 360 was done on the Core I7 8700k. The I7 8700k has a base clock of 3.7 GHz. However, from stock, it usually boosts to about 4.3 GHz. I increased the overclock to 4.5 GHz and left the voltage at stock. This seemed to be a reasonable overclock, that just about anyone should be able to achieve with an 8700k. In the past, I’ve gotten this 8700k to 4.8ghz, but not much higher. I tried to set the CPU to 4.8 GHz, and the system crashed instantly. At 4.7 GHz, the system ran. It was fine on light tasks. However, when I attempted to run the Aida64 FPU stability test, the processor hit 100°c in a matter of seconds and the system crashed. I do my best to keep the ambient temperature around 20°c, or 68°f. Once the ambient temperature hits 21°c (about 70°f), I stop to allow the room to cool down a bit. There are no less than 30 minutes between each benchmark, and or program. This allows the processor to cool down and it gives more fair and balanced results.
Although there are several different options to use while testing a CPU cooler, we use the AIDA64 Stress Test to put a load on the CPU. The AIDA 64 Stress Test is a 64-bit, multithreaded stress test. We use both the CPU stress test, as well as the FPU stress test. The FPU tests put far more of a strain on your processor. Therefore, the FPU test produces more heat than the CPU test. You could have a rock solid overclock that passes the CPU stress test but fails miserably on the FPU test. The chart below reflects the package temperature.
While running the AIDA64 CPU Stress Test, the temperatures were not that bad. Both the CPU test was run until the temperature for about 15 minutes in total. This is the target time for each of the tests to be deemed successful in my eyes. The AIDA64 CPU stress test hit a max temp of 58°c. During the CPU stress test, we recorded no throttling. As stated before, the AIDA64 FPU Stress Test put a far greater strain on your processor. Therefore, there wasn’t too much of a surprise to see the CPU throttle a bit. By the AIDA FPU stress test, the 8700k throttled about 3%. This test also ran for about 15 minutes. In that time, it hit a max temperature of 87°c. This isn’t by any means the lowest temperature but considering the load, the FPU stress test puts on your processor, its not terrible either. Our 8700k passed the Aida64 CPU stress test with no problems. The FPU test was a bit different. Although the system didn’t crash, our 8700k did throttle a bit. It may have made it to 15 minutes. However, due to the 8700k throttling, we have to consider the FPU test a failure.
#gallery-0-23 { margin: auto; } #gallery-0-23 .gallery-item { float: left; margin-top: 10px; text-align: center; width: 50%; } #gallery-0-23 img { border: 2px solid #cfcfcf; } #gallery-0-23 .gallery-caption { margin-left: 0; } /* see gallery_shortcode() in wp-includes/media.php */
The cooler that is usually on my test bench is the Swiftech H320 X2 Prestige, slightly modified of course. The H320 X2 Prestige edition comes with Swiftech compression fittings and 5/8 flexible tubing. However, Like with most AIO coolers, the tubing isn’t long enough to install the H320 x2 on the Praxis Wet Bench. So, I replaced the tubing. I also replaced the Apogee block that comes stock with an Ek Supremacy EVO. So keep that in mind. The last thing is the H320 X2 is using Mayhems X1 Clear coolant. So, it does have several unfair advantages.
That being said, the differences were vast. During the Aida64 CPU stability test, our 8700k running at 4.5 GHz, hit a max temp of 53°c. This was 5°c than the Liqtech II 360 hit. The FPU stability test had an even larger difference. The 8700k hit a max temp of 74°c during the Aida64 FPU stability test. This is a full 13°c lower than the Liqtech II was able to achieve. Again, keep in mind there were some modifications made to the H320 X2.
#gallery-0-24 { margin: auto; } #gallery-0-24 .gallery-item { float: left; margin-top: 10px; text-align: center; width: 50%; } #gallery-0-24 img { border: 2px solid #cfcfcf; } #gallery-0-24 .gallery-caption { margin-left: 0; } /* see gallery_shortcode() in wp-includes/media.php */
While gaming, both the noise levels and temperatures weren’t bad. When the temperature would get too high, the fans would ramp up to lower the temp. While playing Far Cry 5, the average temperature would hover around 65°c and max out at about 74°c. For comparison, the cooler on my test bench is usually the Swiftech H320 X2 prestige. Its also been modified with an Ek Supremacy Evo in place of the original Apogee block it came with. While playing Far Cry 5 for about the same time, 30 minutes or so, the 8700k hit a max temperature of 68°c and averaged around 60°c
We also tested noise levels of the cooler using an Android app called Sound Meter. I know its not the best way to measure sound, but it’s the highest rated sound meter app on the app store and can at least give an idea of the noise levels. We recorded the noise levels with both the pump and fan speeds at 50% as well as 100%. At 50%, the system overall had an average decibel level of 37.7 dB and a max level of 42.6 dB. At 100%, it was loud, at times, and distracting. But the fans do not run 100% all the time. But when the temp rises, the fans will ramp up to 100% and that’s when the system gets loud. At 100%, the system ran at an average of 74.5 dB with a max of 83.4 dB. Now, keep in mind that this is on an open test bench and will not reflect noise levels in a closed system. Especially a case with sound dampening material. Not to mention, we don’t know how accurate the app we use is. We mention what app we used so users can compare their results to ours.
As we mentioned earlier, all testing was done with the pump and fan speeds at 100%. The stock setting was the fan and pump speed set to 50% speed. It was whisper quiet. However, it affected temperatures. The chart below represents initial temperatures taken about 20 minutes or so after the system was initially booted, first thing in the morning, on separate days. At 50% speed for both pump and fans, the max temp hit 53°c and the minimum was 43°c. The average was about 44°c at idle. When we tried to run the AIDA64 FPU stress test, after about 6 or 7 minutes, the temp hit 100°c. That is the reason all testing was done at 100% fan and pump speed. At 100%, the max temp hit only 45°c, 8° cooler than at 50%. The minimum temperature hit only 31°c and averaged about 34°c at idle. That gave us, at average, a difference of about 10°c between 50% and 100% pump and fans speed.
[section_title title=Final Thoughts and Conclusion]
Final Thoughts and Conclusion
I’ll start by saying that first and foremost, I prefer custom water cooling. So, my opinion is a bit bias. There are many AIO coolers in the market. Most of which perform similarly. For the most part, aesthetics will hold a large part in the decision making process. Personally, I love how the Liqtech II looks. I’ve said on several occasions that I am not a fan of RGB lighting. Although, it has started to grow on me when it is done right. I feel Enermax did the RGB lighting very well on the Liqtech II 360. I like the Aurabelt waterblock. The RGB lighting is subtle, and not overdone. That being said, I do think the Liqtech II could have benefited from using some kind of RGB fans on the Liqtech II. I know I just said I don’t care for RGB lighting. However, when the pump has RGB lighting, most would assume the fans would as well. Given the static pressure fans packed with the Liqtech II did a relatively good job, even if they did get a bit loud at times.
The performance overall was pretty good with the Liqtech II 360. At times, the temps did seem a bit high. However, increasing the pump and fans speed rectified that. That being said, the system did get a bit loud when the fan speeds were increased. I will say again and can’t stress enough that I was using an open-air test bench. So, in a closed system, the Liqtech II 360 will be quieter. The temperature on the AIDA64 CPU stress test of 58°c wasn’t bad at all. Although the FPU stress test in AIDA64 did result in the 8700k throttling, it was after more than 10 minutes and the FPU stress test was able to get through the 15 minutes we were aiming for. While gaming the temperatures were about average for an AIO cooler. The results were nothing spectacular, but they weren’t causing performance issues and CPU throttling by any means. Enermax is advertising the Liqtech II 360 to have a TPD of 500 watts. But, it had trouble with the 8700k, with a slight overclock. The 8700k is a 95-watt processor. So I’m not sure how well it would do on a processor with say a 140 watt TDP.
In conclusion The Enermax Liqtech II 360 is a decent cooler. However, if you’re an enthusiast and love to overclock, then this cooler isn’t for you. Nor was it meant for you either. The Enermax Liqtech II is a great option for the average gamer or consumer that wants something more than air cooling. Many 360 MM AIO coolers from other companies are upwards of $200 USD with the average price seeming to be about $180 USD. At the time of this review, The Enermax Liqtech II 360 is on Amazon for $159.99 USD. However, I have seen it as low as $139.99 in recent weeks on other online retailers. If you buy the Liqtech II 360 with intentions of pushing your processor as far as possible, you may be disappointed. However, if your intent to set up your system simply to play games, browse the web and other things the average consumer does with their PC, the Enermax Liqtech II 360 is a solid option. Especially when you compare the price to other 360 mm AIO coolers on the market.
[sc name=”approved_award”]
[sc name=”Amazon Pic_Price” product_link=”https://www.amazon.com/Enermax-ELC-LTTRTO360-TBP-LIQTECH-Addressable-Liquid/dp/B07H778NCW/ref=asc_df_B07H778NCW/?tag=hyprod-20&linkCode=df0&hvadid=309833041189&hvpos=1o1&hvnetw=g&hvrand=15772942665697505974&hvpone=&hvptwo=&hvqmt=&hvdev=c&hvdvcmdl=&hvlocint=&hvlocphy=9001981&hvtargid=pla-558987271135&psc=1″ ]
Enermax Liqtech II 360 Review With the ever increasing core count and TDP of mainstream processors these days, cooling has never been more important to your system.
#360 mm AIO coolers#AIO Coolers#All In One CPU Cooler#Enermax#Enermax AIO coolers#Enermax Liqtech II 360#Liqtech II 360#modders-inc
0 notes
Last Seen Blogs