#but it's ok if you don't have any access to 1080ps
Text


WHAT WE DO IN THE SHADOWS (2019) | 5.03 (Pride Parade)
#what we do in the shadows spoilers#wwdits s5 spoilers#wwditsedit#nandor the relentless#*pride parade (05x03)#dakotasvibe#userligaya#so i won't definitely endorse screenrecording for giffing#but it's ok if you don't have any access to 1080ps#i'll remake this later tho#theshadowsfx if you're seeing this what have you done to me#i'm not including the context bc i'm going insane already#actually thought he's gonna deny and repress again#oh jealous nandor you will always be famous
366 notes
·
View notes
Note
love love LOVE your The Sign gifsets. im still a newbie in giffing lmao and your gifs are like reaaally pretty so i was wondering how you do your gifs? i really like how it's sharp and the colors pop up beautifully (only if you don't mind sharing ofcc <333)
bun this is the kindest thing you could have said to me, thank you so much <3 i wanted to write down my giffing process for a while in case anyone would find anything in it helpful, so thanks for giving me a push!
guzhu-furen's photoshop gifmaking process (kinda oriented on saving up time)
from

to

1. Downloading a video. i prefer to download video files instead of making screen recordings because the latter usually leaves watermarks/captions and makes image quality lower. i will not be linking the downloading websites themselves directly, but they are all easy to find through search engines if you know what to search for! i download ql dramas from:
youtube:
if the video you need is above 1080p quality, search for youtube4kdownloader
if the video is age restricted, search for 9xbuddy
both these websites work for normal videos too!
mkvdrama usually has 1080p episodes of most asian dramas.
dramacool also has downloading options in case the show is not available on other websites!
2. Screencapping (i learned it through this tutorial)
i screencap using KMPlayer. here is the installer i used, but you can find versions of this program on various websites and torrents too! install the program and proceed.
screencapping steps: open KMPlayer > press "CTRL + G" to summon the Frame Extraction window > set identical settings to these:
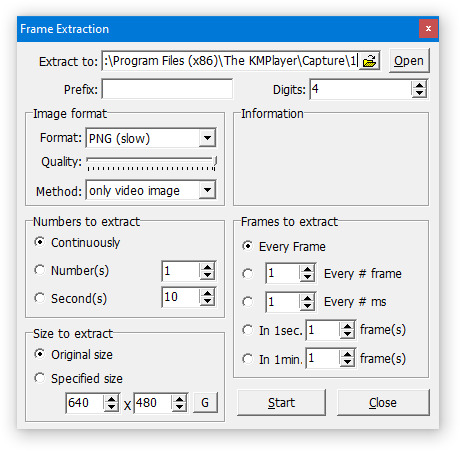
note which computer folder the screencaps will go to (it has a label "Extract to") > go to that folder on your computer and create a bunch of numbered folders there, for example ten folders named from 1 to 10, these would be our separate folders for ten gifs > write "1" or a name of another numbered folder after the backslash in "Extract to" bar in kmplayer > go the timestamp that will be the beginning of your gif in KMPlayer > press "Start" in the Frame Extraction window and press play on the video > when the moment you need to gif is over, press pause on the video and press "Stop" in the Frame Extraction window. great, you now have your folder of screencaps!
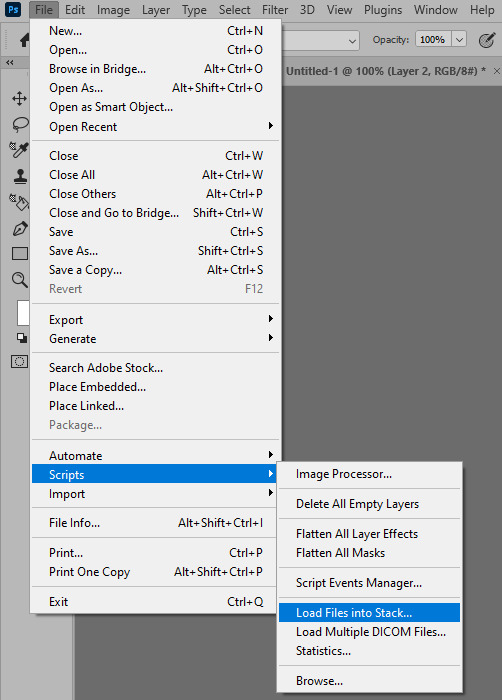
3. Importing screencaps to Photoshop
i use Adobe Photoshop 2023, but had used Adobe Photoshop CS5 for a long time before that, so you can use any version you have or find! it's available on various websites and torrents.
open Photoshop > Scripts > Load Files into Stack > press Browse in the "Load Layers" window that was opened
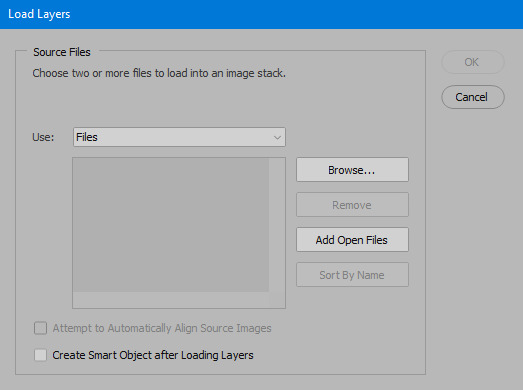
open your screencaps folder (and pin the KMPlayer Capture folder for faster future access) > pick the screencaps you want for your gif by clicking on the first one, and then clicking on the finishing one while pressing Shift on the keyboard > click OK and let them load for some time! i have 65 screencaps loading at the moment
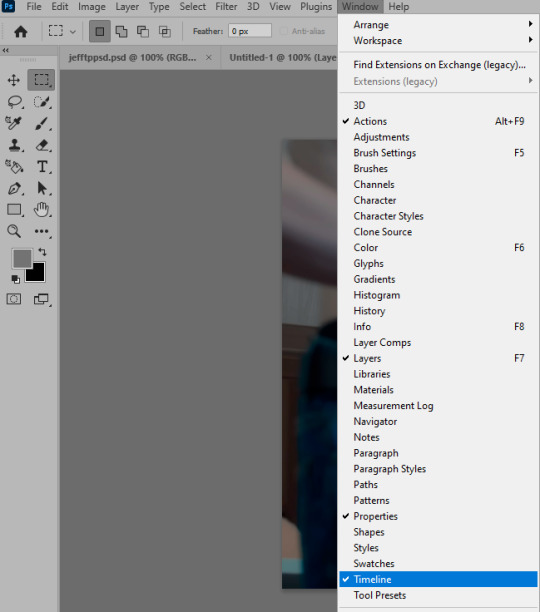
when the screencaps finish loading go to Window > press Timeline > press Create Video Timeline in the opened sidebar > press three dots that will say "Convert to frame animation"


4. Sizing & making the base of a gif
next part will be automatic. i use actions for almost everything from this moment. download the basic action pack here and my additional action pack that we will need here. load them in your photoshop actions window (Actions > Load Actions).
play the Script action to create frames.
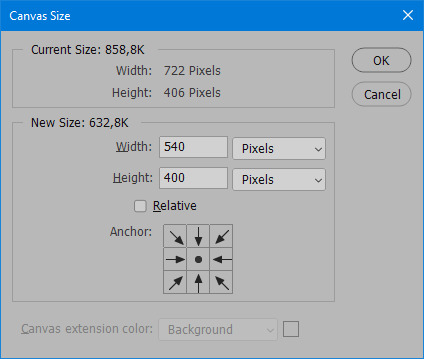
now onto sizing your gif. these are tumblr's width dimensions for 3 types of gifs
my gifs are usually 540 px in width and 640, 400 or 345 px in height. i added a 400 px action (Sizing 400) in the action pack, you can use it! or you can follow the steps by hand:
Image > Image Size > put in the height you want and add 4-6 pixels there (mine will be 406 for a 400 px high gif) > OK

now we need to crop the gif for it to fit tumblr's dimensions:
Image > Canvas Size > change Width to 540 (or 268 or 177) and take away the 4-6 pixels that we left in the previous step in Height
when you figure out which gif dimensions work best for you, record an action and use it to save up time!
after sizing use the action Smart Object. now we have the base of our gif!

you can move your gif left or right if you want! i will be doing this because i would like to show more hips in the gif.
press Ctrl + T > move the layer however you need (not in height though) > press Enter to save
i moved it to the right and my gif looks like this now:
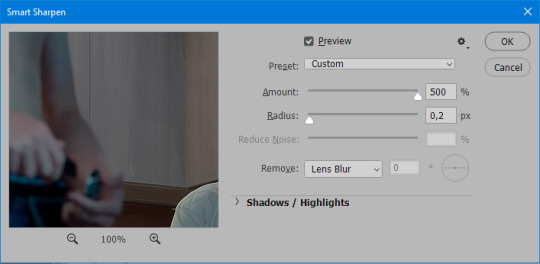
5. Sharpening (i use Tan's sharpening settings explained here)
i added two sharpening actions in the pack, they are called Sharpen Spicy and Sharpen Spicy 12. you can use one of them or you can sharpen your gif by hand, i will explain how to do it below.
Filter > Sharpen > Smart Sharpen > 500% amount, 0,2 px radius > OK
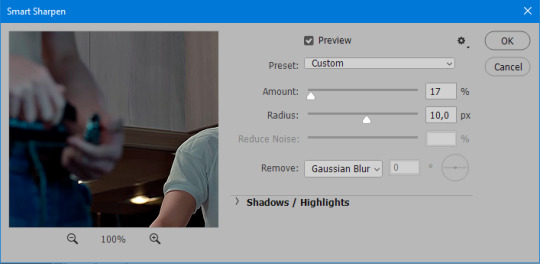
Filter > Sharpen > Smart Sharpen > 17% amount, 10,0 px radius > OK (you can change 17% to lesser or bigger, depending how intense you want your sharpening to look. i use 17% for 4k footage and 12% for 1080 px or less videos)
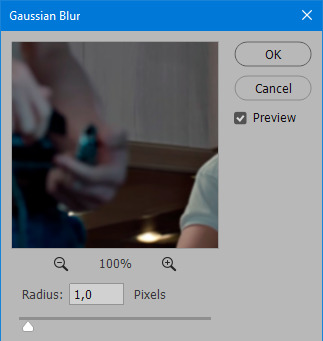
to smooth the sharpening a bit i use Gaussian Blur (this is optional, you can leave the sharpening as it is if you want your gif to be sharper).
Filter > Blur > Gaussian Blur > Radius 1,0 pixels > OK
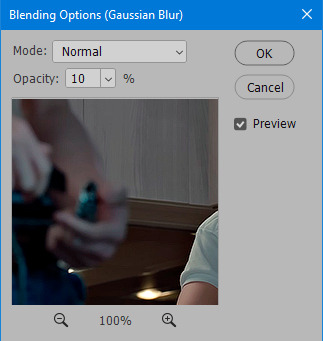
now change blending intensity to let only a bit of the blurring effect stay (you need to change this by hand if you used the sharpening action also).
press Blending Options (the highlighted place) twice > change Opacity to 10%

this is what my gifs looks like with sharpening now!

6. Colouring (i learned how to colour the way i do through this tutorial)
to make it easier for you to learn i will share my blank colouring file. i created it to save as much time while giffing as possible, so whenever i need to colour a gif i simply duplicate all the blank adjustment layers to the base of my every gif and start colouring! once you figure out which adjustment layers work for you best, i recommend creating a blank colouring file too to save time.
if you want to go the easy way, open my colouring file and duplicate selected layers to your gif file by Layer > Duplicate Layer > insert gif's document name

if you want to learn by hand, create the adjustment layers that i will be naming in the process on your own, you can find them all in Layer > New Adjustment Layer
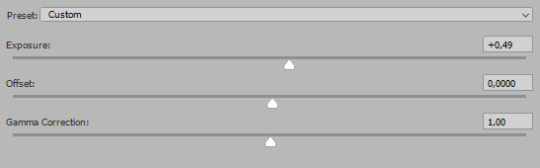
now we will use adjustment layers for our colouring from the bottom to the top! first, Exposure layer to add a bit of light to the gif. i don't always use Exposure because sometimes shots are bright enough on their own. i will, however, use it here. don't use it on your gif too much, because in the next few steps we will also be brightening the gif with other adjustment layers. i added +0,49:

next, Hue/Saturation layer. i use it in gifs with neon lighting to color correct overly bright colours. for example if your characters are standing in neon pink, you might want to lessen Saturation in Magentas and Reds to make the final gif less pixelated, and etc. i will not use Hue/Saturation on this gif, cause it doesn't need it.
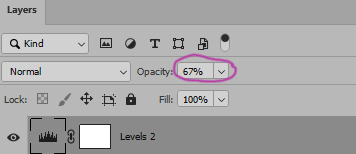
proceed to the layer Levels. this layer usually does most of my colouring. click on the lowest white dropper in your Levels window:
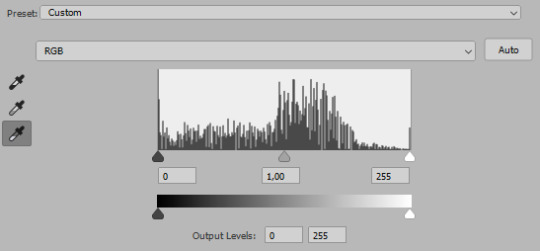
now choose a light place on your gif and click on it with the white dropper. it works especially well if you use the white dropper on the lightened parts of face skin. you can play around by choosing different bright spots and seeing what works best. here is the spot i chose and the resulting colouring:


this is too light, so now we need to balance it out with the black dropper:

choose one of the darkest places this time and click it with black dropper! once again, you can play around and click different spot to see what works best. i will be clicking the highlighted spot and you can see what my gif will look like with this Levels settings


as you can see, darkest places became darker and other colours were corrected a bit! now, this is still too bright, so i will be decreasing the opacity of Levels layer from 100% to a smaller number:

i will have to continue in another post because tumblr only allows 30 pictures per one post in the new editor now and i'd like to explain everything in visuals. click to continue
78 notes
·
View notes
Note
HI!!!! sorry if you've already posted about this before, but i'm aware you help maintain a vod archive - we're trying to do this for another server and were wondering if you had any tips for useful tools or ways to go about this? thanks and sorry for bothering !!
yes ok!!! here r my tips
1. Have some sort of location where all the VODs are accessible from, for people who may want to find them. For us, we have a spreadsheet, with dates & labels; this could also take the form of a YouTube playlist or an archive.org collection
2. Having only one way to download VODs probably wont be able to cover every scenario you encounter. Here's a list of a BUNCH of resources and tools, many of which you might never need, and most of which I've never heard of. In terms of programs to download VODs, I personally use a mixture of three: Twitch Downloader, 4k Video Downloader, and Twitch Recover. (I use Downloader to access most Twitch VODs, 4k for YouTube videos/streams - although it also does Twitch - and Twitch Recover for when a VOD has been recently deleted*.)
3. TWITCH DELETES VODS !!!! unless a vod is saved as a highlight, those suckers go KABLOOEY at a certain point! the exact amount of time will vary, depending on whether ur streamer is affiliate, partner, or not, so knowing your streamer's status is very helpful. I think non-affiliates and affiliates have a week, and then partners have 60 days. Note that Twitch Recover does not work on VODs older than 60 days, so this time limit is REALLY IMPORTANT.
4. If you're able to get in touch with your streamers in some way, that is really cool and epic! Not necessary at all, but sometimes it's nice being able to remind streamers theres a demand for an official VODs channel, or asking if they have any spare VODs lying around
5. HAVE FRIENDS TO DO THIS WITH !! you said "we" so I assume theres probably a team of some sort already, but division of labor is HUGELY helpful for VOD archiving, because those GB start adding up fast. (It's about 2.5 GB per 1 hour of video at 1080p quality, and generally you want the highest quality possible, so VODs can get pretty chunky.) Oh yeah I guess storage space is useful too. Remember to do spring cleaning also every now and then and make sure you dont delete anything that isnt already backed up elsewhere 👍 but yes. Teamwork. Communicating with the group about who will do what, being able to mobilize in a potential crisis, and making occasional public calls for additional hands on help are all super important, I've found.
6. YouTube is a copyright bitch! While it's better for watching vods back on, it will occasionally block a vod for copyright. YouTube is great, I upload all my MCC vods there unlisted, but I also recommend getting familiar with archive.org. archive is a little slower to upload but it won't hide a VOD worldwide because it had a copyrighted song or three in it. Having mirrors of uploads is a good tool for peace of mind - one of my friends has been on a kick of double mirroring VODs lately, even ones that will eventually be up on a VODs channel, but that's also a lot of uploading and slows him down
7. Being aware to at least some degree of the contents of what you're archiving is a good thing. Sometimes you need to censor out an accidental doxxing or worry about an IP leak, and I find it makes me feel more confident in my work if I know what I'm preserving. Like, I archive plenty of MCC POVs I havent necessarily watched, but they're all MCC, and I know what happens, and I sometimes hear details from other people - but a random server VOD from a guy I don't watch much of could contain anything. Sometimes I worry I've accidentally stuck deeply personal information into the internets biggest document repository. And maybe I have. But having some familiarity helps the peace of mind
8. Have fun with it and take pride in your work! You're helping to prevent something you love, the hard work of others, from becoming lost media! That's sooooo epic and sexy and cool of you, actually, and more people should do it - either on their own for their own personal purposes, or in the context of a larger project, like me and you
tl;dr its work but it boils down to communication, having the right tools, and having a team that is willing to adapt and cooperate in order to get stuff done! best of luck in your efforts
#asks#the genesis institute#this is like sooooo much info most of it will come up naturally. & i think the exact rhythm and formula#will vary depending on the exact group of people you've got & the demands of the server itself
76 notes
·
View notes
Text
Zotac Zbox EN1060 audit: Better than reassure gaming in a small bundle In any case, don't expect an indistinguishable execution from a full-estimate Nvidia GTX 1060.
Nvidia obscured the line amongst desktop and portable PC representation not long ago when it supplanted its versatile driven "M" line with about all out GTX 1080, GTX 1070, and GTX 1060 GPUs. Be that as it may, great thin, light, gaming-prepared portable PCs and wallet-busting desktop substitutions aside—I'm taking a gander at you, Razer Blade Pro—there's another little however convincing PC that is profited from this illustrations goodness: the smaller than normal PC.
Surprisingly (Gigabyte's terrible Brix Gaming reach and Alienware's humble Steam Machines in any case), you can purchase a PC that is littler than an amusement comfort, yet packs in enough handling energy to run recreations at ultra settings and 60FPS.
Enter the Magnus EN1060, the most recent model from small scale PC champions Zotac. Inside its minor 20cm-by-20cm impression sits a quad-center Intel Core i5 processor and a Nvidia GTX 1060 design card, giving it enough illustrations snort to power diversions at the most noteworthy settings, even at resolutions over 1080p. It makes for a mean, very compact, VR-prepared PC. Tragically, stuffing such capable segments into a case scarcely greater than a DVD case was continually going to bring about a few bargains—and the EN1060 isn't exactly the desktop powerhouse its spec sheet guarantees.
Down to earth, not beautiful
Be that as it may, we should begin with the more clear issue: this thing isn't a looker. The Zbox, with its metal frame flanked by strong plastic top and base spreads, certainly feels like it could take a couple thumps, however tastefully it feels terribly dated. To be sure, Zotac has been utilizing the EN1060's frame outline for a couple of years now, and outside of a couple of little changes and inner changes it remains to a great extent the same. It's the easily overlooked details that do it: the vast, very obvious vents that have been cut into its naff, finished dark plastic; the completely silly lustrous hover on the top cover; and the curiously large power catch sunk into the piano-dark front. It's a hodgepodge of outline components that neglects to shape a strong entirety. For something that expenses £875 (or $1,000) before you put a SSD or RAM in it or load an OS, I expect better.
The flipside is that, while the EN1060 isn't something you'd effectively flaunt to individuals like you would a Mac Mini or even Intel's Skull Canyon NUC, its ordinary appearance doesn't draw in consideration either. You could forget it in the open in a lounge and the vast majority would expect it's a switch, instead of a completely fledged PC. Measuring a unimportant 210mm by 203mm, with a tallness of only 62mm, the EN1060 fits into spaces where even a PS4 Slim or Xbox One S would have an intense time, and keeping in mind that there's an outer power block, it's generally a large portion of the extent of the one that accompanied the first Xbox One.The plan is handy as well. In advance, to one side of the power catch, is a SD card peruser, a standard USB 3.1 port, a receiver jack, an earphone jack, and a USB 3.1 Type-C port, which covers practically every fringe outcome. Round the back is another vast vent that gives you look at the huge copper warm sink inside, alongside two USB 2.0 ports, two USB 3.0 ports, two DisplayPort 1.3 ports, two HDMI 2.0 ports, an outer ethereal attachment for the inward 802.11ac/b/g/n WiFi, and—in an odd yet welcome consideration—double gigabit Ethernet ports. The absence of USB 3.1 on the back is disillusioning, especially in case you're keen on attaching quick outside capacity, however the double Ethernet ports mean the EN1060 can pull twofold obligation as a DIY switch or a server.
Barebones or go home
The EN1060 is accessible in a couple of various designs, accompanying or without RAM, stockpiling, and an OS. In case you're OK with a little measure of PC DIY (we're talking little here), then the barebones variant is the approach. To get inside the EN1060 you fix two thumb screws from the back of unit, then slide the base board off—that is it. Inside is space for a standard 2.5-inch hard drive or SSD, a M.2 opening for super quick stockpiling like Samsung's most recent 960 Pro NMVe SSDs, and two tablet style SODIMM openings—useful for 32GB of RAM, until somebody discharges some bigger SODIMMs. You can likewise get at the Intel remote card on the off chance that you want to swap it out for another model (read: anybody endeavoring to make a Hackintosh out of this thing).
Whatever is left of the EN1060 is standard over all setups, beginning with an Intel Core i5-6400T processor. While this is a quad-center chip, it originates from Intel's energy enhanced range, with a TDP of only 35W, and is timed impressively lower than a regular i5—at 2.2GHz with a 2.8GHz lift clock. It's a reasonable incorporation given the little suspension, however remember you won't get a remarkable same execution as you would from a chip with a higher TDP and tickers. It's a comparative story for the GTX 1060, which wears precisely the same as its desktop partner, however is timed at a lower 1404MHz, with a 1607MHz lift clock.Its desktop partner has a 1505MHz center clock and an evaluated support clock of 1708MHz. While that 100MHz distinction won't not appear like much on paper, it doesn't consider the significantly more forceful lift tickers you get with an all around cooled desktop GPU. To be sure, in our audit of the GTX 1060 Founders Edition—which wears a straightforward blower-style plan as opposed to the more excessive cooling frameworks of accomplice cards—it easily helped up to only over of 1900MHz without overclocking. That is a strong 300MHz more than the lift clock for the versatile part, and, as the benchmarks appear underneath, it has a significant huge effect to execution. The versatile GTX 1060 basically can't help as high because of its significantly more obliged thermals.Performance
I kitted the EN1060 out with 16GB of Kingston HyperX 2133MHz DDR4 memory graciousness of Overclockers UK, alongside a 480GB Crucial BX200 2.5-inch SATA SSD. While the last is in no way, shape or form the speediest drive around, especially in maintained composes thanks its utilization of TLC blaze, it's fine for the motivations behind design benchmarking, where a quicker SSD has practically no effect to illustrations execution. In case you're feeling flush, you could pick to purchase a littler M.2 SSD for use as an OS drive (where there's a more detectable distinction), and after that purchase a greater, less expensive 2.5-inch SSD or HDD like a Samsung 850 Evo (purchase here) for media and recreations stockpiling.
As noticed, there's a sizable distinction in execution between the GTX 1060 on the EN1060 and a desktop Founders Edition card. By and large the distinction is around 8-10FPS, which while still amazing for such a little PC, can have the effect between playing at a bolted 60FPS, or floating just underneath it at higher resolutions.
The issue is that, while calm, the double fan cooling framework on the EN1060 isn't exactly sufficiently bulky to get the GTX 1060 up to its evaluated support clock. Under a managed stack, the GTX 1060 drifted around 1544MHz—63MHz lower than what it ought to have the capacity to hit. That is a four percent contrast between the portable part and the desktop part, and an incredible 20 percent distinction when taking a gander at true desktop support checks in an all around cooled system.The FPS numbers mirror this flawlessly, with execution differing by as much as 25 percent between the versatile GTX 1060 and the desktop GTX 1060 in amusements like Bioshock Infinite, contracting to 11 percent in Ashes of the Singularity. At 1440p determination in Metro Last Light, for instance, it's the contrast between an agreeable bolted 60FPS and shakier sub-60FPS, which means you need to make a call between determination, visual loyalty, and edge rate that you won't with a desktop card. Local 4K gaming, even at 30FPS, is recently distant for the EN1060 as well.
All things considered, judged all alone merits, the EN1060 still makes for an impressive 1080p gaming PC. Over every one of the amusements I tried, including the all-new (and splendid) Battlefield 1, it ran each diversion at the most noteworthy settings at 1080p without issue. There's a high-loyalty 60FPS experience accessible over each amusement that you just don't as of now get with the Xbox One or PS4. The PlayStation Pro might just change that, however at this moment in the event that you need superior to anything console gaming in a little bundle that isn't a portable workstation, the EN1060 is difficult to beat. (However, at three to four circumstances the cost of a reassure, you would positively expectation that is the situation.)
Decision
Like any littler framework, purchasing the EN1060 implies making an exchange off amongst size and life span. A best aspect concerning PC gaming is that it is so natural to keep a framework significant, just by dropping in another design card. Hell, until the arrival of GTX 1080, you could even now utilize a five-year-old Intel i5-2500K processor with a cutting edge illustrations card and not experience the ill effects of any bottlenecks. In principle the EN1060 is upgradeable—the CPU is socketed, and the GPU is MXM—however you are fantastically far-fetched to do that because of force, warm, and cost limitations. In all actuality, purchasing the EN1060 implies replacing the whole thing each couple of years on the off chance that you need to stay aware of the Joneses.But in spite of its constraints, its significant cost, and the way that—notwithstanding what Nvidia says—a portable GTX 1060 is not by any means the same as a desktop GTX 1060, it's hard not to be awed with exactly how much execution Zotac has stuffed into such a little edge. No other smaller PC approaches this level of gaming execution. On the off chance that that is the specialty you require filled, the EN1060 is best way to go.The great
Minimized outline that is littler than an amusements support
Plays basically everything at 1080p over 60FPS
Simple to introduce RAM and SSD(s)
Peaceful, even under load
The terrible
GTX 1060 battles to hit evaluated support clock, and is slower than the desktop form
Stylishly dated
Expensive
0 notes
Last Seen Blogs


artis-malaysia-seksi
Artis Malaysia Seksi

lonelylilrobin
lonelylilrobin

blotchxx
Blotchxx Candids

k-vault
kzone