#at least one of those expo's will definitely pay for my taxes
Text
girl math is making $670 for the week and then spending $650 of it on a credit card bill and now you're excited because you made a profit of $20 in your bank account and $650 more of free money

#this is a joke i am not excited#i am very much in pain#we cope with laughs#i hate the gauntlet of holidays and special occasions from december through to march#it's christmas then it's new years then it's valentine's and my husband and i's anniversary merged together and then it's my bday#all of that's done with now but both our wallets are hurting lmao#and worse yet i still can't even catch a break because now i need to prepare for conventions and tax season#at least one of those expo's will definitely pay for my taxes#and i'm thankful this year i have three to attend so i get to actually earn money from them LOL#but man the winter season this year was one of the worst i've ever seen for tattooing#it's starting to get a little bit back to normal now but i'm still on edge because it could go back to being dead again at any moment#i got this#i just wish i could breathe lmao
55 notes
·
View notes
Text
Quickbooks Self-Employed Review 2019 — My Most and Least Favorite Features
{"@context":"http:\/\/schema.org","@type":"VideoObject","name":"Quickbooks Self-Employed Review 2019 \u00e2\u0080\u0094\u00c2\u00a0My Most and Least Favorite Features","description":"https:\/\/dyernews.com\/50percentoffquickbooks First, what I liked about the tool was that I could easily link my various financial accounts and categorize each of my transactions. Furthermore, the site and app offers support for tracking business mileage, which can also factor into your tax deductions.<\/p>\n<p>Review: https:\/\/dyernews.com\/quickbooks-self-employed-review\/<\/p>\n<p>Speaking of taxes, Quickbooks Self-Employed also gives you estimates of how much you should be paying for your quarterly taxes based on your income and expenses. However, if you\u00e2\u0080\u0099d like to make tax payments through Quickbooks, you\u00e2\u0080\u0099ll need to upgrade to their tax bundle plan, which is https://dyernews.com/50percentoffquickbooks First, what I liked about the tool was that I could easily link my various financial accounts and categorize each of my transactions. Furthermore, the site and app offers support for tracking business mileage, which can also factor into your tax deductions.
Review: https://dyernews.com/quickbooks-self-employed-review/
Speaking of taxes, Quickbooks Self-Employed also gives you estimates of how much you should be paying for your quarterly taxes based on your income and expenses. However, if youâd like to make tax payments through Quickbooks, youâll need to upgrade to their tax bundle plan, which is $7 more per month. One downside is that this only accounts for federal taxes so youâll still need to figure out any quarterly state tax payments on your own.
Lastly, Quickbooks Self-Employed offers an invoicing tool so that you can easily request payment from clients. If you want, you can even sign-up for Intuitâs payment feature, though this functionality will come at the cost of 2.9% of the bill amount + 25¢ if your client is paying with a credit card, although bank transfers are free. Admittedly, these aspects of Quickbooks Self-employed are those Iâve used the least, but it could definitely be helpful for those currently without an invoicing solution.
Starting off with the good, one of the features Iâve really been enjoying lately is Quickbooksâ Amazon integration that makes categorizing your purchases much simpler.
If you do a lot of shopping on Amazon, letting your personal and business expenses mingle as a result, the ability to view more detail on each of your transactions from Quickbooks can be of great assistance.
Now, instead of seeing a purchase listed just as Amazon, you can view the items included in your order, Furthermore, you can go through and label the individual items as either business or personal. As it turns out, this is a feature I didnât really know I wanted, but have definitely been making use of it and increasing my deductions as a result.
In my last review, I definitely discussed how you could set up rules for certain transactions and have them automatically be categorized in the future. Well, after another year of using the app, itâs really become clear to me just how much this feature can help you keep up to date.
Admittedly, while I try to keep on top of categorizing my transactions with some frequency, there have been a few times Iâve fallen behind. Thankfully, in each of the cases, the backlog wasnât nearly as bad as I would have anticipated thanks to the number of rules I had already set up. Basically, since I had previously defined where my most frequent purchases fell, there were only a few outliers to go through each time.
One small word of warning Iâd give about setting up rules is that you may find yourself going overboard and overlooking some potential expenses. For example, while I nearly set up rules to have some of my favorite restaurants automatically categorized as personal, it occurred to me that I might end up dining at these chains while on a business trip, in which case theyâd be partially deductible. That said, you can get around this my just reminding yourself to look back at transactions made during any business trips you may take and correcting any purchases you may have missed.
Just as spending more time with an app or service can highlight more of the benefits, it can also bring your attention to some annoyances. For me, Quickbooks Self-Employed’s occasional duplicate transactions as well as the inability to clone business mileage trips have become my pet peeves.
Even if you have all of your rules in place, one thing Iâd definitely recommend is to double check all of your reviewed business transactions in order to weed out any duplicates. For the life of me, I canât quite figure out why this pheneonoen happens but it definitely does from time to time. While itâs easy enough to exclude these duplicates when you spot them, it is still unfortunate that you even have to.
Meanwhile, in my previous video I mentioned that I rarely used the mileage options in Quickbooks as my job didnât require me to drive all that often. Yet, when I went to enter a few consecutive trips I did take driving to and from this yearâs FinCon Expo,. I noticed how tedious entering these individual drives could be. Thatâs because there doesnât seem to be an option to duplicate a trip, which seems like a pretty obvious feature. Moreover, unless your computer already has a location in its autofill directory, youâll have to manually enter the addresses each time if you want to keep track of them. This process is slightly easier in the app where Quickbooks will search Google Maps info to fill in addresses.
Despite those notes, Quickbooks Self-Employed has still been extremely helpful to me when it comes to keeping track of my businesses expenses and maximizing my deductions. more per month. One downside is that this only accounts for federal taxes so you\u00e2\u0080\u0099ll still need to figure out any quarterly state tax payments on your own.\n
Lastly, Quickbooks Self-Employed offers an invoicing tool so that you can easily request payment from clients. If you want, you can even sign-up for Intuit\u00e2\u0080\u0099s payment feature, though this functionality will come at the cost of 2.9% of the bill amount + 25\u00c2\u00a2 if your client is paying with a credit card, although bank transfers are free. Admittedly, these aspects of Quickbooks Self-employed are those I\u00e2\u0080\u0099ve used the least, but it could definitely be helpful for those currently without an invoicing solution.\n
Starting off with the good, one of the features I\u00e2\u0080\u0099ve really been enjoying lately is Quickbooks\u00e2\u0080\u0099 Amazon integration that makes categorizing your purchases much simpler.\n
If you do a lot of shopping on Amazon, letting your personal and business expenses mingle as a result, the ability to view more detail on each of your transactions from Quickbooks can be of great assistance.\n
Now, instead of seeing a purchase listed just as Amazon, you can view the items included in your order, Furthermore, you can go through and label the individual items as either business or personal. As it turns out, this is a feature I didn\u00e2\u0080\u0099t really know I wanted, but have definitely been making use of it and increasing my deductions as a result.\n
In my last review, I definitely discussed how you could set up rules for certain transactions and have them automatically be categorized in the future. Well, after another year of using the app, it\u00e2\u0080\u0099s really become clear to me just how much this feature can help you keep up to date.\n
Admittedly, while I try to keep on top of categorizing my transactions with some frequency, there have been a few times I\u00e2\u0080\u0099ve fallen behind. Thankfully, in each of the cases, the backlog wasn\u00e2\u0080\u0099t nearly as bad as I would have anticipated thanks to the number of rules I had already set up. Basically, since I had previously defined where my most frequent purchases fell, there were only a few outliers to go through each time.\n
One small word of warning I\u00e2\u0080\u0099d give about setting up rules is that you may find yourself going overboard and overlooking some potential expenses. For example, while I nearly set up rules to have some of my favorite restaurants automatically categorized as personal, it occurred to me that I might end up dining at these chains while on a business trip, in which case they\u00e2\u0080\u0099d be partially deductible. That said, you can get around this my just reminding yourself to look back at transactions made during any business trips you may take and correcting any purchases you may have missed. \n
Just as spending more time with an app or service can highlight more of the benefits, it can also bring your attention to some annoyances. For me, Quickbooks Self-Employed’s occasional duplicate transactions as well as the inability to clone business mileage trips have become my pet peeves.\n
Even if you have all of your rules in place, one thing I\u00e2\u0080\u0099d definitely recommend is to double check all of your reviewed business transactions in order to weed out any duplicates. For the life of me, I can\u00e2\u0080\u0099t quite figure out why this pheneonoen happens but it definitely does from time to time. While it\u00e2\u0080\u0099s easy enough to exclude these duplicates when you spot them, it is still unfortunate that you even have to.\n
Meanwhile, in my previous video I mentioned that I rarely used the mileage options in Quickbooks as my job didn\u00e2\u0080\u0099t require me to drive all that often. Yet, when I went to enter a few consecutive trips I did take driving to and from this year\u00e2\u0080\u0099s FinCon Expo,. I noticed how tedious entering these individual drives could be. That\u00e2\u0080\u0099s because there doesn\u00e2\u0080\u0099t seem to be an option to duplicate a trip, which seems like a pretty obvious feature. Moreover, unless your computer already has a location in its autofill directory, you\u00e2\u0080\u0099ll have to manually enter the addresses each time if you want to keep track of them. This process is slightly easier in the app where Quickbooks will search Google Maps info to fill in addresses.\n
Despite those notes, Quickbooks Self-Employed has still been extremely helpful to me when it comes to keeping track of my businesses expenses and maximizing my deductions.","thumbnailUrl":"","uploadDate":"2019-01-08T00:49:00.000Z","duration":"PT5M27S","embedUrl":"https:\/\/youtube.googleapis.com\/v\/WYAn5diMvms"}
youtube
This video, https://youtu.be/WYAn5diMvms, can also be seen at https://www.youtube.com/playlist?list=PLFfM5Lf816akffqDilBgawubR7sSZSgFW.
0 notes
Text
Conquering Your Fears: Tokyo, Japan
Whenever we decide to travel, we have these anxieties, fears, and all those scary feelings aside from the excitement that we get when we know we’re going to go somewhere new. SOMEWHERE NEW. There are really those people who are adventurous enough to not be bothered by the anxiety of going someplace new. Whether you’re traveling somewhere local or traveling internationally, there’s always one or two things that make you worry. In this post, I’m going to list some of the most common fears/anxieties/whatever you want to call it of foreigners when going to Tokyo, Japan.
LANGUAGE BARRIER
The first thing that would really scare you when going to Japan is the language barrier. All those signs you can’t read, all those sentences and words you can’t understand, it would really put you off. Now I’m not going to say that I have gotten over this worry already because I still worry right now that I badly want to take actual classes to learn how to speak and read Japanese. My level of understanding with the language is just about 10% which knowledge I just got from anime. I still can’t read any hiragana or katakana and kanji. I can understand the context of the sentence by hearing words I’m familiar with but I can’t come up with my own coherent sentence because the placement of words is just different. I usually end up just saying words without forming sentences.
While there are some phrases you need to at least know before coming to Japan, I can pretty much say that you’ll get by there by using hand gestures and even though it’s not perfect, using Google Translate. Japanese people are very kind and will try to communicate with you and help you when you need help. I personally had some trouble with a coin locker and asked someone standing there for help, and she helped me. She was meeting with her boyfriend that time and when her boyfriend came he asked what happened and he also helped. I think I wasted 15 minutes of their life but I’ll never forget that moment when someone genuinely wanted to help a stranger. Another instance was when we were lost because the Google Maps walking path is not accurate (yep, Google Maps is awesome when it comes to pointing you to the right train station to ride but it sucks when there’s walking involved) and we just asked someone and she helped us tremendously, even using Google Translate to communicate with us so that she can point us to the right direction.
At the airport and on major train stations, there are tourist information booths and they usually speak and understand English. In most touristy places like in Nakamise-dori going to Sensoji temple, the vendors there can also understand and speak English.
In restaurants, there are some which offer an English menu so you can ask them for that. In case there’s no available English menu, most restaurants would have a picture of every dish they have there. In case you want to go to a place where there’s really no English menu nor photos of food, it’s best you Google all the information about it first or look up for some Youtube videos about the place so that you won’t be at a loss. If you’re really adventurous, go ahead and just use Google Translate coupled with hand gestures and they will try to understand you and you can still order.
In trains, specifically JR trains, the announcements are also broadcast in English so you’ll know which side of doors will open and the stop and where to get off if you want to transfer. However, in some subway lines, there’s really no translation whatsoever but you can still hear the name of the station where you want to go to so just remember the name of the station and listen carefully. Usually the name is written in kanji but there will be the Romaji equivalent of it, and if there’s none, just look at your Google Maps and try to remember the symbols/characters.
PRICE OF FOOD, LODGING, TRANSPORTATION, GOODS, ETC.
“Tokyo is an expensive place to go to!” is what people would always say. While comparing to the prices of goods here in the Philippines, the goods in Japan are really more expensive, I can still confidently say that you can go to Japan on a budget.
Comparing the price of food to the Philippines, it is really more expensive in Japan. However, you can choose to buy those relatively cheap food from restaurants or fast food places - you just have to know where to look. You can buy a plate of sushi for just 100 yen. 10 plates and it will just cost you 1,000 yen (+ tax) and you’ll be really, really full. In Yoshinoya/Sukiya/Matsuya, you can buy gyudon for less than 500 yen and it is already filling. It is optional to buy drinks at these food places because they offer water or tea for free!
JAPAN VISA
First thing that you’ll have to spend money on is getting a Visa. There are a lot of accredited agencies and there are some which are cheaper than the others. Watch out for Travel Expos too and you can apply for a Japan Visa for just Php 500. I think this is the cheapest that they offer. You can actually see the prices of getting Japan Visa through their websites so you can already include this in your budgeting.
PLANE TICKETS
Next would be plane tickets. If the flight is just 4-5 hours, I guess you can just choose an airline offering cheap economy seats instead of those airlines which are really more expensive. You can compare prices online (click here for my previous post related to this) and choose which is the cheapest. Most budget airlines don’t have wi-fi or any form of entertainment at the plane, and it doesn’t automatically include the checked-in baggage fees, seat selection fees, and meals so you also have to check this. Just my experience on this:
So we belatedly bought plane tickets last year because we’re still weren’t sure of the date so the prices are pretty much the regular prices and not the discounted ones. I was about to book at Jetstar because I thought it was the cheapest. They have this bundled add-on which includes a checked-in bag of 20kg, meal, and seat selection. The bundle is to be bought per trip so you will pay for the bundle going to Japan, and coming back from Japan. It has a fixed rate but you can still purchase add-ons like if your checked-in luggage is heavier, if you want premium seats, and all that. I then went to the Cebu Pacific website and tried to book there to see if it’s cheaper. So you can choose if you just want to fly, or if you have checked-in luggage, or if you have checked-in luggage plus meals. I chose the one with the checked-in luggage already Then on the next pages you’ll be asked if you want to choose your seats for a fee, if you want to add more kg to your baggage and if you want to pre-order meals. I just chose seats as another add-on because I’m traveling with my sisters and I want to sit beside them and I want the window seat! If you want to save up money, you can just do an early web check-in which can be done 7 days prior to your departure and you can choose your seat there for free. What I like about booking with Cebu Pacific is that they have the option for you to pay your travel tax which is Php 1,620 already so you don’t have to line up there! The lines can get really long. (When I checked Jetstar though this 2018, if I remember correctly there’s also an option already to pay for the Philippine travel tax.)
This 2018 trip, we bought tickets when it was on sale by Cebu Pacific. It is around Php 35,000 cheaper! Even though it’s not from the Php 1 sale (Piso sale), it’s still a whole lot cheaper when it’s on sale.
LODGING
Next thing that you would look for is the place where you’ll stay. Booking and Agoda are great apps for you to look at to have a rough estimate of the costs of hotel. When we went there we stayed at a hostel and it was great! However when I checked even months before June 2018, it is already fully-booked. Most cheaper hotels are also fully-booked so I looked for another option and found Airbnb. I booked there and even with the new Japanese law we were able to stay there (really a relief!!!) and it was a great experience. I will provide a separate post about the Airbnb we stayed at to give you an idea about it.
If you’re traveling alone staying at capsule hotels is actually a good idea because it’s inexpensive but it still looks good.
There are also those manga cafes where you can stay at a cheap price but I just don’t think it’s comfortable to just stay there if you’re staying for more than a week in Japan.
GOODS/FOOD ITEMS
There are a ton of shops and restaurants in Tokyo - you just need to look for it. There are many travel guides available online and on Youtube, so you can just search for it. Most of the time they already include the prices of the goods or the food so you’ll have a rough estimate of how much you’re going to spend. (Check out this post for a list of Youtubers I watched!)
For souvenir shopping, there’s always those 100-yen stores like Daiso and Can-Do. They have a vaaaast selection of items and you just have to decide whether it’s worth it or not. Daiso is everywhere too and you can find a lot of Can-Do stores as well. I like Daiso but there are items in Can-Do which are not available in Daiso so you definitely have to check it out.
In buying chocolates or grocery snack items, it is best to go to your local grocery than to those tourist-y shops because it is cheaper at the groceries. For snacks, there’s this place in Ueno located Ameyoko which is Niki No Kashi and it pretty much sells all kinds of snacks and chocolates. It’s also a tax-free shop! Also in Ameyoko there are a lot of stores there which sell snacks and teas so you just have to look for the ones which offer the cheapest one.
TRANSPORTATION FEES
When you arrive at the airport, you need to ride a bus or a train to go to Central Tokyo. There are quite a lot of options here - some expensive, and some cheap so you just have to choose accordingly. Taking the bus is the cheapest I think because it just costs 1000 yen as opposed to those trains like the Narita Express which I think is about 3000 yen? There are also those local trains which are cheaper but travel time is longer. What you’re basically paying for those Narita Express and Keisei Liner (the expensive one) is that you can get to Tokyo in less than an hour and they have reserved seats. You can also search for this in Youtube as there are many guides there already. Pretty much everything I know, I learned from vloggers first before I was able to experience it myself.
Just a quick story: When we went this 2018 in Japan, we had a place at Kinshicho and we chose that place in Airbnb because it has a direct train to and from Narita Airport. Our travel time from Narita to Kinshicho station is about 1 hour and 30 minutes but the train was not packed when we rode so we were able to sit, and it just costs 1,320 yen one-way. A lot cheaper than 3,000 yen!
Going around Tokyo, Google Maps is your best friend. From there you can see the price of trains going from one place to another. We used this to have an estimate about the transportation fees that we need to spend.
TRANSPORTATION - TRAINS (and others)
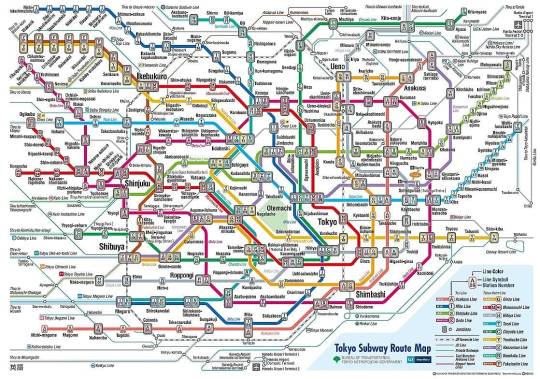
Traveling around Tokyo is easy. Yep, I am kidding you not, it is easy. “But what’s with that subway map that you so graciously provided without explaining anything? It looks so complicated!” Well yes it looks so confusing and you really wouldn’t understand it. However, Google Maps is your best friend! It shows you everything you need to know. The time trains depart, the stops, the cost - just everything. I also used another app which is the Japan Travel app by Navitime Japan, and when you reach Japan, you can also download the Hyperdia app. These apps have this option to prioritize JR lines for when you have a Japan Rail pass so that you can maximize your JR pass. (Picture provided is just a subway map. JR lines are not included yet.)
The trains can take you around Tokyo and it costs about 170 yen from one stop to another. The price differs but yes, Google Maps and the other apps I mentioned provide the price already so you don’t have to worry about it.
Another worry would be the buying of tickets. I removed this worry altogether by just purchasing an IC card. I had a friend who didn’t know about the existence of this and he had a hard time navigating Tokyo just because he cannot read the name of the stops and he doesn’t know how much the fare is and he had a hard time communicating there because they don’t really understand English. Anyway. mine is a Suica card just because it looks cute. There’s also a Pasmo card. The only difference is the issuing authority. These two can be used in any station or subway, and can be used to buy drinks from vending machines or stuff from convenience stores as long as they have the option. I think it can also be used in buses. Basically you can have this card at the train stations. There’s an English menu available so you can just choose that. (Please search for this in Youtube so that you’ll know what I’m talking about. There are many vloggers who show how it’s done and all that. I wasn’t able to make a video about this because I completely forgot to do so.) There’s a deposit fee of 500 yen, and you must load it there. We had a rough estimate of how much it would cost us to go around Tokyo for the entire time we’re there so we deposited that amount. Once you leave Japan, you can return the card and the balance would be returned to you and the deposit fee. However, I’m not sure about this fee that they’d charge you if the balance is more than 500 yen still. Since we know we’ll go back to Japan again and again, we just kept the card because the card is valid for 10 years. Yes, it is valid for that long so if you’ll go back to Japan within 10 years, I highly suggest just keeping it.
So I just talked about trains because this is the only mode of transportation we used (aside from walking). I apologize if this is not enough but with the convenience of trains, I just really didn’t bother with other modes of transportation anymore.
Oh, there are taxis too but they’re expensive especially when you’re alone and you have no one else to split the bill. We used a taxi once during our last trip because we were just so tired and from Skytree to our place in Kinshicho, it costs 810 yen. Considering that it is just near, this is quite expensive but I was with my sisters so we split the bill. Taxis are amazing because of the automatic doors! Also, they issued a receipt when we paid. There are some taxis too that accept Suica/Pasmo as a mode of payment which is just really convenient.
So these are some fears/concerns we commonly experience. I know there’s still a lot so you can leave questions or comments or just anything in my Ask.
I will try to update this post when needed because I know I forgot something which I’ll remember soon. :)
(Posted on July 17, 2018)
#traveltheworldwithme#traveljapan#japan#tokyo#tokyojapan#travelguide#travelguideph#japantravelguide#travelguidejapan
0 notes
Last Seen Blogs

onewolfaday
awooo

ashtonderoy
Ashton Deroy

chickenmcnuggies
I don't even like mcdonald's chicken nuggets.

sevgiiart
sevgi!!

forageworkshop
Forage Workshop