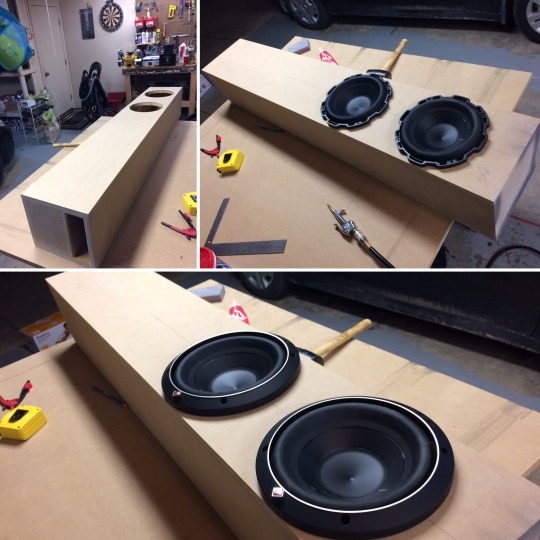
#This is part of a larger sketch page but i'm afraid that one's gotta be confined to the discord homies
Text

in which Cassian is relieved to finally be out of the Narkina uniform, and Melshi has not been touched (except when Kino would knock him around) in years.
#melshian#andor#cassian andor#ruescott melshi#This is part of a larger sketch page but i'm afraid that one's gotta be confined to the discord homies#if you wanna see some so-so sketches of these trans men fucking and sucking uhhhh message me for a copy of the full page ig lmao?#myart#oats.png
58 notes
·
View notes
Text
Build Something!
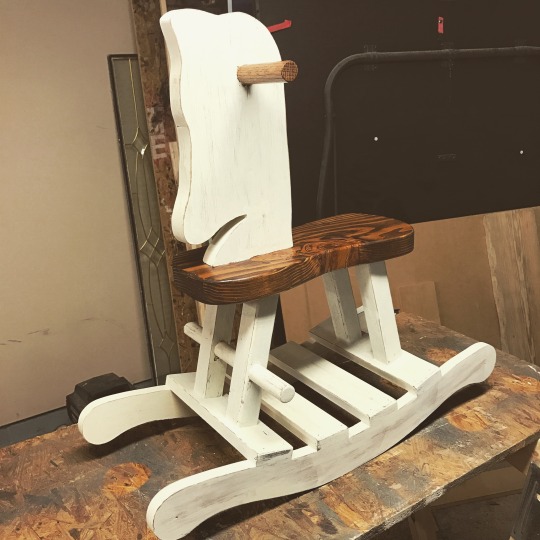
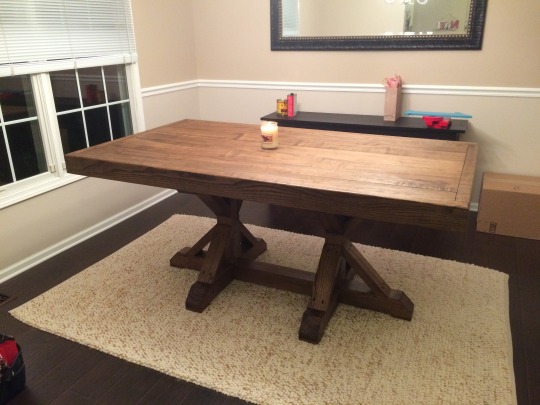
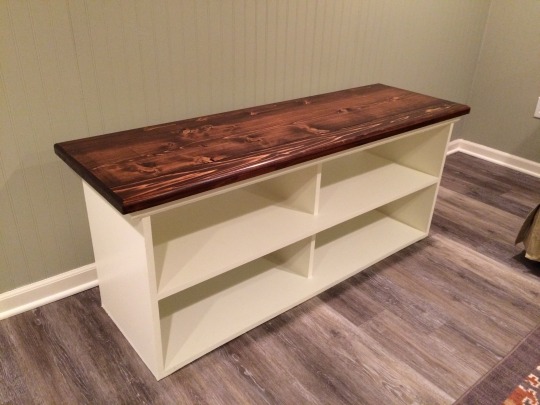
As many of you know, woodworking is one of my hobbies (chores if my wife makes me do it). In the grand scheme I'd say I'm certainly an amateur, but I've still built things that I'm proud of. And whatever your skill level may be, it can be such a rewarding endeavor (not to mention a money saver). Anyone's who's relished in the sweet smell of fresh cut cedar or had their eyes open wide when they apply that first coat of stain and watch that grain come to life knows what I mean. It just makes you want to make more. Whether they're trinkets or decorations or furniture, my house or other people’s homes are starting to get littered with products of my wood shop (garage).
Whenever I build something new, I inevitably get asked from others one of two, if not both questions:
1. Can you make me one? (Quick answer: Yes, if you help out, supply (or pay for) materials, and provide the beer.
2. How did you get started doing this (and how can I start doing this)?
I'll use this post to answer question 2 and hopefully get you on the path of making some sweet sawdust of your own!
A. Get some tools and supplies. When possible, get power tools. Power makes the world go round. NOTE: I'm only going to list building tools and supplies. Finishing supplies is a whole other can of worms.
Mandatory:
Wood -- Duh. I have found that all kinds of beautiful things can be made out of cheap construction timbers (knotty pine) with a little finesse. Birch plywood is great for large panels and looks beautiful with stain. MDF is also a great material for large panels, but you can’t stain it (gotta paint it), you better pre-drill your screw holes, and it makes a awful mess when you cut it. Cut it outside and wear a mask. Beyond that, you can spend as much as you want on higher end boards like poplar, oak, maple, walnut, cherry, etc... but prepare for a little sticker shock if you need several board feet.
Tape measure and speed square -- these will let you accurately measure out and mark cut lines. The speed square can also be used as a handy fence to make quick and straight cross cuts with a circular saw.
Hammer and rubber mallet -- uses of the hammer are obvious. The rubber mallet is very handy for "coaxing" tight pieces into place without marring them.
Safety glasses, ear protection, and shop apron -- self explanatory.
Clamps, clamps, and more clamps -- a woodworker can never have enough clamps. You can get a lot done with a variety of sizes of bar clamps, C clamps, and spring clamps. To save some dough, pick up the cheapies at Harbor Freight. I've got tons of them and they've served me well. Seriously, get a lot of clamps.
A supply of wood glue and nails/fasteners -- TiteBond II is the glue you want. Just always have some on hand. The fasteners will accumulate as you buy more for specific projects.
Cordless Drill/driver -- Any homeowner should already own a decent one. Bonus point if you pick up an impact driver. While not necessary, an impact driver makes driving large screws a breeze and makes stripped out heads a thing if the past. Once I used one I wondered how I lived without it. Of course with these tools you'll need an assortment of drill bits and driving bits. They can be bought in affordable kits. In my experience, Ryobi bits suck.

Circular saw or Jig Saw -- A circular saw (go corded to start out) is very versatile and can perform a variety of cuts... except curved cuts. A jig saw excels in making curved cuts in thinner materials and smaller, more intricate cuts (good for arts and crafts). I'd start out with a circular saw and perhaps add the jig saw as funds become available.
Power Sander -- Some may argue this is optional, but F that. Life is too short to sand shit by hand. Get either a pad sander or random orbital sander and a variety of sanding disks or paper. 80, 150, and 220 grit (or close to those numbers) should cover 98% of your sanding needs.
Cold beer and tunes -- what fun is working in the garage without a pop and Metallica in the background?
Optional:
Kreg Pocket Hole Jig -- I suppose this is one of the "optional" items, but seriously, just spend $100 and buy the K4 system. It is basically "wood joints for dummies". Ask anyone who owns one and they'll echo my sentiments. I wish I'd have known about it when I started woodworking. it allows you to easily fasten pieces together with a fairly strong joint while skipping complex wood joining methods. Buy it.
Miter saw AKA chop saw -- A chop saw will make fast, accurate, and repeatable cross cuts all day long. It can also make angled cuts (either miters or bevels, and both at once). Most simple 10" saws will cleanly cut up to 2x6s and 4x4s, but you'll need a 12" or sliding saw to cut larger pieces. I have a 10" and it's plenty for 95% of what I want to do. While very handy, I would not get only a chop saw and skip the circular saw. Get the circ saw first (it can perform more tasks) and add a chop saw when your ready.

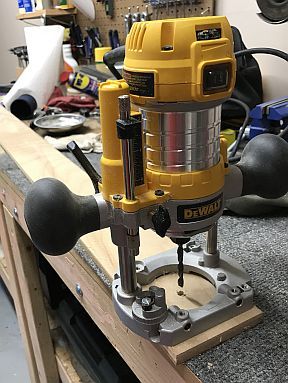
Router and variety of bits -- a router is what can really take your finished projects to professional looking. While a router can perform many tasks, I mostly use it to put a decorative profile on the edge of pieces, like a table top. A simple round over or chamfered edge make your projects look finished. While you can buy a fire-breathing router with a table, I've been plenty satisfied with a "trim router" that accepts 1/4" collet bits. Getting a plunge base with it will further enhance its abilities.
Shop vacuum -- Cutting wood makes a damn mess. If you want, I suppose you could get by with a broom and dust pan, but a capable shop vac makes life easier. But which one? My answer is simple. When you're browsing the selection at your local Home Depot or Lowes, get the one that costs $100.00.
Nail Gun -- If you already have an air compressor at home (for filling tires, basketballs, blowing things off, etc...) you’re halfway there. I picked up an open-box 18ga brad nailer off of Amazon a while ago. It is awesome for tacking on small trim pieces and barely leaves a nail hole. Highly recommended if you can swing it.
Advanced:
Table saw -- while many say that a table saw is the heart of any wood shop, for most of us it isn't going to be an early purchase or practical. I've been fortunate enough to have anytime access to one thanks to my neighbor (thanks Lloyd!) and recently picked up a small one from a garage sale. They excel at rip cuts and are extremely versatile. With certain sleds and accessories, you can do almost anything on a table saw. But they can be pricey and can take up a lot of room. If you have extensive rip cuts that you need done but don’t have a table saw or they may be too big a task for your circular saw, ask the friendly faces at Home Depot or Lowes to make a cut for you. When you buy lumber you’re allowed two free cuts per, and you can usually sweet talk them into more. Just leave them a nice review.
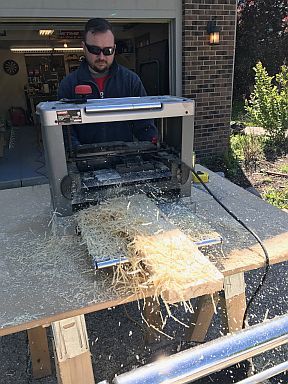
Planer -- This machine let's you control the thickness of your materials. Very nice for if you're making a table top out of multiple boards and want to ensure they're all the exact same thickness, among other things. They can also remove surface imperfections and leave the planed surface clean and almost finish-ready. They also make one HELL of a mess. Use it in your driveway with your shop vac on hand.
There are of course more advanced tools you will see in professional wood shops, but I'm not trying to cover that full scope. This is for the hobbyist.
B. Get a plan. Some people are good at throwing caution to the wind and cutting wood and slapping shit together. I am not one of those people. Thankfully we live in the age of YouTube, Pinterest, and websites like Ana-white.com and rogueengineer.com . There are all kinds of plans and projects on these sources with materials lists, cut lists, finishing tips, etc... Even if the project isn't to your scale, you can always crunch the numbers and adjust to your needs. Brush up on your fractions. I have a little notebook where each page is grid paper. I like to sketch out projects to double check my measurements and make sure the math adds up.
C. Don't be afraid to make a mistake. You learn by doing and you learn from your mistakes. I get better with each project by learning from my previous mistakes. And for the most part, wood is cheap. Of course, by this I don’t mean throw caution to the wind when it comes to safety, which brings us to...
D. BE CAREFUL! Power tools are dangerous. Hell, regular hand tools can be dangerous. I have a few scars to prove that, but thankfully still have all my fingers. In my opinion, two tools you should have a healthy fear of are the table saw and the router.
E. A few tips I’ve learned over the years:
“A little putty and paint makes a carpenter what he ain’t”. A sander, some putty or filler, and some paint can fix a lot of boo boos.
A sharp knife is a safe knife. Too true. If you try to force work pieces against dull blades, you are greatly increasing the risk of something slipping and sending that blade into your fingers. Keep your tools sharp.
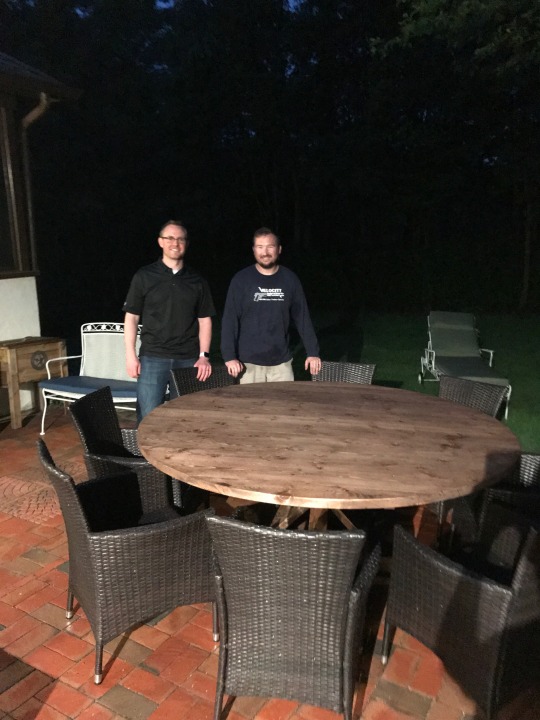
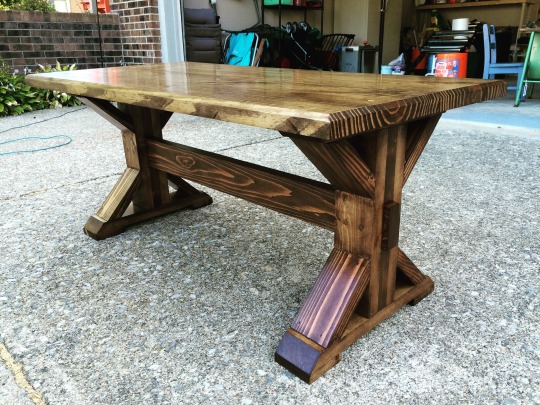
If you have access to some of the advanced tools like a planer and table saw, you can make good use of salvaged wood (just watch for nails!). For example, the trestle coffee table pictured towards the top of this post was make exclusively from wood I found behind a dumpster. That's right, I was dumpster diving.
Work with a friend or neighbor if possible. It will lessen the physical load, give you another set of hands, and put two brains together when trying to solve a problem. Besides, who likes drinking woodworking alone?
That's all for now. Have fun making sawdust!
-JR
0 notes
Last Seen Blogs


