#Qmk
Photo
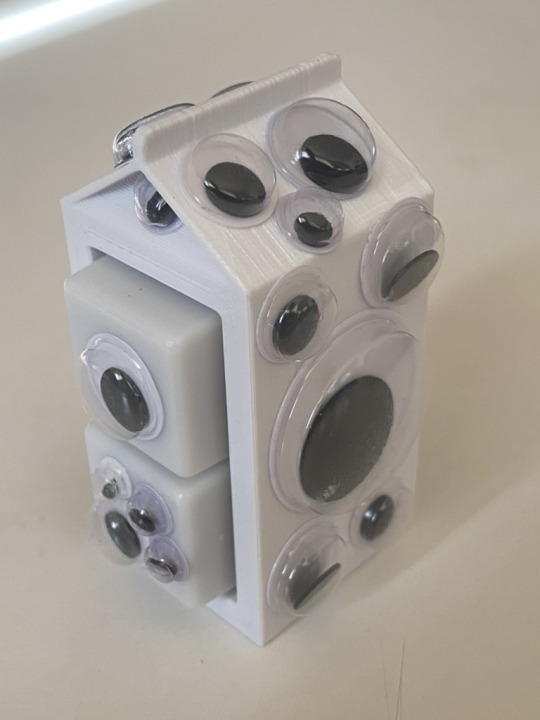
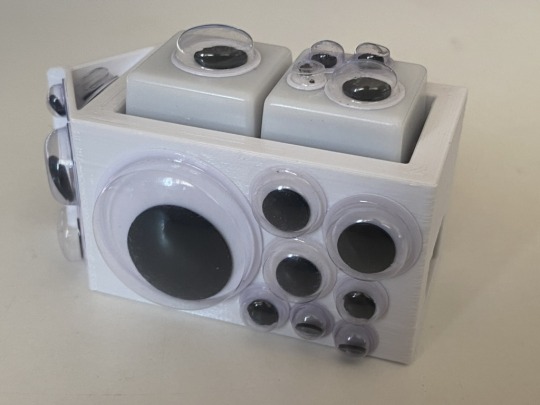


More messing with keyboards:
1. A biblically accurate 2% Milk macropad
2. A Bongo Cat 2% Milk I built for a customer
3. A Dissatisfaction30 macropad
4. A pair of Dogtag macropads connected with a TRRS cable, and with LED lighting added.
5. A NINE wireless keyboard, which uses a bonkers series of layers to fit everything into a grand total of 18 keys.
41 notes
·
View notes
Text
Why does making a custom lighting profile with QMK have to be so hard ;-;
I just want my keyboard to light up like the trans pride flag and I've been pouring over documentation for hours with plenty of trial and error and I'm so close, I can smell it, but I don't know what else I can even do to my code and my brain hurts now. Why can't I have a funny little GUI in VIA that lets me fool around with lights?
2 notes
·
View notes


Note
Offf bebegim seni özledim günaydınnnn dünden beri yazmıyorum(15 saatir uyuyor idim) tatlı gayim ❤️🔥🥵💗
Ooo gelmiş benim yavrum özledim hrr 🥵🥵
1 note
·
View note
Text
Looking for a compact mechanical keyboard that’s sleek, sturdy, and feature-loaded? The Epomaker TH96 is a powerful keyboard packed with functionality in a premium design. Thanks to the special structural design, the TH96 feels completely solid due to the stainless steel plate, which adds weight and strength to the board. It is innovatively designed featuring the silicone gasket mount structure, added silicone sound-absorbing foam, poron foam utilization, and a thick silicone damping bottom pad which all provide a responsive and peaceful typing sound. More details visit our websitehttps://rb.gy/yu2bma
2 notes
·
View notes
Text
if you're the type of person who turns caps lock on and off for single letter capitalization - enable sticky keys, but consciously. most people are only familiar with it due to triggering it on accident but it will make the modifier keys (ctrl/alt/winkey/shift) act like the 'shift' on a phone keyboard where you just have to press it and it'll be applied to your next keypress
#honestly i should find the equivalent of sticky keys in my fucked up linux setup but //shrug#i might also just get a keyboard with QMK and program that in there
0 notes
Note
would it be possible to make a custom keyboard that has keys specifically designated for emojis? like i want to be able to just press on 💀 with a keyboard
Yeah. Logitech even made one! The Logitech Pop.

But generally any keyboard running a QMK or related firmware (so nearly all mechanical keyboards) can do this.
You can also just install WinCompose and set up a key combination to let you type whatever. I use caps lock for mine, like caps lock a " writes out ä. You could tell it to make caps lock+s to write 💀
133 notes
·
View notes
Text
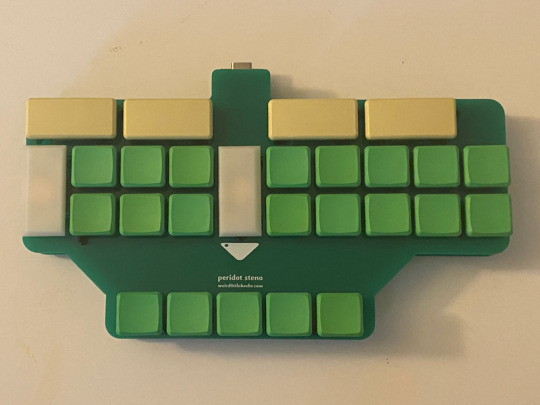
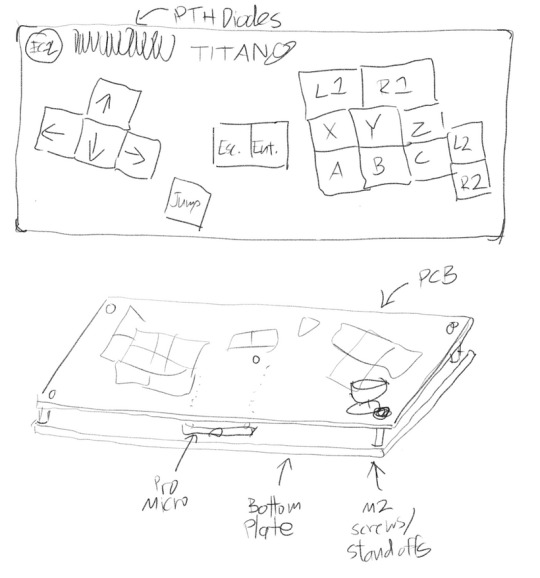
Designing Keyboards
I designed two original keyboards, the Peridot and Titan. I wrote a bit about the experience here. It was interesting, fun, and occasionally frustrating, and I have entirely too many ideas for more keyboard designs.
Peridot on GitHub
Peridot PCBs on Etsy
Titan on GitHub
Titan PCBs on Etsy

3 notes
·
View notes
Text

I finally got my keyboard RGB to work ^_^
1 note
·
View note
Text
[ a warped file is attached ]
———————————————————————
FHBPO CQTH.
UG KNLG NVI GEPBA PEUCT LSP. EQ MYQ RSEG NQ NVB LSZNMONRNO NQBS FNV'UG LTGOQNNMO NKG EULTDGFQRNO NN GONGI QMH PBDEBUGT QSIG EVGG, EYHEUM OEBT NKG LTVIQM NDEG LSV'WK NDELAF "PVGOVSZNMO" UDNYA EULTDGFQRNU; ETPVGHFNDQO PQC ZIMQFRPT NQBS DNVFR NYGPF OKG NUR TL TVI NUNDIG EBTNVGF.
SEBN CX CNVD LEUYA NDEG IGIKRUEUM OKG IMQFRPT YVG NUNMBROE QMH PBDEBUG, RT HFMG PQ MPLTDO NQ IGEGHDGI QMCN NDEG.
XNGIQPEG: HFBRTQPRN-XTIGI-QMK-NPU.NZHDRG.RSE/
FYQQXVGI: FBLCNM-NKG-ABUCOE-NXT
EYF QMG PREMQ RSONEUPN EVRIEUK LNVB VYF.
- IRPQBY HFBRTQPRXY
———————————————————————
12 notes
·
View notes
Text
depresyondayım diye istanbuldan köye geldim qmk intihar edicem şimdi
9 notes
·
View notes
Text
epomaker mini cat 64 build talk
ok i guess a couple people said theyd be interested so let's talk to most recent custom i did, for my friend @jowritesfantasy, of an epomaker mini cat 64.

the final build is an epomaker mini cat 64, with kailh box white v2 switches, and a great wave off of kanagawa (dark) cherry profile keycap set. total cost for what is essentially a full (budget) custom build is about $150USD without tax (off of bezoshell).
note: i am a vision-impaired hobbyist with shitty, shaky hands. i am by far not an expert. this is literally just "all the crap i've had to figure out from the ground up as a basic guide". there are more comprehensive references out there, and build guide videos for most custom kits, and do more research, not less, before building. nothing here is gospel and many people do it differently.
anyway, let's talk turkey.
BASIC GLOSSARY:
keyboard: the whole shebang. case, pcb, switch, caps, everything. the thing you type on.
case: the acrylic/aluminium/ceramic/whatever body that the pcb, switches, and keys live in.
pcb: the brain of the keyboard. you can have one where the switches must be soldered in, or you can have one where the switches can be hot swapped, which means you can change them out without any need to use a soldering iron. pcbs can be bought separately from cases.
group buy: when a bunch of people buy in to get a custom keyboard made by pooling resources up front.
switch: the mechanical switch that you solder or hot swap into a pcb to make the button press. there are thre (standard) types: linear, tactile, and clicky. switches work just fine without lubing. this is optional.
stabilizers/stabs: the support stabilizers for your wider keys that help keep them steady and don't let them wobble. there are two standard types—pcb mounted (screw-in, usually) and plate-mounted (click-in). please lube your stabs. krytox 205g0 is good. otherwise trust me, they will rattle. oh, god, will they fucking rattle.
keycaps: the thingy that goes on top of the switch that you actually press. they come in about a million profiles and in every possible permutation or color you can think of. if they're cherry/mx stem, they'll be compatible with most modern mechanical keyboard switches on the market.
QMK/VIA: software that lets you change what buttons on your keyboard do what.
keyboard %/keyboard #: how many keys are on the keyboard. the 64 mini cat has...64 keys. a 78ish key is the full f-row and most standard laptop keyboards. TKL is tenkeyless, or no numpad. 100%/180 is the entire keyboard, numpad and all. 40% is babymode aka "you like layers? i'll give you layers". each board has its use, everyone has their preferences.
ergo: a keyboard designed to be more ergonomic. ergo boards have different layouts and spacing and height. some are split, some aren't, these days one of the more standard ergo layouts is the alice/arisu. it's nice. i recommend it. (my custom is an alice)
custom: you build it, you decide everything you want on it, you buy all that shit, and you put it together.
prebuilt: open box, plug and play.
from the getgo, while epomaker does offer this for sale ready to plug and play, i knew we would not be buying this premade (both because i wanted to build it, the whole point was i wanted to build it and jo wanted it) and also, epomaker didn't offer clicky switches. jo's previous board had cherry/gateron (not clear which? one or the other) blues, which are the "standard" clicky switch: they're 65g actuation, they click, and there are better options. (note: this blog is a cherry mx hatezone. sorry.) i also knew that i was going to have to get a bit creative with VIA layers because jo works on spreadsheets and this is a 64 key board—no numpad. you kinda need a numpad for spreadsheets.
i didn't know much about clicky keys before this (i personally have sad shitty little goobaby hands that can barely even handle 43g linear switches and most people i know use tactiles), so i had to do a bit of research. you can hear (cherry only) sound profiles and comparison here, and this gives you a pretty standard idea of what mechanical switches sound like.
linear keys tend to be the lightest actuation, since they're for gaming most of the time; tactiles are all over the place and have the most options since theyre the most popular; clicky tend to be a little heavier overall. the "actuation" force in grams is how much pressure it takes to make a keypress go through, the "bottom out" is how much it takes to make the key hit the bottom of its arc. tactiles and clicky keys both make sounds/have texture bumps when the actuation of the key happens; linears you just push.
a short list selection:
cherry mx blue (the "standard" click): 60g actuation, 60g bottom out.
gateron blues (the original clone of the standard): 55g actuation.
cherry mx green/gateron green: 80g actuation, 90g bottom out
kailh box white v2: 45g actuation, 55g bottom out. (note: this is the same actuation/bottom out as the v1; the v2 has increased stability and stronger springs)
we ended up picking the kailh box white v2s because of comparative sound testing, the revision being even sturdier than the original box whites, they were on sale when we bought them and came in a closer to 64 switch pack, and they're about 65¢ a switch. not bad, all things considered. they're lighter than the standard mx blue, have a brighter, springier sound (even unlubed) and the "box" around the stem of the switch makes the connection between switch and keycap more reliable, which is a problem that happened to jo's old keyboard (the stem housing of the keycap broke; there's basically no way to get a replacement without shelling out a good bit of cash for an entire set, the box should help prevent that in the future).
the next thing was keycaps—you can do research about keycap profiles until the cows come home, but there's basically two types. "flat" keycaps are interchangeable per row (so work great if you aren't using a qwerty layout or you don't have a standard layout keyboard), "differentiated" have different heights per row (so work great if you have a hard time finding the right keys or are using a condensed keyboard model where you might get lost in the sauce if everything is the same).
the most common profile is cherry—if you want to find something super fun keycaps-wise, cherry is probably what you'll end up with. every keycap profile presents a slightly different sound because of how the plastic housing handles the noise of the switch (sa has more hollow thock; xda has a little more rumble because it's flat; cherry is a little snappier). frankly, imo, the texture/shape of the key is more the question to keep in mind (as well as the type of plastic they're made with—pbt is much, much more reliable). jo wanted dark wave with whale, we found dark wave with whale, it was cherry profile. success.
(note: knockoff keycaps can be a mixed bag—they use different fonts, the stems can be less reliable, even if they are doubleshot (two different kinds of plastic, layered on top of each other for more stability) and pbt. however, they're a lot more affordable. i like having more keycaps. im also cheap. that said, groupbuy or direct from source keycaps are also rad as hell. it's your call)
the epomaker mini cat is a hot-swap board, which means all that the switches had to do was to be popped into their housing. when popping switches into hotswap, always test the pcb beforehand. always. if you fuck up the pcb during switch installation, that is what it is, and you want to know if there's a problem before that happens. (shit can get weird. trust me. my custom pcb is currently getting replaced because of a freak usb-c daughterboard soldering incident that basically cannot be fixed, and everything worked fine in testing... but it's uncommon).
to build this board, i took it in a series of steps:
1: disassemble the entire board, flip the pcb (the "brain" of the keyboard) over, and manually test all the keys with a keyboard tester website and a paperclip. to test the diodes, you want to put your paperclip/tweezers/whatever into the outsides of the diode, not directly into the slot where your switch pins will go

you shouldn't need to shove. just set them there. your key tester should click, light up, or, if you're me, say "josh"
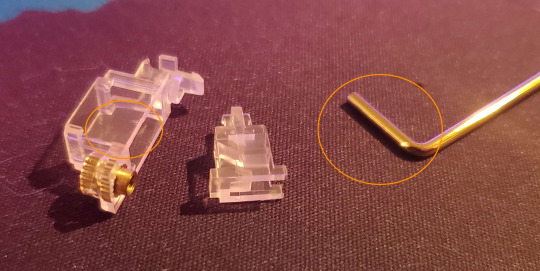
2: once i knew the pcb was good, it was time to disassembe the plate and the stabs. the stabs that came with the mini-cat 64 were plate-mounted and came unlubed, so i clicked them out with my tiny screwdriver, took them apart, and lubed them. if i had a buck for every stabilizer build and lube guide that actually refused to show the parts of a stabilizer, i'd have a lot of bucks, so here's some photos from me. these are akko transparent pink pcb-mounted, screw-in stabilizers. my hands are shaky as fuck so i apologize for any blurriness.

there are three basic components to the stabilizer—the bar, and the two-part housing. when you take a stabilizer apart, whether or not it's screw-in or clip-in, the bar clips and unclips, and the housing works the same.
less lube is always better (you can always add more): when lubing stabs, you want to lube the inside of the larger housing on the two wider portions and the back, where the smaller portion is levered up and down and will hit the plastic, and the part of the bar that goes into it. this is all the stuff that will click and clack if it touches each other.
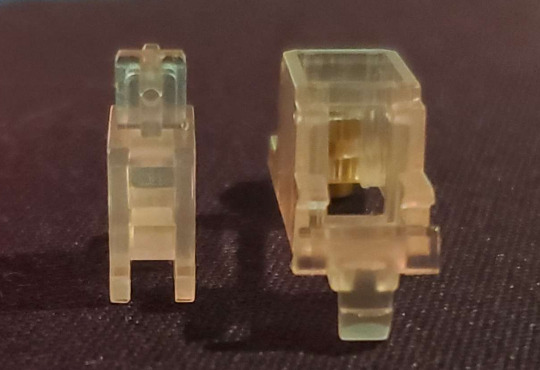
sorry this is a transparent stab so it's kind of hard to see, but when reassembling your stabilizers, the smaller piece will have one side with two holes, and one side with one hole. two holes goes in the front. business in the front, party in the back, whatever. you can see here where the clicky space thing that you click the stabilizer bar into.

i apologize for my shaky ass hands. sorry. the realy nice thing about transparent stabs, otoh, is you can see where the actual bar goes—it goes into the bottom of the two holes, so that the interior part of the housing is lifted up and down when the bar moves. that's it! click it in once it's in the right hole, you're done.
3: it is time to Insert the Switch. most switches tend to be plate-mounted. the "plate" is the part of the case that goes above the pcb, and is what aligns (and holds in) the switches, so that they land in the right spot. here's an example of a pcb and a plate

the plate fits on over the stabs, and then you have your "alignment" for your switches in place. now you know where your switches go, it's time to stick them in. the smaller, metal holes on each switch location are where the pins go—this is a "south facing" rgb pcb, meaning the pins go in up top, with the smd led (the little per-switch light) facing toward, not away from, the user. north-facing switches are more common. (for anyone curious, this is a mechloving adelais en ciel rv3 pcb, akko transparent pink screw-in stabs, and a switchcouture aluminium plate)
take your switch, align your pins, push in the side with the pins first to be sure they go into their sockets straight, and then push them the rest of the way in to click. hot swap sockets can be finnicky and a little fragile, so when installing switches into a hot swap pcb, you want to push straight down into something below—i.e., take the back off of the case and put the pcb flat on a soft, but sturdy, surface, like a deskmat. then click them in.
and now you've got a keyboard! time for the fun part. put those keycaps on and give it a test.
well, now you have a working keyboard. except for one small issue... the person using this keyboard needs a numpad! okay, so that means that you need to get CREATIVE.
all our keyboards have some level of "layer mapping"—shift + a = A. that's a layer, becuse it changes the key input. on my keyboard, because i use a mac with the extended international keyboard, alt + a = ¯. that's another layer. most people are more familiar with fn + 1 = f1. that's a layer.
for this keyboard, since jo needed a numpad, the way to do that is to make use of it being via compatible and to build that in as a layer. via is a great program (wish it worked with firefox!) in that it's as close to plug and play as you can really get for something like this. it's all overlay, you just click what you need. i am stupidbad at tech, and i can figure it out. let's take a look at the layers that are mapped into this keyboard:


here we have layer 0 (the "home" layer, what the keyboard's base state is), layer 1 (the "modifier" layer), and layer 2 (the "spreadsheet") layer. i made a few changes after i took these screenshots pgup/dwn/home/end are on the modifier layer now and not just the spreadhseet layer), but this is pretty much the final version. in via, the upside-down triangle means that the button naturally defers down to the layer below it. this means, on all layers, the red circle is always the fn/modifier button. if you're on the spreadsheet layer and press fn+1, it will be f1, because that button is always fn.
the "modifier" layer came baked into the keyboard, since that's the way that the function row buttons/the keyboard light adjustment works. all i added was the blue "toggle" layer button, which, when pressed with the fn button, turns the spreadsheet layer on.
even more simply, if you push fn+ralt, it makes the keyboard be for spreadsheets.
on the spreadsheet layer, the right-hand side of the keyboard becomes a numpad, the arrows automatically work as up/down/home/end, and, most importantly, a/s/z/x/c/v are all macros. what those look like, in the via programming, is {KC_LCTL,KC_C} (that's "ctrl+c" as one button press), with the KC_[] changed out for the key you're swapping in as a shortcut. when on the spreadsheet layer, pressing "z" is the same as "ctrl/cmd+z" normally is—only now you only have to hit the button once. that's true for that entire set of macros. so, if you need to save? hit s. if you need to select all? hit a. if you need to cut? hit x. paste? hit v. there's no need to push ctrl at the same time—that's baked into the keys.
you can do this with any keyboard that is qmk/via compatible, by the way. it's fucking amazing. if you work on spreadsheets all the time? awesome. now you can numberpunch one-handed, and copy/paste/undo with the other, no need to use multiple keys.
the macro building and layering on via for this keyboard was waaaay better than what i did on my wife 1.0 (sorry, wife 1.0) and i'll be using the same setup on wife 2.0 (whenver wife 2.0 gets here). overall, this is honestly a really affordable custom board with a lot of adjustment options built in. it was a ton of fun to build, really simple and straightforward in terms of setup, and it's got bongocat on it.
also honestly if i had to get clickies, i'd do the box whites. they're really nice and dont make my fingers feel like they're about to break when typing.
#keycaps are for eating#next time whenever wife 2.0 comes in the mail i'll talk about all-custom builds i guess and more advanced via stuff#and keycap changing in and out#and what kind of screwdrivers you want#uh. and also aviator cables maybe i guess.
18 notes
·
View notes
Text
I have this old Leopold FC980m, which is an 1800 layout board, that's been sitting here de-soldered and taken apart for quite some time now.
The plan was (and is) to replace the PCB with a custom one that I can flash QMK/Via onto by following the process in this Keebtalk thread, as well as Millmaxing the new PCB and changing the switches because stock Cherry Browns just aren't that great once you get used to better objectively better switches.
Unfortunately JLCPCB has not had either of the fitting MCUs in stock for quite a long time now, or rather every time I check they're not in stock. This means I've had this project sitting here taken apart collecting dust for nearly a year at this point.
2 notes
·
View notes
Text
Good morning, May your run of shows, and QMK’s bday go well. All the best, from my heart to yours.🫶🏼☮️👑💖🔮🧶😘
2 notes
·
View notes
Last Seen Blogs

ritadcsc
Rita de Cássia

kessellluvr
Helen’s bunny

cardioboy508
Cardioboy508

sajansloan
HLA Financial Services

chirpsy
intertwined