
Last Seen Blogs

bestbiographysblog
Untitled

jazzistolkienfanfics
Jazzi's Tolkien Fanfics

theunderestimator-3
THE UNDERESTIMATOR

mi-universo-personal
MI UNIVERSO

vbecker10
Loki'd
Text
Hyundai and Kia team with Factorial Energy on solid-state batteries
Hyundai and Kia team with Factorial Energy on solid-state batteries


Massachusetts startup Factorial Energy claims its solid-state battery technology is “safer than conventional lithium-ion technology, extends driving range by 20 to 50 percent, and is drop-in compatible for easy integration into existing lithium-ion battery manufacturing infrastructure.” Hyundai’s Cradle division — the concept tech folks who brought its Elevate walking vehicle to CES 2019 — has been working with Factorial for a while, now the mothership is getting involved. Hyundai and Kia have signed an agreement to jointly test and develop Factorial’s solid-state for future Hyundai Group vehicles, the agreement including the OEM making a “strategic investment” in the startup.
First, the batteries. What’s called the Factorial Electrolyte System Technology (FEST) relies on a proprietary, solid electrolyte to create cells with high-voltage and high-capacity electrodes. In April of this year, Factorial emerged from “stealth mode” with a 40 Amp-hour solid-state battery cell for EVs that works at room temperature. The company announced that packs with its FEST tech perform better than Li-ion units “without sacrificing pack longevity, and surpass prevailing EV battery performance standards, including those for energy density, cycle life, and safety.” On top of that, CEO Siyu Huang said the build process for her company’s batteries makes them compatible with lithium-ion battery manufacturing and Li-ion charging infrastructure.
This is Factorial’s first official public partnership with an OEM. Hyundai and Kia will team with Factorial on every step of battery integration, from the cell to manufacturing and integration into OEM vehicles. There’s no timeline for a retail debut, but the venture could have Toyota and BMW to watch for guidance, both OEMs having invested heavily in trying to get solid-state batteries in production vehicles well before the end of the decade.
Related Video:
.embed-container position: relative; padding-bottom: 56.25%; height: 0; overflow: hidden; max-width: 100%; .embed-container iframe, .embed-container object, .embed-container embed position: absolute; top: 0; left: 0; width: 100%; height: 100%;
0 notes
Text
How to Open a BIN File
How to Open a BIN File
How to Open a BIN File
Device Links
The BIN file format is an old and outdated way to store data. A BIN file is a binary file, which means it can’t be read by programs that require text formats like .doc or .pdf.
Nonetheless, BIN files often contain important data. For example, they can be used to create disc images, which can be helpful if you need to install an operating system or other software programs. BINs can also include other kinds of data like music and videos.
This begs the question: How can you open a BIN file on your device?
In this article, we’ll show you a few ways to open BIN files depending on the type of device you’re using.
How to Open a BIN File on Windows
File extensions like .bin may not be as common as they once were with the advent of new technology and formats. Fortunately, Windows is still equipped with the tools you need to open and view BIN files. After opening the file, you can even extract important individual files or executables that can help you install a program on your system.
To open a BIN file on your system, you can burn it to a disc or mount it to a virtual drive.
Let’s see how each option works.
Method 1: Burning the File to a Disc
Here’s how you can burn a BIN file to a blank disc on your PC:
Step 1: Insert the Disc on Your Computer.
Before the burning process begins in earnest, you’ve got to insert a blank disc into your PC’s disk drive. If you go with a disk that already has some images or videos, ensure that there’s enough space for the contents of your BIN file.
Step 2: Find the CUE File
When you want to burn a BIN file, you may have to find the related CUE file.
A CUE file (short for Closed User Group) is a metadata file that contains information about the tracks on an audio compact disc.
CUE files are typically found in the same folder as the corresponding BIN file. Although they will usually have the same name as the BIN file, they have the .cue extension.
After you’ve located the CUE file, be sure to note its location since you may need it when the actual burning begins.
Step 3: Find a Burning Program
You need a dedicated program to burn the BIN file onto your disc.
Since BIN is an outdated format, most burning programs today don’t support it. However, some of the most popular programs still accept BIN files, including Nero, Alcohol 120%, and CDRWIN.
Step 4: Load the BIN/CUE File Onto the Burning Program
After installing a compatible burning program, open it and choose the option to burn. At this point, you’ll be prompted to choose the BIN/CUE file you wish to burn. With most burning programs, you just need to drag and drop the files onto the program’s interface.
Step 5: Test Your Disc
Once the BIN file has been burned onto your disc, you can safely eject it from your computer’s disk drive. You may also reinsert the disc and then right-click to open it and view files. All of the items in the BIN file will now be visible on your computer’s media player.
Method 2: Mounting the File to a Virtual Drive
Burning a BIN file onto a physical disc can be an efficient way to open the file and view or play its contents. But what if you don’t have a disk? That’s where mounting comes in.
Mounting is a process used to unlock files stored on a disc or file, making them accessible via a computer’s file system.
You can open a BIN file by mounting it to a virtual drive software installed on your PC. Here’s how to go about it:
Step 1: Find a Suitable Virtual Drive Software
First, you need virtual drive software that supports BIN files.
A virtual drive software installs on your computer to simulate the use of a physical CD-ROM or DVD-ROM. With a virtual drive, you don’t have to insert discs into your computer every time you install, run, play, back up or save data.
Step 2: Find the CUE File
Most virtual drive software may ask for the CUE file associated with your BIN file before mounting begins. The software uses the CUE file to unlock and open the BIN file.
As noted earlier, you’ll most likely find the CUE file and the corresponding BIN file within the same folder on your computer.
Step 3: Mount the CUE File
Most virtual drive software come with a selection tool that helps you pinpoint the CUE file on your system. Once the file has been identified, click on the “mount” button. The software will immediately make a copy of the file and transform it into a readable virtual disc.
Once the mounting process is complete, you can open the virtual disc the same way you open a physical disk attached to your PC via the disk drive.
How to Open a BIN File on a Mac
Although PCs and Macs have different features, the methods used to open a BIN file are the same.
As with a PC, you can open a BIN file by burning it onto a physical disc or mounting it to a virtual drive.
But if you don’t fancy any of these methods, there’s a third one: converting the BIN file into an ISO file.
An ISO file is a “distilled” version of a BIN file that excludes most original metadata while retaining the most important elements. You could also call it a refined or redacted BIN file that only keeps the most important information contained in the original file.
To convert a BIN file into an ISO file, you need a dedicated conversion program like AnyToISO or Roxio Toast. For illustration, let’s look at the conversion process when using Roxio Toast.
Install Roxio Toast on your Mac.
Drag the BIN file into the app’s interface.
Select “Save Image Disk” from the File menu.
Type a name for your file and click on “Save.”
Once your BIN file has been converted into an ISO file, you can mount it to a virtual drive that can be opened just like a physical disc.
How to Open a Bin File in Linux
If you have BIN files in a device running on Linux, you can open them by converting them to ISO files and then mounting them to a virtual drive using the built-in Disk Image Mounter.
Here’s how to go about it:
Use a suitable program to convert your BIN file into an ISO file. PowerISO is one of the most popular programs.
Once the conversion is complete, right-click on the ISO file, select “Open With,” and then click on “Disk Image Mounter.” At this point, the file will be converted into a readable disc image.
How to Open a BIN File on Chromebook
If you have some BIN files on your Chromebook, you can easily extract them for viewing using Archive Extractor – the dedicated file extraction tool for the Chrome OS.
Here’s how that works:
Add the Archive Extractor extension to your Chrome browser.
Once the extension has been installed, launch it and then drag and drop your BIN file into the Archive Extractor window.
When the extraction is complete, you’ll be able to open all the constituent files in just a few clicks.
How to Open a BIN File on Android
BIN files on Android devices come about due to errors on the Android system.
As you may know, all applications that can be installed on an Android device are developed in APK format. But if there are errors in the download process, .apk files may save as .bin files, making it impossible to install the app in question.
The good thing is that you can convert .bin files back to .apk files in just a few steps:
Ensure that your Android device can install apps from unknown sources. To do so, go to “Application Settings” and check the box next to “Unknown Sources.”
Connect your Android device to a computer using a compatible USB cable.
Access your Android’s internal storage through your computer and navigate to the folder containing the BIN file.
Change the file extension from .bin to .apk.
Disconnect the Android device from your computer.
The newly renamed file can then be installed on your Android device via App Installer.
If you have a non-executable BIN file on your Android device, you can still open it and view the contents using a computer. To do so:
Transfer the file to your computer using a USB cable.
Right-click on the file, select “Open with,” and then choose “Notepad.” You’ll now be able to open the text and read it with no problems.
How to Open a BIN File on an iPhone
If you want to open BIN files on your iPhone, you just need to download an app called Archives from the App Store.
Once you’ve done that:
Launch the app and open the “How to Open Archives” menu.
Follow the on-screen instructions to open the BIN file and view its contents.
Open Any File You Want
The BIN file format may be outdated, but it still provides developers a safe and secure way to share files or even download programs for installation on both computers and mobile devices.
If you want to open a BIN file that’s loaded with executable computer programs, you could try burning it onto a disc, mounting it to a virtual drive. You can also convert it into an ISO file and then mount it to a virtual drive that can be opened the same way you open a physical disc.
If an application downloads in .bin format on an Android device, you can still sideload it, but first, you need to change its name via a computer. Non-executable BIN files can be viewed via Notepad on a PC.
For iPhones, Archives has proved to be an excellent application that can open BIN files and extract their contents in just a few steps.
Have you tried using any of the tools discussed in this article to open a BIN file on your device?
Let us know in the comments section below.
Disclaimer: Some pages on this site may include an affiliate link. This does not effect our editorial in any way.
Send To Someone
Missing Device
0 notes
Text
Android 12 Scrolling Screenshot Not Working? How to Fix
Android 12 Scrolling Screenshot Not Working? How to Fix

Google released Android 12 for all owners of the Pixel 3 or newer models and the latest mobile OS from the company has been more than just a fresh paint of coat. Besides changing the look and feel of Pixels, Android 12 has made these devices more functional than ever. One such feature is the new ‘Capture mode’ option that adds the ability to take scrolling screenshots natively on a Pixel device, something users have requested for a very long time.
However, some users have complained that the new scrolling screenshots feature doesn’t work on their phones as the ‘Capture mode’ option doesn’t up when taking a screenshot on Android 12. In this post, we’ll help you fix this problem so that you can get back to capturing long screenshots as you intended.
Related: How to Make Lock Screen Clock Smaller on Android 12
Android 12 Scrolling screenshots not working? Know this
Scrolling screenshots is a native feature inside Pixel phones on Android 12 but some users aren’t really able to use this new functionality on their devices. There have been several instances reported by users who say that the ‘Capture mode’ option to take scrolling screenshots appears once in a while or doesn’t appear at all. If you’re one of those who’re affected by this issue, here are a few reasons why this may be happening to you:
You may be taking screenshots from the Recents screen.
The screen you’re trying to capture may not be scrollable.
The screen you want to capture may contain sensitive information.
The app you’re trying to take long screenshots on may not support the new scrolling screenshots functionality.
You may still be running Android 12 on your Pixel device.
Related: Android 12 Icon Shapes issue: How to fix
5 Ways to fix scrolling screenshots not working on Android 12
If you’re not able to use the ‘Capture mode’ option on Android 12, then you can fix it by following any of the methods below.
Fix #1: Know the right way
The first thing to make sure is that when taking scrolling screenshots is to learn how to use the new feature first on Android 12. Since scrolling screenshots is a native functionality on Google’s latest mobile OS, you can use it by first going to the screen you want to capture and then triggering the screenshot on Android. When a screenshot has been captured, its preview will appear on the bottom left portion of your screen.
If the screen you are on supports the feature, you should see the ‘Capture more’ option next to your screenshot preview. To capture a long screenshot, tap on this ‘Capture more’ option.
From there, you can expand the total area that you want to capture by dragging the top and bottom edges. We have prepared an in-depth guide on capturing scrolling screenshots in the post we’ve linked below.
▶ How to Take a Scrolling Screenshot on Android 12
Fix #2: Use phone’s physical buttons for scrolling screenshots
The new ‘Capture more’ option only seems to appear when you trigger the screenshot functionality using your phone’s physical buttons; that is when you use this combination – Power button + Volume button. You won’t see the ‘Capture more’ option when you tap on ‘Screenshot’ from inside the Recents screen.
We believe that is the case because taking a screenshot of an app from the Recents screen puts this app in the background, thus eliminating the purpose of scrolling screenshots. The app only remains in the foreground when you use the physical buttons on your phone and only then can you capture scrolling screenshots on Android 12.
Related: What is Themed Icons on Android 12?
Fix #3: Make sure the screen is scrollable
To capture scrolling screenshots, you need to ensure that the screen you’re about to capture is scrollable. If the screen you are on doesn’t have much content to scroll through, you won’t see the ‘Capture more’ option when you trigger the screenshot function on your phone. When your current screen has only a single page to capture, the ‘Capture more’ option won’t show up on such an occasion.
Fix #4: Check if an app supports scrollable screenshots
Although the ‘Capture more’ option is built natively on Android, it currently supports only a handful of apps. We tested the scrolling screenshots feature across several apps on Android 12 and these are the ones that support the ‘Capture more’ option – Contacts, Facebook, Files, Gmail, Instagram, Spotify, Phone, Photos, Podcasts, Twitter, Telegram, Youtube, and Youtube Music. You may also find other apps where this ‘Capture more’ option may pop up.
However, some apps still don’t support the scrolling screenshots feature which includes the Google Chrome app that comes pre-installed on Pixel phones. The same can be said about other browser apps like Firefox and Brave, neither of which also show the ‘Capture more’ option when you press the Volume down and Power buttons together.
Fix #5: Update your phone to the latest version
The option to capture scrollable screenshots has existed since the initial beta builds of Android 12. But beta releases are unstable and can constantly show issues; and the only way to solve them is by updating your Pixel phone to the latest stable build. If you’re someone who is still running the Android 12 beta firmware on your Pixel device, then you can update it to the official version of Android 12 by going to Settings > System > System Update.
That’s all you need to know about fixing scrolling screenshots on Android 12.
RELATED
0 notes
Text
Using Windows 10 Sandbox to Test Potentially Malicious Applications
Using Windows 10 Sandbox to Test Potentially Malicious Applications
The Windows 10 Sandbox acts as an isolated environment that can be used for testing potentially malicious code. Nothing run inside the sandbox environment should harm the primary operating system, and the sandbox is automatically reset to a pristine state each time it is used. Even so, there are a few aspects of the Windows 10 Sandbox that may be cause for concern.
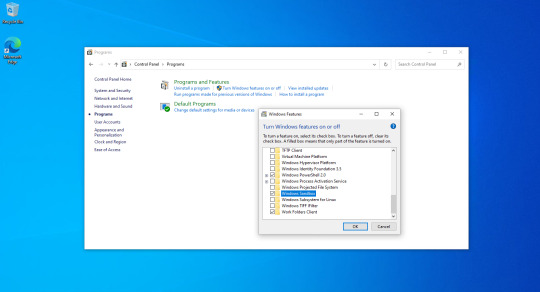
The Windows 10 Sandbox is based on container technology, so, to use it, your PC must support hardware virtualization. You can enable the Sandbox by entering the Control command at the Windows Run prompt to open the Control Panel. Now, click on Control, followed by Turn Windows Features On or Off. This will cause Windows to display a list of optional features. Select the Windows Sandbox option and click OK. Windows will now install the Sandbox feature and prompt you to reboot the system.
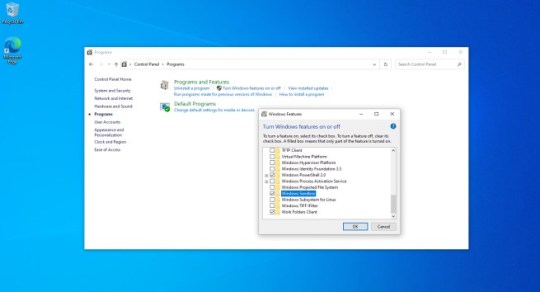
Figure 1
Select the Windows Sandbox option and click OK.
When the system restarts, you can access the Windows 10 Sandbox by selecting the Windows Sandbox option from the Start menu. You can see what the Windows Sandbox looks like in Figure 2. As you can see, the Sandbox looks almost exactly like a Windows 10 virtual machine. Unlike a virtual machine, however, you don’t have to manually allocate hardware resources to the sandbox, nor do you have to install a Windows operating system. All of that is done automatically.
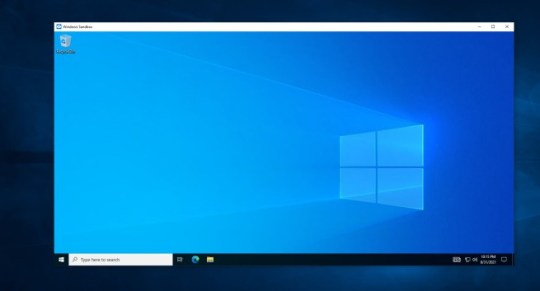
Figure 2
The Windows Sandbox looks a lot like a virtual machine.
Once the sandbox is up and running, you can use it to test potentially malicious code. There are two main ways that you can do this. The first option is to cut and paste files from your desktop into the sandbox. Just right-click on the files that you want to test, and select the Copy option from the shortcut menu. Next, right-click inside of the sandbox and choose the Paste option. This will cause the files to be pasted into the sandbox. You will then be able to run those files inside of the sandbox environment. The figure below shows an example of a few files that I pasted into the sandbox.
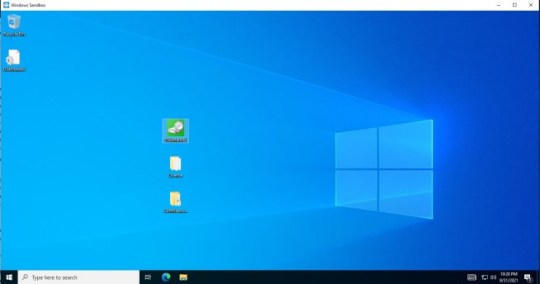
Figure 3
You can paste files into the sandbox for testing purposes.
As convenient as it might be to cut and paste files into the sandbox, it is also possible to copy files that exist within the sandbox and paste them into the system’s primary operating system. It is at least theoretically possible that malware could exploit this capability and escape the sandbox environment. Thankfully, a Group Policy setting can help to prevent clipboard sharing. I will explain more about this Group Policy setting later on.
The other way to test potentially malicious code in the Windows 10 Sandbox is to open a Web browser and download whatever it is that you want to test. Obviously, allowing the sandbox to have network access so that it can access the internet poses certain risks. Microsoft attempts to mitigate these risks by placing the sandbox onto an isolated subnet. Even so, it is still possible to open a Command Prompt window and use the Net Use command to map a network drive to resources on your private network, as shown in Figure 4. Some of the IP addresses are partially obscured in the figure, but the figure clearly illustrates that it is possible for the sandbox environment to access your private network.

Figure 4
The Windows Sandbox can gain access to your private network.
Windows 10 Build 20161 and higher include several Group Policy settings that will allow administrators to place additional restrictions on the Sandbox, including preventing network access. These settings, which are shown in Figure 5, are also available in Windows 11. As you can see, they allow you to disable audio, clipboard sharing, networking, printer sharing, vGPU sharing and video input in the sandbox environment. These settings, when properly used, should go a long way toward making the Windows Sandbox more secure.
You can find the Sandbox-related Group Policy settings within the Group Policy Editor at: Computer Configuration \ Administrative Templates \ Windows Components \ Windows Sandbox.
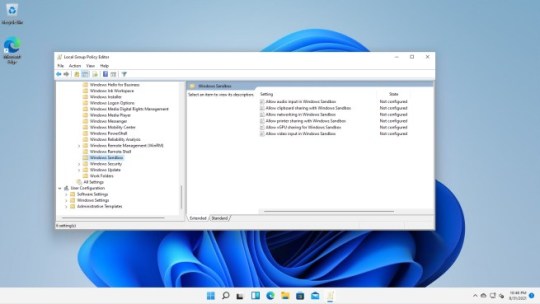
Figure 5
Microsoft is introducing several Group Policy settings to make Windows Sandbox more secure.
0 notes
Text
How to download and install Safari on Windows 11
How to download and install Safari on Windows 11
by Matthew Adams
Windows & Software Expert
Matthew is a freelancer who has produced a variety of articles on various topics related to technology. His main focus is the Windows OS and all the things surrounding it. He is passionate about… Read more
You can download Safari on Windows 11 and run it, but the most recent versions aren’t compatible with the latest desktop platform.
To install Safari on Windows 11, you’ll need to download the setup wizard for version 5.1.7.
Safari 5.1.7 includes a novel Top Sites tab that displays thumbnail shortcuts for your most visited websites.
XINSTALL BY CLICKING THE DOWNLOAD FILE
To fix various PC problems, we recommend Restoro PC Repair Tool:
This software will repair common computer errors, protect you from file loss, malware, hardware failure and optimize your PC for maximum performance. Fix PC issues and remove viruses now in 3 easy steps:
Download Restoro PC Repair Tool that comes with Patented Technologies (patent available here).
Click Start Scan to find Windows issues that could be causing PC problems.
Click Repair All to fix issues affecting your computer’s security and performance
Restoro has been downloaded by 0 readers this month.
Safari is the default browser for all Apple devices. The big A claims its browser is the fastest in the world. Apple boasts Safari is 50 percent faster than Google Chrome, which is the browser most users enjoy on Windows desktops.
Aside from that, Apple claims Safari Browser is also more battery efficient than its primary rivals. Take a look at this Safari vs Opera article to see that by yourself.
Safari’s webpage says you can browse 30 minutes longer on laptops and mobile devices with this browser than Chrome, Edge, and Firefox.
So, Safari is undoubtedly a strong alternative to the likes of Chrome, Firefox, and Edge. Many users would no doubt love to install and try out Safari on Windows 11 PCs. You can do just that, but there’s a bit of a catch.
Is the Safari Browser compatible with Windows 11?
Safari is only compatible with Windows 11 up to a point. Apple discontinued Windows support for its flagship browser back in 2012. Therefore, the big A hasn’t released a Safari Browser version you can utilize on Windows platforms for some time.
Yet, you can still take advantage of the most recent Safari Windows version on Microsoft’s latest desktop platform. Safari Browser 5.1.7 is an old version that runs just fine in Windows 11. As it’s not so recent, however, don’t expect it to be notably faster than Chrome and co.
Nevertheless, even that antiquated Safari Browser version incorporates some neat features you won’t find in Google Chrome. So, it’s still worth having a look at that browser. This is how you can download and install Safari in Windows 11.
How can I download and install Safari in Windows 11?
1. Download Safari 5.1.7
Open the Safari 5.1.7 download page in your browser.
Click the Download Now button on that webpage.
Select the Download: Softpedia Mirror (US) option.
If your browser isn’t configured to automatically download to the user Downloads folder, you’ll need to select a directory to save the file in. Then press the Save button.
2. Install Safari in Windows 11
When you’ve downloaded Safari’s setup wizard, click the File Explorer taskbar button.
Open the folder you saved the downloaded installer to in File Explorer.
Next, double-click SafariSetup.exe to open its window.
Click Next to bring up the license agreement details.
Select the I accept the terms radio button.
Then select the installation options shown directly according to preference. Note that Bonjour is not required for Safari.
Click the Change button to choose an alternative installation folder for Safari if you prefer. Alternatively, you can install the software at the default directory specified.
Press the Install button, and click Yes on UAC prompts.
When Safari has been installed, select the Open Safari after the installer exits checkbox.
Select the Finish option.
What are the best features in Safari 5.1.7?
When you’ve got Safari up and running in Windows 11, you can discover some of its best features. Its standout feature is its Top Sites tab, which displays your most visited sites. Click the Show Top Sites button to view that tab.
To add a new site to that tab, click the Edit button. Then input the URL for the website you want to add there in the address bar, but don’t press Enter. Left-click the small globe icon on the left of the website’s address, and drag the URL onto a thumbnail on the Top Sites page.
Safari has a Reading List feature, which is like a secondary bookmarks sidebar for web pages. Click the Show Reading List button to open it. Then open a webpage to add to that sidebar, and click the Add page button.
Safari’s Bookmarks Bar also includes novel thumbnail previews for pages. To view it, click the Show all bookmarks option on the left side of the browser. Then click bookmarked pages to cycle through their thumbnail previews.
You can also customize Safari’s URL toolbar. To do so, click the Display a menu button at the top right of the browser’s window. Then select Customize Toolbar to bring up the window in the snapshot you can see below:
With that window open, you can drag-and-drop buttons to and from the toolbar to customize it. Left-click buttons on that window to drag them onto the URL bar. You can also drag buttons already on the toolbar onto the window to remove them. Click Done to save changes.
You may even access blocked websites on Safari. The trick of changing Parental Control settings is ideal for Mac users.
Is there any way I can utilize the latest Safari versions in Windows 11?
The only way you can try out Apple software that’s not compatible with Windows 11 is to install virtualization software. Note that it enables you to utilize different operating systems in Windows. So, you can enjoy newer Safari versions for Mac platforms within virtualization software.
There are numerous virtualization software tools available for Windows platforms. VMware Workstation, VirtualBox, and Hyper-V are three decent virtualization packages you can utilize on Windows 11.
Our virtualization software guide provides further details about those virtual machine packages. Even though the guide talks about Windows 10 software, it works perfectly fine with the new OS as well.
Without virtualization software, however, you’ll have to settle for Safari 5.1.7 on Windows 11. It might be an old version, but it still includes good navigation options for web browsing nonetheless. Just don’t expect too much from an antiquated browser version that’s more than five years old.
Even more, if you happen to change your mind and choose to rollback from Windows 11 to Windows 10, note that you can download and install Safari Browser for Windows 10 too.
Overall, it’s quick and easy to install Safari in Windows 11, which has minimal system requirements. If you want to sample some Apple software on your Windows PC, then check out Safari 5.1.7.
Have you done that already? Tell us in the comments section below and let’s start a discussion.
Was this page helpful?
Thank you!
Not enough details Hard to understand Other Contact an Expert
Start a conversation
0 notes
Text
How to Start, Use and End Shareplay on FaceTime: Everything You Need To Know
How to Start, Use and End Shareplay on FaceTime: Everything You Need To Know

One of the most talked-about features on iOS 15 is SharePlay and although the feature was about to roll out during the official release, it’s now readily available on iOS 15.1. In case you don’t know, SharePlay will make video calls with your loved ones more interactive by letting you share and stream supported content like movies, TV shows, music, and other stuff with anyone on FaceTime.
In this post, we’ll explain what SharePlay is all about, how to start sharing media with others in a video call, and what all apps currently support SharePlay on iOS.
What is SharePlay?
Before you start using it on your iPhone, it’s first important that you know what SharePlay is. SharePlay allows you to stream content together with your friends and family you connect with on FaceTime. The shared content can be anything from a movie or TV show on Apple TV to any other shareable content available on a third-party app from the App Store. All this is done within a single video call you make on FaceTime with your family or group of friends.
SharePlay eliminates the need to use additional apps or a clunky setup on your iPhone which you may otherwise need to watch stuff together with your friends remotely at the same time. Since SharePlay is a native feature on iOS specifically made for FaceTime calls, we can expect more apps to be able to allow simultaneous streaming for everyone on a video call.
Related: How to Turn Off Focus on iPhone
How to start SharePlay on FaceTime
Before you start using SharePlay with FaceTime on your iPhone, it’s important that you know that the feature will only work if you’re running iOS 15.1 on your iPhone. This also applies to people other than the host of a video call on FaceTime and for SharePlay to work on each of their devices, they should also be running iOS 15.1. SharePlay will also work on iPads and Apple TVs but both of these devices should also be updated to iPadOS 15.1 and tvOS 15.1 respectively.
Once that’s done, you can proceed to start SharePlay on FaceTime. For this, open the FaceTime app on your iPhone and either tap on the ‘New FaceTime’ button or select the contacts you may have recently contacted on FaceTime.
When you create a new FaceTime call, you can search for the contacts you want to start a video call with or select the required people from the list of suggestions.
To initiate the call with the selected people, tap on the ‘FaceTime’ button at the bottom.
When the call gets connected, you’ll see FaceTime’s new control bar at the top of the screen. From here, tap on the SharePlay icon (the rectangle with a person icon) at the top right corner.
In the dropdown menu that appears, select the ‘Share My Screen’ option.
FaceTime will now show you a three-second countdown so that you prepare to share stuff on your screen.
When the screen-sharing commences, the time section at the top left corner will now show up inside a purple box. This will indicate that your screen is being shared with others who are on the FaceTime call.
The FaceTime control window won’t be persistent at the top but will be accessible when you tap on the purple clock icon at the top left corner of the screen. You can now go to any app you want to present to others in the video call and share stuff from your screen on their iPhones or other Apple devices.
Related: How to Change App Icons Without Shortcuts in 2 Ways
How to use SharePlay [6 Tips]
Once you’ve initiated SharePlay with FaceTime on your iPhone, you can start using it in various apps, depending on what you want to share with your friends and family.
1. Stream songs and movies from an app with others
If you want to stream content from a SharePlay-supported app using FaceTime, make sure you’ve initiated the video call and then started SharePlay. After that, head over to the app you want to share content from. In this instance, we’ve opened the Apple TV app on our iPhone. When you launch a SharePlay-supported app, you should see the “Choose Content to Use SharePlay” message at the top of the screen.
When you tap on this message, FaceTime will offer you different options to start SharePlay for the app’s content. You’ll get two options – SharePlay Automatically and Ask Next time. The first option will trigger SharePlay every time you open Apple TV or a supported app when on a FaceTime video call. The latter option will allow you to choose whether or not you want to use SharePlay the next time you play content on the app. Choose the option you prefer.
Next, go to the content you want to stream together with your loved ones using SharePlay. When you play a media or tap on SharePlay-supported content from an app, you should see the prompt below asking whether or not you want to SharePlay the selected content. In this prompt, tap on ‘SharePlay’.
When the media starts playing, you should see the “Started <media>” message bubble at the top. It’s up to others to decide whether or not they want to join in on your SharePlay content.
2. Join someone’s SharePlay
When someone in a FaceTime call starts SharePlay to share their screen or stream content they’re watching, you’ll see what they’re watching or playing under their name or group name inside the FaceTime controls at the top. If you wish to join their SharePlay session, you can do that by tapping on the ‘Open’ button adjacent to ‘Join SharePlay’ inside FaceTime controls. The ‘Join SharePlay’ portion will also highlight the app from where content is being streamed (in this case, Apple TV).
iOS will now launch the app that’s playing this content which in this instance is Apple TV. When this app opens, you’ll see a new prompt on the screen asking you whether or not to join. Here, tap on the ‘Join SharePlay’.
When you do that, SharePlay will start playing the media or content someone has shared on FaceTime. At this time, the screen will instantly switch to the app’s playback screen and all the controls available to you will be shared with others in the FaceTime call.
You’ll also see the video call screen as a floating window on top of the playback screen at all times unless you hide it yourself.
Related: What Does ‘Live’ Mean on Find My Friends?
3. Check what someone is watching
FaceTime offers a clear way of telling you what someone’s sharing through SharePlay without needing to join in on the shared content. To check what others are sharing using SharePlay, all you need to do is look for a video player icon under the names of contacts. Next to this icon, you’ll see what show, movie, or content someone is sharing on FaceTime.
You can tap on this section to reveal more info about the SharePlayed content. On this screen, you’ll see what’s being shared under the ‘Currently Playing’ section. You’ll also see the people who are taking part in SharePlay alongside the app that’s being used for sharing content.
4. Pause/play content for everyone on FaceTime
After you start or join SharePlay inside a FaceTime call, anyone on the video call can control the content that’s being streamed together. This includes not just the person who started SharePlay but everyone else who has joined the SharePlay session. If the content that’s being streamed is media, you can pause or play it at your will and it will affect playback for all others who are currently involved in the same SharePlay.
If the content that’s being streamed is media, its playback controls will almost always show up at the bottom part of the screen. These controls include play/pause, seek forward/backward by 15 seconds, select playback device, subtitles, languages, and adjust playback.
When you play/pause content on SharePlay, the action will appear at the top of the screen of everyone else’s iPhone.
5. Minimize/maximize video call window
One of the biggest talking points of SharePlay is being able to watch something together in addition to being in a video call with others on FaceTime. So, when you’re watching something together with your friends using SharePlay, you’ll also see a floating window that shows you the video feed from everyone.
If you think the video call window is disrupting your media experience, you can hide from the screen by dragging this window toward any portion on either edge of the iPhone. When you hide the video call window, it will minimize to a tiny tab on the edge where you drag the window to and this pill-shaped tab will be marked with an arrow toward the center of the screen.
At any time you wish to see other participants from FaceTime, you can see them by tapping this tab.
6. Change content on SharePlay
When you’re sharing content from an app with SharePlay, you can replace which app the content is played from directly without needing to pause or stop the current SharePlay content. To replace what’s being shared on SharePlay, open the app you now want to stream content from and select the content you wish to play for everyone. This will trigger a prompt on your screen asking whether you wish to replace the content that’s being SharePlayed. inside this prompt, tap on ‘Replace Existing’ to end the last SharePlay activity and replace it with the new one.
How to End SharePlay on FaceTime
Regardless of who started SharePlay on FaceTime, you or anyone else in a video call can stop the current SharePlay session at any time. However, when you opt to leave a session, it’s up to you to decide whether you want to remove yourself from the SharePlay streaming or stop it for all. Just like playback controls, each and everyone using SharePlay can also end a session as well.
There are two ways you can stop a SharePlay activity.
Method #01: From FaceTime controls
The easiest way to end SharePlay is to access FaceTime controls first which you can do by tapping the green/purple color clock at the top left corner of your screen.
When FaceTime controls appear, tap on the SharePlay icon.
In the dropdown menu that appears, select ‘End SharePlay’.
You’ll now see a dialog box on the screen asking whether you wish to stop SharePlay for everyone or just you. Tap on your preferred option.
When you end SharePlay for yourself, you will be removed from the SharePlay activity but others will continue with the activity. When SharePlay is stopped for everyone, you will see who stopped it on your iPhone.
Method #02: From playback screen
Another way to stop SharePlay is from the media playback screen. This applies when you’re watching a movie, show, or match with others and you can only interact with the playback. To stop SharePlay from this screen, tap on the ‘X’ button at the top left corner.
In the prompt that appears, select ‘End for Everyone’ or ‘End Only for Me’ based on how you want to end SharePlay.
Which apps support SharePlay on FaceTime?
With iOS 15.1, users can share and stream content together with friends and family members they’re talking to on a FaceTime call. The media that’s streamed together can be anything from a movie or TV show to music and other supported content. This content can be shared directly from Apple-developed apps like Apple Music or Apple TV as well as other apps from third-party developers like HBO Max, Hulu, Showtime, TikTok, and more. We have prepared a detailed list of apps that support this new feature in the post in the link below.
▶ What Apps Support SharePlay?
That’s all you need to know about using SharePlay with FaceTime on iOS 15. \
RELATED
0 notes
Text
How to Rotate a Laptop or PC Screen: Flip Your Display on Its Side
How to Rotate a Laptop or PC Screen: Flip Your Display on Its Side

How to Rotate a Laptop or PC Screen: Flip Your Display on Its Side
Most laptop or PC applications work perfectly well in landscape mode. But occasionally, the position of the screen can hinder your productivity – especially if you want to work with information in a tall and thin window.
In those situations – assuming you have a monitor that you can pivot to portrait mode – it may be worth spinning your working window around 180 degrees. This quick guide will explain how to spin your desktop on its side to keep you working productively.
Sometimes, it’s useful to flip screens to help employees remember to lock them as they walk away. Whatever the reason – even if you’re the recipient of an office gag carried out by an unkind colleague – rotating your screen 90° is an easy task, and here we’ve covered a couple of ways to do it.
How to Rotate a Laptop or PC Screen in Windows
Let’s cover the various ways to rotate the screen in Windows.
How to Rotate a Laptop or PC Screen Using Your Keyboard
If you’re running Windows 7, 8, or 10 you may be able to quickly rotate your screen 90°, 180°, or 270° at any time by pressing three keys.

Simply hold down Control + Alt and then select the arrow key for which way you want your laptop or PC screen to face.
Your monitor will then go blank briefly and return in a few seconds facing a different orientation. To restore this back to the original settings, press Ctrl + Alt + the up arrow.
This keyboard combination will rotate your entire screen and all of the open apps on it.
This feature is only available on devices that support it, you can check your Intel Graphics Settings to check if your device does.
How to Check Intel Graphics Settings on Windows
Right-click anywhere on your Desktop and select Intel Graphics Settings.
2. You’ll want to select Options and Support.
3. Next, select Hot Key Manager.
4. You’re looking for the screen rotation shortcuts, if not present, then your device doesn’t support it.
If this doesn’t work, you’ll need to use one of the methods below.
How to Rotate a Laptop or PC Screen Via Control Panel
You can access the control panel to flip your screen but beware, it will be awfully difficult to switch it back as not only the appearance will be flipped but so will the mouse movements.
Another way to rotate your screen is to right-click the Windows desktop and select Display Settings from the dropdown menu that appears. Changing the screen orientation via Control Panel is equally simple. Press the Windows key and type in “Screen Resolution” then press Enter.
Alternatively, if you’re using Windows 7, you can click Start > Control Panel > Display > Screen Resolution.

2. From here select the monitor that you wish to rotate from the Display drop-down box and then finally select Portrait or Landscape in the Orientation field.
3. You can also access these settings by using the Win + I keyboard shortcut and then clicking on System. From here, you can choose the orientation of your display.
How to Rotate a Laptop or PC Screen Using Intel Graphics and Media Control Panel
You can also rotate a display using your graphics card’s control panel. (Note that there are too many different software suites to list each one individually, so treat this as a general guide.)
A shortcut to your graphics control panel can be found in a couple of places. Right-clicking the desktop and selecting the appropriate option will give you access to the Intel, Nvidia, or AMD graphics card control panels, but the graphics drivers and software often add icons to the system tray on the right-hand side of your taskbar. Double-clicking these icons, or right-clicking thereon, will normally give access to the control panel, and also often a wide range of other options, too. Handily, some also permit you to right-click their respective icons and select screen rotation from a dropdown menu.
Once the relevant control panels are open, you’ll need to peruse the ‘display’ or ‘desktop’ menus to find the rotation option for your monitor. The exact location varies from manufacturer to manufacturer, so a quick hunt around will soon locate the option you need.

Locking Your Screen
You can lock your screen so that it does not rotate. If you’ve been the recipient of too many office jokes, or you just want to prevent a new end-user from accidentally flipping their screen, simply lock the screen rotation.
To do this:
Click the Action Center Icon.
You can also click the Windows + A keys to open the Action Center.
2. Next, click Rotation lock.
Once you’ve done this the same steps must be taken to unlock the screen rotate functions.
Screen Orientation is Stuck
Several users have stated that their screen becomes stuck in one orientation. The hotkeys don’t work to fix it and many times the user can’t even input their password to gain access to their PC. Let’s review some options if your screen is stuck in one orientation and the above methods aren’t working for you.
Aside from powering down your PC (which likely won’t work because your system will remember it’s last orientation), you can try unplugging your peripherals, wait a couple of minutes, then plug them back in. This may force the system to reboot with the correct orientation.
If screen rotation isn’t working you can go into your system’s Registry by using the Win + R keyboard shortcut.
Next, type ‘regedit‘ in the box and hit Enter to open a new window.
From here, follow the path: HKEY_LOCAL_MACHINE/SOFTWARE/Microsoft/Windows/CurrentVersion/AutoRotation.
4. Double-click LastOrientation and enter 0 in the value box. This should help you to reset your screen orientation. This process is incredibly difficult to follow if your screen is upside down or even sideways. If nothing else works, physically rotate your monitor to make following these steps easier.
How to Rotate a Laptop or PC Screen on a Mac
Here’s a quick rundown of how to rotate the screen on a Mac.
Click on the Apple Menu and select System Preferences.
Now, click on Displays > Display Settings.
Then, select your display.
Next, click on the Rotation pop-up menu and select the amount of desired rotation.
Select Confirm in the window that appears.
You can easily undo the rotation by selecting Rotation > Standard.
Frequently Asked Questions
Here are some answers to your most frequently asked questions:
Will the Screen Rotate Back if I Turn Off My Computer?
No, in most cases it will reboot with the same orientation you last used. The only way to rotate it back would be to use one of the methods above.
My Screen is Stuck and Will Not Rotate After the Newest Updates. What Can I Do?
If your screen no longer rotates after the update, check first that the rotate function isn’t locked. If it isn’t, then follow the steps above using the Intel Control Panel.
My Screen Still Won’t Rotate, What Else Can I Do?
If the rotate lock function is off and you’ve tried the control panel, you should power cycle your device to see if the problem corrects itself. If not, then try disconnecting your peripherals and reconnecting them.
Lastly, use Microsoft’s built-in troubleshooting software to check your sensors. If your computer is having a driver issue it may cause the screen orientation on your computer to stop working properly. You can change the driver yourself, check for a manufacturer’s warranty, or contact a repair shop for further assistance.
What if I Have Two Screens and Only One of Them is Flipped?
In most cases, you can click on the screen that needs adjusting and use the keyboard to fix the issue for that one screen. The alternative would be to head over to the control panel, select the screen that’s needs rotated, and choose the orientation.
If the issue is not immediately corrected try to unplug the peripherals and plug the monitor back into your computer.
The Ctrl+Alt+Arrow Key Doesn’t Work, Why?
If the above-mentioned hotkeys aren’t working for you it’s likely because your PCs graphics card doesn’t support the function. You can check the functions by using the Ctrl + Alt + F12 keyboard shortcut and selecting Options & Support. Next, click on the Hotkey manager and browse for your keyboard shortcut.
Rotating Your Screen

As you’ve now seen, the method to rotate your PC or laptop screen depends on the OS and also the graphics card you’re using. If you’re rotating your screen a lot, then it’s useful to learn the shortcut keys used to get it done.
Were you able to rotate your screen? Is your screen locked and you’ve tried all of the suggestions? Feel free to share your thoughts in the comments below.
Disclaimer: Some pages on this site may include an affiliate link. This does not effect our editorial in any way.
Send To Someone
Missing Device
0 notes
Text
How to Watch Movies on FaceTime: Step-by-step Guide
How to Watch Movies on FaceTime: Step-by-step Guide

With the release of iOS 15.1, everyone can use Apple’s SharePlay feature as long as they own an iPhone. This new feature works when you’re on a video call inside FaceTime and can be used to stream content together with your friends and family. This way, if you wish to watch a movie or TV show with your loved ones, you can directly do it from within a FaceTime call without needing an app other than the streaming service from where you want to watch a movie from.
How to watch movies or TV shows on FaceTime
The only way you can watch movies and TV shows with others on FaceTime is by using the new SharePlay feature. When you watch movies together using SharePlay anyone in a call can pause content, control playback, and change what’s being streamed; all while being in a video call and continuously talking to each other. SharePlay thus eliminates the need to rely on third-party apps and extensions that people otherwise used to watch movies remotely with their loved ones.
What do you need?
Before you start watching movies and TV shows with others on FaceTime, you need to make sure that you and others in the video call have the following things:
iPhones, iPads, and Apple TVs of all participants should be updated to iOS 15.1, iPadOS 15.1, and tvOS 15.1 respectively.
FaceTime app signed in with your Apple ID
An active subscription on everyone’s device of the app/service you want to watch content from (yes, not only the host, the participants also need active subscription)
The aforementioned requirements apply to all the participants of the FaceTime call, including the person who will initiate SharePlay.
In the guide below, Steps 1 and 2 are for the host who initiates the FaceTime call with SharePlay, and Step 3 is for the participants to join the call and watch movies together on FaceTime.
Step 1: Start a FaceTime call
This step is for the host of the FaceTime video call who will be streaming the movie on SharePlay.
Once you’ve made sure that you and your friends have all the requirements to watch movies or shows together on FaceTime, it’s time to initiate a FaceTime call and start SharePlay. To do that, open the FaceTime app on your iPhone and either tap on the ‘New FaceTime’ button or select the contacts you may have recently contacted on FaceTime.
When you create a new FaceTime call, you can search for the contacts you want to start a video call with or select the required people from the list of suggestions.
To initiate the call with the selected people, tap on the ‘FaceTime’ button at the bottom.
When the call gets connected, you’ll see FaceTime’s new control bar at the top of the screen. You’ve now successfully initiated a call on FaceTime and it’s now time to head over to the movie or TV show you want to stream.
Step 2: Stream a movie/TV show from supporting app like Apple TV, Showtime, Hulu, etc
This step is also is for the host of the FaceTime video call who will be streaming the movie on SharePlay.
Unlike sharing your screen on FaceTime, you’re not required to start SharePlay from within FaceTime when you want to watch a movie or TV show with someone on a video call. Instead, you can simply head over to the app from where you want to stream something with others and then start playing it. To stream a movie/show on FaceTime, open the app you want to stream content from. In this instance, we’re using the Apple TV app which supports SharePlay.
When you launch Apple TV or any other SharePlay-supported app, you should see the “Choose Content to Use SharePlay” message at the top of the screen.
Tapping on this message will offer you different options to start SharePlay for the app’s content – SharePlay Automatically and Ask Next time.
SharePlay Automatically – Will trigger SharePlay every time you open Apple TV or a supported app during a FaceTime call.
Ask Next time – Lets you choose if you want to use SharePlay the next time you play content on Apple TV or a supported app.
Now, select the movie/show you want to stream together with your family or friends on FaceTime. When you start playing a movie on the streaming app, a prompt will appear asking you whether or not you wish to SharePlay the selected content. To watch this movie together with others, tap on ‘SharePlay’.
When the movie starts playing, you should see a message at the top that reads “Started <movie name>”.
With the movie’s playback screen in the foreground, you’ll also see the video call screen as a floating window at all times, unless it’s hidden manually.
Step 3: Join SharePlay
This step is for the participants of the FaceTime video call who will be watching the movie on SharePlay created by the host.
As a participant, once SharePlay is shared with you on a FaceTime call, you can tell that from within the video call’s controls at the top. If you see a video player icon at the top and next to it a name of a movie also appears, then it means that some people may be watching a movie or TV show inside this FaceTime call.
You can start watching the movie that’s being played here by tapping on the ‘Open’ button adjacent to ‘Join SharePlay’ inside FaceTime controls. You’ll also see the app where a movie or TV show is streamed from by looking for its app icon on the left side of the ‘Join SharePlay’ section.
When you join someone’s SharePlay activity, iOS will open the app that’s playing the movie or TV show. To watch this content on your iPhone, tap on the ‘Join SharePlay’ option in the prompt that appears on the screen.
SharePlay will now start playing the movie or TV show that’s being shared for everyone in this video call.
When the movie starts playing, you’ll enter a playback screen with various controls like play/pause, seek forward/backward by 15 seconds, select playback device, subtitles, languages, and adjust playback. You should use these controls with caution as changing a setting will affect playback on others’ iPhones as well.
Related: How to Use Shareplay on FaceTime
What apps can I SharePlay movies and shows from?
The ability to stream movies and shows directly on FaceTime is only possible with apps that support SharePlay. Since the feature is relatively new, you can only watch movies from a select bunch of apps with SharePlay. These apps include Apple TV+, Digital Concert Hall, Disney+, HBO Max, Hulu, Paramount+, Pluto TV, and Showtime.
As SharePlay gains more popularity, we may see more apps support it across various platforms but for now, you cannot watch movies and shows available on Netflix, Amazon, and Youtube via SharePlay. Check out our complete list of apps that support SharePlay on FaceTime in the post linked below.
▶ What Apps Support SharePlay?
That’s all you need to know about watching movies and TV shows on FaceTime.
0 notes
Text
How to Use an iPhone as a Second Monitor
How to Use an iPhone as a Second Monitor
How to Use an iPhone as a Second Monitor
Device Links
Whether you use your PC for work, gaming, or other kinds of entertainment, your screen is probably just enough. And even though having a second monitor would make your life easier, you don’t feel like spending money on an additional screen. However, there is a handy solution if you have an iPhone.
You can connect your iPhone to your PC or Mac and use it in two ways – to either display different content than your primary monitor or mirror the content. This article will talk about how to achieve both of these options.
How to Use an iPhone as a Second Monitor With a Mac
There are a few options to make your iPhone a second screen for your Mac. However, you have to decide which option would be the best for you depending on your needs. In any case, you will need to install an app on your phone and your Mac. Check out some of the options available below.
Duet Display or iDisplay
Both apps will get the job done and allow you to use your screen as a separate monitor or as a mirroring monitor. You will need a USB to plug in your iPhone to your Mac or have your iPhone and Mac connected to the same Wi-Fi network to use either one. The iDisplay is $14.99 at the time of writing, while the Duet Display app is $19.99 for the complete package.
To start, you need to decide whether you want to use Duet Display or iDisplay and download the appropriate app to your iPhone.
Next, you’ll need to get the desktop version of the app you’ve chosen. Go to their respective website and click on the “MacOS” button to download the correct version and pay the requisite fee. On the Duet Display website, you can choose between the basic and full package or a free seven-day trial. After the download has finished, run the .exe and follow the installation steps.
Now that you have everything ready, the next steps are:
Open the app on your iPhone.
Plugin your iPhone via USB or connect it to the same Wi-Fi.
Run the program on your Mac.
Right-click on your desktop.
Select “Display Setting.”
You will see two monitors; the second one is your iPhone. Here you can select what you want to project on which screen.
In the program or app, select the setting for both of your monitors.
Air Display
Similar to the previous two apps, Air Display gives you the option to add your iPhone as a second monitor. You will only need for the devices to be connected to the same Wi-Fi network. The app is $19.99 at the time of writing.
If you want to try out Air Display, you’ll first need to download the desktop client. To do this, download the app from the Mac App Store and follow the installation prompts.
Once you have the app’s desktop version, you need to download the app from the App Store to your iPhone and make sure that both devices are connected to the same Wi-Fi. Then you can proceed in the following way:
Run the apps on both devices.
Follow the on-screen instructions to make sure that the devices are connected.
From here, you can configure your preferences on both devices, like the high resolution.
You can adjust what will be displayed on your main screen by opening the “Arrangements” tab or toggling on the “Mirroring” option for your iPhone to mirror your main screen.
VNC
If you just want to mirror your main screen and don’t want to pay full price, the VNC app may be the perfect fit for you. It is completely free and does just that – it mirrors your main screen to your added iPhone screen. Moreover, it will allow you to control your main screen remotely from your iPhone. To use this app, follow the steps below:
Download the Desktop client from the official website.
Download the client for your phone – Mocha VNC Lite is a free one, but different ones are available.
Run both clients on both devices.
Configure according to your preferences.
How to Use an iPhone as a Second Monitor With a Windows PC
All the apps we mentioned also have a Windows version. Depending on your needs, budget, and preferences, you can choose between Duet Display, iDisplay Air Display, or VNC. You will also need a USB cable or connected to the same Wi-Fi connection to use the apps.
The steps are also very similar to connecting your iPhone to a Mac as a second screen.
Download the desktop client for the app of your choice; make sure to select the Windows version.
Download the app to your iPhone from the App Store.
Connect your iPhone to your PC via USB cable or connect to the same Wi-Fi network.
Run both apps on both devices to connect them.
Right-click on your desktop screen.
Go to “Display Settings.”
Scroll to the bottom of the page until you see “Multiple displays.”
Change the settings to “Extended Display.”
Confirm by clicking on “Keep changes.”
While using Mac with an iPhone allows you to have the highest resolution settings on iPhones with Retina displays (HiDPI), the Windows version of some apps doesn’t support the high-resolution mode. This is supposed to change in future updates.
Additional FAQ
What Are the Compatibility Requirements for the Desktop Clients on Windows?
Most of the apps mentioned are compatible with Windows 8.1 or later. If you want to use an app on an older Windows version, you can download older client versions. But keep in mind that these versions are no longer getting updated.
Can I Add More Than One Additional Monitor at a Time?
Yes. Most apps allow you to add more than one device for an additional monitor.
I Can See My Wallpaper, but I Cannot See Any of My Program Icons?
You did nothing wrong and are probably in the “Additional Monitor” mode. You can now drag icons, windows, or resize windows to display them on your additional monitor.
To Sum It All Up
Using your iPhone as another monitor may take some work, but with the right app, it’s more manageable. Even if you choose to go with the most expensive app listed, it’s probably less expensive than buying a new screen. Moreover, it will save you some time and finish the job just as efficiently as having a second monitor.
Do you think two screens will make you more efficient? Which app mentioned would you recommend? Have you had any personal experience with any of these apps? Let us know in the comment section below.
Disclaimer: Some pages on this site may include an affiliate link. This does not effect our editorial in any way.
Send To Someone
Missing Device
0 notes
Text
How to Change a Wi-Fi Network From Public to Private in
How to Change a Wi-Fi Network From Public to Private in
How to Change a Wi-Fi Network From Public to Private in Windows 10
[embedded content]
There are several reasons why you might want to switch a network from Public to Private, the main reason being securing your home or office network from being accessed by unauthorized devices. Given the abundance of Wi-Fi capable devices, it’s an easy process to change your network settings.
This article will show you several ways to change your Wi-Fi network to Private, such as using the PowerShell or Registry Editor, in Windows 10.
Switch From Public to Private Network Using Wi-Fi Settings
To change your network from public to private using the Wi-Fi settings:
Click on the Wi-Fi network icon, found towards the far right of the taskbar.
Select Properties under the Wi-Fi network that you’re connected to.
From Network profile, select Private.
Switch From Public Network to Private Using Ethernet Lan Settings
To change your network from public to private using the Ethernet Lan settings:
Open Settings from the Start menu.
From here, select the Network & Internet settings option.
Select Ethernet from the menu on the left.
Click on the name of your connection.
Select Private.
Switch From Public Network to Private Using the Registry
Note: A single mistake in Registry Editor has the potential to break an entire system, so consider creating a backup in advance. Once you’ve opened the Registry Editor, click on File > Export to save the backup in a secure location. If anything goes wrong, you can import the backup.
To change your network location from public to private using the Registry Editor:
To launch a Run box, press Windows + R.
Type “regedit’ then Enter.
From the left pane of Registry Editor, navigate to the following key:
HKEY_LOCAL_MACHINE\SOFTWARE\Microsoft\Windows NT\CurrentVersion\NetworkList\Profiles
From the left pane, expand the Profiles key.
Click on the subkeys to find the “ProfileName” that matches your current network connection’s name.
Once you’ve found the right subkey, in the right pane, double-click Category and edit the DWORD to the following:
Public: 0, Private: 1, Domain: 2.
To apply the new network location, reboot your computer.
Switch From Public Network to Private Using PowerShell
To change your network settings from public to private using PowerShell, first enable Administrator access:
Click on Start and then type “CMD” into the Search Bar.
Right-click on Command Prompt, then select Run as administrator.
To grant admin rights, you may be prompted to enter the admin’s username and password.
Type: net user administrator /active:yes, then hit Enter.
Now launch PowerShell, then:
To list the name and properties of the current network connection, paste or type in the following command Get-NetConnectionProfile, then press Enter.
To change your network location from public to private, type in the following command— replacing “NetworkName” with your network name:
Set-NetConnectionProfile -Name "NetworkName" -NetworkCategory Private
To change your network location back to public:
Set-NetConnectionProfile -Name "NetworkName" -NetworkCategory Public
Switch From Public Network to Private Using Local Group Policy Editor
Changing from a public to private network using the Local Group Policy Editor:
Access the Local Group Policy editor by clicking on Start then type “gpedit.msc” into the Search box then Enter.
Now, click on Computer Configuration\Windows Settings\Security Settings\Network List Manager Policies.
Then, double-click on Unidentified Networks.
In the Location type box, select the Private option.
Private and Public Network FAQs
Can I Customize My Public/Private Network Settings?
To customize your public and private network settings:
1. Click on Start from the taskbar.
2. Then select Settings > Network & Internet.
3. Select “Sharing options,” found underneath “Change your network settings.”
4. Expand “Private” or “Public,” and select the radio button for your preferred options e.g., turning off printer sharing.
Why Would You Want Your Network Set to Public?
You would set your network to Public to connect to Wi-Fi in a public place, such as a coffee shop or library. During that time, even when you’ve set up a Homegroup, your computer won’t appear to other devices, nor try to discover other devices on the network. Windows will also disable the file-sharing discovery feature.
Why Would You Want Your Network Set to Private?
Setting your network to Private is suitable for a home or office network environment, comprised of trusted devices that you may need to connect to. Discovery features are enabled, and your computer is seen by other computers on the network for sharing files, media, and other networked features.
Can I Change Network to Private Using Homegroup?
Homegroup does not have a feature for making changes to the network connection.
During the Homegroup setup process, you may be asked to change the network privacy settings on your computer. Depending on your internet connection set up (wireless or ethernet cable), this can be done through the Wi-Fi settings or “Network & Internet settings” option.
To change your network to private using the Wi-Fi settings:
1. Click on the Wi-Fi network icon, found towards the far right of the taskbar.
2. Select Properties under the Wi-Fi network that you’re connected to.
3. From Network profile, select Private.
To change your network to private using the Ethernet Lan settings:
1. Open Settings from the Start menu.
2. Select the Network & Internet settings option.
3. Select Ethernet.
4. Click on your connection’s name.
5. Select Private.
How Do I Create a Homegroup in Windows 10?
1. Type in “homegroup” in the Search bar on the taskbar, then click on Homegroup.
2. Click on Create a homegroup and then Next.
3. Select the devices and libraries you wish to share with the homegroup, then Next.
4. Make a note of the password that pops up on your screen; this will allow other PCs access to your homegroup.
5. Click on Finish.
To add other computers to your Homegroup:
1. Again, type in “homegroup” in the Search bar and click on Homegroup.
2. Click on Join now then Next.
3. Select the devices and libraries you wish to share, then Next.
4. Enter the homegroup password, then Next.
5. Click on Finish.
To share an individual file or folders:
1. Type “file explorer” into the search text field on the taskbar, then select File Explorer.
2. Click on the item, then select the Share option.
3. Depending on your computer’s set up, whether it’s connected to a network and the network type, select an option from the Share with group:
· Select a person’s account to share items with them.
· Select a Homegroup option to share with your Homegroup members, e.g., libraries.
· Click on the Share tab, then Stop sharing to prevent a folder or file from being shared.
· Click on the Share tab, then Homegroup view or Homegroup (view and edit) to modify the level of access to a folder or file.
· Select Advanced sharing to share a location e.g., a system folder.
To share/stop sharing your printer:
1. Type in “homegroup” into the Search bar and click on Homegroup.
2. Select Change what you’re sharing with the homegroup.
3. Click on Shared or Not shared next to Printers & Devices.
4. Then Finish.
How Can I Keep My Internet Connection Secure?
Here are four things to consider to help prevent unauthorized users from gaining access to the Wi-Fi on your home network:
Rename Your Routers and Networks
Once you’ve set up your router for the first time and it’s up and running, change the generic username and password that accompanies it. The username and passwords provided with routers are public record, making your Wi-Fi easily accessible if unchanged.
Use Strong Passwords
Make your passwords stronger by:
· Making it at least 16 characters long.
· Not using personal information or common phrases.
· Using a mixture of numbers, special characters, upper and lowercase letters.
· Ensuring it’s unique; don’t reuse passwords.
Keep Everything Up-to-Date
Whenever a vulnerability is detected, router manufacturers will update the router firmware. To stay protected, set a reminder every month to check that your router settings are up-to-date.
Turn On Encryption
Encrypting your router is one of the easiest ways to secure your internet connection:
1. Find the security options on your router’s settings.
2. Then find the WPA2 personal setting.
3. If that option isn’t there, select WPA Personal. However, this is a sign of an outdated and vulnerable router; consider updating to one that includes WPA2 encryption.
4. Set the encryption type to AES.
5. Enter the password or network key; this password is different from the router password and will be used to connect all your devices to your Wi-Fi network.
Securing Your Wi-Fi Network
Windows 10 offers us the flexibility of switching our internet connection settings between public to access the internet in public places and private for a home or office setup. The change can be made using a variety of methods.
Now that you know how to change your network from public to private, and other ways to strengthen the security of your internet connection; what method did you use to change the setting; via the Wi-Fi/Ethernet Lan settings or using command prompts? Have you employed further practices for a more secure home network? Please let us know in the comments section.
Disclaimer: Some pages on this site may include an affiliate link. This does not effect our editorial in any way.
Send To Someone
Missing Device
0 notes
Text
Free EV charging perks for car buyers? Here's what each automaker offers
Free EV charging perks for car buyers? Here's what each automaker offers
Car manufacturers sending out press releases that herald free charging for their current and forthcoming electric vehicles continue to hit us left and right. At a certain point, it gets difficult to keep them all straight. Some are unlimited charging offers, while others only give you a few charges to get going. There are even different programs within car companies for different EVs. Just because one model gets free charging for years, doesn’t mean the rest of that company’s EVs do, too.
So, in an effort to simplify this madness, we’ve put together this handy guide (that we’ll keep updated as new programs come out) on what OEMs and what EVs offer free charging. You’ll find all the car companies that currently (or are about to) sell EVs in the U.S. on this list. We tell you what cars get free charging, and which ones don’t, then let you know how much free charging you’re going to get. Hopefully this makes sorting through the giant web of free charging programs easier, and it might even affect which EV you choose to buy.
Audi
Owners of the new Audi E-Tron GT are in for a great deal of free charging, as they’re getting three years of totally free charging on the Electrify America charging network. That’s a substantial perk for buyers of the new Taycan-based Audi. The regular E-Tron and E-Tron Sportback models don’t get the same perk.
The soon-to-launch Q4 E-Tron gets a relatively minor amount of free charging, as Audi is offering new buyers of that crossover 250 kWh of charging at Electrify America over the first two years of ownership.
BMW
The value proposition for BMW EVs here is low, but it’s not nothing. New buyers of BMW EVs will receive a $100 credit toward charging at EVGo’s charging stations. Models eligible for the $100 include the i3, i4 and iX.
Chevrolet
Owners of the Bolt EV and Bolt EUV are not offered any free charging at public charging stations. However, GM was subsidizing installations of at-home Level 2 charging stations to make it easier for folks to charge at home. That said, charging is not free.
Ford
Ford Mustang Mach-E owners are treated to a bit of free charging, but nothing too lucrative. You’ll get 250 kWh of free charging at Electrify America stations, which Ford says is the equivalent of about 3-5 full charges for the Mach-E. If your Mach-E was delayed, Ford is offering those folks an additional 250 kWh of charging, bringing the total up to 500 kWh.
Hyundai
Hyundai is offering folks who buy a Kona Electric or Ioniq Electric the same offer as Ford. Buyers of those EVs will be able to redeem 250 kWh of free charging at Electrify America stations.
However, buyers of the soon-to-come Ioniq 5 get a much sweeter deal. You’ll get two free years of unlimited fast charging at Electrify America stations with the Ioniq 5, which is almost as good a deal as the E-Tron GT. You’re limited to 30-minute charging sessions, but that shouldn’t be much of an inconvenience considering the charging speed possible.
Jaguar
Jaguar does not offer free public charging to buyers of the electric I-Pace.
Jeep
Jeep hasn’t gone into great detail about its 4xe charging program, but it revealed that it’s working with Electrify America to set up chargers at trailheads for Wrangler 4xe owners. Using the Jeep app, you’ll be able to charge up your Wrangler for free at these locations for fully electric off-roading.
Kia
Kia does not offer free public charging to buyers of the Niro EV. There’s no stated plan to provide EV6 owners with free charging, but reservation holders were given the opportunity to snag a free at-home Level 2 charging station.
Lucid
The new Lucid Air will come with three years of free charging at Electrify America stations. It’s unlimited free charging, so you’ll be able to stay as long as you like. That said, maximum charging speed on the Air adds 300 miles in just 20 minutes, so if you can find a charger capable of those speeds, you likely won’t be sticking around for long.
Mazda
The MX-30, while only available in California for now, comes with $500 per year of free charging at ChargePoint chargers. You could also put that cash toward installing an at-home charging station if you prefer.
Mercedes-Benz
Only the EQS is out so far (the EQE and other are coming soon), but those who purchase Benz’s new, flagship EV will get two years of free charging at Electrify America charging stations. You’ll be limited to just 30-minute charging sessions throughout those two years, but at the EQS’ charging speed, that’s going to provide you a lot of miles.
Mini
Mini does not offer free charging for its all-electric SE model, nor its PHEV model.
Nissan
The Leaf is Nissan’s only available EV for now (the Ariya is coming soon), and it’s being offered with $250 of free charging at EVGo stations for new buyers. Nissan estimates that it’s good for about 30 fast-charging sessions.
Polestar
As of late October, Polestar 2 owners will get two years of free charging via Electrify America chargers. Just like Ioniq 5 owners, you’ll be limited to 30-minute sessions with the Polestar. The two years of free charging applies to both new buyers and those who have already purchased a Polestar 2.
Porsche
Porsche only has the Taycan and Taycan Cross Turismo for the time being, but it’s offering folks a sweet charging deal for the expensive EV. Owners will get three years of free, unlimited charging at Electrify America charging stations. Just like the others on this list, you’ll be limited to 30-minute sessions. If you can find one of the extra-quick 350 kW chargers, though, chances are low you’d need more than 30 minutes.
Rivian
Rivian doesn’t offer free charging as standard to R1T or R1S drivers, but it has released plans to offer a cost “membership” of sorts that will include free, unlimited charging at Rivian chargers baked-in. The details are not yet fully clear, though.
Tesla
At one point, Tesla offered free Supercharging as a bonus to purchasing its vehicles. In 2021, however, that’s no longer the case. All new Tesla buyers must pay to charge their vehicles, even if there are still many older models on the road that are grandfathered into the free charging system.
Volkswagen
The ID.4 comes with three years of free, unlimited charging at Electrify America stations. This one’s no surprise, considering that VW is the company behind everything Electrify America. There are no time limits on this one, so feel free to remain plugged in until you reach your desired charge percentage.
Volvo
All 2022 Volvo Recharge models get the same charging perks. You’ll get 250 kWh of free charging with your purchase, which will be valid for three years. Plus, it’s providing folks with an Electrify America Pass+ membership that gets you discounted charging at Electrify America stations.
Related video:
.embed-container position: relative; padding-bottom: 56.25%; height: 0; overflow: hidden; max-width: 100%; .embed-container iframe, .embed-container object, .embed-container embed position: absolute; top: 0; left: 0; width: 100%; height: 100%;
0 notes
Text
Can You Disable TPM and Secure Boot After Installing Windows 11? What Happens…
Can You Disable TPM and Secure Boot After Installing Windows 11? What Happens…

After months of beta testing and bug squashing, the public build of Windows 11 has been released for the general public. It is currently being offered as a free upgrade to all Windows 10 users with capable hardware, meaning a sizable chunk is being left out of the update cycle. Most of it is down to Windows 11’s long list of requirements, which includes TPM 2.0.
Today, however, we are not talking about how you could disable TPM and other requirements to get Windows 11; you can already check that out by clicking on this link. Here, we will talk about what happens when you try to disable TPM and Secure Boot after installing Windows 11 on your PC. Now, without further ado, let us get to it!
Related: How to Install and Use WSA Toolbox on Windows 11 to run Android apps
What do TPM and Secure Boot mean?
As you may know, Windows 11 requires your PC to have a Trusted Module Platform or TPM 2.0. Without it, your computer is deemed unfit to run the latest version of Windows. And although it is annoying to make the update unavailable to a large sector, we cannot blame Microsoft for making TPM 2.0 one of the main prerequisites for running Windows 11.
TPM, which acts as an added layer of protection, makes sure no potential malware gets to access sensitive information, including your login details, encryption keys, and more. TPM comes in three forms. It can be soldered to your motherboard. It can be a physical chip that you stick to your motherboard. And finally, it can be a soft, firmware implementation of the TPM architecture integrated into your processor. All three implementations have the same end product.
While TPM is more of a hardware component, Secure Boot is cooked into the UEFI firmware itself. So, as long as you have UEFI up and running, Secure Boot would continue to prevent unauthorized hardware from interfering while booting your system. Secure Boot can use TPM but it does not require it. So, even if you do not have TPM, you can use Secure Boot on Windows 11.
Can you disable TPM and Secure Boot on Windows 11?
Yes, you can disable TPM and Secure Boot after installing Windows 11. You will have to go into UEFI and turn Secure Boot and TPM off.
As of now, a few Windows 11 features require you to have them turned on at all times. You will lose out on these features and face bugs in case you decide to disable TPM and Secure Boot. Here are some known apps, games, and Windows 11 features that depend on Secure Boot and TPM.
Windows Hello Sign-in Features
Ability to run certain VMs
Windows Subsystem For Android and consequentially all Android Apps
Future games and secure apps with anti-cheat or tamper utilities: Such apps and utilities are expected to take full advantage of this hard requirement as seen by Valorant’s Vanguard lately.
Bitlocker
Other encryption tools, security software, admin utilities, and remote management systems.
Some games (Valorant, for example)
What happens after you disable TPM and Secure Boot on Windows 11?
Generally, disabling TPM and Secure Boot on Windows 11 will not do you any harm in day-to-day tasks. However, if you had Bitlocker enabled, you will have to enter your recovery keys every time your computer boots up. Additionally, Windows Hello — biometrics-based authentication feature for Windows 11 — will stop working when you disable TPM and Secure Boot on Windows 11.
Here is a complete list of drawbacks that you face when disabling TPM and Secure Boot on Windows 11.
1. No Windows Hello Sign in
If you were using this before disabling TPM and Secure Boot, then you won’t be able to log in to your PC. You will need to disable Windows Hello Sign in first and then disable TPM and Secure Boot on your PC.
2. Incompatibility with upcoming and competitive games
Games that are highly competitive and employ dedicated software to prevent cheating are expected to take full advantage of the strict TPM and Secure Boot requirements. You will lose the ability to play such games on your PC until you enable Secure Boot and TPM. Case in point, the issues faced by the Valorant game’s players.
3. Bitlocker
If you disable TPM and Secure Boot with Bitlocker enabled on a drive, then you will need to manually decrypt the same using your key after each boot.
4. Ineligible for Windows Subsystem for Android
WSA is another VM that can be installed directly within Windows to run Android apps much like Linux’s WSL which was introduced a few years ago. Not only does WSA have hard requirements for TPM 2.0 and Secure Boot, but it also needs a higher clock processor, at least 8GB of RAM, and an SSD on your system to run properly. If you were looking to enjoy Android apps on your Windows 11 system, then you should avoid disabling TPM 2.0 and Secure Boot on your system.
5. Windows Updates issues
While there is very little concrete information on the same, Microsoft’s release notes make it seem that having TPM disabled will cause you to lose out on Feature and Cumulative updates. Subsequently having Secure Boot disabled will cause you to lose out on regular security updates and definitions. If you wish to keep your system updated to the latest version for maximum security and privacy then it is recommended that you do not disable TPM and Secure Boot on your system.
This is not a complete list of drawbacks when disabling TPM and Secure Boot. Windows 11 is fairly new and we have no word on what apps will be taking advantage of these security features. As time passes and we get to 2022, we could see a whole batch of new apps and games with a hard requirement for TPM and Secure Boot.
Will automatic updates get disabled after you turn off TPM and Secure Boot?
Microsoft made a big deal about TPM and Secure Boot before the release of Windows 11, making it impossible for Windows 10 users to upgrade to the latest OS the official way. So, it makes sense to have some consequence of disabling TPM and Secure Boot after installing Windows 11. That comes in the form of Windows Updates.
If you turn off TPM after Windows 11, you will stop receiving automatic Windows Updates. However, given how unpredictable Windows 11 updates are, it might not be the worst idea to turn off TPM and consequent auto-updates. Just make sure you are on a relatively bug-free version before disabling TPM.
RELATED
0 notes
Text
Does Pixel 6 Have Wireless Charging and Fast Charging?
Does Pixel 6 Have Wireless Charging and Fast Charging?

The most Google phone ever made is here and it is not short of surprises. With a new in-house Tensor chip in the Pixel 6 and Pixel 6 Pro, stunning camera upgrades, and no charger in the box, Google is clearly making bold statements. But does the Pixel 6 have wireless charging and fast charging? Here’s everything you need to know.
Does Pixel 6 and Pixel 6 Pro have wireless charging?
Google may be following in the footsteps of Apple and Samsung by ditching the charger, but it makes up for it with faster wireless charging. Pixel 6 supports 21W of wireless charging while the Pixel 6 Pro supports 23W of wireless charging.
Of course, a Pixel Stand is required to get these wireless charging speeds. On other Qi-enabled wireless chargers, the speed will be limited to 12W. This is a slight upgrade from its predecessors’ capabilities, but it still falls short when compared to OnePlus and Samsung phones that support 15W wireless charging speeds with unofficial Qi-based chargers.
Does Pixel 6 and Pixel 6 Pro have fast charging?
Yes, fast charging is also supported by the Pixel 6 series. In the case of wired charging, both the Pixel 6 and Pixel 6 Pro support 30W PD fast charging.
Some people may feel bummed out by Google’s decision to not include a charger with these premium phones. All that users get is a USB C-to-C data cable. Fortunately, an old plug can serve just fine to charge the Pixel 6. Those that want Google’s proprietary 30W charging head will have to shell out $25.
How fast is charging in Pixel 6 and Pixel 6 Pro?
30W of wired fast charging on the Pixel 6 is truly fast, especially if you’re comparing it with the 18W limit of previous pixel phones. With such speeds, you can expect the Pixel 6 to go from 1 – 50% in about half an hour.
When charging with the Pixel Stand, Pixel 6 Pro can hit the max speed of 23W (21W on standard Pixel 6) of wireless charging which is faster than what previous pixel phones could achieve with charging bricks.
Google shifts to the USB Power Delivery PPS standard
Going from 18W of wired charging to 30W requires modifications to the USB Power Delivery standard possible with USB-C. Pixel 6 supports PPS (programmable power supply), which is the newest addition to the PD 3.0 standard. It necessitates that the chargers work at full speed to make fast charging truly fast.
Some other flagship phones in the market use this USB PD standard too, like the Galaxy S21 series, and more and more third-party plugs are supporting it too. At the same time, this means that older plugs won’t fast charge Pixel 6, and you’ll have to get the $25 charger to get those speeds.
Fast charging, via both wired and wireless mechanisms, is the future and it’s good to see Google bringing it to the Pixel 6. However, not having a charger is a disappointment, and so is the 12W wireless charging with non-official wireless chargers.
0 notes
Text
How to Delete Your Spotify Account: Cancel Your Spotify Subscription and Close Your Spotify Account for Good
How to Delete Your Spotify Account: Cancel Your Spotify Subscription and Close Your Spotify Account for Good
How to Delete Your Spotify Account: Cancel Your Spotify Subscription and Close Your Spotify Account for Good
[embedded content]
Spotify is still a poster-child for the music streaming industry, with 138 million paying subscribers it’s a leading music service used around the globe. The Swedish firm is holding its own in the industry but has taken many steps to publicize the company and increase revenue. This, coupled with increasing competition from the similarly priced Apple Music, Amazon Music Unlimited, Tidal, and more, is causing some users to switch allegiances.
In an attempt to attract more people to the service, supposedly in the hope they’ll upgrade to the paid-for plan, Spotify launched a new free tier in April. Before the launch, Spotify offered two tiers – an ad-free one for $9.99 per month, and a free, ad-funded tier. The former lets you download songs to listen to offline and doesn’t restrict access, the latter restricts how many songs you can access, popular playlists, and only on shuffle. Under the new Spotify Free tier, you can listen to any song from 15 Discovery playlists, on-demand.
Spotify also offers Student accounts, Family accounts, and Spotify Duo (for two people at a discounted price). Each tier is competitively priced with others on the market but, if you’re ready to save some money each month, it may be time to cancel your subscription.
In this article, we’ll walk you through how to cancel your Spotify Premium account.
Things to Know Before Your Cancel
If you’re a Spotify Premium customer you’ll need to cancel your Spotify subscription before closing your account. With that, any playlists you’ve downloaded to listen to offline will be removed; you don’t own that music and as soon as you end your subscription, you’ll lose those locally stored playlists.
If you just unsubscribe but continue to use Spotify Free, you will still be able to stream those playlists and they’ll be in your listening history. However, if you go on to delete Spotify completely, you’ll lose access to those playlists both on and offline.
Additionally, deleting your Spotify account will mean you lose your username. Plus, if you have a student discount, you won’t be able to apply it to another account until a year after you first signed up for it, if you decide to return to Spotify.
How to Cancel Your Spotify Subscription
Before you delete your account you’ll need to cancel any paid subscriptions you have with the service. This may seem straightforward enough but there is one hiccup you may run into; where do you cancel it?
Simply going to the Spotify website to cancel your account only works if you set up the service through Spotify. Some users signed up through an iTunes subscription, while others may have used their Google Play subscription or another service. The first thing you’ll need to do is figure out where you’re paying for the service at and cancel it accordingly.
Cancel the Subscription – Spotify Website
If you’ve signed up for the Premium service directly through Spotify, do this to cancel the service:
Visit the Spotify website, login and then click the Account Management tab, it’s on the left-hand side .
2. Next, click the Change Plan option at the bottom of the screen.
Note: Notice the date in the screenshot above. You will still have access to the Premium service until that date.
3. Then, scroll down to the Free section and click Cancel Premium. Follow the preceding prompts to complete your cancellation.
4. Now, you’ll be asked to confirm your cancellation, click Yes, Cancel.
5. You’ll now go to a cancellation page that shows you the end date of your subscription as well as the option to provide feedback, populate the best answers and click Submit at the bottom.
Cancel the Subscription – iTunes
iTunes is a service that allows you to sign-up for other subscriptions using your Apple ID payment methods. If you’ve done this, follow these steps to cancel your subscription:
On your iPhone open Settings and tap iTunes & App Store.
2. Next, tap on your Apple ID at the top and then tap on View Apple ID in the pop-up window that appears .
3. From here, tap on Subscriptions.
4. Locate and tap on your Spotify Subscription which will be listed on the screen below.
5. Then, tap Cancel Subscription. As stated above, you will still have access to the Premium service until the next billing date.
If you signed up for the service using another partner (i.e. your cell phone provider, TV provider, or another service) you will need to cancel using that outlet’s instructions.
How to Delete Your Spotify Account
Once you’ve canceled your subscription, you will need to contact Spotify to permanently delete your account. As mentioned above, there is no way to recover your account once it is closed. Also, if you choose to reopen your account you will need to choose a different username according to Spotify. The same username cannot be used more than once.
Here is how to delete Spotify:
Visit the Spotify cancellation page and click on Account.
2. Now, click I want to close my account.
3. Click Contact to Close.
4. Fill out the information form and click Start Chat.
5. A Spotify representative will begin typing, explain that you’d like to close your account permanently. The representative will send you an email confirmation once done.
Frequently Asked Questions
There are a few more things you should know about Spotify account cancellation. See our FAQs below:
I cancelled my account, but I was billed again. What happened?
Assuming you canceled your Premium subscription the only reason you would’ve been billed again is that the cancellation wasn’t set before the renewal date.
The first thing you should do if you’ve been charged for a Spotify subscription after cancellation is to check your email for a confirmation. It should have the cancellation date set on it. If that all checks out and the charge was an error, contact Spotify support.
Can I reactivate a closed account?
First, it’s important to note that you can reactivate your paid subscription (along with all playlists and benefits) if your account is still open.
Once you’ve opted to close your account there aren’t any options for recovery. The account and all of its data are gone when you close the account. Your only option is going to be to open a new account and create new playlists.
I signed up for Spotify using Facebook, can I just disconnect it?
Unfortunately, no. Spotify gives its users several different sign-in options and if Facebook is yours then you’ll need to close your account per the instructions above and start over with a new account.
Once you’ve canceled your account, use your email and a unique password to create the new account. Just beware, if you do this all of your previous music, playlists, and downloads will not be available until reset them all up.
However, if you set up your Spotify account with an email and password then later connected it to Facebook you can disconnect your accounts. All you need to do is open Spotify on a web browser and go to the Settings. Then click ‘Disconnect from Facebook’ when the option appears.
What can I do if I can’t login?
If you can’t log into your Spotify account, you’ll have some difficulty getting the service canceled. Of course, you could always contact your financial institution to put a stop to future payments (this may or may not be the best solution depending on how you’re paying for the service), or you can fill out Spotify’s Contact Us form for more help.
If for some reason you can’t cancel via the website, iTunes, or wherever you started the service (even in the case of fraud) contact the company for further assistance.
I don’t have the option to cancel Spotify from the website. What’s happening?
If you can’t cancel Spotify using Spotify directly, it’s likely that you signed up for the service through a third party. This could be Apple, Google Play (at one time), or even a service bundle like Hulu. The fastest way to track down who you signed up for the service with is by checking your email (look for the confirmation email when you first signed up) or your bank statements.
Then, log in to that service and follow the cancellation steps.
Spotify
Regardless of your reasons for cancelling your Spotify subscription and deleting your account, you now know the steps involved to do so. As with many services, there are many steps involved to ensure that the account holder truly wants to delete their account.
Disclaimer: Some pages on this site may include an affiliate link. This does not effect our editorial in any way.
Send To Someone
Missing Device
0 notes
Text
How To Change OK Google to Something Else
How To Change OK Google to Something Else

How To Change OK Google to Something Else
Microsoft has Cortana, Amazon has Alexa, Apple has Siri, and Google has, well, Google.
Rather than come up with a human name for its assistant, Google went with the no-nonsense name of “Google Assistant” for its AI assistant. You address Google Assistant by saying “Hey Google” rather than the more personable “Alexa” or “Hey Siri” approach.
Others might say that the product’s name lacks imagination, but there’s certainly no lack of functionality in the Google Assistant service itself. The Google Assistant is a pure software tool that offers a lot of features, such as the ability to launch programs on your computer or smartphone, start TV shows or music playlists, even dim the lights in your house, or turn various appliances on and off.
Understanding the Google Assistant
You can use your voice to communicate with friends and family, give you travel directions, plan your next trip, set alarms, and reminders, translate languages, and so much more. The possibilities and functionalities are endless!
Despite the many things that Google Assistant can do, it cannot make major changes in its voice-activation command. Google will let you set it to “OK Google” or, on some later devices, “Hey Google.”

For whatever reason – probably a branding decision made by marketing – the company wants you to say its name before the Assistant will do anything for you. Having people repeat your company name many times per day is clear branding but not necessarily all that much fun for the Google Assistant users.
Fortunately, the very nature of Google’s software architecture is that it is hackable and modifiable. So what Google hasn’t added as features, third parties eagerly took the opportunity to add functionality to Google Assistant.
By using additional software, you can change your Google Assistant voice activation phrase to be anything you want. In this article, we will show you the various methods of doing this and walk you through each of them.
There are two main methods for changing the “wake up word” or the name of Google Assistant.
The first method involves using Mic+, an application that works pretty well but is no longer being developed as of this writing.
The second method we discuss involves changing your Google Assistant’s name using the Autovoice app. This second approach (described further in this article) is probably better than the first approach, but we’ll provide you with instructions on how to use both.
Can You give Google Assistant a Name?
While the company doesn’t natively support the option, there are some tried and true workarounds to change ‘Ok Google.’
We’ll start by showing you how to change the “wake word” for Google Assistant with Mic+, and then we’ll show you how to do the same thing with Autovoice (probably the better approach). Let’s get started!
How can I rename my Google assistant Using the Open Mic+ App?
Open Mic+ is an app that supplements the Google Assistant, adding a variety of features such as offline voice recognition and integration with Tasker, an extremely powerful Android automation system.
For our purposes today, however, we’re most interested in the feature of Open Mic+ that lets you replace the voice command used to activate the Google Assistant.

Mic+ Setup
For Open Mic+ to work, you have to disable the hot word detection in Google Now. This is easy to do, although Google has done its best to hide the required functionality deep inside its forbidding and quasi-random user interface hierarchy.
First, you will need to turn off your google assistant. To do this, follow these steps:
Activate your Google Assistant by saying “OK Google” or long-pressing the Home button.

Press the Compass icon in the lower right-hand part of the app to access the explore menu.

Tap your profile button on the top right part of the app, some users may need to select Settings depending on your model.

Scroll down to the Assistant Devices section at the bottom and tap on your smartphone or other devices you wish to configure.

Toggle the “Access with Voice Match” setting to off.

Launch Mic+
Step 1
Next, launch the Open Mic+ app. Open Mic+ is no longer available on the Google Play store, but Open Mic+ for Google Now is still available through Amazon.

Make sure you have installed the Amazon Store App before you can download the Open Mic+ app.
Step 2
Open the Open Mic+ app, and you’ll see the start screen. Tap on the preferences sliders to open the settings dialog.

Once into the preferences screen, tap on “Hot Phrase,” and then type in the phrase you want to use going forward.
You might want to resist the temptation to get too cute with this; too long a phrase might be amusing at first but will get old fast. Keep it short and sweet, something you can live with even when you’re stressed and in a hurry.

For our demonstration, we’ll go with Captain Picard and change the activation phrase to “Computer.”
When you’re done typing the new phrase, just tap on the “OK” button. Hit the return button in the upper left corner to exit preferences.
Finishing Up
You should now see a big green button labeled “Start.” Tap that and leave it running, and you can say your chosen hot word instead of “OK Google,” and your Google Assistant will be right there, ready to take your voice command.
How do I Change Google Assistant’s Wake Word using Tasker and AutoVoice?
Open Mic+ works most of the time. Unfortunately, the app is not in active development at this time, and it’s possible that it won’t install or won’t run properly on your phone.
A more reliable method of changing your Assistant hot word is to download and install the very popular Tasker app. Tasker isn’t free; it’s $2.99, but honestly, it’s the best $3.49 you will ever spend if you use your phone a lot.

Tasker handles all kinds of tasks. It automates everything from settings to photos. It allows you to customize over 350 actions, and when loaded with the right plugins, it can let you change your Google Assistant hot word.
Once you’ve downloaded Tasker, you will also need to install the AutoVoice app from the same developer. This download is free, but AutoVoice is ad-supported.

Step 1: AutoVoice
First, you need to go to your “Settings” and then choose “Accessibility.” In the list of options, find “AutoVoice Google Now Integration” and “Tasker” and toggle the switches next to those entries to enable the functionality.

Step 2: AutoVoice
You need to link your AutoVoice app to your Google account. Fortunately, Google Assistant can do this for you.
Activate the Google Assistant.
Say “Talk to AutoVoice.”
The Assistant will tell you that your account is not linked, and will ask for permission to link the accounts. Tap “Yes.”
If you have more than one Google account, a selection dialog will come up asking you which account to link; choose the account you use on this phone.
The Google Assistant will complete linking AutoVoice to your account.
Step 3: AutoVoice
Open the Tasker app, tap on the plus sign, and then add “Event.” From the list of options, select “Plugin” and then choose “AutoVoice” and “Recognized.” Click the edit button next to “Configuration” and then tap “The Hard Way.”
Tap “Speak Filter.” You’ll be prompted to speak your new command phrase. Tasker may ask you to clarify what you said by presenting a list of its best guesses; select the one that you actually said.
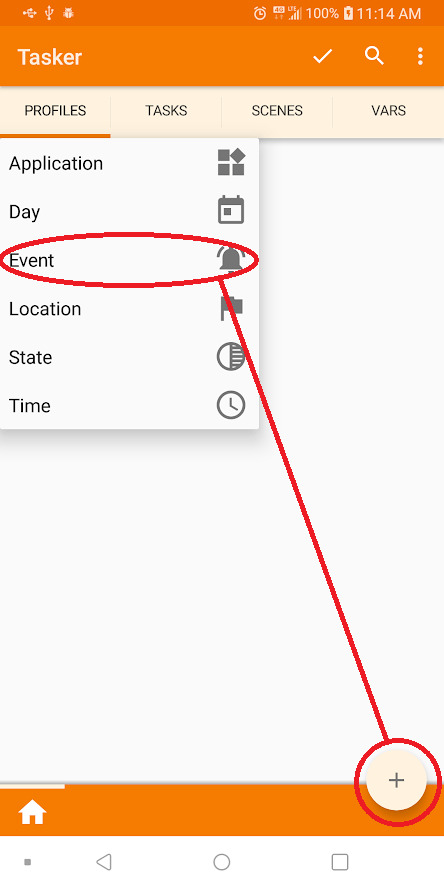

Press the back button on your phone. At the top of your screen, you will see the text “AutoVoice Recognized,” a circle inscribing an ‘i,’ a checkmark, and an ‘X.’ Tap the checkmark.
Now hit the back arrow in the upper left-hand side of the screen, next to the “Event Edit” text.

A pop-up will appear containing “New Task +.” Tap the “New Task +” line in the pop-up.
A dialog will come up allowing you to name the task; you can skip this if you wish.

You really only need to name tasks if there are a large number of tasks in a workflow, and you might get them mixed up. Type in a name (or not) and tap the checkmark to the right of the name field.

Now the Task Edit screen will appear. This is where you assign a command to execute when the command phrase is heard by Tasker.

Tap the + button in the circle on the right-hand side of the screen, and a menu of all the possible actions will appear.

Tap the box labeled “Input,” then the box labeled “Voice Command.” Hit the back button to the left of the “Action Edit” label. You should now see the Task Edit screen with your new task displayed.
Tap the “Play” button to run your task, and you should now have a voice command that opens the Google Assistant.
Frequently Asked Questions
Following these steps may seem quite complicated for most users. If you still have questions about the Google Assistant’s wake commands, keep reading.
Will Google ever include the option to change the wake command?
Unfortunately, as of October 2021, there is no official word from the company that this native feature is in the works. However, there is power in numbers. You can provide feedback to Google requesting such a feature at this link.
Can I turn Ok Google off?
Yes. If you aren’t having a good time with the Google Assistant, or you don’t want it responding to you, open the Google Assistant app and tap on Settings. Then, tap on Voice>Ok Google Detection. Here, you can toggle the slider off, and Google will no longer respond to your wake word.
Disclaimer: Some pages on this site may include an affiliate link. This does not effect our editorial in any way.
Send To Someone
Missing Device
0 notes
Text
Android 12: How To See All Apps [Easy Fix!]
Android 12: How To See All Apps [Easy Fix!]

If you recently updated to Android 12 and are unable to access the ‘All apps’ screen from your launcher, then don’t worry. It’s not a bug, nor a problem actually. Here’s what you need to know to access the All apps screen on Android 12 easily.
You can see all the apps installed on your device on Android 12 with the usual swipe-up gesture on the home screen. While doing this, be careful to perform the swipe-up gesture from the home screen area, avoiding the navigation bar.
If you swipe up from the navigation bar, you will get the App Switcher screen, not the All apps screen. Thus, if you are seeing the App switcher screen when trying to access the All apps screen, simply do the swipe-up gesture in the right way from the home screen area, avoiding the navigation bar.
On the home screen, you can do the swipe-up gesture on any area, whether it’s blank, or has an app icon or widget there. The swipe-up gesture will work anywhere on the home screen, whatever be the case.
On a custom launcher (like Nova launcher), you can get the All apps icon to easily tap that icon and access All apps.
Alternatively, if you want, you can also use an app called Simple App Launcher (Play Store link) to access all apps with a simple tap. For this, install the ‘Simple App Launcher’ app, add its icon to the home screen manually if it doesn’t add automatically, and then launch the app to see all the apps installed on your device.
0 notes
Text
How to Fix Instagram Share to Facebook Stopped Working
How to Fix Instagram Share to Facebook Stopped Working

How to Fix Instagram Share to Facebook Stopped Working
Ever since Facebook bought Instagram, the company has been tying the two together to support each other in many ways. One of the more valuable ways that Facebook and Instagram complement each other is by giving users the capability to share Instagram images directly onto Facebook.
Well, you can share Instagram images directly to Facebook, in theory. In reality, the option is still a little bit buggy at times but getting better.

If you’re having problems sharing images from Instagram directly on Facebook, here are some things you can try to fix the problem.
You have been able to link your Facebook, and Instagram accounts for ages long before Facebook bought Instagram.
However, the acquisition changed the system behind the scenes, and the feature that used to work reliably now seems buggy. Still, the integrations do seem to be improving over time.
The problem can take two forms. The first one tells you the image was shared successfully but never appears on Facebook, and the other is you share something from Instagram, and it just doesn’t seem to do anything at all.
For personal accounts, you’ll make the connection between Instagram and Facebook from Instagram.
If you also have a business Facebook Page, you’ll need to ensure that Instagram has permission to post to your Facebook Page.

Instagram Shares not Showing Up on Facebook
When you share from Instagram, you see a confirmation stating, “Your post was shared successfully,” and it then appears on your Facebook page.
Sometimes you see that message, but nothing appears on Facebook at all, and sometimes nothing happens at all, and you don’t see the message.
Either way, here are some ways to fix it. Try each process step by step until you resolve the problem.
Log out and then back in again on both Instagram nd Facebook. This simple solution often solves all kinds of problems with the apps individually, but it can also resolve issues with integration.
Check the link between Facebook and Instagram. Open the Instagram app on your device and tap on the “profile icon” in the bottom right.
Tap on the “hamburger icon” (three horizontal lines) in the upper right-hand corner.
From your profile, choose “Settings.”
Tap on “Account Center.”
Then tap on the “Accounts & Profiles” option.
Verify that your Facebook account appears in the list.
You may alternatively be asked to log into Facebook and check the link from Facebook. When you first see Facebook in the Linked Accounts list, confirm that it appears blue with the logo beside it, along with your name associated with your account.
If you tap on Facebook, you should be able to log into Facebook from Instagram by tapping “Login.”
If the previous step doesn’t work, reset the link to ensure that Facebook is properly authenticated and linked to your Instagram account.
Head over to the “Account Center.”
Tap on your “Facebook account.”
Tap on “Remove from Account Center.” This will link or re-link your Facebook account with your Instagram account and enable you to share Instagram images to Facebook.
The above steps should fix shThere’snstagram to Facebook problems. There’s nothing to do within Facebook with a personal Facebook account. However, if you have a Facebook Page for your business, the process is a bit different.
Connecting Instagram Account to Facebook Pages
If you’ve linked Instagram to your Facebook account but find you can’t post to your personal or business Facebook Page, you need to ensure you’ve given Instagram permission to post to your Page.

Give Instagram permission to post to your Page. On your laptop or desktop computer using a web browser, click “Settings” in the bottom left of your Facebook Page,
Click “Instagram” on the left-hand side of “Page Settings.”
Click on “Connect Account.”
Finally, type in your username and password, then click “Log In.”
Clear the app cache or re-install Facebook
If you’re still having trouble posting from Instagram to Facebook from your mobile device, clearing the app cache is the final thing to try. Clearing the app cache can solve problems that have nothing to do with Facebook or Instagram. In the case of iOS, you’ll reinstall the app rather than just clear the cache.
On Android, follow these instructions for Facebook and and Instagram separately.
Tap on “Settings.”
Tap on “Apps.”
Tap on “Facebook” or “Instagram.”
Select “Storage.”
Finally, tap “Clear Cache.”
On iOS (not reinstalling apps clears app cache for the app in question):
Tap “Settings.”
Tap “General.”
Select “iPhone Storage.”
Tap “Facebook.”
Choose “Delete App.”
Reinstall “Facebook” from the App Store.
Repeat this same process for “Instagram” to get a clean install of both without the data.

Disclaimer: Some pages on this site may include an affiliate link. This does not effect our editorial in any way.
Send To Someone
Missing Device
0 notes