#twitchartist
Text
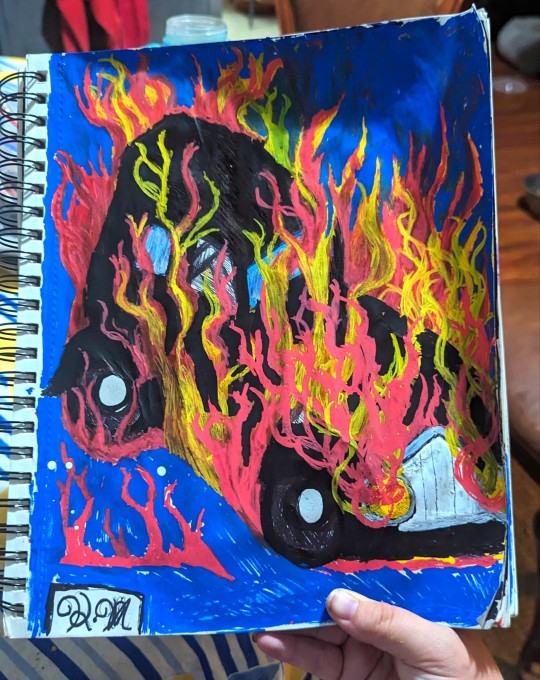
I loved this movie so much. I had to reimagine the poster. Thanks to everyone who hung out with me on stream! Watercolor, ink, and and acrylic on mounted paper, 18"×24".

110 notes
·
View notes
Photo

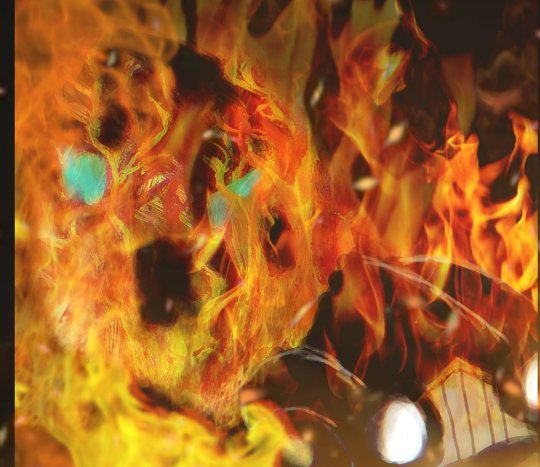
Feel Good Inc.
#pixel art#pixel aesthetic#pixelart#32bit#32bitart#gameboyadvance#twitchartist#pixel illustration#streamer art#gorillaz#feel good inc
445 notes
·
View notes
Photo

Hooray! I made a tumblr! I have absolutely no idea what I am doing so here’s to learning new things I guess? Also Atul is baby. ^-^
#spiritfarer#atul#frog#froggyboi#fanart#illustragram#digitalart#clipstudiopaint#twitchartist#artstreamer#digitalpainting#artist#newtotumblr#helpmeimlost#whatevenisthisplace#imscared
352 notes
·
View notes
Text

A furry art piece of a cute magenta Avali that I did for a friend ^^
#furry#furryanthro#furryfurries#furryart#furrycharacter#art#digitaldrawing#furry_art#furry_artwork#digitalpainting#digitalart#digitalartist#twitchstreamer#twitchartist#twitch#furrytwitch#twitchfurry#avali#avalifurry#furryavali#vrc#vrchatavatar#vrchatmodel#vrchat#pink#magenta#avian
17 notes
·
View notes
Photo

Today I just felt like drawing some Protoman on stream. The McDonald’s colors just pop. #protoman #megaman #sega #gaming #procreate #procreatetips #clipstudiopaint #clipstudiotips #howtodraw #digitalart #artist #igartist #gamingartist #twitchartist #anime https://www.instagram.com/p/Co_hy7OrsAH/?igshid=NGJjMDIxMWI=
#protoman#megaman#sega#gaming#procreate#procreatetips#clipstudiopaint#clipstudiotips#howtodraw#digitalart#artist#igartist#gamingartist#twitchartist#anime
35 notes
·
View notes
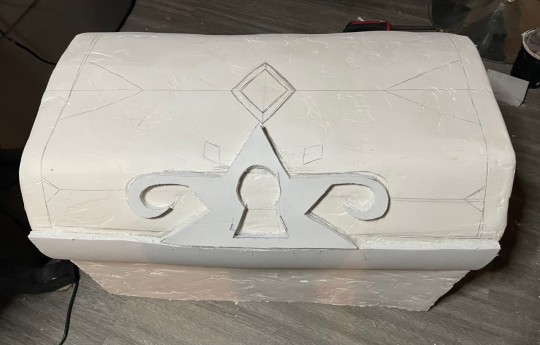
Text
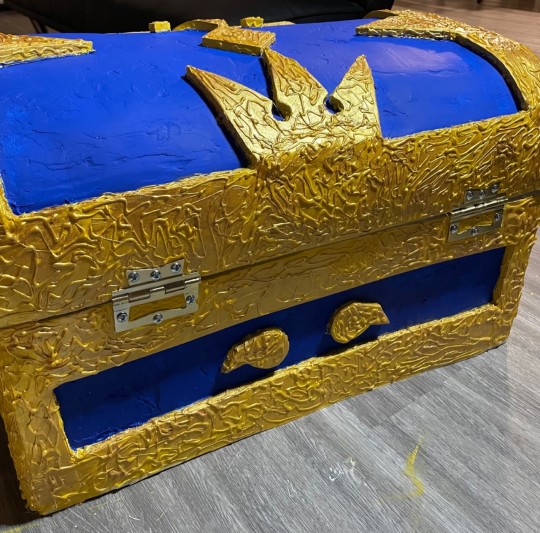
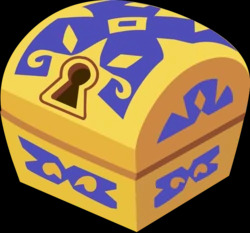
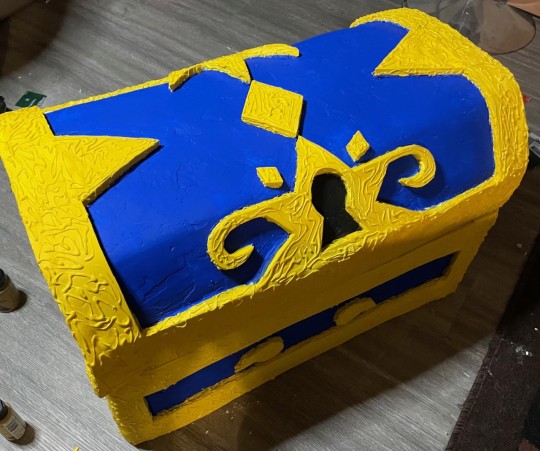
OOAK Kingdom Hearts Chest
Hey party people!
So a while back, I had two boxes that were from a DIY Thanksgiving kit and thought, "wouldn't it be cool to make a Kingdom Hearts Chest?" As a kid, I've always wanted one-and now that I'm old enough to buy the materials, now's the perfect opportunity. Funny yet, later on the process, I've decided that it wasn't going to be for me but for my nephew in his upcoming baby shower. I bought a lot of gifts for him so I thought this would be a cool add-on.
Here I will send you screenshots as well as my thought process/encounters; First off, materials.
I have used the following (Quantity depends on the sizing of the box):
Cardboard (I recommend stiff boards), Acrylic Paint (Warm Yellow, Blue, and Black), Door Hinges, Paint Varnish, Modeling Foam*, Foam Rolls*, fabric, Spackling, scissors, x-acto knife, plaster rolls. Sanding paper or blocks.
*I recommend using Worbla instead of both the modeling foam and foam rolls, I explain why further down.
DISCLAIMER: I'm no professional. I will be pointing out the flaws that I've encountered throughout the process-it is up to you if you want to follow along or find a better alternative.
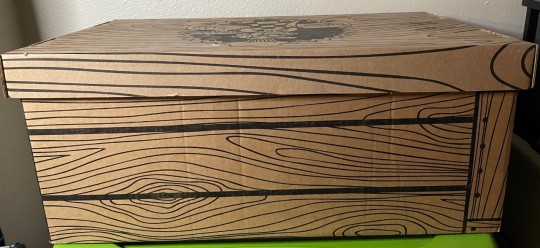
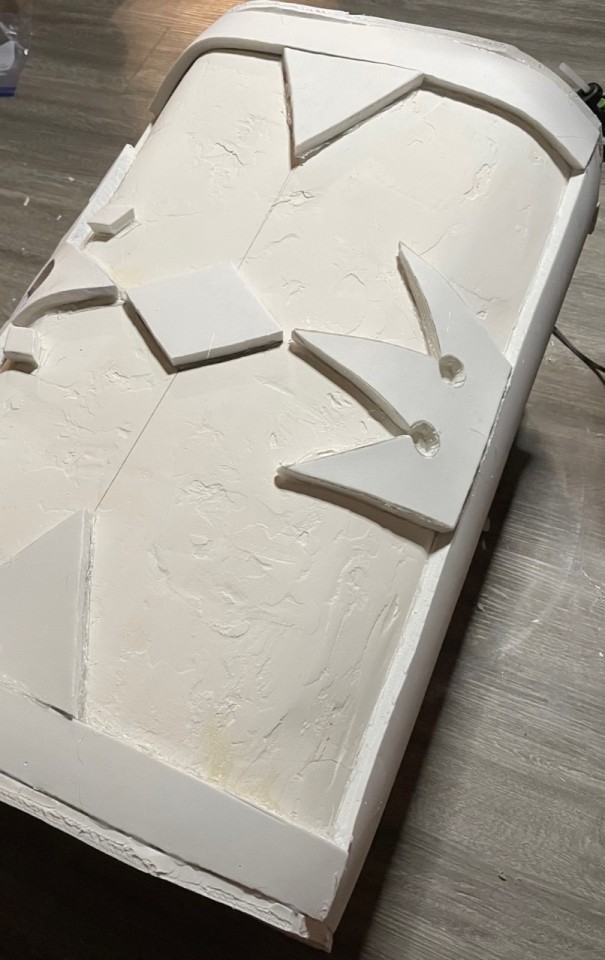
First off, here's what we are working with. Ideally the shape is more rounded I bought about 3 to 4 stiff boards to act as my foundation. After I've placed the stiff boards down in place, I then placed some plaster rolls to hide the seams from each stiff board planks.
At this point, I figured the bottom looked weird. So I did the same process for what I've done on the top.
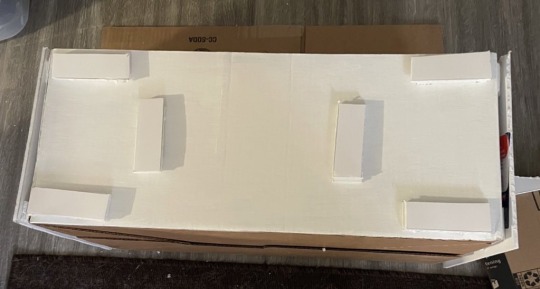
I'm glad that I ended up doing this because I knew the cardboard base was not going to hold for a while. I've made some supports (don't know what these would actually be called) so that I don't have to stack the stiff boards two or three times. If this was regular cardboard, I wouldn't do it since cardboard's weak when it comes to carrying weight, but luckily this held up throughout the process of making it.
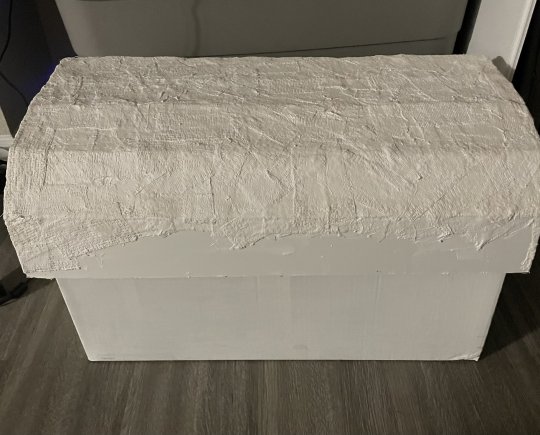
Time for the speckling.
Overall, this process was overwhelming. At this point, I thought I messed up since the speckling didn't want to adhere to the chest at first. However, with lots of patience and elbow grease, I've managed to get it done! I had to do this in multiple layers since soft speckling tends to go everywhere. When it's harden, it's easier to work with.
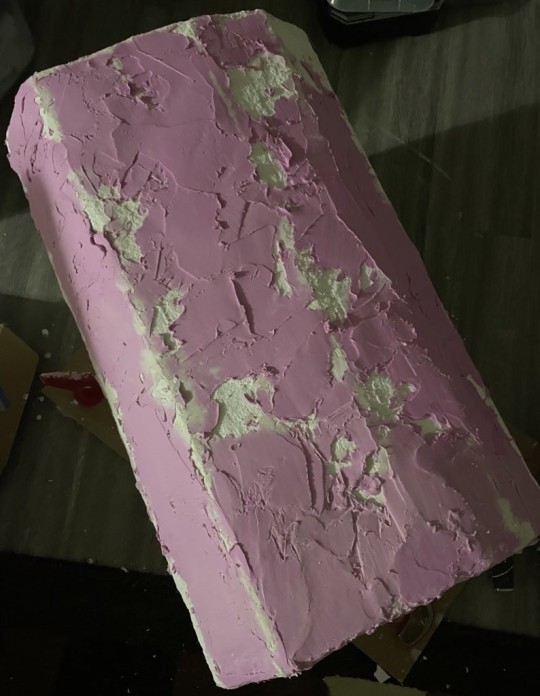
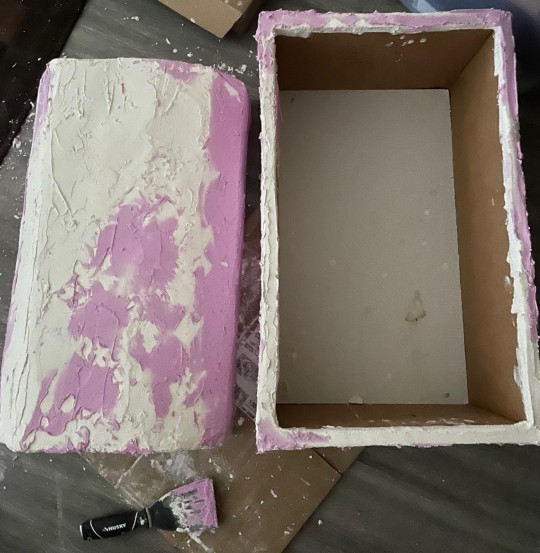
Oh, and yes this step was very messy. Especially when it came to sanding.
Overall, the chest ended two of my sanding block's lives and created a huge mess. Please sand with caution; don't inhale the dust! I know that there are methods to reducing the dust flying everywhere (like using water), but I was afraid to do since I've never used speckling for a project before; not sure if it would affect the cure process of some sort.
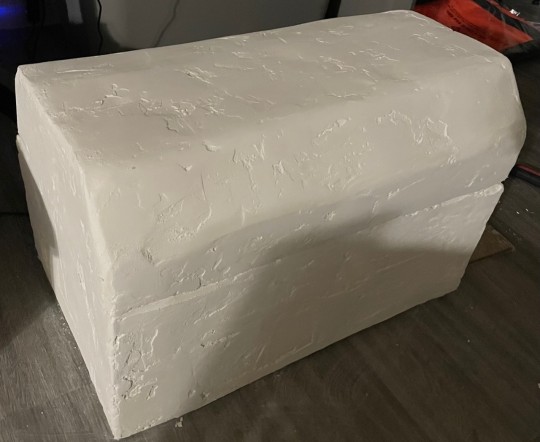
Once sanded, I then made a sketch of where everything will be going and how I want the pattern to be. I knew I wanted to make my own version of the chest instead of trying to make it a carbon copy of it, so I've implemented some key parts (like the keyhole and crown), but everything else was loosely altered.

Just cutting the keyhole alone took me about 2 hours. I wanted to make sure that it was symmetrical and stayed in place nicely. I used Foam Rolls to create the trimming however I highly recommend using worbla instead. My local art store did not have any more worbla so I figured that this was another alternative. I found it difficult to work with and when gluing it in place, it would want to come out. Worbla tends to get sticky when heat is applied so glue might not even be necessary if you plan on applying a lacquer on the entire chest.
To hide the foam seams, I decided to use modeling foam. This...was another medium that I found interesting. Applying it is not as difficult but when it's exposed to air for about 10 minutes, the foam gets extremely sticky. Imagine slime without the activator, or imagine playing with a melted marshmallow. Again, it would just be easier to use worbla.
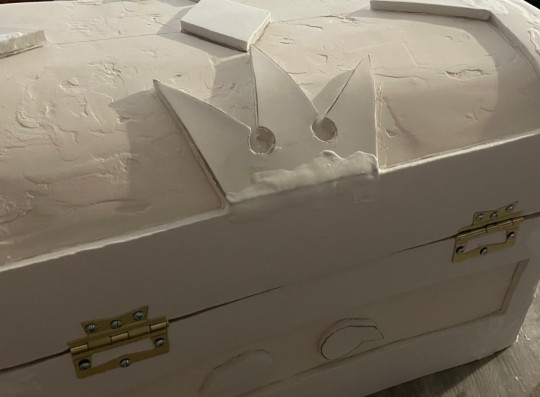
I knew I wanted the chest to open...like a chest so I got some door hinges. So the screws provided were too small for the chest so I ended up buying longer screws. Overall, I wish I had a drill to better secure the screws and bolts together, but not the worst thing ever. Still stays in place.
The paint job was fun, but difficult..my goodness...
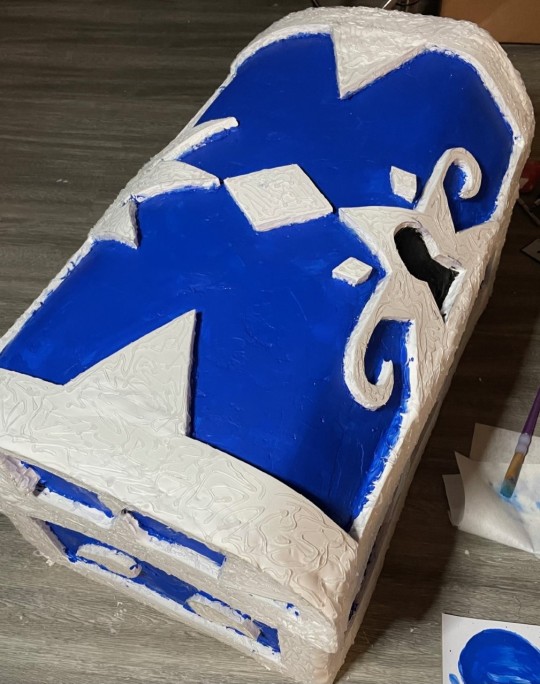
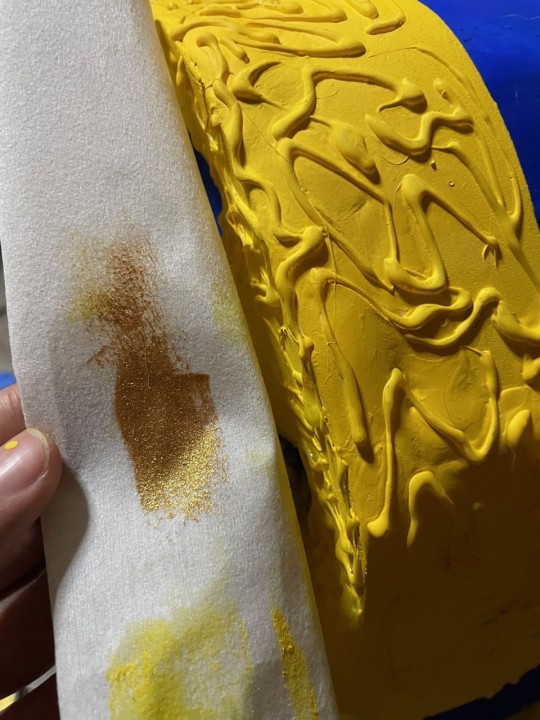
I knew the modeling foam would stick out like a sore thumb and unlike other clay or pastes, you can't sand it. So I got my hot glue and created some texture which I think did a well-good job on hiding the foam. While contemplating about the overall design, I thought it would be cool to give the yellow a metallic, gold sheen to it. I thought it was a good move. I love how the hot glue sticks out with the gold compared to just using the yellow paints.
Oh the inside... It's a hot mess.
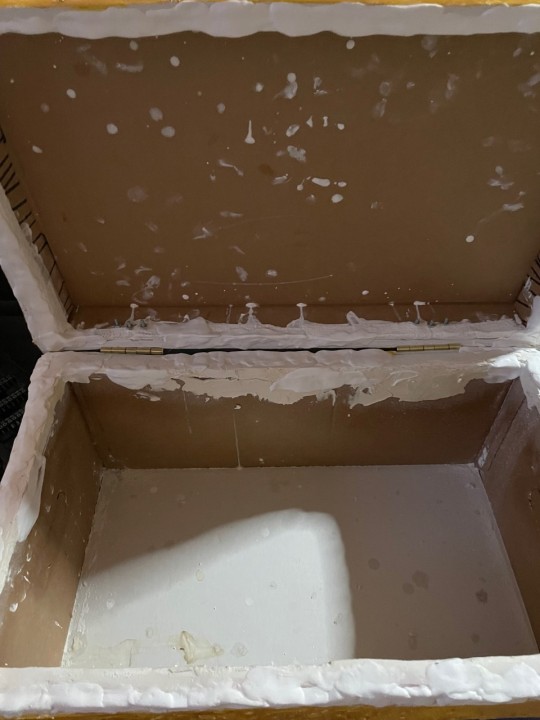
Instead of trying to paint, sand and use even more modeling foam. I've decided to hide this ugly mess with some fabrics that I have around from previous projects.
I've glued some gold fabric onto some felt (not necessary to be honest). and applied it on the base and the roof of the chest. I didn't have any blue fabric but I did have some shiny purple fabric. I think it works well with the gold.
(I know the base looks like silver but I guarantee you that it's gold)
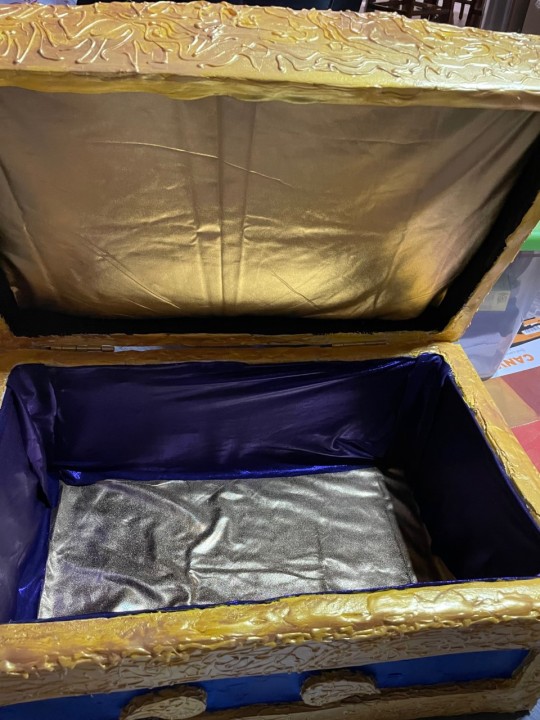
After applying two layers of lacquer to prevent the paint from chipping, I'm finally done!
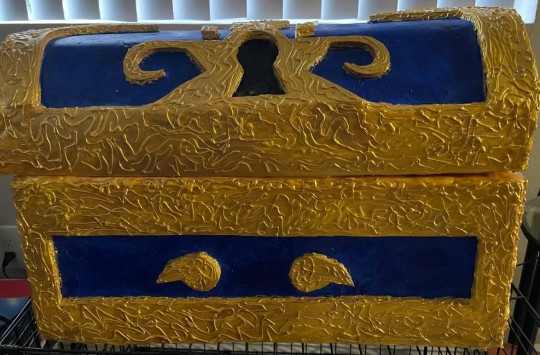
So happy with how this turned out! To be quite honest, this project took forever to finish. I think I spent about 15 hours on it? I know for some people, that sounds ridiculous but let me remind you that this is the first time for me and this entire project had a lot of trial and error.
I know there's a lot of flaws with it but one thing about me, I like to cherish my artwork-even if it's a hot mess.
Self Critiques:
Not use foam rolls/ modeling foam but rather worbla.
Pay more attention to how the chest looks opened and closed
Be more patient when applying the fabrics inside the chest. It looks messy in my opinion and I know I could've been more patient when cutting and folding the seam allowance.
Invest in a drill. the latch is not exactly the most secured when opening.
#ooak#kingdom hearts#instructions#chest#treasure chest#kingdom hearts treasure chest#kh#life size#life size chest#twitchartist#twitchstreamer#art#smallartist#digitalart#etsy#commissions#commissionsopen#twitch#crafting#smallcrafter#blue#gold
48 notes
·
View notes
Text
Gonna relax, chill out, and make a reference for one of the many, MANY character of Aether Eternius on stream!
Tonight's focus? The recently revealed, Thanatos!
twitch_live
3 notes
·
View notes
Photo

had too much fun drawing the details on this one :) #drawing #art #dailysketch #sketch #dailydrawing #sketchbook #artwork #clipstudiopaint #cartoon #illustration #artoftheday #twitchaffiliate #twitchartist #artistsupport #sketch #dailyart #titojaydraws #titojaydraws10 #artistsoninstagram #wip #nyc #nj #njartist #njarts #nycart #nycartscene (at Jersey City, New Jersey) https://www.instagram.com/p/CpHGWezsGKV/?igshid=NGJjMDIxMWI=
#drawing#art#dailysketch#sketch#dailydrawing#sketchbook#artwork#clipstudiopaint#cartoon#illustration#artoftheday#twitchaffiliate#twitchartist#artistsupport#dailyart#titojaydraws#titojaydraws10#artistsoninstagram#wip#nyc#nj#njartist#njarts#nycart#nycartscene
7 notes
·
View notes
Text
The Bentley
#firecrystal1092#twitchartist#good omens#twitchtvstreamers#art#artists on tumblr#mixed media#youtube#twitchstreamersconnected#twitch#Crowley#ineffable husbands#Bentley#good omens prime
5 notes
·
View notes
Photo

sup fuckers. im back on this account only to make sure i still have it.
10 notes
·
View notes
Text

The Veteran. 2023, Gouache, acrylic, and ink on Masonite.
6 notes
·
View notes
Text
Kashira Boys from Spirited Away
3 notes
·
View notes
Photo
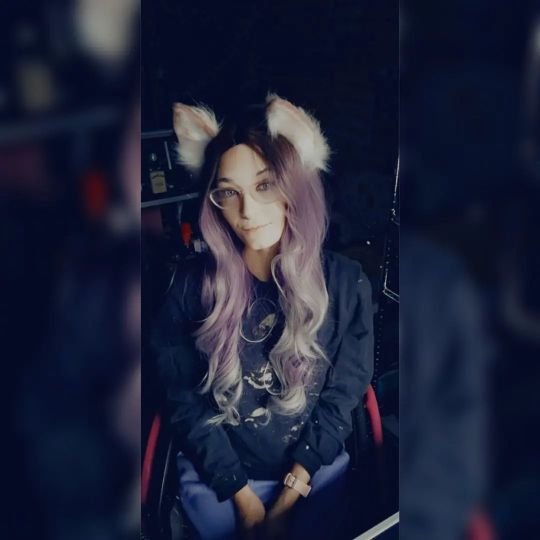
Its been a long rough day and I am mentally drained beyond belief. Being #disabled and #chronicallyill fucking sucks. Here's a throwback photo for now. I'm too tired,sad and sore to take new pics, butI'll be back soon Till then I'll be napping in the void. Back soon. Be soft with me wolf cubs, You're wolf mother is fragile. . . . . . #disabledlife #disabledandcute #disabledpride #catgirl #catears #disabledtwitch #twitchart #twitchgirlstreamers #irishstreamer #irishtwitchaffiliate #twitchaffiliate #twitchartist #twitchartists #selfie #makeup #hair https://www.instagram.com/p/CpRGxwioHXJ/?igshid=NGJjMDIxMWI=
#disabled#chronicallyill#disabledlife#disabledandcute#disabledpride#catgirl#catears#disabledtwitch#twitchart#twitchgirlstreamers#irishstreamer#irishtwitchaffiliate#twitchaffiliate#twitchartist#twitchartists#selfie#makeup#hair
5 notes
·
View notes
Text

This is a lineart of a cute kitty cat done on stream on Twitch!
#furry#furryanthro#furryfurries#furryart#furrycharacter#cat#furrycat#furrycatgirl#furrycatfemale#art#digitaldrawing#lineart#furry_art#furry_artwork#digitalpainting#digitalart#digitalartist#twitchstreamer#twitchartist#twitch#furrytwitch#twitchfurry#streamer#furrykitty#kitty#kitten#procreate#procreateart#furrycharacters#furryfandom
3 notes
·
View notes
Photo
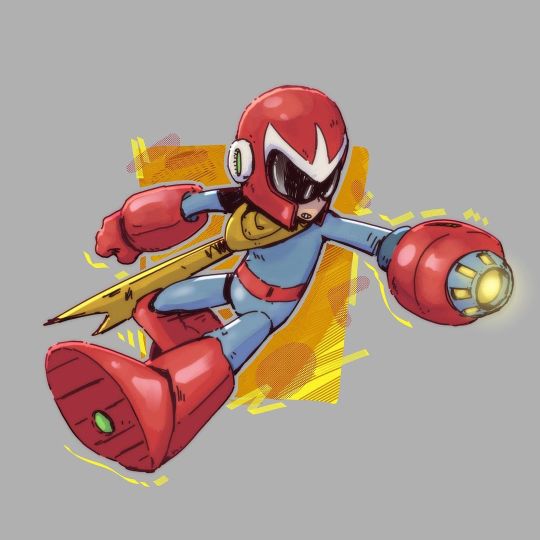
Today I just felt like drawing some Protoman on stream. The McDonald’s colors just pop. #protoman #megaman #sega #gaming #procreate #procreatetips #clipstudiopaint #clipstudiotips #howtodraw #digitalart #artist #igartist #gamingartist #twitchartist #anime https://www.instagram.com/p/CpCIDw8uX6C/?igshid=NGJjMDIxMWI=
#protoman#megaman#sega#gaming#procreate#procreatetips#clipstudiopaint#clipstudiotips#howtodraw#digitalart#artist#igartist#gamingartist#twitchartist#anime
9 notes
·
View notes
Text

Royal Margarine Cookie from Cookie Run Kingdom
#twitch#art#twitchstreamer#twitchartist#digitalart#smallartist#commissions#commissionsopen#digital art#digitalillustration#fanart#cookierun#crk fanart#cookie run art#cookie run#royal margarine cookie#cookie run kingdom
6 notes
·
View notes
Last Seen Blogs
ebeedrawing
wat°ㅁ°

hairtamerstudio
Hair Tamers Studio best salon in Baton Rouge #1

ariastarke
as you wish, m'lady

hermionesslut
easily hurt.

promise-blue2
promise