#this week in sewing
Text
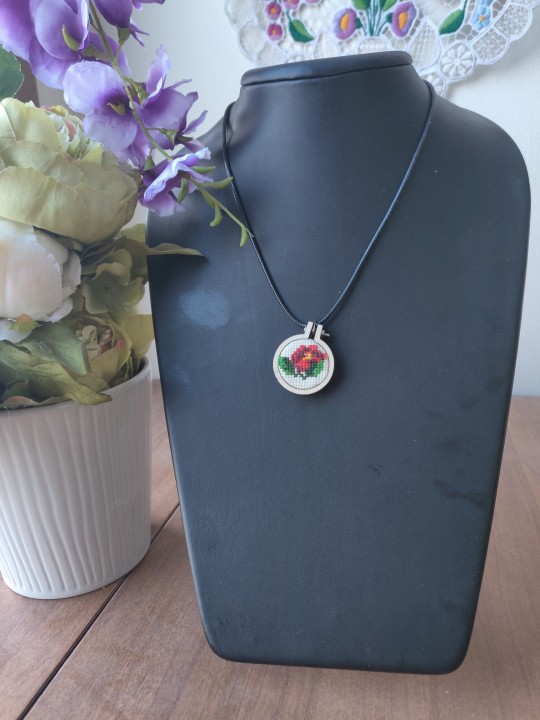
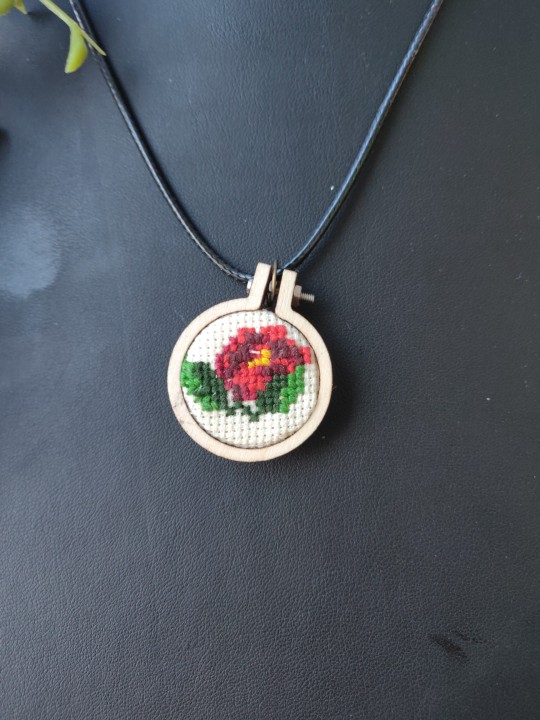
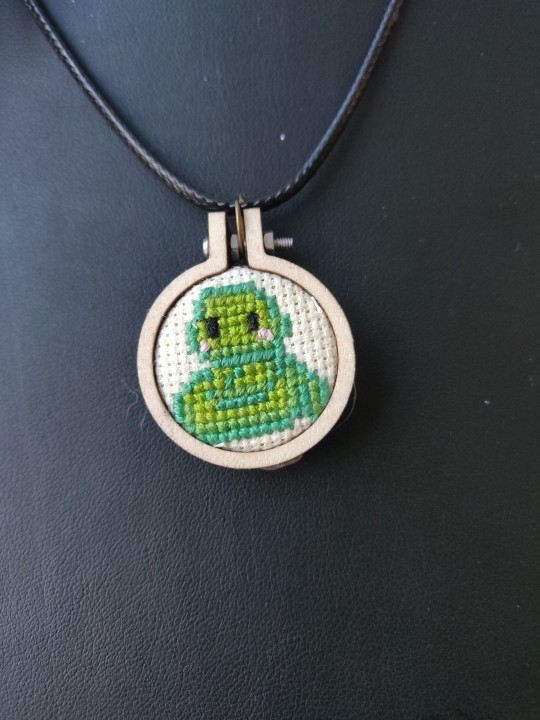
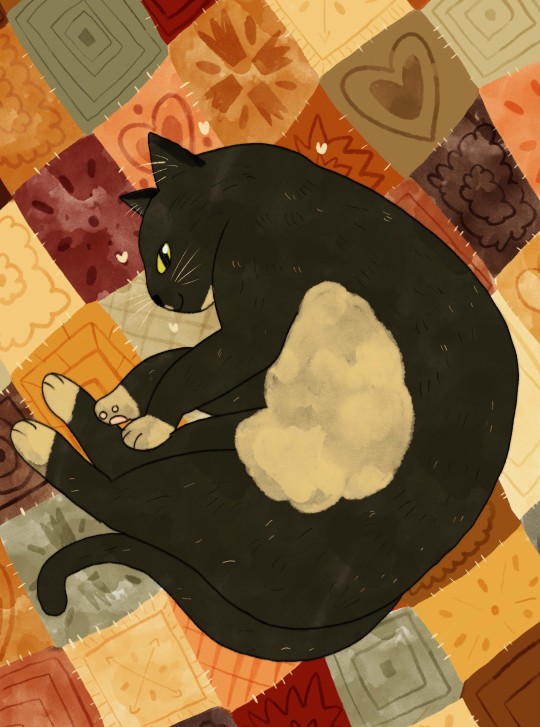
Week Twenty-Six: More Xs
I keep having to pause finishing these because I don't have the right sized mini hoops.
#sewing#weekly update#current projects#this week in sewing#embroidery#embroidery hoop#cross stitch#jewelry
3 notes
·
View notes
Text
Had a few folks interested in how I made the patches I posted for Solarpunk Aesthetic Week, so I thought I'd give y'all my step-by-step process for making hand-embroidered patches!

First, choose your fabric and draw on your design. You can use basically any fabric for this - for this project I'm using some felt I've had lying around in my stash for ages.

Next, choose your embroidery floss. For my patches I split my embroidery floss into two threads with 3 strands each, as pictured. You can use as many strands in your thread as you prefer, but for the main body of my patches I prefer 3 strands.
Next you're going to start filling your design using a back stitch.

First, put in a single stitch where you want your row to start.

Poke your needle up through the fabric 1 stitch-length away from your first stitch.

Poke your needle back down the same hole your last stitch went into so they line up end-to-end.
Repeat until you have a row of your desired length (usually the length of that colour section from one end to the other). Once you have your first row, you're going to do your next row slightly offset from your first row so that your stitches lay together in a brick pattern like this:

Make sure your rows of stitches are tight together, or you'll get gaps where the fabric shows through.
Rinse and repeat with rows of back stitch to fill in your patch design.

When you're almost to the end of your thread, poke your needle through to the back of the fabric and pull the thread under the back part of the stitching to tuck in the end. Don't worry if it looks messy - no one's gonna see the back anyway.
This next step is fully optional, but I think it makes the patch design really pop. Once your patch is filled in, you can use black embroidery floss to outline your design (or whatever colour you want to outline with - it's your patch, do what you want). I use the full thread (6 strands, not split) of embroidery floss to make a thicker outline.

I use the same back stitch I used to fill the piece to make an outline that adds some separation and detail. You could use most any 'outlining' stitch for this, but I just use back stitch because it's just easier for me to do.
Once you're finished embroidering your patch, it's time to cut it out!

Make sure to leave a little border around the edge to use for sewing your patch on your jacket/bag/blanket/whatever, and be careful not to accidentally cut through the stitches on the back of the patch.
If you have a sturdy enough fabric that isn't going to fray, you can just leave it like this. If not, I recommend using a whip stitch/satin stitch to seal in the exposed edges (I find that splitting your embroidery floss into 3-strand threads works best for this).

And then you're done! At this point you can put on iron-on backing if you want, or just sew it on whatever you wanna put it on. Making patches this way does take a long time, but I feel that the results are worth it.
Thanks for reading this tutorial! I hope it was helpful. If anyone makes patches using this method, I'd love to see them! 😁
#solarpunk aesthetic week#sewing#tutorial#sew on patch#punk diy#diy punk#punk aesthetic#handmade#solarpunk#handcrafted#embroidery#embroidered patch#how to#how to make a patch
17K notes
·
View notes
Note
Any tips on learning to make buttonholes? I've been putting it off for.... *checks notes* like three years.... but better late than never and all that. I don't have any fancy machines so I gotta do it by hand but that seems right up your alley.
Thanks!
It IS up my alley, yes, I do most of my buttonholes by hand!
I'm actually part way through filming an 18th century buttonhole tutorial, but I expect it'll be a few more weeks before I finish that and put it on the youtubes, so in the meantime here's the very very short version. (The long version is looking like it'll probably be about 40 minutes maybe, judging by how much script I've written compared to my last video?)
Mark your line, a bit longer than your button is wide. I usually use a graphite mechanical pencil on light fabrics, and a light coloured pencil crayon on dark ones. (I have fabric pencils too, but they're much softer and leave a thicker line.)
You may want to baste the layers together around all the marked buttonholes if you're working on something big and the layers are shifty and slippery. I'm not basting here because this is just a pants placket.

Do a little running stitch (or perhaps a running backstitch) in fine thread around the line at the width you want the finished buttonhole to be. This holds the layers of fabric together and acts as a nice little guide for when you do the buttonhole stitches.

Cut along the marked line using a buttonhole cutter, or a woodworking chisel. Glossy magazines are the best surface to put underneath your work as you push down, and you can give it a little tap with a rubber mallet if it's not going through all the way.

I'm aware that there are some people who cut their buttonholes open using seam rippers, and if any of them are reading this please know that that is abhorrent behaviour and I need you to stop it immediately. Stop it.
Go get a buttonhole cutter for 10 bucks and your life will be better for it. Or go to the nearest hardware store and get a little woodworking chisel. This includes machine buttonholes, use the buttonhole cutter on them too. If you continue to cut open buttonholes with a seam ripper after reading this you are personally responsible for at least 3 of the grey hairs on my head.
Do a whipstitch around the cut edges, to help prevent fraying while you work and to keep all those threads out of the way. (For my everyday shirts I usually do a machine buttonhole instead of this step, and then just hand stitch over it, because it's a bit faster and a lot sturdier on the thin fabrics.)

I like to mark out my button locations at this point, because I can mark them through the holes without the buttonhole stitches getting in the way.
For the actual buttonhole stitches it's really nice if you have silk buttonhole twist, but I usually use those little balls of DMC cotton pearl/perle because it's cheap and a good weight. NOT stranded embroidery floss, no separate strands! It's got to be one smooth twisted thing!
Here's a comparison pic between silk buttonhole twist (left) and cotton pearl (right). Both can make nice looking buttonholes, but the silk is a bit nicer to work with and the knots line up more smoothly.

I've actually only used the silk for one garment ever, but am going to try to do it more often on my nicer things. I find the cotton holds up well enough to daily wear though, despite being not ideal. The buttonholes are never the first part of my garments to wear out.
I cut a piece of about one arm's length more or less, depending on the size of buttonhole. For any hole longer than about 4cm I use 2 threads, one to do each side, because the end gets very frayed and scruffy by the time you've put it through the fabric that many times.
I wax about 2cm of the tip (Not the entire thread. I wax the outlining/overcasting thread but not the buttonhole thread itself.) to make it stick in the fabric better when I start off the thread.
I don't tend to tie it, I just do a couple of stabstitches or backstitches and it holds well. (I'm generally very thorough with tying off my threads when it comes to hand sewing, but a buttonhole is basically a long row of knots, so it's pretty sturdy.)

Put the needle through underneath, with the tip coming up right along that little outline you sewed earlier. And I personally like to take the ends that are already in my hand and wrap them around the tip of the needle like so, but a lot of people loop the other end up around the other way, so here's a link to a buttonhole video with that method. Try both and see which one you prefer, the resulting knot is the same either way.


Sometimes I can pull the thread from the end near the needle and have the stitch look nice, but often I grab it closer to the base and give it a little wiggle to nestle it into place. This is more necessary with the cotton than it is with the silk.
The knot should be on top of the cut edge of the fabric, not in front of it.

You can put your stitches further apart than I do if you want, they'll still work if they've got little gaps in between them.
Keep going up that edge and when you get to the end you can either flip immediately to the other side and start back down again, or you can do a bar tack. (You can also fan out the stitches around the end if you want, but I don't like to anymore because I think the rectangular ends look nicer.)
Here's a bar tack vs. no bar tack sample. They just make it look more sharp, and they reinforce the ends.

For a bar tack do a few long stitches across the entire end.

And then do buttonhole stitches on top of those long stitches. I also like to snag a tiny bit of the fabric underneath.

Then stick the needle down into the fabric right where you ended that last stitch on the corner of the bar tack, so you don't pull that corner out of shape, and then just go back to making buttonhole stitches down the other side.
Then do the second bar tack once you get back to the end.

To finish off my thread I make it sticky with a bit more beeswax, waxing it as close to the fabric as I can get, and then bring it through to the back and pull it underneath the stitches down one side and trim it off.


In my experience it stays put perfectly well this way without tying it off.
Voila! An beautiful buttonholes!


If you want keyhole ones you can clip or punch a little rounded bit at one end of the cut and fan your stitches out around that and only do the bar tack at one end, like I did on my 1830's dressing gown.

(I won't do that style in my video though, because they're not 18th century.)
Do samples before doing them on a garment! Do as many practice ones as you need to, it takes a while for them to get good! Mine did not look this nice 10 years ago.
Your first one will probably look pretty bad, but your hundredth will be much better!
Edit: Video finished!
youtube
And here's the blog post, which is mostly a slightly longer version of this post.
#ask#buttonholes#sewing#hand sewing#sewing tutorial#I've been procrastinating on the video this week#I want it done! I don't want to work on it I want new projects! I want to cut out more gloves!#currently forcing myself to do the last few buttonholes on these pants and then maybe I can cut out new gloves? as a treat?#but I hope I get some filming done tomorrow too
3K notes
·
View notes
Text
there he is......the man of the house
#mine#ough hello not posted in a while!!#im busy doin portfolio stuff so . not much cat drawinign going on THO i will. hopefully do one tomorrow hehe#i was gna get stickers for my next shop update but its hurting me head so. gna order new prints hopefully!! this week and then#do stickers n postcards next time. i am so low on stock sihfdkggwe#need 2 buy envelopes also....my least favourite thing 2 spend money on#what hve i been up to ....i made a blanket!! maybe i will post picture. it was gna b a cardigan i started it like last year#n then i went 2 sew it together n was like. this pattern is insane also this wool is too thick so. blanky :)#its very good. good lap blanket!!#what else what else....been re reading lotr. im reading it on ebook i lov ebook sm. i love printed books but i jus absolutely cannot#read them. dyslexia gang rise up !!!!#im reading it so much quicker tho n also actually remembering it ....would die for gimli#also started rewatching cr2 >:) i dont . actually like th new campaign so KSDFKJDN rewatch it is#even tho i dont like molly. not that thats gna b an issue for long sifubshbhebwj#im so seepy...so cold.....gna rest now probably n play skyrim hehe#cat drawings tomorrow >:)#okay bye
4K notes
·
View notes
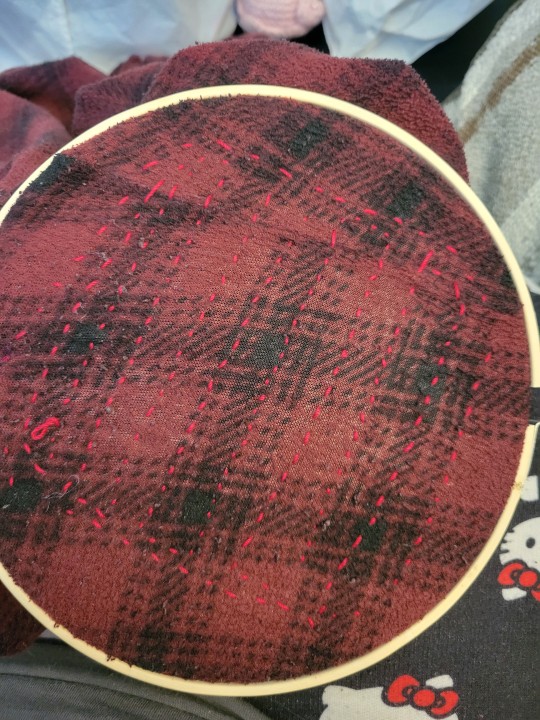
Text
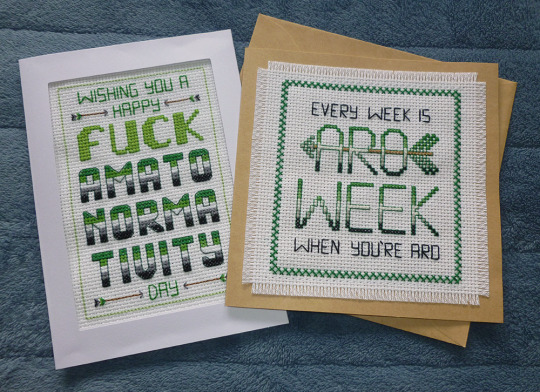
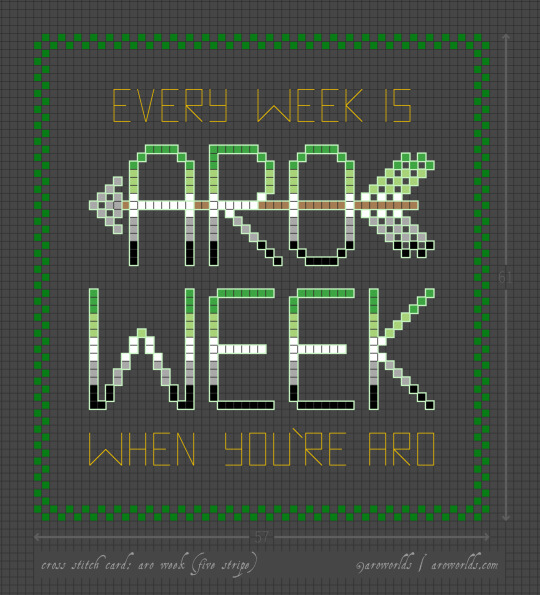

This Aro Week, I've made cross-stitched card designs perfect for gifting to your favourite slightly-snarky aromantic.
The free tutorial includes patterns, card and fabric dimensions and a materials run-down as well as instructions on attaching an aida swatch to cardstock and other border techniques.
#aromantic#aro week#cross stitch#aro feels#aromantic feels#amatonormativity#pride crafts#sewing#embroidery#needlecraft#needlework#green aro pride flag#typographic art#typography#arrows#aro symbols#aro symbolism#link#aro worlds wordpress#tutorial#image description in alt text#text in image#long post
309 notes
·
View notes
Text

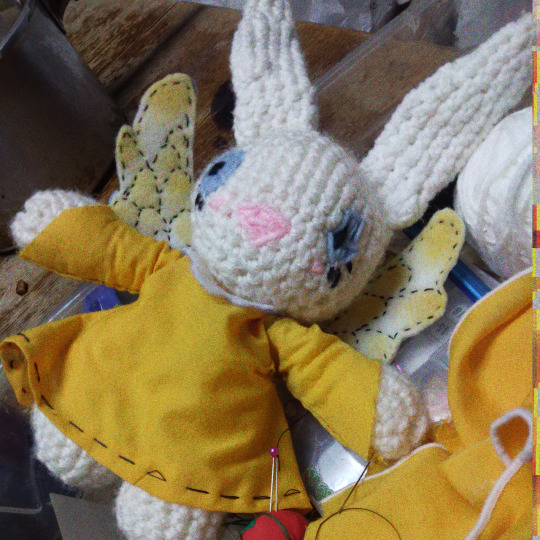
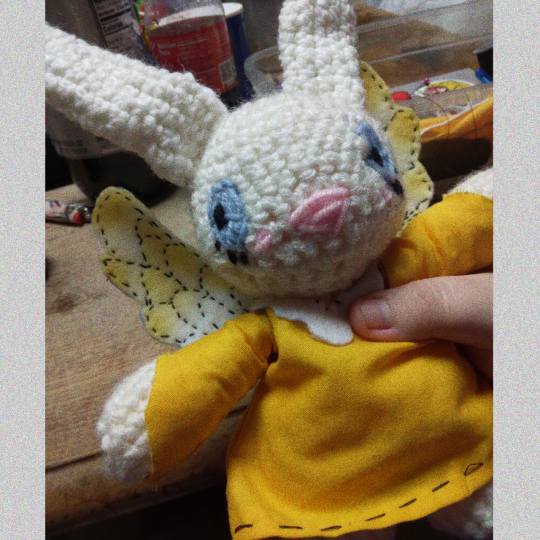
My mom and I were going through some old totes and we found some things from my old Sunday school. We used to do tons of crafts from old cartoons and I found this. I vaguely remember the cartoon she's from- it was like Angel Hare or something? If anyone else remembers it or remembers making crafts like this please do tell! I'd love to relive these memories.
#angel hare#angel gabby#angel gabriel#angel plush#analog horror#unfiction#crochet#fandom crochet#the east patch#online horror series#rabbit plush#bunny#bunny plush#angel zaggy#im mildly hyperfixated#i say as i take a week to crochet and hand sew this
278 notes
·
View notes
Text
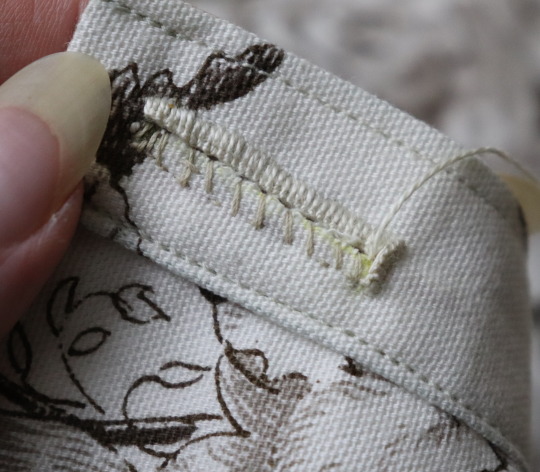
For Solarpunk aesthetic week I finally after like a year of putting it off mended a pair of threadbare pyjama pants I wear constantly. They didn't have holes yet but you could see my fingers through the fabric when I put my hands inside them. It took me most of the afternoon because I kept getting distracted. So I finally put on an audiobook and then hyperfocused so hard I missed my chance to take the bus to therapy. The ADHD has been bad today but! I got something I had been putting off done!
I used size 10 crochet cotton because it's what I had that wasn't embroidery floss (which I didn't want to use because it's not as durable since it's meant to come apart). The fabric was scrap fabric leftover from one of the shirts I made into a crop top this summer.
Patch leg one (inside and outside)

Patch leg two (inside and outside)


It's hard to tell but the second patch has much neater stitches. I also stitched down the ends of thread in the second one.
Finally! I have done the thing! Next is a shirt I found a small hole in, but since the hole is small I am going to just use embroidery thread to fix it.
262 notes
·
View notes
Text

I had to get the image out of my head
(context)
#I love historically accurate Chaos#tl:dr - they both made a shirt (the traditional viking way of proposing) Hiccup is good at sewing. Astrid can't sew for shit.#they both wore the proposal shirt to the wedding#did you know Viking weddings would last for days? imagine Berk partying for a week straight. people would die#vitpost#how to train your dragon#httyd#hiccstrid
311 notes
·
View notes
Text


candy corn sharks heading to their homes tomorrow!! 🦈🏠🎃
#sharks#i love sharks#shark week#shark#ocean#my art#art#artists on tumblr#sewing#shark plushie#plushie#plushblr#plush toy#cute plush#plushcore#handmade plush#plushes#plushies#plush animals#shark plush#plushie community#custom plush#plushies of tumblr
361 notes
·
View notes
Text

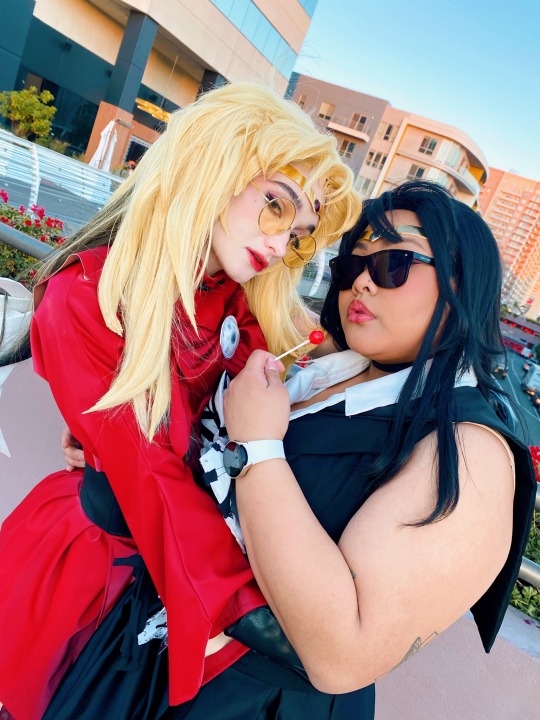
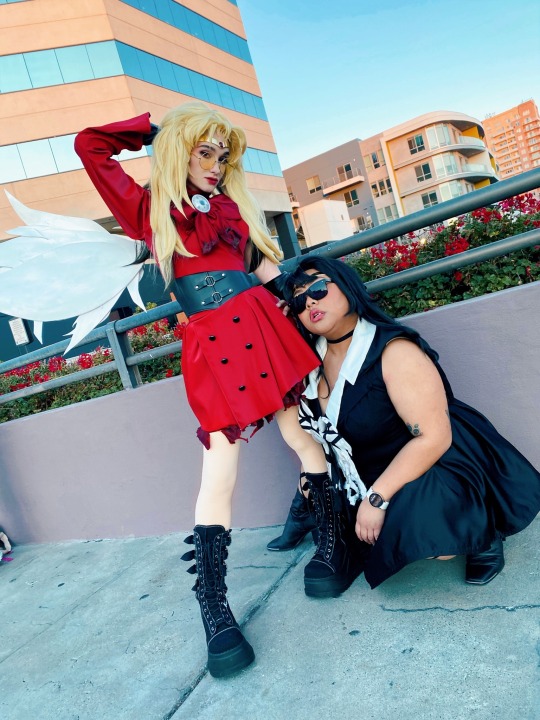
*shoots your doomed yaoi with a doomed yuri beam*
Sailor Trigun at ALA!!!
#I’m so happy with how these cosplays came out they look just like my concept sketches#and I’m genuinely surprised so many ppl realized what we were!#most ppl thought it was just fem vashwood but a lot of ppl knew it was magical girls specifically I’m v happy#hopefully will have milly Meryl photos from ala to show soon#patiently waiting on those from the photographer#bunny sewed me a new longer cape with a better collar and I remade my undershirt for her#ala changed their prop weapon rules mid con tho which was v sad bc I hand painted and made customized stickers for her milly gun all week#and then they stopped allowing any prop guns that weren’t 50% orange :(#we were able to bring it to the Trigun meetup luckily bc it was outdoors but not to our shoot#next time ig!!!#Trigun#sailor moon#pgsm#vashwood#sailor Trigun#magical girls#vash the stampede#Nicholas d wolfwood#what did I name these au guys#sailor gunsmoke#sailor hopeland#???#i think#Trigun maximum#Trimax#cosplay#au#ala 2024#anime los angeles
153 notes
·
View notes
Text

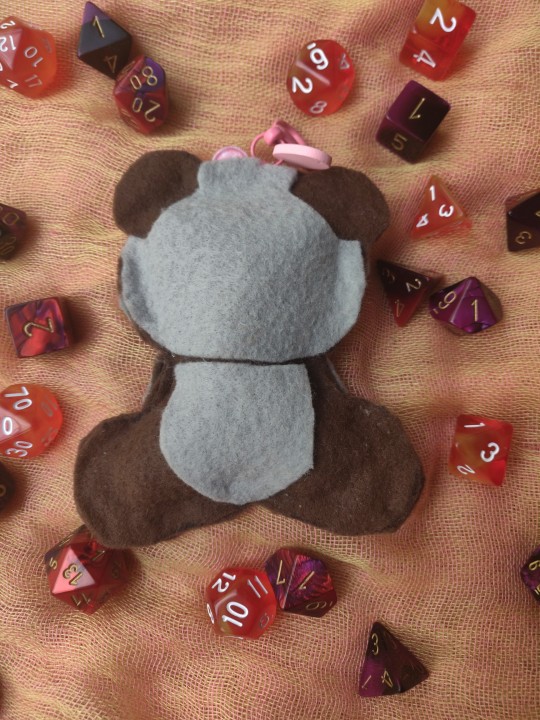
Week Sixteen: Big Boi Trinket Bag Charm
I'm really proud of how this guy turned out. He started as a keychain, but with his size I feel like he'd bea better bag charm. I'm hoping to sell some on Etsy so if you're interested, follow the bouncing link!
#sewing#weekly update#current projects#this week in sewing#critical role#vox machina#trinket bear#vex'ahlia#armored bear#dungeons and dragons#dnd
10 notes
·
View notes
Text
actually while i'm on this topic i'm so salty that i went to art school for a year and managed to learn absolutely nothing. the tutors would just give us briefs and set us free for a week and then we'd come back and they'd tell us how much our work sucked
#i wanted to learn colour theory!!!#i'm sure this method worked for people who already knew what they were doing and what kind of stuff they wanted to make but i was so lost#we had a fashion design week and they didn't even show us how to use a sewing machine
119 notes
·
View notes
Text

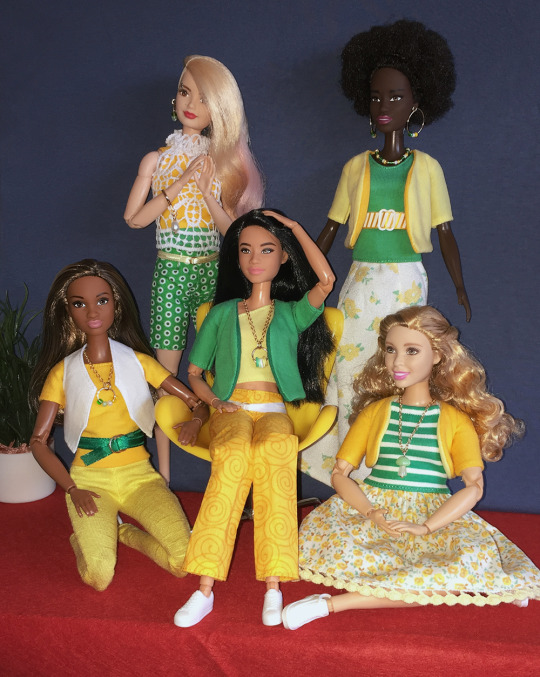
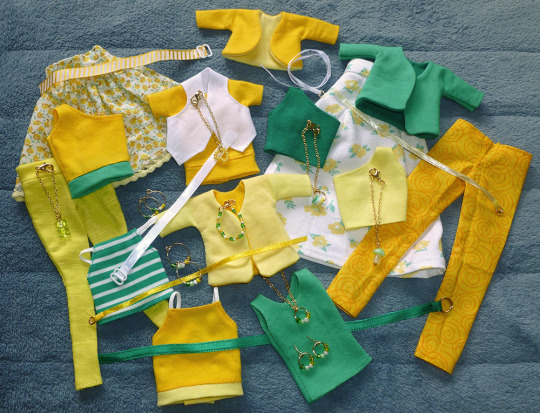
This Aro Week, I'm continuing my adventures in making handsewn aro-themed clothes for Barbie and other one-sixth-scale fashion dolls with my personal favourite pride flag--the allosexual aromantic flag.
Today's post details updates to my original cardigan, legging and trouser tutorials, a new one-shoulder top, and a guide to colour pairings when sewing clothes to suit multiple pride flags.
#aromantic#alloaro#aro week#barbie#fashion dolls#sewing#needlecraft#needlework#jewellery#beading#pride crafts#link#aro worlds wordpress#long post#image description in alt text#and yes everything is sewn by hand#because i don't seem to get on with sewing machines
114 notes
·
View notes
Text

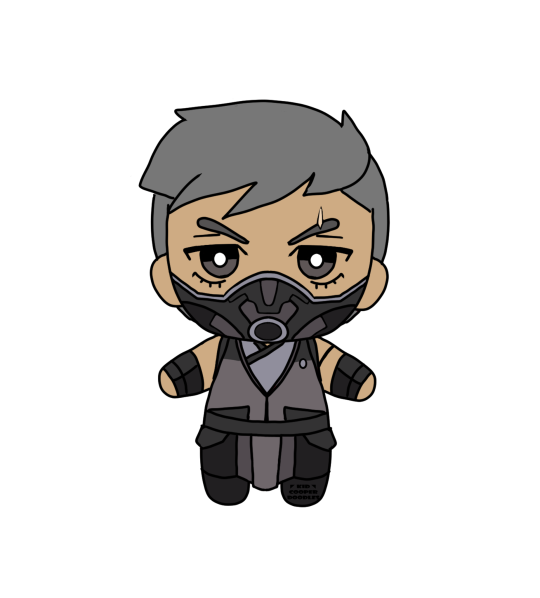
Microorganism Smoke is 10km away
Microorganism Smoke is 9km away
Mic-
Bonus:

Give up all worldly possessions to Smoke
#mortal kombat#mk1#tomas vrbada#mk smoke#he will be real in like a week im sewing my own#you dont understand i need him tiny#i need to hold him
285 notes
·
View notes
Text

HAPPY BIRTHDAY NENE 🐠💚
#project sekai#pjsk#prsk#emu otori#nene kusanagi#Le fishe.#noposts for like 2 weeks sory i havent really been drawing other than trying to finish my last comms lined up. worlds slowest drawer#actually i forgot to post one of the finished comms here...? i feel embarassed postingthem. maybe later#MY BAAACK HUUUUUUURTS#MY FRIDGE BROOOOOKE#LOATHESOME . JICE#um but i rethreaded my sewing machine and fixed it a bit and found out it came with a twin needle...!! waow ! so cool!#its a hand me down form a very nice old lady it gave up on me like 10 hours before i left for a con i crode#i hotglued SO much of my daibanana cosplay together. help. i dont have an iron though so not doing much with it yet#am gonna make my first project sekai cosplay... heheh.....#Dont tell wnyone. I love talking in my tags OMG ACTUALLY#MANIFEST FOR MEEEE. alos OHH MY GOD NO SEKE NO FIND IS MAKING ME EPXLODE I CANT PULL AUUUGUH SAAAKIIIIIIIIII AAAAUGH#emu. cgo rmu... im sorry. emu is lim saki os forever
399 notes
·
View notes
Text

Realizing I can use plushies as bookends is a game changer for me
#sewing#handmade#plushies#my favorite is the s’mores ghost peeking around the edge of the shelf#I made every plushie in this picture except for two#the crocheted little mushroom creature#and one of the elephants (the less spherical one)#all of these plushies have been chilling in a giant ikea bag since I took group plushie photos#and that was…weeks ago? months????#but they are all back up on shelves now#more plushies are with my sewing stuff but I might move more over to my bookshelves
90 notes
·
View notes
Last Seen Blogs

professorarachel
Língua Portuguesa e Literatura📚❤

endurancenuz
Endurance Nuzlocke

j-erk-off
jerk off

diamonddogs-terrarium
Diamonddog