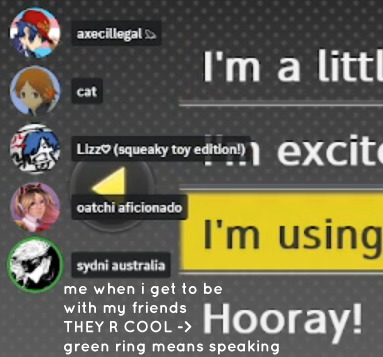
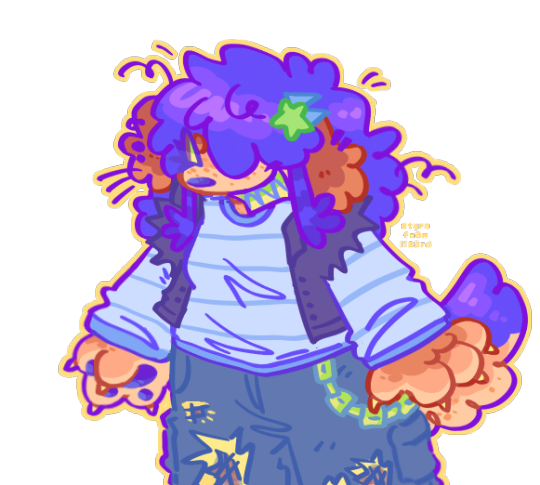
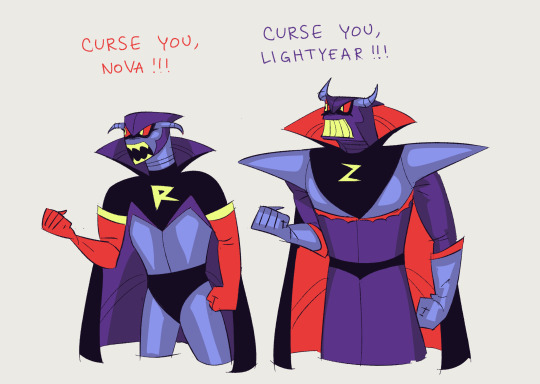
#this is so stressful who DESIGNED this
Text
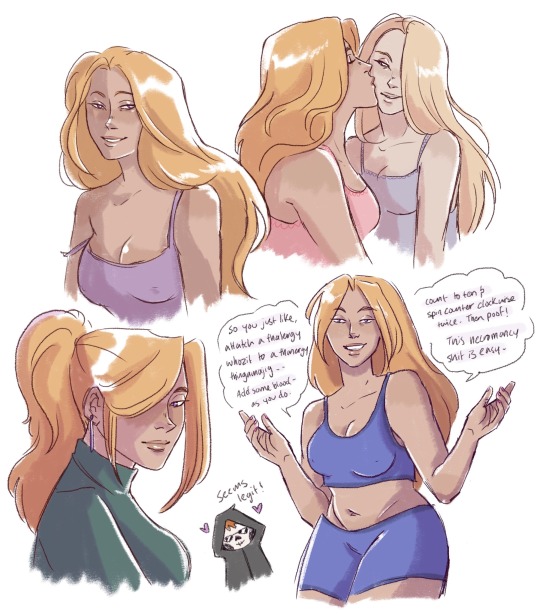
you can crown this bitch with so many crowns
#it is way harder to design a coronabeth who resembles ianthe than it is to design a nona that fits narrow#coronabeth tridentarius#ianthe tridentarius#tridentarii#gideon the ninth#the locked tomb#tlt#these were all stress relief doodles and they got me really wanting to reread gt9#I started thinking about what could happen to these two in at9#I’m almost wondering if corona is going to be the one to kill ianthe#it would be tragic and narratively fitting#I can’t begin to speculate though#tamsyns brain is so big#my art
2K notes
·
View notes
Text
Darla/Angelus is also great because the show has a competing designated OTP and they exist to serve as contrast and hateful competition to THE ship. they are soulless monsters even by the standards of soulless monsters, they literally make the other soulless monsters go "yikes... your relationship seems not good maybe." but they love each other so fucking much. the writers can't help it. they are constantly trying to find their way back to each other. the way she hits him over a head with a shovel and leaves him to an angry mob while he tries to say he doesn't mind dying if it's with her AND the way they coo about it to each other afterwards. the way she takes him back against her better judgement because she missed him so so much but then kicks him out again later because he still can't be who she needs him to be. that's just how they say i love you.
#press says btvs#the thing i appreciate about buffy/angel the shows and the ship#is that it really does set up a designated otp. and like i would argue that for a time at least it succeeds!! who isn't#being sent to hell right alongside angel at the end of season two?#but everyone is having too much fun even in early seasons to just pick a ship and stick to it. they really say you're going to love so many#people in so many ways. sometimes you'll be in denial about it or the way you loved them will feel gross or demeaning or small in hindsight#but like. you're gonna love a lot of people. you're going to have a community. you will also have sex with a lot of people#probably.#the overlap between these two categories will be a source of much conversation on the internet#incidentally thank u to the comic strip goofus and gallant for perfectly exemplifying a particular kind of morality play and having a fun#little name. your contributions to online discourse should never be discounted#da is not the goofus to ba's gallant but you kind of expect it to be going in#anyway i'm so glad they decided to expand their family/polycule#even if the mixed metaphors got my tumblr temporarily suspended like i cannot stress how much they mixed those metaphors IN THE TEXT#I DIDN'T DO THAT. drusilla did that. Darla also did that a little
146 notes
·
View notes
Text
so you want to use OBS
hello! i’ve decided to compile information on my OBS setup and some resources that have helped me along the way. this is mostly for personal reference, but maybe others can make use of this information!
some notes before i get into it:
i use OBS for both offline recording and (twitch) streaming. any footage i record is edited using DaVinci Resolve 18, which is free.
most of my OBS captures are of video games (through a USB capture card, specifically elgato), and the occasional screen/application capture (like clip studio paint, and sometimes PC games).
as such, the information here is reflective of these experiences. this post is not comprehensive to all of OBS’s features- this is just an overview of the settings and configurations that are most relevant to me.
with that out of the way, all the information will be under the cut!
Basic Setup
file format:
how to change: settings -> output -> recording -> recording format -> press “apply” once finished!
I save most of my recordings as .mkv files- it supports multi-track audio! i prefer .mkv over .mp4 because if your power goes out, you still have a recording to work with.
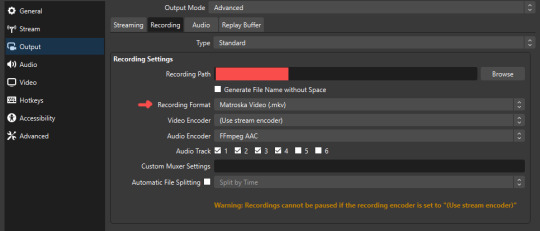
.mkv files can be read by DaVinci Resolve without an issue- but for Adobe software, they'll need to be remuxed to .mp4 within OBS! (file -> remux recordings -> press the … to select a file -> press the “remux” button)
video resolution and framerate:
how to change: settings -> video -> output (scaled) resolution
my obs canvas is @ 1920 x 1080p (16:9)
i switch between 720p and 1080p as needed! if you're concerned about space, you can probably just go for 720p. i also record at 30 fps, simply because that’s what my capture card supports.
video bitrate:
how to change: settings -> output -> encoder settings (located in both the streaming and recording tab) -> press “apply” once finished!
bitrate is a bit of a doozy to explain, but the most important thing to know is that bitrate affects your video’s quality. lower numbers = lower quality, while higher numbers = higher quality.
generally speaking, you'll want higher bitrate when you're recording things with high depth of information (e.g. you’d want a higher bitrate for something fast-paced like splatoon, compared to a slower-paced game like animal crossing).
my video bitrate is either set to 3000 or 4000 kbps! and here's some of my other (related) settings while i'm at it:
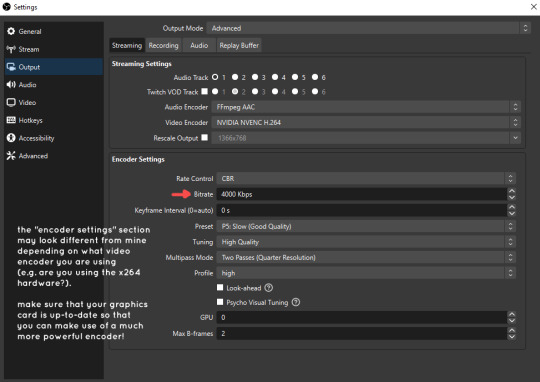
you can put your bitrate at much higher values than me if you're a stickler for quality- but keep in mind that a higher bitrate means:
bigger file size
more information to upload (when streaming)
your computer will need to encode more
i’d recommend reading twitch’s guidelines on encoding, bitrate, resolution, and framerate to get an idea of what values to pick. for people who are doing offline recording or streaming on a different platform, i suggest googling the appropriate resources!
multi-track audio:
this is mostly applicable to anyone looking to do video editing!
multi-track audio basically allows you to separate your audio sources (e.g. discord, game audio, and your own microphone) into different tracks.
this is an immensely helpful tool because it lets you adjust audio levels in post-production (editing). some examples of how this can be used:
increasing someones microphone volume if they speak too softly
increasing/decreasing game audio
muting swear words/sensitive information
completely muting voice call + microphone if you want to upload a no commentary video
and more!
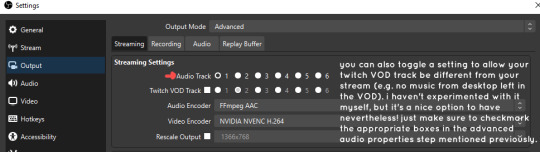
to set this up, take a look at your audio mixer panel, and press the ⚙ icon. this will bring up advanced audio properties.
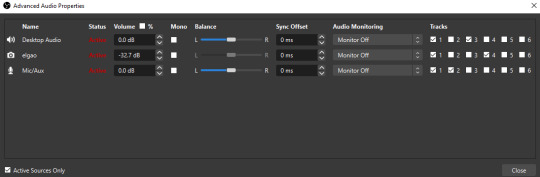
by checkmarking a track box, it puts the audio on that track. to make the above screenshot easier to digest:
track 1 consists of ALL three audio sources- desktop, elgato, and microphone.
track 2 only has the microphone audio.
track 3 only has desktop audio (i use this for voice calls)
track 4 only has the elgato capture card audio (game audio). the volume has also been lowered so that any speaking voices can be heard clearly.
tracks 5 and 6 are unused.
you might be wondering, “why do all three of these have 1 checked off?” this is what i call the universal audio track. i recommend having a universal audio track for a few reasons:
when you stream from OBS onto twitch/youtube- you have to select ONE audio track.
it’s also a nice backup in case you didn’t separate your audio correctly.
if for whatever reason you need to move around your individual audio tracks in editing, the universal track acts as a nice reference point.
mark off your audio tracks for each audio source as you see fit! once you’re finished with the advanced audio properties, go to settings > output.
for the streaming tab, you’ll want to have the number of your universal audio track selected. in my case, that will be audio track 1.
for the recording tab, checkmark all the audio tracks that are applicable to you (in my case, audio tracks 1, 2, 3, and 4). by default, only audio track 1 is selected.
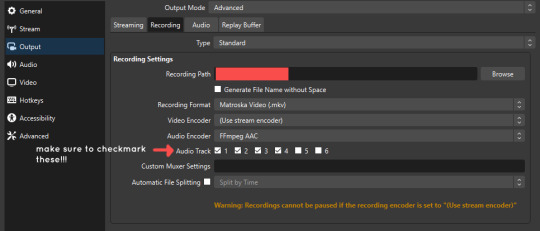
if you don’t check off the additional audio tracks in the output > recordings section, you will not have access to those audio tracks in editing, and you won’t be able to edit your audio tracks independently of each other. so don’t forget to do this! 👍
custom browser docks
custom browser docks are a great tool for when you’re streaming and want to have access to your twitch chat and/or activity feed! (or if you wanted to have some other web browser on OBS).
to create one, go to docks -> custom browser docks.
you’ll be given a table interface that asks you to put the dock name and URL. for streamers who want to have chat and alerts available, do the following:
on twitch’s homepage, go to the upper right and click your icon
then, click creator dashboard
once you’re on your dashboard, go to stream manager
click the vertical “...” on my chat OR activity feed.
press “pop-out chat” OR “pop-out activity feed”
copy and paste the link into the table back into OBS
press apply once you’re done
click and drag the docks around at your leisure to put them where you like!
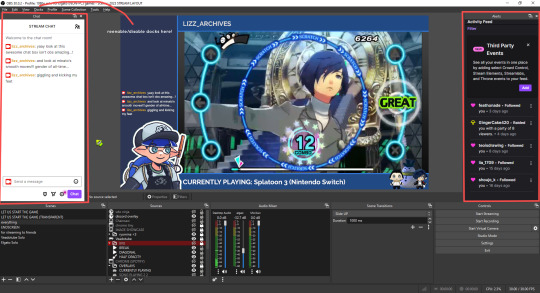
if you ever decide you don’t want to have something on your OBS dock (or want to bring something back), go to the toolbar, click “docks,” and click the appropriate dock!
third party things
a section of optional things that you may enjoy having.
streamlabs alerts
this is basically for anyone who streams and wants to have their chat and/or follower notifications visualized on screen!
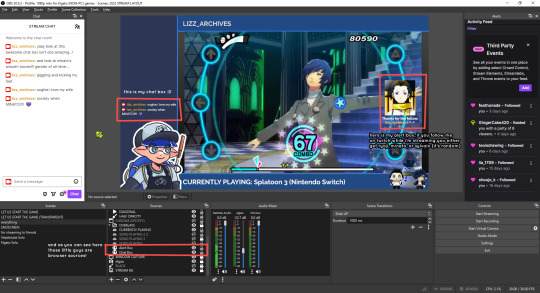
streamlab alerts can be added to OBS by adding a browser source into your scene, and the specifics can be customized on streamlabs itself. it’s pretty self-explanatory, so i’ll just leave a link to streamlabs website, where you can log in using the streaming platform of your choice: https://streamlabs.com/
discord overlay
this is a browser source that can be set up to show people who are in a server's voice chat and who speaks. i recommend this to people who make multiplayer content- it can help viewers distinguish who is who but also it can be helpful in editing.
to set this up, go to https://streamkit.discord.com/overlay, click “install for OBS,” and after logging in with discord, go to “voice widget” and click the server and voice channel you want.
you are able to apply CSS if you'd like more control over the visuals, but the standard layout tends to work fine for me! a search of “discord overlay css” on youtube can help you get more information.
veadotube mini
this is a pngtuber software that a friend recommended to me! no webcam is required- mouth opening and closing is based on your microphone input!
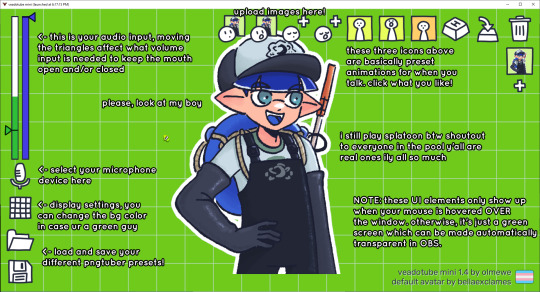
you can download it here (it’s pay what you want!): https://olmewe.itch.io/veadotube-mini
for a proper tutorial on how to use it, i recommend checking out the app's documentation, which you can read here: https://veado.tube/help/
source record
have you ever wanted to stream something with a chat overlay/layout, but wanted your recording to ONLY be the gameplay? or maybe you wanted to record BOTH your gameplay AND your webcam so that you can have a crisp zoom-in on your webcam!
source record is a third party plugin that can help you with that!
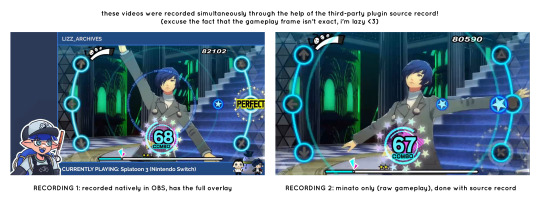
the general gist of source record involves applying the “source record” filter on either a scene or source, and customizing the encoding settings accordingly. the exact details of how to set it up is beyond the scope of this post, so I'll just direct people to this video instead (it was very helpful to me):
youtube
⚠ a quick note about source record: this plugin can be intense for your computer. be sure to do test recordings and the like to see what your computer can handle (and see if the recordings come out the way you like). it took me a few tests before i settled onto something i liked!
you can download and install source record here: https://obsproject.com/forum/resources/source-record.1285/
vdo.ninja
have you ever wanted to do a collaborative video or stream where you feature someone else’s video on your stream? or maybe you’re doing a multi-person streaming event! vdo.ninja is the perfect tool for you!
vdo.ninja turns your OBS virtual camera into a browser source link- which your collaborator can add on their stream! this is a new tool that i’ve added to my arsenal recently- since my friend and i are planning to stream a side order challenge together! i’ve still got to iron it out a bit more, but i like what i’ve used of it so far.
try it out for yourself at their website here (with documentation and demos available on the homepage!): https://vdo.ninja/ (no downloads required!)
ok! i’m set up! what now?
and with that, that’s all of the settings and tools that i thought would be worth mentioning! while most of my setup was written with video games in mind, some of these plugins and setups may be applicable to other types of videos (e.g. tabletop gaming with a physical camera)!
now that i’ve outlined all these settings, i have one more thing i have to say: regardless of what you're using OBS for, do a test recording before doing anything “official” with it. this recording can be as short as 30 seconds. it’s a good habit to develop that can make sure your streams/recordings turn out the way you want them to!
here are the kinds of things i like to check! it’s not an exhaustive list, but this can be a starting point:
video:
does my video look the way i want it to (and can my computer handle that)?
can my computer handle the load of encoding? - OBS will note in the bottom if the encoding is overloaded. if it can’t handle it, turn down your bitrate or adjust other encoding settings (e.g. i had to toggle psycho visual tuning OFF because it was causing lag)
this is especially the case if you're recording PC games- you don’t want to have slowdown on either your game or the recording!
audio:
are my audio sources (e.g. desktop audio and microphone) correct? - if you plug/unplug devices a lot, be sure to check this (settings -> audio).
are any of my audio sources muted? - make sure you don’t have anything on 🔇 if you don’t want it to be muted! otherwise the audio will be lost forever… (i lost my friend’s VC audio once… it was sad)
are my audio tracks separated properly? - requires you to boot up your editing software, but it's worth doing! for the test recording, just have something from all your sources playing at once, and see if your editor has things separated into tracks.
can i hear the voices clearly? or does the music and/or game overpower them?
if for whatever reason your OBS crashes, or you want more information on anything “critical” or “warning” worthy in your set-up, you can go to help > log files > upload current log file > analyze. crash logs currently can’t be analyzed by the log analyzer- but they’re a valuable tool when asking for help on the OBS forums!
and that’s all! for real, this time. i hope that some of these tools and settings can help anyone wanting to get more out of OBS. there’s definitely other things i didn’t touch upon (e.g. audio filters for noise compression, suppression, etc.), so i suggest doing your own research and trying things out!
happy recording/streaming, and thanks for reading! ✨
#lizzy speaks#this was a fun little write up!! i've been slowly getting some of my friends into video making teehee and its SO FUN!!!#(digital) video is like one of my other passions next to art. everyone say thank you splatoon for getting me back into it again <3#i've been using obs since like 2018 so i wanted to share some of the things i learned for funsies... i really love video...#but also i like having reference posts like this in the case people have questions they want to ask me...#because i don't always remember what video tutorials i watched and it's nice to document that somewhere...#warning to anyone who reads it this is like 2.1k words. i do want to stress that this isn't comprehensive but there's still a lot of info#that i wanted to put for this post...! that said topics like designing your own stream layout + assets for it are NOT in the scope of this#post and nor is this a beginner's guide to obs (i wrote this with the assumption that you know how to record and/or stream and that-#people already have an idea of how to use scenes and the different types of sources obs can use).#i hope everyone's had a lovely march 5th! i would love to look at the fanart but im still not done with reload...#but im hoping to finish it by the end of the month!!! yipee!!!#Youtube
44 notes
·
View notes
Note
I've been thinking a lot about Lunar's different designs, and would love to ramble about them a bit, if you don't mind!
All of this is, of course, completely self-indulgent, and my own interpretation!
Now, Lunar has three official VR models. There's the most iconic one, with the crescent moon, the cuter version of moon, and of course his current one!
For simplicity, I will refer to them as "Crescent", "CutieMoony", and will call his current one "Pastel".
There was one other design, his very first, which was shown in the thumbnail, though in the actual show was just a very pale recoloring of moon, and only shown in reaction videos.
Though it was never canon, I do still have my own interpretation to that as well!
This one, I will refer to as "Pale".
"Crescent" is most important design, as it brings meaning to the rest.
It lays the foundation for everything else, as it is his real design.
It's what he automatically glitches into when he's under high stress.
Most importantly, it's what he's been shown to look like in every other universe.
Lord Lunar, Lunara, swap Lunar, all of them are the same.
Crescent is universally shown to be his real self.
"Pale", on the other hand is, simply put, what Eclipse wanted him to be.
Something easily pushed into the background, something mild.
Something to sit by quietly, to take what is thrown at him.
Pale is the opposite of who Lunar actually is.
Interestingly enough, his design in the thumbnail changed the day Moon returned, the day Lunar finally decided to cut off his puppet strings and reject Eclipse.
That day, he rejected the image Eclipse had crafted for him,
and his design, pale and barely there at all, bloomed into something bright, something noticeable.
Lunar finally became themself, no longer bound to their purpose.
"CutieMoony", is the opposite of Pale, as it's what he chose to be. This design, to me, truly underlines Lunar's relationship and appreciation for old moon.
He already has an actual design, one designed by his brothers, one that's truly him, in this universe and every other, and he can change into everything he wishes to be, yet he chooses to look like old Moon.
Old Moon, who knew him best, right after Monty.
They have shared the same body, and old Moon has seen the dents and hurt left in Eclipse's wake.
He is the one Lunar ran to, when they couldn't bear the abuse anymore, the one they cried their heart out to.
And despite what Lunar did, even under the influence of someone else, he met them with nothing but care and concern.
He listened to them, and visibly tried to reach out, only to hesitate and hover instead, for his hands were only ever used to hurt before, something Lunar knew.
He didn't force them to stay outside, and took their place, didn't even hesitate when Lunar asked him to be his brother.
He is the first one who tried so hard to be a loving brother, arguably trying to be what he couldn't be for Sun, at least not in the beginning.
He actively supported their interests, remembered what they liked.
When Sun scared Lunar in a horror game and made them cry, Sun panicked because Moon would hear, showing just how much of a protective barrier old Moon was for Lunar.
By taking his appearance, Lunar truly showed how much they looked up to him, and how safe he made them feel, considering they took this appearance while they were trapped by KC.
Another thing to note is the red and yellow accents, very reminiscent of Sun, showing how much their bond has grown since the rocky start.
Last but not least, there is "Pastel".
This design definitly has a lot of interpretation to give, but my favorite to focus on is the raw wrongness of it.
Because we know what Lunar looks like. He's supposed to be vibrant and blue, yet this body is purple and mellow.
Ironically enough, it's very similar to "Pale", the very personification of what Eclipse wanted him to be, showing the permanent mark he has left on them, as well as their mental state.
Their energy isn't genuine anymore, it's a distraction and exaggeration to run from the mess left in their head.
There is also the divinity inside of them, reflected in their eyes, showing them that now, they are more than just Lunar.
They are part of something much bigger than themself.
This body, in every sense of the word, is not their own.
It's something they might never see as a home either.
Another irony is how it once again links them to Eclipse, who himself is in a body not his own.
His body is a literal copy after all, not to forget that his "real self" was universally shown to look like Solar, minus God Eclipse.
This was a rather long ramble, but I really needed to get it out of my system! The brainrot's been growing steadily-
Thank you for reading!
-Stardust
BELOVED STARDUST ANON I'M GOING TO START DOING FLIPS OVER HOW EXCITED I AM ABOUT THIS OH MY GHOD
I don't even know what to say other than these are all a fantastic observations and that I am wholeheartedly accepting these into my soul forever I think
#asks#stardust anon#anon#THIS IS ALL SO IMPORTANT 2 ME....... U JUST DISSECTED THE FUCK OUTTA THIS LITTLE ROBOT I'M GENUINELY SO ENAMORED#i'd kind of rotated before the fact that lunar had /also/ gone thru multiple bodies/designs like eclipse had and how there's likely some-#-fun ideas you could make outta that but i never actually like#/THOUGHT/ ABOUT IT#I KNOW I SAID THIS ON UR LAST BIG RAMBLE BUT I CANNOT STRESS ENOUGH HOW ABSOLUTELY HUGE YOUR BRAIN IS FOR THIS AHSJWBSJSN#ghooooddd could you imagine if part of lunar's arc is learning to comfortable w/ themselves again#and it leads to them having the Crescent body/a new body that reflects more of who they are now#and they're Happy and Okay and Nothing Goes Wrong 🙏 GDJWHDJS#sun and moon show#the sun and moon show#tsams#sams lunar#lunar sams#laes lunar#lunar laes#lunar and earth show#the lunar and earth show#tlaes#lunar#long post#other's thoughts and rambles
20 notes
·
View notes
Text
Tip for people who sit cross legged a lot: when you get up and stretch, twist your legs inwards and outwards a couple times to stretch out the pectineus muscle. It has to stay contracted to keep you in that position, and it gives you hip pain if its upset.
#the pectineus muscle is a trooper#support NDs everywhere with the urge to sit cross legged#you can also massage the pectineus muscle if sitting cross legged is painful#but girl it will not feel nice (even tho you will feel so much better afterwards)#anyways follow for more physiotherapy tips that no physiotherapist seems to know#(none in internet pop media or who I've personally met. most of these are ones im finding on my own because i have a body that is designed#to speedrun repetitive stress injuries the likes of which youve never seen)#bonus physiotherapy tip: most common aches and pains can be addressed with self-massage
27 notes
·
View notes
Note
Your art is very lovely, I adore the way you put things together and your character designs are memorable. I hope you're feeling better <3 If not right now, soon!
Thank you so much! All I want with my art is to make characters that feel a special blend of unique yet familiar. Like meeting a real person, I want them to feel like a cartoonized version of someone who could exist :3.
And thank you for your concern as well. I'm feeling a little better the last couple of days, I just get really stressed out during the holiday season and it brings out all the nasty in my brain x_x.
I hope you are doing well too, and if not now then I wish for wellness to come for you.
#christmas wasnt so stressful before i married into a. very christian family#which its fine all the decorations knock my socks off#but i come from a family who does fuck all for xmas & also doesnt keep in close contact with extended family#so suddenly having to deal with all that is definitely a weight on my shoulders lmfao#anyway you didnt ask about all that.#im really glad the characters i design are pleasing to the eye#it makes me so happy to hear
26 notes
·
View notes
Text
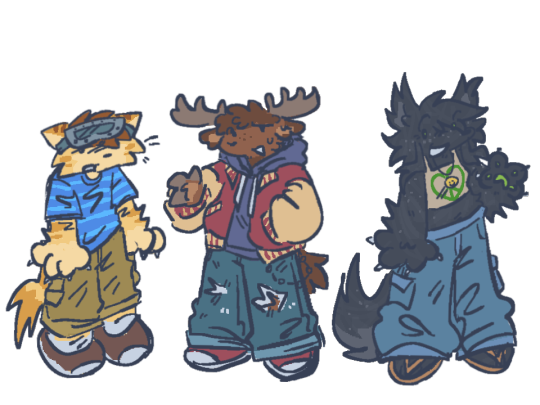

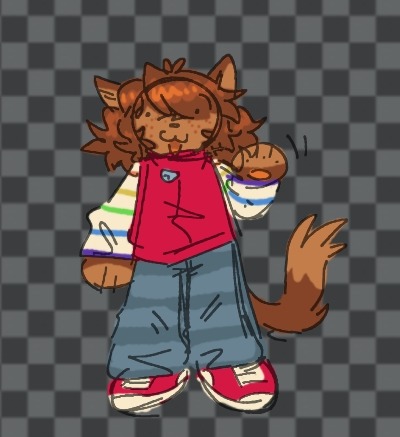

uhh heres some oc art 👍
#ignore the shitty formatting idk what im doing#scribbles#ocposting#designs in the first one r kinda rough i havent figured out color palettes for two of them yet#i hate designing outfits im so bad at it 😭#oh also character in the third image was designed by @/cybercreature on . scratch. lol#i should talk abt my ocs man … none of these guys have actual stories or plots but like they have . vague lore yknow ?#like the first three are the lps ocs i mentioned in the tags on the previous art post uhhh okay everyone in the middle#row doesnt have lore but thats okay. its fine. who care#and the bottom row are my silly mascot esque guys#not that they are mascots for Me but that theyre like. meant to evoke those sorta designs#idk if that makes sense or if i even did that well. lol#uhmmmmmm yeah idk where i was going w this#i have soooooo much art i could post but i hate tagging stuff =\#like idk i hate attention being perceived stresses me out so bad#but also i want ppl to see my stuff yknow?????? i like sharing my art????????? idk#i think theres smthn wrong w me /silly
15 notes
·
View notes
Text

Get real!!!!
#what if i#boy who struggled so hard with making it simple enough for me to comfortably recreate but also i love adding pointless things ill forget so#see how long it takes for me to completely forget to draw the second smaller pin on the jacket#heavy metal core who is definitely very much a core and not a turret thats just convinced everyone that they're a core nuh uh#one day ill think of more ways to making my turret android designs more distinct from cores bc rn they kinda got the Octoling treatment#which is technically different species but the differences in base appearance are actually pretty minor like its just the suckers and eyes#but im not gonna stress myself over it but its something ill get to whenever i feel like it#unfortunately i had a stomach ache so ended up sleeping until 4pm then getting to play games with my friend gave me motivation at 11 pm#i should really just write how my day was in a separate post bc i talk a whole lot <3#heavy metal core#heavy metal core aperture tag#portal 2#aperture tag
11 notes
·
View notes
Text
#i think i first listened to this song around the time Behind The Codes became an official project#My brain probably associated the feelings of excitement and fear with the song so ig that's why I love it so much#On one side. I love working on the Behind The Codes#there's an overwhelming amount of ways to tell this story: brainstorming. designing. animating. writing and rewriting until your brain-#starts to fry and get foggy with so many ideas. its both good and stressful to push your limits like this#On another side. I'm constantly anxious about it#I've always been afraid to admit the things I enjoy as well as the things that i create#You don't allow yourself to create and embrace new things even when you're essentially alone#and yes I'm aware of the fact that there will be people who won't enjoy the series- which isn't what bothers me#What bothers me is that I might regret certain decisions#'This is not the message I wanted to convey'#'This is not the story I wanted to tell'#The decision to share this song here is the clearest example of what I mean:#Part of me says: this song is so btc oh my god please put it at the end credits wait THERE IS A 2ND PART OF IT AND IT'S EVEN COOLER OOOAAAA#then there's the main thought: this song is so stupid. it's so corny in a way it makes me uhghu7ujhkjg..#i won against my negative thoughts today. yay#this whole post is just me rambling and being anxious. i dont even know what to say hjdsfbwjkefkdsf#bye :waves:#starbstalks
27 notes
·
View notes
Photo
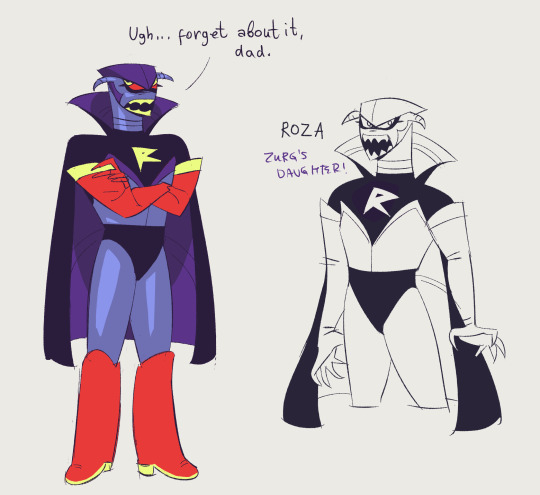

QUICK FYI.? in my blosc:the adventure begins remake there would be a whole new storyline where everyone is convinced that buzz is zurg’s son because like 20+ years ago zurg created an offspring in a capsule but got bored very quickly and sent that child into space. and buzz was found in space debris and adopted, so it all makes total sense. but in the end of the movie zurg learns about this and laughs because that offspring 1. was tooootally evil 2. was a genetic mutant alien with horns 3. was a girl. ok? and in blosc:the movie:the remake:the sequel this daughter, roza, is a major villain who instead of conquiring the universe wants to destroy it completely and zurg has to show her that universe is actually a great place when it’s not in shambles and also that she doesnt have to be mad bc people could care about her (like her dad for example!!!) <3
#buzz lightyear of star command#evil emperor zurg#roza#drawpost#origpost#i use the word dad extensively because i am horrified that if someone sees the art without reading the LORE theyll think roza is zurgs gf#so hmmmm character concept notes#her name is roza because i needed the letters Z and R because theyre evil#and roses are beautiful yet prickly! which i think can suit her well:)#her design is obviously heavily inspired by zurgs except i gave her pants because i think its funny that shes in pants and zurgs in the robe#feminism ever heard of it#roza is hellbent on destroying the universe because shes very bitter at having been abandoned by zurg#and she has never been rly loved/felt like someone cared about her i think#shes also smart and strong and cooler than buzz at everything which leads to him having a wicked identity crisis lol#um and she has rivalry with mira because roza is part tangean herself and they r the only people who can fight each other bc of ghosting#also while mira is doted on by her dad roza is oppositely abandoned and forgotten. character foils etc.#roza is (and i cannot stress this enough) part-alien. many alien. so many alien oh my god she has genes for days#but! she has a lot of flaws because of her hypermixed heritage. this species is allergic to salt this one gets headaches from orange color#etc.#roza is WILD for me because i made her up and she fit into my image of lightyear/blosc universe so perfectly#...so many dad zurg content... so much funny bickering villains....#oh yes and in the first movie she would be introduced only in like a pre-credit teaser scene!!!!!#everyone laughs and maybe 1 person remembers that thing with zurg having a daughter apparently#HARD CUT#to a sinister montage of a person in zurg type fit walking through a scrappy but very lived-in spaceship....#and stopping near a monitor which displays zurgs face on it....#the mysterious person touches the screen and says The Time Has Come....#(they blow up the monitor and zurgs face with a NAAASTY gun)#...Father.......#(AND THE AUDIENCE GOES WIIIILD)
58 notes
·
View notes
Text
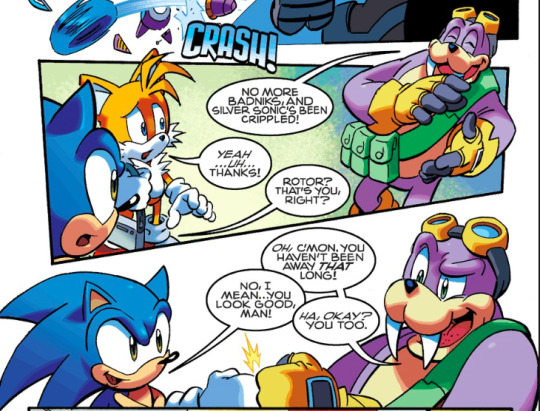
Sonic: i ain't believing this
#so apparently the fandom kinda hates this design for Rotor but i like it#i reminds me the boom series and i like the boom series#i didn't like Rotor other design cause he weird and old like Rotor is around Sonic's age he looked like he was 45 going on 50#like somebody's grandpa like i know he looked like that because of stress and other situations but i didn't really vibe with that#i never really liked the big type characters to began with but i can get behind this#say what you will that's my taste and if im wrong let me be wrong i can like things#rotor walrus#sth#EDIT When i say “i dont like big type characters” i mean Tall there is nothing wrong with big charcaters or tall characters#I just like characters that are small and when i say small im talking tiny or short i did not mean to offend anyone who is fat#For what it's worth Sonic is fat and we appreciate fat people here#i apologize again
15 notes
·
View notes
Text
ever had a day you felt you just could not exist?
#today was that day#it’s like my mood and physical symptoms decided to get together against a common enemy (me)#:/#i think part of it is the ongoing stress from the doctor situation#plus the pca i started working with who i thought i could rely on#told me last night she basically can only do things around the house during our designated time slot#i cannot drive#we do not have public transport here#so if hubby is working down town i don’t have any way to go or get many things#and i thought i could count on her and that would be one less thing on my stress pile#but noooo apparently#sigh#not kuro#personal#btw this isn’t a suicide thing#it’s more like….#uh how to explain#idk like my brain and body kept giving me the blue screen of death so i couldn’t work today#🤷🏻 a very inelegant and not quite accurate metaphor but here we go
8 notes
·
View notes
Text
Can ya'll please let women be dirty, or unkempt, or fuckn idk, not overly sexualised and feminised? Can ya'll let women have their natural bodies without objectifying them? I'm fucking begging you to stop sanitising the appearance of your female characters.
#please#im begging you#please . as a dirtbag woman i need dirtbag women solidarity#i need that precious representation#Dirtbag Women#dirtbag women please#women that have not washed their hair in weeks#women who have not brushed their hair for even longer and don't style it because they can't be bothered and havent had a cut in months#women who have not washed in a week#women with dirt on their face#women without any make up because they cannot be fucked#women wearing the clothes that have been in the corner of their room on the floor and later realise when they're out it's got marks all ove#women walking around without a bra not because they have intention but because they can't be bothered to wear one today#women coughing and sneezing into the inside of their shirts#women who absolutely do not have a skincare routine and not out of pride they just cannot be bothered#women that want a boyf or a girlf but they don't have one because it stresses them out too much or jus cant be fuckt to date#or women that don't want to date anyone because they cant be fcuked#Like I'm so glad there are more fantastic female characters being written and designed who are actually allowed to be Human#but they still look WAY too manicured#and if they don't look manicured then it's a fucking Character Journey (retchhh) for them to get Manicured#NO.#LET WOMEN NOT GIVE A FUCK HOW THEY LOOK.
11 notes
·
View notes
Text
gnna be honest im like genuinely and profoundly horrified by how little knowledge and understanding most therapists and psychiatrists have. it's actually shocking how everything they know is at base level and only covers the most "usual" mental health issues such as depression. even after years in school it's still like they're only capable of applying their very limited knowledge on "normal", neurotypical and healthy people. they actually have no idea how to treat people who are mentally ill. therefore they only cause ever stronger feelings of isolation, alienation and wrongness upon their patients
#the help i've gotten is ridiculous. it's like they can only treat a normal person who just had a rough patch at work#and is going thru a divorce so theyre extra stressed#thats the limit of who they can help lmao#like... it makes me so dejected#to have finally ubderstood this#if ppl do experience that therapy helps them thats great! it's lucky to come across the one or two therapists that are actually good#but like 9/10 times thats not the case#the mental health care system is crazy and it is NOT designed to actually help anyone who experience mental illness#IF you even manage to access help bc unless you create issues for society they'll just keep turning you down#idk i can write 20 pages on this bc there's so much to say#but the bottom line is. there is actually nowhere to go for mentally ill ppl. no help unless you're very lucky (or rich)#it's extremely dejecting and thats why i lowkey hope a lot of ppl who struggle will never come to this realization#when you open your eyes to reality and see how hopeless it all is you're completely alone and helpless so just live on that false hope#anti psych
14 notes
·
View notes
Text

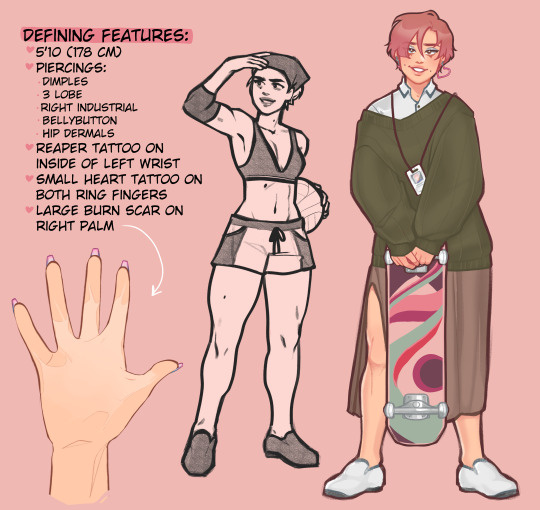
finally got around to doing this! bambi's my mc for all yan games, but here's her design for @14dayswithyou specifically! more details under the cut (tw for burn scar) ♥
also rare jpeg of bambi when she finds out ren was just a persona and he's been lying to her the whole time:
#i like to think bambi's hairstyle is like.. haruko insp. bc she thinks his design is very gender#but in a way that's sneaky and appropriate for work#so when she sees ren for the first time she's like *spiderman pointing meme*#she also just recently picked up skateboarding since returning to corland bay and is NOT good at it#getting to an from work without embarrassing herself in someway is doable but nothing more complicated than that#mc: bambi#14dwy#14 days with you#my art#also her whole vibe is like.. she seems very put together#but it's mainly because her coping mechanisms#are things people associate with people who have their shit together#like she stress cleans#100% will show up at her friends' apartments#when she's had a bad day and clean everything#if she's already cleaned her own house#exercises A LOT but it can get to a point where#people are like#okay there's something a little wrong with u huh#like that calvin and hobbes strip where the dad is like#what could be better than a saturday 6 mile run at dawn in 20 degree weather followed by a big bowl of plain oatmeal and dry toast#or the one where he's out biking during a blizzard#when she lived in the city she also did wrestling and she LOVED being a heel#i def think she'd like to keep doing that but she's still settling into life back at corland bay and not sure if they have much of a#wrestling scene there#anyway all that to say she's very that meme that says fuck yoga i need to break a car with a hammer#very put together looking but one bad day away from throwing all of her dishware out the apartment window
124 notes
·
View notes
Text
*through gritted teeth* what the fuck do people want from a resume
#this semester i've had three different people look at my resume and all three of them were like contradicting whatever the other person said#one said add references. the other said don't add references. the other said no add them back in#one said add color. one said only do black & white. one said no you should have color#also in terms of content they all differed as well like. guys i just want to get this fucking internship so i can get out of here#i appreciate the feedback but i think it's made me more stressed in the long run#alex’s inane ramblings#plus just now finding out im gonna need to do a fucking seminar probably in addition to my internship unless i want to do 4 credits of#internship. i fucking hate seminars. and it's taught by my advisor who i like. but he knows how fucking quiet i am and calls me out on it o#the daily. which gets on my fucking nerves let me tell you#im the most non-english-major english major to ever exist#don't make me talk. please dear god don't make me talk#plus in this seminar we would be writing a 20 page paper. on american romance lit.#sorry dr. phillis but that sounds godawful#and if i decide to do the seminar it conflicts with another class i need to take so id have to talk to my graphic design advisor about maki#a substitution#hell on earth. why the fuck is graduating so goddamn hard#i don't have enough credits to be staying an extra semester so i have to get this all wrapped up by december#alright im gonna shut up now. college is hard guys
6 notes
·
View notes
Last Seen Blogs
humblezombieponders
humblezombie ponders

couple
くコ:彡

katsitsiyo
Katsi’tsí:yo Columbula

scamlifeguard
ScamLifeGuard
pandoranotebook
pandora's notebook