#shoe tutorial
Photo

I updated an old shoe tutorial I did and changed it a bit for the better.
This is just a basic break down, but it still helps me a lot when drawing shoes.
338 notes
·
View notes
Text
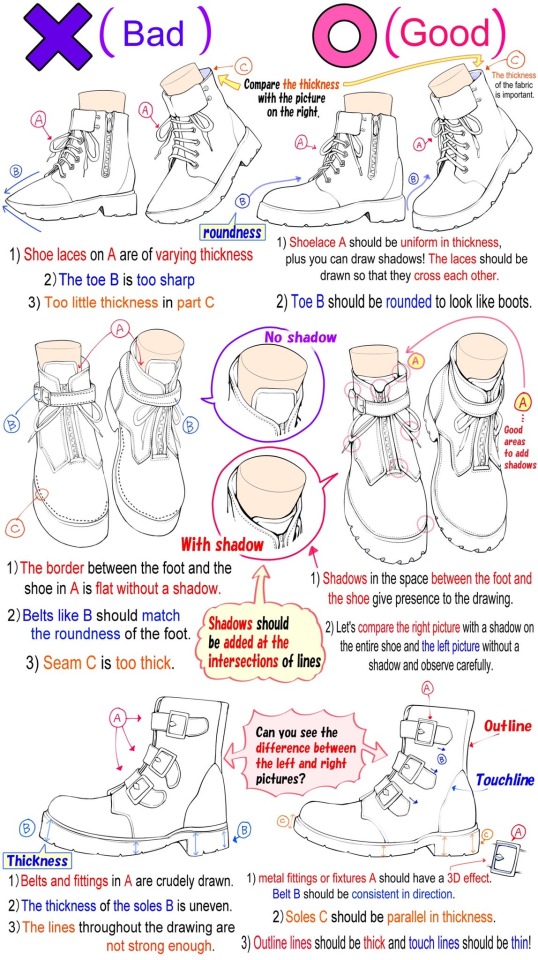
“Drawing techniques to improve boot shoes”
Source: takuya_kakikata at Twitter
#drawing boots#art tutorial#art reference#tutorial#human anatomy#art tips#drawing tips#boots#drawing shoes#drawing clothes
1K notes
·
View notes
Text
How To: Auto Height for Shoes

Haiii! As promised, here is the tutorial to make it so your custom shoes no longer require a shoe slider!
Thank you to the bestie who took the time to pick through Madlen's package file to figure out how it worked. And of course, thank you to Madlen who did the majority of the work figuring out how to make this possible in the first place!
♥ Tut below cut ♥
~~~
Set Up Your Blend File:
We're going to add a plane that will act as the mesh for the SlotRay which will allow for you to adjust the height of your shoes!
Open your blend file that contains the shoes your wish to adjust.
In the 3D View, press Shift + S and in the menu, select “Cursor to Center” In the 3D View, press Shift + A and in the menu, hover over “Mesh” then add a plane.
Now size this plane down as small as you can get it. You don’t want this plane visible in game.
Double check to make sure the plane has not moved from the center!! Your sim won't be centered in game if it has! If you see that it's moved:
Press "Shift + S" and click "Cursor to Center".
Then Select your plane and press "Ctrl + Shift + Alt + C", click "Origin to 3D Cursor".
Press "Ctrl + Shift + Alt + C" again and click "Geometry to Origin".
Navigate to the “Object data” tab and under “UV Maps” add a new one then name it “uv_0”.
Next, navigate to the “Scene” tab and under “S4Studio CAS Tools” set the cut number.
Depending on how many cuts your shoes have, you’ll want to adjust this number. For example, if your shoe has 3 cuts (0000, 0001, 0002) then this plane would have a cut number of 0003.
Since my boots only have one cut, I will put the number as 0001.
Now select your shoes and enter Edit mode. Select a face/vertice/edge on the very bottom of your shoes. Look to the panel on the left side of the screen (if it’s not open, press “N”). Under “Transform”, note down the number next to “Z”
After that, save your blend file under another name so you can distinguish which is which. I’ll name mine “Boots_3_Height Cut”
youtube
~~~
Add a New Cut to your Package File:
We're going to add an additional cut in your package file for the new plane!
Open Sims 4 Studio, make a new package file for your shoes and import them.
Go to the Warehouse tab and select your LOD 0, it will be the geometry with the largest file size. Sometimes you have to close then reopen the package to see the geometry.
Duplicate this geometry and in the box that pops up, change the last character of the “Group”. It can be any number or letter as long as it’s not the same as the duplicated geometry. On the duplicated geometry, note down the Group, Instance & Type values.
Find the “Region Map” and next to “Entries” click “Edit Items”. Add a new entry and in the “Layer” box, type the number you used for your cut. Since I used the cut number 0001, I will type 1.
Keep the “Region Type” as “Base” and move to “Models” then click “Edit Items”. Add a new Model entry and paste the Group, Instance & Type values you noted down before. Save and close each box.
Find your “CAS Part”, this is your swatch.
If you have additional swatches, it is a good idea to remove them and add them back once you are finished with this process.
Scroll down until you find the “Lods”.
Click “Level: 0” and next to "LOD Models", click “Edit Items”. Add a new entry and paste the Group, Instance & Type values again.
Save & close each window and return to the Warehouse.
youtube
~~~
Adjusting SlotRays:
We are now going to edit the SlotRays for the new cut which will adjust the height of the sim for your shoes!
Return to the new duplicated Geometry and in the “Data” tab, find the “SlotRay Intersections” and click “Edit Items”. Add a new entry and find the “OffsetFromIntersectionsOs” box.
You'll want to change ONLY the middle coordinate number. That will be the height of the sim.
You want to take the “Z” coordinate that you noted down from blender and replace middle coordinate number. If the number you wrote down is negative (i.e -0.01234) make it positive (i.e 0.01234).
In the “SlotHash” box, change the value from “00000000” to “FEAE6981”. This is the hash for the b__ROOT__ bone in the Sim's Rig.
Save and close the dialogs then return to the warehouse. Next, reimport your mesh and save your package file. You can now test your shoes in game!
youtube
Please keep in mind:
You have to do this for every LOD of your mesh
You can freely replace the mesh of your shoes and adjust the height since the cut with the plane has the SlotRay data
Animations may be off since EA hasn't made the game to support taller sims
CAS windows may move slightly if your sim is using poses/animations where they are leaning to the side. This won't affect gameplay
I recommend using Helgatisha's Stand Still in CAS mod to make sure your sim is absolutely centered
Hope this helped :)
1K notes
·
View notes
Text
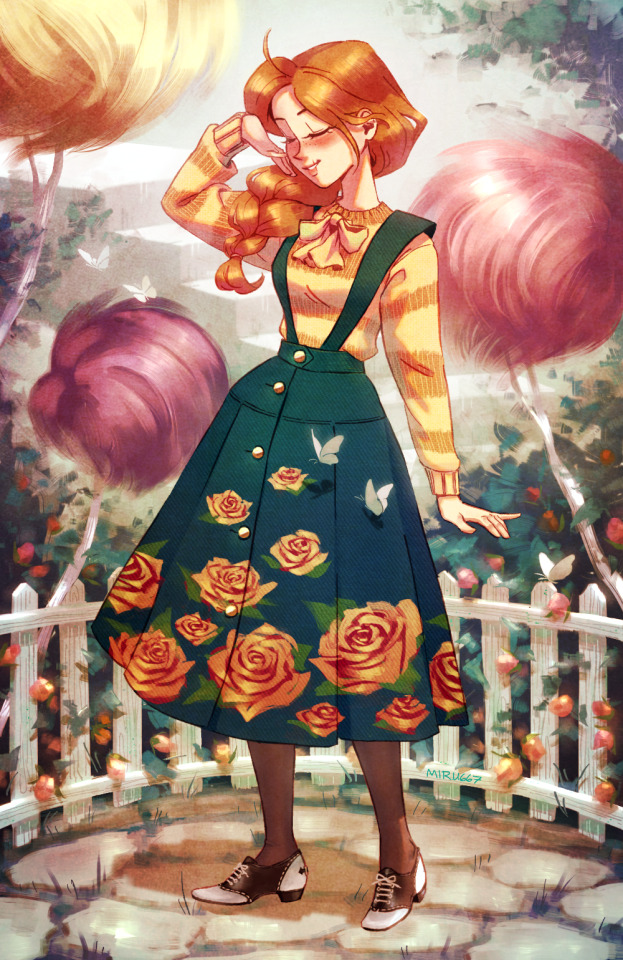
Audrey Grace in a vintage outfit! She went on a shopping trip with friends in a 1950s Thneedville and found some stuff she liked. 😊 I had fun researching dresses, sweaters and shoes, also this piece [link] from the Lies of P OST was the music I listened to the most while painting, I think the vibes fit...🥹 Click the readmore below to see a video of my WIPs!
#i spent literally the entire month of january from the 1st to the 31st working on this omg TTWTT#miru art#audtree#audrey grace#the lorax#truffula trees#thneedville#the rust factory#truffulas#vintage#vintage fashion#artists on tumblr#saddle shoes#saddle oxfords#7 hours on just the shoes#kind of embarrassing but i have so little time to work on art these days aaaa#im proud of me for attempting a background again!!!#tutorial
249 notes
·
View notes
Text
diy shoe lace crotch on crust pants tutorial from a punk named @reptil_diy whos been patching his crust pants for 17 years
I went out of my way to ask this guy on instagram for permission to reupload his stuff heer and he says its all good :3 he actually liked my pink patch pants which is great :3!
#punk#diy#folkpunk#folk punk#patches#diy patches#patch pants#crust pants#crust punk#crustpants#punk fashion#crust core#crust pants diy#punk diy tutorial#diy shoe lace crotch#diy shoe crotch
232 notes
·
View notes
Text
Sometimes I just get the most nonsensical crossover ideas.
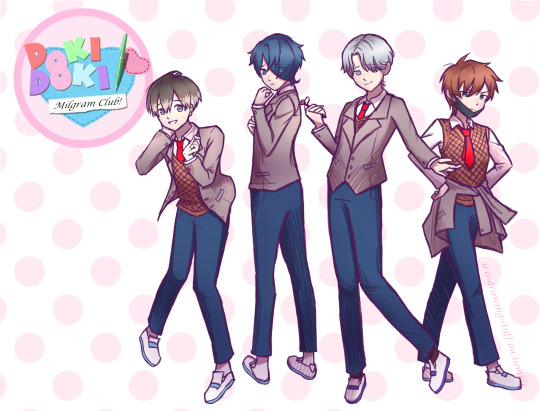
Doki Doki Literature Club! Milgram Edition
Does this make sense? No.
Was it fun to draw? Yes!
And that's what's important!
#milgram#mikoto kayano#haruka sakurai#shidou kirisaki#fuuta kajiyama#doki doki literature club au#i think this might be the first time i've properly drawn shidou#the reason it's only the boys is because i wanted to make a separate version for the girls#sorry for the lack of kazui there's only 4 characters in ddlc#minus the protagonist but nobody cares about him#fun fact! shidou's shoes are the same purple as his prisoner color while everyone else's is blue#just like how monika's shoes are different from everyone else's#fuuta ties his jacket around waist to emulate his Bring It On knight outfit (i really hope his T3 outfit does this)#i wanted to fuck his tie up (to imply he doesn't know how to tie a tie) but then realized that he'd probably be the type of person to#watch a tutorial to tie it once and then just loosen it to remove it and never untie the knot#this was originally a sketch but i got a bit carried away and colored it#I wonder how obvious my struggle with haruka's pose is#his upper legs look off but i don't want to keep changing it over and over again#random thought! Natsuki's first 2 poems actually sort of fit Fuuta I think#i can imagine him writing Eagles Can Fly#Both Sayori and Mikoto are also people pleasers and depressed so yeah#and Shidou gives me a Monika vibes IDK why
113 notes
·
View notes
Text
process of some ice skates I turned into roller skates
#rainbow high dolls#rainbow high#shadow high#heather grayson#doll diy#bruise.mp4#mini skate boards from twrget halloween section and the shoes are winter break ruby#tutorial
78 notes
·
View notes
Text
FIGHT FOR THE ARTS AND CRAFTS!!!
FIGHT FOR THE LEGACY OF A CULTURE!!!
The book binders, the shoemakers, the secrets of fabric and wood. What will happen when all is automatized, what will happen if we grow far and far away from the things we use and do.
Fight to keep alive the legacy. The wisdom and knowledge macerated by generations. Someone has to carry the torch!
#ahshashahsa ok I know it sounds like shit you'd find in a pamphlet#But I think a lot of what it means to be part of a hobby of a subculture and all of that#And I just saw the post about the user that started into bookbinding to bind beloved fanfics#and MAN#What will happen to the shoemaker in my town when he dies?#There are another 15 but they all will eventually die. And many people buy more shoes from fabrics in the other side of the world#The book binder closed his workshop years ago#and here I'm trying to bind a book with a youtube tutorial#what will happen when the secrets of tools and craftmanship die?#The little secrets. The secret wisdom. The correct way to cut fabric#The best posture to weave a basket. The divinitaion meaning of every card in a playing deck#Being part of a hobby is like being suddenly part of a whole guild#but we're so far apart#will someone pass the knowledge of how to make a nice table? will someone remember?#if a tree falls in a forest
23 notes
·
View notes
Text
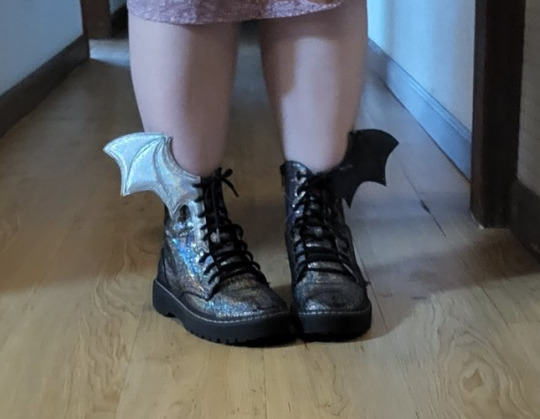
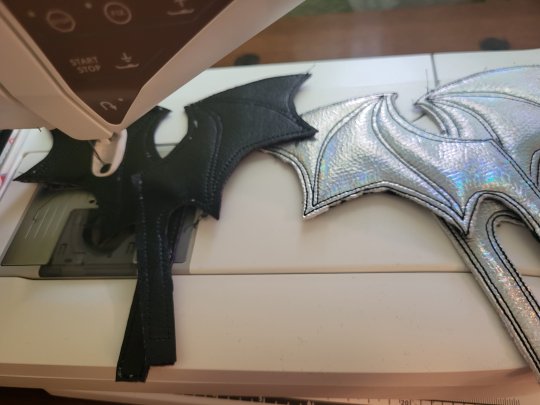
How to make little bat/dragon wings for your ankle boots:
I was going to put a little blurb in here about EGL fashion and the difficulty of finding shoes detailed enough and blah blah, but I don't need to.
You're going to make tiny dragon wings for your boots because it's AWESOME. You don't need another reason.
These are pretty easy to make on your normal sewing machine, but I'll include a machine embroidery file and instructions on that too.
There's a pattern to download here. If you print this at 8.5x11, it will be the correct size. The grid lines on the image are 1cm. If you're a little bit too big or too small, it doesn't really matter on a project like this.
(Actually, the only reason there's an embroidery file of this is that the easiest way for me to make a PDF to print at 100% actual size is to just digitize the file. Emb instructions at the end)

This is going to print you out one wing for the left foot and one wing for the right foot. If you want wings on both feet, print the pattern twice. The process we're using to do this will destroy the pattern piece, so print one per wing.

For each wing, you're going to want a piece or scrap of vinyl or faux leather that you can fit the wing pattern on to, a piece of craft felt the same size, and a washable glue stick. You can also use something like washable spray adhesive, but I like the glue stick because you can get them at the dollar store. You will also want thread (decorative thread is an option) and something to poke or cut holes for the laces.
We're using washable glue here because vinyl is really difficult to transfer marks onto. Chalk and markers don't stay, and any holes you put in it with pins or a marking wheel will be there forever.
So we are going to make a little sandwich. Everything we cut will be oversized, and we'll trim later. Cut your pattern piece out, roughly, and put a line of glue on the back. You don't need a whole lot. Then, stick it onto your roughly-cut piece of fake leather, and then stick another couple of lines of glue on the back of that and stick it onto the felt. Squish it all together and let it sit for a couple of minutes for the glue to settle a bit. You don't need to let it dry all the way.

Now you're going to sew along the lines in the pattern. I've found that the easiest way to do this without weird lumps is to start with the lines inside the wing. You can do the outline after you do the inside part.
You're going to be stitching through the paper, and you'll tear it out later. Each wing rib has two close-together lines. To make this easier on yourself, sew along one line for each of the little wing lines. If you sew both of those lines, it's much harder to remove the paper pattern.
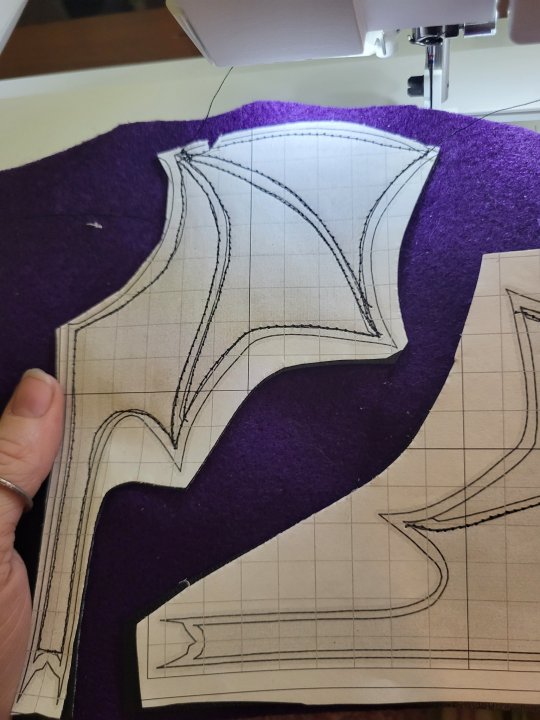
See how there's two lines of stitching along each wing vein? Don't do that. It'll make it really hard to tear the paper out. This is how I know it'll be really hard to tear the paper out.
Once you've done the inside wing lines, you can go around and do the outside lines. If you printed your image in color, it'll be pretty clear that there's a cutting line and a stitching line just inside it. If you have a black and white printer, like I do, just remember to sew the inner line, and the outer line is for cutting.
The bottom edge of my pattern is unnecessarily complex and you can just sew straight across the bottom.

Once you've done all the stitching, grab some scissors and cut your wing shape out. Then, start ripping the pattern off.
A few things that make this easier: 1) Don't use too much glue when you're sticking the pattern onto the vinyl. If you want to be extra smart, put most of the glue you do put down in areas that you'll later cut off. 2) Don't wait too long after you put the glue down to do this stitching. Try to do it all in one day. 3) Do not accidentally buy non-washable glue.
Once you've ripped away as much as you can, you'll want to use water to get the remaining paper and the glue off your project. If you used craft felt and some fake leather for this, it should be pretty washable. If you used real leather and merino wool felt, or something, good luck.
Another tip: When you're done, squish the wings up as hard as you can on the side of your sink. This is the easiest way I found to squish all the water out of the felt, and it makes them dry much faster.
If there's any leftover paper that you can't get off after getting it wet, it'll usually brush away after it's all the way dry. If you have a fancy printer that'll print on soluble paper, congrats, your job is much easier. I suppose you could also use tear-away stabilizer and just hold it up to a window to trace the pattern onto...y'know this is getting complicated. You'll figure something our. Y'all are smart.

You can now go back and add that second line of stitching on the wing veins (any scientists out there willing to tell me what that part is called??), if you like.
If you want, you can do all that topstitching in a cool decorative color. And there's your first set of wings.
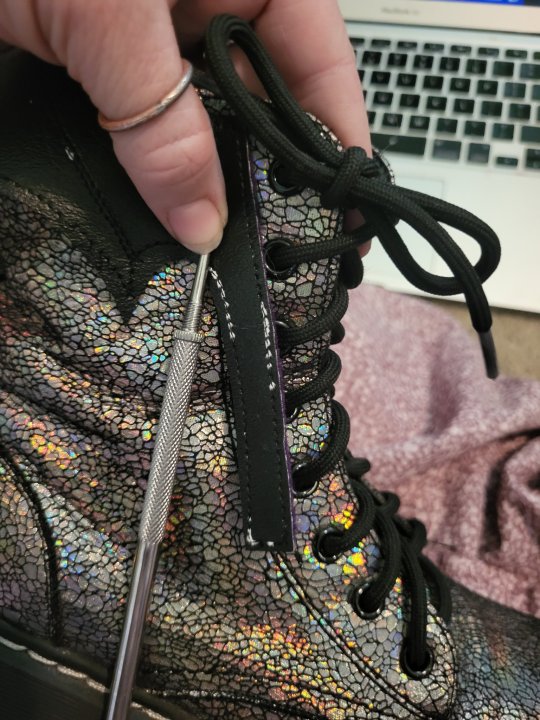
Take the lace out of one of your shoes, and lay the wing over where you want the final thing to lace. There's a lot of different ways to cut holes in something like this. If you have an eyelet punch, that's an option. I used a sharp metal stick and just stabbed it through a couple of times. You could also cut an asterisk pattern with the tip of a small exacto blade. Whatever you pick doesn't matter too much because you're going to put laces through it and hide your resulting hole. If you need to, you can chop some of the lacing strip off if it's too long.

And you're done!
If you want to do them on your embroidery machine, here's some steps:
File for Right Wing | File for Left Wing | File for Both Wings on One Hoop
You can do these one at a time in a 5x7 hoop, or do both at once if you have a bigger hoop. The left and right wings are identical but reversed so if you're low on space, you can download just the one and flip it in the machine.

There are three colors on each file, but you will sew them all in the color you want to use. The colors themselves are so that you can keep track of what step you're one.
Hoop just your stabilizer. I used a medium cut-away. The red color blocks are for the felt layer.
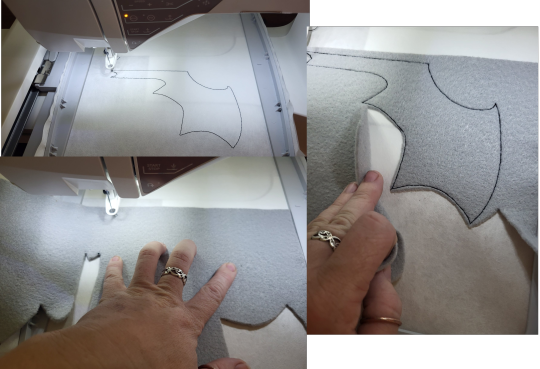
For block 1, it's going to sew the outline of the wing directly onto your stabilizer. Place your felt over the outline and run block 2. Block 2 is going to double-stitch down the felt. You can now trim off the excess felt next to the stitching and run block 3. That's just one more running stitch to keep it in place. Once you've finished your last red color block, it's time to get your vinyl.

There's no placement stitch for the vinyl, because you don't need one. So, before you run your first green color block, place your vinyl down, then run the block. BTW, I don't tape things for this. I just hold it down with my hand. I do almost all machine applique by just holding it down with my hand.

Your machine will sew the vinyl down, just like the felt. Grab some scissors and trim that all close to the stitching line, and then run the final green color block.
(That extra running stitch line is there because I ALWAYS trim my applique too short and cut the placement line at least once. The last line of running stitch really neatens it up).
The final blue lines are the decorative lines in the wings. If you want, you can switch to some decorative thread and make these extra sparkly.
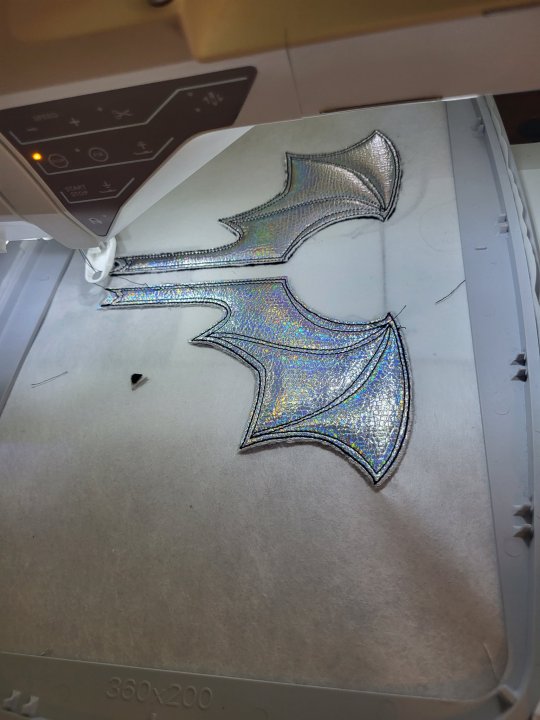
Let the machine sew those down and you'll be done! Time to cut the stabilizer off and then follow the steps for punching holes in the lacing strips.
You might also be asking why the felt is on its own applique layer, and why you don't just hold it and the vinyl together, like you did for the non-embroidery version. There's two answers to that. The first is that doing them individually makes the wings just a little bit puffier, and I like that look. The actual answer is that, if you want to be very over the top about it, you can do the felt layer on the REVERSE side of the stabilizer. You'll run the first block take the hoop off, tape a piece of felt to the backside of the stabilizer, put the hoop back on, run the next block, take off the hoop, trim, etc. Then, you have the felt on the back and you don't see your stabilizer in the finished project! Cool, huh? I thought it was WAY too much work for the end result, but your mileage may vary. You've got the option if you want it.
And there's both versions. This was such a fun project, and I hope you get a chance to try it out.
You know those light-up shoes that kids get? Why don't they make those in adult sizes? I want some light-up RHS.
550 notes
·
View notes
Text
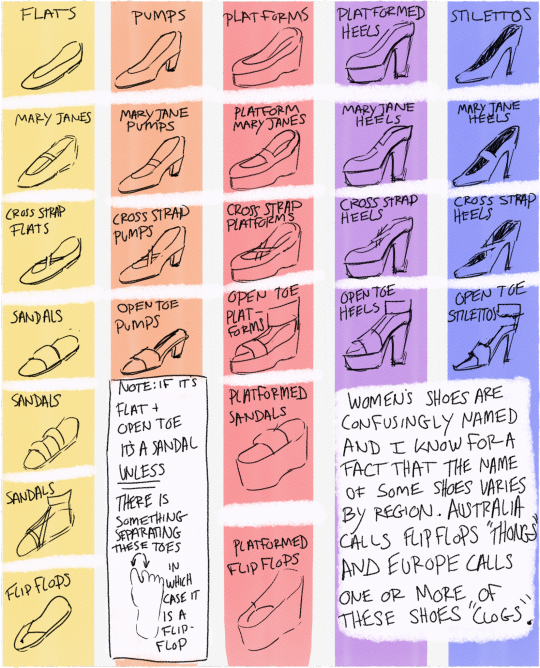
Shoes and their names reference for writers and people trying to Google images.
309 notes
·
View notes
Note
How do you draw shoes?
they are very shaped but hard to do
Learn to draw feet first, learn the structure of it and draw them from every angle, if you nail that shoes come easy
#ask#not that I don’t want to make a tutorial#it’s more that I tried to and failed#realized that oh shit I actually don’t know how to draw shoes#:’)
39 notes
·
View notes
Text
youtube
Athena Cykes COSPLAY Transformation video - The Opal Empress
#athena cykes cosplay#Athena cykes#ace attorney#ace attorney cosplay#the opal empress#ace attorney trilogy#ace attorney art#ace attorney dual destinies#wright anything agency#ace attorney spirit of justice#cosplay shoes#cosplay tutorial#capcom#widget#phoenix wright ace attorney#phoenix wright#apollo justice#apollo justice ace attorney#simon blackquill#逆転裁判#逆転裁判5#逆転裁判6#希月心音#希月心音コスプレ#コスプレ#Youtube
26 notes
·
View notes
Text
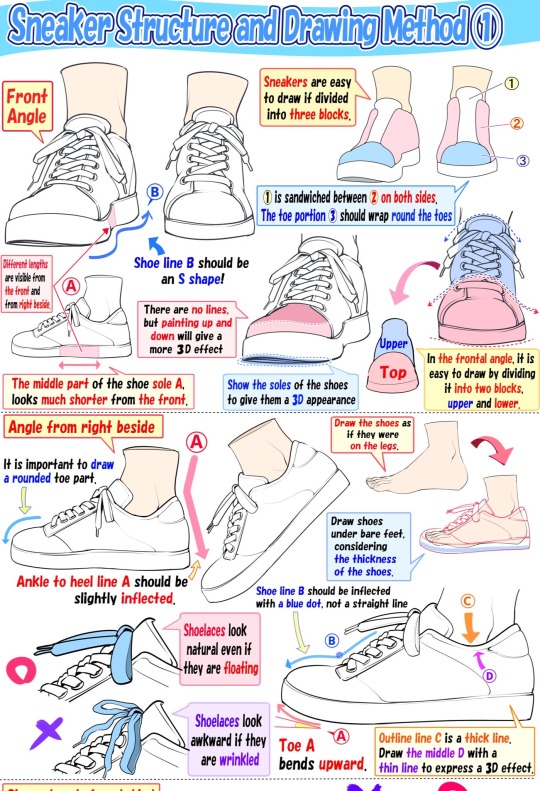
“Sneaker Shoe Drawing Technique
Front and Side View Composition"
Source: Twitter at takuya_kakikara
#art tutorial#digital art#art reference#drawing anatomy#drawing tips#drawing feet#drawing shoes#shoes#tutorial
118 notes
·
View notes
Text
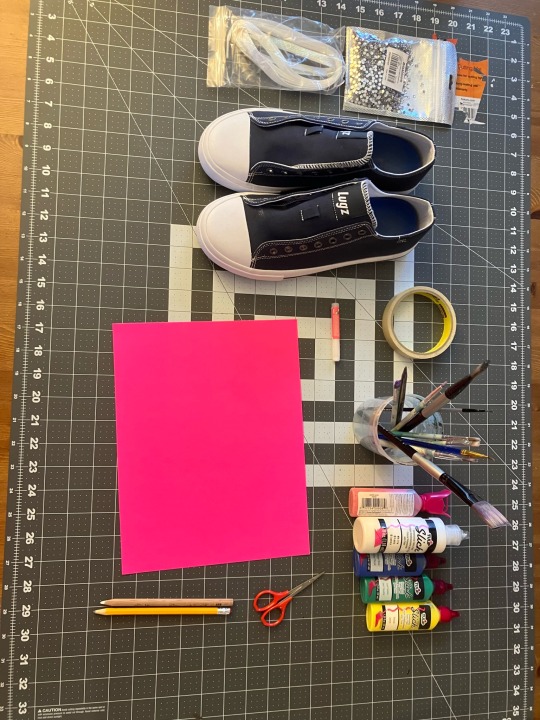
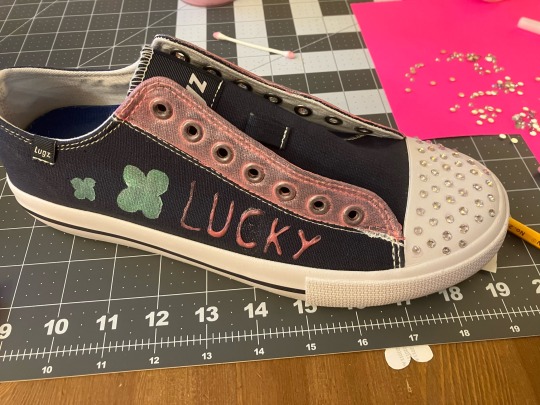
DIY Twinkle Toes-style shoes

If you’re a 2000s kid, you might remember twinkle toes. They were very popular in my gradeschool, and I owned a pair when I was around 8, which happens to be around the age that I regress to. Unfortunately, they do not make these in adult sizes, but I still wanted a pair, so I decided to make my own.
Disclaimer: while this is an age regression and dreaming blog, it’s best if you make these while in a big headspace, because of the delicate details and materials required for the project.
With that out of the way, let’s get into the tutorial:
To make these you will need:
One pair of basic canvas sneakers with the laces removed
Glitter shoelaces
6mm rhinestones
Nail glue
Masking tape and sticker paper
Scissors
Pencil
Paint brushes
Fabric paint
Tweezers (not pictured)
The first step is to tape off the area around the rivets where the laces go like this:
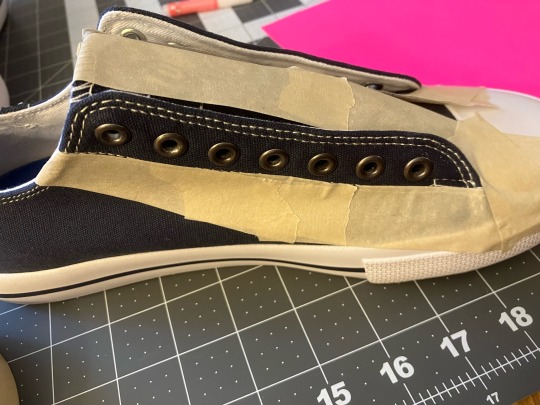
This ensures that you will get a clean line. Now, if you are using dark shoes like me, you’ll want to paint this area white so that the color you choose to color it with shows up brighter.

If you’re using light shoes, you can skip this step.
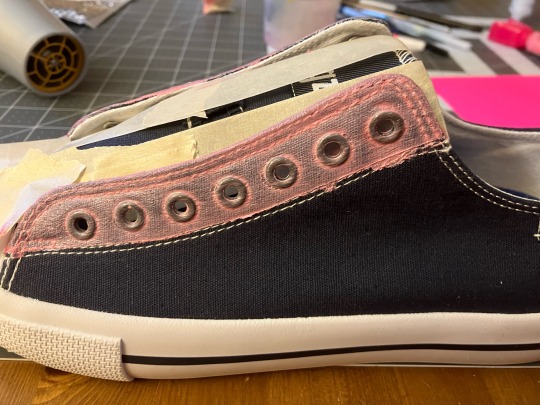
Now, choose whichever color you like, and paint over the area with it. If you want the fabric paint to dry faster, you can use a hairdryer.
When you’re done, it should look something like this.
Now, you can create designs on the rest of the shoe. I like clovers, so I decided on a clover motif.
Draw the design you want on the sticker paper like so:
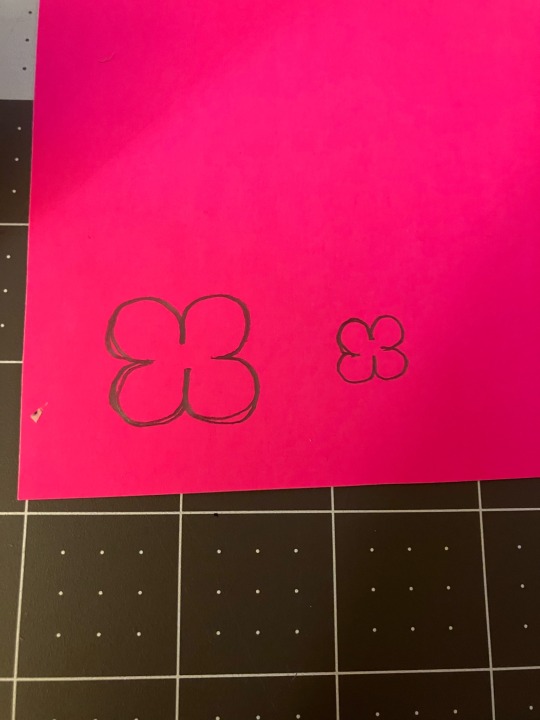
And then cut it out from the inside. this will be your stencil. Paste the stencil wherever you want on the shoe, and then paint inside of it like you painted around the rivets earlier. You can also write words on the shoes.
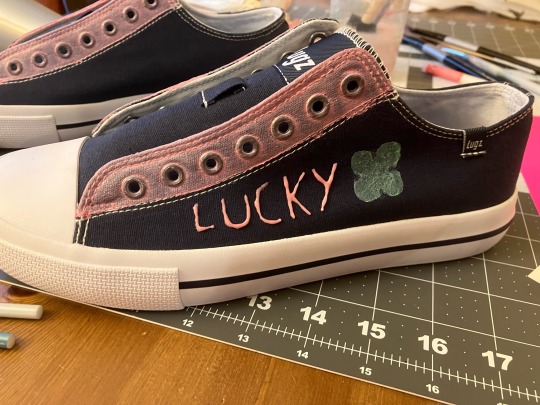
Now for the part you all have been waiting for: the rhinestones. Using tweesers, take eache rhinestone and dip it in nail glue. Then place the rhinestone onto the white part of the sneakers like this:
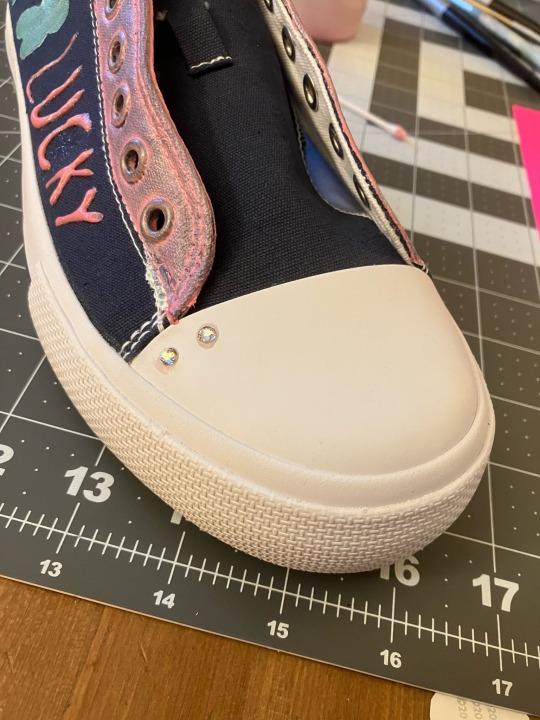
When you’re done, they should look like this:
Now,once the glue is dried, you can lace them up with the glitter laces! I put beads on mine.
Ta-daaaa!!!! You’re done! I hope this tutorial can find the people who wanted a pair but never got one, or just would like to wear them again!
#nostalgia#sfw middle regression#middle regression#sfw agere#agere blog#sfw agedre#age regression#agere#shoes#crafts#tutorial#diy#fashion#wardrobe
9 notes
·
View notes
Note
I've had these wool slippers for 13 years, but the bottoms were starting to wear out faster than I can darn, so I used some of the techniques from your blog to reinforce around the holes, and added woven wool scraps from another project over the soles to make them stronger. Thank you for all the useful tips on your blog!
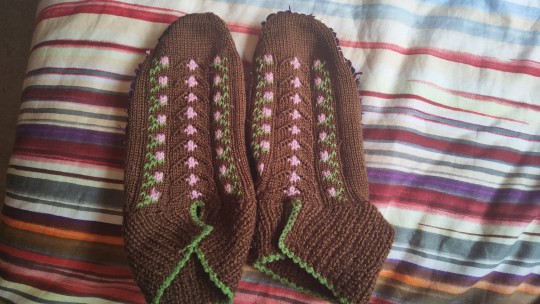


[ID: three progress pictures of mending a pair of brown flowery knit slippers with worn-out soles. The holes in the soles have been closed and reinforced, after which they were covered with a patch of purple wool fabric.]
Mended slippers
Gosh, those are cute slippers. I get why you'd hold on to them for 13 years.
Good job on fixing them! I hope you'll get many more years of wear out of them.
#wasteless crafts#ask#slippers#knit slippers#mending#visible mending#diy#how to#tutorial#crafts#fashion#fast fashion#slow fashion#sustainable fashion#sustainability#zero waste#reduce reuse recycle#darning#soles#shoe soles
194 notes
·
View notes
Text

my rainbow clown barbie custom so far :'D
#her hair was already rainbow so no rerooting done for this btw#just painted her face and sewed an outfit using a specific youtube tutorial for the patterns but altered a but for clown aesthetics#hat was a different tutorial i also altered a bit#everything us coming together so nicely but yes this is a work in progress#gonna put a white pom pom on her hat#also bought her some purple clown shoes that will be here probably monday... legit the only existing barbie clown shoes i can find anywhere#there was one pair on ebay and none anywhere else not even anything similar#so im glad i was able to get them and hope they fit her high heeled barbie feet which they SHOULD.#then i just need stockings which I'm probs gonna buy some cheap Amazon pack of em in different colors and see which looks best#barbie custom#doll custom#doll custom wip#doll wip#clown#rainbow#rainbow clown
15 notes
·
View notes
Last Seen Blogs

stephenking11
无标题

well-dad
So, what's the plan, son?
theia12-moved-blog
inactive
mulberryhop
Шелковица
theia12-moved-blog
inactive