#painting tutorial
Text
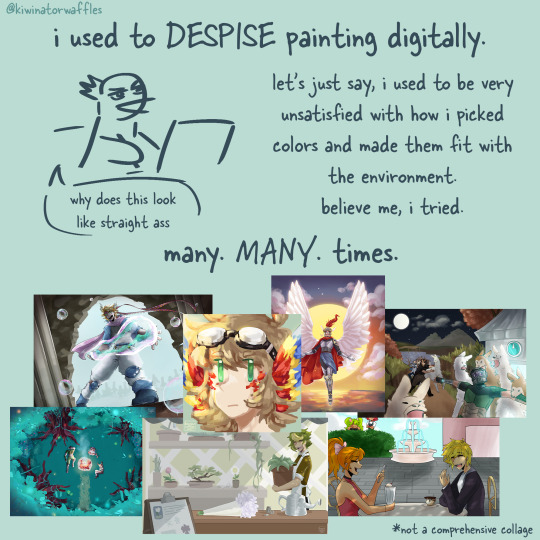
HOW I PAINT WITH GRADIENT MAPS

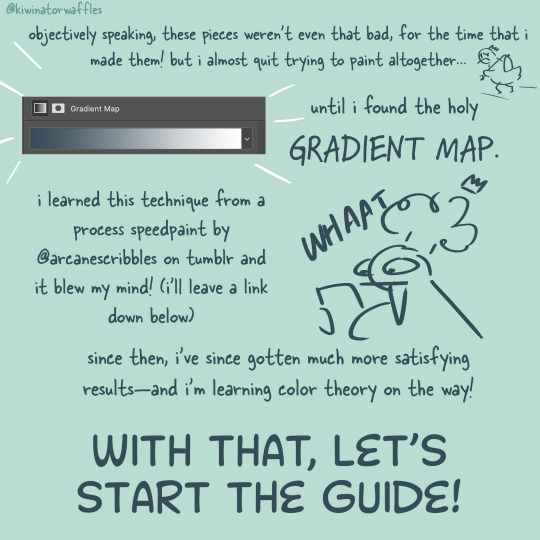
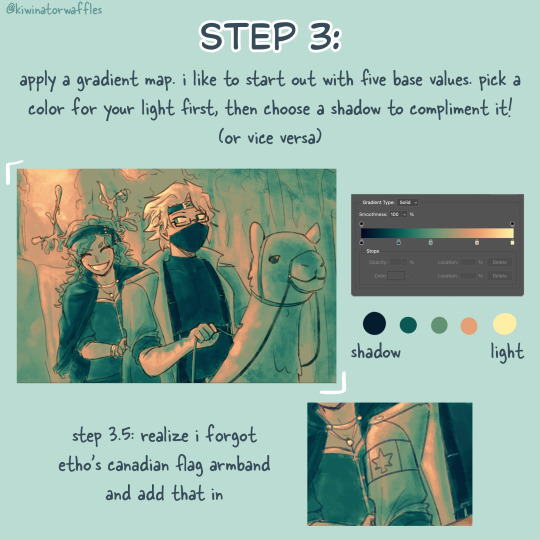


the post by arcanescribbles where i learned this technique! check out their works!
an even simpler version of this is to just lightly brush colors over a base color in the background and then go off of that. otherwise, i hope this can help!
a full version of my example piece here
#congrats to etho for being in all 3 of my gradient map paintings so far#art tip#art tips#art tutorial#painting tutorial#digital art tips#art help#drawing tips#digital art#kiwi’s scribbles#kiwisonator
413 notes
·
View notes
Text
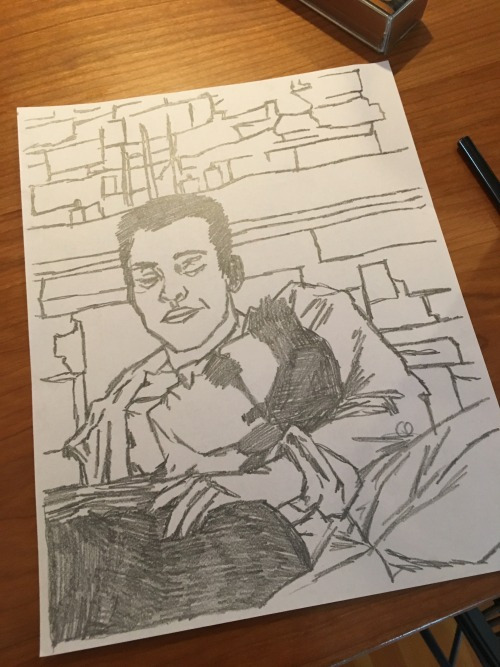
How to transfer sketches to watercolor paper
Ever created a drawing you really love, then decided that you wanted to paint it in watercolor (or transfer it to another type of paper)? Or maybe you just want to avoid smudges on your good paper? Or transfer a digital sketch onto paper?
This tutorial will help!
Start with a sketch on plain cheap copy or sketch paper (print if you need to, or photocopy your original sketch if you don't want to ruin it).

Next, flip the paper over (so you're looking at the blank side) and put it on a lightbox. Don't have one? No worries! Hold it up to a window, or put it on your iPad screen at max brightness.
Now, take an (ideally HB non-mechanical) graphite pencil and scribble all over the lines shining through, until it looks like a messy copy of your original sketch.
(First image is of just the graphite back, second is of the corner flipped so you can see the original sketch too)

Now, attach it to your nice paper graphite side down. Use tape on two corners (so it stays in place, but you can peel up the other corners to check it).
Tips for easily released tape: Cut the tape to your desired length and put it on fabric, like your pants, and pull it off. Repeat a few times. The oils from your fingers plus the fibers will make it less sticky!

Now, trace the original side of your sketch with a ball point pen! You need a very sharp tip and to be able to see where you’ve drawn, so definitely use a ball point pen for this. Use firm pressure!! (Your hand will probably be sore if you do this all at once). Make sure you’re on a hard surface, too.
Tip: start in a corner you can flip to check, and make sure it's transferring properly. If not, add more/a softer graphite to the back and/or press harder.
When you're done, you'll have a light but visible pencil guide to paint right over!

Want other tips? Send in an ask or check out my tutorial tag!
#watercolor#watercolor tutorial#art tutorial#painting tutorial#traditional art#illustration#artists on tumblr#paper transfer#tutorial#art tips
339 notes
·
View notes
Note
hello! do you have any tips for drawing in paint?
I ended up making a little tutorial so. .
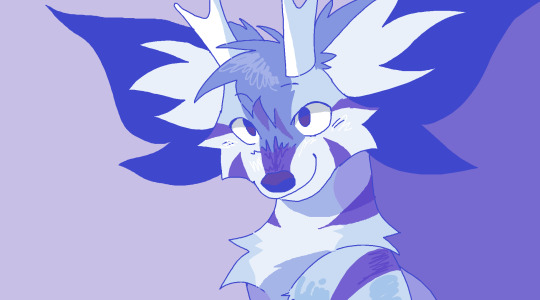
My MSpaint workflow!
(not applicable to everyone each person has their own way to use each program)
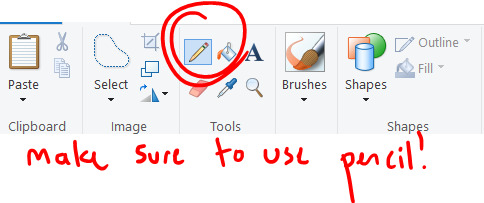

Start with a sketch!

Do lineart over sketch, and make sure its in a DIFFERENT COLOR!

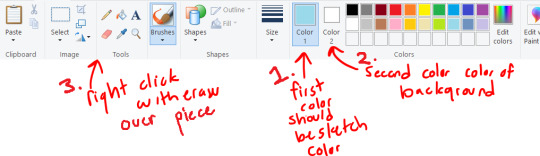
From here you can isolate the lineart by just erasing the lineart color! (and ctrl + makes the tool your using bigger)

Now we have just the lineart!
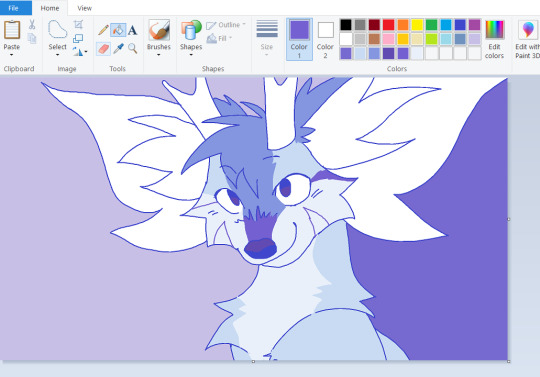
From here I color, just using the paint bucket tool and drawing the markings on
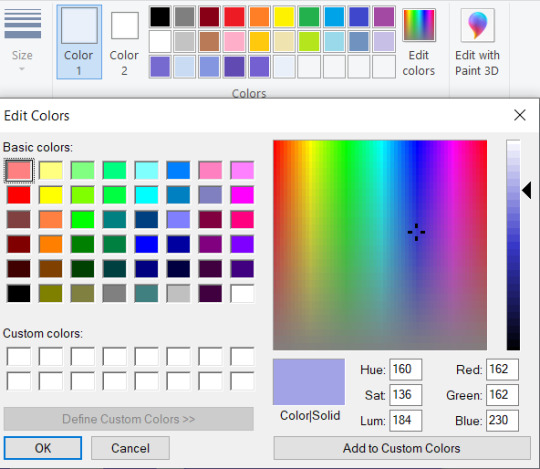
Adding the shading, I choose the colors I chose, then use the edit colors tool to make them darker and a slightly different tint.

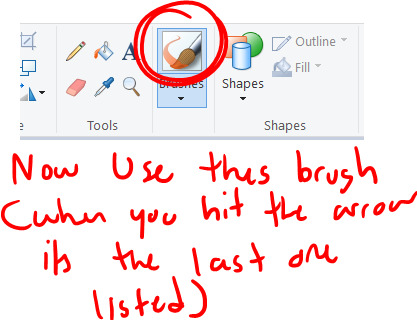
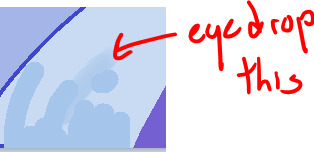

Now for the painting process, I use this to mix my colors together. Basically find two colors, paint a line inbetween them using this paint brush tool and one of the colors, then select the inbetween color. This is mostly the same as how I paint in other programs.

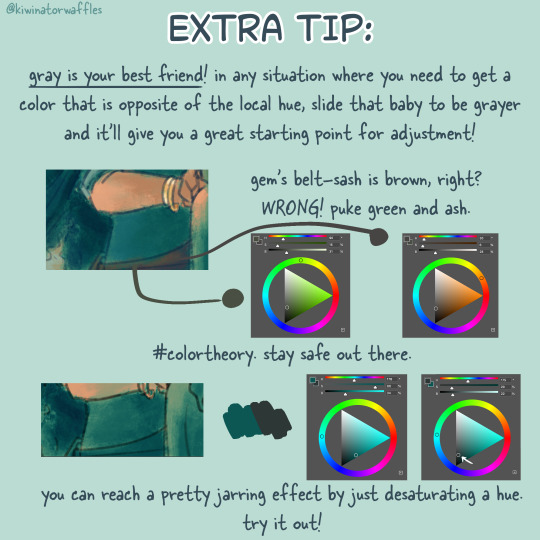
COLOR TANGENT!! When digitally paintings it is sometimes better to just choose a color that would be inbetween, ESPECIALLY with yellow and blue. Its kinda complicated but how the computer does its calculations it can grey out your colors.

But I basically do the painting mixing and coloring all around the piece, choosing inbetweens everywhere, and smoothing out the shading lines, I tend to go over my lineart here

And Im done!
Just adding a lot of details + I tend to do the bg last
My style depends on which piece im working on, sometimes I use the paint brush for all of the piece so its a lot smoother
This was done with the paint brush in MS Paint (the one I used in the mixing section) but it is still the same process, I would just use the paint brush instead of the pencil

but this one was done entirely with the pencil tool, so its up to you which style your going for
Hope that was helpful, and at least taught some fun ms paint tricks heh. Its really fun to work with because it forces you to work on one layer
#long post#ms paint#tutorial#ms paint tutorial#painting tutorial#digital painting#digital painting tutorial#i hope this makes any sense at all LMAO#i can never tell with tutorials#but i thought it would be fun : D
651 notes
·
View notes
Note
if you ever feel like it I would LOVE to see a little tutorial from you about how you paint. i am obsessed with your paintings!!!! I love your use of color and how you do do lighting and like your strokes and just!!! Everything!!! it’s so beautiful and I keep just finding myself staring at it and trying to absorb it into my brain. sosososo good. argh. anyway. if you have any tips that would be great cause i would love to learn to paint but im intimidated and I don’t know where to start haha
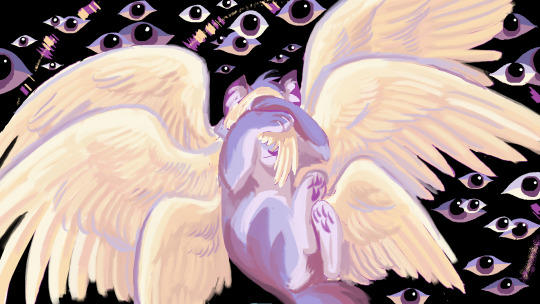
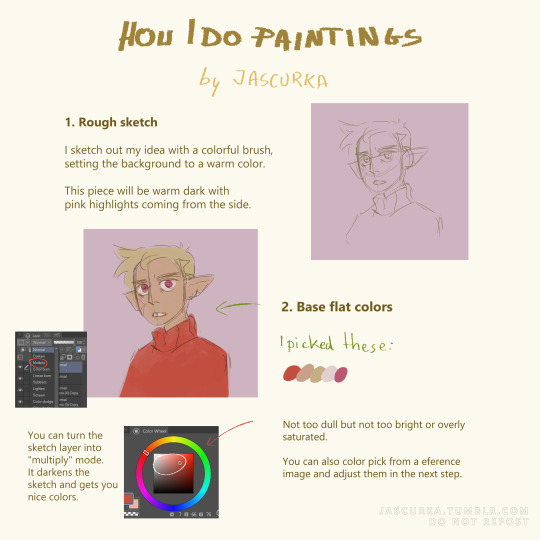
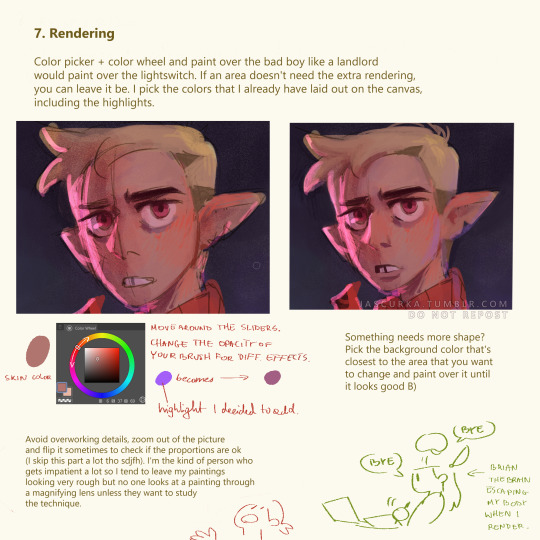
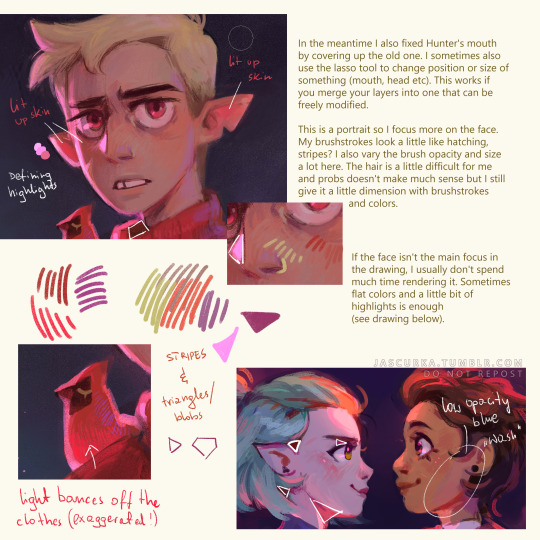
I hope this helps a little!!


[DO NOT REPOST TO OTHER SITES]
I work in Clip Studio Paint but the layer settings are similar in various drawing programmes. I work on canvases around A4 format 300dpi.
I also recommend looking at the things that taught me a lot when I wanted to first get into digital painting:
This painting tutorial by @littleulvar
Speedpaints (especially drawlloween) by Mirey's (also on deviantart)
#art tutorial#painting tutorial#digital art#artists on tumblr#how to paint#art tips#tutorial#digital painting#art#art process#honestly idk if im qualified to add these tags sjdfhsk#I made it unnecessarily long and there are typos and grammar mistakes but............. there is only so much i can do XD ok......#sorry for the watermark as well...........#my art#I also do have drawing speedpaints on my insta in the reels section but they are a little fast#if you need me to link you more tutorials hmu I do have a little collection
739 notes
·
View notes
Text
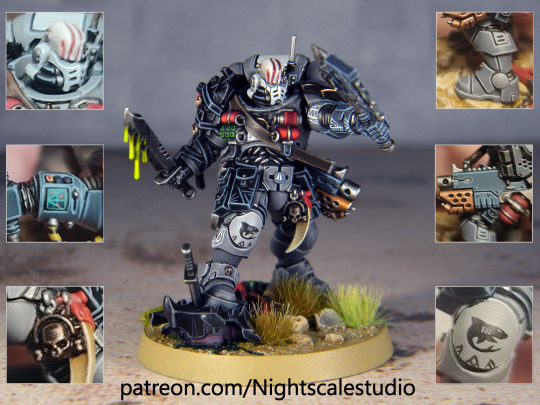
We've posted all the Carcharodon Lieutenant tutorials on Patreon. Now you can find both tutorials on individual elements of miniature for a subscription, and buy a fully assembled tutorial in PDF format.
We are waiting for your feedback and suggestions.
#nightscalestudio#space marine#space marines#primaris lieutenant#carcharodons#carcharodons astra#carcharodon astra#warhammer#warhammer40k#warhammer40000#miniaturepainting#paintingminiature#painting tutorial
55 notes
·
View notes
Text
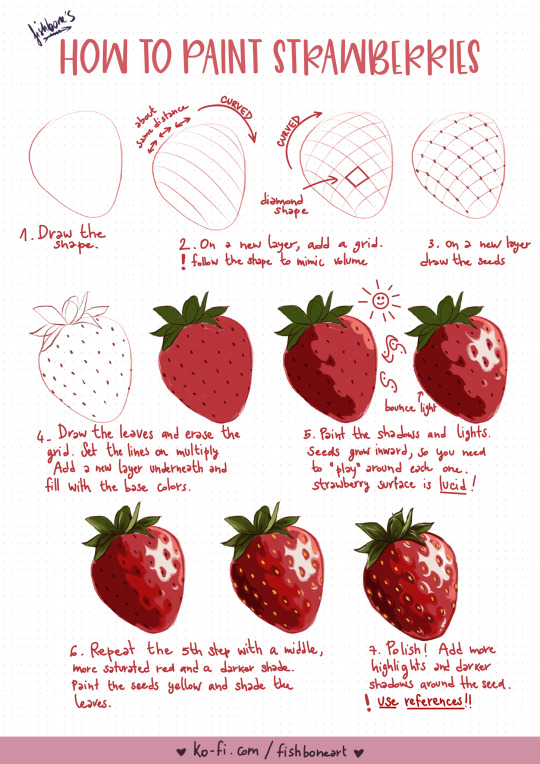
#art tutorial#tutorial#step by step#how to paint#strawberry tutorial#strawberry#artist#digital art#procreate#painting tutorial#digital painting#art
164 notes
·
View notes
Text
youtube
Painting a smoke stack using watercolors and acrylic paints.
Youtube / Ko-fi / Instagram / DeviantART / TikTok
293 notes
·
View notes
Photo
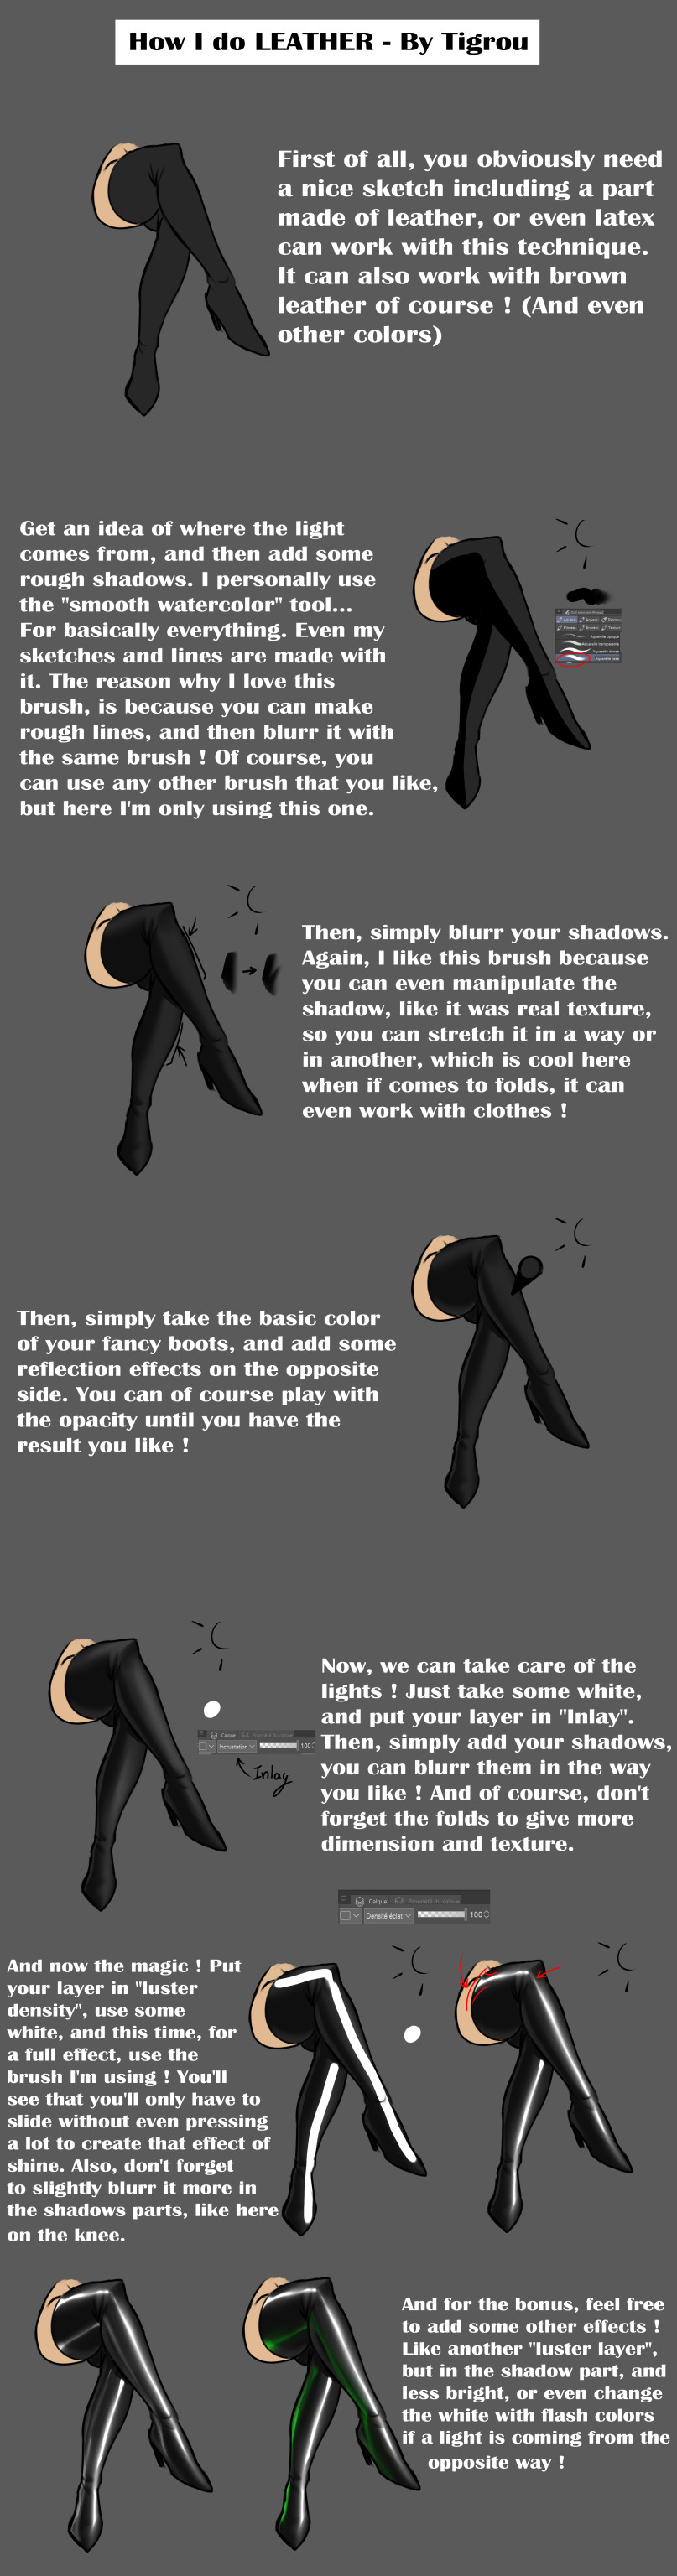
Sorry for the screenshots, I couldn't change the language on my software
I'm using Clip Studio Paint btw !
159 notes
·
View notes
Text
I made a watercolor process reel.
I just love watercolor, no matter what you do it looks so good, and I especially like creating layers like this. It's so simple, you just put on darker and darker layers and it would turn out nicely.
Anyways, it's pretty relaxing to watch, enjoy.
#my art#original art#postcard paintings#art process#watercolor#watercolor illustration#illustration#painting tutorial#blue
46 notes
·
View notes
Text

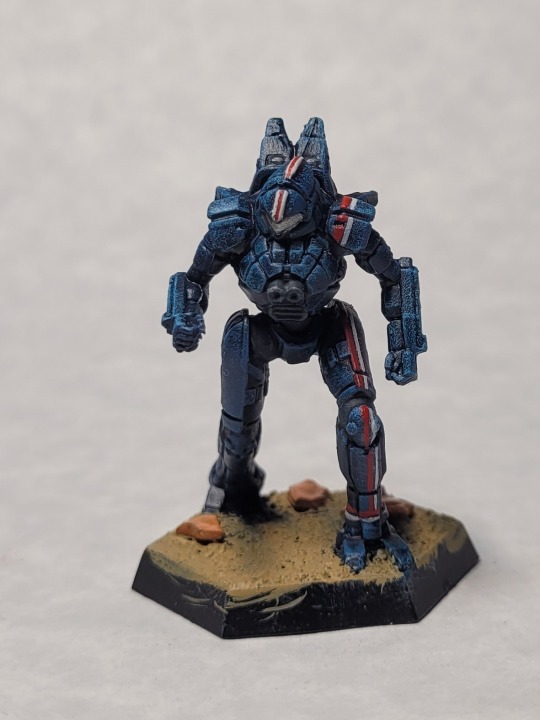
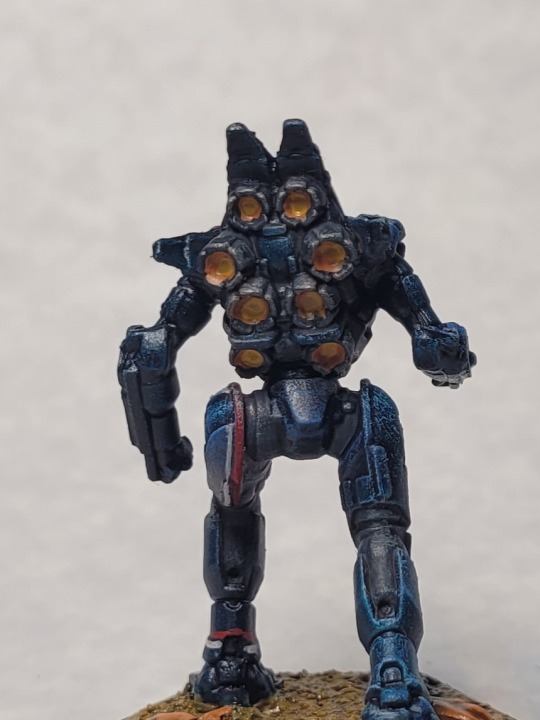
Getting back into the swing of doing paint tutorials- I pulled a Spider out of a salvage box and I figured I'd do a quick and dirty davion scheme! This is the parade paint job for the First Davion Guards, AKA quintessential battletech 'good' guy mechs.
Paints you will need:
Black primer
Dark grey (citadel mechanicus standard grey)
Light grey (citadel dawnstone)
Off white (army painter spaceship armor)
Red (citadel mephiston red)
Light blue (citadel baharroth blue)
Green (citadel warpstone glow)
Gun metal (citadel leadbelcher)
Silver (citadel rune fang steel)
Dark wash (citadel drakenhof nightshade)
Citadel akhelian green cintrast
Citadel blood angels red contrast
Things you might want
Khaki (citadel zandri dust)
Fleshy orange (citadel ratskin flesh)
White (army painter matt white)
Dark green (citadel Caribana green)
Light red (citadel evil sunz scarlet)
Yellow (citadel averland sunset)
Black (army painter matt black)
Citadel aggaros dunes contrast

I started by basing my mini with my normal desert badlands basing scheme (paint base in glue, sprinkle on basing sand and let cure. Paint on more glue and stick down some aquarium gravel) and then priming the whole thing black with brush-on primer.
Once the primer is finished drying, load some of your dark grey up on a fat drybrush, wipe off slightly less than most of the paint, and then apply the remainder to the model in long up and down strokes. All of the panels should be grey, with some black showing in crevices and hard to reach recesses of the model. Next, repeat this process with your light grey paint, but wipe off more and apply less liberally- you want the darker grey color to remain in most places with the edges and raised details highlighted in grey. Finally, drybrush the model one last time with your off-white color only in the areas that will catch the light most like the head, torso, shoulders, the vectoring fins on the mech's back, and the outstretched left knee.
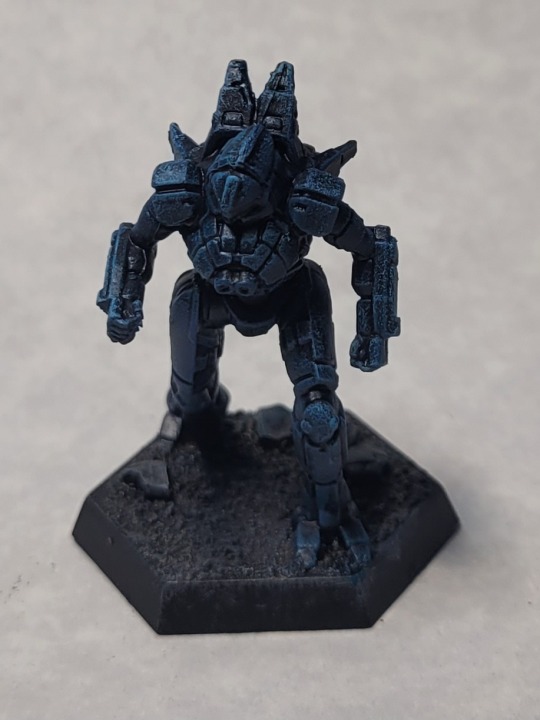
Now that the mech has been presented in greyscale, we can make it blue. Akhelian green is going to be doing the majority of the heavy lifting in this paint scheme- I find it to be a pretty easy contrast paint to work with. Apply it undiluted to the model, looking to spread it in a single coat like a thick wash, and then leave it to dry for 20 minutes. Afterwards, you might want to brighten the blue up in places as I did- drybrush on some light blue in the same areas you used off-white earlier.

At this point, I got a little excited and decided to do the Davion stripes. Start with your red, pretty well thinned on your palet, and a thin detail brush. To make this easy on ourselves, we're going to look for vertical panels on the left side of the mech's torso and leg and basically connect all of those with a straight line. In the case of the Spider, the easy ones are the shoulder and that panel that runs down the upper thigh. Apply a thin edge highlight of red along those panels and then carefully continue the line down the rest of the leg, terminating at the ankle. If your hand is steady enough, run a thin line of red around the mech's ankle where the vertical line ends. Then, go back with your off-white and using the red line you made already as a guide, run a parallel stripe down the outside edge of the red (if you swap these battletech nerds will dunk on you online).
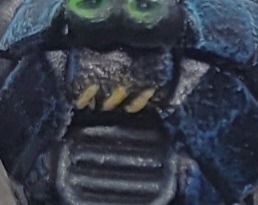
At this point, I also striped the ridge running down the Spider's helmet, but it's not super necessary.
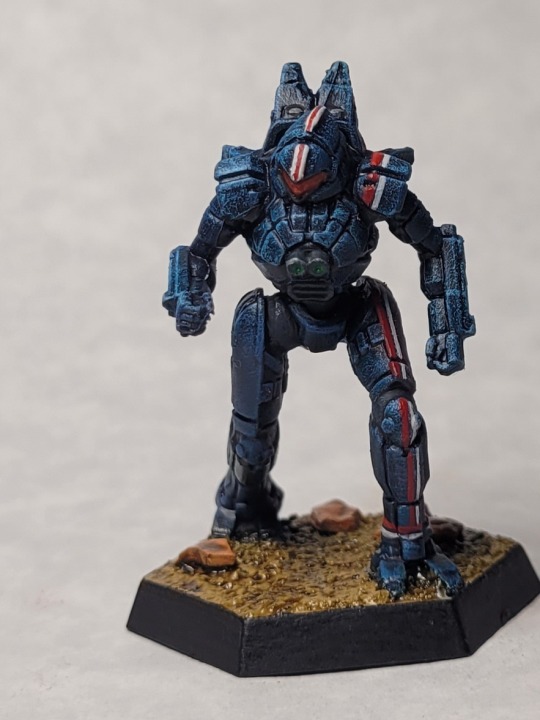
Now that we've got our blue sorted out, we've got a bit of a 'draw the rest of the owl' step. First, you're going to want to go back over any of the parts of the model that you want to be exposed mechanical elements with your dark grey. I painted the joints in the legs, the shoulders, the lasers and the big vent on the chest, the 'chin strap' under the spider's canopy glass, and the jump jets in this color. Then, wash the grey with your favorite dark wash- I really like the deep blue of drakenhof nightshade but something like nuln oil will also work well for this. Finally, apply a light drybrush of your light grey to the shaded grey. If a part is too recessed to easily drybrush, you can leave it as is or do use a small brush to carefully highlight it. You should also add a small dot of green to the inside of each of the laser barrels at this point.
Next, paint the mech's canopy glass silver. Once that's dry, paint over the silver with blood angels red or any other colorful contrast paint for a vibrant metallic color.
If you're following along with my desert basing, paint the sand on the base khaki and the larger pebbles with your fleshy orange. Then paint over everything with agarros dunes contrast or a dark brown wash like agrax earthshade.
And with that you have a Spider that's fully ready for tabletop with 3 colors, shading, and a textured base. There's still a couple more things we can do if you have more time and patience that I'll detail below.
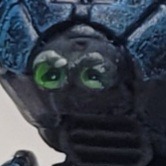
To apply some quick and dirty jeweling to the lasers, start by painting a half circle of light green on each barrel, focused on one of the bottom corners. Paint the recess of the barrel with a dot of dark green and put a tiny little dot of white opposite the half circle of green, which should now be more of a crescent shape with with dark spot in the center.
While the white is still in your pallet, you can also highlight the parts of the off white stripes on the mech most exposed to overhead light like the lower thigh, knee, and shoulder. Do the same thing with the red stripe using a light red as well.
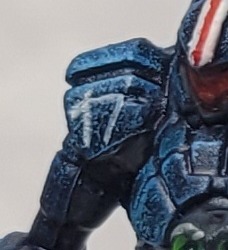
At this point I also added unit numbering to the mech's shoulder. Basic numbers are a really good way to practice your fine control and I try to consistently add a couple to each of my projects. Use your off-white well thinned and a fine detail brush, lock your hand holding the model against your hand holding the brush just below the wrists, and then draw the paintbrush 'downwards' with a pulling motion. This should keep you your line relatively straight and fine.
While you can keep the jump jets on your mech dark I prefer to paint mine with some orange in them. Using the fleshy orange from earlier, paint most of the interior of each jump jet, then add a dot of yellow at the very deepest recess of each one.
Finally, let's add some hazard stripes to the mech. Pick out a few areas near joints or vents that seem like a bad place for an Astech's hand to go and paint in a thick 'edge highlight' of black. Then, going back to yellow find the center of the line and add a diagonal tickmark there. You may need to go over this more than twice to get a strong color depending on your yellow. Once your centerline is marked, work out towards the edges, painting another ticmark at regular intervals until you hit the ends of the Black.
#hobby#battletech#miniatures#mini painting#battlemech#mecha#mechwarrior#mech#light mech#spider#first davion guards#house davion#painting tutorial#tutorial#c&c pls
34 notes
·
View notes
Text
Made a tutorial how I paint fabric in still life studies for my friends but y’all can have it too

#my art#art#art tutorial#fabric#fabric tutorial#paint#painting#painting tutorial#if you see any spelling errors no you don't
190 notes
·
View notes
Photo


Quick overpaint of an old work.
Back then, I tried hard to paint natural looking sunlight. Now I understand it better 🌞
Sunlight in general creates harsh shadows. It looks like just 2 main values: light and dark. There will be generally hard eges and a clear separation of the 2 main values.
The old version has too many gradations and soft edges to read as sunlight in many parts. It actually looks more diffused, like cloudy daylight.
175 notes
·
View notes
Text

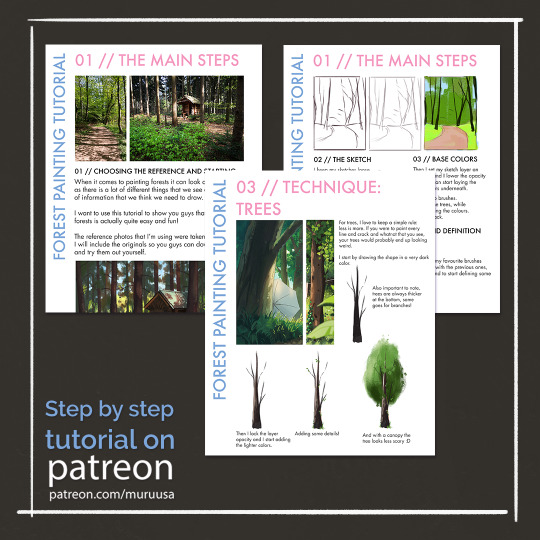
I created a new tutorial that is available on my Patreon!
This tutorial is about painting forests specifically and includes some techniques and tips on drawing trees and the forest floor.
#art#digital art#digital art tutorial#painting tutorial#forest tutorial#art tutorial#art resource#illustration#personal work#2023
74 notes
·
View notes
Note
Would you ever do a tutorial on how to draw tit so well? you are a titmancer!
Thank you! 🧙♂️
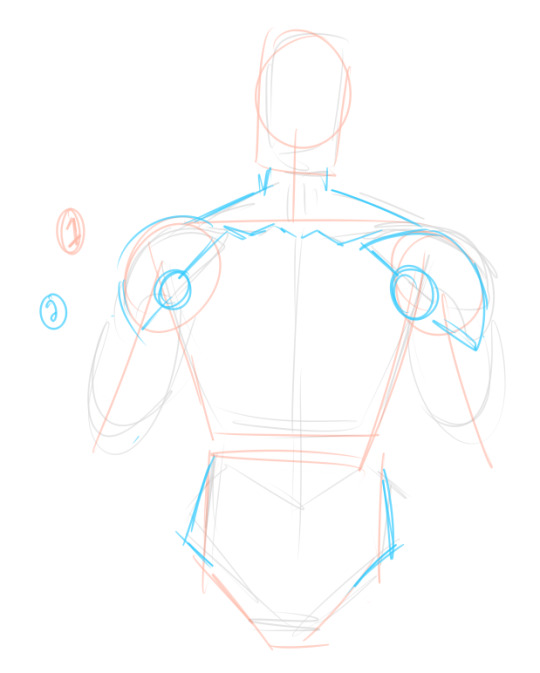
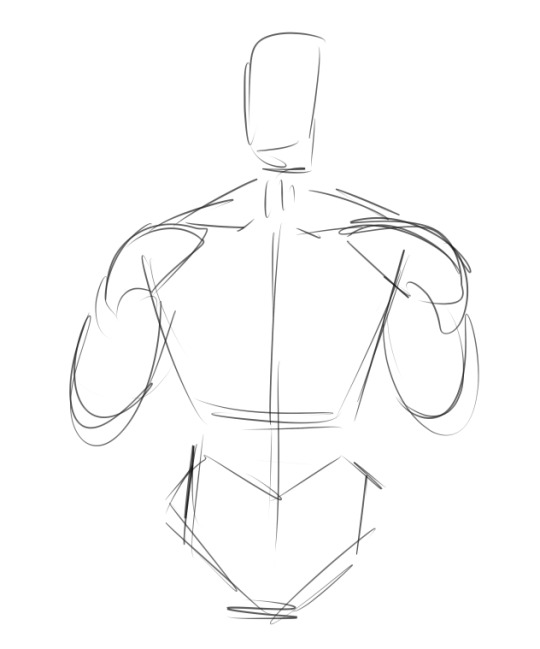
getting used to the Shapes of masculine chest/arms/etc takes some time but tbqh it is sort of just rectangle with more chunks
sketch the body
hes a quick how-to for the front angle and how i sketch the pecs
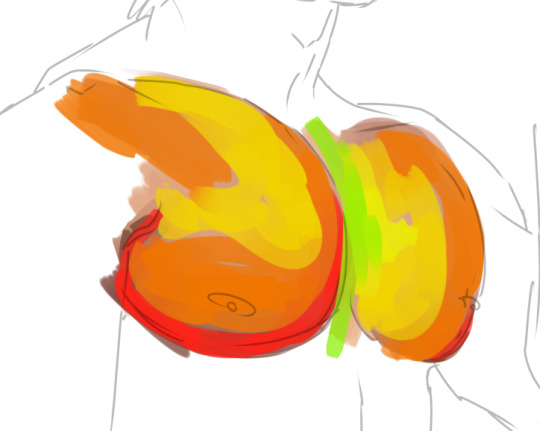
and then I put together a colour palette: i believe skin tones are not just a "base" and then the "darker shadowy colour" and then the "highlight colour"; it is made of so many blue-green-purpley-yellow-orange tones you wouldn't think to include, and all of those together are what creates the illusion of one solid skin tone. Study from real life and use photo references as much as you need. Challenge yourself and get lots of practice! I make a palette from photos when i want to make sure I'm accurate. Here's an example:
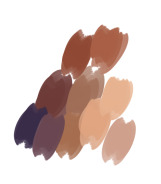
In this, there's light, saturated tones and desaturated colourful ones in deep purples. I tried to get as many different-looking swatches as possible; when I paint, these will blend together and create hundreds of more colours on the canvas. Try to not over-swatch or you'll be sitting there for ages and be focused on perfection.

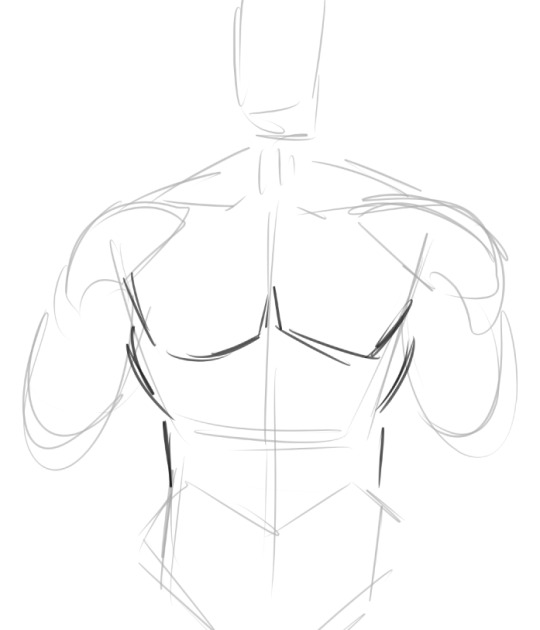
here, I'm getting the general shapes of shadows. In most real-life situations, shadows are not pure black, and highlights are not pure white. Of course, that isn't always true!
I'm not working from a photo reference in this because I am very very very very used to painting boobie but i REALLY recommend using one until you could do it blindfolded. I use references ALL the time, for colour and shape and lighting and angles I have trouble with. There is absolutely no shame in it; you are creating a strong foundation to draw from :)

I'm making it very stark so it's easy to see: the top "square" of both pecs is more shaded where it meets the collarbone. Notice how these bits of shadow don't touch; there's a highlight separating them. This creates the illusion of depth! Shading the body is all about shading the simple shapes plopped on top of eachother :)

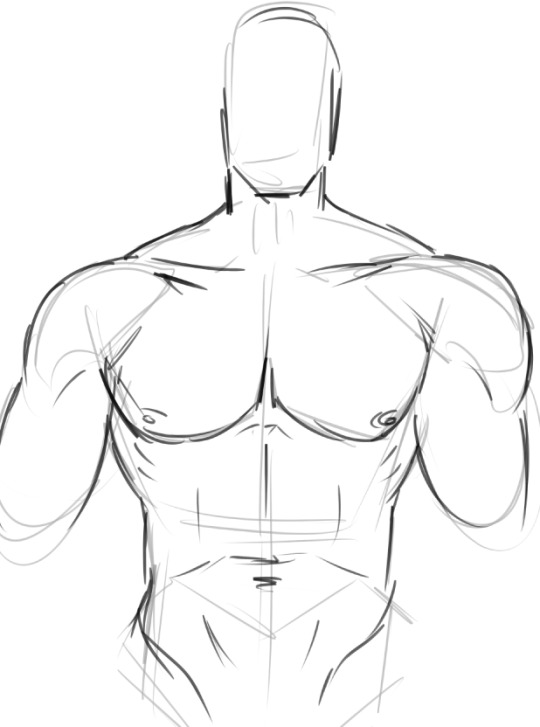
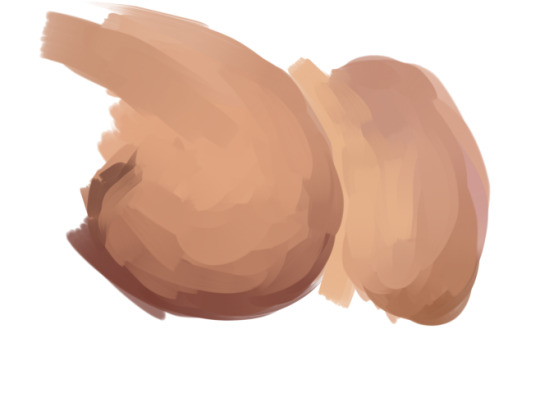
I added purple to the underarms area; I find that adding a saturated colour fools the eye to think the shadows are more intense without needing to dip into a dark, instense palette. I blended out the colours on the pec to make them less stark: see how the general shape of shading versus shadow is the same on the left and right, but the left is more gentle. A lot of my technique is memorising What Stuff Goes Where; for example, the little triangle directly under the collarbone where it meets the shoulder. The collarbone itself is a strip of highlight, with that darker triangle directly underneath. This makes a HUGE!!! difference in how you perceive the shape.
As a general rule (with basic, diffuse lighting on the subject) I will do a strip of shadow along the bottom of the pec (ending a little above where the nip is at; this depends on how big the pec is. Someone with a smaller one will have a taller shadow!!) and then it is IMMEDIATELY a highlight in a kind of "U" shape. A lot of the form comes from choosing to blend slowly between dark and light versus putting darkness and lightness side-by-side. Practice and study photos and you will see what I mean, I promise!!

And there you have it!! The pec is just one part but it can really level up your apparent skill when you know how to draw or paint one to your standards. :)
Another quick tip: these general rules also apply to breasts, though the shadow at the top near the collarbone is far more gentle; that sharp shadow implies firmness and flatness.
And: when more at an angle, you can draw pecs quickly by doing this:

"the closer tit is dark around the edges" up beside "the right tit is highlighted on the edge"; the contrast between dark and light implies the two side by side :)
See, even without lineart, it implies Mounds:
I hope this is helpful!!!
163 notes
·
View notes
Text


Throwback to these plant illustrations I made back in 2021🌿 If you’re interested in learning how I painted these, I have a long video class breaking down my process up on Patreon! I’m looking forward to making more educational content in the future, I just love explaining things 🤓
42 notes
·
View notes
Text

We've posted all the Colonel Colm Corbec from Gaunt’s Ghosts tutorials on Patreon. Now you can find both tutorials on individual elements of miniature for a subscription, and buy a fully assembled tutorial in PDF format.
We are waiting for your feedback and suggestions.
#nightscalestudio#miniaturepainting#paintingminiature#warhammer#warhammer40k#warhammer40000#astra militarum#gaunt's ghosts#painting tutorial
53 notes
·
View notes
Last Seen Blogs
drivewaycleaning-blog1
Power Washing Dublin

cupcakeblake
t o g e t h e r
readysetbo
Bo Mason

crewel-intentions
Two Tired Ex-Criminals

shesfromcleaveland
BABES IN CLEAVELAND