#gyoza dumplings
Text

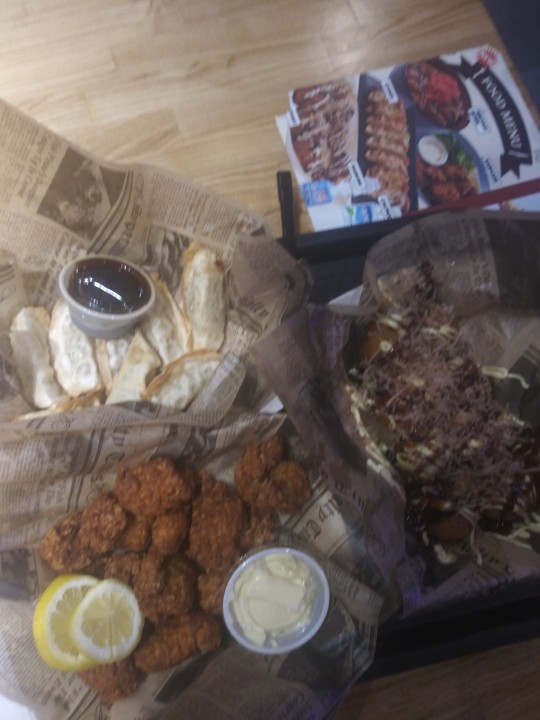
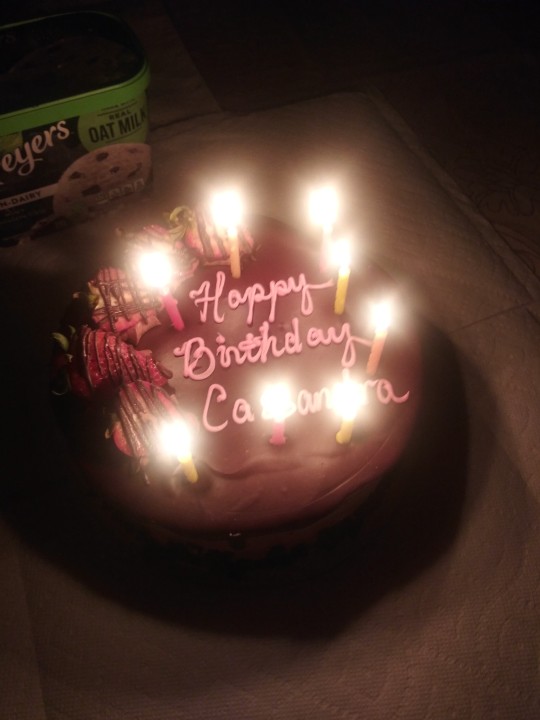

My birthday pics!
33 YEARS OLD YAHOO!!!
💯🌸🌈🎊🎉🎈🎁👑🦋🎂🍱🎮🕹🩷💋🌟
#Happy Birthday to Me#Arcade#Dance-A-Round#Food#Japanese Food#Karaage Chicken#Gyoza Dumplings#Takoyaki#Cake#Birthday Cake#Ice Cream#Mint Chocolate Ice Cream#💯🌸🌈🎊🎉🎈🎁👑🦋🎂🍱🎮🕹🩷💋🌟#April 3
3 notes
·
View notes
Photo


thatfoodiejess
17K notes
·
View notes
Text

Char Siu Chicken Gyoza Noodles (via Instagram)
554 notes
·
View notes
Photo

https://www.instagram.com/p/Cc678kVrRJw/
437 notes
·
View notes
Text
El mejor invento del Temu:
Enviado por: Carmen
74 notes
·
View notes
Text

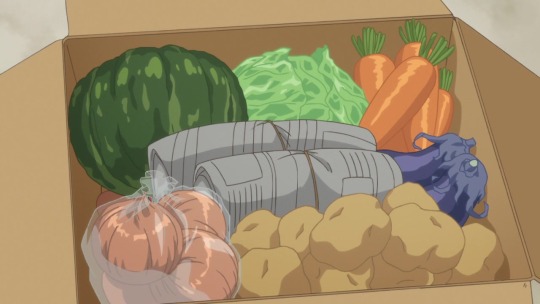

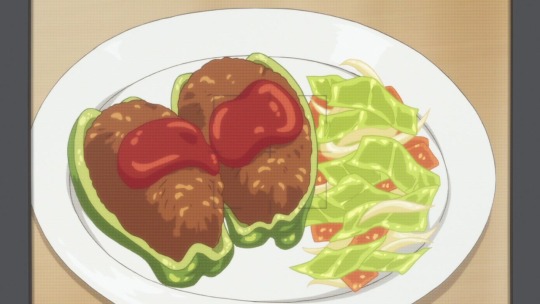

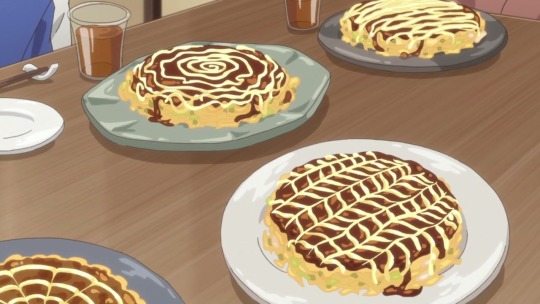


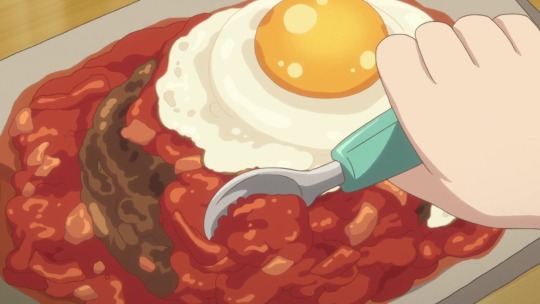
Sweetness & Lightning / Amaama to Inazuma Food (2016)
#anime aesthetic#anime screencap#anime#2016#sweetness and lightning#amaama to inazuma#amaama to inazuma food#food anime#anime food#anime snack#delicious#meal#gyoza#soup dumplings#dumplings#donuts#vegetables#bento#bento box#crocket#patty#okonomiyaki#steak#eggs#potato#pumpkin#onion#paprika
165 notes
·
View notes
Photo
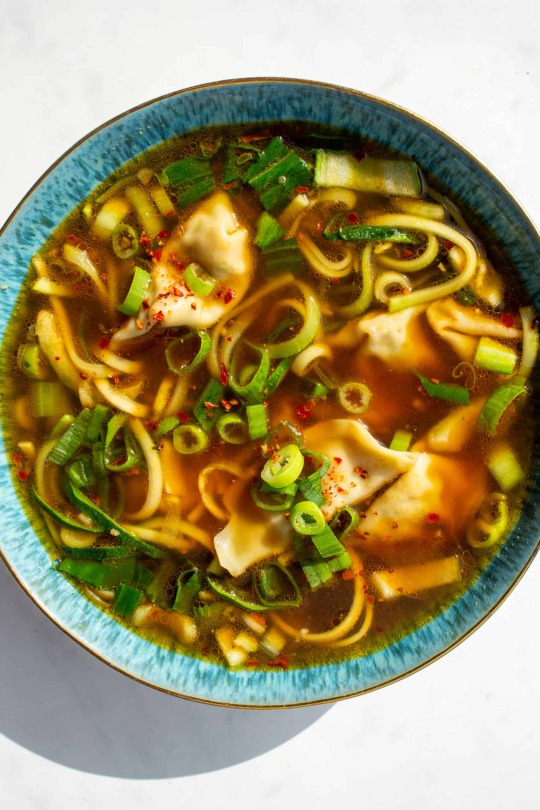


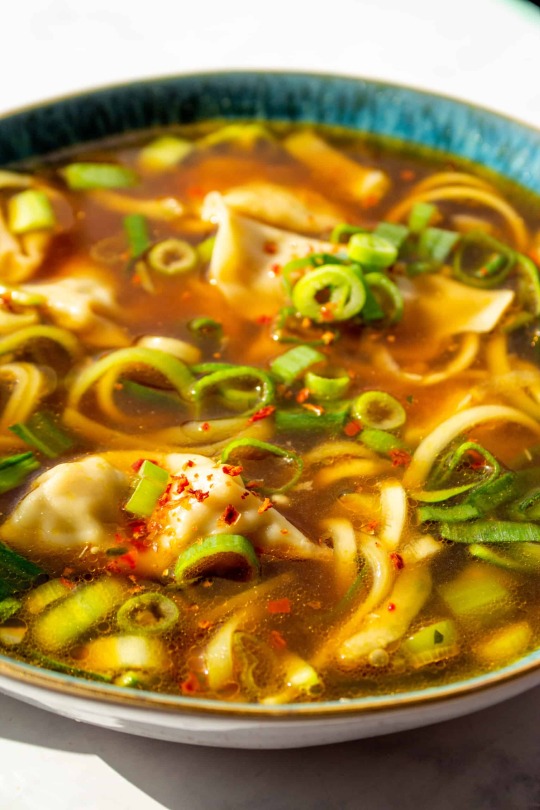
DIY Gyoza Soup (Japanese Dumpling Soup)
This 10 minute gyoza soup is the perfect speedy lunch/dinner. Similar to a Japanese dumpling soup, it’s packed with veg.
✖✖✖✖✖✖✖✖
sew-much-to-do: a visual collection of sewing tutorials/patterns, knitting, diy, crafts, recipes, etc.
#DIY#recipe#food#gyoza#soup#japanese#japan#dumpling#lunch#dinner#simple#easy#quick#veggie#veggies#healthy#green#yummy
174 notes
·
View notes
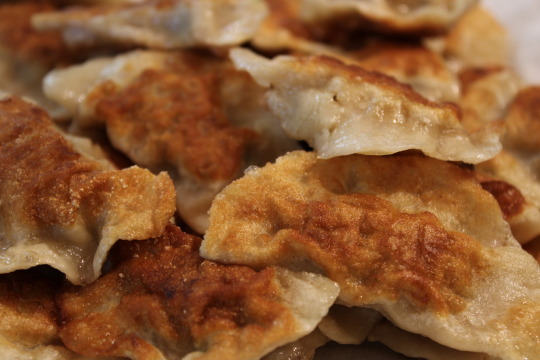
Photo


開運(日本酒/純米 涼々)、及び、“くりばやし”の生餃子(えび、肉ニラ、生姜の三種)を焼いたもの。
Kaiun(Japanese Sake) & “Kuribayashi” Gyoza Dinner - May 2023
Previous Post:
https://chuck-snowbug.tumblr.com/post/718232880015458304
84 notes
·
View notes
Text

Vegan Kimchi Dumplings (Mandu)
#vegan#dim sum#korean cuisine#East Asian cuisine#dumplings#mandu#kimchi#tofu#green onion#bean sprouts#garlic#vegan beef#gochugaru#soy sauce#sesame oil#gyoza wrappers
28 notes
·
View notes
Text

Full of savoury meats
125 notes
·
View notes
Text
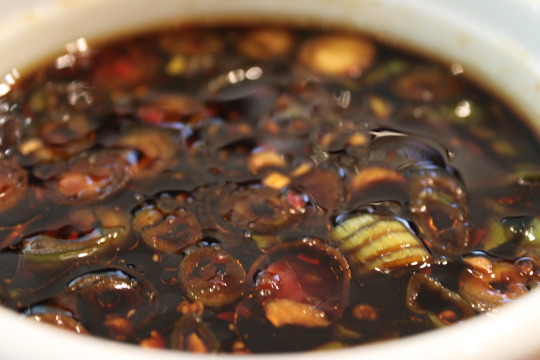
鍋貼
#My mom's homemade dumplings are so good! I miss them so much 😭#also featuring a richly seasoned soy sauce dip!#me want eat#food photography#food#photography#foodcore#dumplings#gyoza#potstickers#cooking#homemade#do not upload on other sites/steal
13 notes
·
View notes
Photo


potapotasoup
551 notes
·
View notes
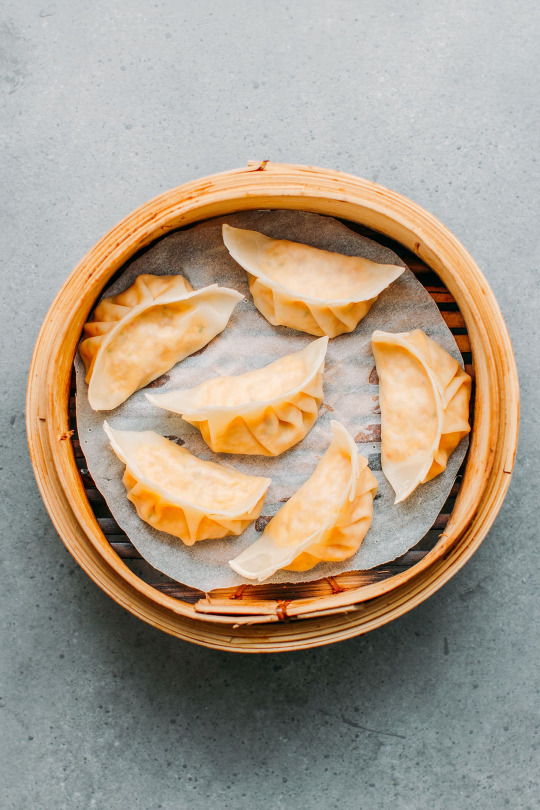
Text
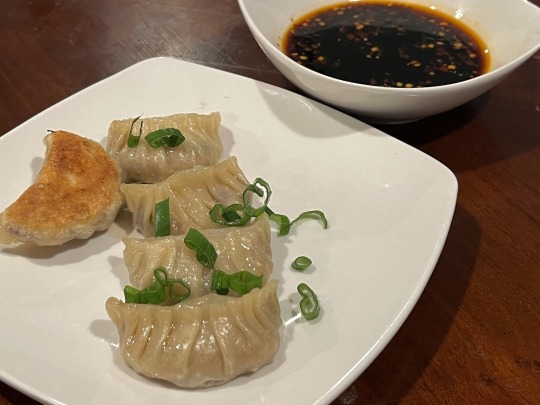
[ID: Five gyoza, each with ten small inward-facing pleats, sit on a plate garnished with green onion. One of the gyoza is upside-down to show a golden brown bottom. A bowl of dark brown dipping sauce is visible in the background. End ID.]
Tofu and vegetable gyoza / 豆腐餃子
Japanese gyoza are similar to Chinese potstickers, but they are usually smaller, with a thinner wrapper. These gyoza consist of a tender wrapper and a juicy, umami vegetable and tofu filling, pan-fried and steamed to produce a crisp bottom and served with a tangy, slightly spicy dipping sauce. I like to make a big batch of these and freeze some to add to a quick meal throughout the next few weeks.
Recipe under the cut!
Patreon | Tip jar
Makes about 45.
INGREDIENTS:
For the wrappers:
2 cups (240g) all-purpose flour
½ tsp salt
3 tbsp vegetable oil
About ½ cup (120mL) water
For the filling:
3/4 cup (75g) green cabbage, minced
1 medium carrot (50g), minced
1 small stalk celery (30g), minced
5 shiitake mushrooms, minced
2 stalks green onion, thinly sliced
7oz (1/2 package) firm or extra firm tofu
1 clove garlic, minced or grated
1/2-inch chunk (5g) ginger, minced or grated
2 Tbsp cornstarch
2 Tbsp soy sauce
1 Tbsp red miso paste
2 tsp toasted sesame oil
1 tsp salt
1/4 tsp white peppercorns, toasted and ground
Also try other vegetables and herbs such as daikon (Japanese radish), chives, &c.
For the dipping sauce:
1 Tbsp rice vinegar
1 Tbsp soy sauce
1 tsp sesame oil
1/4 tsp chili oil (optional)
INSTRUCTIONS:
For the wrappers:
1. If measuring by volume, measure flour by spooning into a dry cup measure and levelling off. Combine flour and salt in a large bowl. Add vegetable oil and stir.
2. Add water slowly until a soft, non-sticky dough forms. You may need more or less than 1/2 cup. Add more water, 1 Tbsp at a time, if dry flour remains in the bottom of the bowl. Cover and allow to rest for 10 minutes.
3. Knead dough on a lightly floured surface for about 10 minutes until very smooth. Cover with a damp kitchen towel and allow to rest for half an hour to make rolling out easier.
4. Divide dough in half, leaving the half you're not using covered (this makes it easier to achieve a thinner wrapper). Roll out each dough half on a lightly floured surface into a large rectangle of about 1.5mm thickness. Allow to rest, covered with a kitchen towel, for another 30 minutes.
5. Use a 3" (7 1/2 cm) cookie cutter or cup to cut out circular gyoza wrappers. Lightly dust each wrapper with cornstarch and set them aside on a covered plate. Allow scraps to rest in plastic or under a damp kitchen towel before rolling them out again.
For the filling:
1. Drain tofu. Press by wrapping in a clean kitchen towel and placing on a clean surface or cutting board, then placing a plate or other flat surface over the tofu and weighing it down with a heavy object. Press for about an hour to remove excess water.
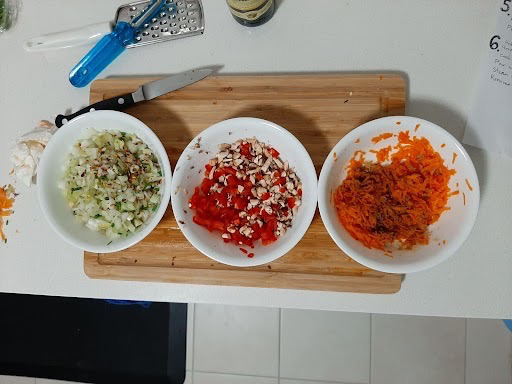
2. Meanwhile, shred cabbage by slicing in half lengthwise (through the root) and cutting out the stem, then placing cut-side down and slicing thinly lengthwise to achieve thin strips. Finally, cut strips into a fine mince.
3. Peel carrot and mince; mince celery and mushrooms. Alternately, prepare all vegetables in a food processor.
4. Cover vegetables with about 1/2 inch table salt and allow to sit for 5-10 minutes to release moisture. Rinse briefly to remove excess salt and then squeeze firmly over a colander to get rid of moisture. A too-wet filling means a decrease in flavor and a higher likelihood of soggy gyoza!
5. Dice tofu. Mix tofu with mushrooms, cabbage, carrot, celery, green onions, garlic, and ginger in a large bowl.
6. Whisk soy sauce, miso paste, sesame oil, salt, white pepper, and cornstarch in a small bowl until well combined. Add to vegetable mixture and stir to combine.
To assemble:
Assembling gyoza the way shown in the recipe photo takes a little bit of practice. You want to make 10-12 tiny, even folds along one edge of the gyoza--these can be facing the same direction for the length of the gyoza, or they can all face outwards from the center. These tiny folds help the dipping sauce to cling onto the gyoza (as well as looking quite nice), but if you don't want to do something so involved, you can simply fold the wrappers in half around the filling and press to seal, then fry the gyoza lying on one side. They'll still turn out delicious!
1. Take one wrapper in the palm of your non-dominant hand and place a spoonful of filling in the center. (Use less filling to give yourself more wrapper to work with if you're not experienced with shaping dumplings.) Use a finger dipped in some water to wet the edges of the wrapper--this will help to seal it closed around the filling.
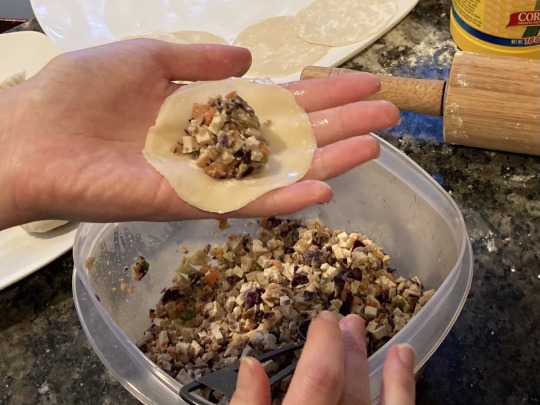
2. With your non-dominant hand, hold the gyoza so that it's roughly folded in half. To make gyoza with folds all facing the same direction: Using your dominant hand, pinch just the half of the dough closest to you into a small fold, then press it down against the half of wrapper furthest from you to seal. Continue making small folds in this manner, each one slightly overlapping the last, until the gyoza is completely sealed.
I like to make gyoza with folds facing outward from the center; to do this, first pinch the gyoza to seal it at the halfway point widthwise, then make folds as described above (pinching just the half of the dough closest to you into a small fold, then pressing it down against the half of wrapper furthest from you to seal) from the center to one edge of the semicircle Then, repeat the process from the center to the other edge, folding in the opposite direction this time.
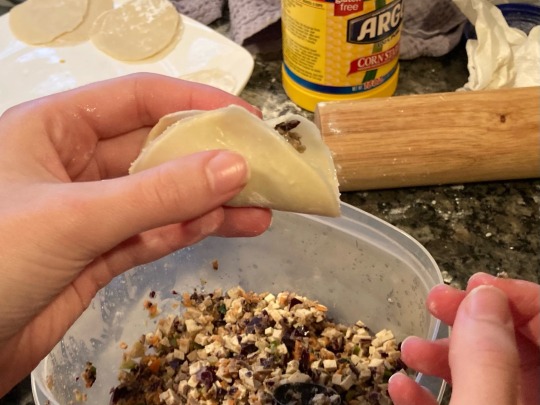

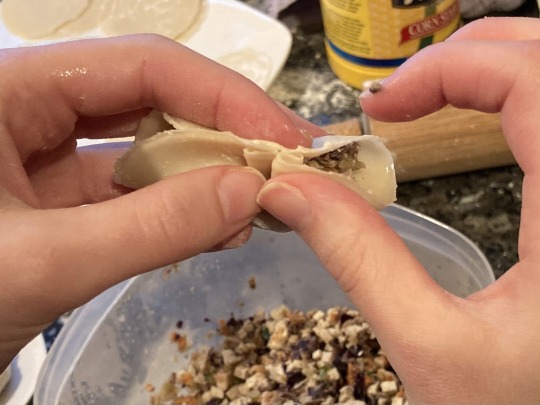
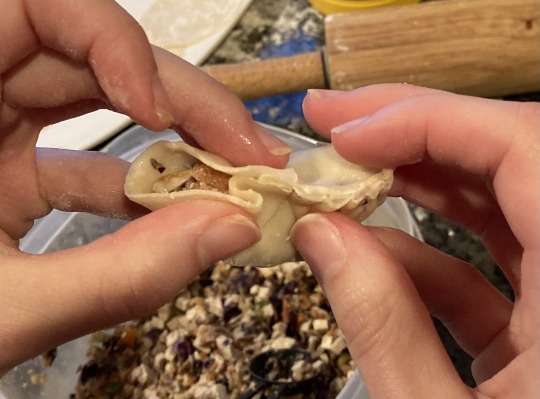


3. Place the gyoza on a plate and cover with a kitchen towel to keep it from drying out. Continue in this way until you have formed all of the gyoza.
For the dipping sauce:
1. Combine all ingredients in a small bowl.
To cook:
1. Heat 2 tsp of a neutral oil on medium in a large skillet. Add gyoza in a single layer and allow to fry until their bottoms are lightly golden-brown.
2. Pour 2-3 Tbsp of water in the center of the pan (not over the gyoza). Immediately cover the pan to allow the gyoza to steam until slightly translucent, about 3 minutes.
3. Uncover the pan and cook until the water has completely evaporated out.
4. Drizzle toasted sesame oil over the gyoza to re-crisp the bottoms and add flavor. Cook until the bottoms of the gyoza are deeply golden brown.
Serve hot with dipping sauce.
Gyoza may be frozen and fried later. Form them and store them immediately (without frying or steaming them) with sheets of parchment paper between each layer; fry and steam them directly from frozen without thawing.
#gyoza#vegan cooking#vegan recipe#recipe#recipes#tofu#carrots#celery#mushrooms#green onions#Japanese#cooking#dumplings
147 notes
·
View notes
Text
#fried dumplings#dumplings#gyoza#pork#shrimp#potstickers#food#dinner#lunch#asian inspired#asian food#video#tiktok#foodtok#pork belly
118 notes
·
View notes
Text
Pot Stickers / Dumplings / Gyoza / there's too many names for this
To spread awareness of Camp Quality Hong Kong, a charity which supports children diagnosed with cancer, I decided to make vegetarian potstickers!
Camp Quality Hong Kong is a bit of a stretch when it comes to Brad Pitt's charity donations, but it's partnership to Kiehl’s as well as Brad Pitt makes for way for a delicious meal.
Now, I already had most of the ingredients in the recipe so I didn't bother to go out grocery shopping for the other ingredients. I just improvised with what I already had, and hoped for the best.
So no cabbage, no cilantro, no sesame or neutral oil (I already had olive oil). I subbed out sherry for balsamic vinegar instead, and for the soy sauce I just used my calamansi soy sauce.
INGREDIENTS
3 tablespoons neutral olive oil = to make more healthier
20 chives, finely diced = instead of green onions
1 garlic, minced
3 mushrooms, finely diced
1/4 red bell pepper, finely diced
1 carrot, shredded
Salt
Ginger powder = I ran out of actual ginger
Chilli
Pepper
2 tablespoons soy sauce = I used Calamansi soy sauce
3 tablespoons of balsamic vinegar = instead of sherry
1 teaspoon sugar
Gyoza wrapper
1/4 cup water (60 mL) for sealing


The garlic granule is a lie.
Its actually chilli.
And always had been chilli.
Preparation
I finely dice the vegetables and grouped them together according to the recipe. I put the onions, garlic, chives, and ginger powder in one bowl. I didn't have any green onions so I put in some chilli in the bowl instead. Then I prepared another bowl and filled it with the mushrooms and bell pepper. And a third bowl for the shredded carrot and sprinkled salt and pepper on it.
Heat 3 tablespoons of oil in a deep pan or wok over medium heat.
Add the onion, ginger, and garlic and cook until the onion is translucent.
Add the mushrooms and bell peppers to the pan. Cook until the mushrooms are softened.
Add the carrots, salt, and pepper.
Cook for another 3-4 minutes, until tender, then remove the pan from the heat. Set aside to cool completely. Once cooled, I added the soy sauce, sesame oil, cooking sherry, and sugar. Mix well.

Add a spoonful of the vegetable mixture to the center of the wrappers. Dip your finger in water and run it around the edge of the dough. Fold the dough over the filling, pleating and pressing the edges together to seal. And for extra measure, I folded the pleats over to secure the fillings inside.
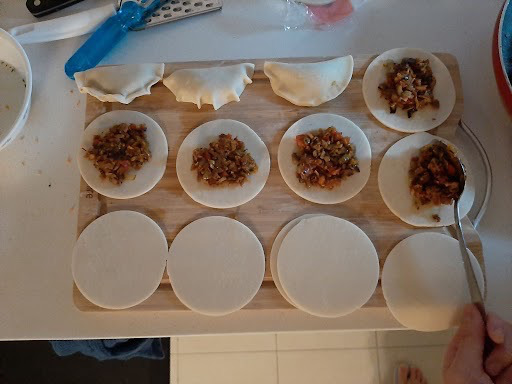
I was feeling lazy and didn't want to wash more dishes, and since I already had a steamer, I just put the pot stickers in there.
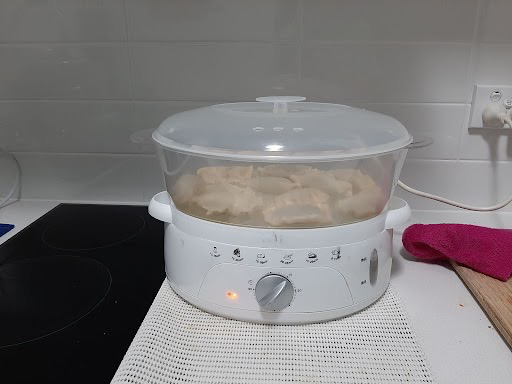
I steamed them for 20 minutes to really cook the wrappers.
And voila!


And just serve with any choice of dipping sauce.
Honestly? It turned out better than I expected. But I think I needed to steam it a bit more since the wrapper was just a bit thick and chewy in my opinion.
Overall, pretty good 👍👍

#pot stickers#dumplings#gyoza#brad pitt#if brad pitt eats it i will to#and cook it#Ocean's 13#care to learn#spicing up my life#and my taste buds#literally its a bit spicy#vegetarian#vegetarian dumplings#vegetarian recipes#vegetarian food#vegetarian cooking#the garlic granule is a lie it was actually chili#we were all lied to#food#foodblogger#food blog#recipe blog#there is no such thing as too many tags
41 notes
·
View notes
Photo

Homemade Potstickers (With Bacon Cheeseburger Filling!)
These potstickers are perfectly chewy and crispy on the outside, with a delicious juicy bacon cheeseburger filling you’ll love! The combination of savory bacon, melted gooey cheese with beef, pickles, and mustard wrapped in a crispy dumpling skin makes these cheeseburger dumplings the ultimate snack!
21 notes
·
View notes
Last Seen Blogs

posterconnection
Poster Spotlight

nhett
Little Bit of Everything

gay-slinkys-blog
gay slinky

sweetsunshine28
Sweet sunshine

princessskye09
princess