#grid method
Text
I think I genuinely did peak at art when I was 14 like what is that shading why was I so good at traditional
Maybe digital art isn't for me /hj
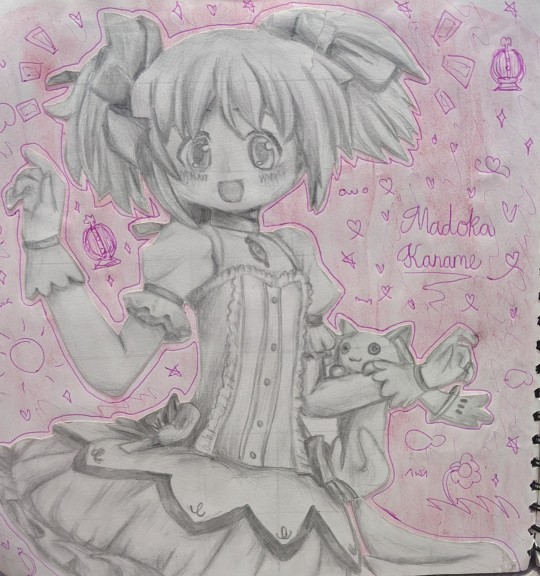
#used the grid method as seen by the poorly erased lines rip#so many art teachers have said they don't recommend the grid method but bro i drew stuff like this when i used it#grid method on top#art gcse#puella magi madoka magica#madoka magica#madoka kaname
70 notes
·
View notes
Text

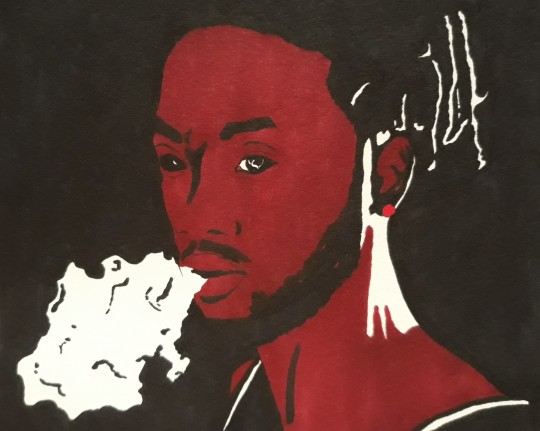
jerma for my art final. speedpaint under the cut
#full disclosure: i traced his fingers and eyes </3 turns out i did the assignment the really hard way on accident (used a grid that wasnt#the right size)#dw my art teacher knows haha#ive never done anything like this before so my method for choosing the right colours could be really off idk#jerma#jerma985#digital art#pictors pictures
42 notes
·
View notes
Note
He doesn't even know that victim doesn't know it's him. When he realizes he has kind of an "oh shit" moment of panic because now victim does know.
YEAH... THIS POOR DUDE HAS NO IDEA THAT VICTIM GENUINELY WANTS TO LIKE, TORTURE HIM.
#dark was one thing#but victim is on a completely different level bc they have SO MUCH MORE pent up rage#not to mention multiple animation tools#and also instead of just being happy to see him emotionally suffer they want to like#put him through the most pain that they possibly can#or worse if you want to get a little off the grid with this. might just leave alan to rot in there just like how alan left victim for dead#sensory deprivation as a torture method and all that#tommy's stickmen tag
14 notes
·
View notes
Text
The second you put math into art the art dies
#art#hot take#<- maybe? Idk probably#I just hate math a think all those things with giant grids and a million (literally a million) fucking lines as ‘guides’ are a bit silly#dare I say stupid even#stop putting math into art!#I don’t need you to tell me that my piece would look better if I used a 123 degree angel at point 24 on the y axes of the later box method#or whatever the hell fuck you guys talk about#I mean good on you if it makes you happy but like#Idk man…#it’s just a bit strange to me
2 notes
·
View notes
Text
root sketches
#my art#slipknot#jim root#james root#fanart#sketches#even when using the grid drawing method guitars and hands are a nightmare to draw
114 notes
·
View notes
Text
every time i draw its like “oh my god how the fuck do i do this. theres no fucking way i can draw” and then i black out for 20 minutes and theres a mona lisa style sketch in front of me. how
#dont ask me to explain my artistic process. i dont even understnd it#literally looking back on my recent art like Whatt he fuck …. What the fuckkkk….#my process actually:#shitty terrible sketch based on eyeballinh the reference#warp it to fit the proportions better (NOT TRACINGG but pretty much similar idea. i hust use the transform tool)#???????#eyeball cleaning up the entire thing#thats it. i guess ?!???#i feel annoyed when i cant eyeball the reference Fully but like whatever it works and im getting better#its kindof the same principle as the grid method. lol#once its lined up how i want it im pretty good at spotting where things curve and bend and fold etc#oops got distrrated drawing lol. also i realised i spend ages touching up one part of a drawing meanwhile the rest is like. incomprehensible#thats kinda funny
1 note
·
View note
Text
That new drawing challenge video is the proof that Esteban and Fernando share a single braincell because everything on the board was positively unintelligible yet they knew exactly what everything was
#f1#esteban ocon#fernando alonso#alpine#meanwhile Kevin and Mick were very methodical with specific drawings#and Pierre and Yuki were#well#pierre and yuki#Chaotic little gremlins#the usual y'know#anyway Esteban and Fernando are the most underrated pairing on the grid
32 notes
·
View notes
Text

man michael really aged poorly (faul trutherism for scale)
7 notes
·
View notes
Text
you would not believe the amount of website development css bullshit i had learned in the process of wanting to format those fake android text message screenshots exclusively through code and not an image, while also!!! having it look readable with the custom css disabled. (as it would be when the fic is downloaded etc etc).
plus, you know. im a huge stickler for accessibility. and you can't ctrl+f an image.
speaking of: theres not a single image involved! even the icons are shaped exclusively through css code, something that i previously didnt even know was a thing. i discovered that working on this, and it seems like a weirdly pointless option especially in a world where you can just embed an icon sheet and use that, BUT it is extremely handy in restrictive environments like ao3 that only allow limited html/css.
im not a huge fan of using external links in fics... as a longtime internet user, linkrot is a real problem. which means im not a big fan of using images in fics. its... just... its not very archival!! and i think that defeats the purpose of the whole dang place!!!! (this is my Hot Take, and also a Hill I'd Die On)
anyway big ups to mimzy for entertaining my complaints about embedding screenshots into their fic and using fancy css workskins instead. and also writing a good fic in a unique semi-meta POV.
the hard sell rules which is why i went through all this trouble, if you are a fic-reader consider reading this mjf and max caster fic.
since im an image-person who likes posting images here is a screenshot of my test environment with placeholder text (very in character) and also what it looks like with creator styles turned off

#talkzon#i also found a typo error with the workskin CSS whitelist and had to send in a support ticket about it...#...and then they got back to me and said that well actually they want to get rid of the grid align tags because theyre deprecated#😭noooo!! thats not what i wanted#and augh every time i thought i was done and made something look nice i'd go test it ON the site in a draft and find out that#something would be incompatible (grid align stuff) or the html-sanitizer would break my delicate house of <span>s (tables! tables broke it!#and i'd be like aaaaaaahhhh noooo this works fine on a normal webpage!!! curses!!!!!!! i'll need to find an alternative method#(this happened like three times)#anyway. every day i am compelled to do low-level webdevving#if only i had any reason at all to make a neocities site#anyway *poses like a cool guy who is also a huge fucking tech nerd* ask me about computers
7 notes
·
View notes
Text
still can't believe grid method is an actual legitimate accepted tool in art like im literally just putting some silly little lines over my reference pic and then suddenly my painting looks photorealistic now what the hell is up with that
#and if it still looks wonky i can just make the grid smaller ?? like at what point is a grid small enough to be cheating . is there a point#cause rn this just feels like tracing but with extra steps and without the tracing just same or even better result#and i get that it doesnt help me at all w learning how to draw without a reference but still#my friends r insanely good artists and they were saying oh yeah i could never figure out the grid method and like ???#its literally just my hack for making a drawing without actually . having to know how to draw#mind blow#anyways#FUCK proportions 🥰🥰❤️❤️#special shoutout to eyedropper too 🙏#my paintings actually looking uhh too realistic for what i had in mind so i might have to add some stylization at the end
6 notes
·
View notes
Text
.
#shower thoughts realizing that silva could have literally acted as the replacement for using a fuck ton of pokemon#to charge the weapon 🙃#i forget if the game actually does this but i do remember the manga doing it after they lose xerneas......#because i know the rocks are there. because thats the method AZ used for at least one of the blasts depending on hcs#[my hcs are that he used 50% of the legend for both and then the other 50% for both firings was filled with pokemon]#🙃 literally silva acts as a double failsafe.............#for both if the legendary manages to escape + if they dont wanna use the pokemon tied to rocks for a charging grid....#they can just use the kid who's been collecting a fuck ton of energy inside her body.#allievate the total amount of suffering pokemon#🙃 fucked up i tell you. she really shouldnt be able to survive. but yveltalness proves otherwise.#ooc ;; pterodolphin has no devil fruit#<- i will turn this into a study post later#needed to get my tboughts down#before i forget#verse ;; pokemon ;; beyond destructing and falling petals#;; ask to tag ;;
4 notes
·
View notes
Text
Here’s a quick guide to how I use digital patterns while lacking a printer. It’s best if they aren’t overly-complicated and detailed (i.e. this won’t work for cross-stitch patterns but really anything else will be fine), and you will need a basic knowledge of a photo-editing software.
So I take my pattern into a photo-editing program and add a coloured translucent layer the size of a sheet of printer paper. Really you could use any size of paper for this, so long as you are consistent the entire time. I’ll stick with printer paper for this example though. I overlay another translucent layer with a grid of inches. I then lay out copies of the coloured original layer on top of the pattern until the pattern is covered. Usually some are vertical and some horizontal, whichever arrangement will save space. It’s important that each coloured layer have one corner fitted directly into the corner of an inch square on the grid layer. There will inevitably be areas where the layers overlap each other because of this, so just make sure the entire pattern is still covered. You’re now done the digital part!

Next you get out a piece of printer paper and starting from one corner, make a mark every inch, then make that into a grid. I recommend doing this in Sharpie or something equally dark so it shows through another piece of paper on top of it easily. Flip the page over and trace that grid onto the other side. This means that no matter what corner you placed the coloured layer on in the computer file, you will be able to use the same piece of paper. You then find the corner of the grid your first coloured layer is lined up with and place that in the corresponding corner relative to you (upper/lower right/left). You might have to flip the grid paper over to do this. Now take another piece of paper and place it on top of your paper, lining it up exactly with the other piece. You then find the lines of your pattern on the computer and where they overlap with the grid, and mark out each intersection on your plain paper with little dots. So maybe one line goes through the one-inch over, two-and-a-half inches down point. Add in any little notes like notches or grain lines as needed. Continue like that until every intersection on the current coloured layer is finished. Trace connecting lines between each point on your paper. Use a ruler for straight lines and a French curve or freehand for curves. Set this paper aside and align a new paper for the next coloured layer and repeat. It can help to number your layers and pieces of paper if you have many similar-looking pieces, or if you are bad at puzzles or don’t feel like doing one now. It’s easy to mix up which piece is which or which direction should be up for each one, especially if you have mixed horizontal and vertical. Repeat until you have a piece of paper for each layer, then (making note of the areas that overlap and by how much) tape everything together and then cut out your pattern. And voila you are done. You can hang on to your grid paper if you plan on ever repeating this method.
#mod theo#sewing#as johanna pointed out in a rb: you can also use this for blowing up book patterns!#if there's no grid already like in patterns of fashion then you can draw one on translucent paper and tape it down maybe#or draw it straight on top why not#and cut out scaled-down pieces of paper maybe? they'd also have to be translucent though#also if anyone is curious this is the front of the 1776 stays i'm making and adjusted using the mariah pattie stays curve method#which i am pleased to announce was successful#if an initial pain in the ass#i made a digital curve so i could manipulate digital patterns#seemed easier for me in order to maximize my use of it for multiple bodices and stays etc.
12 notes
·
View notes
Text
i am cringe and that’s ok
anyways my doodle is turning out sort of ok just done half of it and will continue sketching it tomorrow
#idk if i want to color it digitally or use the grid method#and redraw it on a canvas for acrylic painting or watercolor paper#for painting it with watercolors or gouache#bluebell talks
2 notes
·
View notes
Text

Quick freehand of Stylo G
#i didn't use my usual grid method so it's not perfect 😔#and i still don't know how to use copic markers properly lmao#stylo g#dancehall#art#portrait#ink#copics#drawing#llbtsart#llbtspost
12 notes
·
View notes
Photo


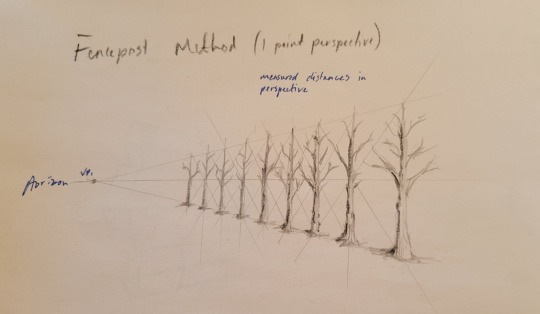


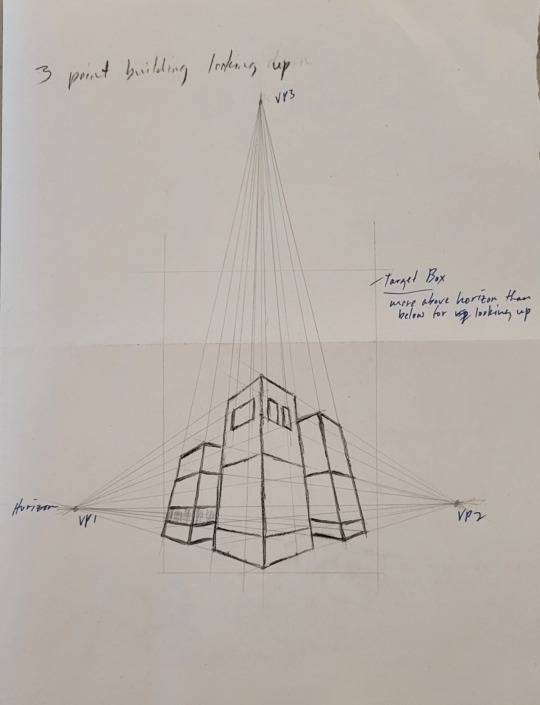

Perspective studies by Andelyn Kaela Neyman 2022
#andelyn-kaela-art#art practice#art studies#perspective#graphite#charcoal#fencepost method#One point grid#two point grid#three point building#one point perspective#two point perspective#drawing
5 notes
·
View notes
Text

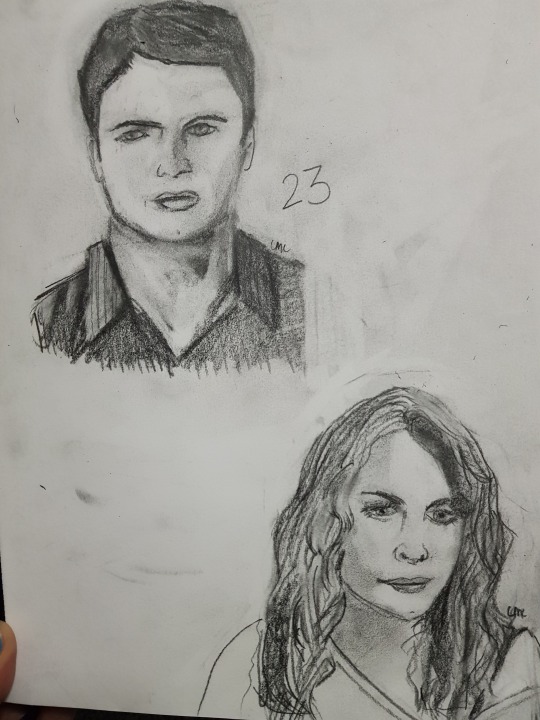

portrait sketches
1. kristen kreuk
2. nathan scott
3. haley james scott
4. brooke davis
#xberryliciousx#pencil drawings#lana lang#nathan scott#haley james scott#brooke davis#joy lenz#kristen kreuk#i did kristen one with the grid method#the others were free hand#art#sophia bush#james lafferty#i might do more of these#drama queens podcast#artists on tumblr#personal
4 notes
·
View notes
Last Seen Blogs


bbhsoos
one two seven squad

trashy-bowtie
Atropa Aconitum

taehwungx
venus

hrhagnes-blog
* OF OUTER SPACE